1
MAGENTO
USER’S GUIDE
THIS IS A SNAPSHOT OF MAGENTO USER’S GUIDE WIKI.
Created: 26/7/2008
Text from:
http://www.magentocommerce.com/wiki/welcome_to_the_magento_user_s_guide/
PDF Created by:
DigitalNews.gr TEAM for www.digitalnews.gr
1
Chapter 1: Introducing Magento
What is Magento
Magento is a new professional open-source eCommerce solution offering unprecedented
flexibility and control. With Magento, never feel trapped in your eCommerce solution again.
Since it is open-source, Magento’s code is available free for download. Just go to
www.magentocommerce.com/download to download your copy today.
In this guide we will introduce key concepts and walk you through setting up your Magento
store, from installing Magento, to entering products.
Elements and Terminologies of Magento Sites
Magento is made up of a few different elements which define the functionality, design and
business logic of the site. In order to follow along with the User Guide it is crucial that you
have a good grasp of the terminologies used to describe these elements of the Magento
system. The terminologies introduced in this chapter are most likely new territory for you, so
take your time and read through them thoroughly. But most importantly, don’t be
discouraged if you can’t fully grasp the concept of all these new terminologies - This chapter
merely serves to introduce them, and further chapters will dig deeper into, and expand
upon, these simple definitions.
Websites and Stores
One of the most powerful features of Magento is the ability to manage multiple websites
and stores from one back-end. This allows store owners to manage stores on different URLs,
display the same products in different languages on the same URL, along with a variety of
other setups. If you will only be selling your products from one URL in one language you will
not need to use this functionality, but the ability to easily expand into additional languages
makes Magento scalable as your business grows out of your home market.
Websites
A website is made up of one or more stores which share the same customer information,
order information and shopping cart. This is a very broad term that can be adopted to define
the unique needs of individual merchants.
Stores
Stores can be setup in a variety of ways, but remember that if they are part of the same
website they will share certain information.
Store Views
2
Store Views are mainly used for different languages, so if you wanted to have a store
displayed in English and Spanish, for example, you could create the store once and create
two different store views for that store.
A few scenarios to define the different uses of website and store are as follows:
Scenario 1: One Website with multiple stores
Scenario 2: Two Stores with two store views each
Scenario 3: One Website with one store and one store view
The most common setup will be a one website and one store setup, but understanding the
functionality of multiple websites and stores will help you understand why certain values are
defined as global defaults and why others are only assigned on the website or store level.
Magento's Architecture
Magento is built on top of the Zend Framework, ensuring that the code base will be secure
and scalable. The reasons for choosing the Zend Framework are many, but at a basic level
the Zend Framework provides an object-oriented library of code with a committed company
standing behind it.
Using this framework, Magento was built with 3 central tenets in mind.
3
Flexibility: We believe each solution should be as unique as the business behind it.
Magento’s code allows for seamless customizations.
Upgradeable: By separating the core code from community and local customizations,
Magento can be easily customized without losing the ability to upgrade.
Speed and Security: The coding standards used by the developers follow best practices to
maximize the efficiency of the software and provide a secure online storefront.
In this chapter we will introduce key concepts and terminologies of Magento. Even if you
won’t be developing or designing for Magento these concepts and terminologies will help as
you set up your own online store.
Core
The core of Magento contains all the functionality included in the downloaded version. The
core code is a collection of modules developed or certified by the Magento core
development team. Editing core files is not recommended and will disable the ability to
upgrade Magento in the future.
Local
Local extensions are customizations of Magento which reside only on a user’s local copy.
These extensions will be placed in a local folder, so that they do not interfere with upgrades
to the core code, and in order to differentiate them from community contributions. There
are different types of extensions, which we will get into in a moment, but they will all reside
in the same directory.
Local extensions function just as core code does, only the directory is different.
Community
Community contributions are just that, and when downloaded will reside in the community
folder. Just like local extensions, by keeping them separate from the core code Magento
store owners are able to enjoy the additional functionality without compromising the ability
to upgrade to future Magento versions.
Extensions
In short, extensions are exactly what they sound like. One or more files packaged together to
extend the functionality of Magento. Strict terms and conditions prohibit extensions from
modifying the core code, ensuring that any extended functionality doesn’t prohibit you from
upgrading when a new version of Magento is released.
Extensions can be installed from the admin panel, or downloaded from Magento Connect.
These processes will both be covered later in the book, but let’s look at the three types of
extensions.
There are three types of extensions, and they will reside in one of the two locations
described above. There are 3 main types of Extensions.
4
Modules
A module is an extension which extends the features and functionality of Magento. You are
probably familiar with the idea of modules from other software, but if not, some concrete
examples of modules would be additional payment gateway integrations, or a featured
items promotional tool.
Interface
An interface is a collection of themes that determines the visual output and frontend
functionalities of your store. An interface can be assigned on either the website-level, storelevel or website and store level through the admin panel. We will cover assigning interfaces
later in the book, for now let’s take a look at the components of a theme.
Themes
A theme is any combination of layout, template and/or skin file(s) that create the visual
experience of your store. Magento is built with the capacity to load multiple themes at once,
and therefore distinguishes themes into two types:
Default Themes - Every interface comes with a theme called ‘default’ which is the main
theme of an interface. When you assign an interface to your store, the application
automatically looks for this theme ‘default’ and loads it to the front-end. In order to
customize your store design, you can either modify this theme, or create a non-default
5
theme in addition and load it alongside the default. The default theme must contain all the
required layouts, templates and skins to run a store error-free and hence is the lowest
theme in the theme hierarchy.
Non-Default Themes - A non-default theme can contain as many or as few theme files as
you see fit for your needs. This type of theme is intended for creating temporary seasonal
design changes to a store without having to create a whole new default theme—By creating
a few images and updating some of the CSS, you can easily turn your store from a real bore
to a stand-out seasonal Christmas store.
Lets take a look at the components of a theme:
Layouts - Layouts are basic XML files that define the block structure for different pages, as
well as controlling the META information and page encoding. Layout files are separated on a
per-module basis, with every module bringing with it its own layout file.
Templates - Templates are PHTML files that contain (X)HTML markups and any necessary
PHP tags to create the logic for the visual presentation of information and features.
Skins - Skins are block-specific Javascript and CSS and image files that compliment your
(X)HTML. What are blocks you ask? Good question, and don’t worry, we are almost done
defining the components of Magento.
Blocks
Blocks are a way by which Magento distinguishes the array of functionalities in the
system and creates a modular way to manage this array from both a visual and
functional stand point. There are two types of blocks and they work together to create
the visual output.
Structural Blocks - These are blocks created for the sole purpose of assigning visual structure
to a store page. Examples would be the header, left column, main column and footer.
6
Content Blocks - These are blocks that produce the actual content inside each structural
block. They are representations of each feature functionality in a page and employ template
files to generate the (X)HTML to be inserted into its parent structural block. Examples are
the category list, mini cart, product tags and product listing.
Unless you will be developing or designing for Magento you won’t need to know any more
than these terms. For those of you who will be developing or designing custom modules and
interfaces, make sure to read Chapter 12: Designing and Developing for Magento. Of course
we suggest you read the book through first, as the next few chapters are full of helpful
information.
7
Chapter 2: Getting Started with
Magento
Magento is developed to take full advantage of the newest technologies available, allowing
your site the maximum flexibility without sacrificing speed. In this chapter we will look at the
system requirements of Magento, how to download and install Magento on your server, and
go through an introduction to the administration panel and key concepts when using the
administration panel.
System Requirements
At the base level, Magento will require the following software.
Linux, Windows, or another UNIX-compatible operating system
Apache Web Server (1.x or 2.x)
PHP 5.2.0 or newer, with the following extensions/addons:
PDO/MySQL
MySQLi
mcrypt
mhash
simplexml
DOM
curl
gd
MySQL 4.1.20 or newer
A Sendmail-compatible Mail Transfer Agent (MTA)
Magento will connect directly to an SMTP server if you don’t have an MTA
We also recommend the use of APC as a bytecode cache for performance improvements.
You can find it in the PECL archives here: http://pecl.php.net/package/APC. Other bytecode
cache systems are not supported at this time.
If you are unsure if your hosting company supports these specifications, please check with
them. You can also view these specifications at: magentocommerce.com/systemrequirements. Once you have a hosting environment set up with support for these
requirements you are able to download and install Magento to your server.
Downloading Magento
Magento is free to download. Simply go to magentocommerce.com/download and you will
be able to download the software. Magento is available for download in two different
versions. The installer version includes only the necessary files needed to begin the
installation process and will be all that is necessary for most cases. If you are planning on
8
installing multiple versions of Magento the full version will be more useful, as you will then
only need to download the full version once, and will then be able to download the installer
version for each new version. To keep it simple, if you are confused about which version to
download, use the installer version.
Both versions are available in multiple formats to suit different needs. If you are unsure of
which version to download use the .zip format.
Note: If you are a developer and are familiar with SVN you can also checkout the newest
version of Magento using SVN. To view the most up to date command please visit
magentocommerce.com/svn.
If you have successfully downloaded Magento you are now ready to install the software on
your web server.
Installing and Configuring Magento
Downloader Install
This section covers the installer installation process for Magento. If you have downloaded
the installer package from magentocommerce.com, then follow this guide to complete the
installation.
Installation
1. Download the .zip or .tar.gz installer package from the Magento website and decompress
it.
2. Upload all the decompressed files to your web server via FTP
3. Create a MySQL database and user/password for Magento
This step varies by hosting provider and is out of the scope of this document. Consult your
provider’s support/documentation for instructions on how to do this.
4. The top-level Magento directory (the one you uploaded the decompressed files to) must
have the correct permissions in order for the installer to proceed. To do so, navigate to the
directory with your FTP client. Then locate the function “Change Permissions” or “Change
Mode” in your FTP client and select it. Once you find the function, you must set the
permissions so the web server can write to this file. There are two typical ways of
representing file permissions in Linux:
As a number (eg, 755)
As a series of permissions categorized into user, group, and other
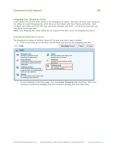
If your FTP client uses the first representation, set the permissions on the directory to be
777, or 0777. If your FTP client uses the second representation, set the permissions as
shown in the image below.
9
5. If your server primarily runs PHP4 then you will require the PHP5 CGI Binary in order to
continue. Please read the PHP5 CGI Setup appendix below and complete it before
continuing to Step 6.
6. Now use your web browser to surf to the Magento installation wizard. If you’ve uploaded
the Magento files to http://www.example.com/magento/, then the wizard will be located
here: http://www.example.com/magento/.
7. Since you are using the installer version, the downloader will be the first installation
process to run. It will attempt to download all the necessary components for a complete
Magento install. If you notice a few “Warning” messages zip by on the green-on-black
screen, don’t worry too much about it. The installer will detect an overall success or failure,
and if you see the “Continue Magento Installation” button at the end (usually takes about 5
minutes) then the process has succeeded. Click the “Continue Magento Installation” button
to continue on to the regular installer wizard.
8. Once in the wizard, you can configure various system-level settings that are required for
Magento to function. Most options will be intelligently guessed for you, but you’re free to
override any settings that don’t look right. At the very least, change the database
parameters in the first box, “Database connection”, to match those of the database you set
up in Step 3.
9. Success! You’ve completed a Magento installation. You can now visit the administration
backend and begin configuring your new online store.
Default Install
This section covers the default installation process for Magento. If you have downloaded
one of the standard release distributions from magentocommerce.com, follow this guide to
complete the installation.
Installation
1. Download the .zip or .tar.gz file from the Magento website and decompress it.
2. Upload the Magento web files to your web server via FTP
10
3. Create a MySQL database and user/password for Magento
This step varies by hosting provider and is out of the scope of this document. Consult your
provider’s support/documentation for instructions on how to do this.
4. Ensure that the directories app/etc , var , and media are writable by the web server.
To do so, navigate to the directory with your FTP client. Then locate the function “Change
Permissions” or “Change Mode” in your FTP client and select it. Once you find the function,
you must set the permissions so the web server can write to this file. There are two typical
ways of representing file permissions in Linux:
As a number (eg, 755)
As a series of permissions categorized into user, group, and other
If your FTP client uses the first representation, set the permissions on each directory to be
777, or 0777. If your FTP client uses the second representation, set the permissions as
shown in the image below.
5. If your server primarily runs PHP4 then you will require the PHP5 CGI Binary in order to
continue. Please read the PHP5 CGI Setup appendix below and complete it before
continuing to Step 6.
6. Now use your web browser to surf to the Magento installation wizard. If you’ve uploaded
the Magento files to http://www.example.com/magento/, then the wizard will be located
here: http://www.example.com/magento/.
7. Once in the wizard, you can configure various system-level settings that are required for
Magento to function. Most options will be intelligently guessed for you, but you’re free to
override any settings that don’t look right. At the very least, change the database
parameters in the first box, “Database connection”, to match those of the database you set
up in Step 3.
8. Success! You’ve completed a Magento installation. You can now visit the administration
backend and begin configuring your new online store.
11
Appendix: PHP5 CGI Setup
Introduction
Some hosting providers do not yet provide PHP5 on their servers, opting instead to stay with
PHP4 for the time being. As Magento is a PHP5-only application, this can be a barrier for
some users. This document outlines a possible workaround for such a scenario. The goal is to
install PHP5 as a CGI binary and configure the web server (Apache) to use it instead of the
default PHP4.
Requirements
Every hosting provider has a slightly different way of doing things, so it’s important to know
if this method will work with your provider before continuing. Below is a list of the basic
requirements that this document requires. If you’re unsure as to whether your provider
supports these requirements, pass the list along to them and find out.
Operating System: Linux
Web Server: Apache with CGI support
FileInfo override control via .htaccess files
A user-writable cgi-bin directory
FTP access to your web root and cgi-bin directories
Step 1: Upload the PHP5 CGI binary
It is possible to compile a PHP5 binary yourself, but for the purposes of this solution, we’ve
provided one for you. You can download it here:
http://www.magentocommerce.com/support/php5cgi/php5-cgi
Once downloaded, use your FTP client to upload the file to your cgi-bin directory. If you
don’t know where your cgi-bin directory is, ask your hosting provider.
After uploading, use your FTP client to set the proper mode on the php5-cgi file. This
function varies for each FTP client, but it usually called “Change Permissions” or “Change
Mode” or “Chmod”. Once you find the function, you must set the permissions so the web
server can run this file. There are two typical ways of representing file permissions in Linux:
As a number (eg, 755)
As a series of permissions categorized into user, group, and other
If your FTP client uses the first representation, set the permission on the php5-cgi binary
to be 755, or 0755. If your FTP client uses the second representation, set the permissions as
shown in the image below.
12
Step 2: Modify the Magento .htaccess file
By default, the web server will want to run the Magento application using PHP4, which will
not work. In order to point it to the new PHP5 CGI binary, you must modify the .htaccess
file in the Magento top-level directory.
Using your FTP client, edit the file .htaccess in your top-level magento directory.
The file is somewhat long so we won’t list it all here. But the first few lines at the top should
look like this:
First, remove the # symbol from the beginning of the last three lines listed in the excerpt
above. This will enable the special CGI handler for your Magento site. Next, you’ll want to
modify the path in the Action line to point to the location of the php5-cgi binary you
uploaded in Step 1. This path should be relative to the web root of your site.
That’s it! You can now proceed with the rest of the Magento installation.
Troubleshooting
I still see “Invalid PHP version” when visiting my Magento page.
This probably means that your hosting provider does not allow the FileInfo overrides via
.htaccess files. This is a necessary requirement for this solution, so you’ll have to ask
your hosting provider for it.
13
I see “Internal Server Error” when visiting my Magento page.
This is a typical error message when a CGI binary quits unexpectedly, and could be caused by
a number of things. If you have access to your server’s Apache error log, you can look there
for some clues. We’ll cover a few more common issues here.
Bad location to the PHP5 binary. Make sure the AddHandler directive in your
.htaccess file is pointing to the correct location for the PHP5 binary. You can often test it
by trying to surf to the location with your web browser. For example, if your site is
www.example.com and your PHP5 location is /cgi-bin/php5-cgi , try visiting
http://www.example.com/cgi-bin/php5-cgi with your web browser. If you see an “Internal
Server Error” message, then that means your PHP5 binary is in the correct location. If you
get a “File not found” message, then this is not the correct location.
Bad permissions on the PHP5 binary. Double check the permissions on the PHP5 CGI binary
you uploaded in Step 1. They should be 755 or “rwxr-xr-x”, depending on your FTP client’s
representation.
Configuration during Installation
Once you select your option you will see the files downloaded. The time required to
download the files will depend on your connection speed. Once the files have downloaded a
success message will be displayed. Select OK and you will be taken to the next step of the
installation where you will set the default configuration settings for your store.
The first settings you will need to enter will be your Database Connection settings. Your host
will likely be your domain name, the database name, user name and user password will be
the values you created when creating the database.
Troubleshooting Installation
If you have difficulty with installation you can receive help at the
www.magentocommerce.com site in the forums.
Introduction to the Administrative Panel
Once you have completed the installation you will be taken to the frontend of your site. To
access the administration panel you will add /admin to the end of the base url you specified
during the installation. E.G. if you specified example.com as the base url, just go to
http://www.example.com/admin. Once you are at the login section you will need to sign in
using the user name and password you created during the installation process. Select the
Login button and you are now in the administration panel.
The following sections detail some of the most important features which you will want to
address in the initial configuration of your admin. Other features, such as adding products,
payment methods, and shipping settings, will be addressed in following chapters.
14
Creating Multiple Websites and Stores
If you are interested in creating a multiple Website, Store, and/or Store View setup you can
do so by navigating to System > Manage Stores.
Website
To create a new Website, click Create Website in the upper right corner.
Websites will each need to have a unique Code. This code can be a text name, but cannot
have spaces or special characters within it.
If your Website name is New Website, a good rule of thumb would be to use “new” or
“newwebsite” as your website code.
You can designate the Sort order of the Website as it will appear relative to your other
Website(s) throughout the admin.
If you have not indicated which Website will be displayed when the index.php path is
requested by the browser, your customers will automatically be directed to the default
Website, which you select by checking the Set as default checkbox.
Store
To create a new Store, click Create Store in the upper right corner.
Select the Website to which this Store will be associated.
Select the Root Category which will be associated to this store. In your categories setup, you
can create multiple Root Categories, each associated to different Stores. The sub-categories
and products associated to those categories will only display in the Store to which the Root
Category is associated. If you do not want to create different Root Categories to display in
different Stores, you can select the same Root Category for all Stores. Categories are
discussed in more detail in the next chapter.
Store View
As explained in Chapter 1, Store Views are best used to display a Store in multiple languages.
To create a new Store View, click Create Store View in the upper right corner.
Select the Store to which this Store View will be associated. The Code and Sort order fields
work like those for Websites.
For a Store View to be visible on the front-end, it must be Enabled. You can remove it from
the front-end without deleting it by selecting Disabled.
You can set unique Locales for each Store View. Simply navigate to System > Configuration,
and select the General tab from the left column. In the Current Configuration Scope dropdown above, select the desired Store View. Uncheck the Use website checkbox next the
15
Locale settings, and select the Locale you prefer. This Locale will only apply to this Store
View.
Permissions
Magento’s Permissions module is both flexible and intuitive. You can create predefined
Roles, which have specific access to various parts of the admin. Then, you can create users
and select which Role each user will possess. You can associate Users to Roles in both the
Users page and the Roles page.
Creating Roles
To create a Role, navigate to System > Permissions > Roles and click Add New Role.
Role Info
Enter the Role Name.
Role Resources
Choose the Resources, or admin features, to which Users associated to this Role will have
access. If you select all from the Resource Access drop-down, this Role will have access to all
resources. If you select Custom, a resource tree will populate, and you will have to select the
checkbox for each resource to which this Role will have access.
Click Save Role.
Role Users
Once a Role has been saved, this tab will appear. It will display all Users that are associated
to this Role. To see a list of all Users, click Reset Filter. Click the checkbox of all Users you
want to associate to this Role, and click Save Role again.
Assigning Users
To create a User, navigate to System > Permissions > Users and click Add New User.
User Info
Enter all the information for this User. The User Name and Password will be used by this
User to log into the Magento admin panel. For a User to be able to access the admin panel,
the User must be Active. You can prevent a User from accessing the admin panel without
deleting their User account by changing this to Inactive.
User Role
Select the Role to which this User will be associated. This page will produce a list of all
existing Roles, and you will only be allowed to choose one.
Click Save User.
16
Cache Management
Cache management can be accessed by navigating to System > Cache management. It can be
enabled to improve the performance of Magento. When developing on Magento it is best to
disable the cache management. You can enable caching on the entire site, or enable cache
management on certain elements of the site by using the various checkboxes in this page.
17
Chapter 3: Set Up Your Catalog
Overview of Catalog Concepts
Now that you have your store installed and your initial configuration settings
established, it’s time to set up the heart of your site: the catalog. The catalog is the
most important part of any eCommerce site, and with Magento, you will have
complete control over it. So take advantage of this great opportunity!
Creating and Managing Categories
Setting Up Defaults
The first step to creating your catalog is to configure the catalog system settings. To
do this, navigate to System > Configuration, and select the Catalog tab.
Frontend
This determines how your products will be shown in the front-end’s catalog pages.
Products per Page - Choose whether the category pages will display 9, 15, or 30
products by default. Your customers will be able to change this, or to display All
products.
List Mode
Grid Only - The products will display in a grid structure and your customers will not
have the option to change this.
List Only - The products will display in a list structure and your customers will not
have the option to change this.
Grid (Default)/List - The products will display in a grid structure by default but your
customers will be able to switch to list.
List (Default)/Grid - The products will display in a list structure by default but your
customers will be able to switch to grid.
Product Options
Default Tax Class - Select whether the default tax class for with new products added
to your catalog will be Taxable Goods or not.
Product Alerts
18
There are two types of product alerts to which you can allow your customers to
subscribe via email. Each have their own enable drop-down, and Email Template, but
they share the same Email Sender. For more information on how to configure email
templates and email sender addresses, refer to Chapter 6: Customers. The Price
Alert will create a link in every product page called Sign up for price alert. Clicking
this link will subscribe your customer to this alert, and they will receive an email
when the product price is changed. This includes adding or changing Special Prices in
addition to the regular Price field. The Stock Alert will create a link in every Out of
Stock product called Sign up to get notified when this product is back in stock.
Clicking this link will subscribe your customer to this alert, and they will receive an
email when the product status changes to In Stock. For each product, there is a tab
listing all customers subscribed to either of these alerts. There is more information
about this in the Products section later in this chapter.
Product Alerts Run Settings
This determines the frequency with which Magento checks both product prices and
stock status for changes, so that your subscribed customers can be alerted.
Frequency - Designate whether you want Magento to check for updates Daily,
Weekly, or Monthly.
Start Time - Select the time of day (in 24 hour mode) at which you wish Magento to
check for updates.
Error Email Recipient - Enter the email address to which emails will be sent in case an
error occurs during the check for updates.
Error Email Sender - Select the address from which the error notification email will
be sent.
Error Email Template - Select the template which the error notification email will
use.
Product Image Placeholders
This is discussed in more detail later in this chapter, under Products.
Recently Viewed/Compared Products
This is discussed in more detail in Chapter 5: Promotions, Marketing and Content
Pages, under Customer Personalization.
Price
You can determine the level at which prices are shared in the Catalog Price Scope
drop-down. If you select Global, prices will be shared across all websites. If you
19
select Website, prices can differ between websites, although they will still be shared
between store views contained in the same website. The price here affects several
different areas in Magento. For example, this includes product prices, base currency,
price filters in the admin, and catalog/shopping cart price rules.
Search Engine Optimizations
Configure these options to make your site more Search Engine Friendly.
Autogenerated site map - If you Enable this feature, a Site Map link will display in the
footer on the front-end, directing to an automatically generated site map including a
list of all of your existing categories. In addition to the Autogenerated site map,
Magento allows for integration with Google Sitemap. There is more information
about this below.
Popular search terms - If you Enable this feature, a Search Terms link will display in
the footer on the front-end, directing to list of all search terms, displayed as a cloud.
This is an SEO feature because each of these search terms counts as a link to your
site, and is registered by search engines.
Page Title Separator - Enter a character in this field, and it will be placed between
the various Meta Information in the Page Title, that displays at the top of the
browser.
Use categories path for product URLs - This determines how the URL Rewrites
autogenerate. If you choose Yes, the URL rewrite for products will include the
associated category, and a separate rewrite will generate for each associated
category. If you choose No, the URL Rewrites will include only the product name, and
there will be only one rewrite, regardless of how many categories the product is
associated to.
Product URL Suffix (cache refresh needed) - This also affects how the URL rewrites
autogenerate. The value entered into this field, for example .html, will automatically
20
be added to the end of your URL rewrite generated for products. There is more
about this topic in the section about URL Rewrites.
If you want to configure Magento integration of Google Sitemap, navigate to System
> Configuration and select Google Sitemap from the left column.
Categories/Products/CMS Pages Options
The sitemap settings for each of these three types of pages can be configured
individually.
Frequency - Designate how often you would like Google Sitemap to check each type
of page for updates.
Priority - Designate the priority that each page type receives in relation to the other
page types when Google Sitemap updates.
Generation Settings
Enabled - Select Yes to Enable Google Sitemap autogeneration and automatic
updates.
Start Time - Select the time of day (in 24 hour mode) at which you wish Google
Sitemap to update.
Frequency - Designate whether you want Google Sitemap to update Daily, Weekly,
or Monthly. This can differ from the frequency that Google Sitemap actually checks
for updates (as defined above).
Error Email Recipient - Enter the email address to which emails will be sent in case an
error occurs during the automatic update.
Error Email Sender - Select the address from which the error notification email will
be sent. For more information on how to configure these email addresses, refer to
Chapter 6: Customers.
Error Email Template - Select the template which the error notification email will
use. For more information on how to configure these templates, refer to Chapter 6:
Customers.
Creating Categories
To create and edit categories, navigate to Catalog > Manage Categories. In the
center of the page you will have the option to create a new category.
Enter a name for the category. This is how it will appear on the front end of the sites
selected.
21
Select the location in which the category will be created from the Parent Category
drop-down. The default is Root, and any category created with this as its parent will
be a Root Catalog level category (although the name of that category does not need
to be Root Catalog). Having multiple Root Catalog level categories is useful if you
want to use different category structures in different Stores. If you are not using a
multiple Store structure, multiple Root Catalogs are unnecessary. Refer back to
Chapter 2 for more information about Stores and assigning Root Catalogs. Any
category created with a Root Catalog level category as its parent category will be a
top-level category in the navigation bar on the front end. If you wish, you can allow
customers to subscribe to a list of all your top-level categories via RSS feeds. There is
more information about RSS Feeds in Chapter 5: Promotions, Marketing, and
Content Pages. If an existing top-level category (i.e. not the Root Catalog) is selected
as the parent category, the new category will be created as a sub-category of the
selected top-level category, and will appear on the front-end in a drop-down menu
when the top-level category is rolled over. If a category is created within a secondlevel category, the category menu will further expand, to the right, when the secondlevel category is rolled over, and so on.
Additionally, when a customer is
browsing through your site, the
category levels will display at the top of the page, below the navigation bar, in a
“breadcrumb”. For example, if a customer rolls over the navigation bar, arrives at
Apparel > Shoes > Mens and clicks Mens, they will be directed to the Mens category
page. The breadcrumb will look like:
The current page will be in plain text, and all the parent categories will be links to the
corresponding category pages. The same is true of product pages. In this case, the
product name will be last in the breadcrumb, in plain text, and all categories will be
linked. This is a dynamic feature, so that the breadcrumb will display the category
pages according to the path by which your customer navigated to the product. If you
have a product associated to multiple categories, the breadcrumb will detail only the
specific path your customer chooses each time they arrive a product page. The
breadcrumb improves usability by allowing customers to keep track of their location
within your site at all times, with a clear path for how to return to previous pages.
22
Enter a Description. This is for internal use only, and will not appear on the front
end.
Select an Image by clicking the Browse... button and locating the image on your
computer. This image will appear on the front end of each category’s page between
the category name and content. Once a category has been saved with an image, a
small icon of the existing image will appear to the left of the Browse... button, and a
Delete Image checkbox will appear to the right.
Enter the meta information for the category in the Page Title, Meta Keywords, and
Meta Description fields.
Display Mode and CMS Block refer to using static blocks with categories. For more
information about this, refer to the Using static blocks with categories section below.
Select Yes or No from the Is Anchor drop-down. This drop-down has two effects.
Anchored categories will display all products associated to all child categories (and
child of child, and child of child of child, etc.) on that category’s page, along with the
products associated directly to the parent category.
Anchored categories will display the filterable attributes of all products that display
in the category page (meaning the products associated to that category and to its
child categories) in the Layered Navigation menu in the left column. Layered
Navigation is discussed in more detail later in the chapter.
Select Yes or No from the Is Active drop-down. Select Yes for this category to be
visible on the front end. If you select No, the category cannot be accessed from the
navigation bar on the front end, nor can any of its sub-categories, and the category
name will display as light gray in the category tree in the left column of the
categories page in the admin.
The URL key adds a relative URL path which can be entered in place of the standard
Target Path. It is Search Engine Friendly because it can use the name of the category
instead of the ID#. For more information about URL Keys, refer to the section about
URL Rewrites. If you leave this field blank, it will automatically generate with the
name of the category upon creation of the category. If you enter a value here
manually, you cannot use spaces in this field.
In the left column will be a drop-down menu called Choose Store View. The default
selection in the menu is All Store Views. When this is selected, you will be able to
view the “default” options for each category. If you select a specific store view, you
will be able to see the options specific to that store view for each category. Only
certain options can vary between store views. Options that cannot vary, and will be
the same in all store views, are called “global” and will have the label *Global+ next to
23
them. Those that can differ between Store Views will be labeled [Store View]. Note:
The products assigned to a category, accessed through the Category Products tab,
are not global. This way, you can choose to have different products display in each
store view.
Below this drop-down is the category tree, which lists all existing categories and
displays their relationship to one another. For example, if one category is a subcategory of another, it will be listed directly below it, and indented one level. Next to
each category name in the tree is a number inside parentheses. This number
represents the amount of products associated directly to that category. Because the
products are associated at the store level, the numbers in parentheses will vary
depending upon which store view is selected from the drop-down. To edit any
existing categories, select it from the category tree, and its options will appear in the
center of the page, replacing the New Category section. When editing a category,
the Parent Category drop-down will not be present. In order to move a category to a
different Parent Category, simply drag and drop it directly in the category tree.
To return to the new category view, simply select a category from the tree and click
the Add New button. This will automatically assign the selected category as the
parent category in the drop-down.
24
Assigning products at the category level
Products can be added to a category while the category is being created, or anytime
thereafter. Simply select the desired category, and access the Category Products tab
(from the top of the category page). You will notice that the leftmost column in the
grid contains a drop-down menu. The default selection will be Yes, meaning that the
grid will only display items already associated to the category. Therefore, a brand
new category will always have a blank product grid. In order to search for existing
products to associate to this category, select either No (which will only display
products that are not associated to the category) or Any (which will display
associated and unassociated products) from the drop-down, and click the Search
button. You can narrow your results further by using the ID, Name, SKU, Price, or
Position filters (although the position filter only works for products already
associated to the category). Select the checkboxes of all products that you wish to
associate the category, and unselect all checkboxes of products you wish to
deassociate. After a product is checked the Position field will become active and
you’ll be able to enter a sort value, which controls the order in which the products
display on the front end, regardless of the order in this grid.
Assigning designs at the category level
You can customize the design of each category individually in the Custom Design tab.
This controls the look of the category page, including the objects on the page and
the structure of the page.
Select the design you want from the Custom Design drop-down. Magento comes
with several different design options out of the box, but you can add your own by...
If you leave this drop-down blank, it will automatically use the Current package
name design. This can be edited by navigating to System > Configuration and clicking
the Design tab. Enter the name of the design you want in the Current package name
field, and this design will apply to all categories for which you do not specify a
different design.
Select your preference from the Apply To drop-down. This category only means that
the design will only apply to this one category page. This category and its products
25
means that the design will apply on this category page, and on the pages of all
products associated to this category. If a product is associated to multiple categories,
each with a different design, the design displayed on that product page will be
determined by the design of the category page from which the user navigates to that
product. This category and its child categories means that the design will apply on
this category page, and on the pages of all sub-categories, sub-sub-categories, and
so on. If a child category has a different design selected than its parent category,
then... All mean thats the design will apply to this category, its child categories, and
its products.
With the Active From and Active To fields, you can select a time frame in which the
category will automatically switch to a design, and then switch back to the blank
option when the time frame ends. This is perfect for the holidays, so that you can
create a holiday design for you pages, and then have your site automatically switch
back to the normal design whenever you want, without having to remember to do it
yourself.
The Page Layout drop-down determines the structural aspects of the page. No layout
updates uses the default settings that come with the Magento installation. Empty
displays the category page without any objects, except for the content (products or
static blocks only), category name, and view options (number to display per page,
view as grid or list, and sort be options). 1 column displays the contents, category
name and view options, as well as the header, footer, search field, and navigation
bar. Column on the left adds the left column to the 1 column display, which by
default includes the currency selection and layered navigation. Column on the right
adds the right column to the 1 column display, which by default includes the
shopping cart view, wishlist, compared products list, polls, and newsletter sign-up. 3
columns displays both the left and the right column.
The Custom Layout Update is essentially a static block, with a few differences.
Rather than HTML, the structure must be in XML format.
The Update will display at the bottom of the page, below the products, whereas a
static block will display above the products (if the static block is set to display with
products)
The Update will display on the page only during the dates specified in the Active date
range.
Using static blocks with categories
If you would like customers to be taken to a landing page when they select the
category, instead of the standard product listing page, you can do so by enabling
static blocks on your category page. This is controlled the in General Information tab.
26
In the Display Mode drop-down, select what content you want to display in your
category page. Products only means that the products associated to the category will
display, but not any static blocks. Static block only means that the selected static
block will display, but none of the products. This is ideal if you want to get your
customers excited about the category before showing them products or if there is
specific content you want to show for a certain category (tip: Make this page an
anchor category and let your customers use layered navigation to find their products
after viewing the landing page). Static block and products means that the static block
will display with the products listed directly beneath it. This is useful if you want to
have several category pages where the same static block content is needed, but each
feature different products.
In the CMS Block drop-down, select which static block you would like to display on
your category page. It will include all existing static blocks, which can be created in
the static block manager by navigating to CMS > Static Blocks. For more information
about creating static blocks, please read the section about them in Chapter 5:
Promotions, Marketing, and Content Pages.
Attributes
Creating an Attribute
In Magento, Attributes are quantifiable or descriptive aspects of a product, from the
color, to the manufacturer, to the SKU number. There are two kinds of attributes in
Magento: Simple Attributes and System Attributes. By default, Magento includes all
the necessary System Attributes. These cannot be deleted, and every product must
have each of these attributes. Therefore, all Attribute Sets must include these
products (more on Attribute sets in the next section). These type of attributes
include Name, Price, and SKU, without which a product would not function. Simple
Attributes, on the other hand, are attributes created by the Store Owner. These will
likely be more specific for individual products, and therefore will not necessarily be
included in every Attribute set. For example, if you were to create an attribute for
color, with values of blue, green, yellow, etc., you may want to apply this attribute to
an Attribute Set for shirts, which you sell in various colors, but you probably would
not include it in an Attribute Set for DVDs, for which color is not really an applicable
attribute. To create a Simple Attribute, navigate to Catalog > Attributes > Manage
Attributes, and click Add New Attribute in the top right of the page.
Properties
Attribute Properties
Attribute Identifier - This is the name of the attribute used by the system. It will
appear in the Attributes list in the Attribute Code column, and it will be used when
27
managing Attribute Sets, however it will not appear on the Front-end. Each attribute
you create must have a unique Attribute Identifier, and this value cannot contain
spaces.
Scope - This drop-down determines the level at which the values of this attribute are
shared. When creating a product, you will be able to see the Scope to the right of
each attribute. You can choose to make any attribute shared Globally, at the Website
Level, or at the Store View Level. Global means that the value of this attribute for a
given product must be the same throughout your site. Website means that the value
of this attribute for a given product can differ in different Websites, however it
cannot differ between Store Views contained under the same Website. Store View
means the value of this attribute for a given product can differ in all Websites and all
Store Views. For example, if you were creating an attribute called Color, with a Store
View Scope, you would be able to set the color of a product to green in one Store
View, and blue in another Store View.
Catalog Input Type for Store Owner - This describes what kind of data the attribute
will store. What’s set here determines how data entry for this attribute will take
place. For example, a Description attribute would use a text field, so that you can
manually enter a description for each product, whereas a Color attribute would use a
drop-down, so that you choose the color of each product from a drop-down list (the
values of which you will enter in the Manage Label / Options tab).
Default Value - If you choose to enter a Default Value, each new product created
with this attribute will automatically have this attribute prepopulated with the value
you enter here. However, you will always be able to edit the prepopulated value.
This field will not display if you have selected Multiple Select, Dropdown, or Media
Image as your Input Type. If you have a Dropdown or Multiple Select Input Type, you
will be able select the Default Value in the Manage Label / Options tab.
Unique Value - If you designate an attribute to be a Unique Value, that means the
value selected or entered for this attribute for each product must be different. If
Color was a unique value, only one product could be green, one be blue, etc.
Values Required - If you require values, you must select a value for this attribute for
each product you create. You will not be able to save a product if this attribute is left
blank.
Input Validation for Store Owner - This controls the type of check Magento places on
the values entered for this attribute for each product. If you select None, you can
enter any type of information as the value for this attribute. If you select Email, for
example, Magento will make sure that the value entered for each product resembles
an email address. If it does not, you will receive a warning message.
28
Apply To - Decide which Product Types will include this attribute. The three Product
Types in Magento are Simple, Grouped, and Configurable Products (there is more
information on the differences between these Product Types in the Products section
later in this chapter). If you select Selected Product Types, a multiple select menu
will appear where you can choose to which of the Products Types this attribute will
be associated.
Use To Create Configurable Product - This drop-down will only appear if the Scope is
Global and the Input Type is Dropdown. If you select Yes, this attribute will be a
Configurable Attribute. When creating a Configurable Product, the next step after
selecting the Attribute Set and Product Type is to select the Configurable Attributes
for this product. You will see a list of all the existing Configurable Attributes
associated to the Attribute Set. If you select the checkbox, this attribute will be a
Configurable Attribute for this product. If you leave the checkbox empty, this
attribute (while still a Configurable Attribute in your attribute settings) will not be a
Configurable Attribute for this product. If an attribute is a Configurable Attribute,
this means that the customer will be able to select the value of the attribute from a
drop-down in the front-end. It is customer configurable. For more information about
Configurable Products, please refer to the Products section later in this chapter.
Note: This drop-down is not related to the Apply To menu above. An attribute can be
a Configurable Attribute even if it is not applied to Configurable Products. If this is the
case, you will be able to select the attribute as a Configurable Product when creating
a product, but you will not be able to see this attribute among the product’s other
attributes in the New Product page.
Frontend Properties
Use in quick search - If you select Yes, Magento will search all the product values for
this attribute when your customer uses the search bar in the header. If you select to
use Color in the quick search, your customers will be able to type in green or blue
and find products that match that color. For more details, see Chapter 5:
Promotions, Marketing and Content Pages.
Use in advanced search - This is very similar to the quick search. However, in the
Advanced Search, each attribute will have its own field, rather than there being one
search field. If you select Yes, a field will be created for this attribute in the Advanced
Search page. For more details, see Chapter 5.
Comparable on Front-end - If you select Yes, a row will be created for this attribute
in the Compare Products pop-up window. For more details, see Chapter 5.
Use in Layered Navigation - Magento’s Layered Navigation allows your customers to
filter down into a category’s products using any attribute that is “filterable” for
Layered Navigation. The Layered Navigation menu will display in the left column of
29
your category pages, and will contain all of the attributes which are filterable. Under
each attribute will display the various values of that attribute. Clicking one of these
values will filter the list of products in that category page so that only products
matching that attribute value will display. There are two types of filterable
attributes, which you can select from this drop-down: Filterable (with results) and
Filterable (no results). This determines which values will display in the Layered
Navigation menu. If you select Filterable (with results), only values that correspond
to products in that category page will display in the menu (that is, only values that
produce “results” when used as a filter). If you select Filterable (no results), all values
that you’ve created in the Manage Label / Options tab will list, whether or not they
correspond to any particular products in that category page (it includes values that
do not produce “results” when used as a filter). If there are no filterable attributes in
a particular category page, the Layered Navigation menu will not display. In order to
make an attribute filterable, the Input Type must be either Dropdown, Multiple
Select, or Price.
Position - This determines the position of the attribute in the Layered Navigation
menu with respect to the other filterable attributes.
Visible on Catalog Pages on Front-end - This field only appears for Simple Attributes.
On the product page in the front-end, there is a section called Additional
Information, that displays below the Product Description section. The attribute name
and value for all “visible” Simple Attributes will display in this section. If a product
does not have any visible Simple Attributes (or if the product does not have any
values selected for its Simple Attributes) there will be no Additional Information
section on the front-end.
30
Manage Label / Options
Manage Titles - In the Admin field, you must enter the name of the attribute as it will
appear in the admin. For each Store View, you can specify a different name for this
attribute. This is useful if you manage multiple Store Views with different languages.
For example, in the Admin field, type Color; in the UK Store View field, type Colour;
in the French Store View field, type Couleur. If you leave the field blank for any of the
Store Views, the Admin Label will be used.
Manage Options - This section will only appear if the Input Type is Dropdown or
Multiple Select. In order to have a drop-down or multiple select menu in the product
page, you must have predetermined values to populate these menus. This is where
the values for these menus are predetermined. This works very similar to the
Manage Titles section above. For each value you wish to create, click Add Option.
You can enter an unlimited number of values. For each value, you must enter a name
in the Admin field, and you have the option to enter a different name for each Store
view. For example, create two options. For the first option, enter Green in the Admin
field; leave the UK Store View field blank, because it uses the same name; enter Vert
in the French Store View field. For the second option, enter Blue in the Admin field;
leave the UK Store View field blank; enter Bleu in the French Store View field. You
will also have the option to select the position and which value(s) is the default.
Enter a numerical value in the Position field, and this will determine the sort order of
the values in the drop-down/multiple select menu relative to each other. For the
Dropdown Input Type, you will have an Is Default radio button with which you can
select one value. For the Multiple Select Input Type, you will have an Is Default
checkbox with which you can select multiple values.
Managing Attribute Sets
An Attribute Set is a collection of attributes, customized to fit certain types of
products. All Attribute Sets must contain all of Magento’s System Attributes, but you
can customize them to include different combinations of Simple Attributes. For
example, if you sell several different kinds of T-shirts in your site, you would want to
create a “T-shirts” Attribute Set, which includes the Simple Attributes commonly
shared by all of your T-shirts. This may include color, size, gender, and brand. Once
31
you have created each of these Simple Attributes (refer back to the previous section
for more details), you can associate them to an Attribute Set. A product is then
associated to an Attribute Set during product creation, and the Attribute Set’s Simple
Attributes will appear in the New Product page so that you can set the various
values.
Creating an Attribute Set
To create an Attribute Set, navigate to Catalog > Attributes > Manage Attribute Sets
and click Add New Set in the top right of the page. Before configuring the Attribute
Set, you must enter a name and import Attributes from an existing Attribute Set. The
Name will not be used anywhere on the front-end, and can be edited at any point.
Even if you have not created any Attribute Sets previously, you can select the Default
Attribute Set from the Based On drop-down, which comes with Magento by default,
from which you will import Attributes. This includes all of the System Attributes,
organized into Groups according to their function. The Default attribute can be
customized just as any Attribute Set that you create. Once you have created
additional Attribute Sets, you can choose any of these from the Based On dropdown, which will import the Simple Attributes and Groups from that Attribute Set,
saving you time during the configuration process. When you are finished, click Save
Attribute Set. The Attribute Set will be created, and you will be directed to the
configuration section.
Edit Set Name - This field will contain the name that you entered in the previous
step. It can be edited at any point during the configuration, or later on by editing the
Attribute Set.
Groups - Groups are like folders which contain attributes. Each Group corresponds to
a different tab in the New Product page. This helps organize the attributes by
function so that you can edit them in the product page more efficiently. Magento
comes with five Groups by default: General, Prices, Meta Information, Images, and
Design. These contain the various System Attributes, marked with a red circle
on the attribute icon. System Attributes cannot be removed from an
Attribute Set, however they can be moved to different Groups. Therefore, you can
remove a Group as long as there are no System Attributes within it. The ordering of
both the Groups and the attributes can be changed by clicking and dragging it. This
affects the order of the tabs and attributes in the product page, respectively. You can
also create a new Group, to which you can move System Attributes, or associate
Simple Attributes. To do this, click Add New, and enter the name of the Group in the
pop-up.
32
Unassigned Attributes - This list contains all of the Simple Attributes which you have
created. You can associate one of these attribute to your Attribute Set by clicking
and dragging this attribute into the desired Group. Once it is associated to this
Attribute Set, it will no longer appear in the Unassigned Attributes list. To
disassociate an attribute, click and drag it back to the Unassigned Attributes list.
33
When you are finished, click Save Attribute Set again to save the configurations.
Assigning Attribute Sets to Products
When creating a new product, you must first select the product’s Attribute Set.
Navigate to Catalog > Manage Products and click Add Product in the top right of the
page.
Selecting the Attribute Set will load all of the corresponding Groups (tabs) and
attributes into the product creation page.
Note: Once the Attribute Set has been selected, it cannot be changed. You can
change the attributes in a product by creating a new product and assigning a
different Attribute Set. You can also edit the Attribute Set, and add or remove
attributes, however this will affect all products associated to this Attribute Set.
Products
Before you begin to create the products that you will be offering in your webstore,
let’s take a moment to explore the different product types that Magento offers, and
what these differences mean. In Magento, there are three product types that you
can create: Simple, Configurable, and Grouped. Let’s begin with Simple, because this
is the foundation for both Configurable and Grouped Products. A Simple product is
basically what its name indicates. It is the simplest type of product to sell on your
34
website; one individual product, where the attributes are determined by the store
owner. It will have system attributes (as all products require), and can have simple
attributes as well. One example of a Simple Product would be a suit jacket. It is
presented on your website as a standalone item, and as the store owner, you define
that it is black, with three buttons on the front. When your customers arrive at the
page for this product, they can see what the color and button count are in the
product information section, their only option is whether or not to buy this item.
A Configurable product, however, offers much more customer interaction. Let’s stick
with the example of the suit jacket, because, as a Simple Product, is the foundation
for a Configurable Product. In addition to this one suit jacket, you start to carry
slightly different versions of the same jacket: a navy blue version, as well as one with
four buttons on the front (in black and navy). You create three new Simple Products
(navy/three buttons, black/four buttons, and navy/four buttons), and if you only use
the Simple Product feature, you would have four product pages, one for each
combination of color and buttons. Using Configurable Products, however, you can
combine all four pages into one, so that your customer is guaranteed find the exact
suit jacket they desire, while simultaneously making navigating your site as easy as
possible. Once you have created the four Simple suit jackets, you can create a
Configurable suit jacket, and associated all four simple products to it. You will not set
the color or button count of the Configurable Product when you create it, but rather,
your customer will set this when they purchase it. It is a Configurable Product
because your customers get to configure the attributes themselves. So, you can
choose not to display any of the four Simple Products on you site, but rather only
display the one Configurable Product. When your customers arrive at this page,
instead of seeing the attributes listed in the product information section, they will
see a drop-down for color (with options for black or navy) and a drop-down for
button count (with options for three or four). The combination of attributes they
choose determine which of the four Simple Products they are actually purchasing.
The attributes point to the Simple Product, so that Magento knows which Simple
Product to place in the order. The Configurable Product is therefore not a product at
all, but rather a feature used to display multiple Simple Products on one product
page.
In this sense, a Grouped Product is very similar to a Configurable Product. It is also
only a feature used to display multiple Simple Products on one product page.
However, it displays them in a different fashion. Let’s again stick with the example of
the suit jacket. Forget about the three new versions that you began to carry, and
let’s go back to the classic black with three buttons design. Along with this suit
jacket, you also sell matching slacks and vest, the venerable three-piece suit. Using
Simple Products alone, you would have three separate pages, one for each piece.
But you feel that these should be sold together, because they are part of a set. This
35
can be easily accomplished using Grouped Products. Simply create a Grouped
Product – maybe you want to call it Three-Piece Suit – and associate all three Simple
Products to it. On your website, the page for this Grouped Product will list all three
Simple Products, each with its own quantity field. This way, your customers are
alerted of the presence of the set, and even encouraged to buy the pieces together,
however they still have the option to buy the pieces individually (you can actually
force them to buy all three pieces together, but we will get into that later on).
Setting up configuration and Attributes
Now that you are ready to start creating products, make sure that you have
everything that you need set up. There is one configuration feature that needs
addressed. If you haven’t already done so, navigate to System > Configuration and
select the Catalog tab. In the Product Options box, select your Default Tax Class. By
default Magento comes with one option for this drop-down: Taxable Goods. If you
will be selling products on your site which will need to be taxed, select this option.
The Tax Class for all new products will automatically be set to Taxable Goods, which
will save you the time of having to manually change this option for each new
product. You can learn more about setting up the Tax Rates and Tax Rules that apply
to the Taxable Goods Tax Class, as well as creating new Tax Classes in Chapter 4: Get
Ready for Selling.
In addition to this configuration setting, make sure that you have created Attributes
and Attribute Sets, which you can apply to your new products. You cannot change a
product’s Attribute Set once the product has been created (although you can add
Attributes to the Attribute Set and thereby add them to the product), so make sure
that you have the correct Attribute Set set up for your product before creating your
product. For more information about Attributes and Attribute Sets, refer back to
those sections in this chapter.
Creating a Simple Product
Navigate to Catalog > Manage Products.
In the top right corner, click Add Product.
Select an Attribute Set. Select Default if you haven’t created any attribute sets. This
will determine what product data you can enter. You can refer back to the previous
section for more information about managing Attribute Sets.
Select Simple Product.
Press Continue.
Enter all product information. Once you’ve set up the product, you’ll be taken to the
product’s data entry page. The fields here may change depending on your Attribute
Set (you may get rid of weight but add megapixels, for example). If you realize that
36
you want to add an attribute to this product before creating it, there is short cut
available. Rather than having to go to the attributes page and create an attribute,
and then having to go to the Attribute Sets page and add that attribute to the Set,
you can simply click Create New Attribute in the product page. This button exists in
all five default Groups (tabs) and any Groups which you have created. Note: Not all
tabs correspond to Groups. Groups are folders that exist in the Attribute Set. This
opens a pop-up window, which is identical to the New Attribute page. When you
enter the attribute information and click Save Attribute, the attribute will be created,
and automatically associated to the Attribute Set for the product you are editing,
into the Group in which you clicked the Create New Attribute button. You will
immediately see the new attribute at the bottom of new product page. If you are
managing multiple Websites or Store Views, the attribute Scope will appear next to
each attribute in the new product page. This can be either [GLOBAL], [WEBSITE], or
[STORE VIEW]. This refers to the level at which this attribute is shared. For example,
if the attribute Color had a [WEBSITE] Scope, you would be able to set the color of a
product to green in one website, and blue in another website. However, within each
website, all the different Store Views would have to have the same color. The Scope
can be defined for each attribute. You can refer back to the section about Attributes
for more information on this configuration.
37
General
Name - The product name as it will appear in the front-end
Description - The product’s description. It will display in the main section of the
product page.
Short Description - Short description is specific to this design package. This
description will display at the top of the product page, and in category listings in List
view.
38
SKU - The products SKU. Magento uses SKU as a unique identifier for this product,
across all stores and websites. SKU is global, meaning if you update the SKU for a
product in one store, it will update in all other stores as well.
Weight - The product’s weight - usually used for shipping calculations
Set Product as New from/to Date - In these fields, enter the date range in which the
product will be promoted as a new product. For more information about this
promotion feature, refer to Chapter 5: Promotions, Marketing and Content Pages.
Status - Two available - Enabled, Disabled. “Enabled” displays normally in the frontend, and “Disabled” doesn’t display in the front-end.
URL key - The Search Engine Friendly URL Identifier adds a relative URL path which
can be entered in place of the standard Target Path. It is Search Engine Friendly
because it can use the name of the product instead of the ID#. For more information
about URL Keys, refer to the section about URL Rewrites. If you leave this field blank,
it will automatically generate with the name of the product upon creation of the
product. If you enter a value here manually, you cannot use spaces in this field.
Visibility - You can decide whether your product will display in the page(s) of its
associated category(ies), display when your customer searches for the product, both,
or neither. It may be useful to “hide” certain products from your customers if they
are associated to a Configurable or Grouped Product, so that the product is only
visible through the Configurable or Grouped Product’s page, and not visible
separately.
Allow Gift Message - If you have enabled Product Level Gift Messages in the
Configuration page (for more about this, see Chapter 4: Get Ready for Selling), you
can allow your customer to enter a gift message for a specific product during
checkout by selecting Yes. If you select Use config, it will use the value in the Allow
Product Level Gift Messages drop-down in the system configuration. This differs
from Order Level Gift Messages because your customers can add a different message
for each product that has this feature enable. This is useful if they create one order,
but ship to multiple addresses.
39
Prices
Price - The price of your item as it will display in the front-end. If you have a special
or discount, this will be the original price.
Special Price - You can enter a Special Price for this product. In the front-end, this will
appear underneath the original price (referred to as the Regular Price), which will be
crossed out. The Special Price will display in red, and be referred to the Special Price.
If you wish, you can allow customers to be alerted of new specials via RSS feeds.
There is more information about RSS Feeds in Chapter 5: Promotions, Marketing,
and Content Pages.
Special Price From/To Date - You can enter a date range within which the Special
price will be active. This price will apply automatically when the From Date arrives
and deactivate automatically when the To Date arrives. If you leave this range blank,
the Special Price will apply until you remove it.
Cost - The Cost is for internal purposes and does not require a value.
Tax Class - This is the Product Tax Class to which this product will be associated. This
determines which Tax Rule will be used for this product, and consequently the Tax
Rate that will be charged to your customers. For more information about taxes, refer
to Chapter 4: Get Ready for Selling.
Tier Price - Chapter 5 also provides more information about Tier Pricing.
40
Meta Information
SEO-related Meta Information is controlled from here. Page Title, Meta Keywords
and Meta Description can be entered for this product. The Page Title will display in
the browser’s title bar when this product is being viewed. Meta Keywords and
Description will show in the tag of the product’s HTML source.
Images
By default, Magento requires you to designate three image types: Thumbnail, Small,
and Base. These images each correspond to different locations on the front-end
where they will display. When first creating a product, you will not have any custom
images uploaded. Therefore, all three image types will be set to No image. This
means that they will use your global Product Image Placeholders. To configure these,
navigate to System > Configuration, click the Catalog tab in the left column, and
upload a placeholder image for each image type. To add custom images to a product,
click Browse Files and locate the desired image. Do this multiple times until you have
41
selected all your desired images, then click Upload Files. The images will list vertically
in the image page. By default, all images uploaded here will display under MORE
VIEWS on the front-end. This is located under the main product image, and clicking
any of the images displayed here will open a pop-up window with the ability to
browse through all the images associated to the product. For each image in the
admin, you can add a Label, which will display above the image in the pop-up
window. You can add a Sort Order, which will determine the order in which the
images are displayed in the MORE VIEWS section and the order in which they are
browsed in the pop-up window. You can designate which of these images is
associated to which of the three image types by selecting the radio button in the
appropriate column (only one image can be the Thumbnail image, only one can be
the Small image, and only one can be the Base image). The images will automatically
resize to fit the dimensions of each image type. The Base image, however, works a
little bit differently. This is the main image that displays prominently on the product
page. It will resize to fit the image window, however, if it is larger than the window,
your customers will be able to zoom in on the image, and then double-click the
image so that it displays the entire image outside of the original image window at
the designated zoom level. If you want and image to only associate to one of the
three image types, and not display in the MORE VIEWS section, you can check the
Exclude checkbox. To remove an image, check the Remove checkbox before saving
the changes.
In addition to these features, Magento allows you to add your own custom
watermarks to the images in your site, to hamper visitors from making unwanted
copies. If you would like to add watermarks, navigate to System > Configuration, and
click the Design tab in the left column. For each image type, you can upload a
separate image file that will be used as the watermark, define the size of the
watermark, and define the position in which it will be displayed relative to your
product images.
Design
There is more about this in the Assigning Designs at the product level section below.
Inventory
Inventory settings can be configured individually per product, however there are also
several very important global Inventory configuration settings. Additionally, many of
the individual product settings can be set to use the default value (the global
setting). Therefore, it is beneficial to discuss the product settings and global settings
together. Please refer to the section about Stock Management later in this chapter
for more detailed information.
42
Websites
If you’re managing multiple Websites, you can select the Websites to which this
product is associated by checking the checkbox next to the Websites from which you
want the product to be available. Each Website will display here with all of the
associated Stores and Store Views, so that you know exactly which Website you are
viewing.
Categories
43
This tab will display the global category tree, which a checkbox next to each category
name. Selecting a checkbox will associate this product to that category, and you can
select as few or as many associated categories as you wish. For the categories to
display on the homepage you must make sure to add the product to a category
below the root catalog. If you have not created a new category below the root
catalog then do so now.
Related Products/Up-sells/Cross-Sells
Each of these tabs contains a product list, from which you can search for and select
products in your store which you wish to be related, up-sells or cross-sells of the
product being edited. There is more information about these three features later in
this chapter.
Product Alerts
If you have either or both product alerts enabled, this tab will appear, showing a list
of all subscribers to both Price Alerts and Stock Alerts for this product. For each
subscriber, both alert lists show the name, email, the date they subscribed to this
alert, the time that the most recent notification was sent to them, and the number
of times a notification was sent to them. For the Price Alert, this is also one
additional column. For each subscriber, it shows the price that the product had at
the time they they described. This includes Special Prices. There is more information
on how to configure Product Alerts earlier in this chapter.
Custom Attributes
If you have added any custom Simple Attributes, make sure to configure those as
well. These can be scattered throughout the existing tabs, or you can create new
tabs in which to put them. It all depends on the configuration of your Attribute Set.
44
In this case, the suit jacket Simple Attributes are in a new tab called Jacket
Attributes.
These are all of the tabs which appear when creating a new product. If you press
Save And Continue Edit, you will see three new tabs appear in the left column.
Product Reviews
You’ll see a list of all reviews that have been added to this product. There is more
information about managing Product Reviews in Chapter 9: User-Generated Content.
Product Tags
Shows all tags that this product has been given by users, and the number of times
each tag has been used. Chapter 9 also has more information about managing
product tags.
Customers Tagged Product
A breakdown of individual customers who have tagged this product - the grid shows
their first and last name, email, and tag used.
When you have completed all of your edits, press Save. You have now created a
Simple Product.
Creating a Configurable Product
By its nature, a configurable product is not useful unless there are simple products
which can be associated to it. Therefore, the first step in creating a Configurable
Product is to create two or more simple products, containing different attributes,
that your customer will be able to configure on the front-end. Once you have
created one Simple Product, use the Duplicate Product feature to create the
separate products without having to enter every value several times. Once you have
created and saved your first product select the Duplicate button on that product’s
page. For the duplicated product, change the attribute values which you are going to
allow your customers to configure. Only Simple Products will have a Duplicate
button. Note: The values of unique attributes (such as SKU) will not duplicate to the
duplicated product, and these will need to be entered manually. The duplicated
product will be created with a Status of Disabled. If you have forgotten to create all
of the Simple Products prior to creating the Configurable Product, you will have the
option to create Simple Products during product creation, in the Associated Products
tab (more below).
To create a configurable product, navigate to Catalog > Manage Products.
In the top right corner, click Add Product.
45
Select an Attribute Set. Select Default if you haven’t created any attribute sets. This
will determine what product data you can enter. You can refer back to the previous
section for more information about managing Attribute Sets.
Select Configurable Product.
Click Continue.
Select Configurable Attributes.
For an
attribute to be listed here, it must be associated to the attribute set which you
selected in step 4, and it must not be a System Attribute. Also, as described in the
message on the page (see image above), The Scope must be Global, the Input Type
must be Dropdown, and Use To Create Configurable Product must be Yes. If an
attribute is selected, it will not be configurable in the admin (as opposed to Simple
Products, for which all attributes are configured in the admin). Instead, a drop-down
menu will appear on the front-end for this attribute, and the customer will be able to
configure it.
The options from
which your customer will be able to select will depend on which Simple Products are
associated to this Configurable Product (more on this below). If an attribute is not
selected in this step, it will be configured in the admin just like is done for a Simple
Product, and it will be fixed on the front-end. For example, if you were to select
Color to be Configurable and Button Count not to be, then you could select the
46
Button Count to be Three in the admin, and associate one Simple Product suit jacket
with a Color black and one with a Color navy. On the front-end, the suit jacket
Button Count will be set at three, but your customer will be able to select their
preferred Color, black or navy, from the drop-down.
Press Continue.
Enter all product information. This is almost exactly the same process as entering the
product information for a simple product. There are, however, three major
differences.
Weight
When a customer purchases a Configurable Product, they are not actually purchasing
this product, but rather one of the associated Simple Products. Therefore, there is no
weight for a Configurable Product, because the weight depends on that of each
Simple Product individually.
Inventory
Just like weight, the inventory options for a configurable product depend on those of
the individual Simple Products. In the Inventory tab, you can set the configurable
product to be In Stock or Out of Stock, but nothing more. If you select In Stock, it will
display as In stock on the front-end, but each attribute will only be purchasable if the
corresponding simple product is In Stock. If your customer selects an Out of Stock
attribute and adds it to the cart, they will receive a message saying “This product is
currently out of stock.” If you select Out of Stock, the configurable product will
display as Out of Stock on the front-end, and will not be available to add the cart,
regardless of the Stock Availability of each Simple Product.
Associated Products
This tab does not exist for Simple Products. At the bottom of the page will be the
product list from which you can associate or disassociate Simple Products to the
Configurable Product. When first navigating to the page, it will only display currently
associated products. Press the Reset Filter button to display all products, associated
or not, which belong to the same Attribute Set (a Simple Product must belong to the
same Attribute Set as the Configurable Product in order for you to be able to
associate it). Select the checkbox of all products you wish to associate. The product
list displays certain pertinent information about the Simple Products. To the right of
the Inventory column will be a column for each configurable attribute, which you
selected in step 7. The value entered for each attribute column will be that product’s
Option, which you selected when creating the Simple Product. In order for a Simple
Product to display in this list, you must have selected an option for each configurable
attribute.
47
Above the product list will display a list of all configurable attributes. Click and drag
the orange arrow next to the attribute name in order to sort the attributes as they
will appear on the front-end. The Attribute Name field will be prepopulated with the
Label you used when creating the attribute, however it can be changed here so that
it displays differently in the front-end. Below each attribute will list all the options
that exist for associated products. Each time you associate a new product with a
unique option, the option will add to this list. For each option, you can enter a
positive or negative Price, which will add or subtract (respectively) from the price of
the configurable product, as either a Fixed amount or a Percentage of the
Configurable Product price.
If you have not already created all of the Simple Products you wish to associate to
this Configurable Product, you will have the option to create Simple Products in this
tab. Above the list of configurable attributes is the Create Simple Associated Product
section. This contains a button called Create Empty. Clicking this button will generate
a pop-up window identical to the New Product page. All of the fields are empty
(hence the name of the button), and you will be required to enter values for all
configurable attributes (so that this Simple Product can be associated to the
Configurable Product). When you click Save, Magento will create a Simple Product,
associated to the same Attribute Set as the Configurable product, and Magento will
automatically associate the Simple Product to the Configurable Product (you will see
this update in the product list at the bottom of the Associated Products tab).
In the front-end, it will look like this:
48
These are all of the options which appear when creating a new Configurable Product.
If you press Save And Continue Edit, you will see two new options in the Associated
Products tab (along with the three new tabs in the left column that were mentioned
in the Simple Product Section). In the Create Simple Associated Product section,
there is a new button called Copy From Configurable. This is similar to the Create
Empty button, except that it will prepopulate many of the Simple Product fields with
the corresponding fields from the Configurable Product. Many of the fields,
however, either must be unique to each product, or are not applicable to the
Configurable Product, and must be entered manually. These include SKU, Weight, all
configurable attributes, and all Inventory information. Clicking Save will
automatically associate the Simple Product to the Configurable Product just as with
the Create Empty feature.
The second new option available is Quick simple product creation section. This
section includes only some of the attribute fields, all of which are mandatory. In the
Name and SKU fields, there is an Autogenerate checkbox. If these are selected,
Magento will use the Name and SKU of the Configurable Product to create a new
Name and SKU for the Simple Product. It will be in the format [Name/SKU][configurable attribute 1]-[configurable attribute 2] and so on. When you click Quick
Create, the Simple Product will be created, with all of the attribute information not
listed in this section copied from the Configurable Product, and it will automatically
associate to the Configurable Product just as with the Create Empty feature.
49
When you have completed all of your edits, press Save. You have now created a
Configurable Product.
Creating a Grouped Product
Like a configurable product, a Grouped Product is not useful unless there are simple
products which can be associated to it. Therefore, the first step in creating a
Grouped Product is to create two or more simple products that can be purchased
together as part of the group.
To create a Grouped Product, navigate to Catalog > Manage Products.
In the top right corner, click Add Product.
Select an Attribute Set. Select Default if you haven’t created any attribute sets. This
will determine what product data you can enter. You can refer back to the previous
section for more information about managing Attribute Sets.
Select Grouped Product.
Press Continue.
Enter all product information. This is similar to entering the product information for
a Simple Product, with four major differences.
Weight
This is the same process as a Configurable Product. When a customer purchases a
Grouped Product, they are not actually purchasing this product, but rather one of
the associated Simple Products. Therefore, there is no weight for a Grouped Product,
because the weight depends on that of each Simple Product individually.
50
Prices
Unlike Simple or Configurable Products, Grouped Products do not have their own
prices. Despite being displayed on the same page, each Simple Product adds to the
cart as a separate item. There are no prices that are applied to the items as a group.
Therefore, there is no Prices tab for Grouped Products. If you want to give a discount
when your customer purchases multiple products within a Grouped Product, you can
set up a Shopping Cart Price Rule for this. There is more information about Shopping
Cart Price Rules in Chapter 5: Promotions, Marketing and Content Pages.
Inventory
Just like Weight, the stock of the individual Simple Products determine the stock of
the Grouped Product. The Stock Availability works like that of a Configurable
Product. If you select In Stock, it will display as In Stock on the front-end, but each
Simple Product will only be purchasable if that Simple Product is In Stock. If your
customer attempts to add one or more of the Out of Stock products to their cart,
they will receive a message saying “This product is currently out of stock.” If you
select Out of Stock, the Grouped Product will display as Out of Stock on the frontend, and will not be available to add the cart, regardless of the Stock Availability of
each Simple Product.
Associated Products
This is much simpler than associating products to a Configurable Product. Grouped
Products do not need to be in the same attribute set as their associated products, so
there is no attribute functionality tied in with creating Grouped Products. You can
associate any product to a Grouped Product in this tab by checking it. When
checked, two fields unlock: Default Qty and Position.
Control the sort order of the items in the Position field. As with all sort orders in
Magento, the product with the lowest number will have the highest position on the
page. You can also enter a Default Quantity which will be a pre-populated value in
the front-end quantity box.
51
When you have completed all of your edits, press Save. You have now created a
Grouped Product.
Related Products, Up-sells, Cross-sells
There are three types of product relations in Magento: Related Products, Up-sells
and Cross-sells. Shown on a product’s page, Related Products are meant to be
purchased in addition to the item the customer is viewing. They will appear in a
Related Products menu at the top of the right column. Simple Products will have
checkboxes, by which the customer can add them to their Shopping Cart. When they
add the main product to their cart, all checked Related Products will be added as
well.
Configurable and Grouped Products will not contain this checkbox, because the user
must specify the settings of these products before adding them to the cart. Also
shown on a product’s page, Up-sells are items that customers would ideally buy
instead of the product they’re viewing. These may be better quality, produce a
52
higher profit-margin, be more popular, etc. They will appear in a section labeled You
may also be interested in the following product(s), which displays beneath the
Additional Information section. The Up-sells will display with a link to that product’s
page, navigating the customer away from the product which they are currently
viewing.
Shown in the shopping cart, Cross-sells act a bit like impulse buys, such as magazines
and candy at the cash register in grocery stores. Usually, they are items that a
customer who is buying the product in question might enjoy. If there are multiple
items in the Shopping Cart, each with their own Cross-sells, the Cross-sells will rotate
each time the Shopping Cart is refreshed.
53
Great For:
Moving Stock
Increasing the Sales of Accessory and High-End Items
Related Products, Up-sells, and Cross-Sells are all associated to a product in
the same manner. Navigate to Catalog > Manage Products. Locate the
product to which you wish to associate the Related Product/Up-Sell/Crosssell, and click Edit. Click on the Related Products/Up-Sells/Cross-sells tab in
the left column.
From the products grid that appears, check any products to mark as Related
Products/Up-Sells/Cross-sells. Click Reset Filter to see all products.
Once a product has been checked, the Position field opens up. This determines the
sort order of the Related Products/Up-Sells/Cross-sells in the product’s
page/Shopping Cart. Note: For Cross-sells, the Position only applies if there is one
item in the cart. When there are multiple items, the Cross-sells will rotate, and not
adhere to the Position.
Click Save.
Product Comparisons
One property of Magento attributes is the ability to make them Comparable on
Front-end. If at least one attribute is in a product is Comparable on Front-end,
customers will be able to add this product to their Compare Products menu. Both
System and Simple Attributes can be set to Comparable. Once added to the Compare
Products menu, customers will be able to view the products side by side and make
an educated shopping decision. This is very powerful; if customers desire, they can
compare a chair, a television, and a pair of running shoes. These types of products
may not have very many attributes in common (probably only attributes such as
SKU, Price, and Product Name), but that is the power of this feature: to allow your
customers to customize their shopping experience. There is more information about
Product Comparisons in Chapter 5: Promotions, Marketing and Content Pages.
Great For
Increasing Customer Convenience
Stores with a Variety of Products
54
Increasing Conversions
You can control which data shows in Product Comparisons. Each product attribute
has a flag called Comparable on Front-end, which can be set to Yes or No. To choose
this:
Navigate to Catalog > Attributes > Manage Attributes.
In the grid, find the attribute you want to edit. Hint: Change the last column
Comparable to Yes or No to see all attributes that can appear in the product
comparison chart.
Click the attribute to edit it.
Change the drop-down Comparable on Front-end to Yes or No.
Click Save Attribute.
Layered Navigation
A customer browsing your site needs to find the products that interest them as fast
as possible. To prevent them from frustrating experience of encountering a category
containing 60 products spread across multiple pages, give them the option to filter
products based on their interests. With layered navigation, customers can search by
any attribute that you have designated as filterable, more easily showing customers
what they want and raising conversions.
Great For
Stores with a variety of products
Giving customers a more individualized experience
Increasing Conversions
55
The Layered Navigation menu actually consists of two parts: Category filters and
Attribute filters.
Category navigation - If a category contains child categories, the child categories will
automatically display in the Layered Navigation menu. Each child category will
display as a link, along with the number of products associated to that category in
parentheses. Only the direct child categories will display. Child of child categories will
not display.
Attribute filters - In order for the attribute filter to display in the Layered Navigation
menu, a category must be an Anchor category (refer back to the section about
categories). For Anchored categories, all filterable attributes will have a section in
the Layered Navigation menu, with a link for each value. Clicking on any of these
values will filter the results on the category page to display only those products
which match the selected value (refer back to the section about attributes for more
information about filterable attributes). There will be one link for each existing value.
There is one exception to this, however. Price, which is a System Attribute, is by
56
default configured to be a filterable attribute (this can, of course, be changed).
Rather than having a separate link for every single price, the price filter values will
display as various price ranges. Magento will automatically set the size of the ranges
based on the prices of the products in that category (each range will be of equal
size), and there will be a maximum of ten ranges.
Assigning Designs at the product level
You can control the look of each product page individually in from the Design tab in
the product page. It is very similar to the individual design options for categories. If
your product page has a design separate from the category page to which it is
associated, then the product level design will supersede the category level design.
Select the design you want from the Custom Design drop-down. Magento comes
with several different design options out of the box. If you leave this drop-down
blank, it will automatically use the Current package name design. This can be edited
by navigating to System > Configuration and clicking the Design tab. Enter the name
of the design you want in the Current package name field, and this design will apply
to all products for which you do not specify a different design.
With the Active From and Active To fields, you can select a time frame in which the
category will automatically switch to a design, and then switch back to the blank
option when the time frame ends. This is perfect for the holidays, so that you can
create a holiday design for your pages, and then have your site automatically switch
back to the normal design whenever you want, without having to remember to do it
yourself.
The Custom Layout Update is essentially a static block, with a few differences.
Rather than HTML, the structure must be in XML format.
The Update will display on the product page, below the product information,
whereas a static block will only display on a category page.
The Update will display on the page only during the dates specified in the Active date
range.
Stock Management
Your ability to manage the details of your products’ inventory is more flexible than
ever with Magento’s Inventory Management System. You will have the ability to
control not only the quantity and availability, but also the backorder capabilities and
the maximum and minimum quantities the consumer is allowed to purchase.
Additionally, you can create the settings system-wide, or customize them individually
for each product.
57
Creating stock management default options
Navigate to System > Configuration, and click on the Inventory tab in the left column.
Enter Minimum Qty Allowed in Shopping Cart. This value requires the customer to
purchase a minimum amount of each product in an order.
Enter Notify for Quantity Below. When a stock of any product goes below this level,
Magento will automatically notify you via RSS Feed. This ability works in conjunction
with the Decrease Stock When Order is Placed drop-down below, because Magento
cannot notify you of a low stock unless you also enable it to keep track of stock
reduction. In this field, enter the quantity level at which Magento will send a
notification. In order to set up the RSS feed, navigate to Catalog > Manage Products,
and click the Notify Low Stock RSS link at the top of the page. You will be prompted
to enter your User Name and Password. These are the same that you use to access
the Magento admin panel. You will be redirected to the RSS page, where you can
select which reader you would like to use for receiving this feed.
Enter Minimum Qty for Items’ Status to be In Stock. This value will determine at
which quantity the availability of the item will switch from In Stock to Out of Stock. If
you set this value to 20, you will always guarantee that you have at least 20 items in
stock.
Enter Maximum Qty Allowed in Shopping Cart. This value limits the amount of each
product the customer is allowed to purchase in a single order.
58
Select Decrease Stock When Order is Placed status.
If you select Yes, the product’s quantity will automatically decrease when an order is
placed.
If you select No, the product’s quantity will not automatically decrease, and it can
only be edited manually.
Select Backorders status.
If you select No Backorders, the customer will not be allowed to purchase more
quantity than is available.
If you select Allow Qty Below 0, the customer will be allowed to purchase more
quantity than is available, but they will not be notified that some of the quantity has
been put on backorder.
If you select Allow Qty Below 0 and Notify Customer, the customer will be allowed to
purchase more quantity than is available, and they will be notified when they are
adding the item to the cart that the unavailable quantity has been put on backorder.
Click Save. You have now created the inventory characteristic for all products in your
system.
Creating stock management on the product level
To customize the inventory settings for an individual product, whether creating a
new product or editing an existing product, navigate to Catalog > Manage Products,
and click the Inventory tab in the left column of the product’s page. Note: These
settings only exist for Simple Products. Because Configurable and Grouped Products
are essentially just a way to display Simple Products, the inventory settings of the
Configurable and Grouped Products are completely dependent upon those of the
associated Simple Products. Therefore, for Configurable and Grouped Products, only
the Stock Availability will be present in the Inventory tab, because this is actually a
display setting and not related to the actual inventory of the product.
59
Enter Qty, or quantity. This is a required field.
Enter Minimum Qty for Items’ Status to be In Stock or click the Use Config Settings
checkbox to use the value you input in the Inventory System Configuration. Clicking
the checkbox will deactivate the text field and it will not be editable.
Enter Minimum Qty Allowed in Shopping Cart or click the checkbox.
Enter Maximum Qty Allowed in Shopping Cart or click the checkbox.
Select Qty Uses Decimals status.
If you select Yes, the customer can enter a fraction of a whole number into the
quantity field in the shopping cart. This is beneficial if items are being sold in
alternative units such as weight or length.
If you select No, the customer can only purchase quantities in whole numbers.
Select Backorders status, or click the checkbox.
Select Notify for Quantity Below, or click the checkbox.
Select Stock Availability. You can designate the product to be Out of Stock even if
you have stock remaining for the product, and it will display as such in the front-end.
This means that your customers will not be able to add the product to their carts,
but they can add it to their wishlists. If there is no stock remaining for the product,
you do not need to manually switch this to Out of Stock. Magento will automatically
60
update the front-end accordingly, unless you allow for Backorders, in which case the
product will display normally and customers will still be able to add quantity to their
carts.
Click Save. You have now customized the inventory characteristics for this product.
Batch Updates
Products can be imported to and exported from the admin using the Magento
DataFlow engine. However, in this section we will concentrate on making batch
updates to products in the admin. This feature saves you time by allowing you to
change the attributes of multiple products at the same time. There is similar
functionality in several other places in the Magento admin, from customers to
Orders. Each will be discussed in the appropriate chapter.
In the admin, navigate to Catalog > Manage Products.
Select the products to which you would like to make updates. At the top of the
products list, you have the option to Select All products or Select Visible products
(products currently displaying on the page). Or, you can simply check the checkboxes
of each product to which you wish to make updates individually. You can see the
number of items selected at the top of the products list, and it will update each time
a checkbox is checked or unchecked.
When you have all the desired products selected, chose your preferred Action from
the drop-down menu, also at the top of the products list.
Delete - This will delete the selected products from your catalog when you press
Submit.
Change Status - Selecting this will produce a Status drop-down menu to the right,
where you can choose to either Enable or Disable the selected products. The status
will change when you press Submit.
Update attributes - When you press Submit, you will be redirected to the Update
attributes page. The Attributes tab displays many of the system attributes from the
General, Prices, Meta Information, Images, and Design tabs in a product page. It also
61
includes the simple attributes that are shared by all of the items selected. You will
not have the option to edit SKU or URL Key, or any other attribute that must be
unique per product. The Inventory tab displays the same fields that are displayed in
the Inventory tab for an individual product. The Websites tab is also very similar to
that of an individual product, however there will be one section for adding the
products to the Websites, and once section for removing the products from the
Websites. In the top left corner is the Choose Store View drop-down, so that you can
choose to make your updates specific to a certain Store View. As always, Global and
Website level attributes cannot differ between Store Views. At first, all the of the
attribute fields are inactive, and you must click the Change checkbox next to each
field in order to activate it and make an edit. The fields will all be blank, even if all
the selected products share the same value for a given attribute. This can be useful
for many scenarios. For example, if you have several products with the same special
price, ending in one week, you can choose to extend the Special Price To Date for all
the products at one time. Simply check the checkbox for this field, enter the new
date on which you wish the special to end, and click Save.
All of the products will update and you will be redirected back to the products list.
Tip: Be careful to only check the attributes which you wish you change. If you select
an attribute and leave it blank, it will erase the existing value of the attribute when
you save.
URL Rewrites
The URL Rewrite Management page is a SEF tool that you can apply to the URLs of
your category and product pages. Rather than having all your URLs in the default
format, which uses category and product IDs, you can use this feature to create a
more descriptive URL, making it easier for search engines to find your pages.
Whenever a new category or product is created, a new entry will be added to this
list, one for each existing store view.
Configuration Settings
Before using this feature, there are two important settings that you must configure.
Navigate to System > Configuration and select the Web tab from the left column.
62
Add Store Code to Urls - This determines whether the store ID (in addition to the
category ID or product ID) will be used in the URLs for your site. If you are managing
multiple stores, this will create a separate URL rewrite for each store.
Use Web Server Rewrites - This controls whether Magento will automatically
generate URL rewrites. To access the list of existing rewrites, this must be set to Yes.
Editing URL Rewrites
Now you are ready to view the list of URL rewrites. To access this list, navigate to
Catalog > Manage Url Rewrites in the admin. Click Edit next to one of the rewrites
and you will be able to change some of the information.
Type - For automatically created rewrites, this value will be System. For manually
created rewrites, this value will be Custom. Neither can be changed.
Store - The name of the store view to which the rewrite directs. Because a separate
rewrite is created for each existing store view, this too can not be changed.
ID Path - Will display in the format of {Type}/{ID#}. If the Type is System, it will
further be specified as either category or product. For products, there may also be
an additional /{associated category ID#} following the standard format. This can not
be changed.
Target Path - This is the actual URL that points to the page. It is a relative path,
automatically generated in a certain format, and can not be changed.
63
Request Path - This is the SEF URL that you can edit. It will be automatically
generated with the name that you specified for the category or product when it was
created. If it is a product, it may also include the associated category, or a suffix
(such as .html), if you have enabled those features in the Catalog Configuration
(refer back to the beginning of this chapter for more information about this).
However, you can edit this to whatever format you desire. This is the same field that
you see in an individual product or category page called URL key. To find this field,
navigate to Catalog > Manage Products/Categories and edit the desired
product/category. Whether you choose to edit the value in the URL Rewrite
Management page, or the individual product/category page, it makes no difference.
Note: The Request Path must be unique for each rewrite.
Redirect - If you select Yes, the URL will switch to the Target Path when the Request
Path is entered in the address bar. If you select No, the URL will remain in the format
of the Request Path.
Description - This is for internal purposes.
When you have completed making edits, click Save Url.
Creating URL Rewrites
You can also create New Url Rewrites. Because Category and Product pages
automatically generate a rewrite when they are created, this is most useful for
adding multiple Request Paths that point to the same Target Path. Additionally, you
can create rewrites that point to CMS landing pages, such as a FAQ page.
On the Managage Url Rewrites page, click Add Url Rewrite.
Select the Type
Category - If you select Category, you will then be required to select the category for
which you wish to create the rewrite from the category tree. Select the checkbox of
the desired category. You will then be redirected to the General Information page
where you enter the relevant information. You will have the ability to choose the
64
Store from a drop-down. And just like when editing an existing rewrite, you can
make changes to the Request Path (which will be autopopulated with the category
name), Redirect and Description. When you are finished, click Save Url.
Product - If you select Product, you will first be required to select the product for
which you wish to create the rewrite from the product list, and then be redirected to
the category tree where you will be required to select the category to which the
product is associated. Then, you will be redirected to the General Information page
where you enter the relevant information. The name of the product will be displayed
at the top as a link to the product’s information page. You will have the ability to
choose the store from a drop-down. And just like when editing an existing rewrite,
you can make changes to the Request Path (which will be autopopulated with the
product name and associated category name), Redirect and Description. When you
are finished, click Save Url.
Custom - If you select Custom, you will be redirected immediately to the General
Information Page. As with the Categories and Products, you will be able to edit the
Store, Request Path, Redirect, and Description. However, because you cannot select
Target Path from a list of Categories or Products, you will have to enter the ID Path
and Target Path manually, to point to the desired CMS landing page. Just as with
Categories and Products, the Request Path field exists in an individual CMS page.
Here, it is called SEF URL Identifier, and you can find it by navigating to CMS >
Manage Pages and clicking on the desired CMS page. When you are finished, click
Save Url.
65
Chapter 4: Get Ready for Selling
Checkout Process
In this chapter we will discuss the details of the checkout process, including localization,
Taxes, Shipping Methods, and Payment Methods. But before describing each aspect of the
checkout process in depth, let’s take a moment to discuss the checkout process as a whole,
along with some of the basic checkout configuration settings. This way, you will have a
better understanding of how localization, Taxes, Shipping, and Payment fit into the checkout
process, giving each section a bit more context.
The process first begins when your customer adds a product to their cart. They can be
redirected to the cart each time they add a product, or remain on the product page, only to
be directed to the cart if they click one of the various shopping cart links. You can configure
this setting by navigating to System > Configuration, clicking on the Checkout tab in the left
column, and choose your preference from the After adding a product redirect to shopping
cart drop-down. Magento automatically saves the contents of your customers’ shopping
carts, but you can limit the amount of time a product will remain in the cart by entering the
limit, in days, in the Quote Lifetime field. If your customer continues shopping, they will
have a quick view of the shopping cart in the right column of all category, product and CMS
pages that include the right column (which you can specify in the design settings for each
page individually).
At the top of the cart view will be a summary of the quantity of items in the cart. This can
display either the number of different products (line items) or the total quantity of each line
item. You can specify this setting in the Display Cart Summary drop-down.
When your customers arrive to the shopping cart, they will see each product listed in a
separate row. Each product here is referred to as a line item. For each line item, your
customers have the option to add quantity to it, or remove it from the cart altogether, and
this can be done at any time. The image that displays for each line item is the Thumbnail
image that you selected for each product. For Grouped and Configurable products, however,
you have the option to use the Thumbnail of the Grouped or Configurable product, or the
66
Thumbnail of the associated Simple Product. This is designated in the Grouped product
image and Configurable product image drop-downs, respectively. To use the Thumbnail of
the Grouped/Configurable Product, select Parent Product Thumbnail. To use the Thumbnail
of the associated Simple Product, select Product Thumbnail itself. In the cart there is also a
link to Continue Shopping, so that your customers can add more products to the cart. If they
have a coupon code which will offer them a discount, they must enter it in the Shopping
Cart, in the Discount Codes field (there is more information about Shopping Cart Price Rules
in Chapter 5: Promotions, Marketing and Content Pages), in order for it to be applied during
Checkout.
When they click the Apply Coupon button, the coupon will be applied to the cart and appear
in the checkout totals in the bottom right corner. Your customers can also receive Shipping
and Tax estimates prior to the checkout process. They must enter their Country,
State/Province, and Zip/Postal Code in the Estimate Shipping and Tax field, and click Get a
Quote. The available shipping rates will appear directly below.
67
Your customers can then click the Update Total button, and the selected shipping rate,
along with the tax (if applicable) will add to the checkout totals in the bottom right corner.
Your customers can change shipping rates at any time, and refresh the checkout totals by
clicking the Update Total button again. The checkout totals includes the Subtotal, Discount,
Shipping, Tax, and Grand Total.
You can configure the order of these amounts by navigating to System > Configuration,
clicking on the Sales tab in the left column, and entering the sort orders in the Checkout
totals sort order section.
The tax will vary depending on the tax settings you specify. Navigate to System >
Configuration, and click on the Sales tab in the left column. Here, you can designate whether
to Apply Tax after Discount. If you select Yes, the tax will calculate as a percentage of the
discounted price rather than the Subtotal. You can also choose the Tax Class for Shipping, if
you want to charge tax on the shipping costs (more on this in the Taxes section below).
Lastly, you can calculate the Tax Based On the customers’ billing or shipping address, or the
shipping origin (the address of your store or warehouse, which you can define in the
Shipping Settings tab). If you choose to base tax on the shipping origin, which is a fixed
address that you must configure, your tax rates will be fixed, and you will then have the
option to set Catalog prices include tax to Yes. If you do, Magento will subtract sales tax
from the product price you entered in the catalog. For example, you have a product listed
for $110.00, and the tax rate is 10%. Instead of the customer being charged 10% on top of
the $110.00, and paying $121.00 total, they will only pay $110.00 total. The actual product
price will therefore be $100.00, and the other $10.00 will be used as the sales tax ($10.00 is
10% of $100.00). The $100.00 price will be shown in the shopping cart as the Unit Price
(Excl. Tax), or the price excluding tax, so your customers can see that the tax was already
included in the catalog price they saw in your site.
68
Tax not included in catalog price
Tax included in catalog price
When your customers have added all the items they want to purchase to the cart, they will
click the Proceed to Checkout button in the cart. There is also a Checkout button in the
Shopping Cart quick view, and a Checkout link in the page header at all times (if you have
PayPal or Google Checkout enabled, separate checkout buttons will appear for these
options). If they are not already logged in, they will have three options: Checkout as Guest,
Register, and LOGIN.
69
If they choose to Checkout as Guest, they will enter all of the necessary order information,
however an account will not be created for them when the checkout is complete. You can
disable guest checkout by navigating to System > Configuration, clicking the Checkout tab in
the left column, and selecting No from the Allow Guest Checkout drop-down. If they choose
to Register, they will enter all of the necessary order information, including a password, and
an account will be created simultaneously when the checkout is complete. If they choose to
LOGIN, they must first enter their Email Address and Password, which will retrieve all of their
account information, and they will only be required to enter the necessary order
information which is not currently saved (for example, if they do not already have any
addresses saved to their account).
Regardless of which of these three options they choose, they will checkout using Magento’s
one-page checkout platform. This makes the checkout process easier than ever, with all the
checkout information conveniently located on the same page, divided into separate tabs for
better organization. The first tab includes the Billing Information (as well as name, email,
and password, if needed), and the ability to select from different addresses and create new
addresses. The second tab includes the Shipping Information, as well as the ability to change
or add addresses. In the first tab, your customers have the option to specify that the
shipping address will be the same as the billing address, in which case the second tab will be
skipped altogether. The third tab will include the available shipping methods, as well as the
option to add gift messages, if they are enabled. Gift messages can be applied to the order
as a whole, or individually to each product. You can configure this by navigating to System >
Configuration, and clicking the Sales tab in the left column. The Allow Gift Messages on
Order Level drop-down controls whether one gift message can be placed for the whole
order, and the Allow Gift Messages for Order Items drop-down controls whether one gift
message can be placed for each product. You can choose to enable both, or just one. In the
Shipping Method tab, the Order Level gift message will have a From field, To field and a
Message field. The Item Level gift message(s) will have the same fields, as well as an
indication as to which product the gift message is associated. The From and To fields will
autopopulate with the billing address name and shipping address name, respectively. The
fourth tab will include the Payment Information. The fifth tab will include the Order Review,
and the Place Order button, which completes the order.
70
As your customers proceed through checkout, the information from each tab will be update
in the Your Checkout Progress menu in the right column.
If you wish, Magento will automatically notify you via RSS Feed of the creation of all new
Orders, whether created in front-end the or the admin. In order to use this RSS feed,
71
navigate to Sales > Orders, and click the New Order RSS link at the top of the page. You will
be prompted to enter your User Name and Password. These are the same that you use to
access the Magento admin panel. You will be redirected to the RSS page, where you can
select which reader you would like to use for receiving this feed. This concludes the
checkout process. Now, let’s a more detailed look at some of the aspects of the checkout
process.
Localization Settings
When you first installed Magento, you were required to select your localization settings. This
includes you Locale, Timezone, and Default Currency. Just because these were configured
during installation doesn’t meant you don’t have access to them any time you want. These
can be reconfigured at any time.
Locale Settings
You can reconfigure your Timezone and Locale settings by navigating to System >
Configuration, and clicking on the General tab. This page also contains other very important
configuration settings, so let’s take this opportunity to discuss them along with the
discussion of the localization settings.
Countries options
Default country - Any time a country drop-down is present, in the admin or the
front-end, it will automatically be populated with the country selected from this list.
The option you select here should be included in the Allow countries list below.
Allow countries - Any time a country drop-down is present, only the options
selected from this list will be available to select in the drop-down.
Locale options
Timezone - Controls all settings related to time in your site, such as timestamps or
automated processes.
Locale - Controls the default language of your site.
Currency
The other localization setting – Currency – can be reconfigured in a different location. In
addition to merely being able to select which currency will be your default currency, there
are many other currency settings that you can configure at this time as well.
Currency Configuration
To configure the currency settings, navigate to System > Configuration, and select the
Currency Setup tab in the left column.
Currencies Options
Allowed currencies - Select from this list each currency with which you would like
your customers to be able to place Orders. This can be unique for each website or
72
store view. The currencies that display in this list are actually determined in another
currency list. Navigate to System > Configuration, and select the System tab in the
left column. In the Currency section, there is a list of Installed Currencies. This list
contains many obsolete 20th century currencies in addition to the current ones. By
default, only current currencies will be selected, and therefore only those currencies
will display in the Allowed currencies list. However, you have the option to select the
obsolete currencies, and add them to the Allowed currencies list. The Installed
Currencies list, therefore, acts like a filter, so that the Allowed currencies list is not
cluttered with obsolete currencies that most store owners will not use. If you select
more than one currency from the Allowed currencies list (and define currency rates,
which will be covered below), a Select Your Currency drop-down will appear on the
category and product pages on the front-end, through which your customers can
choose their preferred currency method.
Default display currency - This is the currency that will be selected on the front-end
when your customers first arrive to your website, before changing it in the Select
Your Currency drop-down. If you are only allowing one currency in your site, this will
be the same as the allowed currency. If you are allowing multiple currencies in your
site, you can choose which of those currencies will be the default. Make sure that
the Default display currency has been selected as an Allowed Currency.
Base currency - This is the currency against which all other allowed currencies will
be configured, based on the ratios established in the Manage Currency page
(covered below). You can establish different Base Currencies per website (so long as
the Catalog Price Scope in the Catalog tab is set to Website). Each website level
Base Currency will have its own row in the Manage Currency page. While you can
allow multiple currencies in which to display your product prices, this is the currency
that will be used for payment transactions with online payment gateways (this is
only if you have enabled one or more online payment methods in your Payment
Methods configuration; there is more about this later in the chapter).
Import Settings
This section is to set up automatic updates of currency rates through an external currency
rate provider. You can manually update the currency rates using an external currency rate
provider in the Manage Currency page (covered below).
73
Enabled - Select Yes to Enable automatic currency rate updates.
Service - Select which external currency rate provider you with which you wish to
update your rates. By default, Magento is configured to import rates from
Webservicex.
Start Time - Select the time of day (in 24 hour mode) at which you wish to update
your rates.
Frequency - Designate whether you want the rates to update Daily, Weekly, or
Monthly.
Error Email Recipient - Enter the email address to which emails will be sent in case
an error occurs during the automatic update.
Error Email Sender - Select the address from which the error notification email will
be sent. For more information on how to configure these email addresses, refer to
Chapter 6: Customers.
Error Email Template - Select the template which the error notification email will
use. For more information on how to configure these templates, refer to Chapter 6:
Customers.
Currency Rates
These can be configured by navigating to System > Manage Currency Rates. This page
contains a table of Base Currencies and Allowed Currencies, with the relative value of each
compared to the Base Currency. Each Base Currency will have its own row, and each Allowed
Currency will have its own column. When the row value and column value for a cell are the
same (for example, where the US Dollars Base Currency and Allowed Currency intersect), the
rate will be 1.0000. All other rates in the same row will be a ratio of this. You can enter the
rates of the other currencies manually, or import them from an external currency rate
provider in the Import Service drop-down. By default, Magento is configured to import rates
from Webservicex. Select this from the drop-down, and click Import. The Allowed
Currencies will populate with the most current conversion rates. If you had rates previously
entered, they will now display underneath the field, as the Old rate. You can revert to these
old rates by clicking Reset. When your currency rates are configured correctly, click Save
Currency Rates.
There are 2 base currencies (1 per Website) and 8 display currencies
74
Taxes
Tax Rates
Magento allows full control over your store’s Tax Rates, from a single statewide rate to rates
per zip code. The proper term Tax Rate, as defined in Magento, is used to describe a set of
up to five individual tax rates, which will be applied to different combinations of Customer
Tax Classes and Product Tax Classes when you create your Tax Rules. These tax features will
be discussed in more detail later in the chapter. To define Tax Rates, navigate to Sales > Tax
> Manage Tax Rates and select Add New Tax Rate.
Country - First, select the country associated to this shipping rate. Magento locates
the appropriate Tax Rate by matching the customer’s shipping address country to
the Tax Rate country. For example, if you select United States from this list, all
customers whose shipping address country is United States will have their tax
calculated based upon this Tax Rate.
State - If the country has different tax rates in different states, you can specify the
state using this drop-down. By default, an asterisk will be selected in the drop-down.
This means the this Tax Rate will apply to all customers from the given country,
regardless of the state. For most countries, the drop-down will be inactive, so that
you will not be able to specify a state. There are six countries – Austria, Canada,
Germany, Spain, Switzerland, and United States – which have options that can be
selected from this drop-down. If you already created a Tax Rate for the United
States, with an asterisk for the state, this will be the standard Tax Rate for the
United States, and will apply to all customers whose shipping address is the United
States. However, you can now create a new Tax Rate, and select California as the
state. Now, all orders with a United States shipping country will use the standard Tax
Rate, unless the shipping state is California, in which case it will use the specific Tax
Rate. You can create a Tax Rate for each state that differs from the standard United
States Tax Rate.
Zip/Post Code - If the country or state has different tax rates in different zip codes,
you can enter a zip code in this field. Note: You can specify a zip code even if you
have not specified a state. By default, this field will contain an asterisk. This means
that this Tax Rate will apply to all customers from the given country or state,
regardless of the zip code. Therefore, this will be the standard Tax Rate for California
and will apply to all customers whose shipping state is California. However, if the zip
code 90064 has different tax rates than the other zip codes in California (and in this
example, it does), you would create another California Tax Rate, where you specify
the zip code as 90064. Now, all orders with a California shipping country will use the
standard Tax Rate, unless the shipping zip code is 90064, in which case it will use the
specific tax rate. You can create a Tax Rate for each zip code that differs from the
standard California Tax Rate.
Rate 1-5 - Now that you have defined to which region this Tax Rate will apply, you
have the option to define up to five different tax rates. Tax rates apply at the item
level, because it can differ depending on the Product Tax Class of each item. It will
75
calculate as a percentage of the price of the item. Magento will choose which of the
five tax rates to apply to the item based on the location defined above and which
rate is defined in the Tax Rules. For example, for the standard California Tax Rate,
you can define Rate 1 as 8(%), and Rate 2 as 4, and Rate 3 as 2. For the 90064 zip
code, you can define Rate 1 as 9, and Rate 2 as 4.5, and Rate 3 as 2.25.
If you navigate to Sales > Tax > Import / Export Tax Rates, you can create a batch of new Tax
Rates. You can upload a .csv file containing a column for Country, State, Zip/Postal Code, and
a column for each Rate. First, you must Browse for the file, and then click Import Tax Rates.
This is especially useful if you have many different regions for which you must create
different Tax Rates, because this is much more efficient than creating each Tax Rate
individually. In this page, you can also Export Tax Rates, which will create a .csv listing all
saved Tax Rates. This is useful when first creating Tax Rates, because you can export a blank
.csv template, enter your rates manually, save, and then import this same .csv file.
Tax Classes
Combined with Tax Rates, Tax Classes define Tax Rules. There are two kinds of Tax Classes:
Customer and Product. Each type of class can be created simply by entering a name. The
Customer Tax Classes will then be assigned to individual customers, and the Product Tax
Classes will be assigned to individual products. Magento will determine which tax rate (1-5)
to apply to an each item in an Order based on the combination of the customer’s Customer
Tax Class and each item’s Product Tax Class in the Tax Rules.
Customer Tax Classes
76
Customer Tax Classes are associated to Customers by assigning them to Customer Groups,
which are then assigned to Customers. By default, Magento will include one Customer Tax
Class: Retail Customer. This Tax Class will be assigned to the two default Customer Groups:
General and Not Logged In. You will learn how to change the Tax Class associated to these
Customer Groups, create new Customer Groups, and associate Customer Groups to
Customers in Chapter 6: Customers. If you have different Tax Rules that will apply to
Wholesale customers, you will want to create a new Customer Tax Class.
1.
2.
3.
4.
To define the Customer Tax Classes, navigate to Sales > Tax > Customer Tax Classes.
Click Add New in the top right of the page.
Enter the Class Name (in this case, Wholesale Customer).
Click Save Class.
Product Tax Classes
Product Tax Classes are associated to Products. By default, Magento will include one Product
Tax Class: Taxable Goods. If you have different Tax Rules that will apply to Apparel, you will
want to create a new Product Tax Class. You can configure all new products to default to
your preferred Product Tax Class by navigating to System > Configuration, selecting the
Catalog tab, and choosing that Product Tax Class from the Default Tax Class drop-down.
1.
2.
3.
4.
To define the Product Tax Classes, navigate to Sales > Tax > Product Tax Classes.
Click Add New in the top right of the page.
Enter the Class Name (in this case, Apparel).
Click Save Class.
Note: If you wish to charge tax on shipping, you may want to create a Product Tax Class that
will be used solely to configure the shipping tax. Magento approaches shipping as another
item in the Order, so it must be associated to a Product Tax Class. You can associate it to one
of the same Tax Classes that you use for your products, or create a separate one that is
unique for shipping tax. This can be done by navigating to System > Configuration, clicking
the Sales tab, and selecting the Tax Class from the Tax Class for Shipping drop-down. If you
select None, shipping will not be taxed. If do you choose to tax shipping, the rates will be
calculated based on your Tax Rules, just as with any item in an Order.
Tax Rules
Now that you have established Your Tax Rates and Classes, you are ready to define your Tax
Rules. If you need to have different tax rates for your different combinations of Customer
Tax Classes and Product Tax Classes, you can define a Tax Rule for each scenario. Let’s first
77
define the most common scenario: Retail Customers purchasing Taxable Goods. This is what
Rate 1 is designated for.
1.
2.
3.
4.
5.
6.
Navigate to Sales > Tax > Manage Tax Rules.
Click Add New Tax Rule in the top right of the page.
Select the Customer Tax Class from the drop-down (in this case, Retail Customer).
Select the Product Tax Class (in this case, Taxable Goods).
Select the Tax Rate (in this case, Rate 1).
Click Save Rule.
Now, whenever a Retail Customer purchases a Taxable Goods product, they will be taxed the
rate defined in Rate 1. Customers in the 90064 zip code will be charged 9% of the item price.
Customers in the rest of the state of California will be charged 8% of the item price.
Wholesale Customers, however, are only required to pay half the tax of Retail Customers.
Therefore, you would create a new Tax Rule. Select Wholesale Customer in the Customer
Tax Class drop-down, and Rate 2 (which is half the amount of Rate 1) in the Tax Rate dropdown. Now, whenever a Wholesale Customer purchases a Taxable Goods product, they will
be taxed the rate defined in Rate 2. Customers in the 90064 zip code will be charged 4.5% of
the item price. Customers in the rest of the state of California will be charged 4% of the item
price.
Again, there is another exception to the scenario defined in the first Tax Rule. Apparel is
taxed at half the rate as other Taxable Goods. Therefore, you would create another new Tax
Rule. Leave the Customer Tax Class as Retail Customer, but select Apparel in the Product Tax
Class drop-down, and Rate 2 (which is half the amount of Rate 1) in the Tax Rate drop-down.
Now, whenever a Retail Customer purchases an Apparel product, they will be taxed the rate
defined in Rate 2. Customers in the 90064 zip code will be charged 4.5% of the item price.
Customers in the rest of the state of California will be charged 4% of the item price.
But what if a Wholesale Customer purchases an Apparel item? They should be taxed at half
the rate defined in second or third scenarios, which is a quarter the rate defined in the first
scenario. Create a new Tax Rule. Select Wholesale Customer in the Customer Tax Class dropdown, Apparel in the Product Tax Class drop-down, and Rate 3 (which is a quarter the
amount of Rate 1) in the Tax Rate drop-down. Now, whenever a Wholesale Customer
purchases an Apparel product, they will be taxed the rate defined in Rate 3. Customers in
the 90064 zip code will be charged 2.25% of the item price. Customers in the rest of the
state of California will be charged 2% of the item price.
78
Shipping Options
Shipping Settings
Configure the Shipping Settings by navigating to System > Configuration and selecting the
Shipping Settings tab in the left column.
Origin
Enter the Country, Region/State, ZIP/Postal Code, and City from where the shipments will
be sent (i.e. the location of your company and/or warehouse). This value will be one half of
the equation used to calculate the shipping rates for the external shipping gateways (UPS,
USPS, FedEx and DHL). The customer’s shipping address will be the other half of the
equation. Additionally, if you choose to calculate the tax in an Order based on the Shipping
origin (which you can configure in the Sales tab), Magento will use the address from these
Origin fields.
Options
Allow Shipping to multiple addresses - If you select No, your customers can only
enter one shipping address per Order, where all the items in the Order will be
shipped. If you select Yes, your customers will have the option to ship to multiple
addresses. A link entitled Checkout with Multiple Addresses will appear in the
shopping cart, below the regular Proceed to Checkout button. In order to use this
checkout method, your customers must have a registered account, even if you have
chosen to allow guest checkout. From this checkout page, each unit of each item will
be divided up. Your customers can quantity to any product in the list, delete any
product, and choose a different address for each as well (or add a new address if
they don’t have the correct one saved in their address book yet).
79
The shipping method can be different for each address as well.
80
Maximum qty allowed for Shipping to multiple addresses - You can determine the
maximum quantity that a customer can enter in the Qty field for each item. When
the Update Qty & Addresses button is clicked, the quantity is split up, so that there
is a separate line for each unit. Entering a limit for this quantity would prevent a
customer from entering a very high number, such as 1,000,000, and potentially
causing the server to time out.
When an Order with multiple shipping addresses is completed, it will split into multiple
Orders. There will be one Order for each unique shipping address, and your customer will
receive separate email notifications for each shipping address as well. This is because in the
admin, there can only be one shipping address per order. Because the Order is split, each
Order in the admin is fulfilled the exact same way as a regular Order. For more information
on managing Orders and Order fulfillment, refer to Chapter 8: Managing Orders.
Shipping Methods
Configure the Shipping Methods by navigating to System > Configuration and selecting the
Shipping Methods tab in the left column.
81
Flat Rate
Enabled - Select Yes for the this method to be listed in the Shipping Method section
of the checkout. Select No for this method not to be listed.
Title - Enter the title of the shipping method as it will appear in the Shipping Method
list. All individual shipping methods contained within this title will display beneath it,
with a radio button that the customer can select.
Method Name - The external shipping gateways provide the names of the individual
shipping methods to Magento. Because this method is not an external gateway, you
must designate the name of the individual method here. The radio button that the
82
customer can select will appear next to this Method Name. There is only one
individual shipping method available, so there is only one field under Method Name.
Type - If you select Per Order, the Price that you designate below will be the
shipping charge for the entire Order. If you select Per Item, the Price will be
multiplied by the quantity of items in the Order.
Price - For the Flat Rate, you determine the amount your customers will be charged
for shipping.
Calculate Handling Fee - If you enter a Handling Fee below, this determines how the
Handling Fee will be calculated. It can be a fixed monetary amount, or a percentage
of the total shipping price.
Handling Fee - If you desire, you can enter a Handling Fee, which will add to the
Price. There is no indication in the Order that an additional Handling Fee has been
added to the shipping Price.
Displayed Error Message - If this shipping method is not available because the
customer does not meet the requirements set by the countries filter below, this
message will display in place of the radio button and Method Name. However, this
message will only display if the shipping method displays. This can be set in the
Show method if not applicable drop-down below.
Ship to applicable countries - Select which customers can use this shipping method.
All Allowed Countries means all customers from the default countries list can use
this shipping method. If you haven’t already configured the default list, it can be
done by navigating to System > Configuration, clicking the General tab, and selecting
each country you wish to allow from the Allow countries menu. If you want to
further reduce the number of countries to which your customers will be allowed to
ship Orders using this shipping method, select Specific Countries. This means that
only customers whose shipping address includes one of the countries listed in the
Ship to Specific countries list below can use this shipping method.
Ship to Specific countries - This list is inactive unless Specific Countries is selected
from the Ship to applicable countries list above. It basically works as a filter, so that
this shipping method will only be listed for those customers whose shipping address
is one of these selected countries.
Show method if not applicable - This drop-down only displays if you select Specific
Countries from the Ship to applicable countries drop-down above. This is because
selecting Specific Countries enables the countries filter, and this method will not be
applicable to any customer who is not from one of the selected countries. Here you
can determine whether or not the method will then be visible to them. If it is, it will
display with the message defined in the Displayed Error Message field above.
Sort Order - If you are choosing to allow multiple shipping methods, this will
determine in what order each method is listed in the front-end.
Table Rates
Enabled - Select Yes for the this method to be listed in the Shipping Method section
of the checkout. Select No for this method not to be listed.
83
Title - Enter the title of the shipping method as it will appear in the Shipping Method
list. All individual shipping methods contained within this title will display beneath it,
with a radio button that the customer can select.
Method Name - The external shipping gateways provide the names of the individual
shipping methods to Magento. Because this method is not an external gateway, you
must designate the name of the individual method here. The radio button that the
customer can select will appear next to this Method Name. There is only one
individual shipping method available, so there is only one field under Method Name.
Condition - This determines which aspects of the order will be used to select the
proper shipping price. Table Rates must be calculated using the Destination,
however the Destination can be calculated in conjunction with either the Weight,
Price, of # of Items. Depending on your selection, the .csv format that is required will
include columns defining the Destiantion, in addition to a column for either the
Weight, Price, or # of Items, respectively.
Export - This option can only be seen at the Website level. It is not a global option.
To use it, you must first select one of your Websites from the Current Configuration
Scope menu. This will produce a .csv file in the format necessary to enter rates given
the option chosen from the Condition drop-down. Enter the rates and other
applicable data into the file, and save. If the Condition was Price vs. Destination,
your .csv file might look something like this:
Import - This option can only be seen at the Website level. It is not a global option.
To use it, you must first select one of your Websites from the Current Configuration
Scope menu. Use this to locate the .csv file that you saved, and upload it, defining
the rate Magento will use for each scenario defined by the Condition.
Calculate Handling Fee - If you enter a Handling Fee below, this determines how the
Handling Fee will be calculated. It can be a fixed monetary amount, or a percentage
of the total shipping price.
Handling Fee - If you desire, you can enter a Handling Fee, which will add to the
shipping cost. There is no indication in the Order that an additional Handling Fee has
been added to the shipping cost.
Displayed Error Message - If this shipping method is not available because the
customer does not meet the requirements set by the countries filter below, this
message will display in place of the radio button and Method Name. However, this
message will only display if the shipping method displays. This can be set in the
Show method if not applicable drop-down below.
Ship to applicable countries - Select which customers can use this shipping method.
All Allowed Countries means all customers from the default countries list can use
this shipping method. If you haven’t already configured the default list, it can be
84
done by navigating to System > Configuration, clicking the General tab, and selecting
each country you wish to allow from the Allow countries menu. If you want to
further reduce the number of countries to which your customers will be allowed to
ship Orders using this shipping method, select Specific Countries. This means that
only customers whose shipping address includes one of the countries listed in the
Ship to Specific countries list below can use this shipping method.
Ship to Specific countries - This list is inactive unless Specific Countries is selected
from the Ship to applicable countries list above. It basically works as a filter, so that
this shipping method will only be listed for those customers whose shipping address
is one of these selected countries.
Show method if not applicable - This drop-down only displays if you select Specific
Countries from the Ship to applicable countries drop-down above. This is because
selecting Specific Countries enables the countries filter, and this method will not be
applicable to any customer who is not from one of the selected countries. Here you
can determine whether or not the method will then be visible to them. If it is, it will
display with the message defined in the Displayed Error Message field above. If this
method is not available because you have not defined the customer’s shipping
address in your rates, this method will not display as an available shipping method
during checkout.
Sort Order - If you are choosing to allow multiple shipping methods, this will
determine in what order each method is listed in the front-end.
Free Shipping
Enabled - Select Yes for the this method to be listed in the Shipping Method section
of the checkout. Select No for this method not to be listed.
Title - Enter the title of the shipping method as it will appear in the Shipping Method
list. All individual shipping methods contained within this title will display beneath it,
with a radio button that the customer can select.
Method Name - The external shipping gateways provide the names of the individual
shipping methods to Magento. Because this method is not an external gateway, you
must designate the name of the individual method here. The radio button that the
customer can select will appear next to this Method Name. There is only one
individual shipping method available, so there is only one field under Method Name.
Minimum order amount - You can designate that Free Shipping will only be offered
to your customers if they have ordered a minimum monetary amount of products. If
this minimum is not reached, this option will not appear in the Shipping Method list.
Displayed Error Message - If this shipping method is not available because the
customer does not meet the requirements set by the countries filter below, this
message will display in place of the radio button and Method Name. However, this
message will only display if the shipping method displays. This can be set in the
Show method if not applicable drop-down below.
Ship to applicable countries - Select which customers can use this shipping method.
All Allowed Countries means all customers from the default countries list can use
this shipping method. If you haven’t already configured the default list, it can be
85
done by navigating to System > Configuration, clicking the General tab, and selecting
each country you wish to allow from the Allow countries menu. If you want to
further reduce the number of countries to which your customers will be allowed to
ship Orders using this shipping method, select Specific Countries. This means that
only customers whose shipping address includes one of the countries listed in the
Ship to Specific countries list below can use this shipping method.
Ship to Specific countries - This list is inactive unless Specific Countries is selected
from the Ship to applicable countries list above. It basically works as a filter, so that
this shipping method will only be listed for those customers whose shipping address
is one of these selected countries.
Show method if not applicable - This drop-down only displays if you select Specific
Countries from the Ship to applicable countries drop-down above. This is because
selecting Specific Countries enables the countries filter, and this method will not be
applicable to any customer who is not from one of the selected countries. Here you
can determine whether or not the method will then be visible to them. If it is, it will
display with the message defined in the Displayed Error Message field above.
Sort Order - If you are choosing to allow multiple shipping methods, this will
determine in what order each method is listed in the front-end.
86
UPS
Enabled - Select Yes for the this method to be listed in the Shipping Method section
of the checkout. Select No for this method not to be listed.
UPS type - To use United Parcel Service XML, you need to have a license number
and password.
Gateway URL - This is the URL which Magento uses to connect to UPS and receive
live shipping rates. It will be prepopulated by default.
Title - Enter the title of the shipping method as it will appear in the Shipping Method
list. All individual shipping methods contained within this title (listed in the Allowed
Methods list below) will display beneath it, with a radio button that the customer
can select.
87
Container - Select the container type that you typically use to package the products
ordered from your store. UPS will only deliver packages weighing up to 150 lbs.
Destination Type - Select the destination to which you typically deliver your Orders,
Residential or Commercial.
Handling Fee - If you desire, you can enter a Handling Fee, which will add to the
shipping cost provided by UPS. There is no indication in the Order that an additional
Handling Fee has been added to the shipping cost.
Pickup method - Select the method by which you prefer to deliver your packages to
UPS.
Allowed Methods - UPS offers a variety of shipping methods. You can choose which
of this carrier’s shipping methods to allow by selecting them from this menu. The
methods you select will display on the front-end under the Title you designate for
UPS.
Free Method - In this drop-down, you can select which of this carrier’s shipping
methods you want to offer your customers for free. Or, you can select None. This is
similar to the Free Shipping method above, however it will be listed with the UPS
section and contain the name of the UPS shipping method, so that your customers
know exactly by which method their order will be shipped to them.
Minimum order amount for free shipping - Also similar to the Free Shipping method
above, you can designate the minimum monetary amount of products your
customers need to purchase in order for this shipping method to be free. If this
minimum is not reached, this option will still appear in the list of UPS methods,
however it will cost the amount designated by UPS. This field will be inactive if you
select None for Free Method above.
Displayed Error Message - If this shipping method is not available because the
customer does not meet the requirements set by the countries filter below, this
message will display in place of the radio button and Method Name. However, this
message will only display if the shipping method displays. This can be set in the
Show method if not applicable drop-down below.
Ship to applicable countries - Select which customers can use this shipping method.
All Allowed Countries means all customers from the default countries list can use
this shipping method. If you haven’t already configured the default list, it can be
done by navigating to System > Configuration, clicking the General tab, and selecting
each country you wish to allow from the Allow countries menu. If you want to
further reduce the number of countries to which your customers will be allowed to
ship Orders using this shipping method, select Specific Countries. This means that
only customers whose shipping address includes one of the countries listed in the
Ship to Specific countries list below can use this shipping method.
Ship to Specific countries - This list is inactive unless Specific Countries is selected
from the Ship to applicable countries list above. It basically works as a filter, so that
this shipping method will only be listed for those customers whose shipping address
is one of these selected countries.
Show method if not applicable - This drop-down only displays if you select Specific
Countries from the Ship to applicable countries drop-down above. This is because
88
selecting Specific Countries enables the countries filter, and this method will not be
applicable to any customer who is not from one of the selected countries. Here you
can determine whether or not the method will then be visible to them. If it is, it will
display with the message defined in the Displayed Error Message field above. If this
method is not available because UPS does not deliver to the customer’s shipping
address, this method will automatically display with the Displayed Error Message.
Sort Order - If you are choosing to allow multiple shipping methods, this will
determine in what order each method is listed in the front-end.
USPS
Enabled - Select Yes for the this method to be listed in the Shipping Method section
of the checkout. Select No for this method not to be listed.
Gateway URL - This is the URL which Magento uses to connect to USPS and receive
live shipping rates. It will be prepopulated by default.
Title - Enter the title of the shipping method as it will appear in the Shipping Method
list. All individual shipping methods contained within this title (listed in the Allowed
Methods list below) will display beneath it, with a radio button that the customer
can select.
User ID - You must create an account with USPS, and this value will provided by
them.
Container - Select the container type that you typically use to package the products
ordered from your store. USPS will only deliver packages weighing up to 70 lbs.
Size - Select the container size that you typically use to package the products
ordered from your store.
Machinable - It is recommended that you select Yes.
Handling Fee - If you desire, you can enter a Handling Fee, which will add to the
shipping cost provided by USPS. There is no indication in the Order that an
additional Handling Fee has been added to the shipping cost.
Allowed Methods - USPS offers a variety of shipping methods. You can choose
which of this carrier’s shipping methods to allow by selecting them from this menu.
The methods you select will display on the front-end under the Title you designate
for USPS.
Free Method - In this drop-down, you can select which of this carrier’s shipping
methods you want to offer your customers for free. Or, you can select None. This is
similar to the Free Shipping method above, however it will be listed with the USPS
section and contain the name of the USPS shipping method, so that your customers
know exactly by which method their order will be shipped to them.
Minimum order amount for free shipping - Also similar to the Free Shipping method
above, you can designate the minimum monetary amount of products your
customers need to purchase in order for this shipping method to be free. If this
minimum is not reached, this option will still appear in the list of USPS methods,
however it will cost the amount designated by USPS. This field will be inactive if you
select None for Free Method above.
89
Displayed Error Message - If this shipping method is not available because the
customer does not meet the requirements set by the countries filter below, this
message will display in place of the radio button and Method Name. However, this
message will only display if the shipping method displays. This can be set in the
Show method if not applicable drop-down below.
Ship to applicable countries - Select which customers can use this shipping method.
All Allowed Countries means all customers from the default countries list can use
this shipping method. If you haven’t already configured the default list, it can be
done by navigating to System > Configuration, clicking the General tab, and selecting
each country you wish to allow from the Allow countries menu. If you want to
further reduce the number of countries to which your customers will be allowed to
ship Orders using this shipping method, select Specific Countries. This means that
only customers whose shipping address includes one of the countries listed in the
Ship to Specific countries list below can use this shipping method.
Ship to Specific countries - This list is inactive unless Specific Countries is selected
from the Ship to applicable countries list above. It basically works as a filter, so that
this shipping method will only be listed for those customers whose shipping address
is one of these selected countries.
Show method if not applicable - This drop-down only displays if you select Specific
Countries from the Ship to applicable countries drop-down above. This is because
selecting Specific Countries enables the countries filter, and this method will not be
applicable to any customer who is not from one of the selected countries. Here you
can determine whether or not the method will then be visible to them. If it is, it will
display with the message defined in the Displayed Error Message field above. If this
method is not available because USPS does not deliver to the customer’s shipping
address, this method will automatically display with the Displayed Error Message.
Sort Order - If you are choosing to allow multiple shipping methods, this will
determine in what order each method is listed in the front-end.
FedEx
Enabled - Select Yes for the this method to be listed in the Shipping Method section
of the checkout. Select No for this method not to be listed.
Gateway URL - This is the URL which Magento uses to connect to FedEx and receive
live shipping rates. It will be prepopulated by default.
Title - Enter the title of the shipping method as it will appear in the Shipping Method
list. All individual shipping methods contained within this title (listed in the Allowed
Methods list below) will display beneath it, with a radio button that the customer
can select.
Account ID - You must create an account with FedEx, and this value will provided by
them.
Packaging - Select the container type that you typically use to package the products
ordered from your store. If you select a smaller package size, but the weight of a
product in the Order is large, FedEx may not return any results. FedEx will only
deliver packages weighing up to 150 lbs.
90
Dropoff - Select the method by which you prefer to deliver your packages to UPS.
Handling Fee - If you desire, you can enter a Handling Fee, which will add to the
shipping cost provided by FedEx. There is no indication in the Order that an
additional Handling Fee has been added to the shipping cost.
Allowed Methods - FedEx offers a variety of shipping methods. You can choose
which of this carrier’s shipping methods to allow by selecting them from this menu.
The methods you select will display on the front-end under the Title you designate
for FedEx.
Free Method - In this drop-down, you can select which of this carrier’s shipping
methods you want to offer your customers for free. Or, you can select None. This is
similar to the Free Shipping method above, however it will be listed with the FedEx
section and contain the name of the FedEx shipping method, so that your customers
know exactly by which method their order will be shipped to them.
Minimum order amount for free shipping - Also similar to the Free Shipping method
above, you can designate the minimum monetary amount of products your
customers need to purchase in order for this shipping method to be free. If this
minimum is not reached, this option will still appear in the list of FedEx methods,
however it will cost the amount designated by FedEx. This field will be inactive if you
select None for Free Method above.
Displayed Error Message - If this shipping method is not available because the
customer does not meet the requirements set by the countries filter below, this
message will display in place of the radio button and Method Name. However, this
message will only display if the shipping method displays. This can be set in the
Show method if not applicable drop-down below.
Ship to applicable countries - Select which customers can use this shipping method.
All Allowed Countries means all customers from the default countries list can use
this shipping method. If you haven’t already configured the default list, it can be
done by navigating to System > Configuration, clicking the General tab, and selecting
each country you wish to allow from the Allow countries menu. If you want to
further reduce the number of countries to which your customers will be allowed to
ship Orders using this shipping method, select Specific Countries. This means that
only customers whose shipping address includes one of the countries listed in the
Ship to Specific countries list below can use this shipping method.
Ship to Specific countries - This list is inactive unless Specific Countries is selected
from the Ship to applicable countries list above. It basically works as a filter, so that
this shipping method will only be listed for those customers whose shipping address
is one of these selected countries.
Show method if not applicable - This drop-down only displays if you select Specific
Countries from the Ship to applicable countries drop-down above. This is because
selecting Specific Countries enables the countries filter, and this method will not be
applicable to any customer who is not from one of the selected countries. Here you
can determine whether or not the method will then be visible to them. If it is, it will
display with the message defined in the Displayed Error Message field above. If this
91
method is not available because FedEx does not deliver to the customer’s shipping
address, this method will automatically display with the Displayed Error Message.
Sort Order - If you are choosing to allow multiple shipping methods, this will
determine in what order each method is listed in the front-end.
DHL
Enabled - Select Yes for the this method to be listed in the Shipping Method section
of the checkout. Select No for this method not to be listed.
Title - Enter the title of the shipping method as it will appear in the Shipping Method
list. All individual shipping methods contained within this title (listed in the Allowed
Methods list below) will display beneath it, with a radio button that the customer
can select.
Gateway URL - This is the URL which Magento uses to connect to DHL and receive
live shipping rates. It will be prepopulated by default.
Access ID - You must create an account with DHL, and this value will provided by
them.
Password - You must create an account with DHL, and this value will provided by
them.
Account Number - You must create an account with DHL, and this value will
provided by them.
Shipping Key - You must create an account with DHL, and this value will provided by
them.
Shipping Key (International) - You must create an account with DHL, and this value
will provided by them.
Shipment Type - Select the container type that you typically use to package the
products ordered from your store. If you select a smaller package size, but the
weight of a product in the Order is large, DHL may not return any results. DHL will
only deliver packages weighing up to 150 lbs.
Handling Fee - If you desire, you can enter a Handling Fee, which will add to the
shipping cost provided by DHL. There is no indication in the Order that an additional
Handling Fee has been added to the shipping cost.
Shipment Dutiable - Indicates whether or not international duty charges can be
applied to the shipment.
Package Description - The content description of the shipment entered in this field
will appear in the online tracking results.
Shipment Duty Payment Type - Indicates from which party the international duty
charges will be paid.
Allowed Methods - DHL offers a variety of shipping methods. You can choose which
of this carrier’s shipping methods to allow by selecting them from this menu. The
methods you select will display on the front-end under the Title you designate for
DHL.
Free Method - In this drop-down, you can select which of this carrier’s shipping
methods you want to offer your customers for free. Or, you can select None. This is
similar to the Free Shipping method above, however it will be listed with the DHL
92
section and contain the name of the DHL shipping method, so that your customers
know exactly by which method their order will be shipped to them.
Minimum order amount for free shipping - Also similar to the Free Shipping method
above, you can designate the minimum monetary amount of products your
customers need to purchase in order for this shipping method to be free. If this
minimum is not reached, this option will still appear in the list of DHL methods,
however it will cost the amount designated by DHL. This field will be inactive if you
select None for Free Method above.
Displayed Error Message - If this shipping method is not available because the
customer does not meet the requirements set by the countries filter below, this
message will display in place of the radio button and Method Name. However, this
message will only display if the shipping method displays. This can be set in the
Show method if not applicable drop-down below.
Ship to applicable countries - Select which customers can use this shipping method.
All Allowed Countries means all customers from the default countries list can use
this shipping method. If you haven’t already configured the default list, it can be
done by navigating to System > Configuration, clicking the General tab, and selecting
each country you wish to allow from the Allow countries menu. If you want to
further reduce the number of countries to which your customers will be allowed to
ship Orders using this shipping method, select Specific Countries. This means that
only customers whose shipping address includes one of the countries listed in the
Ship to Specific countries list below can use this shipping method.
Ship to Specific countries - This list is inactive unless Specific Countries is selected
from the Ship to applicable countries list above. It basically works as a filter, so that
this shipping method will only be listed for those customers whose shipping address
is one of these selected countries.
Show method if not applicable - This drop-down only displays if you select Specific
Countries from the Ship to applicable countries drop-down above. This is because
selecting Specific Countries enables the countries filter, and this method will not be
applicable to any customer who is not from one of the selected countries. Here you
can determine whether or not the method will then be visible to them. If it is, it will
display with the message defined in the Displayed Error Message field above. If this
method is not available because DHL does not deliver to the customer’s shipping
address, this method will automatically display with the Displayed Error Message.
Sort Order - If you are choosing to allow multiple shipping methods, this will
determine in what order each method is listed in the front-end.
Accepting Money
Overview of set up and front-end functionality of gateways - Magento offers you many
different options for accepting payments from customers. There are both offline payment
methods, and online payment methods. For the online methods, Magento supports
integration with several third party payment gateways, so that customer credit card
information will automatically sent through the gateway (as either an authorization, or an
93
authorization and charge) upon completion of an order. To configure your payment settings,
navigate to System > Configuration, and click Payment Methods in the left column. Each
payment method will have its own section which can be configured. There are several PayPal
methods. Because some of these methods share account information, there is a separate
tab in the left column called PayPal Accounts, in which you can enter the account
information for the corresponding PayPal method(s) which you have enabled from the
Payment Methods tab. Google Checkout is entirely contained within a separate tab, called
Google API, so that there are no settings for Google Checkout in the Payment Methods tab.
Payment Methods and PayPal Accounts
Saved CC
If you do not have a payment gateway, but still want to accept Credit Cards for processing
offline, you can capture the credit card information using the Saved Credit Card payment
method.
94
Setup
Enabled - Select Yes for the this method to be listed in the Payment Information
section of the checkout. Select No for this method not to be listed.
Title - Enter the name of the payment method as it will appear in the Payment
Information list.
New Order Status - Select the Order Status of all new Orders created using this
payment method from the drop-down. The recommended status is Pending, as this
is intended to apply to Orders which have not had any actions performed on them,
however you can change this to whichever status you prefer.
Credit Card Types - Select the options which will appear in the Credit Card Type
drop-down on the front-end.
95
Credit Card Verification - Select whether or not the customer will be required to
enter their Credit Card Verification number during checkout.
Payment from applicable countries - Select which customers can use this payment
method. All Allowed Countries means all customers from the default countries list
can use this payment method. If you haven’t already configured the default list, it
can be done by navigating to System > Configuration, clicking the General tab, and
selecting each country you wish to allow from the Allow countries menu. If you
want to further reduce the number of countries from which your customers will be
allowed to use this payment method, select Specific Countries. This means that only
customers whose billing address includes one of the countries listed in the Payment
from Specific countries list below can use this payment method.
Payment from Specific countries - This list is inactive unless Specific Countries is
selected from the Payment from applicable countries list above. It basically works
as a filter, so that this payment method will only be listed for those customers
whose billing address is one of these selected countries.
Minimum/Maximum Order Total - These fields also work as filters. This payment
method will only be listed for those customers whose order total is above the
minimum (if a value is entered) and below the maximum (if a value is entered).
Sort Order - If you are choosing to allow multiple payment methods, this will
determine in what order each method is listed in the front-end.
Functionality on Front-End and Back-End
When the customer selects this method from the payment method list, they will be
required to enter the Name on Card, select the Credit Card Type, enter the Credit
Card Number, and select the Expiration Date. If enabled, they will also be required
to enter the Card Verification Number.
96
The completed Order will display the information entered by the customer in the
Payment Information box, except for the Card Verification Number.
Zero Subtotal Checkout
If a customer places an order and the subtotal is equal to zero, you can offer them this
payment method, whereby they will not be required to enter any payment information.
Unlike the other payment methods, for which you can set order amount filters, this method
contains an intrinsic order amount filter, so that the method will not display unless the
subtotal is equal to zero.
Setup
Enabled - Select Yes for the this method to be listed in the Payment Information
section of the checkout. Select No for this method not to be listed.
Title - Enter the name of the payment method as it will appear in the Payment
Information list.
New Order Status - Select the Order Status of all new Orders created using this
payment method from the drop-down. The recommended status is Pending, as this
is intended to apply to Orders which have not had any actions performed on them,
however you can change this to whichever status you prefer.
97
Payment from applicable countries - Select which customers can use this payment
method. All Allowed Countries means all customers from the default countries list
can use this payment method. If you haven’t already configured the default list, it
can be done by navigating to System > Configuration, clicking the General tab, and
selecting each country you wish to allow from the Allow countries menu. If you
want to further reduce the number of countries from which your customers will be
allowed to use this payment method, select Specific Countries. This means that only
customers whose billing address includes one of the countries listed in the Payment
from Specific countries list below can use this payment method.
Payment from Specific countries - This list is inactive unless Specific Countries is
selected from the Payment from applicable countries list above. It basically works
as a filter, so that this payment method will only be listed for those customers
whose billing address is one of these selected countries.
Sort Order - If you are choosing to allow multiple payment methods, this will
determine in what order each method is listed in the front-end.
Functionality on Front-End and Back-End
When the customer selects this method from the payment method list, they will not
be required to enter any information.
The completed Order will display the Title in the Payment Information box.
Check/Money Order
Setup
Title - Enter the name of the payment method as it will appear in the Payment
Information list.
Enabled - Select Yes for the this method to be listed in the Payment Information
section of the checkout. Select No for this method not to be listed.
New Order Status - Select the Order Status of all new Orders created using this
payment method from the drop-down. The recommended status is Pending, as this
is intended to apply to Orders which have not had any actions performed on them,
however you can change this to whichever status you prefer.
Payment from applicable countries - Select which customers can use this payment
method. All Allowed Countries means all customers from the default countries list
can use this payment method. If you haven’t already configured the default list, it
can be done by navigating to System > Configuration, clicking the General tab, and
selecting each country you wish to allow from the Allow countries menu. If you
want to further reduce the number of countries from which your customers will be
allowed to use this payment method, select Specific Countries. This means that only
customers whose billing address includes one of the countries listed in the Payment
from Specific countries list below can use this payment method.
Payment from Specific countries - This list is inactive unless Specific Countries is
selected from the Payment from applicable countries list above. It basically works
98
as a filter, so that this payment method will only be listed for those customers
whose billing address is one of these selected countries.
Make Check payable to - The value entered here will display when the customer
selects this method from the list.
Send Check to - The value entered here will display when the customer selects this
method from the list.
Minimum/Maximum Order Total - These fields also work as filters. This payment
method will only be listed for those customers whose order total is above the
minimum (if a value is entered) and below the maximum (if a value is entered).
Sort Order - If you are choosing to allow multiple payment methods, this will
determine in what order each method is listed in the front-end.
Functionality on Front-End and Back-End
When the customer selects this method from the payment method list, they will not
be required to enter any information. Instead, the Make Check payable to and Send
Check to values will display.
The completed Order will also display these two values, in the Payment Information
box.
Purchase Order
Setup
Enabled - Select Yes for the this method to be listed in the Payment Information
section of the checkout. Select No for this method not to be listed.
Title - Enter the name of the payment method as it will appear in the Payment
Information list.
99
New Order Status - Select the Order Status of all new Orders created using this
payment method from the drop-down. The recommended status is Pending, as this
is intended to apply to Orders which have not had any actions performed on them,
however you can change this to whichever status you prefer.
Payment from applicable countries - Select which customers can use this payment
method. All Allowed Countries means all customers from the default countries list
can use this payment method. If you haven’t already configured the default list, it
can be done by navigating to System > Configuration, clicking the General tab, and
selecting each country you wish to allow from the Allow countries menu. If you
want to further reduce the number of countries from which your customers will be
allowed to use this payment method, select Specific Countries. This means that only
customers whose billing address includes one of the countries listed in the Payment
from Specific countries list below can use this payment method.
Payment from Specific countries - This list is inactive unless Specific Countries is
selected from the Payment from applicable countries list above. It basically works
as a filter, so that this payment method will only be listed for those customers
whose billing address is one of these selected countries.
Minimum/Maximum Order Total - These fields also work as filters. This payment
method will only be listed for those customers whose order total is above the
minimum (if a value is entered) and below the maximum (if a value is entered).
Sort Order - If you are choosing to allow multiple payment methods, this will
determine in what order each method is listed in the front-end.
Functionality on Front-End and Back-End
When the customer selects this method from the payment method list, the
customer will be required to enter the Purchase Order Number.
The completed Order will display the Purchase Order Number in the Payment
Information box.
100
Authorize.net
Setup
Enabled - Select Yes for the this method to be listed in the Payment Information
section of the checkout. Select No for this method not to be listed.
Title - Enter the name of the payment method as it will appear in the Payment
Information list.
API Login ID - Enter your Authorize.net API login ID, which can be be found in the
Account Settings of your Authorize.net account.
Payment Action - Authorize.net is an online payment method. Therefore, the credit
card must be Authorized by the payment gateway when the order is submitted, in
order for it to complete. However, you can choose whether you want to Authorize
Only, or Authorize and Capture the payment simultaneously during the Order
creation. If you choose to Authorize and Capture, an Invoice will automatically be
created for the full quantity of items in the Order. For more information about
Invoices, refer to Chapter 8: Managing Orders.
Transaction Key - Enter your Authorize.net transaction key, which can be be found
in the Account Settings of your Authorize.net account.
New Order Status - Select the Order Status of all new Orders created using this
payment method from the drop-down. The recommended status is Pending, as this
is intended to apply to Orders which have not had any actions performed on them,
however you can change this to whichever status you prefer.
Test Mode - Select whether or not the Orders placed using this payment method will
be test Orders. Before you take your site live you will want to make sure you set this
drop-down to No.
Gateway URL - This is the URL to which the Order information will be sent. By
default it is populated with https://secure.authorize.net/gateway/transact.dll. The
test mode drop-down will send a notification to Authorize.net that the Order should
be sent to their test site, however, there are test sites featured by Authorize.net in
addition to the one designated by Magento. If you prefer to use an alternate test
site, you can enter the URL in this field. However, the URL of the live site must be
reentered before you take your site live.
Debug - If you select Yes, all requests between Magento and Authorize.net will be
saved in the Magento database.
Email customer - Specify whether you want Authorize.net to send emails to your
customers on the completion of checkout. This does not influence the order
confirmation email and other transactional emails sent from Magento, only the
emails sent from your Authorize.net account.
Merchant’s email - Designate whether you would like Authorize.net to send you
email notifications of orders placed using this payment method by entering the
email address associated with your account in this field. If it is left blank, no emails
will be sent by Authorize.net
Credit Card Types - Select the options which will appear in the Credit Card Type
drop-down on the front-end.
101
Credit Card Verification - Select whether or not the customer will be required to
enter their Credit Card Verification number during checkout.
payment from applicable countries - Select which customers can use this payment
method. All Allowed Countries means all customers from the default countries list
can use this payment method. If you haven’t already configured the default list, it
can be done by navigating to System > Configuration, clicking the General tab, and
selecting each country you wish to allow from the Allow countries menu. If you
want to further reduce the number of countries from which your customers will be
allowed to use this payment method, select Specific Countries. This means that only
customers whose billing address includes one of the countries listed in the Payment
from Specific countries list below can use this payment method.
payment from Specific countries - This list is inactive unless Specific Countries is
selected from the Payment from applicable countries list above. It basically works
as a filter, so that this payment method will only be listed for those customers
whose billing address is one of these selected countries.
Minimum/Maximum Order Total - These fields also work as filters. This payment
method will only be listed for those customers whose order total is above the
minimum (if a value is entered) and below the maximum (if a value is entered).
Sort Order - If you are choosing to allow multiple payment methods, this will
determine in what order each method is listed in the front-end.
Functionality on Front-End and Back-End
When the customer selects this method from the payment method list, they will be
required to enter the Name on Card, select the Credit Card Type, enter the Credit
Card Number, and select the Expiration Date. If enabled, they will also be required
to enter the Card Verification Number.
The completed Order will display the information entered by the customer in the
Payment Information box, except for the Card Verification Number.
PayflowPro
Setup
Enabled - Select Yes for the this method to be listed in the Payment Information
section of the checkout. Select No for this method not to be listed.
Title - Enter the name of the payment method as it will appear in the Payment
Information list.
User - This value is provided when you sign up for your PayflowPro account.
Vendor - This value is provided when you sign up for your PayflowPro account.
Payment Action - PayflowPro is an online payment method. Therefore, the credit
card must be Authorized by the payment gateway when the order is submitted, in
order for it to complete. However, you can choose whether you want to Authorize
Only, or Authorize and Capture the payment simultaneously during the Order
creation. If you choose to Authorize and Capture, an Invoice will automatically be
102
created for the full quantity of items in the Order. For more information about
Invoices, refer to Chapter 8: Managing Orders.
VERBOSITY - The Verbosity level controls the detail of the transaction results (such
as declines or errors) which are returned by PayflowPro. Entering Low normalizes
the transaction results by reducing the variation of the result messages to a set of
nine specific possibilities. Entering Medium does not normalize the results, allowing
for greater variation in these messages. For security purposes, it is recommended
that you select Low.
TENDER - Enter the code referring to the method of payment which you will be
accepting through PayflowPro. The codes are:
o A = Automated clearinghouse
o C = Credit card
o D = Pinless debit
o K = Telecheck
o P = PayPal
Magento is configured to support Tender type C.
URL This is the URL to which the Order information will be sent. By default it is
populated with https://pilot-payflowpro.verisign.com/transaction. This is the URL
for the test site. Before you take your site live you will want to make sure you
remove “pilot-” from this URL.
New Order Status - Select the Order Status of all new Orders created using this
payment method from the drop-down. The recommended status is Pending, as this
is intended to apply to Orders which have not had any actions performed on them,
however you can change this to whichever status you prefer.
Partner - This value is provided when you sign up for your PayflowPro account.
Password - This value is provided when you sign up for your PayflowPro account.
Debug - If you select Yes, all requests between Magento and PayflowPro will be
saved in the Magento database.
Credit Card Types - Select the options which will appear in the Credit Card Type
drop-down on the front-end.
Credit Card Verification - Select whether or not the customer will be required to
enter their Credit Card Verification number during checkout.
payment from applicable countries - Select which customers can use this payment
method. All Allowed Countries means all customers from the default countries list
can use this payment method. If you haven’t already configured the default list, it
can be done by navigating to System > Configuration, clicking the General tab, and
selecting each country you wish to allow from the Allow countries menu. If you
want to further reduce the number of countries from which your customers will be
allowed to use this payment method, select Specific Countries. This means that only
customers whose billing address includes one of the countries listed in the Payment
from Specific countries list below can use this payment method.
payment from Specific countries - This list is inactive unless Specific Countries is
selected from the Payment from applicable countries list above. It basically works
as a filter, so that this payment method will only be listed for those customers
whose billing address is one of these selected countries.
103
Minimum/Maximum Order Total - These fields also work as filters. This payment
method will only be listed for those customers whose order total is above the
minimum (if a value is entered) and below the maximum (if a value is entered).
Sort Order - If you are choosing to allow multiple payment methods, this will
determine in what order each method is listed in the front-end.
Functionality on Front-End and Back-End
When the customer selects this method from the payment method list, they will be
required to enter the Name on Card, select the Credit Card Type, enter the Credit
Card Number, and select the Expiration Date. If enabled, they will also be required
to enter the Card Verification Number.
The completed Order will display the information entered by the customer in the
Payment Information box, except for the Card Verification Number.
PayPal Express
Paypal Express is not compatible with Checkout with Multiple Addresses.
Setup
Enabled - Select Yes for the this method to be listed in the Payment Information
section of the checkout. Select No for this method not to be listed.
Title - Enter the name of the payment method as it will appear in the Payment
Information list.
Payment Action - PayPal Express is an online payment method. Therefore, the credit
card must be Authorized by the payment gateway when the order is submitted, in
order for it to complete. However, you can choose whether you want to Authorize
Only, or Authorize and Capture the payment simultaneously during the Order
creation. If you choose to Authorize and Capture, an Invoice will automatically be
created for the full quantity of items in the Order. For more information about
Invoices, refer to Chapter 8: Managing Orders.
New Order Status - Select the Order Status of all new Orders created using this
payment method from the drop-down. The recommended status is Pending, as this
is intended to apply to Orders which have not had any actions performed on them,
however you can change this to whichever status you prefer.
payment from applicable countries - Select which customers can use this payment
method. All Allowed Countries means all customers from the default countries list
can use this payment method. If you haven’t already configured the default list, it
can be done by navigating to System > Configuration, clicking the General tab, and
selecting each country you wish to allow from the Allow countries menu. If you
want to further reduce the number of countries from which your customers will be
allowed to use this payment method, select Specific Countries. This means that only
customers whose billing address includes one of the countries listed in the Payment
from Specific countries list below can use this payment method.
payment from Specific countries - This list is inactive unless Specific Countries is
selected from the Payment from applicable countries list above. It basically works
as a filter, so that this payment method will only be listed for those customers
whose billing address is one of these selected countries.
104
Sort Order - If you are choosing to allow multiple payment methods, this will
determine in what order each method is listed in the front-end.
Account Information - To enable this as a payment method, you’ll need a Website
Payments Pro account. To get one, go to www.paypal.com and click on “Merchant
Services”. It is free to register. You will receive the account information for this
payment method, and it can entered in the PayPal Accounts tab, in the Website
Payments Pro section. PayPal Direct also requires and Website Payments Pro
account, and these two methods will share the same account information, so you
probably would not enable both methods at the same time.
o API Username - Enter your API username (provided by PayPal). You can
locate it by clicking on the API Credentials link in your PayPal seller account.
o API Password - Enter your API password (provided by PayPal). You can
locate it by clicking on the API Credentials link in your PayPal seller account.
o API Signature - Enter your API signature (provided by PayPal). You can locate
it by clicking on the API Credentials link in your PayPal seller account.
o Proxy Host - Enter the proxy host.
o Proxy Port - Enter the proxy port.
o Sandbox Flag - If testing, select Yes. If using in an active environment, select
No.
o Use Proxy - This is used if the server has a firewall, and there’s no direct
access to the PayPal server. You can use a third party server to relay the
traffic.
Functionality on Front-End and Back-End
When the customer selects this method from the payment method list, they will see
the message: Your billing address will be ignored and you will be redirected to
PayPal website. When they press Continue, instead of navigating to the Order
Review tab in the checkout, they will be redirected to the PayPal website, where
they can review the order information. When the order is submitted in PayPal, the
order will be created in Magento, and the customer will be redirected back to
Magento.
105
The completed Order will display the shipping address information that Magento
receives from PayPal Express. PayPal Express does not send billing address
information to Magento, and this section will be empty. The Payment information
box will only contain the payment method.
PayPal Direct
Setup
Enabled - Select Yes for the this method to be listed in the Payment Information
section of the checkout. Select No for this method not to be listed.
Title - Enter the name of the payment method as it will appear in the Payment
Information list.
New Order Status - Select the Order Status of all new Orders created using this
payment method from the drop-down. The recommended status is Pending, as this
is intended to apply to Orders which have not had any actions performed on them,
however you can change this to whichever status you prefer.
Payment Action - PayPal Direct is an online payment method. Therefore, the credit
card must be Authorized by the payment gateway when the order is submitted, in
order for it to complete. However, you can choose whether you want to Authorize
Only, or Authorize and Capture the payment simultaneously during the Order
creation. If you choose to Authorize and Capture, an Invoice will automatically be
created for the full quantity of items in the Order. For more information about
Invoices, refer to Chapter 8: Managing Orders.
Credit Card Types - Select the options which will appear in the Credit Card Type
drop-down on the front-end.
payment from applicable countries - Select which customers can use this payment
method. All Allowed Countries means all customers from the default countries list
can use this payment method. If you haven’t already configured the default list, it
can be done by navigating to System > Configuration, clicking the General tab, and
selecting each country you wish to allow from the Allow countries menu. If you
want to further reduce the number of countries from which your customers will be
allowed to use this payment method, select Specific Countries. This means that only
customers whose billing address includes one of the countries listed in the Payment
from Specific countries list below can use this payment method.
payment from Specific countries - This list is inactive unless Specific Countries is
selected from the Payment from applicable countries list above. It basically works as
a filter, so that this payment method will only be listed for those customers whose
billing address is one of these selected countries.
Sort Order - If you are choosing to allow multiple payment methods, this will
determine in what order each method is listed in the front-end.
Account Information - To enable this as a payment method, you’ll need a Website
Payments Pro account. To get one, go to www.paypal.com and click on “Merchant
Services”. It is free to register. You will receive the account information for this
payment method, and it can entered in the PayPal Accounts tab, in the Website
Payments Pro section. PayPal Express also requires and Website Payments Pro
account, and these two methods will share the same account information, so you
probably would not enable both methods at the same time.
o API Username - Enter your API username (provided by PayPal). You can
locate it by clicking on the API Credentials link in your PayPal seller account.
o API Password - Enter your API password (provided by PayPal). You can
locate it by clicking on the API Credentials link in your PayPal seller account.
106
o
o
o
o
o
API Signature - Enter your API signature (provided by PayPal). You can locate
it by clicking on the API Credentials link in your PayPal seller account.
Proxy Host - Enter the proxy host.
Proxy Port - Enter the proxy port.
Sandbox Flag - If testing, select Yes. If using in an active environment, select
No.
Use Proxy - This is used if the server has a firewall, and there’s no direct
access to the PayPal server. You can use a third party server to relay the
traffic.
Functionality on Front-End and Back-End
When the customer selects this method from the payment method list, they will be
required to enter the Name on Card, select the Credit Card Type, enter the Credit
Card Number, select the Expiration Date, and enter the Card Verification Number.
The completed Order will display the information entered by the customer in the
Payment Information box, except for the Card Verification Number.
PayPal Standard
Setup
Enabled - Select Yes for the this method to be listed in the Payment Information
section of the checkout. Select No for this method not to be listed.
Title - Enter the name of the payment method as it will appear in the Payment
Information list.
Payment Action - PayPal Standard is an online payment method. Therefore, the
credit card must be Authorized by the payment gateway when the order is
submitted, in order for it to complete. However, you can choose whether you want
to Authorize Only, or Authorize and Capture the payment simultaneously during
the Order creation. If you choose to Authorize and Capture, an Invoice will
automatically be created for the full quantity of items in the Order. For more
information about Invoices, refer to Chapter 8: Managing Orders.
Type - This indicates the method in which the transaction information is sent to
PayPal. Magento currently only supports Instant Payment Notification (IPN)
because this is the most secure method.
New Order Status - Select the Order Status of all new Orders created using this
payment method from the drop-down. The recommended status is Pending, as this
is intended to apply to Orders which have not had any actions performed on them,
however you can change this to whichever status you prefer.
Transaction Type - This controls the amount of detail from the Order that will be
sent to PayPal. Aggregate Order will send the amount of the entire Order to PayPal,
while Individual Item will send a more detailed description of each line item and
amount.
payment from applicable countries - Select which customers can use this payment
method. All Allowed Countries means all customers from the default countries list
can use this payment method. If you haven’t already configured the default list, it
can be done by navigating to System > Configuration, clicking the General tab, and
selecting each country you wish to allow from the Allow countries menu. If you
want to further reduce the number of countries from which your customers will be
allowed to use this payment method, select Specific Countries. This means that only
107
customers whose billing address includes one of the countries listed in the Payment
from Specific countries list below can use this payment method.
payment from Specific countries - This list is inactive unless Specific Countries is
selected from the Payment from applicable countries list above. It basically works
as a filter, so that this payment method will only be listed for those customers
whose billing address is one of these selected countries.
Sort Order - If you are choosing to allow multiple payment methods, this will
determine in what order each method is listed in the front-end.
Account Information - To enable this as a payment method, you’ll need a Website
Payments Standard account. To get one, go to www.paypal.com and click on
Merchant Services. It is free to register. You will receive the account information for
this payment method, and it can entered in the PayPal Accounts tab, in the Website
Payments Standard section.
o Business Name - Enter the name of your business as it appears in your
PayPal seller account.
o Business Account - Enter your Business Account as it appears in your PayPal
seller account.
o Paypal Logo Image URL - Enter the URL of the logo which you wish to
display in place of the PayPal logo in the PayPal page to which your
customers are redirected when checking out with this method.
o Sandbox Flag - If testing, select Yes. If using in an active environment, select
No.
o Debug Flag - If you select Yes, all requests between Magento and PayPal will
be saved in the Magento database.
Functionality on Front-End and Back-End
When the customer selects this method from the payment method list, they will see
the message: You will be redirected to PayPal website when you place an order.
When the customer clicks Place Order in the Order Review tab, the Order will be
created in Magento, but the payment will not be authorized. The customer will be
redirected to the PayPal website, where they will submit the order again. When it is
submitted in PayPal, the payment will be authorized and possibly charged (if the
Payment Action is configured to do so), and a comment will be added to the Order
with the payment approval or decline details.
108
The completed Order will display the billing and shipping address information the
customer entered in Magento, but the Payment Information box will only display
the payment method.
PayPal UK Express
Setup
Enabled - Select Yes for the this method to be listed in the Payment Information
section of the checkout. Select No for this method not to be listed.
Title - Enter the name of the payment method as it will appear in the Payment
Information list.
Payment Action - PayPal UK Express is an online payment method. Therefore, the
credit card must be Authorized by the payment gateway when the order is
submitted, in order for it to complete. However, you can choose whether you want
to Authorize Only, or Authorize and Capture the payment simultaneously during
the Order creation. If you choose to Authorize and Capture, an Invoice will
automatically be created for the full quantity of items in the Order. For more
information about Invoices, refer to Chapter 8: Managing Orders.
New Order Status - Select the Order Status of all new Orders created using this
payment method from the drop-down. The recommended status is Pending, as this
is intended to apply to Orders which have not had any actions performed on them,
however you can change this to whichever status you prefer.
payment from applicable countries - Select which customers can use this payment
method. All Allowed Countries means all customers from the default countries list
can use this payment method. If you haven’t already configured the default list, it
can be done by navigating to System > Configuration, clicking the General tab, and
selecting each country you wish to allow from the Allow countries menu. If you
want to further reduce the number of countries from which your customers will be
allowed to use this payment method, select Specific Countries. This means that only
customers whose billing address includes one of the countries listed in the Payment
from Specific countries list below can use this payment method.
payment from Specific countries - This list is inactive unless Specific Countries is
selected from the Payment from applicable countries list above. It basically works
as a filter, so that this payment method will only be listed for those customers
whose billing address is one of these selected countries.
Sort Order - If you are choosing to allow multiple payment methods, this will
determine in what order each method is listed in the front-end.
Account Information - To enable this as a payment method, you’ll need a Website
Payments Pro UK account. To get one, go to www.paypal.co.uk. It is free to register.
You will receive the account information for this payment method, and it can
entered in the PayPal Accounts tab, in the Website Payments Pro UK section. PayPal
UK Direct also requires and Website Payments Pro UK account, and these two
methods will share the same account information, so you probably would not
enable both methods at the same time.
o URL - Enter the URL to which Magento will send the payment information.
You can use the pilot URL to enable a test environment.
o User - Enter the User name from your PayPal seller account.
o Vendor - Enter the Vendor information from your PayPal seller account.
o Password - Enter the Password from your PayPal seller account.
o Debug Flag - If you select Yes, all requests between Magento and PayPal will
be saved in the Magento database.
109
Functionality on Front-End and Back-End
When the customer selects this method from the payment method list, they will see
the message: Your billing address will be ignored and you will be redirected to
PayPal website. When they press continue, instead of navigating to the Order
Review tab in the checkout, they will be redirected to the PayPal website, where
they can review the order information. When the order is submitted in PayPal, the
order will be created in Magento, and the customer will be redirected back to
Magento.
The completed Order will display the shipping address information that Magento
receives from PayPal Express. PayPal Express does not send billing address
information to Magento, and this section will be empty. The Payment information
box will only display the payment method.
PayPal UK Direct
Setup
Enabled - Select Yes for the this method to be listed in the Payment Information
section of the checkout. Select No for this method not to be listed.
Title - Enter the name of the payment method as it will appear in the Payment
Information list.
New Order Status - Select the Order Status of all new Orders created using this
payment method from the drop-down. The recommended status is Pending, as this
is intended to apply to Orders which have not had any actions performed on them,
however you can change this to whichever status you prefer.
Payment Action - PayPal UK Direct is an online payment method. Therefore, the
credit card must be Authorized by the payment gateway when the order is
submitted, in order for it to complete. However, you can choose whether you want
to Authorize Only, or Authorize and Capture the payment simultaneously during
the Order creation. If you choose to Authorize and Capture, an Invoice will
automatically be created for the full quantity of items in the Order. For more
information about Invoices, refer to Chapter 8: Managing Orders.
Credit Card Types - Select the options which will appear in the Credit Card Type
drop-down on the front-end.
payment from applicable countries - Select which customers can use this payment
method. All Allowed Countries means all customers from the default countries list
can use this payment method. If you haven’t already configured the default list, it
can be done by navigating to System > Configuration, clicking the General tab, and
selecting each country you wish to allow from the Allow countries menu. If you
want to further reduce the number of countries from which your customers will be
allowed to use this payment method, select Specific Countries. This means that only
customers whose billing address includes one of the countries listed in the Payment
from Specific countries list below can use this payment method.
payment from Specific countries - This list is inactive unless Specific Countries is
selected from the Payment from applicable countries list above. It basically works
as a filter, so that this payment method will only be listed for those customers
whose billing address is one of these selected countries.
Sort Order - If you are choosing to allow multiple payment methods, this will
determine in what order each method is listed in the front-end.
Account Information - To enable this as a payment method, you’ll need a Website
Payments Pro UK account. To get one, go to www.paypal.co.uk. It is free to register.
110
You will receive the account information for this payment method, and it can
entered in the PayPal Accounts tab, in the Website Payments Pro UK section. PayPal
UK Express also requires and Website Payments Pro UK account, and these two
methods will share the same account information, so you probably would not
enable both methods at the same time.
o URL - Enter the URL to which Magento will send the payment information.
You can use the pilot URL to enable a test environment.
o User - Enter the User name from your PayPal seller account.
o Vendor - Enter the Vendor information from your PayPal seller account.
o Password - Enter the Password from your PayPal seller account.
o Debug Flag - If you select Yes, all requests between Magento and PayPal will
be saved in the Magento database.
Functionality on Front-End and Back-End
When the customer selects this method from the payment method list, they will be
required to enter the Name on Card, select the Credit Card Type, enter Credit Card
Number, select the Expiration Date, and enter the Card Verification Number.
The completed Order will display the information entered by the customer in the
Payment Information box, except for the Card Verification Number.
Google Checkout
Setup
Setting up Google Checkout requires a more intricate configuration than with the other
payment types. In addition to configuring your settings in Magento, you must also configure
the settings in your Google Checkout seller account, so that it will integrate with Magento. If
you wish to deploy Google Checkout in your store, please be aware of these limitations:
1. Your website must be serving pages on standard ports (80 and/or 443).
2. If you have PHP CGI setup, you will need to have mod_rewrite enabled. GoogleCheckout uses HTTP authorization for callbacks. CGI processes do not receive
headers from Apache, so a hack in .htaccess utilizing mod_rewrite was implemented
to pass the authorization as an environment variable.
3. If you enable Carrier Calculated shipping rates, your packages will be limited to
150lb total. USPS further limits this to 70lb.
Integrating Magento using Google Checkout seller account
The first step to integrating Google Checkout with Magento is to configure your settings in
the Google Checkout seller account. The configuration settings are located in the Settings
tab, with links to each page in the left column. The following pages contain the most
relevant configuration settings for Magento integration. If you don’t already have a Google
Checkout seller account, you can click the link in the Google API tab in Magento System >
Configuration.
Profile - Enter your business information as it will appear to your customer in the
Google Checkout interface, including your address, Business Name, email address,
relevant URLs, and policies. When you are finished, click Save profile at the bottom
of the page.
Preferences
111
o
o
When an order is placed, your customer’s credit card will automatically be
authorized by Google Checkout. You can, however, choose whether you
solely want to authorize the card, or authorize and Charge the credit card at
the time of purchase. To find out more about charging credit cards and how
to do so after an order is placed, see the Handling completed orders in
Google Checkout section below.
Designate whether or not you would like Google Checkout to send you email
notifications of any transactions made for completed orders. This is separate
from Magento notifications.
When you are finished, click Save preferences at the bottom of the page.
Integration
o Shopping cart post security - This checkbox is not mandatory, however we
recommend that it be checked.
o API Callback URL - The URL should be in the format:
https://yourserver.com/base_path/index.php/googlecheckout/api.
index.php can be omitted if mod_rewrite is enabled. The Callback method
must be XML.
o Advanced settings - These settings will determine what information Google
Checkout sends back to Magento to populate in the order page.
Should be checked
Provide the first name, last name and full name of the buyer
and order recipient in separate fields in the new order
notification.
Return the buyer’s ship-to phone number in the new order
notification.
Return the buyer’s billing phone number in the new order
notification.
Should NOT be checked
Notifications must include any amounts involving a Google
promotion
Require notification acknowledgments to specify the serial
number of the notification. This has been witnessed causing
problems during testing.
o On the right side of the page under Account Information will be the
Merchant ID and Merchant Key. These will be needed for Google Checkout
configuration in Magento.
When you are finished, click Save at the bottom of the page. You are now ready to configure
your Magento settings in order to complete Google Checkout integration.
112
Setting up Google Checkout configuration in Magento
113
To complete Google Checkout integration, you must now configure your settings in
Magento. To do so, navigate to System > Configuration in the admin, and click on the Google
API tab in the left column.
Main Settings - The main settings are all located in the Google Checkout section.
o Enable - In order to provide your customer’s with the option to checkout via
Google Checkout, select Yes. This will add the Google Checkout buttons to
the shopping cart, adjacent to the default Magento Checkout button.
o Sandbox - This is the name of Google’s test orders interface. If you select
No, the Google Checkout button will direct to checkout.google.com. Orders
placed here are real, so that when the order is charged, the payment will be
processed. If you select Yes, the Google Checkout button will direct to
sandbox.google.com/checkout. This has the same checkout format as the
real orders interface, but orders placed here are for test purposes only, so
that when the order is charged, no payment will actually be processed (as
the background text on the site explains).
o Debug - If you select Yes, all requests between Magento and Google
Checkout will be saved in the Magento database, as well as Tools >
Integration Console in the Google Checkout seller account.
o Merchant ID and Merchant Key - These values are provided by Google and
are unique for each account. You can find them in you Google Checkout
seller account, in Settings > Integration, on the right side of the page under
Account Information.
o Checkout Image Style - This controls the style of the Google Checkout
button. There are three sizes (small, medium and large), and a transparent
and white version for each (depending on the background of your site).
o Location - This selection depends on which type of seller account you have
set up with Google. Select United States if you have a U.S. account, and
United Kingdom if you have a U.K. account. These are the only countries
supported by Google Checkout at this time.
o New order status - The selection here will determine the order status of all
new orders created using Google Checkout.
o Continue Shopping URL - When the customer has finished placing their
order in Google Checkout and clicks the Return to [Business Name] button,
they will be redirected to this URL.
It can be a URL part of CMS page, product or category, such as
thank-you-for-shopping, apparel/specials.
It can be any other URL, such as http://www.google.com.
If it is left blank, they will automatically be redirected to your home
page.
o Hide Cart Contents During Checkout - This will hide the cart contents if your
customer is in the Google Checkout page and clicks the browser Back button
to return to the Magento Shopping Cart page.
Shipping Settings - There are three options with which you can configure shipping in
Google Checkout.
o Merchant Calculated - This option cannot be enabled with any other option
at the same time, or your customers will receive an error message when
they attempt to checkout.
Enable Merchant Calculated - If you select Yes, this will be the
option available for the customer to select.
114
o
o
Allowed Methods - Each time you click Add Shipping Method, you
will be able to select a shipping method from the drop-down list and
enter a Default Price for each method. All shipping methods that
you add will display in the Shipping & Handling drop-down in
Google Checkout.
Carrier Calculated
Enable Carrier Calculated - If you select Yes, this option will be
available for the customer to select.
Carrier Calculated Methods - All shipping methods that you select
from this multiple select menu will display in the Shipping &
Handling drop-down in Google Checkout.
Delivery Address Category - Choose type of address of your usual
customers.
Default price for methods - Google Checkout requires a default
price for shipping, however this will be overwritten by the prices
returned from the carriers.
Default Package Width/Height/Length (in) - Google Checkout
requires default dimensions of a package for Carrier Calculated
rates.
Flat Rate - This option allows you to enter up to three methods from which
the customer can choose.
Enable Flat Rate - If you select Yes, this option will be available for
the customer to select.
Rate 1/2/3 Title - This is the name of the shipping method as it will
appear in the Shipping & Handling drop-down.
Rate 1/2/3 Amount - This is the price of the shipping method as it
will appear in the Shipping & Handling drop-down.
When you are finished, click Save config, and your customers will now be able to checkout
using Google Checkout.
Functionality on Front-End and Back-End
Customer Checkout with Google Checkout
Once you have enabled Google Checkout, your customer will now have this checkout
method available to them in the shopping cart. There will be a Google Checkout button
displayed adjacent to the default checkout button. When they click it, they will be directed
to Google’s checkout interface. This is a completely separate process from Magento’s
default checkout process.
1. First, your customer will be asked to log into their Google account. This is separate
from any account they may have created within your store. The information they
provide here, such as the name, email, and addresses, will be sent back to Magento
and display in the order information.
2. Magento will upload all products in your customer’s shopping cart to the Google
Checkout page, including quantity and price. This cannot be updated directly from
Google Checkout, as it can from Magento checkout. In order to modify quantities or
remove items, the customer must navigate back to their cart in Magento and make
these edits.
115
3. Your customer can choose their preferred Shipping & Handling method from the
drop-down menu. The available methods in the menu can be configured in the
Google API page in the Magento admin.
4. The tax will be calculated according to the guidelines established in the Magento
admin, in Sales > Tax. The tax guidelines established in Settings > Tax setup in the
Google Checkout seller account will not have any bearing on the order.
5. If your customer chooses to Keep my email address confidential, their real email
address will not be provided to Magento. The email address displayed in the order
page will have a sandbox.google.com domain name, and the order confirmation sent
here will be directed by Google to the user’s actual email address.
6. If your customer chooses I want to receive promotional email from [Business
Name] it should subscribe the email address received from Google Checkout to the
store newsletter.
7. When your customer is done, they will press the Place your order now button. This
will automatically send a record of the order to your seller account in Google, and
Google will send this information to Magento as well, where a record of the order
will be created in Sales > Orders. Your customer will see an order confirmation
message, and a link to return to your site. Additionally, if you have email notification
enabled, your customer can receive order confirmation emails from both Google
and Magento.
Handling completed orders in Google Checkout
As discussed in Chapter 8: Managing Orders, once an order is completed, you will have the
ability to create Invoices, Shipments, Credit Memos, and cancellations. For orders placed
with Google Checkout, there is partial integration of these tasks as well. Updating the order
in Magento will update the order in Google Checkout, and vice versa. In Google Checkout, a
list of your orders will be displayed in the Orders tab. Changes can be made from the orders
list (using the button in the Action column), or the orders page, which can be viewed by
clicking on the Order Number.
Invoice
o
When creating an invoice in Magento for an order placed in Google
Checkout, you will have the option to Capture Payment. If you choose to do
so, the order will be automatically be Charged in Google Checkout. If you
create a partial invoice (the invoice contains only some of the quantity in the
order) and capture the payment, Google Checkout will make a partial
charge. The remaining balance can be charged either from Magento or
Google Checkout. Because Google Checkout does not have an equivalent
functionality to the Void feature in Magento, voiding an order in Magento
will have no affect on the order in Google Checkout.
o If the order is charged from Google Checkout, Magento will automatically
generate an invoice with a captured payment. Invoice creation will occur
whether the order is charged at the time of purchase, or charged manually
after the order is placed. If the order is charged for a partial amount in
Google Checkout (which can only be done manually), no invoice will be
created in Magento.
Shipment
o When creating a shipment in Magento for an order placed in Google
Checkout, a shipment will automatically be created in Google Checkout. This
includes partial shipments as well. However, Google Checkout does not
116
recognize partial shipments, so there will be no indication in Google
Checkout that the shipment is only partial. If multiple shipments are made in
Magento, each with tracking information, the single shipment in Google
Checkout will update to list the multiple tracking numbers.
o If a shipment is created in Google Checkout, no shipment will be created in
Magento.
Credit Memo
o If a credit memo is created in Magento, and you press the Refund button (as
opposed to the Refund Offline button), the order will be refunded in Google
Checkout. This includes partial credit memos.
o If an order is refunded in Google Checkout, no credit memo will be created
in Magento.
Cancel
o If you cancel an order in Magento, it will not automatically be canceled in
Google Checkout.
o If you cancel an order in Google Checkout, it will automatically be canceled
in Magento. If some of the items have already been invoiced and/or
shipped, only the remaining items will be canceled in Magento. If all of the
items have already been invoiced and/or shipped, Google Checkout still
allows you to cancel the order, however this will have no effect in Magento.
117
Chapter 5: Promotions, Marketing
and Content Pages
Customer Personalization
In order to maximize the promotion of your products, Magento offers several great
ways for your customers to keep track of products and changes in your site. Giving
your customers control over which aspects of your site they can monitor gives them
a more personalized experience and encourages them to be more involved in your
site in general.
Wishlist
The Wishlist is one of the more well known promotion features. It allows your
customers to designate products that they wish to purchase (or have someone
purchase for them) at a later date. Having your customers able to save products to a
Wishlist greatly increases the likelihood that they will remember the products that
interested them. To enable Wishlists in your site, navigate to System > Configuration,
click on the Wishlist tab in the left column, and select Yes from the Enabled dropdown. This will enable the Add to Wishlist link for every product listed in the
category pages, as well as in all product pages. When a customer clicks this link for a
given product, they will be directed to their personal Wishlist page (if they are not
logged in, they will be prompted to do so, or register first, and then they will be
directed to the Wishlist page). This page lists all items that your customers have
added.
118
For each product, there is a field for comments where your customers can make
personal notes for each product, the date the product was added to the Wishlist,
and a link to Add to Cart. At the bottom of the Wishlist is the option to Add All to
Cart, and Share Wishlist. The Share Wishlist feature is a good word of mouth tool for
customers to promote products they like to their friends, as well as a way to informs
their friends about products that they would like to receive as a gift. Configuration
for the Share Wishlist feature is in the same page as above. Select the Email
Template which the Share Wishlist email will use. The Email Sender is the address
from which the Share Wishlist email will be sent. For more information on how to
configure these email templates and addresses, refer to Chapter 6: Customers. There
is also a Wishlist quick view located in the right column of category, product, and
CMS pages, where your customers can view a summary of the products in the
wishlist, and add each product to the cart. The Wishlist can be accessed via this quick
view, the My Wishlist link in the header, or via the My Account page. Additionally,
the Wishlist has several more features that are discussed in more detail in other
sections. There are RSS feeds available for your customers and the friends with
whom they share the wishlist, which will be described in more detail below. The
Wishlist can be accessed in the admin in a customer’s page and during admin Order
creation, where products can be moved between it and the Order, which will be
covered more in Chapter 8: Managing Orders.
Compare Products
The Compare Products feature is a useful way for customers to quickly compare
product attribute information in a side-by-side view, and it similar to the Wishlist in
several respects. The Add to Compare link appears in category and product pages,
however when the link is clicked, your customers will not be directed to the
Compare page. The product will be added to the Compare Products quick view (also
119
in the right column), and the Compare page will only be accessed when the Compare
Items button is clicked in the quick view.
This produces a pop-up window, with a table of all products in the list. Each product
receives a separate column and each attribute name receives a separate row. You
can designate which attributes will display in this page via the Comparable on Frontend drop-down in the Attributes page (refer back to Chapter 3). The products in the
Compare page do not necessarily have to belong to the same Attribute Set, or
contain values for all the same attributes. If one product does not have a value for an
attribute which another product in the Compare page contains, it will simply be left
blank. Within this page, your customers will also have the ability to add products to
the Wishlist or cart. Additionally, like the Wishlist, you will have the ability to access
the Products in Compare List during admin Order creation in order to move products
into the Order.
Note: Only Simple Products can be added to the Compare Products list.
120
Recently Viewed/Compared Products
When a customer removes an item from the Compare Products list, Magento
continues to keep track of the item, so that your customers can easily find it if they
decide to purchase it later on. Also in the right column, towards the bottom of the
page, is the Recently Compared Products list. It contains a link to the page of each
product which has recently been removed from the Compare Products list. There is
also a Recently Viewed Products list, which works the same way, and lists all
products for which your customers have recently viewed the pages. Both of these
can also be accessed in the admin during admin Order creation, just like the features
above, where you can move products into the Order. To configure the settings for
these two features, navigate to System > Configuration, and click the Catalog tab in
the left column. In the Show for Current drop-down, select the level at which these
lists will save product information. For example, if you select Website, these lists will
show all products compared or viewed within the same Website. Additionally,
Magento by default comes with a pregenerated Home page CMS page, which has a
prepopulated Layout Update XML field (more details about this later in the chapter),
containing the code that allows both the Recently Viewed Products and Recently
Compared Products to display at the bottom of the Home page so that your
121
customers can see lists of these products very prominently each time they visit your
site.
New Products
Along with the Recently Viewed and Compared Products, there is also code
contained in that Layout Update XML to display new products. Chapter 3 described
the process for entering the Set Product as New from/to Date when creating a new
product, and this is where that date range is presented. If you have chosen to use
this XML code, all products with a date range including the current date will display
at the bottom of the home page (or any other page to where you may have copied
the XML code), above the Recently Viewed and Compared Products. This is a great
promotion tool to let your customers know about newly added products to your site
each time they arrive at your home page. Additionally, you can redesign a product
page or change some attributes and then set it as new in order to rekindle some
interest in that product.
122
RSS Feeds
In addition to the XML update for newly added products, the new product date
range also controls which products will appear in the New Products RSS feed. This is
actually just one of several RSS Feeds to which your customers can subscribe,
keeping them informed about changes to your site, or even changes to your
customers’ personal accounts that they have initiated themselves. In the front-end,
there are three different places where customers can sign up for RSS feeds. If you
navigate to System > Configuration, click on the RSS Feeds tab in the left column,
and Select Enable in the Rss Config section, an RSS link with the RSS logo
will appear in the footer of your site on the front-end. This is the first of the three
locations where customers can sign up for RSS Feeds. This link will contain links to
any of the Catalog section RSS Feeds that you have enabled, including the New
Products feed. If you do not have any Catalog feeds enabled, this page will be blank.
123
Your customers can click on each enabled feed link and subscribe to it individually.
Depending on which feed reader they choose, the feed may include all
corresponding items, or only the most recent 20. For example, for the Special
Products feed, one reader may display all products that currently have a special
price, whereas another reader may display only the 20 most recently created
specials.
The second location is in the Wishlist, as referenced in the Wishlist section above.
First, however, you must select Enable in the Wishlist section of the Configuration
page. This will create an RSS FEED link in the Wishlist page, so your customers can
subscribe to a feed listing the items currently in their Wishlist. However, since your
customers already have access to the list of items currently in their Wishlist (that is,
by logging in to their account and viewing their Wishlist page), the RSS feature will
probably be more useful for sharing the Wishlist with friends. In the Share Wishlist
feature, which was described in the Wishlist section above, there is a checkbox with
a description reading, “Check this checkbox if you want to add a link to an rss feed to
your wishlist.” This checkbox will only appear if the Wishlist RSS is enabled. If it is
checked, the Share Wishlist email that is sent will include a link so that your
customers’ friends can subscribe to feeds of your customers’ Wishlists, allowing your
customers’ friends to stay current with great gift ideas.
The third location is in the Order page of the My Account section. First, however, you
must select Enable in the Customer Order Status Notification drop-down in the
Configuration page. This will create a Subscribe to Order Status link at the top of the
page of every Order that your customer has placed. They must enter the My Account
page, and click on an individual Order in order to access this feed link. When a
customer signs up for this feed, they will only be receiving order status updates for
the Order from which they accessed the link. This way, they have the option to keep
track only of the Orders in which they are interested. Whenever you update the
status of that Order, your customer will receive an RSS feed notifying them of the
change. There is more information on the My Account page and all of its features in
124
the next chapter, and more information about order statuses in Chapter 8: Managing
Orders.
Tier Pricing
Tier Pricing is a promotional tool that allows a store owner to price items differently
for higher quantities. This is an effective way to move more merchandise and appeal
to customers who buy more than one product at a time. When a customer adds a
certain quantity of a product to their cart, the price is automatically changed to
reflect the discount.
1. In the Magento Admin Panel, navigate to Catalog > Manage Products.
2. Find the product that you want to add tier pricing to (or create a new
product) and click Edit in the Action column.
3. Locate the Prices tab on the left and click on it.
4. Click the button that says Add Tier.
5. Designate which customers will receive the tiered price in the Customer
Group drop-down. You can make this tier available to only one Customer
Group, or ALL GROUPS. There is more information about Customer Groups in
Chapter 6: Customers. Tip: To apply a tier to multiple groups, but not all
groups, create multiple tiers, each with the same Qty and Price information,
and select a different customer group in each.
6. Enter the Qty at which you wish to apply the discounted price.
7. Enter the Price. This is the price that each item will cost when the customer
chooses to purchase the specified quantity or greater.
8. If you want to add multiple tiers, press the Add Tier button again. The prices
on the front-end will take precedence from the highest to lowest quantity.
Therefore, if you have a tier for quantity 5 and one for quantity 10, and a
customer adds 5, 6, 7, 8, or 9 items to the cart, they will receive the
discounted price you specified for the quantity 5 tier. As soon as they add the
10th item, the discounted price specified for the quantity 10 tier will
supersede the quantity 5 tier, and that discounted price will apply instead.
9. Press Save to save the changes and have these changes reflected on the
front-end. On the product info page, the percentage that your customers can
125
save will calculate automatically and display next to each tier, as displayed
below.
On the product listing pages, the best available deal will display below the regular
price.
If you don’t want one of the tiers, press Delete Tier next the tier you want to get rid
of.
Catalog Price Rules
There are two types of price rules in Magento: Catalog Price Rules and Shopping
Cart Price Rules. Catalog Price Rules are implemented into product price before they
are added to the cart, while Shopping Cart Price Rules are applied in the shopping
cart.
Great For
Storewide Sales
126
Customer Group-Targeted Sale
To create a new rule, navigate to Promotions > Catalog Price Rules and select Add
New Rule.
Rule Information
1. Enter a Rule Name and Description for the price rule.
2. Enable it by selecting Active from the Status dropdown.
3. Select the Customer Groups to which you want the rule to apply. There is
more information about Customer Groups in Chapter 6: Customers.
4. Define the date range for the promotion to be in effect. If you leave the date
range empty the rule will be enabled as soon as it is created.
5. Set the promotion’s priority. This is useful if you have two catalog price rules
enabled at once. This priority tells Magento in which order to process the
rules. This is important because it may affect the amount of the discount. For
example, you have two rules: “10% off T-shirts” and “$1 off all Blue items”. If
you prioritize the 10% rule first, a $20 Blue T-shirt would first receive a 10%
discount (of $2) and then a $1 discount. However, if you prioritize the $1 rule
first, a $20 blue T-shirt would first receive a $1 discount and then a 10%
discount (of $1.90). The priority affects the total discount offered.
Conditions
Once you have set up the information for the price rule you can set the Rule’s
Conditions.
If you’re creating a rule which requires two conditions (for example, the
product must be manufactured by Sony AND the price must be over $100),
select “If ALL of these Conditions are TRUE”. If you wanted the discount to
take effect if the product is manufactured by Sony OR if the product is over
$100, you would select “If ANY of these conditions are TRUE.” Additionally,
you can change TRUE to FALSE, which will make the rule apply to the exact
opposite situation. For example, “If ALL of these conditions are FALSE” would
127
mean that the rule would apply to all products where the manufacturer is
NOT Sony, and the price is LESS THAN $100.
When you click the green + button, a drop-down will appear. You can select
either Conditions Combination (see below for more details about this), or one
Product Attribute from the list of all existing Attributes. The middle rule (‘is,’
‘is not, ‘equals or greater than,’ etc.) defines the relation between the
attribute and the option. Finally, enter the value of the attribute option.
Different attributes will require you to enter the option value in a different
manner. For example, Manufacturer will product a drop-down, contained all
the existing options that you previously defined when you created the
Manufacturer attribute. Price, however, will have an open text field where
you can manually enter the price.
To add more rules, keep pressing the green + button. Each condition further
limits the number products to which this discount applies. To remove a
condition, click the red X button.
If you select Conditions Combination instead of one of the Product
Attributes, you can create and different set of ALL/ANY and TRUE/FALSE
conditions within the overall condition. For example, in the first condition
you can establish that the Manufacturer is Sony. In the second condition, you
can create a Conditions Combination, where you change ALL to ANY. Within
this “subcondition” you set the Price equal or greater than $100, and the
Weight equal or less than 5 lbs. With this Conditions Combination, the rule
will apply if the Manufacturer is Sony, AND either the Price is $100 or more
OR the weight is 5 lbs or less.
128
Actions
Now that you have the Conditions set, you can create the Actions. This defines what
Magento actually does to the product matching your conditions. This is where the
discount is defined.
Apply - Select how you want the discount applied to the product (By
Percentage of the original price, By Fixed Amount, To Percentage of the
original price, or To Fixed Amount). The difference between By and To is that
By subtracts the Discount amount from the original price, whereas To sets
the final discounted price to the Discount amount. For example, if a product
costs $100, and a discount amount of 15 is applied By Percentage of the
original price, the final price would be $85. If the discount amount of 15 was
applied To Percentage of the original price, the final price would be $15 (in
this example, you would choose By Percentage).
Discount amount - Enter the numerical value of the discount, which will be
either a percentage or fixed monetary amount, depending on what you
selected in the drop-down above.
Stop further rules processing - If you have multiple promotions active on the
same products at once, and you don’t want another rule to interfere with this
one, you would select Yes here. This will cause Magento to ignore any other
existing rules with a lower priority once this rules has been calculated. For
example, if you have a storewide discount of $5 that you don’t want to apply
to products in this promotion, you would select Yes here, set the priority of
this rule higher than that of the other existing rule, and any products
matching the conditions established in your new rule would no longer receive
the $5 discount from the other existing rule.
When you are finished, you can click either Save and Apply or Save Rule. Save and
Apply activates the rule immediately after creating it, so that the price change will be
displayed on eligible products in the front-end. Save Rule saves without activating. If
you click this, you can go back and apply the rule later by clicking on it in the Catalog
Price Rules grid and clicking Save and Apply, or by clicking the Apply Rules button on
the Catalog Price Rules page, which will activate all existing rules. If you wish, you
can allow customers to be alerted of new Catalog Price Rules via RSS feeds. There is
more information about RSS Feeds earlier in this chapter.
IMPORTANT: Catalog price rules require periodical execution of scheduled task.
Please refer to this article for information on cronjob setup:How to setup a cron job
Shopping Cart Price Rules
The other kind of price rule – Shopping Cart Price Rules – is applied when the
customer reaches the shopping cart. They can be enacted either with or without a
coupon code, and include features not found in traditional coupon tools. Shopping
Cart Price Rules are very similar to Catalog Price Rules (CPRs), with a few changes
and additions. For those aspects which are the same as Catalog Price Rules, please
129
refer back to that section for a more detailed description. To create Shopping cart
Price Rules, navigate to Promotions > Shopping Cart Price Rules and select Add New
Rule. As discussed in Chapter 3, this tool can be very useful to market Grouped
Products. To illustrate this, let’s revisit the example of the 3-piece suit introduced
there.
Rule Information
Rule Name - Same as CPRs
Description - Same as CPRs
Status - Same as CPRs
Customer Groups - Same as CPRs
Coupon Code - If a code is not entered the rule will take effect once the
customer reaches the cart without any action taken. If a code is entered, the
customer will have to enter that code to receive the discount.
Uses per coupon - This is the maximum amount of times the Rule can be
used total. This limit will apply whether or not you require a coupon code. If
it is left blank, there will be no limit.
Uses per customer - This is the maximum amount of times the Rule can be
used per customer. This limit will apply whether or not you require a coupon
code. If it is left blank, there will be no limit.
From/To Date - Same as CPRs
Priority - Same as CPRs
Public In RSS Feed - If you wish, you can allow customers to be alerted of
new Shopping Cart Price Rules via RSS feeds. If you have enabled this feature,
you can determine here whether or not users who subscribe to the RSS Feed
will be alerted about this particular Rule. There is more information about
RSS Feeds earlier in this chapter.
130
Conditions
This is very different from CPRs, however there is some overlap. To begin with, the
overall condition is in the same structure: If ALL/ANY of these conditions are
TRUE/FALSE. However, clicking the green + button presents you will a different set of
options.
Product Attribute Combination - Selecting this will create a “subcondition”
with a different format from the ALL/ANY and TRUE/FALSE overall condition.
It will state: If an item is FOUND/NOT FOUND in the cart with ALL/ANY of
these conditions true. This subcondition applies directly to the products
within the cart, therefore when you click on the green + button, you will have
the same Product Attribute options that exist when created CPRs. In addition
to this, you will have the choice to select a Cart Item Attribute instead,
including Price in cart, Quantity in cart, and Row total in cart. These options
differ from the Product Attributes because they define aspects of the product
as they exist in the cart, which may differ from the aspects that you defined
when creating the product.
Conditions Combination - Same as CPRs
Cart Attribute - Cart Attributes describe a condition within the shopping cart,
rather than within a particular product. This ranges from the Subtotal to the
Shipping Country. Like with Product Attributes, you will need to define the
option, and the relationship to the option. For Shipping Country, the option
would be the name of the country (which you would select from a drop-down
listing all allowed countries in you site) and the relationship to this option
would be is or is not.
131
Actions
Apply - Select how you want the discount applied to the product (Percentage
of product price discount, Fixed amount discount, Fixed amount discount
for whole cart, or Buy X get Y free).
Discount amount - Same as CPRs
Maximum Qty Discount is Applied to - You can limit how many units of each
line item will receive this discount. If you select 5, each line item with a
quantity greater than 5 will only receive a discount for five of the items, and
the remaining quantity will be calculated at the normal rate.
Discount Qty Step (Buy X) - This field only works depending on which option
you selected from the Apply drop-down. This field is not applicable to the 3piece suit example, so it will be discussed using different examples.
o Percent of product price discount - If you selected this option, the
Buy X field determines the quantities that your customers will have to
purchase in order to receive a percentage discount. For example, if
you sell an item at whatever quantity the customer prefers, but you
receive the item in packs of six, and would like to offer a discount to
the customer for every factor of 6 items that they buy, you would
enter 6 into this field. The product costs $5, and the discount
percentage is 10. If the customer buys 1-5 items, they will receive no
discount. If they buy 6-11 items, they will receive a 10% of $5×6
discount ($3). If they buy 12-17 items, they will receive a 10% of
$5×12 discount ($6), and so on. This way, they are encouraged to buy
items in a factor of 6, ans they are allowed to buy additional quantity,
but they just won’t receive any discount for that additional quantity.
o Buy X get Y free - If you selected this option, the Buy X field
determines the quantity that your customers will have to purchase in
order to receive free item(s). These quantities will be a factor of the
number entered into this field. The amount of free items they receive
is determined in the Discount amount field. For example, if you want
to give your customer 2 free items for every 5 that they buy, you
would enter 5 in this field and 2 in the Discount amount field. If the
customer buys 1-5 items they will receive no free items. The 6th and
7th items that they add to the cart will be free. The next 5 items that
they buy must be paid for, and the 13th and 14th items that they add
to the cart will be free, and so on.
Free ground shipping - Select whether you want to combine the coupon
amount with a free shipping offer. You can select For matching items only to
offer free shipping only to specific items in the cart, or For shipment with
matching items to offer free shipping for the entire order when the
designated items are present.
Stop further rules processing - Same as CPRs
Apply the rule only to cart items matching the following conditions - This is
similar to the Product Attribute Combination option that you can set in the
Conditions tab. You can select from the same list of Cart Item Attributes and
Product Attributes. This determines which items in the cart will receive the
132
discount defined above when the conditions defined in the Conditions tab
are met. If you leave this section blank, the discount will apply to the entire
cart.
This way, only the three specific items listed will receive the 10% discount. If
the 3-piece suit is purchased in the same order as other items, the discount
will not apply to any of the other items.
When you are finished, click Save Rule.
Newsletters
Newsletter Configuration
The first step to creating newsletters is to configure the newsletter settings for your
site. To do so, navigate to System > Configuration, and click on the Newsletter tab in
the left column
Unsubscription/Success/Confirmation Email Sender - Designate the address
from which Unsubscription/Success/Confirmation Emails will be sent to your
customers. For more information on how to configure these email addresses,
refer to Chapter 6: Customers.
Unsubscription/Success/Confirmation Email Template - Designate the
template of the Unsubscription/Success/Confirmation Emails. For more
information on how to configure these templates, refer to Chapter 6:
Customers.
133
Need to Confirm - Select whether or not you customers will need to send an
email confirmation reply in order to activate their newsletter subscriptions.
Newsletter Templates
Before sending a newsletter, create a newsletter template. You can create and save
as many of these as needed for any situation, whether it be an annual holiday
newsletter, or weekly product updates. To do so, navigate to Newsletter >
Newsletter Templates, and click Add New Template in the top right of the page.
Template Name - This is for internal purposes, to help you differentiate
between templates.
Template Subject - This is the subject of the email that will be sent to your
customers for a newsletter using this template.
Sender Name - This is the name of the sender of the email that will be sent to
your customers for a newsletter using this template.
Sender Email - This is the email address of the sender of the email that will
be sent to your customers for a newsletter using this template.
Template Content - This is the body of your email. It can be written in HTML
format. If you want to include a static block into the email, use the code:
{{block type="cms/block" block_id="block-id"}}
You can read more about Static Blocks later in the chapter. All new templates will
automatically be populated with an unsubscribe link in the Content field, however
you can choose to remove this link if you wish. If you click Convert to Plain Text, you
can see the content of your email without the HTML tags. You can then click Return
HTML Version to add the tags back again. This is a good way to check the text
without having to sort through HTML tags, which can be confusing.
To view the content with the HTML tags formatted as your subscribers will
see it, click Preview Template.
When you are finished, click Save Template.
Once you have saved a template, you will see a new button when you edit
this template. Save As allows you duplicate the template, so that you can
make changes and save the template as a new template without affecting the
original template. This can save you time by not having to enter all the
template information for a new template. If you already have an existing
134
template that is similar to the new template, simply edit the fields that you
need, and Save As a new template.
Newsletter Queue
Once you’ve created a template, you can send your newsletter by queuing the
template. Navigate to Newsletter > Newsletter Templates. You will automatically be
redirected here when you save a template.
Find the template you want to use in the newsletter and select Queue
Newsletter from the Action column.
Queue Date Start - This allows you to line up multiple newsletters to be sent
automatically at select times. If you want to send it immediately, leave this
blank.
Subscribers From - Select the subscribers from which Store View you wish to
send the newsletter. You can select multiple Store Views. You can see the
Store View from which each subscriber subscribed by navigating to
Newsletter > Newsletter Subscribers.
Subject - This will automatically populate from the template you selected,
however it can be changed.
Sender Name - This will automatically populate from the template you
selected, however it can be changed.
Sender Email - This will automatically populate from the template you
selected, however it can be changed.
Message - This will automatically populate from the template you selected,
however it can be changed.
Click Save Newsletter. You will automatically be taken to Newsletter >
Newsletter Queue. This lists all currently queued newsletters. From this page,
you will be able to see the which newsletters have an have not been sent.
Magento will batch a newsletter if there are a large amount of recipients. For
example, if you have 1000 recipients, Magento may send 100 emails every 15
minutes. Because of this, you can see which emails are in progress, how
many recipients have currently received the newsletter, and the time than
the newsletter finished sending.
Newsletter Subscribers
To view a list of all current and former subscribers to your newsletter, navigate to
Newsletter > Newsletter Subscriber. You can view all of their information, as well as
the Store View from which they subscribed to the newsletter. As mentioned in the
previous section, you can send different newsletters to subscribers from different
Store Views. In the Type column, a subscriber can be either a Customer or a Guest.
Customers have several options to sign up for the newsletter. There is a checkbox
present when creating an account, as well as a checkbox in their My Account page.
All visitors have the option to sign up by entering their email address in the
Newsletter block located in the left column. Logged in customers can enter alternate
email addresses (other than the one associated to their account) in order to have
135
newsletters sent there. If they are not logged in at the time, they will be subscribed
as a Guest.
From this list you have the option to make batch updates to subscribers, to
unsubscribe one or more subscribers at one time. To make Batch Updates to
subscribers, select the subscribers to which you would like to unsubscribe. At the top
of the subscribers list, you have the option to Select All subscribers or Select Visible
subscribers (subscribers currently displaying on the page). Or, you can simply check
the checkboxes of each subscribers to which you wish to unsubscribe individually.
You can see the number of items selected at the top of the customers list, and it will
update each time a checkbox is checked or unchecked. When you have all the
desired subscribers selected, choose Unsubscribe from the Actions drop-down
menu, also at the top of the customers list. This will unsubscribe the selected
subscribers from your newsletter when you press Submit.
Newsletter Problem Reports
You can view any problems that the system had sending the newsletter by navigating
to Newsletter > Newsletter Problem Reports. For example, a newsletter sent to an
erroneous e-mail address will appear here.
Static Blocks
By using Static Blocks you are able to create content for category pages, allowing
you to showcase items and promotions instead of just displaying a grid list of
products. To create a static block, navigate to CMS > Static Blocks and select Add
New Block
136
1. Enter the Block Title.
2. The Block Identifier must not contain any spaces. When you want to place a
block on a landing page or in a newsletter (see Landing Pages and Creating
and Sending Newsletters), you can use this identifier and this piece of code:
{{block type="cms/block" block_id="block-id"}}
3. Select the Store View to which this block will apply. You can also apply it to
All Store Views.
4. With the Status you can choose whether the block is Enabled or Disabled.
5. Enter your Content in an HTML Format.
6. When you are finished, click Save Block.
You can place this block on a category page by selecting it from the CMS Block dropdown in Catalog > Manage Categories.
137
The static blocks are incredibly flexible, allowing you to create something as simple
as a text category description, or something as intricate as multiple image maps,
such as what we are showcasing on the Electronics category page. You can also add
blocks to a Landing Page by using the code:
{{block type="cms/block" block_id="block-id"}}
You can read more about Landing Pages later in the chapter.
138
Landing Pages
Landing Pages in Magento can be used for any static page, from a Homepage to a
Frequently Asked Questions page. To create and edit landing pages, navigate to CMS
> Manage Pages. To create a new page, click the Add New Page button. You will see
three tabs for the new page: General Information, Customer Design, and Meta
Data.
General Information
139
1. Enter the Page Title for this page. The Page Title is used for the Meta Page
title for the new landing page.
2. The SEF (Search Engine Friendly) URL Identifier allows you to create a more
descriptive URL for each page, so that search engines can find them more
easily. In the example above, entering home for the homepage would create
a URL for this page i the format domain.com/home. For more information
about URL rewrites, refer back to Chapter 3: Set up your Catalog.
3. Select the Store View in which you want to present this Landing Page. You
can also present it in All Store Views.
4. The default Status for a new page is Disabled, meaning the page will not
show on the Front-end. Switch the status to Enabled to have the page
appear.
5. Create the content of the Landing Page in the Content field. It must be in
HTML format, allowing the most flexibility. You can use HTML to upload
images, videos, text, Static Blocks, etc. To add Blocks use the code:
{{block type="cms/block" block_id="block-id"}}
Custom Design
Configure the theme and layout of your Landing page in the Custom Design tab. This
is very similar to the design options available for category and product pages.
1. Select the design you want from the Custom Theme drop-down. Magento
comes with several different design options out of the box. If you leave this
drop-down blank, it will automatically use the Current package name design.
This can be edited by navigating to System > Configuration and clicking the
Design tab. Enter the name of the design you want in the Current package
140
name field, and this design will apply to all Landing Pages for which you do
not specify a different design.
2. With the Customer Theme From and Custom Theme To fields, you can select
a time frame in which the category will automatically switch to a design, and
then switch back to the blank option when the time frame ends. This is
perfect for the holidays, so that you can create a holiday design for you
pages, and then have your site automatically switch back to the normal
design whenever you want, without having to remember to do it yourself.
3. The Layout drop-down determines the structural aspects of the page. The
default is Empty, which will only show the information you enter in the
Content field. If you want to keep your headers and footers on this page you
will need to code them into the content area. All options other than Empty
include both the header and footer, so they will not need to be codes into the
content area. 1 column displays only the Contents, header, and footer. 2
Columns with left bar adds the left column to the 1 column display, which by
default includes the currency selection and layered navigation. 2 Columns
with right bar adds the right column to the 1 column display, which by
default includes the shopping cart view, wishlist, compared products list,
polls, and newsletter sign-up. 3 columns displays both the left and the right
column.
4. The Layout Update XML is essentially a static block, with a few differences.
o Rather than HTML, the structure must be in XML format.
o The Update will display at the bottom of the page, below the content,
whereas a static block will display anywhere within the content that
you specify.
o The Update will display on the page only during the dates specified in
the Customer Theme From/To date range.
Meta Data
You already designated the Meta Page Title in the General Information tab, but you
can add Meta Keywords and Meta Description in this tab. When you are finished,
click Save Page. You can edit the page again by clicking on it, or view the page with
all HTML and XML formatted by clicking the Preview button in the Action column.
141
Once you have created a few Landing Pages, designate which one will be used as
your home page, and which one will be used for HTTP 404 errors. Navigate to System
> Configuration, and select Web from the left column. In the Default web url field,
enter the relative path of the home page, and select which Landing Page to use as
the home page from the CMS Home Page drop-down. In the Default no-route url
field, enter the relative path of the no-route page. This is the page that visitors will
encounter when they attempt to view a page in your site that does not exist. Select
which which Landing PAge to use as the no route page from the CMS No Route Page
drop-down. You can also determine whether or not Landing Pages will have the
breadcrumb feature enabled from the Show breadcrumbs for CMS pages dropdown.
Polls
Polls are a powerful marketing tool, and Magento makes it easy to find out your
customer’s opinions on just about everything.
142
Polls are beneficial because they occupy a small amount of space on your pages and
are likely to be answered by many people. Poll results are immediately displayed
after an answer is submitted, as shown below:
The first step is to ensure that your configuration settings are correct. Navigate to
System > Configuration, select the Advanced tab, and set Mage_Poll to Enable. This
should be Enabled by default, but if it has been Disabled, you must Enable it before
being able to create polls. If you want to Disable Polls, select Disable. When you are
finished, click Save Config.
To create a Poll, navigate to CMS > Poll Manager.
Poll Information
1. Click on Add New Poll in the top right of the page.
2. The Poll Question will be the question displayed at the top of the poll in the
front-end, i.e. What is the best open source e-commerce solution?
3. The Status by default will be Open. This is similar to Enabled. To remove the
Poll from your store, select Closed.
4. Select which store views in which you want the poll to appear from the
Visible In multiple select menu.
Poll Answers
1. Click on Add New Answer to add potential answers. Each answer will list on
the front-end, with a radio button by which the customer can select that
answer.
2. Enter an Answer Title, i.e. Magento.
3. If you want to “influence” the poll and skew the results, you can add or
remove votes from the Votes Count. This will automatically increase each
time a customer votes for this answer in the Poll.
4. Click Add New Answer for each answer you want to display in the poll, and
repeat the steps above.
143
Customers can only answer a poll once. Once they submit an answer, they will only
be able to view the results. You can view the results in the admin in this tab. If you
have multiple polls, they will rotate randomly in the front-end each time the page is
reloaded.
Search Synonyms and Re-directs
In Magento, the Store Owner has complete control over the catalog’s Search. This
includes the ability to designate which aspects of which products the search can
access, as well as capability to instruct the search to display different results or even
a different website. There are two search options available to your customers: Quick
Search and Advanced Search.
Quick Search
Quick search is available to your customers via the search bar at the top of the
header in the front-end.
What the In-Store Search looks for
When conducting a search, results will populate based on matches in any of a
searchable product’s searchable attributes (yes, there are separate search settings
for both products and attributes). Because all characteristics of a product are
considered attributes – such as the name, description, and color – you can search for
anything related to any product. Simply make sure that the product is searchable by:
144
1.
2.
3.
4.
In the Admin, navigate to Catalog > Manage Products.
Click the Edit link under the desired product.
Locate the Visibility dropdown and select either Search or Catalog, Search.
Click Save.
And make sure that the attribute is searchable by:
1.
2.
3.
4.
5.
In the Admin, navigate to Catalog > Attributes > Manage Attributes.
Click on the desired attribute.
Click Properties in the left column.
In the Use in quick search drop-down, select Yes.
Click Save Attribute.
When the customer types a set of characters into the search field, the query will
locate any occurrence of those characters in the order which they were typed,
anywhere within an attribute. For example, if your customer created a search for tie
rack, and you had a product description containing the words necktie racks, your
customer’s search would yield this product as a result, because their search term is
contained in order within the attribute: necktie racks. An additional feature of
Magento Search is that as soon as your customer has typed two characters into the
search field, a dropdown window will appear listing up to ten suggested search
terms that begin with the same characters, along with the amount of results for each
term. You will find more about how to customize this feature below.
Saving a Search Term
All saved search terms can be accessed in the Admin by navigating to Catalog >
Search. There are two ways for a search term to be saved to this page. All search
terms used by a customer in the store will automatically save here. Additionally, you
can manually enter a search term that you believe will be useful to your customers.
From the Store
When a customer types any set of characters into the Search Bar at the top of the
page and clicks Search, those characters will save as a new search term, provided
this set of characters has not already been searched for. The term will save whether
or not the search returns any results in the store.
From the Admin:
1. Click Add New Search.
2. In the Search Query field, enter the search term as you anticipate the
customer will type it.
3. If you anticipate that a customer may incorrectly type a term in the search
bar, but you still want this search to point to the correct results, you can
enter the correct term in the Synonym For field. For example, when
searching for electronics, if your customer accidentally types electroincs, the
145
query will produce no results. If you designate that electroincs is a synonym
for electronics, your customer will see the correct results.
4. If you prefer that a customer’s search does not produce a results page, but
rather leads somewhere else, such as an existing catalog page, you can enter
the desired web address in the Redirect URL field. This web address can be
within the same store, or a completely different website altogether. For
example, if you have two stores, one that sells digital wristwatches and one
that sells analog wristwatches, you can designate that a search for digital in
your analog wristwatch store redirects to the digital wristwatch store. This
way, your customers won’t wind up with an empty results page.
Editing Search Terms
Once a search term has been saved, you have the ability to edit two new fields.
Simply click on the desired search term in the list and you have access to:
The Number of Results field displays how many results were displayed to the
customer during the most recent search using the selected search term. This
can be changed manually, but it will reset to the real number of results the
next time this search term is used in the store. This is more useful when
creating a new search term, or adding a synonym for an existing search term.
For example, you noticed that several customers have searched for the plural
shirts, but this has not produced the maximum results, since several of your
products only contain the singular shirt. You know that shirt returns 32
results (including the singular and plural occurrences), so after you have
added this to the Synonym For field, you add 32 to the Number of Results
field. This way, the next time a customer types shirt into the search field, they
will see an option for shirt and for shirts, both with 32 results.
Note: If the Number of Results for a search term is blank, the term will not display in
the suggested search terms dropdown window.
The Number of Uses field displays how many times a customer searched for
this term. As mentioned above, the suggested search terms dropdown
window displays up to ten terms. The top ten terms are determined by the
highest Number of Uses, and they will sort from top to bottom based on this
as well. Therefore, you can ensure that a certain suggested term will always
display at the top of list by entering a high Number of Uses into this field.
When you’re done, click Save Search, and you have successfully customized
your search options.
146
Advanced Search
In the footer of the front-end is a link to the Advanced Search page. As you will
notice immediately, the Advanced Search contains separate fields for each attribute.
For an attribute to appear in this page, you must navigate to Catalog > Attributes >
Manage Attributes, locate the attribute, and select Yes from the Use in advanced
search drop-down. The field of each attribute will vary depending on the Catalog
Input Type for Store Owner in the attribute’s properties. Some attributes may have
text fields, others may have drop-down menus, while still others may have multiple
select menus, and so on. Therefore, unlike the Quick Search, the Advanced Search
will only search the attributes for which search criteria has been entered by the
customer (if your customer enters search criteria in the color field, but not in the size
field, the Advanced Search will only search within the color attribute). Within a given
attribute, the query will locate occurrences of the characters similar to the manner
in which the Quick Search works, however this is only for text fields. Drop-downs,
multiple select menus, and other Input Types will search for an exact match, since
the available search options are already presented to the customer. As a result of
the multiple search fields, there are no Search Terms which save to admin.
147
Chapter 6: Customers
Default Customer Options
Before creating customer accounts, or allowing your customers to create their own
accounts, it is important for you to configure your customer settings. To do so,
navigate to System > Configuration and select the Customer Configuration tab in the
left column.
Account Sharing Options
Share Customer Accounts - When a customer creates an account in a given
Store View, that account will be shared with every Store View in the same
Website if you select Per Website. If you select Global, that account will be
shared will be shared with every store view in every Website that you have
created.
Create New Account Options
Email Template - Select the template for the email that will be sent to a
customer when they create a new account. There is more information on
how to configure these templates later in the chapter.
Email Sender - Designate the address from which New Account emails will be
sent to your customers. There is more information on how to configure these
addresses later in the chapter.
Default Email Domain - This field is primarily used during admin Order
creation. In this process, the email field is optional. If it is left blank, Magento
will automatically generate an email address to associate to the Order. The
format will be [Customer ID]@[Default Email Domain]. During this process
there is a checkbox allowing you send an Email Order Confirmation. If you
left the email field blank, you would not want to send an Order email. The
automatically generated email is fictitious, so it would bounce back.
Default Group - Designate the Customer Group that will be assigned to all
customers when they first create an account. This drop-down will list all
existing Customer Groups other than NOT LOGGED IN. There is more
information about Customer Groups later in the chapter.
Need to Confirm - Select whether or not you customers will need to send an
email confirmation reply in order to activate their account.
Password Options
Forgot Email Template - Select the template for the email that will be sent to
a customer when they click the Forgot Your Password? link during log in.
148
Forgot Email Sender - Designate the address from which the Forgot Password
emails will be sent to you customers.
Contact Options and Emails
Throughout Magento there are options to send your customers email notifications
for various purposes, from newsletter subscription, to invoice creation. Each option
requires you to select the template of the email, and the address from which the
email will be sent. Each of these two aspects is configured in a different location. In
addition to being able to contact your customers for various purposes, you also have
the ability to allow your customers to contact you via the Contact Us feature.
Editing Email Templates
To create new email templates, navigate to System > Transactional Emails, and click
Add New Template in the top right of the page.
Template - From this drop-down, you can select one of the many pre-existing
email templates that are included with Magento by default. These have been
created for a number of purposes, including currency rate update warnings,
Order updates from the admin, and product stock alerts.
Locale - If you have Locales other than English (United States) installed, you
can select one of those Locales from this drop-down prior to loading the preexisting templates. This will load the selected template in the corresponding
language of that Locale. Click Load Template and the template data will load
into the Template Subject and Template Content fields, where you can
customize them for your store.
149
Template Name - This is the name of the template as it will appear in the
drop-down menus throughout the admin, where you can select to use this
template for various purposes.
Template Subject - This is the subject of the email that will be sent when you
designate to use this template. This can be loaded from a pre-existing
template above, or you can create your own.
Template Content - This is the body of the email that will be sent when you
designate to use this template. This can be loaded from a pre-existing
template above, or you can create your own. All stylization must be in HTML
format.
At the top of the page there are buttons which offer several more features. If you
have loaded a pre-existing template, or if you have created your own using HTML
tags, you can click Convert to Plain Text. This will remove all HTML tags in the
Template Content field and display only the text. You can then return the tags by
clicking Return Html Version. If you leave the tags, you can click Preview Template,
which will load the Template Content into the browser window so that you can see
the formatted content as it will display to your customers in the email. When you are
finished with your edits, click Save Template, and you will be able to select this
template to send to your customers for various purposes. It will also add to the
template list, where you can Preview each template by clicking Preview in the Action
column, or edit the template by clicking on it.
150
Email Sender
To configure the addresses from which your customer emails will be sent, navigate
to System > Configuration, and select the Store Email Addresses. There are five
different sender to which you can associate an email address: General contact, Sales
representative, Customer support, Customer email 1, and Customer email 2. For
each of these senders, you must designate the Sender name, which is the name that
will appear in the drop-down menus throughout the admin (where you can select to
use these Senders for various purposes), and the name that will appear next to the
Sender Email in the emails sent to your customers. You must also designate the
Sender email, which is the address from which the emails (that you associate to this
Sender) will be sent.
Contact Us
If you wish to allow your customers to be able to send comments to you via email,
Magento offers a Contact Us feature. In order to enable this, navigate to System >
Configuration, click the Contacts tab from the left column, and select Yes from the
Enable Contact Us drop-down. This will create a Contact Us link in the footer of you
site on the front-end. When your customers click this link, they will be directed to
the Contact Us page, which enables them to enter their name, email address,
telephone number, and a comment. When they click Submit, this information will be
sent via email to the address entered in the Send Emails To drop-down in the same
configuration page as above. The Email Sender drop-down determines the address
from which the email will be sent to the specified address. The Email Template dropdown determines the template that the email will use.
Creating Customers
Customer accounts can be created multiple ways. Perhaps the most typical method
to create an account is for your customers to do so themselves in the front-end.
However, Magento allows you to create new customer accounts in the admin.
In Front-end
There are two sections in the front-end where your customers may choose to
register and create a new customer account: Log In and Checkout. The process for
both of these is very similar.
Log In
In the top right of your store is a Log In link. When a customer clicks here, they will
have the option to log in using their pre-existing account, or, if they don’t already
have an account, they can create one by clicking Create an Account. This will redirect
them to the Create an Account page, which will require them to enter their First
Name, Last Name, Email Address, and Password (they will have to confirm the
password as well). They will also have the option to sign up for the newsletter by
151
checking the checkbox. When they click Submit, the customer account will be
created in Magento, and the customer will by redirected to the My Account page.
There is more information later in the chapter about the features offered to your
customers in this page.
Checkout
If a customer is not logged in when they click the Proceed to Checkout button, they
will have the option to log in using their pre-existing account, or, if they don’t
already have an account, Checkout as Guest (if you have enabled this) or create a
new account by selecting Register. If they select Register, and click Continue, they
will be redirected to the standard one-page checkout page. This is the same process
that previously registered customers go through when checking out, except that the
First Name, Last Name, Email Address, and Password fields will be blank. When all of
the information is entered and the Order is submitted, a new account will be created
using the information used in the checkout, including the address information, which
will automatically be saved to the account.
152
In Admin
To create a new customer account in the admin, navigate the Customers > Manage
Customers and click Add New Customer in the top right of the page. This is the same
process that your customers will go through on the front-end, with some small
differences.
Account Information
Create In - This is the Website in which this account will be created. You can
also choose to create it in the Admin. If you have configured customer
accounts to share Per Website, this will affect in which Websites your
customers will have accounts. If customer accounts are shared Globally, this
has little effect.
Customer Group - You have the option to select the Customer Group to
which this customer will be assigned. Customers who create an account on
the front-end will automatically be assigned to the Customer Group
designated in System > Configuration, as described above. There is more
information about Customer Groups below.
Send welcome email - By checking this checkbox you can choose to send a
new account email to the customer. This is the email you designated in
System > Configuration, as described above. Customers who create an
account on the front-end will automatically receive this email.
Password - You will not be required to confirm the password, because the
characters are not hidden in this field. Instead of entering a password
manually, you can check the checkbox to auto-generate a password for the
customer. Either way, the password will be included in the email sent to the
customer.
Addresses
In the Addresses tab, you will have the option to enter one or more addresses for
this account while creating it. For each address you wish to create, click Add New
153
Address. As you enter the information in the fields on the right, the address manager
panel on the left will update. The address manager panel will have a separate entry
for each address, and you can designate which address is the Default Billing Address
and which is the Default Shipping Address by selecting the radio button. The default
addresses will automatically be selected from the address drop-down each time an
order is placed with this account in the admin or front-end. When an address is
selected as either of the defaults, the red X button will disappear, because it will not
be able to be deleted.
When you are finished, click Save Customer. Once a customer has been created, you
will have access to several additional tabs in the left column. There is more
information later in the chapter about the features offered in these tabs.
Customer Groups
For each customer who has an account in your store, you have the option to
configure a Customer Group. Customer Groups are a means to apply other features
in Magento to groups of customers all at once. This is useful in many areas, from
allowing certain customers to use Catalog and Shopping Cart Price Rules, to assigning
Customer Tax Classes.
Creating Customer Groups
To create Customer Groups, navigate to Customers > Customer Groups, and click
Add New Customer Group in the top right of the page.
Group Name - Enter the name of the Customer Group as if will appear
throughout the admin.
Tax class - Each Customer Group will have one Customer Tax Class assigned
to it. Select that tax class from this drop-down, which will list all existing tax
classes you’ve created in Sales > Tax > Customer Tax Classes. Tax classes are
not assigned directly to customers, but rather to Customer Groups, which are
154
then assigned directly to customers. For more information about Taxes, refer
back to Chapter 4: Get Ready for Selling.
By default, Magento comes with two Customer Groups: NOT LOGGED IN and
General. NOT LOGGED IN is the default Customer Group for all customers who have
not created an account, such as those who have used Guest Checkout or Google
Checkout (if you have enabled those features), which do not require creating an
account in Magento. General is the default Customer Group for newly registered
customers, although this can be changed in System > Configuration, as described
earlier in the chapter. Neither of these Customer Groups can be deleted, and the
Group Name for NOT LOGGED IN cannot be edited. When you are finished, click
Save Customer Group, and you can now assign this group to your customers.
Managing Customer Groups
Assigning Customers to Customer Groups
Now that you have set up all of your Customer Groups, you can assign them to
customers by navigating to Customer > Manage Customers. When customers first
create an account, they will be assigned to the Customer Group you designated in
System > Configuration as described earlier in the chapter. To re-assign the customer
to a new Customer Group, locate the customer and click the Edit button in the
Action column. Click the Account Information tab in the left column. You can select a
new Customer Group in the Customer Group drop-down, which lists all existing
Customer Groups other than NOT LOGGED IN. There are also a few other places
where you can change a customer’s Customer Group, such as when creating a new
order in the admin, or creating a reorder in the admin. To re-assign the Customer
Group for several customers at once, refer to Batch Updates below.
Using Customer Groups as filters
There are several places in Magento where you can filter features to only apply to
certain Customer Groups. You can filter Catalog Price Rules by navigating to
Promotions > Catalog Price Rules, and you can filter Shopping Cart Price Rules by
navigating to Promotions > Shopping Cart Price Rules. There is more information
about both of these feature in Chapter 5: Promotions, Marketing, and Content
Pages. You can filter Tier Pricing by navigating to Catalog > Manage Products,
selecting a product and clicking the Prices tab. More information about this feature
can also be found in Chapter 5.
Batch Updates to Customers
Similar to Batch Updates for products, this feature saves you time by allowing you to
change certain settings for multiple customers at the same time. To make Batch
Updates to customers, navigate to Customers > Manage Customers. Select the
customers to which you would like to make updates. At the top of the customers list,
you have the option to Select All customers or Select Visible customers (customers
currently displaying on the page). Or, you can simply check the checkboxes of each
155
customer to which you wish to make updates individually. You can see the number
of items selected at the top of the customers list, and it will update each time a
checkbox is checked or unchecked. When you have all the desired customers
selected, chose your preferred Action from the drop-down menu, also at the top of
the customers list.
Delete - This will delete the selected customers from your catalog when you
press Submit.
Subscribe to/Unsubscribe from newsletter - This will subscribe/unsubscribe
the selected customers to/from the newsletter when you press Submit.
Assign a customer group - Selecting this will produce a Group drop-down
menu to the right, which lists all existing Customer Groups other than NOT
LOGGED IN. Select a Customer Group, and this will be assigned to the
selected customers when you press Submit.
Front-End and Back-End functionality for
Customer Accounts
Front-End
Once a customer has created an account, and logs in they will have access to
features on the front-end that they otherwise would not have. This includes the My
Account page, My Wishlist, and Checkout with Multiple Addresses.
My Account
When a customer clicks on the My Account link, they will be taken to the Account
Dashboard. This is a summary of the most important account information, including
Recent Orders, the general Contact Information, Newsletter status, default
addresses, and Recent Reviews. If they click Edit for any of these options, they will be
redirected to the corresponding tab of the more detailed My Account page. This
offers more even more account information.
156
Account Dashboard
Takes the customer back to the summary page.
Address Book
Lists the Default Billing Address, Default Shipping Address (these are listed
separately even if they are the same address, unlike in the admin), and all additional
addresses with the option to edit each individually.
Account Information
Here the customer can edit the general contact information, including the account
password.
157
My Orders
Lists all Orders placed by the customer, with more detailed information available
when View Order is clicked. Here, the order status of each Order can be tracked by
the customer via RSS feeds (refer back to Chapter 5 for more details). Additionally, if
an Invoice, Shipment, or Credit Memo has been created for an Order, an About this
Order bar will appear above the Order information, containing an Invoices,
Shipments, or Refunds link, respectively (or a combination of multiple links). Each
link will contain more detailed information about all related Invoices, Shipments, or
Credit Memos, with the ability for your customer to print a copy of each individually,
or copies of all Invoices, Shipments, or Credit Memos simultaneously. Shipments
have an additional feature. If a Shipment has one or more associated tracking
numbers, your customer will have the ability to Track this shipment or Track all
shipments, which will open a pop-up window containing the shipment status, which
Magento receives directly from the shipment gateway. There is more information
about Invoices, Shipments, and Credit Memos in Chapter 8: Managing Orders.
My Product Reviews
Lists all product reviews placed by the customer, with and a link to the product, and
more detailed information when View Details is clicked.
Newsletter Subscription
Lists all newsletters, with a checkbox next to the ones to which the customer is
subscribed.
My Wishlist
List all products that the customer has added to the wishlist, with an option to add
comments and add each item to the cart. When the customer is logged in, they can
also see a quick view of their wishlist in the right column, below the shopping cart
feature. Additionally, the number of items in the wishlist will display next to the My
Wishlist button at the top of the page.
Checkout with Multiple Addresses
In order to be able to use this feature, the customer must have an account and be
logged in. Checkout as Guest is not available for this checkout process, even if you
have enabled it. Additionally, there is no option to Register during checkout. If a
customer does not already have an account, they will have the option to Create an
Account, which must be completed as a separate process before they can proceed to
the checkout page. For more information about Checkout with Multiple Address,
refer back to Chapter 4: Get Ready for Selling.
158
Back-End
Once a customer account is created, you will have access to more features in the
admin than are available when creating an account in the admin. These features
include those available to the customer in the My Account page on the front-end,
along with several additional features.
Customer View
This is a summary of the customer’s information, including the most recent time and
date the customer logged in, whether the customer is online currently, the time and
date the account was created, the store in which the account was created, the
Customer Group, Primary Billing Address, a summary of lifetime purchase
information grouped by store, a list of all Recent Orders, and the items currently in
the Shopping Cart and Wishlist.
Account Information
This includes the general contact information, and has the same functionality as
when originally creating and account from the admin. It will also list the Website and
Store View in which the account was created.
Addresses
This includes all the customer’s addresses, and has the same functionality as when
originally creating an account from the admin.
Orders
159
Lists all Orders created by the customer, or created for the customer from the
admin. Clicking on an order will redirect to the Order page, which contains for
detailed information and has additional features, such as creating Invoices and
Shipments. For more information about these features, refer to Chapter 8:Managing
Orders.
Shopping Cart
Lists all products currently in the customer’s Shopping Cart, with the option to
Delete each product. Clicking on a product will redirect you to that product’s page in
the admin.
Wishlist
Lists all products currently in the customer’s Wishlist, with the option to Delete each
product. Clicking on a product will redirect you to that product’s page in the admin.
Newsletter
Here you can subscribe or unsubscribe this customer from the newsletter, as well as
view a list of all the newsletters of which this customer is a recipient. This looks very
similar to the Newsletter Queue, and includes both Sent and Not Sent newsletters.
Product Reviews
Lists all Product Reviews submitted by the customer, and clicking on a Review will
redirect you to that review’s page in the admin.
Product Tags
Lists all Product Tags submitted by the customer, and clicking on a Tag will redirect
you to that tag’s page in the admin.
Online Customers
You can see a list of every customer that is currently logged in by navigating to
Customers > Online Customers. This list even includes customers who are not logged
in. They are referred to as Visitors, and the First Name for all Visitors will be Guest.
For each customer, you will be able to see the IP address from which they are
accessing your site, the time their session began, the time of the most recent activity
in your site, and the most recent URL they visited. When you click on a logged in
customer, you will be redirected to that customer’s page in the admin.
160
Chapter 7: Reports and Analytics
Reports
Magento includes several useful Reports to keep updated on anything from your
customer’s Shopping Cart to their Tags. All of the reports can be accessed by
navigating to the Reports tab, and then locating the name of the desired report.
Every report can be downloaded in CSV or Excel format. To do so, navigate to the
appropriate report, select the desired format from the Export to drop-down, and
click Export.
Sales
Sales Report
This report summarizes sales information for the designated scope and period of
time. The scope can be defined in the Show Report for drop-down at the top of the
page. There will be one line for each Period. A Period can be a Day, Month, or Year,
and is defined in the Show by drop-down at the top of the page. The number of
periods in the report depends on the date range designated at the top of the page.
For each Period, you can see the total number of Orders placed, total number of
items ordered, and the total monetary amount for the Subtotal, Tax, Shipping,
Discount, Total, Invoices, and Credit Memos of each order. There will also be a row
that totals the amounts of all Periods displayed in the report.
Tax Report
This report summarizes tax information for Orders placed within the designated
scope and period of time. The scope can be defined in the Show Report for dropdown at the top of the page. There will be one line for each Period. A Period can be a
Day, Month, or Year, and is defined in the Show by drop-down at the top of the
page. The number of periods in the report depends on the date range designated at
the top of the page. Each Period will further be divided by the Tax Rates. For each
161
Tax Rate, you can see the total number of Orders placed using that Tax Rate, and the
total amount of tax charged using that Tax Rate. There will also be a row that totals
the amounts of all Periods displayed in the report.
Shipping Report
This report summarizes shipping information for Orders placed within the
designated scope and period of time. The scope can be defined in the Show Report
for drop-down at the top of the page. There will be one line for each Period. A
Period can be a Day, Month, or Year, and is defined in the Show by drop-down at the
top of the page. The number of periods in the report depends on the date range
designated at the top of the page. Each Period will further be divided by the Shipping
Carrier/Method. For each Carrier/Method, you can see the total number of Orders
placed using that Carrier/Method, and the total amount of shipping charged using
that Carrier/Method. There will also be a row that totals the amounts of all Periods
displayed in the report.
Total invoiced
This report summarizes Invoice information for the designated scope and period of
time. The scope can be defined in the Show Report for drop-down at the top of the
page. There will be one line for each Period. A Period can be a Day, Month, or Year,
and is defined in the Show by drop-down at the top of the page. The number of
periods in the report depends on the date range designated at the top of the page.
For each Period, you can see the total number of Orders placed that have Invoices
associated to them, and the total monetary amount invoiced, including how much of
this amount was captured and how much was not. There will also be a row that
totals the amounts of all Periods displayed in the report.
Total refunded
This report summarizes Credit Memo information for the designated scope and
period of time. The scope can be defined in the Show Report for drop-down at the
top of the page. There will be one line for each Period. A Period can be a Day,
Month, or Year, and is defined in the Show by drop-down at the top of the page. The
number of periods in the report depends on the date range designated at the top of
the page. For each Period, you can see the total number of Orders placed that have
Credit Memos associated to them, and the total monetary amount refunded,
including how much of this amount was refunded online and how much was offline.
There will also be a row that totals the amounts of all Periods displayed in the
report.
Coupons Report
This report summarizes coupon information for Orders placed within the designated
scope and period of time. The scope can be defined in the Show Report for dropdown at the top of the page. There will be one line for each Period. A Period can be a
162
Day, Month, or Year, and is defined in the Show by drop-down at the top of the
page. The number of periods in the report depends on the date range designated at
the top of the page. Each Period will further be divided by the Coupon Code. For
each Coupon Code, you can see the total number of Orders placed using that
Coupon Code, and the total monetary amounts for the Subtotal, Discount, and Total
of Orders placed using that Coupon Code. There will also be a row that totals the
amounts of all Periods displayed in the report.
Shopping Cart Report
Products in carts
This report lists all products in your store, including the price, the amount of
Shopping Carts currently containing that product, and the amount of Orders placed
containing that product.
Abandoned carts
This reports lists all registered customers who added products to their Shopping
Cart, and then logged out with the items still in the cart. For each customer, you can
see the number of line items in the cart, total quantity, total monetary amount of
the products, any coupon code the customer may have applied, and the timestamps
for when the first item was added to the cart and the most recent cart activity.
Products
Bestsellers
This report summarizes product information for products ordered within the
designated scope and period of time. The scope can be defined in the Show Report
for drop-down at the top of the page. There will be one line for each Period. A
Period can be a Day, Month, or Year, and is defined in the Show by drop-down at the
top of the page. The number of periods in the report depends on the date range
designated at the top of the page. Each Period will further be divided by the product
name. For each product name, you can see the product price and total quantity of
that product which has been ordered. There will also be a row that totals the
amounts of all Periods displayed in the report.
Most Viewed
This report summarizes product information for products viewed within the
designated scope and period of time. The scope can be defined in the Show Report
for drop-down at the top of the page. There will be one line for each Period. A
Period can be a Day, Month, or Year, and is defined in the Show by drop-down at the
top of the page. The number of periods in the report depends on the date range
designated at the top of the page. Each Period will further be divided by the product
name. For each product name, you can see the product price and total number of
times a customer has navigated to that product’s page. There will also be a row that
totals the amounts of all Periods displayed in the report.
163
Low stock
This report lists all products in your store, including the SKU and remaining quantity
in stock. The products are listed from lowest quantity to highest quantity.
Customers
New Accounts
This report summarizes new customer accounts the designated scope and period of
time. The scope can be defined in the Show Report for drop-down at the top of the
page. There will be one line for each Period. A Period can be a Day, Month, or Year,
and is defined in the Show by drop-down at the top of the page. The number of
periods in the report depends on the date range designated at the top of the page.
For each Period, you can see the total number of new customer accounts created.
There will also be a row that totals the amounts of all Periods displayed in the
report.
Customers by orders total
This report summarizes customer order information for Orders placed within the
designated scope and period of time. The scope can be defined in the Show Report
for drop-down at the top of the page. There will be one line for each Period. A
Period can be a Day, Month, or Year, and is defined in the Show by drop-down at the
top of the page. The number of periods in the report depends on the date range
designated at the top of the page. Each Period will further be divided by the
customer name. For each customer name, you can see the total number of Orders
they placed, the average monetary amount of those Orders, and the total monetary
amount of those Orders. The customers will be listed from highest to lowest by the
total monetary amount of their Orders. There will also be a row that totals the
amounts of all Periods displayed in the report.
Customers by number of orders
This report summarizes customer order information for Orders placed within the
designated scope and period of time. The scope can be defined in the Show Report
for drop-down at the top of the page. There will be one line for each Period. A
164
Period can be a Day, Month, or Year, and is defined in the Show by drop-down at the
top of the page. The number of periods in the report depends on the date range
designated at the top of the page. Each Period will further be divided by the
customer name. For each customer name, you can see the total number of Orders
they placed, the average monetary amount of those Orders, and the total monetary
amount of those Orders. The customers will be listed from highest to lowest by the
number of Orders placed. There will also be a row that totals the amounts of all
Periods displayed in the report.
Review Reports
Customers Reviews
Lists all registered customers who have placed a review, and the number of total
reviews that they have placed.
Products Reviews
Lists all products that have received a review, the number of total reviews received,
the average rating, and the time and date of the most recent review. Clicking on a
product will redirect to a list of each review placed for that product, including the
Nickname, Summary, the content of the review, and the timestamp.
Tags Reports
Customer
Lists all customers who have submitted tags that currently have a Status of
Approved, and the number of approved tags submitted by the customer. Clicking on
a customer will redirect to a list of each approved tag, including the product name,
tag name, the site(s) where the tag is visible, the site where the tag was submitted,
and the timestamp when it was submitted.
Products
Lists all products for which tags have been submitted that currently have a Status of
Approved, and the number of unique approved and total approved tags. Clicking on
a product will redirect to a list of each unique approved tag, including the tag name,
the number of times the tag has been applied to this product, and the site(s) where
the tag is visible.
Popular
Lists all approved tags, and the number of times each tag has been used in your
store. You can filter the tags by scope using the Show Report for drop-down at the
top of the page.
165
Search Terms
Lists all existing search terms, including the number of results that displayed the last
time the search term was used, and the number of times a search has been
performed using that term. Both of those numbers, however, can be manipulated in
the admin by navigating to Catalog > Search. For more information on Search terms,
refer back to Chapter 5.
Dashboard
While the Reports offer a variety of very detailed information about your site, you
can get a quick summary of some of the most important information regarding your
site with the Magento Admin Dashboard. By default, the Dashboard is first page you
will view when logging in to the admin. In the top left corner is the View Statistics
for drop-down, where, like most reports, you can change the scope of the data
represented. In the left column is a summary of your Lifetime Sales (total monetary
amount of all Orders) and Average Sales (total monetary amount divided by number
of Orders), followed by links to the five most recently placed Orders, five Search
Terms most recently used in the front-end, and five most popular Search Terms
(based on number of uses). In the main section of the Dashboard, in the Orders tab,
you can see a chart of Order frequency over a period of time, which you can change
in the Select Range drop-down. If you select the Amounts tab, it will display the
same information using the monetary amounts of the various Orders, rather than
the number of Orders placed. At the bottom of this chart is the Revenue (total
monetary amount of all Orders), Tax (total monetary amount of all Taxes paid),
Shipping (total monetary amount of all Shipping paid), and Quantity (total number
of all Orders placed). Underneath this section is four tabs, each containing links to
various pages of the admin. The Bestsellers tab contains links to the five most
purchased products. The Most Viewed Products tab contains links to the five most
viewed products. The New Customers tab contains links to the five most recently
created customer accounts. Finally, the Customers tab contains links to the five
customers with the highest Total Order Amount.
166
Analytics
Magento offers integration of Google Analytics, which tracks information about your
customers’ experiences in your site. Once you create a Google Analytics account,
navigate to System > Configuration, and click the Google API tab in the left column.
In the Google Analytics box, select to Enable the feature, and then enter your
Account number, which will be provided to you by Google Analytics. When you are
finished, click Save Config, and the tracker code will be inserted into each page of
your site.
167
Chapter 8: Managing Orders
Overview of Order Functionality
Creating Orders
With Magento, you have the ability to create an Order in the administrative
interface, just like your customer does in the front-end. This is useful if you have a
call center with operators taking orders directly for your customers, because the
process is not much different from the one your customers experience. You have all
the same abilities that your customers have when creating an Order in your
webstore, including the ability to move products between the shopping cart,
wishlist, last ordered items list, products in compare list, recently viewed products,
and recently compared products.
Terminology
In addition to creating Orders, there are many features in the Magento admin for
Order fulfillment and management, from creating Invoices, Shipments, and Credit
Memos, to canceling and editing.
Sales Order
When an order is created, either from the front end, or through the admin, a Sales
Order will be created to record this transaction. It will be accessible in the Orders list,
by navigating to Sales > Orders in the admin. This is merely a temporary record,
however, as the payment has not been processed, and the Order can be canceled.
Invoice
This is a record of the receipt of payment for an Order (in some cases, payment can
actually be automatically received simultaneously during the creation of an Invoice),
thereby essentially making it a permanent record of an Order. Multiple Invoices can
be created per Order, containing as much or little of the purchased item quantity as
you desire. However, each unit of each item can only be invoiced one time, so there
is a finite limit to the number of Invoices that can be created. Because this is a
permanent record of the Order, all quantity that has been Invoiced can no longer be
canceled.
Shipment
This is a record of the items in an Order which have been shipped. Like an Invoice,
Multiple Shipments can be created per Order, with a finite limit.
Credit Memo
168
This is a record of a refund. An item cannot be refunded until it is paid (as in an
Invoice), so you will not be able to create a Credit Memo until an Invoice has been
created. While it is a record of a refund, it is not a record of a return (the actual
returning of funds to the customer). In some cases, a return can be given
simultaneously during the creation of a Credit Memo (just as a payment is with an
Invoice), but it is not a necessary part.
Managing and Editing Orders
This encompasses the remainder of options you have with regard to completed
Orders. It includes putting an Order On Hold, Canceling the Order, Editing various
aspects of the Order, or creating a new Order using the values from the original
Order.
Creating Orders
Accessing the Order Page
There are two ways to access the Order Creation Page. You can navigate through the
Orders page, or through the Manage Customers Page.
From the Orders page
1. In the Magento Admin Panel, navigate to Sales > Orders.
2. Click Create New Order in the upper right corner of the page.
3. Locate and select the customer for which you would like to create the order.
Or, you can Create New Customer first.
4. Select the store in which you would like the order to be placed. When a
customer creates an account in a website, that account will exist either
globally, or only within the website in which it was created. This depends on
what you select in the Share Customer Accounts drop-down in the Customer
Configuration tab of System > Configuration. The Shopping Cart and Wishlist
will be shared across the same scope as the account itself, so these will not
change between different store views, however the rest of the Customer’s
Current Activities are not shared. Therefore, selecting a store determines not
only to which product list you will have access when creating the order, but
also to which of your Customer’s Current Activities lists you will have access.
If you choose a store within a website in which the customer does not have
an account, an account will be created for the customer in that website upon
completion of the order, with all the customer information duplicated.
169
You are now ready to create the order.
From the Customers page
1. Navigate to Customers > Manage Customers.
2. Locate and select the customer for which you would like to create the order,
and click the Edit link in the Action column.
3. Click Create Order.
4. Select the store in which you would like the order to be placed.
You are now ready to create the order.
Creating the Order
From this one page, you have the ability to edit all aspects of the Order.
Select the Order Currency from the drop-down list.
Manage the Customer’s Current Activities in the left column. Select the left
checkbox for all products you would like to remove from the Shopping Cart,
Wishlist, Last ordered items, Products in Compare List, Recently Compared
Products, or Recently Viewed Products, and select the right checkbox for all
products you would like to add to your order. Select both if you want to add
it to the order and remove it from the list simultaneously, and then click
Update Changes.
170
171
To add products that are not in the Customer’s Current Activities section,
click Add Products on the right of the page. A list of all products in the store
will display. Locate and select the checkbox for each product you wish to add,
enter the desired quantity, and click Add Selected Product(s) to Order. Note:
Configurable and Grouped Products will not display in this list. Because these
are methods for displaying Simple Products, they are not necessary here.
The Items Ordered section should now contain all the products you want in
the order. You can edit the price and quantity, add a discount (and specify
which products receive the discount using the checkbox), and add a gift
message (if that feature is enabled). You can also remove the product by
selecting the desired Action from the dropdown menu. You can simply
Remove the product, remove and Move to Shopping Cart, or remove and
Move to Wishlist. After you have selected all the edits you wish to make,
click Update Items and Qty’s.
You can edit the customer’s Email or Customer Group in the Account
Information section.
Select the Billing and Shipping Address, or, you can select Add New Address
from the addresses dropdown list.
Select the Payment and Shipping Method.
In the Order Total section, you can Apply Coupon Code or Add Order
Comment. The comment will appear in the completed order information
page. Selecting the Apply Comment to the Confirmation Email checkbox will
cause the comment to also appear at the bottom of the customer’s
confirmation email. However, the customer will only receive this email if you
also select the Send Order Confirmation Email checkbox. You can configure
the Order confirmation email by navigating to System > Configuration, and
clicking the Sales Emails tab in the left column. In the New Order
Confirmation Email Sender drop-down, select the address from which the
172
order confirmation email will be sent. For more information on how to
configure these email addresses, refer back to Chapter 6. In the New Order
Confirmation Template drop-down, select the template which the order
confirmation email will use. For more information on how to configure these
templates, refer back to Chapter 6. In the Send Order Email Copy To field,
you can enter an email address which will receive a copy of the order
confirmation email each time one is sent. Order Comments can also be added
to completed Orders. If you choose to notify the customer when adding
comments, the email notification configuration is located in the same
Configuration page as above, in the Order Comments section. The status of
the Order confirmation email will display in the completed Order (either sent
or not sent), in the Order information box.
When you have finished reviewing all of your selections, click Submit Order,
and the order will be processed. If you wish, Magento will automatically
notify you via RSS Feed of the creation of all new Orders, created in the
admin or the front-end. In order to use this RSS feed, navigate to Sales >
Orders, and click the New Order RSS link at the top of the page. You will be
prompted to enter your User Name and Password. These are the same that
you use to access the Magento admin panel. You will be redirected to the RSS
page, where you can select which reader you would like to use for receiving
this feed.
Sales Order Options
Whether an Order has been created by you in the admin, or by your customer in the
front-end, you will have the ability to use Magento’s order fulfillment features. This
includes creating Invoices, Shipments, and Credit Memos for every Order.
Invoice Options
Create New
You can create an Invoice for an Order by clicking the Invoice button at the top of
the Order page. For Orders with online payment methods, this button will not
appear if you have chosen to Authorize and Capture in the Payment Action dropdown for that payment method in the Payment Method tab of System >
Configuration. This will take you to the the New Invoice page. A new invoice page
looks very similar to the completed Order page, with some additional fields that can
be edited. When creating the first Invoice for an Order, the shipping amount for the
entire order will be included, regardless of how many products are included in the
first invoice. If the first Invoice did not include all of the items, all additional invoices
thereafter will have no shipping charges attached (there will be no line for shipping
in the order totals box). The tax, however, will only be added for the items that are
included in the invoice.
Qty to Invoice - For each line item, there will be a Qty to Invoice field, which
will be prepopulated with the total quantity in the order that is still available
to be invoiced. This is equal to the full quantity in the order minus the
173
quantity already invoiced. This amount can be reduced, but since it equals
the maximum quantity available for invoice, it cannot be increased. If the qty
is changed, you must press Update Qty’s to save these changes, to
recalculate the pricing information. You will not be able to change the
quantities for Orders placed with online payment methods (except Google
Checkout). For these types of Orders, only one Invoice can be created per
Order, which will include the full quantity ordered.
Placed with an offline payment method
Create Shipment - There is a checkbox in the Shipping Information box called
Create Shipment. If it is checked, a tracking number generator will appear
(the same as exists in a New Shipment page), and you can attach one of more
tracking numbers to the Shipment, which will simultaneously be created
upon completion of the Invoice, The Shipment will include the same products
as the Invoice.
Amount - If the Order’s payment is an online method (such as through
Authorize.net) there will be a drop-down in the order totals box called
Amount. There are three options available.
o Capture Online - When the Invoice is submitted, the system will
capture the payment through the third party payment gateway. You
will have the ability to create a Credit Memo, or Void the Invoice.
o Capture Offline - When the Invoice is submitted, the system will not
capture the payment. It will be assumed that the payment is going to
be captured directly through the gateway, and you will no longer have
the option to capture this payment through Magento. You will have
the ability to create a Credit Memo, but you will not have the option
to Void the Invoice (even though the Order used an online payment,
the Invoice is essentially an offline Invoice).
o Not Capture - When the Invoice is submitted, the system will not
capture the payment. However, it will be assumed that you will
capture the payment through Magneto at a later date. Therefore,
there will be a Capture button in the completed Invoice. Before
capturing, you will be able to cancel the Invoice, and after capturing,
you will be able to Credit Memo and Void the Invoice. Note: Do not
select Not Capture from the drop-down unless you are certain that you
are going to capture the payment through Magento at a later date.
You will not be able to create a Credit Memo until the payment has
been captured using the Capture button.
174
Placed with an online payment method
Just as with an Order, you will have the ability to notify the customer of the
creation of an Invoice (by checking the Email Copy of Invoice checkbox) and
add comments to the Invoice (in the Invoice Comments field). If you have
done both, you can choose to include the Invoice Comments in the Invoice
notification email by checking the Append Comments checkbox. You can
configure the Invoice email by navigating to System > Configuration, and
clicking the Sales Emails tab in the left column. In the Invoice Email Sender
drop-down, select the address from which the Invoice email will be sent. For
more information on how to configure these email addresses, refer back to
Chapter 6. In the Invoice Email Template drop-down, select the template
which the Invoice email will use. For more information on how to configure
these templates, refer back to Chapter 6. In the Send Invoice Email Copy To
field, you can enter an email address which will receive a copy of the Invoice
email each time one is sent. The status of the Invoice email will display in the
completed Invoice (either sent or not sent), next to the Invoice number.
When finished, press the Submit Invoice button at the bottom of the page.
Completed Invoices
When an Invoice is completed, it can be accessed in two locations. In an Order page,
there is an Invoice tab, which contains a list of all Invoices associated to that Order. If
you navigate to Sales > Invoices, you can view a list of all Invoices associated to all
Orders. There are several features available for completed Invoices.
Credit Memo - Completed Invoices created from Orders will have a Credit
Memo button at the top of the page, which will take you to the New Credit
Memo page. This is almost identical to creating a Credit Memo from the
Order page (more about this below), except that the Qty to Refund will be
prepopulated with the total available quantity to refund from that particular
Invoice, rather than the from entire Order. This amount can be increased up
to the total available amount from the Order.
175
Cancel - If the Order’s payment is an online method, and you selected Not
Capture from the Amount drop-down when creating the Invoice, you will
have the option to Cancel the Invoice. There will be a record of the canceled
Invoice, but the Invoiced quantity will be able to be re-Invoiced at any time.
Capture - If the Order’s payment is an online method, and you selected Not
Capture from the Amount drop-down when creating the Invoice, you will
have the option to capture the payment anytime by clicking the Capture
button. Once the payment has been captured, the button will no longer
appear.
Void - If the Order’s payment is an online method, and you have captured the
payment through Magento (either automatically during Order creation,
during Invoice creation, or after the Invoice has been created), the Void
button will appear. Pressing this will void the payment through the third
party payment gateway. Unlike Cancel, the Invoiced quantity will no longer
be able to be Invoiced again.
Print - You have the option to print a copy of the Invoice using the Print
button. This will open a .pdf file containing all the Invoice information. At the
top of the Invoice slip will display a custom image and address. These can be
configured by navigating to System > Configuration, clicking the Sales tab in
the left column, and opening the Invoice and Packing Slip Design section.
Invoices, packing slips, and Credit Memos will use the same image and
address. The image will automatically resize to fit the dimensions 200×50.
Comments - Invoice Comments can also be added to completed Invoices. If
you choose to notify the customer when adding comments, the email
notification configuration is located in the same Configuration page as above,
in the Invoice Comments section.
Shipment Options
Create New
You can create a Shipment for an Order by clicking the Shipment button at the top of
the Order page. This will take you to the the New Shipment page. A New Shipment
page looks very similar to the completed Order page, although it does not include
any price information, and it contains some additional fields that can be edited.
Qty to Ship - Similar to an Invoice, each line item will have a Qty to Ship field,
which will be prepopulated with the total quantity in the order that is still
available to be shipped. This is equal to the full quantity in the order minus
the quantity already shipped. This amount can be reduced, but since it equals
the maximum quantity available for shipment, it cannot be increased. If the
quantity is changed, however, you do not need to press Update Qty’s to save
these changes (no such button exists on this page), as there is pricing
information that needs to be recalculated.
176
Add Tracking Number
In the Shipping Information box is the tracking number generator. A new
tracking number will be added each time the button is pressed, allowing you
to add multiple tracking numbers. Each tracking number will have a section
to enter the carrier (selected from a dropdown menu), title, and number.
There will also be a delete button next to each tracking number in order to
remove it from the Shipment.
Just as with an Order, you will have the ability to notify the customer of the
creation of a Shipment (by checking the Email Copy of Shipment checkbox)
and add comments to the Shipment (in the Shipment Comments field). If you
have done both, you can choose to include the Shipment Comments in the
Shipment notification email by checking the Append Comments checkbox.
You can configure the Shipment email by navigating to System >
Configuration, and clicking the Sales Emails tab in the left column. In the
Shipment Email Sender drop-down, select the address from which the
Shipment email will be sent. For more information on how to configure these
email addresses, refer back to Chapter 6. In the Shipment Email Template
drop-down, select the template which the Shipment email will use. For more
information on how to configure these templates, refer back to Chapter 6. In
the Send Invoice Email Copy To field, you can enter an email address which
will receive a copy of the Shipment email each time one is sent. The status of
the Shipment email will display in the completed Shipment (either sent or not
sent), next to the Shipment number.
When finished, press the Submit Shipment button at the top of the page.
Completed Shipments
When a Shipment is completed, it can be accessed in two locations. In an Order
page, there is a Shipment tab, which contains a list of all Shipments associated to
that Order. If you navigate to Sales > Shipments, you can view a list of all Shipments
associated to all Orders. There are several features available for completed
Shipments.
Send Tracking Information - Completed Shipments will have a Send Tracking
Information button at the top of the page. If you add or edit Tracking
Information to the Shipment, you can click this button in order to notify the
customer of the changes. This will send an email in the format of the
Shipment Email Template.
Print - You have the option to print a packing slip for this Shipment using the
Print button. This will open a .pdf file containing all the Shipment
177
information. At the top of the packing slip will display a custom image and
address. These can be configured by navigating to System > Configuration,
clicking the Sales tab in the left column, and opening the Invoice and Packing
Slip Design section. Invoices, packing slips, and Credit Memos will use the
same image and address. The image will automatically resize to fit the
dimensions 200×50.
Comments - Shipment Comments can also be added to completed
Shipments. If you choose to notify the customer when adding comments, the
email notification configuration is located in the same Configuration page as
above, in the Shipment Comments section.
Credit Memo Options
Create New
Once you have created at least one Invoice, you can create a Credit Memo for an
order by clicking the Credit Memo button at the top of the Order page. The button
will only appear if at least one Invoice has been created. This will take you to the the
New Credit Memo page. A New Credit Memo page looks very similar to the
completed Order page, with some additional fields that can be edited.
Qty to Refund - Similar to an Invoice, each line item will have a Qty to Refund
field, which will be prepopulated with the total quantity in the order that is
still available to be refunded. This is equal to the full quantity that has been
invoiced minus the the quantity already refunded. If the Order’s Payment
Method is an offline method, or Google Checkout, this amount can be
reduced, but since it equals the maximum quantity available for refund, it
cannot be increased. If the Order’s Payment Method is an online method
other than Google Checkout, this field will not be editable, because Magento
currently does not support multiple captures for these Payment Methods
out-of-the-box (however, this can be customized). If the qty is changed, you
must press Update Qty’s to save these changes, to recalculate the pricing
information. There is also a Return to Stock checkbox. This will add the
refunded quantity back to the inventory quantity for each item. This is useful
if your customer has returned the product to you, and you want to resell it. If
the product is damaged or otherwise unable to be resold, you may want to
leave this checkbox unchecked. Note: This checkbox will only appear if you
have enabled your inventory to Decrease Stock When Order is Placed in the
Inventory tab of System > Configuration. You cannot return quantity to stock
if it had never been subtracted from stock.
Placed with an offline payment method
178
Refund Shipping - In the order totals box is the Refund Shipping field. The
value entered here will be refunded from the shipping. It will be
prepopulated with total shipping amount in the order that is still available to
be refunded. This is equal to the full Shipping Amount from the order minus
the Shipping Refund, which is the amount that has already been refunded.
Like the quantity, it can be reduced, but not increased.
Adjustment Refund - Below Refund Shipping is the Adjustment Refund field.
The value entered here will add to the total amount refunded as an
additional refund, so it will not apply to any particular aspect of the order
(shipping, items, or tax). However, the amount entered here cannot raise the
Total Refund higher than the Paid Amount.
Adjustment Fee - Below Adjustment Refund is the Adjustment Fee field. The
value entered here will subtract from the total amount refunded, but will not
be subtracted from any particular aspect of the order (shipping, items, or
tax).
Just as with an Order, you will have the ability to notify the customer of the
creation of a Credit Memo (by checking the Email Copy of Credit Memo
checkbox) and add comments to the Credit Memo (in the Credit Memo
Comments field). If you have done both, you can choose to include the Credit
Memo Comments in the Credit Memo notification email by checking the
Append Comments checkbox. You can configure the Credit Memo email by
navigating to System > Configuration, and clicking the Sales Emails tab in the
left column. In the Credit Memo Email Sender drop-down, select the address
from which the Credit Memo email will be sent. For more information on
how to configure these email addresses, refer back to Chapter 6. In the Credit
Memo Email Template drop-down, select the template which the Credit
Memo email will use. For more information on how to configure these
templates, refer back to Chapter 6. In the Send Invoice Email Copy To field,
you can enter an email address which will receive a copy of the Credit Memo
179
email each time one is sent. The status of the Credit Memo email will display
in the completed Credit Memo (either sent or not sent), next to the Credit
Memo number.
When finished, press the Refund button at the bottom of the page. This will
complete the offline refund. Currently, there is one instance of online Credit
Memos available. If the Order’s Payment Method is Google Checkout, if you
clicked the Credit Memo button in the Invoice (rather than in the Order), and
if the Invoice has been captured, there will be two Refund buttons. One will
be offline and one will be online. Similar to capturing an Invoice, this will
“capture” the refund.
Refund Offline - The systems assumes that the refund will be captured
directly through Google Checkout without involving Magento.
Refund - The system will capture the refund through Google Checkout. There
is more information about Magento integration with Google Checkout,
including integration of Invoices, Shipments, and Credit Memos, in Chapter 4:
Get Ready for Selling.
Placed with Google Checkout
Completed Credit Memos
When a Credit Memo is completed, it can be accessed in two locations. In an Order
page, there is a Credit Memo tab, which contains a list of all Credit Memos
associated to that Order. If you navigate to Sales > Credit Memos, you can view a list
of all Credit Memos associated to all Orders. There are several features available for
completed Credit Memos.
Print - You have the option to print a copy of this Credit Memo using the
Print button. This will open a .pdf file containing all the Credit Memo
information. At the top of the Credit Memo slip will display a custom image
180
and address. These can be configured by navigating to System >
Configuration, clicking the Sales tab in the left column, and opening the
Invoice and Packing Slip Design section. Invoices, packing slips, and Credit
Memos will use the same image and address. The image will automatically
resize to fit the dimensions 200×50.
Credit Memo Comments can also be added to completed Credit Memos. If
you choose to notify the customer when adding comments, the email
notification configuration is located in the same Configuration page as above,
in the Credit Memo Comments section.
Managing and Editing Orders
In addition to the order fulfillment process of creating Invoices, Shipments, and
Credit Memos, there are several other features available for completed orders.
Hold
Changes the order status to On Hold. No changes can be made to the order until it is
released from Hold, which can be done by pressing the Unhold button.
Cancel
Cancels all items that have not been invoiced and/or shipped. If some of the quantity
of a line item has already been invoiced and/or shipped, only the remaining quantity
will be canceled, and this amount will display in the quantity column as Qty
Canceled. The item status will remain either shipped or invoiced. If none of the
quantity for the line item has been invoiced and/or shipped, all of the quantity will
be canceled, and the item status will become canceled. Any time an order is
canceled, a notification should automatically be sent to the customer in the format
of the order confirmation email. It should also display the status of each line item
and the qty ordered, invoiced, shipped, refunded, and canceled.
Edit
You can edit an Order by pressing the Edit button. This will take you to the Edit Order
page, which contains all the same fields as an order being created in the admin
(including access to the customer’s current activities in the left column), and many of
them will be prepopulated with the values from the original order, including order
currency, items ordered, customer email, customer group, billing and shipping
addresses (whether or not the address is saved in the customer’s address book), and
payment method. Shipping method, credit card number and card verification
number, if applicable, will not prepopulate. The prepopulated products will only
include those from the original order which have not been invoiced and/or shipped.
Therefore, if the entire quantity of the order has been invoiced and shipped, you
cannot make an Edit. At the bottom of the page, you will have the option to add
comments and notify the customer. If the customer is notified, they will receive an
email in the format of the order confirmation email. If the customer used guest
181
checkout or an alternative checkout (such as Google Checkout) and does not have an
account, there will not be a current activities column. When all edits are complete,
press the Submit Order button. This will simultaneously create a new order and
cancel the previous order. The new order will have all of the same information as the
original order (updated, of course) with a couple of additions. The Order Number will
now display the original order number, a dash, and the running number for the order
version. For example, if the original order number was Order # 100000005, the
edited order number would be Order # 100000005-1. The next edit would be Order
# 100000005-2, and so on. Additionally, in the order information box, there will be a
“Link the the previous order”.
In the previous order, there will now be a “Link to the new order”.
If an edit is made to Order # 100000005-1, that order will have links to the previous
Order # 100000005 and the new Order # 100000005-2.
Reorder
At any stage of the order, whether it has been fully invoiced and shipped, fully
refunded, or even canceled, you can make a Reorder by pressing the Reorder button
(the button will only appear if you have enabled Reorders, which can be done by
navigating to System > Configuration, clicking the Sales tab, and selecting Yes from
the Allow Reorder drop-down). This will take you to the New Order page, the same
page that you reach when creating an order in the admin. However, it is similar to an
Edit in the sense that all the fields will be prepopulated with much of the information
182
from the previous order. Only credit card number and card verification number will
not autopopulate. It is also like an Edit because the customer’s current activities
column may not appear if the customer does not have an account. Unlike an Edit,
however, this is treated as a completely new order. It will receive its own Order #,
and there will be no links to the previous order from the newly created order, nor to
the newly created order from the previous order.
Batch Updates to Orders
Similar to Batch Updates for products, this feature saves you time by allowing you to
change certain settings for multiple Orders at the same time. Batch Updates are
made from the Orders list, which can be accessed by navigating to Sales > Orders.
Select the Orders to which you would like to make updates. At the top of the Orders
list, you have the option to Select All Orders or Select Visible Orders (Orders
currently displaying on the page). Or, you can simply check the checkboxes of each
Order to which you wish to make updates individually. You can see the number of
items selected at the top of the Orders list, and it will update each time a checkbox
is checked or unchecked. When you have all the desired Orders selected, chose your
preferred Action from the drop-down menu, also at the top of the customers list.
Cancel - This will cancel the selected Orders when you press Submit. If a
selected Order can no longer be canceled, this Order will not be affected by
this Action.
Hold - When you press Submit, this will set the Order status of all selected
Orders to On Hold. If a selected Order is already On Hold, this Order will not
be affected by this Action.
Unhold - When you press Submit, this will set the Order status of all selected
Orders back to the status they held prior to being put On Hold. If a selected
Order is not currently On Hold, this Order will not be affected by this action.
Print Invoices - When you press Submit, this will open a .pdf file containing all
the Invoice information for all Invoices associated to all selected Orders. You
can also make batch prints of Invoices by navigating to Sales > Invoices.
Print Packingslips - When you press Submit, this will open a .pdf file
containing all the Shipment information for all Shipments associated to all
selected Orders. You can also make batch prints of packing slips by navigating
to Sales > Shipments.
Print Credit Memos - When you press Submit, this will open a .pdf file
containing all the Credit Memo information for all Credit Memos associated
to all selected Orders. You can also make batch prints of Credit Memos by
navigating to Sales > Credit Memos.
183
Print All - When you press Submit, this will open a .pdf file containing all the
Invoice, Shipment, and Credit Memo information for all Invoices, Shipments,
and Credit Memos (respectively) associated to all selected Orders.
184
Chapter 9: User-Generated Content
Ratings and Reviews
Managing Ratings
Magento’s Product Rating system allows you to customize rating categories by which
your customers can rate products when they create product reviews.
Great For:
Adding social shopping elements to your store
Increasing customer trust in your product
Increasing Conversions
By default, Magento comes with three pre-existing ratings: Price, Quality, and Value.
These can be edited by navigating to Catalog > Reviews and Ratings > Manage
Ratings, and clicking one of these Ratings. To create a new Rating, click Add New
Rating in the top right of the page.
Rating Title
Default Value - Enter the name of the Rating as it will appear in the admin.
Store Views - For each Store View, you can enter a unique name for this
Rating as it will appear on the front-end. If you leave the field blank for any
Store View, the Default Value will display in the front-end of that Store View.
Rating Visibility
Visible In - Select the Store Views in which this Rating will be available for
your customers to rate products when they create product reviews.
When you are finished, click Save Rating. Now when your customers add a Review,
they will see a table with Rating options, and the ability to give 1-5 stars for each
Rating option.
185
When the review is submitted, and approved by you, the Rating is displayed above
the review comments.
Additionally, all Ratings will be averaged, and display on all product listing pages
(category pages, search results, etc.) and the product info page, with the number of
total approved reviews to the right (in some places this number displays in
parentheses).
186
Managing Reviews
Magento’s Reviews system allows you to monitor, edit, and delete any product
reviews and ratings that have been added to a product. Reviews can be left by any
user whether or not they’re logged in, however, reviews will not display in the frontend for other customers to see until you approve them in the admin. If you wish to,
you can also add reviews to products from the admin.
Great For:
Getting Customer Input
Adding Social Shopping Elements
Increasing Conversions
Adding a new review from the admin
To add a new review from the admin, navigate to Catalog > Reviews and Ratings >
Customer Reviews > All Reviews and click Add New Review in the top right of the
page. You will be redirected to a list of all existing products in your site. Select the
product for which you wish to add the review.
Product - You can see the name of the product to which you just selected to
add a review. Clicking on this product name will direct you to that product’s
page in the admin.
Product Rating - This will state “Rating isn’t Available” until you select at least
one Store View in which this rating will be visible, from the Visible In dropdown below. Once this is done, the same Rating table that is available to your
customers in the selected Store View will appear, in which you can select 1-5
stars for each Rating option.
Status - Select whether the Review will be Approved, Pending, or Not
Approved. For it to display in the front-end, it must be Approved.
Visible In - Select the Store Views in which this rating will display for the
designated product.
Nickname - Enter the name of the reviewer as it will appear in the front-end.
Summary of Review - Enter the title of the review as it will appear in the
front-end.
Review - Enter the contents of the review as they will appear in the frontend.
When you are finish, click Save Review. If you set the Status to Approved, this review
will now appear in the front-end.
Editing and approving pending reviews
The process by which customers create reviews in the admin is very similar to the
process by which they are created in the front-end. Customers, however, cannot edit
the Status or Visible In fields. When a customer first submits a review, by default the
187
Status will be Pending. It will therefore list in the Pending Reviews queue. To access
this queue, navigate to Catalog > Reviews and Ratings > Customer Reviews > Pending
Reviews. You can make changes to any review by clicking Edit in the Action column.
Select Approved to remove this review from the Pending Reviews queue and display
it in the front-end. Select Not Approved to remove this review from the Pending
Reviews queue without displaying it in the front-end. The Visible In field will
automatically select the Store View in which this review was submitted, however you
can choose to change, add, or remove Store Views from this list. You can also edit
any of the content of the review. You may notice there is a field here that was not
present when creating a review from the admin: Posted by. This field describes
whether the reviewer was logged in (Customer) or not (Guest) when they submitted
the review. It will say Administrator for reviews that you created in the admin. When
you are finished, click Save Review.
If you do not need to change the contents of any reviews, you can make batch
updates to pending reviews in order to save time. In the Pending Reviews queue,
select the reviews to which you would like to make updates. At the top of the
reviews list, you have the option to Select All reviews or Select Visible reviews
(reviews currently displaying on the page). Or, you can simply check the checkboxes
of each review to which you wish to make updates individually. You can see the
number of items selected at the top of the reviews list, and it will update each time
a checkbox is checked or unchecked. When you have all the desired reviews
selected, chose your preferred Action from the drop-down menu, also at the top of
the reviews list.
Delete - This will delete the selected reviews from your site when you press
Submit.
188
Update Status - Selecting this will produce a Status drop-down menu to the
right, where you can choose to set the Status of all selected reviews to
Approved, Pending, or Not Approved. The status will change when you press
Submit.
Set Visible In - Selecting this will produce and Store(s) multiple select menu
to the right, where you can choose the Store Views in which the selected
reviews will display. The “visibility” will change when you press Submit.
When a review is Approved or Not Approved, it can still be edited. Simply navigate to
Catalog > Reviews and Ratings > Customer Reviews > All Reviews, locate the desired
review, and click Edit in the Action column. You can make the same edits here that
you can in the Pending Reviews queue. If you wish, you can also subscribe to an RSS
Feed of all newly created Reviews. In both the Pending Reviews page, and All
Reviews page, there is a link called Pending Reviews RSS. When you click on this link,
you will be prompted to enter your User Name and Password. These are the same
that you use to access the Magento admin panel. You will be redirected to the RSS
page, where you can select which reader you would like to use for receiving this
feed.
Tags
Tags are essentially one-word descriptors that act as keywords. They can be assigned
to products by registered customers who are currently logged in. Tags help your
customers organize and remember the products that they have seen, offer quick
navigation options in your store, and aid in the process of search engine
optimization. Each product has an Add Your Tags field at the bottom of the page on
the front-end.
When a customer enters a word and clicks Add Tags, that tag will be sent to the
Pending Tags queue (if they are not logged in, they will first be prompted to do so, or
create an account, before the tag will be submitted to the queue). If they add
multiple words, each word will be separated as a separate entry in the queue, unless
the separate words are surrounded by single quotes, in which case they will be
grouped as one tag. If you wish, you can allow customers to be alerted of new tags
via RSS feeds. There is more information about customer RSS Feeds in Chapter 5:
Promotions, Marketing, and Content Pages. To access the Pending Tags queue,
navigate to Catalog > Tags > Pending Tags. You can make changes to any Tag by
selecting Edit Tag in the Action column. Select Approved to remove this Tag from the
Pending Tag queue and display it in the front-end. Select Disabled to remove this Tag
from the Pending Tags queue without displaying it in the front-end. You can also edit
189
the name of the Tag. When you are finished, click Save Tag. If you do not need to
change the name of any Tags, you can make batch updates to pending Tags in order
to save time. In the Pending Tags queue, select the Tags to which you would like to
make updates. At the top of the Tags list, you have the option to Select All Tags or
Select Visible Tags (Tags currently displaying on the page). Or, you can simply check
the checkboxes of each Tags to which you wish to make updates individually. You
can see the number of items selected at the top of the Tags list, and it will update
each time a checkbox is checked or unchecked. When you have all the desired Tags
selected, chose your preferred Action from the drop-down menu, also at the top of
the Tags list.
Delete - This will delete the selected Tags from your site when you press
Submit.
Change Status - Selecting this will produce a Status drop-down menu to the
right, where you can choose to set the Status of all selected Tags to
Approved, Pending, or Disabled. The status will change when you press
Submit.
From the Pending Tags queue you have the option to view the list of all products to
which this Tag has been applied, by locating the desired Tag and selecting View
Products in the Action column. For each product you can see how many times this
tag was applied to it. Clicking a product will redirect you to that product’s page in the
admin. From the Pending Tags queue you also have the option to view the list of all
customers who have applied this Tag to a product, by locating the desired Tag and
selecting View Customers in the Action column. For each customer you can see the
Store View(s) in which they used this Tag, the product(s) to which they applied this
Tag, and the product SKU. Clicking a customer will redirect you to that customer’s
account page in the admin.
Once a Tag has been approved, it will display on the front-end for all products to
which it has been applied. It no longer needs to be approved each time it is added to
a new product, or added by a different customer. It will automatically display on the
front-end, above the Add Your Tags field, with the number of times this Tag has been
applied to this product in parentheses.
190
Clicking on the Tag will produce a list of all products that have the same Tag applied
to them. Additionally, a Popular Tags block will appear in the left column of your site,
listing the most commonly used approved Tags in a cloud. Clicking a Tag here will
also produce a list of all products that have the same Tag applied to them.
Although Approved and Disabled Tags no longer appear in the Pending Tags queue,
they can still be edited, Simply navigate to Catalog > Tags > All Tags. You can make
the same individual or batch updates that are possible in the Pending Tags queue.
Email to a Friend Options
Magento’s Email to a Friend option allows your customers to help you in promoting
your site through word of mouth. They can customize a message that will be sent in
the email, along with a link to the product from which they chose to “Email to a
Friend”, making it easier for people to find out more information about your
products. This is similar to the Share Wishlist feature available in the Wishlist (refer
back to Chapter 5). To configure your Email to a Friend settings, navigate to System >
Configuration, and select the Email to a Friend tab in the left column.
Enabled - Select Yes to Enable the Email to a Friend feature. This will place
the Email to a Friend link on every product page, below the product name,
where your customers can click in order to use this feature.
Select email template - Designate the template of the Email to a Friend
emails. For more information on how to configure these templates, refer
back to Chapter 6.
Allow for Guests - Designate whether you would like guests to be able to use
this feature. If you select No, the Email to a Friend links will only appear for
logged in customers.
191
Max Recipients - Define the maximum number of different email addresses
your customers can enter each time they send an email. They can add
multiple address by clicking the Add Recipient button on the front-end. When
they have reached this limit, the button will no longer appear, and they will
be notified that they have reached the limit for addresses allowed. This is to
prevent spamming.
Max Products Sent in 1 Hour - Define the maximum number of different
products for which your customers can send an email within a 1 hour period
of time. This limitation will be explained to your customers at the top of the
Email to a Friend page. When they have reached the limit, they will no longer
be able to send emails, until the 1 hour period has passed. This is to prevent
spamming.
Limit Sending By - This works in conjunction with the two anti-spamming
features above. Designate how Magento will define a user, so that the antispamming features can be enforced. You can choose to identify a user by IP
Address, or by browser Cookies. As indicated in the drop-down, however,
Cookies are the less secure method, because the user can simply delete them
and avoid the email limitations.