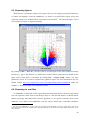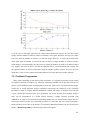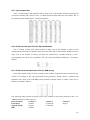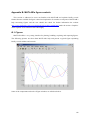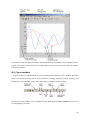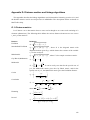
1
ARMADA
Automated Robust MicroArray Data Analysis
version 1.1
User’s manual
Metabolic Engineering and Bioinformatics Group, Institute of Biological Research and Biotechnology
National Hellenic Research Foundation
©
2008
2
Contents
Contents............................................................................................................................................... 3
1. Overview ......................................................................................................................................... 6
1.1. Program overview .................................................................................................................... 6
1.2. Release changes........................................................................................................................ 7
1.3. Bug reporting............................................................................................................................ 8
2. Basic Operations ............................................................................................................................. 9
2.1. Installation requirements and instructions................................................................................ 9
2.2. Creating a new project.............................................................................................................. 9
2.3. Opening a previously saved project ....................................................................................... 10
2.4. Saving a project ...................................................................................................................... 10
2.5. Importing data ........................................................................................................................ 10
2.5.1. Importing data directly from image analysis software – supported program outputs ..... 10
2.5.2. Importing data directly from image analysis software – text tab delimited files ............ 13
2.5.3. Importing already processed data.................................................................................... 15
2.6. Exploring data – main window .............................................................................................. 17
2.6.1. ARMADA’s main window ............................................................................................. 17
2.6.2. History textbox ................................................................................................................ 18
2.6.3. Tree view......................................................................................................................... 18
2.6.4. Arrays list ........................................................................................................................ 20
2.6.5. Analysis Object List ........................................................................................................ 21
2.6.6. Raw Image....................................................................................................................... 22
2.6.7. Normalized Image ........................................................................................................... 22
2.6.8. Array Raw Table ............................................................................................................. 23
2.6.9. Normalized List............................................................................................................... 23
2.6.10. Differentially Expressed genes List............................................................................... 24
2.6.11. Cluster List .................................................................................................................... 25
2.6.12. Reports .......................................................................................................................... 25
2.6.13. Deleting analysis objects ............................................................................................... 26
3. Preprocessing Data........................................................................................................................ 27
3.1. Selecting subjects of experimental conditions ....................................................................... 27
3.2. Background Correction .......................................................................................................... 28
3.3. Spot quality filtering............................................................................................................... 30
3.4. Normalization......................................................................................................................... 34
4. Statistical Operations..................................................................................................................... 40
3
4.1. Statistical Selection ................................................................................................................ 40
4.2. Fold Change Calculation ........................................................................................................ 44
4.3. Clustering ............................................................................................................................... 45
4.3.1. Hierarchical clustering .................................................................................................... 45
4.3.2. k-means clustering........................................................................................................... 47
4.3.3. Fuzzy C-means clustering ............................................................................................... 49
4.4. Classification .......................................................................................................................... 51
4.4.1. (Linear) Discriminant Analysis ....................................................................................... 52
4.4.1.1. (Linear) Discriminant Analysis – Tuning................................................................. 52
4.4.1.2. (Linear) Discriminant Analysis – Classifying.......................................................... 55
4.4.2. k–Nearest Neighbors ....................................................................................................... 56
4.4.2.1. k–Nearest Neighbors – Tuning................................................................................. 57
4.4.2.2. k-Nearest Neighbors - Classifying ........................................................................... 61
4.4.3. Support Vector Machines................................................................................................ 62
4.4.3.1. Support Vector Machines – Tuning ......................................................................... 62
4.4.3.2. Support Vector Machines - Training........................................................................ 65
4.4.3.3. Support Vector Machines - Classifying ................................................................... 66
5. Graphical data exploration ............................................................................................................ 67
5.1. Array Images .......................................................................................................................... 67
5.2. Normalized and Un-normalized images................................................................................. 70
5.3. Array plots.............................................................................................................................. 71
5.4. MA Plots ................................................................................................................................ 74
5.4.1. MA plots before normalization ....................................................................................... 75
5.4.2. MA plots after normalization .......................................................................................... 76
5.4.3. MA plots before and after normalization ........................................................................ 77
5.4.4. Subgrid MA plots ............................................................................................................ 78
5.5. Expression Distributions ........................................................................................................ 80
5.6. Boxplots ................................................................................................................................. 84
5.7. Volcano Plots ......................................................................................................................... 87
5.8. Expression Profiles................................................................................................................. 90
6. Exporting Data .............................................................................................................................. 95
6.1. Exporting gene lists ................................................................................................................ 95
6.2. Exporting gene cluster lists .................................................................................................... 97
6.3. Exporting figures.................................................................................................................... 98
6.4. Exporting to .mat files ............................................................................................................ 98
7. Other Tools.................................................................................................................................. 102
7.1. The Principal Component Analysis tool............................................................................... 102
4
7.2. The Gap Statistic tool ........................................................................................................... 104
7.3. The Batch Programmer ........................................................................................................ 107
7.4. The Annotator ...................................................................................................................... 109
References ....................................................................................................................................... 111
Appendix A: Input file formats ....................................................................................................... 112
A.1.Raw data – Image analysis software output and tab delimited files..................................... 112
A.1.1. QuantArray file format ................................................................................................. 112
A.1.2. ImaGene file format ..................................................................................................... 113
A.1.3. GenePix file format ...................................................................................................... 114
A.1.4. Text tab delimited files................................................................................................. 115
A.2. Processed data ..................................................................................................................... 115
A.3. Files used for classification ................................................................................................. 116
A.3.1. New sample files .......................................................................................................... 117
A.3.2. External class prior files for DA classification............................................................. 117
A.3.3. External kernel parameters files for SVM tuning......................................................... 117
Appendix B: MATLAB’s figure controls ....................................................................................... 118
B.1. Figures ................................................................................................................................. 118
B.2. Figure toolbars ..................................................................................................................... 119
Appendix C: Multiple testing correction issues .............................................................................. 121
Appendix D: Distance metrics and linkage algorithms ................................................................... 122
D.1. Distance metrics .................................................................................................................. 122
D.2. Linkage algorithms.............................................................................................................. 123
5
1. Overview
1.1. Program overview
Microarray technology allows gene expression profiling at a global level by measuring mRNA
abundance. ARMADA (Automated Robust MicroArray Data Analysis) is a MATLAB implemented
program with a graphical user interface (GUI) which performs all steps of typical microarray data
analysis; starting from importing raw data from several image analysis software outputs as well as
text tab delimited files or already processed data that need to undergo statistical testing, ARMADA
continues with processes including noise filtering, spot background correction, data normalization,
statistical selection of differentially expressed genes based on parametric or non parametric
statistics, cluster analysis based on several widely used clustering methods (Hierarchical, k-means,
Fuzzy C-means) and annotation steps, resulting in detailed lists of differentially expressed genes
and formed clusters. Along with the user friendly interface, ARMADA offers a variety of
visualization options (MA plots, boxplots, array images, clustering heatmaps etc), a module which
allows multiple analyses to be performed in batch mode under a specific analysis workflow and an
annotation tool. Emphasis is given to the output data format which is fully customizable and
contains a substantial amount of useful information such as detailed normalized and unnormalized
expression values for each gene on each slide replicate along with several statistics concerning
expression values for each experimental condition. The ARMADA output files can be easily
imported in a spreadsheet like software such as MS Excel or in a database for further processing and
storage and the analysis results can be saved as .mat files for further possible processing with
MATLAB’s built-in algorithms.
Depending on the user’s programming experience and analysis preferences, ARMADA can be
used to perform analyses step by step through the GUI of the system or as an automated analysis
pipeline (by using the batch programming module). For the most experienced user, ARMADA can
also be invoked directly from MATLAB’s command window, as the main routines that perform the
analysis behind the GUI are designed to run also individually in command line mode with specific
arguments (the user should see help inside .m files to perform command line analysis). ARMADA
is a completely open source MATLAB based platform and the user may alter, adjust or extend each
of the main functions or create new routines according to specific needs. It should be noted that
ARMADA can be used in command line mode only if MATLAB is present on the computer where
ARMADA is installed. Otherwise, the program is distributed with MATLAB Component Runtime
(MCR) and MATLAB is not required on the installation machine.
In order to use ARMADA under MATLAB or in command line mode (and thus be able to export
results in MATLAB’s workspace for further processing with built-in algorithms), MATLAB 7.3
(R2006a) or higher should be installed on the target computer. In this case the platform consists
6
only of MATLAB routines and not compiled files and is platform independent. After downloading
the routines, the user should place them in a folder of preference maintaining the structure in the
compressed file and then add this folder including its subfolders to the MATLAB path. If
MATLAB is not present in the target computer, MATLAB Component Runtime (MCR) 7.6 is
required. The MCR is included in the program installer which can be downloaded from (URL here).
If MCR 7.6 was previously installed for other reasons, then it does not have to be installed again.
Note that in this case the program will work ONLY with MCR 7.6 and NOT with older or newer
versions of the MCR.
One of the main advantages of ARMADA is that it offers an analysis workflow by not allowing
the user to do “anything” at “anytime”, a feature that will prove valuable especially for users mostly
with biological background. The purpose of this user’s guide is to provide insights on the use of the
platform and explain its capabilities as simple as possible in the eyes of a biologist with little
programming experience or little experience in statistical computing. If some points are unclear or
not explained as explicitly as expected, please provide feedback and help the developers perform
better on later versions of ARMADA. Please report feedback (comments, suggestions or possible
bugs and malfunctions) to Panagiotis Moulos ([email protected]).
Analysis workflow of ARMADA
1.2. Release changes
The following section is a description of the additions made in version 1.1 of ARMADA
compared to the previous version, 1.0:
•
Users can now import external already processed data directly for clustering or supervised
learning training without having to perform statistical selection first.
7
•
Complete dye-swap experiment support, implemented during the normalization procedure,
under the Normalization preferences.
•
Added single array plots for several image quantitation types (e.g. Channel 1 vs Channel 2
etc.). Data are selectable and exportable as in MA or Volcano plots.
•
Added array vs array plots for several measurements (e.g. log2 ratio, dye quantitation etc.).
Data are selectable and exportable as in MA or Volcano plots.
•
Several bug fixes.
1.3. Bug reporting
If the user wishes to report a bug, it is recommended that the exact error message is included in
the report (a simple screenshot of the error using a simple screen capturing program or simply
hitting the button ‘PrtScn’ on the keyboard would be enough) together with a small description on
what process the user tried to perform. If the bug appears during the data import process and if the
problem is not solved by following the import instructions described in this user’s guide exactly, it
is recommended that a sample of the files used for import is included in the report.
8
2. Basic Operations
This section of the user guide presents the installation requirements and installation process of
ARMADA and how the user can perform basic operations such as creating and saving and opening
projects, opening new session windows and importing data to ARMADA in various ways.
2.1. Installation requirements and instructions
In order to run ARMADA, the user must have at least MATLAB 7.3 (R2006a) or higher, or the
MATLAB Component Runtime (MCR) 7.6 (not higher) installed on his computer. ARMADA can
be downloaded from (site here) as MATLAB routines for the users who are experienced with
MATLAB and have at least MATLAB 7.3 (R2006a) installed on their computer, or as an
executable installer file which also contains MCR 7.6. Example datasets can also be downloaded
from the above site. If the user chooses to download ARMADA as MATLAB routines, the
downloaded file should be unzipped in a location of user’s preference and then the specific location
must be added to MATLAB’s path including its subfolders (In MATLAB, File → Set Path… →
Add with Subfolders…). If the user chooses to download ARMADA as an executable installer file,
the instructions provided through the installation process should be followed carefully. ARMADA
is
distributed
under
the
Academic
Free
License,
version
3
(http://www.opensource.org/licenses/academic.php).
2.2. Creating a new project
To create a new project, the user should click on File → New → New Project (or Ctrl + N) and
then the following window will appear:
The user is prompted to fill the field File name with the desired project name and click Save for the
new project to be created. For a new ARMADA session window, the user should click File → New
→ New Session (or Ctrl + I).
9
2.3. Opening a previously saved project
To open a previously saved project, the user should click File → Open (or Ctrl + O) and then
the following window will appear:
From there, the user should select a previously created project and click Open.
2.4. Saving a project
To save the current project, the user should click File → Save (or Ctrl + S). To save a project
under a different filename, the user should click File → Save As, enter a new filename on the
project and click Save.
2.5. Importing data
The following sections describe how data files derived from the image analysis programs
supported or from text tab delimited files (e.g. downloaded from public repositories) can be
imported for processing to ARMADA. The user should note that when data import is completed
properly, no further data importing is possible in the same project. This is part of ARMADA
workflow and if the user wishes to import other data in ARMADA, a new project should be created.
2.5.1. Importing data directly from image analysis software – supported program
outputs
The first step of analyzing a dataset consists of proper import of the image analysis software
output files or text tab delimited files containing image quantitation data for each spot on the array.
To import a dataset in the current project, the user should click File → Data Import → Raw image
data and the following window will appear:
10
In this data import wizard, the user is prompted firstly to choose the software which was utilized to
process raw images and create the files containing image quantitation data. Currently, 4 software
formats are supported: QuantArray (Perkin Elmer, Inc.), ImaGene (BioDiscovery, S.A.), GenePix
(Molecular Devices) and simple text tab delimited format files containing image quantitation
elements coupled with (optionally) spatial information on how the spots are distributed on the
microarray. This format is useful when datasets downloaded from public databases such as
ArrayExpress
(www.ebi.ac.uk/arrayexpress/)
or
Gene
Expression
Omnibus
(GEO)
(http://www.ncbi.nlm.nih.gov/geo/) are to be imported. The user can use this option also when the
dataset images have been processed with software not supported by ARMADA after certain manual
manipulation first (the user should see Appendix A for further information on file formats). Note
that if the dataset files have been produced with ImaGene software, the user can check the Mark
‘empty’ spot as poor (ImaGene) option. If this option is activated, then spots that are flagged by
the user or the software as empty will be treated by ARMADA as poor quality spots and excluded
from analyses. This option is included in case the user wishes to include empty spots in the analysis,
for example as an estimation of noise in the images of the experiment.
As a second step, the user is prompted to enter the number of different conditions of the
experiment in the field Number of Experimental Conditions (e.g. if the experiment includes the
experimental factors Control, Treatment 1, Treatment 2, the user should enter 3). Next, in the field
Condition Names, the user should fill in the names of the experimental conditions (e.g. Control,
Treatment_1, Treatment_2). It should be noted that many special characters 1 are not allowed and
the names should not start with numbers (e.g. the condition names “Control.1*T” or “1Control” will
1
These characters are the following: < > / \ , ; '''' [ ] " | ? . ! @ # $ % ^ & * ( ) - + = ` ~ or white spaces.
11
generate an error message and will be automatically replaced by valid names). After properly
setting the parameters described above, the user should click on the button Select Files… and will
be prompted to select the directory where the data files are placed (it is not necessary to have all
files in one directory; this step exists for user’s convenience). The following window will appear
that will help the user select the files of the experiment:
This window will appear as many times as the number of the experimental conditions in the project.
Each time the user will be prompted to select the files for the condition with name displayed in the
window title (e.g. “Select files for condition Control”). This file selection window gives certain
control over the file names and what is displayed (e.g. the user can filter what is displayed by a
regular expression (the user should see for example http://www.regular-expressions.info/), change
the directory or display the full paths of the selected files). In the case of importing from ImaGene
output, the user should also take into account that ImaGene files are produced in pairs (one file for
Cy3 – 1st channel and one file for Cy5 – 2nd channel). Thus, the files are also selected in pairs.
ARMADA distinguishes the channels for ImaGene files by searching for the text ‘Cy3’ or ‘Cy5’ in
the filenames. The user should make sure that this string exists in the filenames and that each file
corresponds to the proper channel. After selecting the array files for each condition, the user should
click Done.
To finish importing the dataset, click OK in the Data Import wizard window. If the user has
chosen to import direct output files from one of the supported image analysis programs, they will be
automatically imported for analysis in ARMADA. The case of tab delimited text files that contain
the image quantitation types is explained in the next paragraph.
Important notice: when importing from GenePix, the user should make sure that channel 1 (or Cy3
or ‘Green’) corresponds to the 532nm wavelength and that channel 2 (or Cy3 or ‘Red’) corresponds
to the 635nm wavelength because ARMADA assigns channels in this way. In case of the opposite,
the user should correct for this by selecting ‘Cy5 is channel 1’ at the Channel – Dye
correspondence list in the normalization preferences window (section 3.4).
12
2.5.2. Importing data directly from image analysis software – text tab delimited files
In the case of selecting to import image quantitation data from text tab delimited files (e.g.
downloaded from a public repository), after clicking OK in the Data Import wizard window, the
following window will appear:
Each list contains all the column headers of the first file out of the whole file set imported by
pressing the Select Files… button in the Data Import wizard. Therefore the user should have
checked before this step that all the text files in the dataset have exactly the same format (e.g. there
isn’t a file where the column with name ‘Row’ is placed 4th from the beginning of the file while in
all other files it is placed 3rd). The following table explains the content of each required field.
Field Name
Gene Numbers
Array Blocks
Meta Rows
Meta Columns
Description
A unique gene numbering present on the microarray slide
(e.g. the column “Gene Number” on QuantArray files).
This attribute allows the unique gene identification in the
case of multiple clones of a transcript present on the slide.
If not given, it will be assigned automatically.
The column with numbers from 1 to the number of blocks
into which the probes on the array are organized. This
attribute helps in the reconstruction of array images. If not
given and the slide is organized in blocks, the Meta Rows
and Meta Columns attributes should be provided.
Probe meta-coordinates 2 (row). This attribute helps in the
reconstruction of array images. If not given and the slide
is organized in blocks, the Blocks attribute should be
provided.
Probe meta-coordinates (column). This attribute helps in
the reconstruction of array images. If not given and the
Optional
Yes
Yes
Yes
Yes
2
If not given properly, probe meta-coordinates as well as slide probe coordinates could generate errors. If the user is not
sure about the validity of these attributes they should not be provided. ARMADA will still produce an image, but it will
not represent the distribution of probes on the array.
13
Rows
Columns
Gene Names
Spot Flags
Cy3 Signal Mean
Cy3 Signal Median
Cy3 Signal Standard
Deviation
Cy3 Background Mean
Cy3 Background Median
slide is organized in blocks, the Blocks attribute should be
provided.
Probe coordinates (row) in each block or simple probe
coordinates. This attribute helps in the reconstruction of
array images. If given with meta-coordinates, it helps in
the reconstruction of blocks in the image. If metacoordinates are not given, this attribute (together with
“Columns” are taken to be the array coordinates.
Probe coordinates (column) in each block or simple probe
coordinates. This attribute helps in the reconstruction of
array images. If given with meta-coordinates, it helps in
the reconstruction of blocks in the image. If metacoordinates are not given, this attribute (together with
“Rows” are taken to be the array coordinates.
The column containing (ideally) unique gene identifiers
(usually provided by manufacturers).
The column containing flags (manually or automatically
produced by the image analysis software used marking
poor spots). Note that this column should contain only
one’s (1’s) and zero’s (0’s) with 1 representing good spots
while 0 poor quality spots. If you wish to provide this
attribute make sure that your files contain proper flags as
defined above. If not, do not provide this attribute and the
internal filters of ARMADA will be used to mark poor
quality spots.
The column containing signal quantitation for each spot
for the 1st channel. The title Cy3 is indicative and taken by
the fact that the reference samples in 2-coloured
microarray experiments are labelled with Cyanine 3
(“green”). In any case, this attribute should contain the
foreground intensities for the reference dye (channel). The
title “Mean” is indicative. It depends on the quantitation
algorithm of each image analysis software. However, this
attribute is mandatory and should contain the main signal
quantitation for each spot.
The column containing the median of signal quantitation
for each spot of the 1st channel 3.
The column containing the standard deviation of signal
quantitation for each spot of the 1st channel 4.
The column containing background contamination
quantitation for each spot for the 1st channel. The title Cy3
is indicative and taken by the fact that the reference
samples in 2-coloured microarray experiments are labelled
with Cyanine 3 (“green”). In any case, this attribute
should contain the background intensities for the reference
dye (channel). The title “Mean” is indicative. It depends
on the quantitation algorithm of each image analysis
software. However, this attribute is mandatory and should
contain the main background quantitation for each spot.
The column containing the median of background
quantitation for each spot of the 1st channel.
Yes
Yes
No
Yes
No
Yes
Yes
No
Yes
3
It should be noted that if the “Median” attributes are not given, ARMADA’s filtering methods will not be available at
full extent.
4
It should be noted that if the “Standard Deviation” attributes are not given, ARMADA’s filtering methods will not be
available at full extent.
14
Cy3 Background
Standard Deviation
Cy5 Signal Mean
Cy5 Signal Median
Cy5 Signal Standard
Deviation
Cy5 Background Mean
Cy5 Background Median
Cy5 Background
Standard Deviation
The column containing the standard deviation of
background quantitation for each spot of the 1st channel.
The column containing signal quantitation for each spot
for the 2nd channel. The title Cy5 is indicative and taken
by the fact that the reference samples in 2-coloured
microarray experiments are labelled with Cyanine 5
(“red”). In any case, this attribute should contain the
foreground intensities for the sample dye (channel). The
title “Mean” is indicative. It depends on the quantitation
algorithm of each image analysis software. However, this
attribute is mandatory and should contain the main signal
quantitation for each spot.
The column containing the median of signal quantitation
for each spot of the 2nd channel.
The column containing the standard deviation of signal
quantitation for each spot of the 2nd channel.
The column containing background contamination
quantitation for each spot for the 2nd channel. The title
Cy5 is indicative and taken by the fact that the reference
samples in 2-coloured microarray experiments are labelled
with Cyanine 5 (“red”). In any case, this attribute should
contain the background intensities for the sample dye
(channel). The title “Mean” is indicative. It depends on
the quantitation algorithm of each image analysis
software. However, this attribute is mandatory and should
contain the main background quantitation for each spot.
The column containing the median of background
quantitation for each spot of the 2nd channel.
The column containing the standard deviation of
background quantitation for each spot of the 2nd channel.
Yes
No
Yes
Yes
No
Yes
Yes
After filling all the necessary fields by choosing from the lists, the user should click OK. Data
importing should begin immediately.
2.5.3. Importing already processed data
If data which have been preprocessed with another analysis tool or downloaded from a public
repository have to be imported to the project, the user should click File → Data Import →
Processed data and the following window will appear, prompting the user to select a text tab
delimited or MS Excel file containing the data to be imported:
15
The user should see Appendix A for how this file should be structured. Briefly, each column (or
pair of ratio-intensity columns) should correspond to measurements of a single array. The file
should contain only one column with unique gene identifiers. As with the Data Import wizard, the
user should properly fill in the number of experimental conditions of the dataset and proper
condition names (the user should see 2.5.1 for information on proper condition names). After setting
the above parameters, the user should provide some information on the contents of the file. The
following table explains the types of processed data that can be imported to ARMADA.
Type
Un-normalized data
Normalized data
Description
Such data should be structured in ratio-intensity pairs. Ratio is the ratio
between channel 2 (treated) and channel 1 (reference) data while intensity is
an estimate of spot intensity based on the signals of the two channels (the
user should see Apendix A). If the provided ratios are not log2 transformed,
the user should choose “Raw ratio-intensity pairs” and ratios will be log2
transformed. If ratios are already log2 transformed, the user should choose
“Log ratio-intensity pairs”. Un-normalized ratios alone cannot be
imported.
Such data should be structured in ratio-intensity pairs or ratios alone. Ratio
is the ratio between channel 2 (sample) and channel 1 (reference) data while
intensity is an estimate of spot intensity based on the signals of the two
channels (the user should see Apendix A). If the provided ratios are not log2
transformed, the user should choose “Raw ratio-intensity pairs” or “Raw
ratio” only depending on the nature of the data and ratios will be log2
transformed. If ratios are already log2 transformed, the user should choose
16
“Log ratio-intensity pairs” or “Log ratio”. The user should note that some
of the data exploration plots will not be available in the case of only ratio
data.
The list File columns contains the column headers found in the data file to be imported. The user
should use this list and the buttons Add>> and <<Remove to assign proper ratio-intensity pairs (or
ratios only) to each of the conditions in the Conditions list. At any point the user can see the
assigned ratios and intensities in the Ratios and Intensities lists 5. All columns of the file should be
assigned to an experimental condition and the only column that will remain in the File columns list
should contain a unique gene identifier. After properly setting all the above parameters, the user
should click Import for the data to be imported to ARMADA.
2.6. Exploring data – main window
2.6.1. ARMADA’s main window
The image below depicts the main window of ARMADA. It consists of the history textbox, the
project tree view, the array list, the analysis objects list, the image (or data) area and some shortcut
buttons for main functionalities of the program. The menu bar provides access to all the platform’s
functions and abilities. This and the following sections describe the functionalities that can be
accessed directly from the main window and present the first steps of data exploration with
ARMADA.
5
Special attention should be paid during column assignment. It is of great importance for the relevance of the subsequent
analysis.
17
2.6.2. History textbox
The history textbox is placed at the right bottom in the main window. It contains messages
produced during different analysis steps in the project. These messages could be used in the
production of reports.
2.6.3. Tree view
The tree view is placed in the left side of the main window and displays analysis history in the
form of the tree. It contains several summary data for each analysis in your project, such as the
number of conditions and slides included in the analysis, which filtering or statistical methods were
used etc.
18
The following table presents the names of the tree branches:
Branch name
Name
Filename
Date
NumberOfConditions
Description
The name of the project.
The path and filename of the project.
The date the project was created.
When placed directly under the root of the tree, it represents the total
number of experimental conditions in the project, while when placed
under an “Analysis” branch it represents the number of condition for that
specific analysis.
NumberOfSlides
When placed directly under the root of the tree, it represents the total
number of microarrays in the project, while when placed under an
“Analysis” branch it represents the number of microarrays for that specific
analysis.
Slides
A sub-tree containing the experimental conditions as branch names and
the names of the data files as leafs.
Analysis
Different analyses of the project (e.g. using a different set of conditions or
different preprocessing or statistical selection methods.
Preprocess
Branch name for the preprocessing steps used in the project. Its children
contain detail on the preprocessing methods used (the user should see
“Preprocessing data”).
BackgroundCorrection The background correction method used.
UseEstimate
The main signal estimation (mean or median).
19
FilterMethod
FilterParameter
OutlierTest
Normalization
Span
Subgrid
ChannelInfo
StatisticalSelection
BSN
Impute
When
TF
Test
Correction
Cut
DEgenes
Clustering
Algorithm
Linkage
Distance
Seed
Limit
PValue
Clusters
SVM
Kernel
Parameters
The spot filtering method used.
The parameters used with the spot filtering method used with the filtering
method.
The statistical test that was used for outlier detection among replicates of
the same condition (if performed).
The name of the within slide normalization method that was utilized (if
any).
The spanning neighbourhood size for LOWESS/LOESS normalization
methods.
Whether block dependent normalization was chosen to be performed or
not.
Whether the 2nd channel (sample channel) refers to Cy3 or Cy5.
Branch name for the statistical selection steps applied in the data of project
after preprocessing. Its children contain details on the steps performed.
The name of the Between Slide Normalization (BSN) that was utilized (if
any).
The missing value imputation algorithm that was used to impute any
missing value caused by the image processing or the filtering steps.
Impute missing values before or after between slide normalization.
The Trust Factor filter value.
The statistical test used in the statistical selection process.
The multiple testing correction procedure applied (if any).
The p-value (or FDR depending on multiple testing correction method)
threshold applied in the process of statistical selection.
The number of Differentially Expressed genes found after the application
of a statistical test.
Branch name for clustering steps applied in the data of the project after
statistical selection. Its children contain details on the steps performed.
The clustering algorithm utilized.
The linkage algorithm used (only in the case of hierarchical clustering).
The distance calculation metric used with the chosen clustering algorithm.
The initial cluster position (only in the case of k-means clustering).
The limitation method used to identify the number of clusters.
A p-value cutoff to filter the differentially expressed genes to be clustered
after the statistical selection process.
The number of clusters found.
Branch name for Support Vector Machine classifier constructed for
classification purposes after statistical selection.
The kernel function type of the SVM classifier.
The parameter set for the SVM classifier.
2.6.4. Arrays list
The arrays list is a list of all the files (arrays) that were imported to the project. By selecting an
array from the list and right clicking inside the list, a menu with the following options appears:
20
The functionalities of the submenu commands are explained in the following table:
Command name
Image
Data
Normalized Image
Report
Description
Displays an image for the selected array which is reconstructed from the raw
data.
Displays a data table reconstructed from the columns of the selected file.
Displays an image for the selected array which is reconstructed from log2
ratios after the normalization procedure.
Displays information concerning the selected array in a separate window.
2.6.5. Analysis Object List
The analysis list is a list of all the different analyses that have been created in the current project.
By selecting an array from the list and right clicking inside the list, a menu with the following
options appears:
The functionalities of the submenu commands are explained in the following table:
Command name
Normalized List
DE List
Cluster List
Export Normalized List
Export DE List
Export Cluster List
Delete
Report
Description
Displays the list of genes of the selected analysis and their expression
values (data displayed customizable) after the normalization procedure.
Displays the list of Differentially Expressed genes of the selected
analysis and their expression values (data displayed customizable) after
the statistical selection procedure.
Displays the list of clusters and the genes belonging to each cluster
coupled by their expression values after the clustering procedure.
Exports the list of genes of the selected analysis and their expression
values (data exported and export format customizable) after the
normalization procedure.
Exports the list of Differentially Expressed genes of the selected analysis
and their expression values (data exported and export format
customizable) after the statistical selection procedure.
Exports the list of clusters and the genes belonging to each cluster
coupled by their expression values after the clustering procedure (export
format customizable).
Deletes the selected analysis and all its components.
Displays a brief report on analysis steps and results in a new window.
21
2.6.6. Raw Image
By hitting the Raw Image button in the main window, if array block coordinates are provided,
an image is reconstructed based on these spatial data by overlaying raw signal data from both
channels for the selected array from the Arrays list. If coordinates are not provided, ARMADA
creates an image with grid size equal to the number of genes on the arrays multiplied by the number
of slides on the project. In this way, each row of the reconstructed image presents a gene and each
column the corresponding slide. Array images in the main window can also be created by rightclicking on the selected array in the Arrays list and selecting Image or by clicking View → Raw
Image.
The user can click on raw images and view individual spot data. Zooming and scrolling is also
possible.
2.6.7. Normalized Image
By hitting the Normalized Image button in the main window, if array block coordinates are
provided, an image is reconstructed based on these spatial data using normalized log2 ratio data for
the selected microarray from the Arrays list. If coordinates are not provided, ARMADA creates an
image with grid size equal to the number of genes on the arrays multiplied by the number of slides
on the project. In this way, each row of the reconstructed image presents a gene and each column
the corresponding slide. Normalized array images in the main window can also be created by rightclicking on the selected array in the Arrays list and selecting Normalized Image or by clicking
View → Normalized Image.
22
2.6.8. Array Raw Table
By clicking on the Array Raw Table button, ARMADA displays a spreadsheet like view which
contains basic data derived directly from the input file(s) for the selected array from the Arrays list.
The same data can be displayed by right-licking on a selected array from the Arrays list and then
clicking on Data, or by clicking View → Raw Data.
2.6.9. Normalized List
By right-clicking on and Analysis object from the Analysis Objects lists and selecting
Normalized List, ARMADA displays a spreadsheet like view which contains normalized data for
23
the selected Analysis. The same data can be displayed by clicking View → Normalized Data. The
data elements displayed are customizable (the user should see section 5).
2.6.10. Differentially Expressed genes List
By clicking on the DE List (Differentially Expressed) button, ARMADA displays a spreadsheet
like view which contains data for the differentially expressed genes derived from a statistical
selection process. The data displayed correspond to the selected Analysis from the Analysis Objects
list. The same data can be displayed by right-licking on the selected Analysis from the Analysis
Objects list and then clicking on DE List, or by clicking View → DE Genes List.
24
2.6.11. Cluster List
By clicking on the Cluster List button, ARMADA displays a spreadsheet like view which
contains data concerning gene cluster memberships derived after clustering procedures. The data
displayed correspond to the selected Analysis from the Analysis Objects list. The same data can be
displayed by right-licking on the selected Analysis from the Analysis Objects list and then clicking
on Cluster List, or by clicking View → Gene Clusters List.
2.6.12. Reports
There are two kinds of brief reports that can be displayed from ARMADA in separate windows:
array reports and analysis reports. Array reports can be obtained by right-clicking on an array in the
Arrays list and then selecting Report or by clicking View → Array Report while analysis reports
can be obtained by right-clicking on an analysis object in the Analysis Object list and then selecting
Report or by clicking View → Analysis Report.
25
These reports display very briefly certain information on the array files imported (if header
information is available when importing directly from the supported image analysis software, this
information is displayed too) or the analysis steps followed and results obtained. By right-clicking
inside the report window, the user can export the displayed information in a text file.
2.6.13. Deleting analysis objects
In order to delete an analysis object, the user should select the analysis to be deleted from the
Analysis Object list, right-click on the selected analysis and click Delete. The selected analysis will
be deleted and the number of the following analysis in the list will be decreased in order to keep a
continuous analysis object numbering. For example, if there are 5 analysis object named ‘Analysis
1’, ‘Analysis 2’,…, ‘Analysis 5’, if the user deletes ‘Analysis 4’, ‘Analysis 5’ will be renamed to
‘Analysis 4’.
26
3. Preprocessing Data
The first steps on analyzing data derived from microarray experiments consist from several
preprocessing steps which include quality control, data filtering and normalization to assure the
quality of the data that will be used to extract results and compensate for systematic error
measurements among different arrays. The next sections describe the filtering and normalization
methods implemented in ARMADA and explain the program interfaces. The user should also note
that data preprocessing will not be available if the data import step is not completed properly.
3.1. Selecting subjects of experimental conditions
In order to create an analysis object, the user should first choose a subset of experimental
conditions and replicates from the total set of the imported arrays. If this step is skipped for the first
analysis, ARMADA will apply the chosen preprocessing procedures to the whole dataset. The
application of the same preprocessing steps on the whole dataset is recommended when the user
wishes to preprocess the data in a same manner (e.g. with the same normalization method) and then
be able to choose different sets of experimental conditions to perform different statistical tests
without re-performing the sometimes time consuming step of normalization.
The user is able to select different sets of experimental conditions and replicates and create
different analysis objects by clicking Preprocessing → Select Conditions. The following window
appears:
The above interface helps the user to create a new analysis object by defining which experimental
conditions and which arrays from each experimental condition should be included in the analysis
object. This feature is helpful for example when experiment quality control or filtering has shown
that an array from one of the conditions is of poor quality and maybe should not be used in further
analysis but should be imported or remain to ARMADA to perform data exploration on this array
(e.g. create array images and compare the signal with the background noise).
27
If the user has chosen to perform the preprocessing procedures (up to normalization) for the
whole dataset (without selecting any subset of experimental conditions at the beginning), the
checkbox Use same preprocessing steps as 1st time (if performed) will be active and the user
may check it in order to define a new analysis object using part of the preprocessed whole dataset. If
this option remains unchecked, a new clean analysis object will be created where the user can
perform several preprocessing steps from the beginning. It should be noted that keeping the same
preprocessing steps does not mean that another set of preprocessing steps cannot be applied to the
selected set of experimental conditions. Also, if the user has selected a subset of experimental
conditions from the beginning (e.g. Analysis 1 consists of ‘WT’ and ‘D7’ in the above example),
then the option Use same preprocessing steps as 1st time (if performed) will not be available and
the user should preprocess the data from the beginning for each analysis object created.
If there is no reason for an array to be excluded from a condition subset, the user can check the
Select all replicates for each condition option to select directly from the list ‘Conditions’ without
having also to select individual arrays. Finally, the Add>> and <<Remove buttons add or remove
arrays in the selected experimental condition in the analysis object to be created. When finished
with condition and array selection the user should click OK and a new analysis object will be
displayed in the Analysis Object list.
3.2. Background Correction
The first step in data preprocessing with ARMADA is the definition of a background correction
method to correct for background image contamination caused by several factors such as artifacts
on the array surface, scratches or non-specific hybridization. To choose the background correction
method, the user should click Preprocessing → Background Correction and the following
window will appear:
The program uses one of three possible methods (Background Subtraction, Signal to noise Ratio
or No correction), to correct for each spot background contamination and calculate the pure signal
value for each gene in each slide replicate for all conditions. Each background correction method
implemented is summarized in the table below (notation: S is the signal mean/median, B is the
background mean/median and S is the net signal estimation for each spot):
28
Method
Background Subtraction
Description
In this case the net signal for each spot is S = S − B and the log ratio
⎛ SCy 5 − BCy 5
⎜ SCy 3 − BCy 3
⎝
between channels is R = log 2 ⎜
Signal to Noise Ratio
⎛ SCy 5 ⎞
⎞
⎟⎟ = log 2 ⎜⎜ ⎟⎟ .
⎠
⎝ SCy 3 ⎠
S B and the log ratio
In this case the net signal for each spot is S=
⎛ ⎞
⎛
⎞
between channels is R = log 2 ⎜ SCy 5 BCy 5 ⎟ = log 2 ⎜ SCy 5 ⎟ .
⎜ SCy 3 BCy 3 ⎟
⎝
⎠
No Correction
⎜ SCy 3 ⎟
⎝
⎠
In this case the net signal for each spot is S = S and the log ratio
⎛ SCy 5 ⎞
between channels is R = log 2 ⎜
⎟.
⎜ SCy 3 ⎟
⎝
⎠
It should be noted that the case of Signal to Noise Ratio takes into consideration the signal-tonoise content of a signal, an established notion in systems theory and image processing (1), thus
coming in line with the perception of the experimentalist about the quality of a signal, taking into
account its interest in the strength of the signal compared to noise. The following example
illustrates the strength of using the signal to noise ratio for the net signal estimation compared to
background subtraction which is the most common method used for background correction.
Let S denote the signal mean, B the background noise mean and S the final signal estimation for
a spot on the microarray. Let also i, j denote two arbitrary genes on the microarray and let Si =200,
Bi =100, S j =1100 and B j =1000. Then the net signal estimation with each of the two methods
would be:
Background Subtraction
Signal to Noise Ratio
Si = Si – Bi = 200 – 100 = 100
S j = S j – B j = 1100 – 1000 = 100
S = S / B = 200/100 = 2
i
i
i
S j = S j / B j = 1100/1000 = 1.1
It can be seen that when using background subtraction, signals of different intensity range and thus
with variation of different order are assigned similar corrected values, a fact that could lead to
misinterpretation of subsequent analysis. On the other hand, signal-to-noise ratio provides a more
rational scale of measurement and it can be seen that when signal distribution is too close to
background distribution the signal-to-noise ratio is close to 1 and can be filtered easily and thus
ensure constant level of comparison across all intensities range.
After selecting the desired background correction method, the user should click OK. If the user
skips the background correction step, ARMADA sets it automatically to No Correction.
29
3.3. Spot quality filtering
After setting the background correction method, the next step in the analysis consists of spot
quality filtering to exclude spots with high background contamination. By clicking Preprocessing
→ Filtering the following window will appear:
ARMADA uses by default the signal and background means to estimate the net signal that will be
used to calculate expression for each spot. In the General panel, the user can select to use the signal
and background medians instead of the means (if available) or to export the genes sensitive to the
filtering processes in Excel format.
In the Noise filtering and Outlier detection panel, the user is able to select the gene filtering
methods and change the default thresholds if desired. ARMADA divides spot quality filtering in 2
parts: i) spot filtering based on background noise and ii) spot filtering based on measurement
reproducibility among replicates (optional). In the first step, spots marked as poor manually or by
the image analysis software are excluded for every replicate and noise sensitive genes are further
isolated for each slide of each condition based on one of the available filters applied to both
channels. At this point, it should be noted that if data are imported directly from the supported
image analysis programs, ARMADA recognizes automatically each program’s spot flags and treats
the flagged spots appropriately. On the other hand, if data are imported from other sources (tab
delimited files, public repositories) and they contain spot flags, the user is responsible for
transforming the flags column into ARMADA recognizable flags (the user should see Appendix A
for file formats) or let ARMADA decide on each spot’s quality by one of the supported filters. The
available filters (No filtering, Signal to Noise threshold, Signal-Noise distribution distance:
m(S)-x*std(S)<m(B)+y*std(B), Custom filter) are described in the table below:
30
Filter
No filtering
Signal to Noise threshold
Signal-Noise distribution distance:
m(S)-x*std(S)<m(B)+y*std(B)
Custom filter
Description
Data are filtered based only to the automatic flagging of
image analysis programs or by the flags provided during
importing (if they are valid flags). No other filters are applied.
This filter is based on the formula S B < T where T is the
(
)
threshold below which noisy spots are filtered out from each
array.
This filter is based on the distance between the signal and
background distributions: a spot is robust against this filter if
its signal and noise distributions abstain from each other a
distance which is determined by the respective standard
deviations. Sensitive spots are determined by the
inequality S − xσ S < B + yσ B , where x and y are user-defined
parameters.
In this case the user can create his own custom filter using
any of the operators +, –, *, /, <, >, =, ~=, & (logical AND) or
| (logical OR), any positive real number and any of the
expressions below:
SigMean
Signal Mean
BackMean
Background Mean
SigMedian
Signal Median (for ImaGene, GenePix or
other, if medians information present)
BackMedian Background Median (for ImaGene, GenePix
or other, if medians information present)
SigStd
Signal Standard Deviation
BackStd
Background Standard Deviation
As an example of the custom filter case, the following filtering expressions are valid and are applied
for each microarray in the selected set of conditions on both channels:
SigMean < 2*SigStd
SigMedian – BackMedian < 500
SigMean/BackMean < 3 & SigMean < 1000
It should be noted that spot filters are applied to both channels and the union of poor spots from
both channels are considered to be poor spots and excluded from further analysis.
31
In the second filtering step which is optional (spot filtering based on measurement
reproducibility among replicates for each experimental condition), the user is able to select between
a t-test (parametric) or Wilcoxon (non-parametric) test that will verify that for each spot, the ratio
measurements of all condition replicates derive from a normal (or a continuous symmetrical)
distribution with mean (median) equal to the average ratio for this spot among all replicates. This
test tracks and excludes outliers among the replicate slides of an experimental condition. If the user
does not wish to perform this test, the choice of Statistic in the Outlier detection panel should be
set to None, else, the user should select the desired test to be performed, set a statistical threshold
cutoff (p-value, usually a cutoff of 0.05 is not considered neither very strict nor very loose) in the
field p-value cutoff and choose whether or not to display histograms of p-values that depict the pvalue range frequencies for all genes of an experimental condition.
After making the necessary selections (or leaving the default settings) the user should click OK
to perform the selected operations. At this point, ARMADA filters the selected data based on the
32
intensities of both channels and calculates the log2 ratio between channels as well as the intensity
values (2) for the genes that passed the filtering procedures. If the option Export filtered spots in
Excel format is checked, the following window will appear, prompting the user to select which
types of filtered spots should be exported:
The following table describes what spots will be exported by checking each of the check boxes:
Option
Bad spots for each condition
Good spots for each condition
Bad spots for each condition and replicate
Good spots for each condition and replicate
Common bad spots between replicates for
each condition
Common good spots between replicates for
each condition
Common bad spots between replicates for
all conditions
Common good spots between replicates for
all conditions
Description
The union (all filtered spots from all replicates) of
filtered spots for each experimental condition.
The union (all remaining spots from all replicates) of
remaining spots for each experimental condition.
Filtered spots for each experimental condition and
each individual replicate.
Remaining spots for each experimental condition and
each individual replicate.
The conditional intersection (filtered spots that are
common between replicates) of filtered spots for each
experimental condition.
The conditional intersection (remaining spots that are
common between replicates) of remaining spots for
each experimental condition.
The total intersection (filtered spots that are common
between conditions) of filtered spots among all
experimental conditions.
The total intersection (remaining spots that are
common between conditions) of remaining spots
among all experimental conditions.
For example, checking Bad spots for each condition and replicate will return an Excel file (the
user chooses the name and store location of the file) containing the filtered spots (named with their
GeneID) for each array replicate under each condition in separate columns, while checking
Common bad spots between replicates for all conditions will return an Excel file containing the
spots that were commonly filtered from all conditions and replicates.
33
Array spots which were found to be sensitive to any of the procedures described in this section
are marked as non-informative poor quality spots and excluded from the dataset to be subsequently
normalized in order to alleviate the normalization procedure from the impact of systematic
measurement errors. It should also be noted that if the filtering part is skipped, ARMADA assumes
takes as default the No filtering option.
3.4. Normalization
The analysis part that follows the poor quality spot filtering in ARMADA workflow is the data
normalization for each slide to compensate for systematic measurement errors. At this point it
should be noted that normalization is performed on each microarray slide separately using only
genes that passed the filtering tests for each slide. In order to select the normalization method and
set various parameters, the user should click Preprocessing → Normalization and the following
window will appear:
In the Normalization panel, the user should select among one of the currently supported
normalization methods. In the case of LOWESS/LOESS methods (3) the field Spanning
Neighbourhood should also be completed (or left with its default value). The span value modifies
the running window size (proportion of neighbouring points to the currently processed point) for the
smoothing function. If the span value is less than 1, the window size is taken to be a fraction of the
number of points in the data. If span value is greater than 1, the running window contains as many
data points as the value given. The table below describes briefly the currently supported
normalization methods. The notation used is R for ‘Red’ or ‘Cy5’ or ‘Channel 2’, G for ‘Green’ or
‘Cy3’ or ‘Channel 1’ and i denotes gene i on the array under normalization. The function notation
N(.) denotes normalized values.
34
Method
Global Mean
Global Median
LOWESS (linear fit)
Robust LOWESS (linear fit)
LOESS (quadratic fit)
Brief description
Global Mean normalization normalizes data on each microarray
slide by calculating the mean expression of all genes present on
the array and subtracting this value from each individual gene.
⎛
⎛ R ⎞⎞
⎛R ⎞
N ⎜ log 2 ⎜ i ⎟ ⎟ → log 2 ⎜ i ⎟ − M
⎜
⎟
⎝ Gi ⎠ ⎠
⎝ Gi ⎠
⎝
⎛
⎞
⎛R ⎞
M = mean ⎜ log 2 ⎜ i ⎟ , i = 1...# genes ⎟
⎜
⎟
⎝ Gi ⎠
⎝
⎠
Global Median normalization normalizes data on each microarray
slide by calculating the median expression of all genes present on
the array and subtracting this value from each individual gene.
⎛
⎛ R ⎞⎞
⎛R ⎞
N ⎜ log 2 ⎜ i ⎟ ⎟ → log 2 ⎜ i ⎟ − M
⎜
⎟
⎝ Gi ⎠ ⎠
⎝ Gi ⎠
⎝
⎛
⎞
⎛R ⎞
M = median ⎜ log 2 ⎜ i ⎟ , i = 1...# genes ⎟
⎜
⎟
⎝ Gi ⎠
⎝
⎠
LOWESS normalization normalizes data on each microarray slide
by local regression of log2 ratio against intensity using weighted
linear least squares and a 1st degree polynomial model. This model
is used to calculate normalized expression values for each gene.
⎛
⎛
⎛ R ⎞⎞
⎛R ⎞
⎛ R ⎞⎞
N ⎜ log 2 ⎜ i ⎟ ⎟ → log 2 ⎜ i ⎟ − f ⎜ log 2 ⎜ i ⎟ ⎟
⎜
⎟
⎜
⎟
⎝ Gi ⎠ ⎠
⎝ Gi ⎠
⎝ Gi ⎠ ⎠
⎝
⎝
⎛
⎛
⎛ R ⎞⎞
⎛ R ⎞⎞
f ⎜ log 2 ⎜ i ⎟ ⎟ = LOWESS ⎜ log 2 Ri ⋅ Gi ,log 2 ⎜ i ⎟ ⎟
⎜
⎟
⎜
⎟
⎝ Gi ⎠ ⎠
⎝ Gi ⎠ ⎠
⎝
⎝
Robust LOWESS normalization normalizes data on each
microarray slide by local regression of log2 ratio against intensity
using weighted linear least squares and a 1st degree polynomial
model. The robust version of LOWESS performs additional fitting
iterations and assigns lower weight to outliers in the regression.
The method assigns zero weight to data outside six mean absolute
deviations. This model is used to calculate normalized expression
values for each gene. Robust LOWESS needs more time to
complete than simple LOWESS but produces results more robust
against possible outliers.
⎛
⎛
⎛ R ⎞⎞
⎛R ⎞
⎛ R ⎞⎞
N ⎜ log 2 ⎜ i ⎟ ⎟ → log 2 ⎜ i ⎟ − f ⎜ log 2 ⎜ i ⎟ ⎟
⎜
⎟
⎜
⎟
⎝ Gi ⎠ ⎠
⎝ Gi ⎠
⎝ Gi ⎠ ⎠
⎝
⎝
⎛
⎛
⎛ R ⎞⎞
⎛ R ⎞⎞
f ⎜ log 2 ⎜ i ⎟ ⎟ = RobustLOWESS ⎜ log 2 Ri ⋅ Gi ,log 2 ⎜ i ⎟ ⎟
⎜
⎟
⎜
⎟
⎝ Gi ⎠ ⎠
⎝ Gi ⎠ ⎠
⎝
⎝
LOESS normalization normalizes data on each microarray slide by
local regression of log2 ratio against intensity using weighted
linear least squares and a 2nd degree polynomial model. This
model is used to calculate normalized expression values for each
gene.
35
⎛
⎛R
N ⎜ log 2 ⎜ i
⎜
⎝ Gi
⎝
Robust LOESS (quadratic fit)
Rank Invariant
No normalization
⎞⎞
⎛ Ri
⎟ ⎟⎟ → log 2 ⎜
⎠⎠
⎝ Gi
⎞
⎟−
⎠
⎛
⎛R
f ⎜ log 2 ⎜ i
⎜
⎝ Gi
⎝
⎞⎞
⎟ ⎟⎟
⎠⎠
⎛
⎛
⎛ R ⎞⎞
⎛ R ⎞⎞
f ⎜ log 2 ⎜ i ⎟ ⎟ = LOESS ⎜ log 2 Ri ⋅ Gi ,log 2 ⎜ i ⎟ ⎟
⎜
⎟
⎜
⎟
⎝ Gi ⎠ ⎠
⎝ Gi ⎠ ⎠
⎝
⎝
Robust LOESS normalization normalizes data on each microarray
slide by local regression of log2 ratio against intensity using
weighted linear least squares and a 2nd degree polynomial model.
The robust version of LOESS performs additional fitting iterations
and assigns lower weight to outliers in the regression. The method
assigns zero weight to data outside six mean absolute deviations.
This model is used to calculate normalized expression values for
each gene. Robust LOESS needs more time to complete than
simple LOESS but produces results more robust against possible
outliers.
⎛
⎛
⎛ R ⎞⎞
⎛R ⎞
⎛ R ⎞⎞
N ⎜ log 2 ⎜ i ⎟ ⎟ → log 2 ⎜ i ⎟ − f ⎜ log 2 ⎜ i ⎟ ⎟
⎜
⎟
⎜
⎟
⎝ Gi ⎠ ⎠
⎝ Gi ⎠
⎝ Gi ⎠ ⎠
⎝
⎝
⎛
⎛
⎛ R ⎞⎞
⎛ R ⎞⎞
f ⎜ log 2 ⎜ i ⎟ ⎟ = RobustLOESS ⎜ log 2 Ri ⋅ Gi ,log 2 ⎜ i ⎟ ⎟
⎜
⎟
⎜
⎟
⎝ Gi ⎠ ⎠
⎝ Gi ⎠ ⎠
⎝
⎝
Rank Invariant normalization normalizes data on each microarray
slide by selecting a number of genes which are non-differentially
expressed, fit a normalization curve through these genes and use
this curve coupled with interpolation methods to normalize the
genes present on the slide. Genes are ranked based on the signal
intensities of the two channels and the rank invariant set of genes
is determined by those genes whose proportional rank difference is
smaller than a given threshold. Rank Invariant normalization is
useful especially when data on a microarray slide appear not to be
very homogeneous (e.g. the histogram of expression is bimodal).
⎛
⎛ N ( Ri ) ⎞
⎛ R ⎞⎞
N ⎜ log 2 ⎜ i ⎟ ⎟ → log 2 ⎜⎜
⎟⎟
⎜
⎟
⎝ Gi ⎠ ⎠
⎝ Gi ⎠
⎝
N ( Ri ) → RankInvariant ( Gi ,Ri )
If this option is selected, ARMADA will continue without
performing any data normalization. It is highly not recommended
unless the user wishes to perform a comparison study or any other
purposes that include un-normalized data.
⎛
⎛ R ⎞⎞
⎛R ⎞
N ⎜ log 2 ⎜ i ⎟ ⎟ → log 2 ⎜ i ⎟
⎜
⎟
⎝ Gi ⎠ ⎠
⎝ Gi ⎠
⎝
If Rank Invariant normalization is selected, the following window will appear prompting the user to
set certain parameters (or leave the default values unchanged):
36
In the General panel the user should set parameters concerning the determination of the rank
invariant set of genes while in the Smoothing panel, the type of smoothing curve that will be fit
using the set of rank invariant genes and will be used to normalized the genes on the array. The
following table describes the several parameters and their values:
Parameter
Rank thresholds
Exclusion rank threshold
Maximum dataset % included
in rank invariant set
Iterate until specified rank
invariant set size reached
Display plots
Smoother
Description
The thresholds for the lowest average rank and the highest average
rank, which are used to determine the invariant set. The rank
invariant set is a set of data points whose proportional rank
difference is smaller than a given threshold. These two thresholds
are usually being set empirically to limit the spread of the
invariant set, but should allow enough data points to determine the
normalization relationship. Parameter values must lie between 0
and 1.
This parameter filters the invariant set of data points, by excluding
genes whose average rank (between ‘Channel 2’ or ‘Red’ or ‘Cy5’
and ‘Channel 1’ or ‘Green’ or ‘Cy3’) is in the highest N ranked
averages or lowest N ranked averages. This parameter is useful if
the user wishes to exclude rank invariant genes whose ranks are
very ‘high’ or very ‘low’ respectively, in order to ensure that this
genes won’t affect the normalization curve as ‘outliers’.
This parameter stops the rank invariant set definition iterative
process when the number of genes in the invariant set reaches x
percent of the total number of array genes. If set to 0, the iterative
process continues until no more genes from the array under
process are eliminated.
This option controls the iterative process which determines the
rank invariant set of genes. When checked, the rank invariant
selection algorithm repeats the process until either no more genes
are eliminated, or a predetermined percentage of genes
(Maximum dataset % included in rank invariant set) is
reached. When unchecked, the algorithm performs only one
iteration of the process.
This option controls whether to display MA (Ratio-Intensity) plots
of un-normalized and rank invariant normalized genes of the slide
under process after the completion of the procedure.
This option defines the method that will be used to fit a curve
using the rank invariant set of genes determined by the rank
37
Span
invariant selection algorithm. The available methods are Lowess,
Running Mean and Running Median. For a description of
Lowess the user should see also the LOWESS/LOESS
normalization descriptions.
The span value modifies the running window size (proportion of
neighbouring points to the currently processed point) for the
smoothing function. If the span value is less than 1, the window
size is taken to be a fraction of the number of points in the data. If
span value is greater than 1, the running window contains as many
data points as the value given.
For more details concerning Rank Invariant normalization, the user should see (4).
Concerning the Dye-Swap options panel in the normalization window, the list Channel – Dye
correspondence is used to determine which channel corresponds to which dye, for example, if the
reference samples were labeled with Cy3 prior to hybridization it should be assigned to ‘Channel 1’
(and Cy5 to ‘Channel 2’). Typically, reference samples are labeled with Cy3 and treated samples
with Cy5 which is also the default setting to ARMADA. If for any reason Cy3 corresponds to
Channel 2, this should be declared by choosing Cy3 is channel 2. Alternative, if there is a dye-swap
experimental design, the user can press the Launch Dye-Swap editor button and the following
window will appear:
From there, the user can select which arrays from which experimental condition correspond to a
dye-swap hybridization. In other words, the user should select only the arrays for which Cy3 (or
‘Green’) corresponds to Channel 2, or the channel user for treated samples. If the user makes a
mistake in the selection of the arrays, the Clear condition and Clear all buttons will reset the
arrays for the selected condition or all the arrays to the default which is Cy3 corresponding to
Channel 1 or ‘Control’ channel. After finishing with the selection of dye-swapped arrays, the user
should click OK. Attention should be paid to the dye-swap options as they affects directly the
calculation of the log2 ratio between channels and thus gene expression.
Concerning the Other panel in the normalization window, if subgrid meta-coordinates are
present on the slides, the user is given the choice to select subgrid normalization by checking the
Subgrid normalization box to possibly allow considering several spatial dependent properties such
38
as local background noise (caused by the robotic printing of the arrays) in the normalization
procedure instead of performing normalization on the whole slide. Finally, if the user checks the
Display timebar box, a timebar will be displayed presenting the progress and the remaining time of
the normalization procedure. While a timebar gives an estimate of the time required for
normalization (especially for large datasets), it consumes computer memory resources causing the
normalization procedure to take more time, thus the default choice is not to display a timebar.
After making the necessary selections, the user should click OK to normalize the data.
Depending on the normalization algorithm chosen, the normalization procedure might take some
time. At this point it should be noted that the Statistics menu will not be enabled if normalization is
not performed. ARMADA workflow does not allow performing any statistical tests without having
normalized the data first in order to scale them and be able to make rational comparisons among
different experimental conditions. This does not apply when the users has imported external data for
process unless those data are not normalized.
39
4. Statistical Operations
After completing data preprocessing and normalization which excludes poor quality spots and
scales data within each array, a proper statistical test can reveal several genes which are statistically
distinguished among different experimental configurations. The result of statistical selection is
usually a far smaller set of genes (compared to the initial dataset) which provides valuable
information about the experiment. Gene expression pattern analysis can be also performed using a
clustering algorithm in order to reveal genes belonging to groups with common expression. This
section presents the statistical selection and clustering methods implemented in this platform, along
with how these can help the user reaching to a conclusion.
4.1. Statistical Selection
This section presents the statistical tests supported by ARMADA for the extraction of differentially
expressed gene lists as well as the statistical analysis workflow which includes the Trust Factor
filtering, between slide normalization, imputation of possible missing values caused by image
analysis, user flagging or filtering steps and multiple statistical testing correction methods. In order
to perform statistical analysis, the user should click Statistics → Statistical Selection. This will
bring up the Statistical Selection preferences window which is shown below:
In this window, the user can set up the parameters that best fit his needs or leave the defaults. In the
left side of the window, there are two lists. The left one contains the pool of available Analysis
objects created so far and the right list contains the Analysis object for which the user wishes to
perform statistical testing. Different Analysis objects can be added to or removed from the list for
testing by clicking on the Add >> or << Remove buttons. All the parameters can be set by the
options available in the Before testing and Statistical testing panels. The following table describes
the available options in the Before testing panel:
Option
Missing value imputation
Description
This option determines how missing values from the dataset will be
imputed. If Average within the same condition is selected, then
40
Trust Factor cutoff
Between slide scaling
missing values for each gene are imputed per experimental condition
by averaging the average expression of the remaining present values of
the gene of interest from the same experimental condition. If k-nearest
neighbor (kNN) is selected, then missing values are imputed using the
whole dataset used a kNN based value estimation (5).
The Trust Factor is defined for each experimental condition as: TF =
#Appearances/#Replicates. The number of appearances for each gene
is determined by the initial filtering steps: for example, if one gene in a
specific slide is found sensitive either to any of the filters applied, then
it is marked as absent. If one gene is filtered out from all replicates for
a given condition, then the TF for this gene is zero. This gene is then
marked as ‘unreliable’ and is excluded from further analysis. The user
is prompted to supply a cutoff or leave the default value.
This option determines the between slide normalization method. If
Median Absolute Deviation (MAD) is selected, then expression
values among all arrays for the selected Analysis will be scaled using
the MAD. MAD is defined as MAD = median Yi − Y where Y is the
(
Impute values
Display boxplots before
and after scaling
)
median of the data and Y is the absolute value of Y. This is a variation
of the average absolute deviation that is less affected by extremes in a
distribution tail because the data in the distribution tails have less
influence on the calculation of the median than they do on the mean.
This value is calculated for each condition of the selected Analysis and
then subtracted from it in order to make data more easily compared. If
Quantile normalization is selected, then data are normalized between
slides using the Quantile normalization algorithm (6). If No scaling is
selected, then no between slides normalization is performed.
This option determines whether missing value imputation will take
place before (Before scaling) or after (After scaling) between slide
normalization. It is recommended to perform missing value imputation
after between slide normalization as data are standardized.
If this box is checked, a boxplot (the user should see also section 5.5)
will be displayed, depicting the distributions of the data before and
after between slide normalization.
In the case of selecting k-nearest neighbor (kNN) in the Missing value imputation options list,
the following window will appear prompting the user to set some parameters for the imputation:
The following table explains each option and parameter:
Option
Distance
Description
Determines the distance metric that will be used to
calculate the distances among gene vectors determined
by the gene expression values for all experimental
conditions in the selected Analysis. For more
41
Nearest Neighbors
Use median instead of weighted mean
information on distance metrics, the user should see
Appendix D.
The number of nearest neighbors that will be used to
impute the missing values.
If checked, missing values will be imputed based on the
median of the nearest neighbors expression values
instead of the weighted mean.
In the case of selecting Quantile normalization in the Between slide scaling options list, the
following window will appear prompting the user to set some parameters for scaling:
The following table explains each option and parameter:
Option
Use median instead of mean
Plot distribution summaries after scaling
Description
If checked, the median of the ranked values will be used
instead of the mean.
If checked, a plot presenting the gene expression
distributions among all slides of the selected Analysis
and the summary quantiles distribution will be displayed.
In the Statistical testing panel, the user can select the test to be performed, select a multiple test
correction method and set the cutoff values that will determine which genes are statistically
differentially expressed. The following table describes the available options in the Statisticaltesting
panel:
Option
Statistical test
Multiple test correction
Description
Available statistical tests are 1-way ANOVA
(ref. here, Kerr), Kruskall Wallis (nonparametric equivalent of ANOVA), t-test and
Time Course ANOVA. Time Course ANOVA
should be used when each experimental
configuration has its own control (e.g. when
performing a time course experiment, where one
possible configuration is that each separate time
point has its own control). In this case, ANOVA
is performed among each point’s fold changes
instead of among expression values.
Available multiple testing correction methods,
are the following:
None
No multiple testing
correction.
Bonferroni
Bonferroni
multiple
testing
correction
procedure (7).
FDR Benjamini- Benjamini-Hochberg
Hochberg
False Discovery Rate
control procedure (8).
42
p-value threshold
FDR threshold
pFDR
Storey Storey positive False
(Boostrap)
Discovery Rate control
procedure. True null
hypothesis is calculated
from
the
tuning
parameter based on
bootstrap (9).
pFDR
Storey Storey positive False
(Polynomial)
Discovery Rate control
procedure. True null
hypothesis is calculated
from
the
tuning
parameter based on
polynomial fit (9).
The user should consult Appendix C for more
information on multiple testing correction
issues.
A p-value cutoff threshold (when no or
Bonferroni multiple testing correction chosen) to
determine the number of differentially expressed
genes.
An FDR threshold value (when all other
multiple testing correction methods chosen) to
determine the number of differentially expressed
genes.
In the case of selecting Time Course ANOVA in the Statistical test options list, the following
window will appear:
In this preferences window, the user should define pairs of experimental conditions so that fold
changes can be calculated for time course ANOVA to run. The user can define pairs by using the
Select control and Select treated lists and using the Add >> and << Remove buttons to add or
remove pairs respectively.
After setting all the desired parameters in the statistical selection preferences window, the user
should clink OK. It should be noted that the user can define a different workflow for each Analysis
in the right list by selecting the Analysis object and setting the desired parameters. After clicking
OK, ARMADA will start the statistical selection process for each of the selected Analysis objects.
For each Analysis object, the following window will appear:
43
This is the result of the Trust Factor cutoff. The user should click Yes or No depending on
preference. If No is clicked, ARMADA will stop the process for the Analysis object under
processing and will jump to the next one. If the user click Yes, the following window will appear
after the application of a statistical test:
This is the result of the statistical test concerning the number of differentially expressed genes
found. If the user clicks Yes, ARMADA stores the results and continues with the next Analysis
object. If the user clicks No, ARMADA will skip the result for the Analysis object under processing
and will jump to the next one. Differentially expressed genes can be viewed by hitting the DE List
button on the main window.
4.2. Fold Change Calculation
Apart from statistical testing which leads to statistical score values, fold changes can provide
useful estimations on how much a gene is differentiated compared to its control or other conditions.
In order to calculate fold changes, the user should select an Analysis object from the Analysis
Objects list and click Statistics → Fold Change Calculation and the following window will
appear:
In this preferences window, the user should define pairs of experimental conditions so that fold
changes can be calculated. The user can define pairs by using the Select control and Select treated
lists and using the Add >> and << Remove buttons to add or remove pairs respectively. The Select
control and Select treated lists contain the names of the experimental conditions of the Analysis
object selected in the Analysis Object list. After finishing with pair assignment, the user should
click Calculate to calculate fold changes based on the assigned pairs.
44
4.3. Clustering
The term cluster analysis or clustering encompasses a number of different algorithms and
methods for grouping objects of similar kind into respective categories. A general question facing
researchers in many areas of inquiry is how to organize observed data into meaningful structures. In
other words cluster analysis is an exploratory data analysis tool which aims at sorting different
objects into groups in a way that the degree of association between two objects is maximal if they
belong to the same group and minimal otherwise. Given the above, cluster analysis can be used to
discover structures in data without providing an explanation/interpretation. In other words, cluster
analysis simply discovers structures in data without explaining why they exist.
Clustering differentially expressed genes in a microarray experiment helps scientists to organize
these genes into groups. Genes that belong to the same group might have something in common
about how they are activated or even the way they interact with each other. For example, a group of
similarly expressed genes might affect the transcription of proteins that catalyze reactions from
specific pathway, and thus giving clues to the scientists to further examine this particular pathway
of the cell cycle. There are several methods of clustering; ARMADA supports hierarchical, k-means
and fuzzy C-means clustering. This section presents how the user can perform cluster analysis using
one of the three mentioned methods.
4.3.1. Hierarchical clustering
In hierarchical clustering the data are not partitioned into a particular cluster in a single step.
Instead, a series of partitions takes place, which may run from a single cluster containing all objects
to n clusters each containing a single object. Hierarchical clustering may be represented by a two
dimensional diagram known as clustergram (or clustering heatmap) which illustrates the fusions or
divisions made at each successive stage of analysis. An example of such a clustergram is given
below:
45
For further information concerning hierarchical clustering, the user should see (10). In order to
perform hierarchical clustering the user should select an Analysis object from the Analysis Objects
list and click Statistics → Clustering → Hierarchical. The following preferences window will
appear:
The following table explains the available options in the two upper panels, Clustering values and
Clustering variables:
Clustering variables
Clustering values
Option
Condition means
All replicates
Genes (rows)
Replicates/Conditions (columns)
Both (rows and columns)
Description
If selected, gene expression values to be clustered are the
mean expression value among replicates for each
condition of the selected Analysis.
If selected, gene expression values to be clustered are all
the values from all array replicates from each condition of
the selected Analysis. This option sometimes serves also
as quality control of an experiment. If all replicates of an
experimental condition are not clustered together, the
missing replicate might be of low quality.
If selected, hierarchical clustering will be performed for
genes, revealing clusters of genes with similar expression.
If selected, hierarchical clustering will be performed for
conditions or replicates (depending on the choice in the
Clustering values panel), revealing clusters of conditions.
If chosen, hierarchical clustering will be applied to both
genes and conditions/replicates, constructing thus a tree
clustering diagram (dendrogram) for both genes and
replicates or conditions.
46
The following table explains the available options in the bottom panel, Options:
Option
Linkage
Distance
Clustering
p-value cutoff
Inconsistency coefficient
Maximum number of clusters
Heatmap
Cutoff
Display heatmap
Calculate optimal dendrogram
Colormap
Colormap density
Heatmap title
Description
The linkage algorithm to be used for data clustering (for
further information the user should see Appendix D on
distances and linkages).
The distance metric to be used for data clustering (for
further information the user should see Appendix D on
distances and linkages).
A p-value cutoff, additional to the statistical test p-value
cutoff, in order to cluster fewer genes than those determined
by the statistical test. For example, if the statistical test was
performed with a p-value cutoff of 0.05, the user can enter
0.01 to cluster fewer genes than those determined by the
cutoff of 0.05.
The inconsistency coefficient cutoff to determine the
number of clusters based on the dendrogram 6 (11).
The maximum number of clusters to which the dataset can
be grouped into.
Either the inconsistency coefficient cutoff or the maximum
number of clusters.
If checked, a clustering heatmap will be displayed.
If checked, the dendrogram on the clustering heatmap will
be optimized for better clustering results. However, it can
take a considerable amount of time.
The user should see section 5.1.
The user should see section 5.1.
A title for the heatmap to be created, if chosen.
After setting the desired parameters (or leave the defaults) the user should click OK.
Hierarchical clustering will be performed and ARMADA will store the result. Gene clusters can be
viewed by hitting the Cluster List button on the main window.
4.3.2. k-means clustering
k-means clustering is one of the simplest algorithms that solves the well known clustering
problem. It differs from hierarchical clustering in that the number of clusters, k, needs to be
determined at the onset. The goal is to divide the objects into k clusters such that some metric
relative to the centroids (cluster centers) of the clusters is minimized. These centroids should be
placed in a skillful way because different location causes different results. The better choice is to
place them as much as possible far away from each other. The next step is to take each point
belonging to a given data set and associate it to the nearest centroid. When no point is pending, the
first step is completed and an early grouping is done. At this point re-calculation of k new centroids
should be performed based on the results of the first grouping. This procedure is repeated until the
6
Only one among Inconsistency coefficient and Maximum number of clusters can be provided to determine the
number of returned clusters.
47
centroids stop changing positions. k-means clustering is very useful when there is an a priori
estimation of the number of clusters that the data should be grouped into. For further information on
k-means clustering, the user should see (10) In order to perform k-means clustering, the user should
select an Analysis object from the Analysis Objects list and click Statistics → Clustering → kmeans. The following preferences window will appear:
The following table explains the available options in the two upper panels, Clustering values and
Clustering variables:
Clustering
values
Option
Condition means
All replicates
Clustering
variables
Genes (rows)
Replicates/Conditions (columns)
Description
If selected, gene expression values to be clustered are the
mean expression value among replicates for each
condition of the selected Analysis.
If selected, gene expression values to be clustered are all
the values from all array replicates from each condition
of the selected Analysis.
If selected, hierarchical clustering will be performed for
genes, revealing clusters of genes with similar
expression.
If selected, hierarchical clustering will be performed for
conditions or replicates (depending on the choice in the
Clustering values panel), revealing clusters of
conditions.
The following table explains the available options in the bottom panel, Options:
Option
Number of centroids (k)
Distance
Seeds
Description
The number of clusters that the genes should be grouped into.
The distance metric to be used for data clustering (for further
information the user should see Appendix D on distances and linkages).
Method used to choose the initial cluster centroid positions. The
following methods are available:
Sample
If selected, k observations from the data matrix to be
clustered are selected randomly to be the initial centroids.
48
Uniform
Repeat clustering
Maximum iterations
p-value cutoff
If selected, k random points are selected uniformly from
the range of the data matrix to be clustered.
Clusters If selected a preliminary clustering phase is performed on
a random 10% subsample of the data matrix to be
clustered. This preliminary phase is itself initialized using
the ‘Sample’ option.
Number of times to repeat the clustering process, each with a new set of
initial cluster centroid positions. The solution with the smallest distance
between clusters is returned.
Maximum centroid convergence iterations.
A p-value cutoff, additional to the statistical test p-value cutoff, in order
to cluster fewer genes than those determined by the statistical test. For
example, if the statistical test was performed with a p-value cutoff of
0.05, the user can enter 0.01 to cluster fewer genes than those determined
by the cutoff of 0.05.
After setting the desired parameters (or leave the defaults) the user should click OK. k-means
clustering will be performed and ARMADA will store the result. Gene clusters can be viewed by
hitting the Cluster List button on the main window. The user can also consult section 5.7 on how to
plot gene expression profiles for clusters formed with the k-means algorithm.
4.3.3. Fuzzy C-means clustering
While partitional clustering methods such as k-means or hierarchical clustering assign each gene
to a single cluster, these methods do not provide information about the influence of a given gene for
the overall shape of clusters. Fuzzy partitioning methods such as fuzzy c-means clustering can solve
this problem by attributing cluster membership values to genes. The cluster where the membership
for each gene is highest is probably the cluster which it belongs to, but there is the possibility to
check what happens with possible membership to other clusters by looking other memberships for
specific genes. For more information on fuzzy c-means clustering as well as the algorithm
implemented in ARMADA, the user should see (12). In order to perform fuzzy c-means clustering,
the user should select an Analysis object from the Analysis Objects list and click Statistics →
Clustering → Fuzzy C-Means. The following preferences window will appear:
49
The following table explains the available options in the two upper panels, Clustering values and
Clustering variables:
Clustering
values
Option
Condition means
All replicates
Clustering
variables
Genes (rows)
Replicates/Conditions (columns)
Description
If selected, gene expression values to be clustered are the
mean expression value among replicates for each
condition of the selected Analysis.
If selected, gene expression values to be clustered are all
the values from all array replicates from each condition
of the selected Analysis.
If selected, hierarchical clustering will be performed for
genes, revealing clusters of genes with similar
expression.
If selected, hierarchical clustering will be performed for
conditions or replicates (depending on the choice in the
Clustering values panel), revealing clusters of
conditions.
The following table explains the available options in the bottom panel, Options:
General options
Option
Number of clusters
Fuzzy parameter
Convergence tolerance
Maximum iterations
p-value cutoff
Optimize fuzzy parameter
Description
The number of clusters that the genes should be grouped into.
The parameter in fuzzy c-means clustering algorithm
The maximum error allowed between two consecutives values
of the constrained fuzzy partition matrix (cluster membership
matrix).
Maximum number of iterations for centroid convergence.
A p-value cutoff, additional to the statistical test p-value cutoff,
in order to cluster fewer genes than those determined by the
statistical test. For example, if the statistical test was performed
with a p-value cutoff of 0.05, the user can enter 0.01 to cluster
fewer genes than those determined by the cutoff of 0.05.
If checked, fuzzy parameter value will be optimized as
proposed in (12).
50
Optimization
options
CV constant
Tolerance
Maximum iterations
Coefficient of Variation of the set of distances between genes
(the user should see (12)).
Allowed tolerance to be used in the fuzzy parameter
optimization algorithm.
Maximum number of iterations for the convergence of the
fuzzy parameter.
After setting the desired parameters (or leave the defaults) the user should click OK. Fuzzy cmeans clustering will be performed and ARMADA will store the result. It should be noted that if
the box Optimize fuzzy parameter is checked, the running time of the algorithm might increase
considerably (depending on the size of the dataset and the number of clusters). Gene clusters and
cluster memberships can be viewed by hitting the Cluster List button on the main window. The
user can also consult section 5.7 on how to plot gene expression profiles for clusters formed with
the fuzzy c-means algorithm. For a complete description of the parameters in the table above as well
as the fuzzy c-means clustering algorithm, the user should see (12).
4.4. Classification
Apart from classical statistical methods used for the selection of differentially expressed genes,
several other techniques are used, derived especially from the area of Machine Learning for the
classification of genes and the prognosis and prediction of new data. These methods are mainly
classified into two categories: unsupervised learning and supervised learning. In unsupervised
learning, the algorithm is given a set of objects and is trying to group them into classes without any
prior knowledge of these classes or any labeled output. Classical unsupervised techniques are
clustering techniques (the user should see section 4.3). Supervised learning algorithms make use of
a set of classified examples and they are trying, given this sample of input-output pairs, to
determine the function that maps any input to any output such that disagreement with future inputoutput pairs is minimized. Supervised learning usually refers to classification problems; the term
classification usually refers to a prediction or learning problem in which the variable to be predicted
assumes one of k unordered values, (c1, c2, …, ck), arbitrarily relabeled as (1, 2, …, k) or sometimes
(0, 1, …, k-1). The k values correspond to k predefined classes, e.g., tumor class or bacteria type.
Classification algorithms are given a set of samples and their class label and try to predict the
correct class for new data and regression problems where the output is a set of real numbers instead
of class labels (10). Classification algorithms supported in ARMADA are (Linear) Discriminant
Analysis, k-Nearest Neighbor algorithms (kNN) and Support Vector Machines (SVM)
classification.
The performance of classifiers can be evaluated by several techniques. Three of them are
supported in ARMADA:
i) N-fold cross validation. In this technique, the p data used to train the classifier are randomly
split in n independent datasets of size approximately p/n. Subsequently, n rounds of validation
51
follow, where in each round, n-1 datasets are used to train the classifier and 1 to test it. The
misclassification error is the average number of misclassified instances.
ii) Leave-m-out. In this technique, m rounds of classification are performed, where in each round,
m samples are left out from the dataset in order to be used later to validate the classifier built
with the rest p-m samples. A widely used value for m is m=1. The misclassification error is the
average number of misclassified instances.
iii) Training-and-test. In this technique, a percentage of the dataset is held out and the rest is used
to train the classifier. The misclassification error is the average number of misclassified
instances from the held-out part of the dataset.
At this point, the user should note that usually, prior to building a classifier using any
classification technique, the number of variables used as variables that can discriminate among
classes, have to be reduced in order to remove noise. For example, in a microarray experiment
where microarrays contain several thousands of genes, not all of them are differentially expressed
among different experimental conditions (classes) and they only add noise to the experiment. This
procedure of noise removal in classification procedures is called feature selection. Feature selection
can be performed in ARMADA by any of the statistical selection methods that are supported
(section 4.1). For this reason, classification algorithms become available in ARMADA only after
the statistical selection procedure. The rest of this section presents how the user can build and use
classifiers in ARMADA. For more information on classification, feature selection and classifier
evaluation techniques, the user should see (13).
4.4.1. (Linear) Discriminant Analysis
Discriminant Analysis (DA) may be used for two objectives: either to assess the adequacy of
classification, given the group memberships of the objects under study, or to assign objects to one
of a number of (known) groups of objects. DA may thus have a descriptive or a predictive objective.
In both cases, some group assignments must be known before carrying out the DA. Such group
assignments, or labelling, may be arrived at in any way. For example, in microarray classification
studies, one group might represent samples from healthy tissues while the other(s) from diseased
tissues. For more information on DA the user should see (10). Apart from building a DA classifier,
ARMADA offers a batch process module that allows the user to tune the classifier (e.g. select the
best discriminant function type of class prior probabilities) for a specific problem studied using a
representative dataset. The following sub-sections describe the tuning and classification process
using DA in ARMADA.
4.4.1.1. (Linear) Discriminant Analysis – Tuning
In order to perform DA classifier tuning, the user should select an Analysis object from the
Analysis Objects list and click Statistics → Classification → Discriminant Analysis → Tune.
The following preferences window will appear:
52
The following table explains the available options in the DA tuning options, Model validation
options and General options panels:
DA tuning options
Option
Discriminant function
Priors
Description
The type of discriminant function. The following types
are available (descriptions partially from MATLAB’s
help):
Linear
Fits a multivariate normal
density to each group, with a
pooled estimate of covariance.
Diagonal Linear
Similar to Linear, but with a
diagonal covariance matrix
estimate
(naive
Bayes
classifiers).
Quadratic
Fits
multivariate
normal
densities
with
covariance
estimates stratified by group.
Diagonal Quadratic Similar to Quadratic, but with a
diagonal covariance matrix
estimate
(naive
Bayes
classifiers).
Mahalanobis
Uses Mahalanobis distances
with
stratified
covariance
estimates.
The way that prior class probabilities are defined. The
following options are available:
Uniform
Prior probabilities are derived from a
uniform distribution (equal prior
probabilities for each class).
Empirical
Class prior probabilities are estimated
from the group relative frequencies in
the training dataset.
External
User-defined class prior probabilities; in
this case, the prior probabilities are
given in a text tab delimited or Excel
file.
53
Model validation
options
Priors file
N-fold cross validation
Leave-M-out
Training and Test
General options
Display evaluation plots
Display output results
Verbose output (command line)
A text tab delimited or Excel file containing class prior
probabilities structured as follows: the 1st column should
contain the class names and the 2nd the prior probabilities
corresponding to each class in the 1st column (the user
should also see Appendix A for an example).
The user should check this box to perform N-fold cross
validation of the classifier and supply N.
The user should check this box to perform Leave-M-out
validation of the classifier and supply M.
The user should check this box to perform Training and
Test validation of the classifier and supply the
percentage of the dataset that should be held out for
testing.
Displays classifier evaluation plots based on the tuning
options and parameters (plots are based on the
discriminant function types, class prior probabilities and
validation methods).
A report containing classification evaluation statistics
and confusion tables 7 is displayed in a separate window.
Several messages are displayed during the classifier
tuning procedure in the command line or in MATLAB’s
command window if MATLAB is present.
After setting the parameters, the user should click Tune and classifier tuning will be performed.
Depending on the DA tuning results, the user can select the appropriate parameters to build a model
that best fits the dataset under examination. If the user selects to display classifier evaluation plots
by checking the box Display evaluation plots, the following example depicts how these plots are
presented.
7
A confusion matrix is a visualization tool typically used in supervised learning. Each column of the matrix represents the
instances in a predicted class, while each row represents the instances in an actual class. One benefit of a confusion matrix
is that it is easy to see if the classifier is confusing two classes (i.e. commonly mislabelling one as another).
54
If the user selects to display a classifier evaluation report by clicking Display output results, a
window like the following will appear presenting the classifier evaluation results:
If the user right-clicks inside the report area, a context menu will appear allowing to export the
report in a text tab delimited file or clear the report window.
4.4.1.2. (Linear) Discriminant Analysis – Classifying
In order to perform DA classification, the user should click Statistics → Classification →
Discriminant Analysis → Classify and the following preferences window will appear:
55
The user should select the file that contains the new samples to be classified using as training data
the data imported to ARMADA. The file can be a text tab delimited or Excel file which should be
structured as follows: the first column should contain variable names (e.g. gene names) that serve as
unique variable identifiers. The first row should contain sample names that will be used to identify
the new samples when they will be assigned to classes. The rest of the data should be numeric.
Attention should be paid so that the number of variables-features is the same as the number of
features used to build the classifier model. For an example of a file of new samples to be classified,
the user should consult Appendix A.
The rest of the options in the DA Classify preferences window under the DA classification
options panel (Discriminant function, Priors) are the same as in the case of tuning the DA
classifier and their description can be found in section 4.4.1.1. After setting the desired parameters,
the user should click OK. After the classification procedure, a report window will appear:
4.4.2. k–Nearest Neighbors
The k-Nearest Neighbors (kNN) classification is a very simple, yet powerful classification
method. The key idea behind kNN classification is that similar observations belong to similar
classes. Thus, one simply has to look for the class designators of a certain number of the nearest
neighbors and weigh their class numbers to assign a class number to the unknown. The weighing
56
scheme of the class numbers is often a majority rule, but other schemes are conceivable. The
number of the nearest neighbors, k, should be odd in order to avoid ties, and it should be kept small,
since a large k tends to create misclassifications unless the individual classes are well-separated.
One of the major drawbacks of kNN classifiers is that the classifier needs all available data. This
may lead to considerable overhead, if the training data set is large. Apart from building a kNN
classifier, ARMADA offers a batch process module that allows the user to tune the classifier (e.g.
select the best number of nearest neighbors in combination with the proper distance function and tie
breaking rule) for a specific problem studied using a representative dataset. The following subsections describe the tuning and classification process using kNN in ARMADA.
4.4.2.1. k–Nearest Neighbors – Tuning
In order to perform kNN classifier tuning, the user should select an Analysis object from the
Analysis Objects list and click Statistics → Classification → k – Nearest Neighbors → Tune.
The following preferences window will appear:
The following table explains the available options in the kNN tuning options, Model validation
options and General options panels:
kNN
tuning
Option
k Nearest Neigbors range
Description
A range of values that should be used as number of
nearest neighbors. It should be given as a series of
numbers separated by commas or spaces, or in
MATLAB’s sequence number format, (e.g. 1:10 results
in a range of 1-10 and 1:2:10 gives 1, 3, 5, 7, 9).
57
Distance
Model validation
options
Ties rule
N-fold cross validation
Leave-M-out
Training and Test
General options
Display evaluation plots
Display output results
Verbose output (command line)
The distance function used to calculate the distance of
samples to their nearest neighbors. The following
distances are available:
Euclidean
The Euclidean distance
Cityblock
The cityblock (Manhattan) distance.
Cosine
The cosine distance.
Correlation Pearson’s correlation distance.
Hamming
Hamming distance. It can be used only
with binary data else it will generate an
error.
For further information on distances, the user should see
Appendix D.
Tie breaking rules. The following rules are available:
Nearest
Majority rule with nearest point tie-break
Random
Majority rule with random point tiebreak
Consensus Consensus rule; when using the
consensus option, points where not all of
the k nearest neighbors are from the same
class are not assigned to one of the
classes. Because of this, it might generate
errors when not used carefully.
The user should check this box to perform N-fold cross
validation of the classifier and supply N.
The user should check this box to perform Leave-M-out
validation of the classifier and supply M.
The user should check this box to perform Training and
Test validation of the classifier and supply the
percentage of the dataset that should be held out for
testing.
Displays classifier evaluation plots based on the tuning
options and parameters (plots are based on the number of
nearest neighbors, distances, tie-break rules and
validation methods).
A report containing classification evaluation statistics
and confusion tables 8 is displayed in a separate window.
Several messages are displayed during the classifier
tuning procedure in the command line or in MATLAB’s
command window if MATLAB is present.
After setting the parameters, the user should click Tune and classifier tuning will be performed.
Depending on the kNN tuning results, the user can select the appropriate parameters to build a
model that best fits the dataset under examination. If the user selects to display classifier evaluation
plots by checking the box Display evaluation plots, the following examples depict how these plots
are presented, according to selected validation methods (1st plot using n-fold cross validation, 2nd
leave-m-out and 3rd training and test):
8
A confusion matrix is a visualization tool typically used in supervised learning. Each column of the matrix represents the
instances in a predicted class, while each row represents the instances in an actual class. One benefit of a confusion matrix
is that it is easy to see if the classifier is confusing two classes (i.e. commonly mislabelling one as another).
58
59
If the user selects to display a classifier evaluation report by clicking Display output results, a
window like the following will appear presenting the classifier evaluation results:
If the user right-clicks inside the report area, a context menu will appear allowing to export the
report in a text tab delimited file or clear the report window.
60
4.4.2.2. k-Nearest Neighbors - Classifying
In order to perform kNN classification, the user should click Statistics → Classification → k –
Nearest Neighbors → Classify and the following preferences window will appear:
The user should select the file that contains the new samples to be classified using as training data
the data imported to ARMADA. The file can be a text tab delimited or Excel file which should be
structured as follows: the first column should contain variable names (e.g. gene names) that serve as
unique variable identifiers. The first row should contain sample names that will be used to identify
the new samples when they will be assigned to classes. The rest of the data should be numeric.
Attention should be paid so that the number of variables-features is the same as the number of
features used to build the classifier model. For an example of a file of new samples to be classified,
the user should consult Appendix A.
The rest of the options in the kNN Classify preferences window under the kNN classification
options panel (k Nearest Neighbors, Distance and Ties rule) are the same as in the case of tuning
the kNN classifier and their description can be found in section 4.4.2.1. After setting the desired
parameters, the user should click OK. After the classification procedure, a report window will
appear:
61
4.4.3. Support Vector Machines
Support Vector Machines (SVM) classification method was developed by Vapnik (14) for binary
classification and have been extensively used for microarray data classification (e.g. (15)). Briefly,
the optimal separating hyperplane between the two classes is computed by maximizing the margin
between the classes’ closest points. The points lying on the boundaries are called support vectors
and the middle of the margin is the optimal separating hyperplane. The points of the “wrong” side
of the discriminant margin are weighted down to reduce their influence. When a linear separator
cannot be found, the points are projected into a higher dimensional space where the points
effectively become linearly separable. A program able to perform such optimization tasks is called a
Support Vector Machine. Although SVMs were initially developed for binary, classification
problems, there exist several strategies that can deal with this problem. An example is “one-againstone” approach, in which k(k-1)/2 binary classifiers are trained; the appropriate class is found by a
voting scheme. The SVM classifier implemented in ARMADA is based on the OSU SVM Toolbox
(http://sourceforge.net/projects/svm/) which supports mutliclass classification. The following subsections describe the tuning and classification process using SVMs in ARMADA.
4.4.3.1. Support Vector Machines – Tuning
In order to perform SVM classifier tuning, the user should select an Analysis object from the
Analysis Objects list and click Statistics → Classification → Support Vector Machines → Tune.
The following preferences window will appear:
62
The following table explains the available options in the SVM options, Model validation options,
General options, Polynomial kernel options, Sigmoid (MLP) kernel options and RBF kernel
options panels:
Option
Kernel
Description
The kernel function type used to build the classifier model. The
following kernel types are available (X denotes the data matrix):
Linear
The
kernel
function
has
the
form
k ( X ) = w⋅ X − b = 0
Polynomial The
kernel
function
has
the
form
(
SVM options
k ( X , X T ) = Gamma ⋅ X , X T + Coefficient
RBF
kernel
Sigmoid
kernel
Polynomial
kernel
Scale
Tolerance
Gamma
Coefficient
Degree
Parameters
Gamma
Coefficient
Parameters
Gamma
Parameters
Gene
ral
Model
validation
N-fold cross validation
Leave-M-out
Training and Test
Display evaluation
plots
Degree
Sigmoid
(MLP)
MLP stands for Multi-Layer Perceptron. The
kernel
function
has
the
form
RBF
RBF stands for Radial Basis Function. The kernel
(
k ( X , X T ) = tanh Gamma ⋅ X , X T + Coefficient
function has the form k ( X , X T ) = e
Normalize
)
− Gamma ⋅ X − X T
)
2
Normalize input data matrix so that each column has mean 0 and
standard deviation 1.
Scale input data matrix so that all data values lie between a given
range. The upper and lower limits can be given through the
corresponding text boxes.
Tolerance of termination criterion.
The gamma coefficient in the polynomial kernel model.
The correction coefficient in the polynomial kernel model.
The degree of the polynomial kernel model.
Triplets of parameters: they can be entered manually using the
respective text boxes or be read by an external file by pressing the
Read button. The file can be a text tab delimited or Excel file. For
details on its format, the user should see Appendix A.
The gamma coefficient in the sigmoid kernel model.
The correction coefficient in the sigmoid kernel model.
Doublets of parameters: they can be entered manually using the
respective text boxes or be read by an external file by pressing the
Read button. The file can be a text tab delimited or Excel file. For
details on its format, the user should see Appendix A.
The gamma coefficient in the sigmoid kernel model.
Parameter values: they can be entered manually using the
respective text box or be read by an external file by pressing the
Read button. The file can be a text tab delimited or Excel file. For
details on its format, the user should see Appendix A.
The user should check this box to perform N-fold cross validation
of the classifier and supply N.
The user should check this box to perform Leave-M-out validation
of the classifier and supply M.
The user should check this box to perform Training and Test
validation of the classifier and supply the percentage of the dataset
that should be held out for testing.
Displays classifier evaluation plots based on the tuning options
and parameters (plots are based on the number of nearest
neighbors, distances, tie-break rules and validation methods).
63
Display output results
Verbose output
(command line)
A report containing classification evaluation statistics and
confusion tables 9 is displayed in a separate window.
Several messages are displayed during the classifier tuning
procedure in the command line or in MATLAB’s command
window if MATLAB is present.
After setting the parameters, the user should click Tune and classifier tuning will be performed.
Depending on the SVM tuning results, the user can select the appropriate parameters to build a
model that best fits the dataset under examination. If the user selects to display classifier evaluation
plots by checking the box Display evaluation plots, the following example depicts how these plots
are presented, according to selected validation methods:
If the user selects to display a classifier evaluation report by clicking Display output results, a
window like the following will appear presenting the classifier evaluation results:
9
A confusion matrix is a visualization tool typically used in supervised learning. Each column of the matrix represents the
instances in a predicted class, while each row represents the instances in an actual class. One benefit of a confusion matrix
is that it is easy to see if the classifier is confusing two classes (i.e. commonly mislabelling one as another).
64
If the user right-clicks inside the report area, a context menu will appear allowing to export the
report in a text tab delimited file or clear the report window.
4.4.3.2. Support Vector Machines - Training
In order to train an appropriate SVM classifier model (normally after a tuning session so as to
evaluate the best kernel and respective parameters for the dataset under examination), the user
should click Statistics → Classification → Support Vector Machines → Train and the following
preferences window will appear:
The options in the SVM training preferences window under the SVM options panel (Kernel,
Normalize, Scale and Tolerance) are the same as in the case of tuning the SVM classifier and their
description can be found in section 4.4.3.1. After setting the desired parameters, the user should
click OK. After the classification procedure, a confirmation dialog will appear stating that the
classifier training has finished. ARMADA will store the classifier model for further use.
65
4.4.3.3. Support Vector Machines - Classifying
In order to perform SVM classification model the user should click Statistics → Classification
→ Support Vector Machines → Classify and the following window will appear, prompting the
user to select the file that contains the new samples:
The file can be a text tab delimited or Excel file which should be structured as follows: the first
column should contain variable names (e.g. gene names) that serve as unique variable identifiers.
The first row should contain sample names that will be used to identify the new samples when they
will be assigned to classes. The rest of the data should be numeric. Attention should be paid so that
the number of variables-features is the same as the number of features used to build the classifier
model. The classifier model that will be used is the one corresponding to the Analysis Object
highlighted in the Analysis Object list. Example of a file of new samples to be classified can be
found in Appendix A. After the classification process, a report window will appear:
66
5. Graphical data exploration
The following sections describe several graphics which are customizable and accessible in
ARMADA through the Plots menu in the main window. Such graphics include 2 or 3 dimensional
array reconstructed images based on given data, MA plots, expression distribution plots across
different arrays, boxplots, volcano plots and expression profiles across different arrays or
conditions. The user should note that not all plots are available at any time of the analysis. For
example MA plots become available after normalization and volcano plots become available after
the statistical selection procedure and only if the selected Analysis has two conditions.
5.1. Array Images
An array image depicts a reconstructed spatial image of a microarray based on the data of the
corresponding input file(s). The image can be created using several input data (e.g. the user can
create an image based on Channel 1 mean signal or Channel 2 background median). Such images
can help the user identify several spatial hybridization effects or the presence of artifacts on arrays
responsible for high background contamination and perform quality control. To create array images,
the user should select an array from the Arrays list and then click Plots → Array Images. The
following window appears:
From there, the user is able to select the type of available data to be displayed on the reconstructed
image, the image dimensionality to be displayed (2D or 3D), the color settings (Image colormap)
as well as the color density (e.g. a density of 64 will create 64 intermediate colors between the basic
colors that defined the colormap while a density of 256 will create 256 intermediate variations) and
whether to display a bar depicting the color-data correspondence for the data range that was used to
create the image. The following picture depicts the supported colormaps (taken from MATLAB’s
help) apart from Red and Green colormaps which are created by ARMADA. The default colormap
is the ‘Jet’ colormap.
67
The following table presents the data types, derived from the imported files, that the user can use
to create array images (choices may vary depending on the input data file type and the available
data in the case of importing text tab delimited files):
Data type
Channel 1 Foreground Mean
Channel 2 Foreground Mean
Channel 1 Foreground Median
Channel 2 Foreground Median
Channel 1 Background Mean
Channel 2 Background Mean
Channel 1 Background Median
Channel 2 Background Median
Channel 1 Foreground Standard Deviation
Channel 2 Foreground Standard Deviation
Channel 1 Background Standard Deviation
Channel 2 Background Standard Deviation
Channel 1 Foreground - Background (Mean)
Channel 2 Foreground - Background (Mean)
Channel 1 Foreground - Background (Median)
Channel 2 Foreground - Background (Median)
Description
The foreground spot signal mean for channel 1 (or
‘Cy3’ or ‘Green’).
The foreground spot signal mean for channel 2 (or
‘Cy5’ or ‘Red’).
The foreground spot signal median (if available)
for channel 1 (or ‘Cy3’ or ‘Green’).
The foreground spot signal median (if available)
for channel 2 (or ‘Cy5’ or ‘Red’).
The background noise spot mean for channel 1 (or
‘Cy3’ or ‘Green’).
The background noise spot mean for channel 2 (or
‘Cy5’ or ‘Red’).
The background noise spot median (if available)
for channel 1 (or ‘Cy3’ or ‘Green’).
The background noise spot median (if available)
for channel 2 (or ‘Cy5’ or ‘Red’).
The foreground spot signal standard deviation (if
available) for channel 1 (or ‘Cy3’ or ‘Green’).
The foreground spot signal standard deviation (if
available) for channel 2 (or ‘Cy5’ or ‘Red’).
The background noise spot standard deviation (if
available) for channel 1 (or ‘Cy3’ or ‘Green’).
The background noise spot standard deviation (if
available) for channel 2 (or ‘Cy5’ or ‘Red’).
The difference between mean signal and
background noise for channel 1 (or ‘Cy3’ or
‘Green’).
The difference between mean signal and
background noise for channel 2 (or ‘Cy5’ or
‘Red’).
The difference between the medians (if available)
of signal and background noise for channel 1 (or
‘Cy3’ or ‘Green’).
The difference between the medians (if available)
of signal and background noise for channel 2 (or
68
Channel 1 Foreground / Background (Mean)
Channel 2 Foreground / Background (Mean)
Channel 1 Foreground / Background (Median)
Channel 2 Foreground / Background (Median)
‘Cy5’ or ‘Red’).
The signal-to-noise ratio between mean signal and
background noise for channel 1 (or ‘Cy3’ or
‘Green’).
The signal-to-noise ratio between mean signal and
background noise for channel 2 (or ‘Cy5’ or
‘Red’).
The signal-to-noise ratio between the medians (if
available) of signal and background noise for
channel 1 (or ‘Cy3’ or ‘Green’).
The signal-to-noise ratio between the medians (if
available) of signal and background noise for
channel 2 (or ‘Cy5’ or ‘Red’).
The user is also able to provide titles for the images to be created. Titles are given in the Title(s)
panel and should be as many as the arrays selected from the Arrays list on the main window.
Different titles should be separated by a new line (Enter). The field should remain empty for
automatic title generation. After specifying the desired parameters the user should click OK. Below,
there are some examples of 2 and 3 dimensional array images created with different colormaps:
69
If the user clicks on any of the array images created, individual spot data are displayed (as in Raw
Image in ARMADA’s main window). The user should also note that array spatial images are
available only if grid coordinates and meta-coordinates are provided with the input files and that if
meta-coordinates exist, the array images are available right after importing the data files to
ARMADA.
5.2. Normalized and Un-normalized images
An array normalized or un-normalized image depicts an array spatial image reconstructed using
the normalized or un-normalized log2 ratio between the two channels. Such images may help the
user identify individual characteristics of microarrays, identify possible differentially expressed
transcripts and check the effects of normalization procedures as well as compare normalized versus
un-normalized images. To create (un)normalized array images, the user should select an Analysis
from the Analysis Object list and click Plots → (Un)Normalized Images. The following window
appears:
In the Arrays list, the (un)normalized images preferences window displays the arrays from the
currently selected Analysis in the Analysis Object list. The user can select one or multiple arrays for
image creation and, as with the array images described in section 5.1, there are options on what data
to use for image creation, the image color settings and the colormap density as well as whether to
display a colorbar or not. As before, the user may supply own titles, or leave the filed Title(s) empty
for automatic figure title generation. The following table presents the data types the user can use to
create array images:
Data type
Normalized Ratio
Unnormalized Ratio
Description
Between channels log2 ratio as calculated after data normalization.
Between channels log2 ratio as calculated prior to data normalization.
70
After finishing with setting the desired parameters, the user should click OK in order to create
the images. Below, there are two examples of 2 and 3 dimensional array normalized or unnormalized images created with different colormaps:
If the user clicks on any of the images created, individual spot data are displayed (as in Normalized
Image in ARMADA’s main window). The user should also note that (un)normalized spatial images
are available only if grid coordinates and meta-coordinates are provided with the input files and that
if meta-coordinates exist, the (un)normalized images are available right after the data normalization
step (the user should see also 3.4).
At this point it should be noted that for better image exploration, as well as image saving,
exporting and other figure operations, the user can utilize several figure controls and utilities which
are provided by MATLAB’s interface and are briefly explained in Appendix B.
5.3. Array plots
An array plot can depict the comparison of several input data (e.g. Channel 1 mean signal vs
Channel 2 mean signal) based on the input files or can depict the comparison between different
arrays for the same measurements as well as log2 ratios or intensities if normalization has been
performed. Such images can help the user identify several phenomena connected to the nature of the
experiment or identify correlations or differences between different dyes or different arrays of the
same or another experimental condition. To create array plots, the user should click Plots → Array
Plots and the following window will appear:
71
In the All arrays list, all the imported arrays of the experiment are displayed and the user can select
which arrays to plot. On the other hand, the Normalized arrays list displays the normalized arrays
which correspond to the conditions of the analysis highlighted in the Analysis Object list on
ARMADA’s main window. In the Plot options panel, when the Single array choice is selected, the
Normalized arrays list and the bottom drop down list are deactivated and reactivated when the
Array vs array choice is selected. When the Single array choice is selected, the user can choose
which measurements to plot in a 2-D plot for each array by selecting from the drop down lists Data
to plot. Additionally, the letters H and V which appear next to the lists when Single array is
selected, represent the Horizontal and Verical axis respectively. The user can also provide titles for
the plots or leave the corresponding fields empty for automatic title generation. Concerning the
measurements which are available for plotting, the user should see section 5.1. The Clear buttons
below the array lists clear the selections allowing the user to make new ones.
The General options panel allows the user to display the Pearson correlation coefficient between
the two measurements selected in the 2-D plot as well as plotting in log2 scale by checking the
Display correlation or Plot in log scale boxes respectively. The user can also check the Display
cutoff lines box. If selected, the resulting plots will also depict the line which crosses the beginning
of the axis system (y=x) and two lines parallel to it, at a distance chosen by the Cutoff level number
n (y=x–n, y=x+n respectively). After making the necessary selections, the user should click OK.
Below, there are two examples of array plots. The data on the plots are viewable, selectable and
exportable through the use of a right-click context menu. For further details on these operations the
user should consult section 5.4.
72
73
5.4. MA Plots
MA plots of microarray data (7) are plots of log2 ratio of two channel intensities versus the mean
log2 expression of the two. MA plots are applied to the red (‘Channel 2’ or ‘Cy5’) and green
(‘Channel 1’ or Cy3) channels and are representations of the data from single arrays which can be
useful in depicting the effects of various normalization methods and quality control issues. To
create MA plots, the user should select an Analysis from the Analysis Object list and click Plots →
MA Plots. The following window will appear:
In the Arrays list, the user can select one or multiple arrays for which to display MA plots. In the
Plots panel, the user can select to display MA plots before the normalization procedure, after the
normalization procedure or both and also supply the respective titles (one for each selected array,
separated by new line (Enter)) if desired. Leaving the title(s) boxes as is or empty will cause
automatic plot title generation.
In the Options panel, the user may choose to display the above selected plots for each part of the
array subgrid (this option is enabled only when subgrid normalization has been performed, the user
should see 3.4), choose whether to also display the normalization curve calculated by any of the
normalization methods described in section 3.4 (this option applies only to MA plots presenting
data before normalization) and finally, choose whether or not to display a fold change line depicting
desired thresholds in fold changes among channels. The threshold should be filled in the field Fold
change. Attention should be paid that while the users fill the fold change in natural scale, the fold
change lines are presented in the figures in log2 scale (e.g. for a fold change of 2, the corresponding
threshold lines are at 1 and -1 because log2(2)=1). After setting the parameters, the user should click
OK for creating the plots. It should be noted here that MA Plots in Plots menu is activated only
after the normalization procedure. The next three subsections describe several figure functionalities
provided for each of the three categories of MA plots (before normalization, after normalization and
before/after normalization).
74
5.4.1. MA plots before normalization
Below there is an example of an MA plot before normalization for a specific array:
The image created right after clicking OK in the MA plots preferences window, is on data
exploration mode. In this mode, the user can click on any data point on the figure and then more
specific information will be displayed for that point (the GeneID, ratio value etc.). If the user rightclicks inside the figure, the following menu will appear:
If the user clicks on Select Data, the menu title will be check marked and the figure will enter in
data selection mode (the cursor will become a cross, +). In this mode, the user can select several
data points (genes) by setting a rectangular area which includes the desired data points with the help
of the crosshair cursor. To export the selected data points in text tab delimited format, the user
should right-click on the edge of the specified rectangular area and select Export Selected. A new
window will appear prompting the user to select a location to place the new file that will contain
information (GeneIDs and expression values) on the selected data points. Below there is an example
of how the figure looks like when data selection mode is on:
75
The following table explains the functions of the items displayed in the menu appearing after rightclicking:
Name
Select Data
Export Selected
Export All
Function
Switches between data exploration and data selection modes.
While on selection mode, exports data points defined by the rectangular selection
area. The user must right-click on one of the edges of the selection area.
Exports all data points, regardless of mode status.
5.4.2. MA plots after normalization
The same things concerning image modes, apply also in the case of MA plots after the
normalization procedure with the only difference that when the user right-clicks inside the image
the appearing menu is different:
Below there is an example of an MA plot after normalization for a specific array:
76
The user should note that red and green points will appear only if the Display fold change lines
option in the MA plots preferences window has been enabled and a proper fold change threshold
value has been provided. The following table explains the functions of the items displayed in the
menu appearing after right-clicking:
Name
Select Data
Export Selected
Function
Switches between data exploration and data selection modes.
While on selection mode, exports data points defined by the rectangular
selection area. The user must right-click on one of the edges of the
selection area.
Export up regulated
Exports up regulated genes (red data points). Available only if fold change
thresholds have been provided.
Export down regulated Exports down regulated genes (green data points). Available only if fold
change thresholds have been provided.
Export deregulated
Exports up and down regulated genes (red and green data points).
Available only if fold change thresholds have been provided.
Export unregulated
Exports up unregulated genes (blue points). If fold change thresholds have
not been provided, exports all data points.
Export All
Exports all data points, regardless of mode status.
5.4.3. MA plots before and after normalization
The same things concerning image modes, apply also in the case of MA plots before and after
the normalization procedure. In this case, the output figure consists of two panels: the upper panel
contains the MA plot for un-normalized data while the bottom panel contains the MA plot for
normalized data. If the user right clicks inside one of the two panels, the menus that appear are the
77
same as the ones in the cases of MA plots before normalization (5.3.1) and MA plots after
normalization (5.3.2). Below there is an example of an MA plots before and after normalization for
a specific array:
5.4.4. Subgrid MA plots
If subgrid normalization is performed at the presence of array meta-coordinates (the user should
see 3.4), MA plots for each subgrid block are also possible (by checking Display subgrid plots in
the MA plots preferences window). However, the functionalities of simple MA plots (such as data
selection and exporting) are not available in the cases of subgrid MA plots. Subgrid MA plots
consist of an image with as many blocks as the number of blocks in each slide. Below, there are two
examples of subgrid MA plots: the first picture depicts a subgrid MA plot before data normalization
while the second depicts a subgrid MA plots after data normalization.
78
79
5.5. Expression Distributions
Slide expression distributions are histograms depicting the gene expression (log2 ratio)
distributions for specific arrays. They are useful for determining the nature of the data (e.g. the
normality or the bimodality of gene expression distributions) and subsequently decide on which
normalization method is suitable for specific datasets. They can also be used for quality control
issues and for visualizing normalization effects. To create slide distribution histograms, the user
should select an Analysis from the Analysis Object list and click Plots → Slide Distributions. The
following window will appear:
In the Arrays list the user can select one or multiple arrays for which to create gene expression
distributions. The Options panel determines whether expression distributions will be created for
individual arrays by selecting Each array (in this case, the Arrays list is activated and the user may
select arrays from there) or for conditions by selecting Each condition (in this case, the Arrays list
is deactivated and the user may select conditions from the Conditions list which is activated). As
with MA plots, the user may choose to plot expression histograms for data before normalization,
after normalization or make combined diagrams with data before and after normalization. Below
there are several examples of expression histograms:
80
81
82
83
The user should note that Expression Distributions in the Plots menu become available only after
the normalization procedure.
5.6. Boxplots
In descriptive statistics, a boxplot is a convenient and commonly used way of graphically
presenting groups of numerical data. A boxplot also indicates which observations, if any, might be
considered outliers and is able to visually show different types of populations, without making any
assumptions of the underlying statistical distribution. The spacings between the different parts of
the box help indicate variance, skewness and identify outliers. For more information on boxplots the
user should see (16).
In the case of microarray data, boxplots are used to summarize the gene expression distributions
and identify their shape and several characteristics. They are useful for quality control as well as
depicting differences between distributions among different slides and assessing the results of data
normalization. Boxplots are available right after data importing. To create boxplots with
ARMADA, the user should select an Analysis from the Analysis Object list and click Plots →
Boxplots. The following window will appear:
The interface is similar to the interface of Expression Distributions (5.3) with the selections in the
Options and Plots panels denoting exactly the same configurations as with Expression
Distributions and the only difference being the list Data to plot. This list contains the types of data
that the user can visualize by using boxplots. All data apart from the Channel Ratio can be plotted
only before normalization. For a description of the data types for which boxplots can be created, the
user should look at the table in section 5.1 as they are exactly the same. The channel ratio is the log2
84
ratio between the two channels depicting gene expression. Below there are several examples of
boxplots for data before and after normalization 10:
10
By examining the boxplots before and after normalization, the effect of normalization is immediately seen: gene
expression distribution are scaled and centered so that they can be compared using statistical tests.
85
86
5.7. Volcano Plots
Volcano plots are useful for visualizing differentially expressed genes that have already been
detected using a statistical test. In ARMADA, they are a plot of the log2 fold change on the
horizontal axis and the quantity -log10(p-value) where the p-value comes from a statistical test (the
user should see section 4). The volcano plot can be used to visualize differentially expressed genes,
and also to show that large fold changes do not necessarily equal statistical significance or the
opposite. Moreover, volcano plots can be created only for pairwise statistical comparisons (e.g.
when performing a t-test between control and samples treated with a specific drug) and not in cases
where the user seeks statistically significant genes among several conditions (e.g. using 1-way
ANOVA to identify differentially expressed genes in at least one among five experimental
configurations). Thus, the Volcano Plots command in the Plots menu is enabled only after a
statistical test has been performed and when the selected Analysis in the Analysis Object list
contains 2 experimental conditions. To create volcano plots, the user should select an Analysis from
the Analysis Object list and click Plots → Volcano Plots. The following window will appear:
In the Options panel, the user should choose whether to display a p-value threshold line or not by
checking or unchecking the Display p-value cutoff line box and provide a p-value threshold. The
user can also select whether to display a fold change threshold line or not by checking or
unchecking the Display fold change cutoff line box and provide a fold change threshold. As in MA
plots (5.3) the fold change threshold is provided in natural scale but converted to log2 scale for the
construction of fold change lines. A title for the volcano plot can be given in the Title field, else the
field should be left empty or as is for an automatic title generation. In the Correspondence panel,
the user should tell ARMADA which condition corresponds to the reference condition and which to
the treated (e.g. with a drug) condition so that proper fold changes can be calculated. The table
below explains the different options in the Effect calculation panel (how fold change is calculated
in each case):
87
Option
Ratio treated
Ratio treated – ratio control
Ratio treated/ratio control
Description
This option should be chosen when the volcano plot should be created
by defining the fold change as the log2 ratio between channels in
cases where there is only one experimental condition in the project or
the current Analysis and Cy3 channel represents the reference
samples while Cy5 channel represents the treated samples. In such
case, it is also the only available option. It might also occur in other
case studies depending on what the user wishes to see (e.g. when the
analyst is interested to examine what is happening when comparing
the treated sample to the common reference but not to the control
which can be the 1st time point in a time point experiment). The fold
⎛ Cy5treated ⎞
change is thus FC = log 2 ⎜
.
⎜ Cy 3reference ⎟⎟
⎝
⎠
This option is the default in volcano plots in ARMADA when the
project or the current Analysis includes more than one experimental
condition. Is such cases, there is usually a control condition which has
to be compared to several other conditions and the common reference
labelled by Cy3 is common to all samples under examination. In these
cases
the
fold
change
is
calculated
as
⎛ Cy5treated
⎞
Cy5control
=
FC = log 2 ⎜
⎜ Cy 3common reference Cy3common reference ⎟⎟
⎝
⎠
⎛ Cy5treated
⎞
⎛ Cy 5control
⎞
= log 2 ⎜
− log 2 ⎜
⎜ Cy 3common reference ⎟⎟
⎜ Cy3common reference ⎟⎟
⎝
⎠
⎝
⎠
as derived from logarithm properties.
This option should be used only when conducting statistical tests on
non log2 transformed data and should generally be avoided as it will
not produce valid plots when used with log2 transformed data 11.
After setting all the proper parameters, the user should click OK. Below there is an example of a
volcano plot created with fold change calculated with the option Ratio treated – ratio control
(which was proper for the example used):
11
ARMADA log2 transforms data by default. However, it is possible to get non log2 transformed data when the user is
importing from external data by selecting Log ratio options in the external data import wizard (2.5.3). For these reasons,
this option is included in volcano plots.
88
As with MA plots (5.3), volcano plot figures exist in two modes: data exploration mode, where the
user can click on any data point on the figure and more specific information will be displayed for
that point (the GeneID, ratio value, p-value etc.) and data selection mode where the user can select
several data points to export. Below, there is an example of a volcano plot in data selection mode:
89
If the user right-clicks inside the volcano plot area, the following menu will appear:
The following table explains the functions of the items displayed in the menu appearing after rightclicking:
Name
Select Data
Export Selected
Function
Switches between data exploration and data selection modes.
While on selection mode, exports data points defined by the rectangular
selection area. The user must right-click on one of the edges of the
selection area.
Export up regulated
Exports up regulated genes (red data points). Available only if fold change
and/or p-value thresholds have been provided.
Export down regulated Exports down regulated genes (green data points). Available only if fold
change and/or p-value thresholds have been provided.
Export deregulated
Exports up and down regulated genes (red and green data points).
Available only if fold change and/or p-value thresholds have been
provided.
Export unregulated
Exports up unregulated genes (blue points). If fold change and p-value
thresholds have not been provided, exports all data points.
Export All
Exports all data points, regardless of mode status.
5.8. Expression Profiles
Expression profile plots allow the analyst to follow the expression of specific genes across
different experimental conditions or across different time points in a time course experiment with
the help of a graphic which displays the gene expression (their log2 channel ratio) against the
different experimental conditions or time points. Expression profile plots are especially useful for
the display of expression patterns after the application of a clustering algorithm (4.3) such as kmeans clustering (4.3.2) as they allow the user to identify specific patterns and give initiatives for
further research. Expression profile plots are also helpful for overlying the expression of many
genes across different conditions and identify several phenomena such as genes with reverse
expression, early or late deregulated genes (compared to each other others) etc. To create expression
profile plots, the user should select an Analysis from the Analysis Object list and click Plots →
Expression Profiles. The following window will appear:
90
In the left part of the expression profile preferences window, the Genes or Clusters list displays the
GeneIDs or the gene cluster numbers for the selected Analysis from the Analysis Object list,
depending on the selection on the Plot options panel. The following table explains in detail all the
user options from the Plot options, Display options and Plot values panels:
Plot options
Option
All genes
DE genes
Description
This option gives the ability to plot expression profiles using
normalized values for several genes out of all the genes that
passed the preprocessing filtering steps. The user may select
genes by their GeneID from the list Genes or Clusters on the
left of the expression profile preferences window.
This option gives the ability to plot expression profiles using
normalized values for several genes but only from the
Diferentially Expressed genes that were determined after the
statistical selection process (4.1). The user may select genes
by their GeneID from the list Genes or Clusters on the left of
the expression profile preferences window. If statistical
selection has not been performed, this option will not be
available.
91
Gene clusters
Plot centroids only
Display options
Plot centroids in selections
Multiple cluster plot
Different color for each gene
Display legend (gene names)
Plot values
Title(s)
Condition means
All replicates
This option gives the ability to plot expression profiles using
normalized values for genes belonging to clusters determined
by the clustering algorithm used after the statistical selection
process (4.3). The user may select genes by their cluster
number from the list Genes or Clusters on the left of the
expression profile preferences window. If clustering has not
been performed, this option will not be available.
This box is enabled only for the Gene clusters option in the
Plot options panel. If checked, it will produce expression
profile plots but instead of using all the genes for each cluster,
it only uses the gene centroid 12 expression pattern reflecting
the general deregulation motif of the genes belonging to each
cluster. The Plot centroids only box is enabled only if kmeans (4.3.2) or fuzzy c-means (4.3.3) clustering has been
performed and disables the Plot values panel as the centroids
have been calculated by the clustering algorithm.
This box is available for all the options in the Plot options
panel. If checked, the expression profile plots will also
display a centroid calculated using the mean expression of the
selected genes or the genes belonging to the each gene
cluster. Error bars are also created displaying expression
standard deviation.
This box is enabled only for the Gene clusters option in the
Plot options panel. If checked, expression profiles will be
displayed in one figure with multiple plots instead of multiple
figures (one for each cluster).
This box, if checked will display the expression of each gene
with a different color instead of using only one color for each
gene. It should be checked when plotting gene clusters
because it offers better visualization.
This box, if checked will create a legend in the figure,
containing GeneIDs that correspond to different lines in the
expression profile plot. It should not be used when plotting a
large number of genes for proper visualization purposes.
By filling this field, the user can provide title(s) for plots. As
with other plot preference windows in ARMADA, the
number of titles should match the number of figures to be
created (e.g. 5 titles for 5 figures of different clusters).
This option, if chosen will produce expression profile plots
where gene expression is calculated from the mean of all the
arrays for each condition.
This option, if chosen will produce expression profile plots
using expression values from all replicates for each condition.
Below, there is an example of an expression profile plot for 11 genes selected from the list of
differentially expressed genes after applying a statistical test. The plot was produced with the option
DE genes in the Plot options panel chosen, the Different color for each gene and Display legend
(gene names) boxes checked and the All replicates option from the Plot values panel chosen:
12
Cluster centroids are usually calculated by averaging the expression of all the genes belonging to a cluster, defining thus
a ‘meta-gene’ which reflects the expression pattern of the entire cluster.
92
To illustrate another example, the following figure presents an expression profile plot for 10 gene
clusters presented in a graph with multiple plots. The plot was produced with the option Gene
clusters in the Plot options panel chosen, the Plot centroids in selections, Multiple cluster plot
boxes checked and the Condition means option from the Plot values panel selected:
93
The following figure was created with exactly the same options but with the Plot centroids only
box checked and the Plot centroids in selections unchecked.
As with most figures in ARMADA, if the user click on specific data points, more information on
that data point will be displayed. It should be noted that Expression Profiles become available in
the Plots menu after the normalization process.
94
6. Exporting Data
This section presents the various data types that can be exported using ARMADA’s exporting
functionalities as well as how to export and save figures. In summary, the subsection of this section
explains how the user can customize and export normalized gene lists, differentially expressed gene
lists and cluster lists, as well as how to export figures in various formats using MATLAB’s figure
interface and controls.
6.1. Exporting gene lists
After completing several steps of data analysis and exploration, the user can export two kinds of
gene lists from ARMADA: normalized gene lists and differentially expressed gene lists. Both lists
can contain the same data (apart from several statistics which are produced only after the
application of statistical tests). Exporting normalized gene lists becomes available right after the
normalization step while exporting differentially expressed gene lists only after the statistical
selection process. To export normalized gene lists, the user should select an Analysis from the
Analysis Object list on the main window and click on File → Export Data → Normalized Genes
List, or right-click on the selected Analysis from the Analysis Object list and select Export
Normalized List. To export differentially expressed gene lists, the user should select an Analysis
from the Analysis Object list and click File → Export Data → DE Genes List, or right-click on
the selected Analysis from the Analysis Object list and select Export DE List or click on the
Export DE List shortcut button on the main window. In all cases the user will be prompted to
specify a location for the output file to be saved at.
The normalized and differentially expressed gene lists are text tab delimited or Excel files which
contain data separated in different columns. The user is able to specify the output file format (Excel
or text tab delimited) as well as the data fields to be exported by clicking on File → Export
Settings → Gene Lists. The following preferences window will appear:
95
The following table explains the data types that are exporting by checking each of the boxes in the
gene list export preferences window (the term ‘ratio’ denotes the ratio between channels and
‘intensity’ the intensity values calculated from the two channel signals):
Option
Ratio (raw)
Unnormalized ratios
Ratio (log)
Mean ratio (raw)
Mean ratio (log)
Median ratio (raw)
Median ratio (log)
StDev ratio (raw)
StDev ratio (log)
Ratio (raw)
Ratio (log)
Normalized ratios
Mean ratio (raw)
Mean ratio (log)
Median ratio (raw)
Median ratio (log)
StDev ratio (raw)
Statistics and general
Intensitie
s
StDev ratio (log)
Intensity
Mean intensity
Median intensity
StDev intensity
Slide positions
Gene names
p-values
q-values
FDR
Description
The un-normalized ratio in natural scale for each replicate of each
experimental condition.
The un-normalized ratio in log2 scale for each replicate of each
experimental condition.
The mean un-normalized ratio of the replicates for each condition in
natural scale.
The mean un-normalized ratio of the replicates for each condition in
log2 scale.
The median un-normalized ratio of the replicates for each condition in
natural scale.
The median un-normalized ratio of the replicates for each condition in
log2 scale.
The standard deviation of the replicates un-normalized ratio for each
condition in natural scale.
The standard deviation of the replicates un-normalized ratio for each
condition in log2 scale.
The normalized ratio in natural scale for each replicate of each
experimental condition.
The normalized ratio in log2 scale for each replicate of each
experimental condition.
The mean normalized ratio of the replicates for each condition in
natural scale.
The mean normalized ratio of the replicates for each condition in log2
scale.
The median normalized ratio of the replicates for each condition in
natural scale.
The median normalized ratio of the replicates for each condition in log2
scale.
The standard deviation of the replicates normalized ratio for each
condition in natural scale.
The standard deviation of the replicates normalized ratio for each
condition in log2 scale.
The intensity for each replicate of each experimental condition.
The mean intensity of the replicates for each condition.
The median intensity of the replicates for each condition.
The standard deviation of the replicates intensity for each condition.
The numbers denoting each gene’s unique positioning on the
microarray slide (the user should see 2.5 and 2.5.2)
The genes’ identifier names (usually the chip manufacturer’s
identification names) which serve as a textual identification for each
gene.
The p-value (or adjusted p-value) scores for each gene returned by the
statistical test applied for the identification of differentially expressed
genes (the user should see 4.1).
The q-values returned by the False Discovery Rate estimation
procedure (the user should see 4.1).
The False Discovery Rate estimates returned (the user should see 4.1).
96
Fold change
Trust factors
Output file type
CVs
Text tab delimited
Excel
The fold change estimates as calculated by the process explained in
section 4.2 for each condition.
The trust factor estimates calculated by the process explained in section
4.1 for each condition.
The coefficients of variation (StDev/Mean) for each condition.
The output files are of text tab delimited format and can be opened by
any text editor or spreadsheet editing programs (such as MS Excel).
Text tab delimited files can also easily be imported to other tools for
process or easily stored in local databases.
The output files are of Excel format. They can be opened and processed
with MS Excel or Open Office tools but they are larger than and not as
flexible as text tab delimited files.
After selecting the preferred fields to be exported, the user should click OK and all files that are
exported from that point forward will contain the data fields specified. If the user wishes to change
the number of fields exported, the export gene list preferences window can be used again. It should
be noted that the tables presented in ARMADA’s main window and described in sections 2.6.9 and
2.6.10 will contain the fields specified in the export gene list preferences window.
6.2. Exporting gene cluster lists
The gene cluster files contain the results of the clustering processes (the user should see 4.3) and
their format is standard. To export gene cluster files, the user should click on File → Export Data
→ Gene Clusters List, or right-click on the selected Analysis from the Analysis Object list and
select Export Clusters List or click on the Export Clusters shortcut button on the main window.
The user will then be prompted to select the storage location of the clusters file. As with the gene
list files, the cluster output files can be either text tab delimited or Excel files. The following table
explains the meaning of each header in the cluster files:
Column name
Slide Position
GeneID
ClusterNo
Feature depending on
clustering algorithm
p-value
Data columns
Description
The numbers denoting each gene’s unique positioning on the microarray
slide (the user should see 2.5 and 2.5.2)
The genes’ identifier names (usually the chip manufacturer’s
identification names) which serve as a textual identification for each
gene.
The cluster ID the genes belong to.
The value of a specific feature which can be different for each algorithm,
e.g. for hierarchical clustering, the Silhouette value is returned, while for
k-means clustering, the sum of distances from cluster centroid for each
gene is returned. The user should see 4.3 for further details.
The p-value (or adjusted p-value) returned from statistical test applied.
The rest of the columns until the end of the file contain normalized
expression values according to what values the clustering is based on
(e.g. means or replicates, the user should see 4.3).
Additionally, in the case of fuzzy c-means clustering, each gene’s membership coefficient (the user
should see 4.3.3) is returned to the c columns following the data columns.
97
6.3. Exporting figures
While the user could utilize simple screen capture tools (or even simply pressing the PrtScn key)
to capture the diagrams created by ARMADA, it is better to use MATLAB’s figure saving and
exporting controls even if MATLAB is not present on the machine 13. The following figure is used
as an example of image or diagram exporting:
By clicking on File → Save As… the user is able to save the figure in any of the widely used image
formats (e.g. .jpg or .png formats). To obtain more results of better quality the user should use the
figure export setup which is accessible by clicking File → Export Setup…where a lot more
parameters can be set in order to optimize the graphical output. For more information, the user
should consult http://www.mathworks.com/access/helpdesk/help/techdoc/matlab.html under the
Graphics → Preparing Graphs for Presentation section.
6.4. Exporting to .mat files
As ARMADA is addressed to both experienced and inexperienced users, the more experienced
user can export the results from several analyses steps to a .mat file and import it to MATLAB for
further processing with MATLAB’s internal algorithms or use specific functions from several
toolboxes. To be able to read ARMADA .mat file exports, MATLAB 7.1 (R13SP3) should be
13
The purpose of ARMADA is to allow users not experienced with MATLAB to use the program and to offer a free
analysis tool which needs only the MATLAB Component Runtime to run and not necessarily MATLAB installed on the
user’s machine.
98
installed on the user’s machine and the Statistics Toolbox should be present. To export ARMADA
results to .mat files, the user should click on File → Export Settings → MATLAB Workspace.
The following window will appear:
From there, the user can select several data types to be exported to the .mat file which then can be
opened from within MATLAB for further process. The following table describes the data exporting
choices of the export to MATLAB preferences window:
Option
Gene names
Raw data (image software output)
Description
Exports the chip manufacturer’s gene identification
which are determined from the input files (the user
should see 2.5 for further details).
Exports the raw data provided with the input files in
structure format. Each input file is a structure with the
following fields (some might be missing, depending on
the type of the input files) which are described here very
briefly, as the user can find information on these fields in
section 2.5:
Field name
Short description
Header
The header of the input file.
Blocks
Array subgrid blocks.
ArrayRow
Row meta-coordinates.
ArrayColumn
Column meta-coordinates.
Row
Row coordinates.
Column
Column coordinates.
ColumnNames
File column names.
Number
Gene numbering (slide
positions).
GeneNames
Gene identifiers.
ch1Intensity
Channel 1 signal mean.
ch2Intensity
Channel 2 signal mean.
ch1IntensityMedian
Channel 1 signal median.
ch2IntensityMedian
Channel 2 signal median.
ch1IntensityStd
Channel 1 signal standard
deviation.
ch2IntensityStd
Channel 2 signal standard
deviation.
ch1Background
Channel 1 background
mean.
ch2Background
Channel 2 background
mean.
99
ch1BackgroundMedian
Un-normalized log ratio – intensity data
Normalized log ratio – intensity data
DE genes data (p-values etc.)
Channel 1 background
median.
ch2BackgroundMedian Channel 2 background
median.
ch1BackgroundStd
Channel 1 background
standard deviation.
ch2BackgroundStd
Channel 2 background
standard deviation.
IgnoreFilter
Spot flags
Indices
MATLAB indices created if
meta-coordinates are
provided and used to create
array images.
Shape
MATLAB matrix defining
subgrid block orientation.
Un-normalized log2 ratio and intensity data for all arrays
in the Analysis Object.
Normalized log2 ratio and intensity data for all arrays in
the Analysis Object.
Statistics and data for differentially expressed genes.
It should be noted that the option boxes in the export to MATLAB preferences window are
available only if the corresponding procedures have been performed (e.g. DE genes data will not be
available if statistical operations have not been performed). Also, the user may select different data
to be exported for each Analysis Object.
After making the necessary selections, the user should click Export and will be prompted to
select a storage location for the .mat file. The .mat file which is created with the above procedure
consists of a structure of length equal to the Analysis Objects in the project from within the .mat file
was created. Each structure in the structure matrix has the following fields (displayed below in tree
format):
Analysis
|------GeneNames
|------RawData
|------UnNormalized
|
|---Ratio
|
|---Intensity
|
|------Normalized
|
|---Ratio
|
|---Intensity
|
|------DEGenesStats
100
The user can easily correlate the field names with the options described in the table above. Each leaf
of the above tree (apart from the GeneNames field which is a cell array of strings and the RawData
field which is a cell array of structures with fields describe in the table above) is a MATLAB object
of class ‘dataset’. For more information on datasets and how they can be handled the user should
consult http://www.mathworks.com/access/helpdesk/help/toolbox/stats/ under the Organizing Data
→ Statistical Arrays → Dataset Arrays section. MATLAB includes internal functions to handle
dataset objects and convert them to simple matrices which can be then used with any MATLAB
toolbox.
101
7. Other Tools
This section presents some additional analysis tools implemented in ANDFROMEDA. These
tools are the principal component analysis tool which allows pattern discovery between genes
belonging to different experimental conditions, the Gap statistic which allows the determination of
the number of clusters in a dataset using one of the supported clustering algorithms, the Batch
Programmer module which allows to perform multiple analysis steps in an automated way and the
Annotator module which allows the easy annotation of the gene and cluster lists created by
ARMADA.
7.1. The Principal Component Analysis tool
Principal Component Analysis (PCA) is a statistical pattern analysis technique for determining
the key variables in a multidimensional data set that explain the differences in the observations and
is very useful for analysis simplification and visualization of multidimensional data sets. Given m
observations (samples or arrays) on n variables (genes) which form an m×n data matrix, the goal of
PCA is the reduction of the data matrix dimensionality by finding r new variables, where r is less
than n. These r new variables are termed principal components and together they account for as
much of the variance in the original n variables as possible while remaining mutually uncorrelated.
For more information on PCA for gene expression datasets derived from microarray experiments,
the user should consult (17). The user can conduct PCA in ARMADA by selecting an Analysis
from the Analysis Object list and click on Tools → Principal Component Analysis. The following
window will appear:
From there, the user is able to choose to perform PCA on the gene selected from the list on the left,
to perform PCA on all genes using their normalized gene expression values after the trust factor
filtering step (the user should see 4.1) or to perform PCA on the differentially expressed genes
selected after the application of a statistical test. After making the necessary selections, the user
should click OK and the following figure will appear 14:
14
The PCA module uses a slightly altered version of the mapcaplot function of the Bioinformatics Toolbox of MATLAB.
102
This figure contains two main panels: the upper panel presents the projections of the data matrix on
the 2-dimensional plane defined by the first two principal components, which account for the largest
and the 2nd larger percentage of the variance observed in the data matrix (the data matrix has been
defined using the PCA preferences window above) respectively. Each point inside the diagram in
the upper panel corresponds to a gene. The percentage of the data variance which each principal
component ‘caught’ can be seen inside the parenthesis on each axis label. The bottom panel
presents the projection of the data matrix on the 2-dimesional plane defined by the 1st and 3rd
principal components respectively. The user can use the popup lists in order to change the data
projection plane by changing the principal components displayed. The user can also click on each
data point (gene) to view its label and also select data (as in MA or volcano plots). The names of the
selected genes are displayed in the list on the right part of the figure and user can export the selected
genes coupled with their expression values in text tab delimited format by clicking the Export
button. In addition, the user can move the rectangular area (‘window’) over other data points and
the list on the right will be updated with the genes that are inside the moving window each time.
The main goal of PCA is to transform the original data in such a way so as to reveal any possible
patterns that can help the researcher to distinguish among different experimental conditions. In the
example used to create the above figure, it is obvious that the first 2 principal components
(presented in the upper panel) are able to account for a large percentage of variance in the dataset
103
and this can also be seen by the shape of the projected data where there are two distinguishable
clouds of data points. Genes furthest from the whole swarm center can be thought of as genes that
their expression is different and can separate among different experimental configurations. The
PCA tool becomes available after the statistical selection procedure.
7.2. The Gap Statistic tool
A major problem when trying to discover groups in data without the help of a response variable
(e.g. when trying to discover groups of similarly deregulated genes without having a prior idea on
how many are these groups) is how to estimate the optimal number of these groups or ‘clusters’.
One way to partially solve this problem is the Gap statistic introduced by Tibshirani et al. in 2001
and has been applied in microarray data. The main idea is to use the pairwise inter-cluster distances
to define a within-cluster dispersion measure with the original data and a background distribution
which reflects ‘randomness’ and then use statistical measures to compare the within-cluster
dispersion measures of the original data distribution with the dispersion in the random case. To
ensure the random characteristics of the background distribution, the latter is estimated by
averaging several instances of the randomly generated data (reference data). For more information
and details about the algorithm that estimates the number of clusters in a data matrix using the Gap
statistic the user should see (18).
When the user does not have a prior knowledge in how many clusters can the dataset be grouped
at, one choice is to use the Gap statistic implementation of ARMADA and based on the estimate
returned, perform clustering using the same algorithm and parameters as those used by the Gap
statistic tool. To use the Gap statistic tool, the user should select an Analysis from the Analysis
Object list and click Tools → Gap Statistic and the following window will appear:
104
By using this window, the user can set several parameters that will be used for the estimation of the
optimal number of clusters. The following table describes each of the user options in the above
preferences window:
Option
Number of clusters range
Size of reference dataset
Method repetitions
Gap statistic options
Clustering algorithm
Reference data type
Description
The range of number of clusters form which the optimal
number of clusters should be estimated.
How many reference datasets should be randomly created
and averaged for the estimation of the background
distribution.
Due to the stochastic nature of the algorithm (randomness
of background distribution) the optimal number of times
may differ each time. By allowing several repetitions of
the whole estimation, the program returns the number of
clusters that was found to be optimal in the majority of
the repetitions (the most frequent).
The clustering algorithm to be used to cluster data and
estimate their within-cluster dispersion measures. It can
be one of the clustering algorithms supported by
ARMADA (Hierarchical, k-means, Fuzzy C-Means).
After selecting the desired algorithm, the respective
clustering preferences window will open (the user should
see 4.3) allowing parameter setting.
Reference dataset generation method. This option
determines the method and the data source from which
each reference dataset will be created. The user can select
one of the following:
Uniform
The reference dataset is created
based on uniformly distributed
data with ranges taken from the
columns (samples, arrays) of the
original data matrix.
Uniform - PCA The reference dataset is created
based
based on uniformly distributed
data which were derived by taking
into account the shape of the
original data, using the principal
components of the original data
matrix.
Bootstrap 15
The reference dataset is created by
bootstrapping the original data
matrix.
Bootstrap - PCA The reference dataset is created by
based
bootstrapping the data matrix
derived by taking into account the
shape of the original data, using
the principal components of the
original data matrix.
15
The bootstrap is an iterative resampling procedure which is based on creating new data by drawing with replacement
from an initial dataset. For more information on the bootstrap, the user should see (19. Efron, B. and Tibshirani, R.
(1993) An introduction to the bootstrap. Chapman & Hall/CRC.
105
General options
Use always squared euclidean
Verbose output (command line)
Use waitbar
Show output plot
Whether to always use the squared euclidean distance to
calculate the within cluster pairwise distances (as the
authors of (18) propose or to use the metric used during
the clustering process (sometimes seems to work better).
Display output messages on the operating system
command line (or MATLAB’s command window if
ARMADA used under MATLAB) showing different
stages of progress.
Display a bar showing progress of the calculations.
If checked, will generate a figure with two panels: the
upper panel shows the within-cluster dispersion range (for
the original dataset) against the range of the number of
clusters. The bottom panel displays the Gap curve which
is the values of the Gap statistic against the range of the
number of clusters. The user should also see (18).
When choosing the clustering algorithm, each corresponding preferences window contains a field
for specifying the number of clusters (e.g. the field Number of centroids (k) in the k-means
clustering preferences window). This choice is ignored as the number of clusters range is given in
the Number of clusters range field. After setting the desired parameters, the user should click OK.
The tool will start the estimation process of the optimal number of clusters (might take some time).
It is recommended to also perform a graphical inspection (by checking the box Show output
plot in the Gap statistic preferences window) as the algorithm might fall in local minima and not
return the true best number of clusters. Ideally, the optimal number of clusters should be the point in
the horizontal axis where the within-cluster dispersion range drops steeply and then remains
relatively stable across different numbers of clusters. This should also be the point where the Gap
curve rises before and drops steeply after. After completing the process, ARMADA will display the
following message informing about the result:
The figure below displays the output plot of the Gap statistic module:
106
It can be seen in the upper panel that the within-cluster dispersion measure Wk (red line) drops
steeply until the number of clusters reaches 5 and then it rises again. Similarly, the Gap curve (blue
line) rises until the number of clusters is 5 and then drops. However, it can be observed that Wk
drops again until the number of clusters becomes 8 and for a larger number of clusters, presents
small changes. Correspondingly, the Gap curve rises until the number of clusters is 8 and then drops
very slightly. This fact can give a clue that the algorithm fell on a local minimum and returned 5 as
the optimal number of clusters while there might be another optimal solution. This fact does not
mean that 5 is not a correct solution but rather that there are more than one possible solutions.
7.3. The Batch Programmer
Many times, depending on the nature of the experiment, it is required to perform several rounds
of statistical selection procedures (e.g. when the experiment includes lots of possible contrasts) in
order to extract different results corresponding to each case. Moreover, it is possible that the analyst
would like to follow different analysis workflows concerning the statistical or the clustering
procedures in order to compare different methods or combine the results. As all these cases can take
a quite considerable amount of time to be performed, this section presents how multiple analysis
steps can be programmed to a batch process through a simple interface provided with
ARMADA. In order to use the batch programming module, the user should firstly import data in a
new project with one of the ways described in section 2.5. After that, the user is able to program a
batch procedure at any time of the analysis. To launch the Batch Programmer, the user should click
Tools → Batch Programmer. The following window will appear:
107
In order to program a batch procedure, the user should first create a new batch file by clicking File
→ New batch. The user will be prompted to select a location for the batch settings file to be
created. After this step, the button Background Correction will be activated. By hitting the
Background Correction button, the background correction preferences window will open (section
3.2) and the user should select the preferred background correction method. After setting this, the
Filtering button will be activated. As with background correction, the filtering preferences window
(section 3.3) will open and the user must set the desired parameters. Similarly, the Normalization
button which will open the normalization preferences window (section 3.4). At this point it should
be mentioned that the preprocessing steps are common for the entire dataset.
After properly setting the preprocessing steps, the user can define several Analysis objects
through the Select Conditions button (section 3.1) and then for each object, define the desired
statistical selection workflow and the clustering to be performed (optional). The Statistical
Selection button will open a preferences window similar to the one of section 4.1 with some
differences (figure below):
All options are the same as in section 4.1 plus that the user can define pairs of conditions for each
Analysis object so that fold changes can be calculated. After making the necessary selections, the
user should click OK. If OK is pressed without making any selections, the default parameters (what
is displayed in the window) will be used for the batch process. If the user does not wish to perform
statistical tests, Cancel should be pressed instead.
108
The Clustering button will open the following window:
For each Analysis object, the user can define a different clustering algorithm. By selecting an
algorithm from the Choose clustering method list, the corresponding preferences window will
open (the user should see section 4.3) so that parameters can be set (or defaults left). After making
the necessary selections, the user should click OK. If OK is pressed without making any selections,
the default parameters (what is displayed in the window, e.g. hierarchical clustering with default
parameters) will be used for the batch process. If the user does not wish to perform clustering,
Cancel should be pressed instead.
At this point, the user can save all previous settings for the defined batch process by clicking
File → Save batch and also save the settings under a different name by clicking File → Save batch
as… It should be mentioned that simply saving a batch will not save the results produced by a batch
procedure but it saves only the batch settings. In order to save the results after a batch process is
complete, the user should click File → Save batch as… and in the field Save as type: should
choose ADROMEDA Project Files (*.apj). In this way, the results are exported as an ARMADA
project which can be opened from ARMADA in order to perform data exploration and exporting.
After having set all the obligatory parameters (at least background correction and filtering), the
Run button will be enabled. In order to start the batch process, the user should click the Run button.
During the batch process running, the Batch Programmer displays several output messages in the
operating system command line or the MATLAB’s command window (if ARMADA runs under
MATLAB). By clicking File → Exit or the Close button, the Batch Programmer is terminated.
7.4. The Annotator
The ARMADA output files containing gene lists or gene clusters contain only the GeneIDs as
gene identifiers. More annotation elements can be easily added to these files using the Annotator
module. In order to use the Annotator module, the user should have a complete annotation file for
the microarrays used. Such files should be in spreadsheet like format and contain the annotation
elements in different columns. One of the columns in the annotation file must be either a slide
position (if it is not already contained in the annotation elements, it can be easily created by
assigning unique numbers to each spot using e.g. MS Excel) or the same textual identifier as the one
imported in ARMADA (usually the chip manufacturer’s gene identifier). For more information, the
109
user should see Appendix A on input file formats. Generally, such annotation files are provided by
the chip manufacturer or can be created using public repositories. To launch the Annotator, the user
should click Tools → Annotator and the following window will appear:
In the Choose files panel the user should enter the required files location. In the Gene list file(s)
field, the user should provide the exact location of the file(s) to be annotated. By clicking the
Browse button, this task can be completed easily. In the Annotation file field, the user should
provide the location of the annotation file which can also be done easily with the help of the
Browse button. Attention should be paid if multiple files are provided in the Gene list file(s) field;
all of them should be coming from analyses using the same microarray chip (e.g. from the same
project) as they all use the specified annotation file, else the program will generate an error. The
gene list and annotation files can be either in text tab delimited or Excel format or a mix (e.g. the
annotation file is an Excel file and the gene lists are in tab delimited format).
After selecting the necessary files, their column headers are used to fill the Unique gene ID
column in gene list, the Unique gene ID column in annotation file and the Columns lists in the
Choose annotation columns panel. The Columns list contains the column headers from the
annotation file so the user can choose. The user should choose then the appropriate columns (should
contain the same data type, else an error will be generated) and then from the Columns list, the user
should choose the desired annotation elements to be added to the gene lists. After having made at
least one selection from all the lists in the Choose annotation columns panel (even if having to
reselect the default values) the Annotate button will be enabled. The user should click on the
Annotate button and the Annotator will add annotation elements to the provided files. This process
might take some time depending on the number of files to be annotated, their type and their size.
110
References
1.
2.
3.
4.
5.
6.
7.
8.
9.
10.
11.
12.
13.
14.
15.
16.
17.
18.
19.
de Jong, S. and van der Meer, F. (2002) Imaging spectrometry: basic principles and
prospective applications. Kluwer Academic.
Yang, Y.H., Dudoit, S., Luu, P., Lin, D.M., Peng, V., Ngai, J. and Speed, T.P. (2002)
Normalization for cDNA microarray data: a robust composite method addressing single and
multiple slide systematic variation. Nucleic acids research, 30, e15.
Cleveland, W.S., Grosse, E. and Shyu, W.M. (1992) In Chambers, J. M. and Hastie, T. J.
(eds.), Statistical Models in S. Wadsworth & Brooks/Cole Dormand, J.R.
Tseng, G.C., Oh, M.K., Rohlin, L., Liao, J.C. and Wong, W.H. (2001) Issues in cDNA
microarray analysis: quality filtering, channel normalization, models of variations and
assessment of gene effects. Nucleic acids research, 29, 2549-2557.
Troyanskaya, O., Cantor, M., Sherlock, G., Brown, P., Hastie, T., Tibshirani, R., Botstein,
D. and Altman, R.B. (2001) Missing value estimation methods for DNA microarrays.
Bioinformatics (Oxford, England), 17, 520-525.
Bolstad, B.M., Irizarry, R.A., Astrand, M. and Speed, T.P. (2003) A comparison of
normalization methods for high density oligonucleotide array data based on variance and
bias. Bioinformatics (Oxford, England), 19, 185-193.
Dudoit, S., Yang, Y.H., Callow, M.J. and Speed, T.P. (2002) Statistical methods for
identifying differentially expressed genes in replicated cDNA microarray experiments.
Statistica Sinica, 12, 111-140.
Benjamini, Y. and Hochberg, Y. (1995) Controlling the False Discovery Rate: a Practical
and Powerful Approach to Multiple Testing. J R Statist Soc, 57, 289-300.
Storey, J.D. and Tibshirani, R. (2003) Statistical significance for genomewide studies.
Proceedings of the National Academy of Sciences of the United States of America, 100,
9440-9445.
Speed, T.P. (ed.) (2003) Statistical analysis of gene expression microarray data. Chapman
& Hall/CRC.
Jain, A. and Dubes, R. (1988) Algorithms for clustering data. Prentice-Hall, Englewood
Cliffs.
Dembele, D. and Kastner, P. (2003) Fuzzy C-means method for clustering microarray data.
Bioinformatics (Oxford, England), 19, 973-980.
Guyon, I. and Elisseef, A. (2003) An introduction to variable and feature selection. Journal
of Machine Learning Research, 3, 1157-1182.
Vapnik, V.N. (1995) Statistical Learning Theory. Wiley.
Furey, T.S., Cristianini, N., Duffy, N., Bednarski, D.W., Schummer, M. and Haussler, D.
(2000) Support vector machine classification and validation of cancer tissue samples using
microarray expression data. Bioinformatics (Oxford, England), 16, 906-914.
Tukey, J.W. (1977) Exploratory data analysis. Addison-Wesley, Reading, MA.
Raychaudhuri, S., Stuart, J.M. and Altman, R.B. (2000) Principal components analysis to
summarize microarray experiments: application to sporulation time series. Pac Symp
Biocomput, 455-466.
Tibshirani, R., Walther, G. and Hastie, T. (2001) Estimating the number of clusters in a data
set via the gap statistic. J R Statist Soc, 63, 411-423.
Efron, B. and Tibshirani, R. (1993) An introduction to the bootstrap. Chapman &
Hall/CRC.
111
Appendix A: Input file formats
This appendix describes some of the input file formats for ARMADA and provides some links
for further user information.
A.1.Raw data – Image analysis software output and tab delimited files
A.1.1. QuantArray file format
QuantArray files contain two main sections: the file header section and the file data section.
Below there is one example from each section:
File header section:
File data section:
112
Most QuantArray files have the following column headers in the file data section:
Number, Array Row, Array Column, Row, Column, Name, X Location, Y Location, ch1 Intensity,
ch1 Background, ch1 Intensity Std Dev, ch1 Background Std Dev, ch1 Diameter, ch1 Area, ch1
Footprint, ch1 Circularity, ch1 Spot Uniformity, ch1 Bkg. Uniformity,
ch1 Signal Noise Ratio,
ch1 Confidence, ch2 Intensity, ch2 Background, ch2 Intensity Std Dev, ch2 Background Std Dev,
ch2 Diameter, ch2 Area, ch2 Footprint, ch2 Circularity, ch2 Spot Uniformity, ch2 Bkg. Uniformity,
ch2 Signal Noise Ratio, ch2 Confidence, Ignore Filter.
The user should make sure that at least the column names containing main image quantitation
information and spot flags should have the names mentioned above (e.g. ch1 Intensity, ch2
Intensity, ch1 Background, ch1 Background Std Dev, IgnoreFilter etc.) For more information on the
necessary quantitation inputs, the user should see section 2.5.2.
A.1.2. ImaGene file format
ImaGene files usually come in pairs, one file for each channel. ARMADA recognizes the
correspondence to each channel (channel 1 or Cy3 or ‘Green’ and channel 2 or Cy5 or ‘Red’) by
their filenames. The file corresponding to each channel should contain the string ‘Cy3’ or ‘Cy5’
(depending on the channel) somewhere on its filename (not the file extension). The user should also
check section 2.5.1. Below there is an example of an ImaGene file section for one channel (files for
the other channel are the same but they contain different values for the main image quantitation
types):
Most ImaGene files have the following data column names:
113
Field, Meta Row, Meta Column, Row, Column, Gene ID, Flag, Signal Mean, Background Mean,
Signal Median, Background Median, Signal Mode, Background Mode, Signal Area, Background
Area, Signal Total, Background Total, Signal Stdev, Background Stdev, Shape Regularity, Ignored
Area, Spot Area, Ignored Median, Area To Perimeter, Open Perimeter, XCoord, YCoord, Diameter,
Position offset, Offset X, Offset Y, Expected X, Expected Y, CM-X, CM-Y, CM Offset, CM
Offset-X, CM Offset-Y, Min
Diam,
Max
Diam,
Control,
Failed
Control,
Background
contamination present, Signal contamination present, Ignored % failed, Open perimeter failed,
Shape regularity failed, Perim-to-area failed, Offset failed, Empty spot, Negative spot, Selected
spot, Saturated spot.
The user should make sure that at least the column names containing main image quantitation
information and spot flags should have the names mentioned above (e.g. Signal Mean, Background
Mean, Flag, etc.) For more information on the necessary quantitation inputs, the user should see
section 2.5.2. For more information on ImaGene headers, the user should also check
http://www.biodiscovery.com/index/imagene.
A.1.3. GenePix file format
GenePix contains quantitation data in one file. Below there is an example of GenePix output:
Most GenePix files have the following headers:
Block, Column, Row, Name, ID, X, Y, Dia., F635 Median, F635 Mean, F635 SD, B635 Median,
B635 Mean, B635 SD, % > B635+1SD, % > B635+2SD, F635 % Sat., F532 Median, F532 Mean,
F532 SD, B532 Median, B532 Mean, B532 SD, % > B532+1SD, % > B532+2SD, F532 % Sat.,
114
Ratio of Medians, Ratio of Means, Median of Ratios, Mean of Ratios, Ratios SD, Rgn, Ratio, Rgn
R², F Pixels, B Pixels, Sum of Medians, Sum of Means, Log Ratio, F635 Median - B635, F532
Median - B532, F635 Mean - B635, F532 Mean - B532, Flags.
The user should make sure that at least the column names containing main image quantitation
information and spot flags should have the names mentioned above (e.g. F635 Mean, F635 Median,
B635 Mean, Flags, etc.). It has been observed that in some GenePix files, the wavelengths used for
the two channels are slightly different. In ARMADA, the two channels must be named with the
column names above for GenePix. For example, 532 must correspond to Cy3 or ‘Green’ and 635
must correspond to Cy5 or ‘Red’. For more information on the necessary quantitation inputs, the
user should see section 2.5.2. For more information on GenePix headers, the user should also check
http://www.moleculardevices.com/pages/software/gn_genepix_file_formats.html#gpr
and
also
http://www.moleculardevices.com/pages/software/gn_gpr_format_history.html.
A.1.4. Text tab delimited files
ARMADA can process other types of raw data which are derived from not yet supported image
analysis software (e.g. ArrayVision, Imaging Research Inc.) as long as they have a minimum of
quantitation types (section 2.5.2) for both channels and any software dependent headers have been
removed so that the file contains only a number of columns with the first row of each column
containing the name of the quantitation type. The user can also import text tab delimited files from
other sources such as public microarray databases (e.g. ArrayExpress, www.ebi.ac.uk/arrayexpress/
or Gene Expression Omnibus, http://www.ncbi.nlm.nih.gov/geo/).
A.2. Processed data
The user can import already processed data in ARMADA. Such data can be already calculated
(but not normalized) expression (natural or log2 ratio) values or ratio-intensity pairs which can be
imported to ARMADA for normalization, and they can also be normalized data (ratios or ratiointensity pairs) which can be imported to conduct statistical tests. Depending on the input data,
some plots might be unavailable.
Concerning the file format of processed data, these files should have only one column with gene
ids (accession numbers, manufacturer’s ids etc.) and all other columns should be numeric. If only
ratio values are available, the file should have as many ratio columns as the number of microarrays
in the experiment. The column name should correspond to a unique array identifier string so that it
can be used as array unique identifier. For example, if the experiment consists of 20 arrays, the file
should have 20+1=21 columns. In the case of ratio-intensity pairs, the file should have (apart from
the gene ids column) twice the number of columns as the number of microarrays in the experiment.
For example, if the experiment consists of 20 arrays, the file should have (apart from the gene ids
column) 20+20+1=41 columns. The user should make sure that there are no extra columns in such
115
files as they will generate an error. In the case of importing ratio-intensity pairs, the user should
make sure that all ratio columns have their intensity pair column. Again, all columns should have a
unique name. Additionally, any missing data (missing cells) in the file columns, should be empty or
contain the string ‘NaN’. Any other string (such as ‘NULL’) will generate an error. The user can
easily replace any other strings with a text editor or spreadsheet software such as MS Excel. Below,
there is an example of processed data containing only normalized ratio values:
For more information on importing processed data to ARMADA, the user should also consult
section 2.5.3.
A.3. Files used for classification
There are three types of files that can be used as input to classification methods supported in
ARMADA: i) files containing new samples to be classified, ii) files containing class prior
probabilities to be used with DA classifiers and iii) kernel function parameter files to be used with
SVM classifiers. In all cases, the files can be either text tab delimited or Excel files. The following
sub-sections give examples of these files.
116
A.3.1. New sample files
The 1st column of these files should contain as many rows as the number of features (genes) used
to train the classifier and each row of the 1st column should contain names for each feature. The 1st
row should contain sample names. An instance follows:
A.3.2. External class prior files for DA classification
The 1st column of these files should contain as many rows as the number of classes in the
training dataset and each row should contain one class name. The second column should contain as
many rows as the number of classes and each row should have a number between 0 and 1
corresponding to the prior class probability. The sum of the probabilities should be 1. An instance
follows:
A.3.3. External kernel parameters files for SVM tuning
These files should contain as many columns as the number of parameters that each kernel type
accepts. For example, a file with polynomial kernel parameters should contain 3 columns with
arithmetic data, while a file with RBF kernel parameters should contain 1 column. There are no
headers. An instance follows:
The following table presents the proper order of the columns in the kernel parameters files so as
ARMADA interprets them correctly:
Kernel/Column
Polynomial
Sigmoid (MLP)
RBF
Column 1
Gamma
Gamma
Gamma
Column 2
Coefficient
Coefficient
Column 3
Degree
117
Appendix B: MATLAB’s figure controls
This section is addressed to users not familiar with MATLAB and explains briefly several
features that are available for figure control and exploration. It contains several parts of MATLAB’s
help concerning figures and the user should also check for further information the website
http://www.mathworks.com/access/helpdesk/help/techdoc/matlab.html under the section ‘Graphics’
which explains several features more thoroughly.
B.1. Figures
MATLAB offers a very strong interface for plotting, handling, exploring and exporting figures.
The following pictures are taken from MATLAB’s help and present a typical figure explaining
briefly several toolbars and controls:
Some of the components and tools of figure windows are called out below:
118
It should be noted that figure docking in MATLAB desktop is available only when MATLAB is
present, else, figures will be docked to a common figures window and will be accessible from there
as different windows.
B.2. Figure toolbars
Figure toolbars provide shortcuts to access commonly used features. These include operations
such as saving and printing, plus tools for interactive zooming, panning, rotating, querying, and
editing plots. The following picture shows the features available from this toolbar:
Note that two other toolbars can be enabled from the View menu: Camera Toolbar which is used
for manipulating 3-D views:
119
and Plot Edit Toolbar which is used for annotation and setting object properties:
Generally, MATLAB’s figure interface offers a lot of possibilities for figure manipulation.
Through the figure’s several menus, the user can add annotation components (textboxes, arrows
etc.) to figures, as well change titles and axes titles, change colors, colormaps, draw elements etc.
The user is also able to export figures in many available formats. For more thorough information
and examples on MATLAB’s figure interfaces and possibilities, the user should check
http://www.mathworks.com/access/helpdesk/help/techdoc/matlab.html under ‘Graphics’.
120
Appendix C: Multiple testing correction issues
Hypothesis testing in statistics involves two kinds of errors: the Type I error occurs when the
null hypothesis is incorrectly rejected. In the context of microarray experiments, type I errors are
committed when a gene is declared differentially expressed while it is not. On the other hand, Type
II errors occur when the null hypothesis is not rejected while it is false, that is, in the context of
microarrays, when the test fails to identify a differentially expressed gene. When conducting
multiple testing, the probability of Type I errors is increased proportionally to the number of tests.
This is allowable when the number of tests is small, but in the case of microarrays where thousands
of tests are performed, a large number of false positives is undesirable. For example, if an
experiment involves testing over 10000 genes and the p-value threshold to determine differential
expression is set to 0.01, then at least 100 false positives are expected. Such unwelcome results
necessitate the correction of statistical scores to adjust for multiple hypothesis testing.
There exist two main categories of multiple testing correction methods: the Family Wise Error
Rate (FWER) and the False Discovery Rate (FDR) methods. FWER procedures correct for multiple
testing by adjusting p-values to account for multiple testing. For example the Bonferroni procedure
adjusts p-values by dividing with the number of hypotheses n to be tested (padj=p/n). FWER
methods are unsuitable for microarray data mostly because they are too conservative: after
correcting for multiple testing, no single gene may meet the threshold for statistical significance. In
contrast, FDR methods, instead of adjusting p-values, they seek to minimize the proportion of errors
committed by falsely rejecting null hypotheses. As they are less stringent than FWER methods they
are considered more suitable for microarray data. However, a common drawback with both of them
is that they do not assume general variable dependence which is usually the case for microarrays
because genes are involved in complicated interaction networks and pathways.
121
Appendix D: Distance metrics and linkage algorithms
This appendix describes the linkage algorithms used in hierarchical clustering (section 4.3.1) and
the distance metrics used in several processes in ARMADA. The descriptions below are based on
MATLAB’s help.
D.1. Distance metrics
Let X denote a m×n data matrix whose m rows can be thought as m vectors each consisting of n
elements (dimensions). The following table defines the various distances between two row vectors
xi and xj of the matrix X:
Distance
Euclidean
Standardized Euclidean
Mahalanobis
City Block (Manhattan)
Definition
dij =
d ij =
( x − x )( x − x ) .
(x − x )D (x − x )
T
i
j
i
j
i
j
T
−1
i
j
, where D is the diagonal matrix with
diagonal elements given by υ r2 which denotes the variance of the variable
xj over the m objects.
( x − x )V ( x − x )
dij =
T
−1
i
j
i
j
, where V is the sample covariance matrix.
n
dij = ∑ xir − x jr .
r =1
Minkowski
Cosine
1
p p
⎧⎪ n
⎫⎪
dij = ⎨∑ xir − x jr ⎬ . It can be easily seen that for the special case of
⎩⎪ r =1
⎭⎪
p=1, the Minkowski metric gives the City Block metric, and for the
special case of p=2, the Minkowski metric gives the Euclidean distance.
⎛
⎞
xi xTj
⎜
⎟
dij = ⎜1 −
.
1 ⎟
1
⎜ ( xiT xi ) 2 ( xTj x j ) 2 ⎟
⎝
⎠
Correlation
( x − x )( x − x )
( x − x )( x − x ) ( x − x )( x
T
dij = 1 −
i
i
j
j
T
i
i
i
i
j
j
j
− xj
)
T
,
1 n
1 n
xir and x j = ∑ x jr .
∑
n r =1
n r =1
⎛ # ( xir ≠ x jr ) ⎞
⎟.
dij = ⎜
⎜
⎟
n
⎝
⎠
# ⎡( xir ≠ x jr ) ∧ ( xir ≠ 0 ) ∨ ( x jr ≠ 0 ) ⎤
⎦.
dij = ⎣
# ⎡⎣( xir ≠ 0 ) ∨ ( x jr ≠ 0 ) ⎤⎦
where xi =
Hamming
Jaccard
(
)
122
D.2. Linkage algorithms
These linkage algorithms are based on different ways of measuring the distance between two
clusters of objects. If ni is the number of objects in cluster i and nj is the number of objects in cluster
j, and xir is the rth object in cluster i, the definitions of these various measurements is presented in
the following table:
Algorithm
Single
Definition
Single linkage is also called nearest neighbor and uses the smallest distance between
objects
in
the
two
clusters.
It
is
defined
as:
l ( i, j ) = min d ( xir ,x js ) , r ∈ ( r,...,ni ) , s ∈ (1,...,n j ) .
(
Complete
)
Complete linkage is also called furthest neighbor and uses the largest distance
between
objects
in
the
two
clusters.
It
is
defined
as:
(
)
l ( i, j ) = max d ( xir ,x js ) , r ∈ ( r,...,ni ) , s ∈ (1,...,n j ) .
Average
Average linkage uses the average distance between all pairs of objects in cluster i and
n
1 n
cluster j. It is defined as: l ( i, j ) =
∑∑ d ( xir ,x js ) .
ni n j r =1 s =1
j
i
Centroid
Centroid linkage uses the Euclidean distance between the centroids of the two
n
1 n
1
clusters. It is defined as: l ( i, j ) = xi − x j , where xi = ∑ xir , x j = ∑ x jr .
2
ni r =1
n j r =1
i
Median
j
Median linkage uses the Euclidean distance between weighted centroids of the two
clusters. It is defined as: l ( i, j ) = xii − xij , where xii and xij are weighted centroids for
2
the clusters i and j. If cluster i was created by combining clusters p and q, then xii is
1
defined recursively as: xii = xjp + xiq and xij is defined similarly.
2
Ward's linkage uses the incremental sum of squares; that is, the increase in the total
within-cluster sum of squares as a result of joining clusters i and j. The within-cluster
sum of squares is defined as the sum of the squares of the distances between all
objects in the cluster and the centroid of the cluster. The equivalent distance is given
(
Ward
by l ( i, j ) = ni n j
xi − x j
2
(n + n )
i
where
)
2
is the Euclidean distance and xi ,x j as in the
j
Centroid linkage respectively.
123