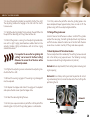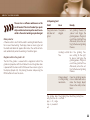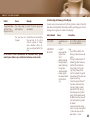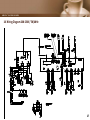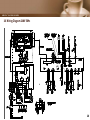
1
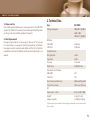
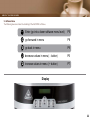
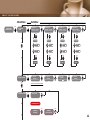
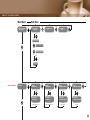
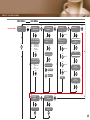
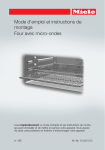
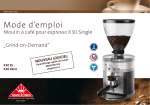
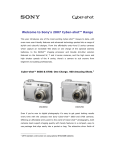
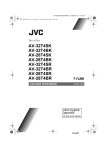
HORECA | GASTRO GRI N DER
Operating Instructions
K30 TWIN Espresso Grinder
Grind-on-Demand“
”
WARE:
T
F
O
S
NEW ime change &
Easy t
mode
barista r 5.3
pte
see cha
The professional art of grinding
since 1924
HORECA | GASTRO GRI N DER
Dear customer / service personnel
the Double Espresso Grinder „K30 TWIN” is a fully automatic
espresso coffee grinder of the proven MAHLKÖNIG quality.
We have developed this product with over 80 years of experience
in the manufacture of coffee grinders assuring you of high quality
grinding of all kinds of espresso and other types of coffee beans.
Espresso as the base of various coffee specialities requires a very
precise grind. With the „K30 TWIN“ you can now grind two different kinds of espresso (like decaf and regular) simultaneously in one
machine.
Read through and observe the operating instructions, so you and
your customers will thoroughly enjoy the ”K30 TWIN”. Follow the
safety instructions at all time and also advise your personell.
Please store the instructions in a safe place. If anything is unclear or
additional information is required, please contact your authorized
dealer or us as the manufacturer. We will be pleased to advise you
further.
We wish you unlimited pleasure and success with our product
MAHLKÖNIG GmbH & Co. KG
2
HORECA | GASTRO GRI N DER
Table of Contents
1. Safety
1.1 Symbols
1.2 Safety Instructions
1.3 Purpose of Use
1.4 User Requirements
2. Technical data
3. Description
4. Set-up and Initial Adjustments
4.1 Place of installation
4.2 Locking in the hoppers
4.3 Electrical Installation
4.4 Adjustment of the portafilter rests
4.5 Adjustment of the cleaning alarm
5. Operation
5.1 Instructions for the first grinding steps
5.2 Operating the grinder
5.3 Grind time adjustment
5.4 Interruption of grinding (break-function)
5.5 Software Menu
5.6 Describtion of the software chapters
4
4
4
5
5
5
6
7
7
7
7
7
8
8
8
8
9
11
11
17
6. Cleaning
6.1 Cleaning with GRINDZTM Grinder Cleaner
6.2 Cleaning the Drip Tray and the Hoppers
6.3 Cleaning the Grinder Placement Surface
6.4 Cleaning the Grinder Casing
7. Maintenance and Repair
7.1 Grinding fineness adjustment with the grinder switched ON
7.2 Taking off the grinder cover
7.3 Basic Adjustment of The Interior Grinders
7.4 Cleaning of the Grinding Mechanism
7.5 Grinding Disc Exchange
7.6 Removal of The Integrated Grinder
8. Trouble Shooting For Operating Faults
8.1 Safety Devices of the Grinder
8.2 Operating Fault
8.3 Alarm Signals Showing in The Display
9. Spare Parts
10. Wiring Diagram
11. Certificate
12. Warranty Conditions
18
18
19
19
19
19
19
20
20
21
21
21
21
21
22
23
25
26
29
29
3
HORECA | GASTRO GRI N DER
1. Safety
Please read carefully and observe the following
safety instructions. Failure to do so can result in
damage to the grinder and danger to the user.
1.1 Symbols
The following two symbols are used in these operating instructions:
Safety Instruction:
Imminent accident danger if you fail to observe.
General Instruction:
Failure to observe can result in damage to the
grinder and optimum operation cannot be guaranteed.
1.2 Safety Instructions
Only whole roasted coffee beans may be ground in the K30 TWIN!
When unpacking please inspect whether the power supply (voltage) complies with the grinder voltage on the manufacturer’s
name plate at the bottom of the grinder.
Always remove the electrical plug from the outlet prior to removing the hopper or conducting maintenance or cleaning work on the
grinder.
Never operate a grinder with a damaged electrical cord. Inspect the
grinder regularly for damages of the electrical cord, plug, etc.
Any required repairs may only be conducted by authorized service
personell. For this reason, please contact a customer service repair
facility, your dealer or us directly as the manufacturer.
Do not exceed the maximum allowable continuous grinding time
of 20 min. Afterwards, allow the grinder to cool off before the next
operation. Do not exceed the maximum allowable running cycle of
4 sec. ON, 6 sec. OFF (6 double shots per minute, S3 40%) for 230V
/ 50Hz, and 6 sec. ON, 15 sec. OFF (4 double shots per minute, S3
25%) for 115V / 60Hz.
Do not make any modifications or alterations to the grinder. The
manufacturer assumes absolutely no liability for damages occurring from failure to observe these instructions.
Children cannot recognize the dangers that can exist in the operation of electrical grinders. For this reason never leave children unsupervised with electronic appliances such as this grinder.
Never operate the grinder in damp or wet surroundings. Never operate with wet hands
4
HORECA | GASTRO GRI N DER
1.3 Purpose of Use
Only whole roasted coffee beans may be ground in the K30 TWIN
grinder. Pay attention to use only clean and unground coffee. Never
use the grinder to grind other products or objects.
1.4 User Requirements
No special requirements are necessary for the user of this grinder.
It is nevertheless a prerequisite that these operating instructions
have been carefully read and understood and that all instructions
provided are observed. In addition safety-conscious operation is expected.
2. Technical Data
Type
Voltage/Frequency Rotation
230-240V
110-115V
Sound Emission
Idle Operation
Operation
Pre-Fuse Motor Fuse Overload Circuit Breaker
200-240V
110-115V
Max. Permissible Running Time of the Grinder OFF
Dimensions in mm
Weight Hopper Capacity K30 TWIN
200-230V / 50/60Hz
240V / 50Hz
100-115V / 50/60Hz
1420 rpm
1640 rpm
65 dB
85 dB
16 A-slow
5x20 10A slow
4A T
7A T
230V:4secON,6secOFF
115V: 6 sec. ON, 15 sec.
B 368, H 590, T 300
26 kg (57.3 lbs)
2 x 750 g (2 x 1.65 lbs.)
(Please request technical data for other voltages and frequencies from the manufacturer or dealer)
5
HORECA | GASTRO GRI N DER
3. Description
The main components and operating elements are pictured in the
illustration.
Pos. 1 Pos. 2 Pos. 3 Pos. 4 Pos. 5 Pos. 6 Pos. 7 Pos. 8 Pos. 9 Pos. 10 Pos. 11 Pos. 12 Pos. 13 Pos. 14 Pos. 15 Pos. 16 Hopper with lid and finger protection
Lock screw for hopper
Grinding fineness adjustment
Brake for grind adjustment
Grinder cover with lock screw
Display
Pre-selection button „single espresso“
Pre-selection button „double espresso“
„Program“-button
Spout
Portafilter mounting
Portafilter rest
Fastening screw for portafilter rest
Start / Stop switch
Drip tray (with hopper slides underneath)
Main switch (at the back of the grinder)
1
4
5
2
3
6
7
9
8
10
11
14
13
12
16
15
6
HORECA | GASTRO GRI N DER
4. Set-up and Initial Adjustments
You have received your grinder in operating condition. Now you
only need to place it in a safe place and connect it to the main power socket. Proceed as follows:
4.1 Place of Installation
Place the grinder on a level, vibration-free surface.
Never operate the grinder in moist, or even
worse, in wet surroundings!
4.2 Locking in the hoppers
Set the hopper into the bayonet socket. Grab the hopper with both
hands and turn it carefully in clockwise direction, until the bayonet
locks in.
Always loosen the grind adjustment brakes and
turn both adjustments to fine (setting 0) when
locking in the hoppers. Turning the grind adjustment ring repeatedly without loosening the
brake could damage the interlock.
Fasten the lock screw for the hopper (pos. 2) to prevent the hoppers
from unauthorized removal.
4.3 Electrical Installation
Prior to plugging in observe the following safety instructions:
Protect your device with separate pre-fuses (not
included in the scope of delivery) according to
the information provided under point 2 „Technical Data“
Make sure that the pre-fuse is not overloaded
by other devices (e.g. fan heaters, deep freezers,
etc)
Check whether the main voltage and frequency
correspond to the information on the rating
plate underneath the grinder.
Insert the plug into the corresponding grounded outlet.
4.4 Adjustment of the portafilter rests
The grinder is designed so that all different portafilters from various espresso machines fit into the rest for hands-free grinding operation.
4.4.1 Keep the grinder switched off. Slightly loosen the allen screws
(pos. 13) with the included allen screw driver size 3mm and pull
down the portafilter rest (pos. 12).
4.4.2 Push the portafilter of your espresso machine onto the start/
stop switch between the portafilter mounting (pos. 11) and the
rest (pos 12). Now push up the portafilter rest until the portafilter
holds on its own. Now refasten the screws.
7
HORECA | GASTRO GRI N DER
The adjustment is correct when the portafilter independently remains in the mounting.
In case the portafilter rest does not fit your
espresso machine’s portafilter, please contact
your local dealer. He will arrange a different
portafilter rest.
4.5 Adjustment of the cleaning alarm
The software of the K30 TWIN has an integrated cleaning alarm
which is activated at a pre-set amount of shots taken. This alarm
should remind you of cleaning the grinder regularly in order to increase the discs‘ lifetime.
MAHLKÖNIG recommends: The cleaning limit
should be set to the amount of shots that are
ground per week. (For the set-up of the limit
and for resetting the counter after cleaning see
chapter 5.5.9)
Observe the safety instructions under 1.2!
Never exceed the maximum permissible continuous operating cycle of 4 sec ON, 6 sec OFF
(S3 40%). Also do not exceed the maximum allowable continuous grinding time of 20 min. Afterwards, allow the grinder to cool down before
the next operation.
5.2 Operating the grinder
5.2.1 Switch on the grinder at the back of the casing (pos. 16).
5.2.2 Open the hopper and pour whole roasted espresso beans into
the hopper.
Never pour in coffee powder which would result
into immediate blocking of the discs.
5. Operation
Once the grinder is set up and ready to operate a grinding test
should be carried out.
5.1 Instructions for the first grinding steps
Only use the K30 TWIN espresso grinder for
whole roasted coffee beans.
5.2.3 Adjust the grinding fineness by pulling the grind adjustment
interlock (pos. 4) and turning the ring (pos. 3) including the hopper
to the desired position. Note that „0“ is the finest setting and „10“ is
the coarsest. Let go and re-lock the brake to fix the setting.
8
HORECA | GASTRO GRI N DER
5.2.6 Push your espresso machine’s portafilter into the partafilter
mounting (pos. 11/12) so that the grinding process starts.
coarse
The first operation will not result in the desired
amount of espresso because the grinder has
to fill up with ground coffee. The second shot
should give the correct result.
fine
Test runs have proved grind adjustments 1 – 4
to be the most common settings for espresso
depending on the origin, roast and blend. This
5.2.7 Now brew a test portion of espresso using your machine. If
Kurzbedienungsanleitung should
K30 Twinbe taken into account when adjusting
the result is unsatisfactory, alter the adjustment again by varying
Basisfunktionen der Tasten
Twin Espresso Grinder
the grinder for the first time.
the grinding time and grinding fineness until the best coffee results
have been achieved.
PROG.
Auswahl (in Menü-Unterpunkt gehen)
P5
5.2.4 For the first test run the grinding time settings are pre-proin Menü-Unterpunkten weitergehen
P8
grammed for single shots to 2.0 sec and for double shots 4.0 sec.
rechts
rechts
in Menü-Unterpunkten zurückgehen
P9
5.3 Grind time adjustment
To adjust the time of grinding and therefore amount of ground coffee please see the following overview:
Werte
eingeben
/ verringern
( - Taste)
P6
5.2.5 Choose the
single
or double
pre-select-button
according
to
your portafilter.Werte
The LED
shows
which
button
is
selected.
eingeben / erhöhen ( + Taste)
P7
links
links
Single espresso left grinder
Display
Single espresso right grinder
Double espresso left grinder
Double espresso right grinder
9
HORECA | GASTRO GRI N DER
Quick time change:
press +
hold
GRINDER No.1
DOS N° 1 2.000s
Single Shot
Left Side
let go
save
(time blinks)
left
MAHLKOENIG
GRINDER READY
left
0,05 sec.
rechts
5.4 Interruption of grinding (break-function)
If the grinding process is interrupted before the set grinding time has
expired, the LED in the active pre-selection button flashes. The grinding process can be re-started by pushing the portafilter back into the
mounting. The missing quantity is ground. If this is not desired push
the pre-selection button and the entire set grinding quantity or grinding time is available once again.
0,05 sec.
rechts
press+
hold
GRINDER No.1
DOS N° 2 4.000s
Double Shot
Left Side
let go
save
(time blinks)
left
MAHLKOENIG
GRINDER READY
left
0,05 sec.
rechts
0,05 sec.
rechts
press +
hold
GRINDER No.2
DOS N° 1 2.000s
Single Shot
Right Side
let go
save
(time blinks)
right
MAHLKOENIG
GRINDER READY
right
0,05 sec.
rechts
0,05 sec.
rechts
press +
hold
GRINDER No.2
DOS N° 2 4.000s
Double Shot
Right Side
let go
save
(time blinks)
right
MAHLKOENIG
GRINDER READY
right
0,05 sec.
rechts
0,05 sec.
rechts
press
Barista Mode
+
left or right
manual dosing / no timer
(ZEIT blinkt)
10
Quick Manual K30 Twin
Twin Espresso Grinder
5.5 Software Menu
HORECA | GASTRO GRI N DER
Basic Functions of the Buttons
The following overview shows the handling of the K30 TWIN’s software.
PROG.
right
right
left
left
Enter (go into a lower software menu level)
P5
go foreward in menu
P8
go back in menu
P9
decrease values in menu ( - button)
P6
increase values in menu ( + button)
P7
Display
11
Quick Manual K30 TWIN
Twin Espresso Grinder
HORECA | GASTRO GRI N DER
Menu
Main Menu
MAHLKOENIG
GRINDER READY
press
PROG.
1) PROGRAM
DOSE
Sub Menu
press
PROG.
GRINDER N° 1
DOSE N° 1 2.000s
(left grinder - single shot)
press
right
GRINDER N° 1
DOSE N° 2 4.000s
(left grinder - double shot)
press
press
right
GRINDER N° 2
DOSE N° 1 2.000s
(right grinder - single shot)
press
PROG.
right
GRINDER N° 2
DOS N° 2 4.000s
(right grinder - double shot)
press
PROG.
time blinking
press
right
press
PROG.
time blinking
press
PROG.
time blinking
time blinking
press
Sec.
Sec.
left
right
Sec.
PROG.
press
left
Sec.
left
Sec.
left
left
press
press
press
press
PROG.
PROG.
PROG.
PROG.
save
press
Sec.
left
Sec.
left
2) DOSE COUNTER
Sec.
left
GR1: SHOTS1
0000002
(left grinder - 2 single shots)
save
press
right
GR1: SHOTS2
0000120
(left grinder - 120 double shots)
save
press
right
GR2: SHOTS1
0002123
(right grinder - 2123 single shots)
save
press
right
GR2: SHOTS2
0000020
(right grinder - 20 double shots)
press
right
counter volumes represent examples
right
3) ALARM / RECORDS
press
PROG.
press
NO RECORDS
right
or ALARM RECORDS e.g.
press
GRINDER 1
BLOCKED
right
press
GRINDER 1
FAN TOO SLOW
right
12
Quick Manual K30 TWIN
Twin Espresso Grinder
HORECA | GASTRO GRI N DER
Menu
Main Menu
4) LANGUAGE, REL
SW, SERIAL N°
Sub Menu
press
PROG.
press
4-1) LANGUAGE
ENGLISH
press
4-2) SW RELEASE
0.07
right
press
4-3) SERIAL N°
1234
right
right
press
PROG.
LANGUAGE BLINKING
press
CHANGE LANGUAGE
left
right
CHANGE LANGUAGE
left
press
PROG.
SAVE
only service menu
5) RESET
press
PROG.
press
RESET
GRINDER N° 1
press
RESET
GRINDER N° 2
right
press
right
press
RESET
ALARM RECORDS
right
press
RESET
CLEANING COUNTER
right
right
press
press
press
press
PROG.
PROG.
PROG.
PROG.
RESETTING
GRINDER N° 1
set dose counter
of left grinder back to 0
RESETTING
GRINDER N° 2
set dose counter
of right grinder back to 0
RESETTING
ALARM RECORDS
delete all
alarm records
RESETTING
CLEANING COUNTER
set cleaning counter
back to 0
13
Quick Manual K30 TWIN
Twin Espresso Grinder
HORECA | GASTRO GRI N DER
Menu
Main Menu
only service menu
6) SETUP
Sub Menu
press
PROG.
press
6-1) CLEANING AL.
NO
right
press
6-2) CLEANING AL.
1000
press
press
PROG.
press
6-1) CLEANING AL.
NO YES
YES
right
left
right
press
6-3) SERIAL N°
1234
only changable
in factory with super pin
right
PROG.
NUMBER blinking
left
or
NO
left
press
PROG.
left
press
PROG.
SAVE
SAVE
14
Quick Manual K30 TWIN
Twin Espresso Grinder
Menu
HORECA | GASTRO GRI N DER
Main Menu
only service menu
Sub Menu
press
7) TEST
PROG.
press
7-1) INPUT, DIP
SWITCH, FAN
press
7-2) TRIAK, RELAY
CURRNET
right
right
SIC:
SW1:
SW2:
MC1:
ON:
press
PROG.
PROG.
PROG.
Lid safety switch
switch left grinder
switch right grinder
230V / 115V
Contact closed
for P5
(checking the function of the
buttons with numbers)
for P6
left
left
for P7
left
press
left
activates / deactivates
the relayof the grinder
FAN 1
Frequency of F1
FAN 2
Frequency of F2
for P9
right
for grinder 1
press
right
for P8
press
right
LED
press
right
for grinder 2
right
right
(testing all LED’s)
press
or
LCD
(testing all display dots)
LCD
press
press
right
F1 (HZ) F2 (HZ)
ON 120 OFF 0
PROG.
press
press
activates / deactivates
the triak of the grinder
right
press
KEYB=
RL=ON
press
press
F1:
(HZ):
F2:
(HZ):
right
press
GR1=OFF
I = 4.89A
press
7-4) DISPLAY
right
press
SIC SW1 SW2 MC1
OFF OFF OFF OFF
press
press
7-3) BUTTONS
END
right
right
BUZZ
(testing the alarm)
press
right
press
7-5) POWER
SUPPLY
press
PROG.
press
7-6) RS232
INTERFACE
right
press
right
PROG.
V-SUPPLY = 27.3V
testing the RS 232
Interface
right
right
15
Quick Manual K30 TWIN
Twin Espresso Grinder
HORECA | GASTRO GRI N DER
Menu
Main Menu
only service menu
8) CHANGE
PASSWORD
Sub Menu
press
PROG.
press
PASSWORD
XXXXXX
right
the first X blinking
left
press
left
press
right
right
for next number
and
for saving in the end
SAVE
9) CLEANING COUNT.
RESET
press
PROG.
press
9-1) CLEANING AT
1000
press
9-2) RESET
right
right
press
press
PROG.
PROG.
NUMBER blinking
RESETTING
CLEANING COUNTER
press
left
right
left
press
PROG.
MAHLKOENIG
GRINDER READY
END MENU
SAVE
16
HORECA | GASTRO GRI N DER
Pressing the PROG-button once enters the user
menu (menu chapters 1-4 and 9).
Pressing the PROG-button for appr. 5 seconds
and typing in the password enters the service
menu (menu chapters 1-8).
Password:
Until serial number 18571: „666 666“ (software version V0.12)
From serial number 18572: „000 000“ (software version V0.13)
5.6 Describtion of the software chapters
5.6.1 Program Dose
Adjust and change the grinding time for single and double dosing
for both grinders.
GRINDER N°1 = left grinder
GRINDER N°2 = right grinder
DOS N°1 = single espresso
DOS N°2 = double espresso
The time can be set in 0.005 sec steps. A change of 0.1 seconds adds
or takes away approximately 0.5 gram of coffee. (This reference value can vary for different coffees and roasting degrees.)
Press and hold the PROG-button after changing the time to quickexit the menu. The display will show „MAHLKOENIG GRINDER
READY“.
5.6.3 Alarm Records
Alarms are saved in the order of appearance (the last one to appear
first in line). 20 alarms can be saved, the 21st overwrites the oldest.
For a detailed describtion of all alarms with causes and remedies
please see chapter 8.3.
5.6.4 Language, Software Release, Serial Number
Change the language of the menu (Italian, English, French, German,
Spanish). Read the software release number and serial number of
the grinder.
5.6.5 Reset (only in the service menu)
All counters and alarm records can be set back to Zero or deleated
respectively.
5.6.6 Setup (only in the service menu)
Set up the cleaning alarm:
• Switch ON or OFF the cleaning alarm.
• Set the Cleaning Alarm Limit, which is the max. allowable limit
that can be set in menu point 9.
5.6.7 Test (only in the service menu)
Check the functionality of the different electrical components and
functions in the grinder. This menu point should help service partners to locate potential malfunctions.
5.6.8 Change Passwort (only in the service menu)
Change the passwort to your individual 6-digit number. (see chapter 5.4)
5.6.2 Dose Counter
Read the counters for single and double shots for both grinders.
17
HORECA | GASTRO GRI N DER
5.6.9 Cleaning Counter Reset
Set the cleaning counter to the appropriate amount of shots so
that the alarm reminds the user to clean the discs on a regular basis. (see chapter 4.5)
Set the counter back to Zero after cleaning the grinder.
6. Cleaning
We recommend cleaning your espresso grinder regularly. Only use
food-safe cleaning detergents.
Always pull the main plug from the socket before carrying out maintenance or cleaning work
on the grinder.
Observe the safety instructions under 1.2.
Do not let any foreign object fall into the grinding mechanism.
6.1 Cleaning with GRINDZTM Grinder Cleaner
We recommend cleaning your espresso grinder once a week with
our GRINDZ™ Grinder Cleaner.
MAHLKÖNIG recommends: The cleaning limit
should be set to the amount of shots that are
ground per week. (For the set-up of the limit
and for resetting the counter after cleaning see
chapter 5.5.9)
Remove all beans from the hopper or take the hopper slides from
under the drip tray and push them into the slots in the bayonet
adapter. Remove the lock screw. Now you can take off the hopper.
When taking off the hopper ALWAYS release the
grind adjustment brakes and turn both rings to
coarse. This will block the adjustment. Turning
the grind adjustment ring repeatedly without
loosening the brake could damage the interlock.
Grab the hopper with both hands and turn it anti-clockwise until
it is released by the bayonet. Empty the input chute of all espresso
beans and vacuum out the disc casing.
Also empty the hopper and relock it onto the grinder. Take off the
hopper slide.
When engaging the hopper into the bayonet
ALWAYS release the grind adjustment brakes
and turn both rings to fine. This will block the
adjustment. Turning the grind adjustment ring
repeatedly without loosening the brake could
damage the interlock.
Drop the recommended dose of GRINDZ (35 - 40g) into the empty
grinder hopper. You can also use the cap of the jar for dosing. A full
cap will yield between 35 - 40 grams.
Turn the fineness adjustment to coarse and operate as if grinding
coffee beans.
Once complete, we recommend passing twice as much coffee
through to purge any residue.
18
HORECA | GASTRO GRI N DER
Set the cleaning counter back to Zero, if the
grinder was cleaned due to the cleaning alarm.
(see chapter 5.5.9)
6.2 Cleaning the Drip Tray and the Hoppers
The hoppers, their lids and the drip tray (without hopper slides) can
be cleaned in a dishwasher or in a bath of water with dish detergent.
Depending on the dish washing detergent the
transparent plastic parts of the hopper can
slightly fade out.
6.3 Cleaning the Grinder Placement Surface
6.3.1 Pull out the main plug.
6.3.2 Take off the drip tray.
6.3.3 Tilt the grinder to one side and clean the area on which it
stands and the bottom of its base. Both surfaces must be dry and
free of oil and grease.
6.3.4 Reposition the grinder and re-insert the drip tray.
6.4 Cleaning the Grinder Casing
Clean the outside of the casing from time to time using a damp
cloth.
Be carefull of sharp edges when cleaning. There
is a risk of injury.
7. Maintenance and Repair
Any required repairs may only be conducted by
authorized specialist personnel. For this reason,
please contact a customer service repair facility,
your dealer or us directly as the manufacturer.
Always pull the main plug from the socket before carrying out maintenance or cleaning
work on the device!
Inspect the grinder regularly for damage, particularly to the electrical cable, plug,
etc.
7.1 Grinding fineness adjustment with the grinder switched ON
Depending on the wear and tear of the grinding discs or after opening the interior grinder the setting of the finest grind adjustment
has to be checked. Proceed as follows:
7.1.1 Set the grinding fineness adjustment to „0“.
7.1.2 Close and remove the hopper.
7.1.3 Remove the remaining beans from the filler shaft and vacuum
out the grinder casing.
7.1.4 Remove the sealing ring from the filler shaft.
7.1.5 Loosen – do not unscrew – the adjusting screws with the allen
key size 2.5mm.
19
HORECA | GASTRO GRI N DER
7.1.6 Insert the adjusting handle (service tool) into the filler shaft.
The adjusting handle must engage in the slot into filler shaft’s
transverse bar.
7.1.14 Only remove the portafilter once the grinding process has
been completed. Repeat approximately twice in order to fill the
grinder casing with the re-adjusted ground coffee.
7.1.7 Hold the adjusting handle firmly and push the portafilter into
the portafilter mounting until the grinder switches on.
7.2 Taking off the grinder cover
Grind or take out all coffee bean residues. Switch off the grinder
and pull the main plug. Turn both grind adjustment rings to coarse
and fix the brakes. Loosen the lock screw in the front with the allen
screw driver size 2mm. Carefully lift the grinder cover upwards.
7.1.8 Whilst the grinder is running, turn the adjusting handle clockwise until a slight ringing sound becomes audible. Now turn the
adjusting handle slightly anti-clockwise until no further ringing
sound can be heard.
It is important to ensure that no grinding disk
„rattling“ can be heard at the finest setting!
Otherwise the service life of the discs will be
significantly reduced.
7.1.9 Tighten the adjusting screws and remove the adjusting handle from the filler shaft.
7.1.10 Insert the sealing ring again. If the sealing ring is damaged it
must be replaced.
7.3 Basic Adjustment of The Interior Grinders
The basic adjustment to a moderately fine setting has been carried
out in the factory using espresso beans. The following markings
have been made on the grinding mechanism (interior):
Red mark 1: Basic adjustment 0, finest setting and minimum grinding disc spacing
Red mark 2: Basic factory setting and also the position for installing and removing the lid, in order to achieve the finest setting after
positioning the lid.
7.1.11 Replace the hopper and allow it to engage in the bayonet
and replace the lock screw. Open the hopper slide.
7.1.12 Reset the desired grinding fineness.
Red mark 1
Red mark 2
7.1.13 Push your espresso machine’s portafilter into the portafilter
mounting (pos. 11/12) until the grinding process is switched on.
20
HORECA | GASTRO GRI N DER
Never rotate the grinding discs clockwise further then the red mark 1, as the grinding discs
may otherwise be damaged.
7.4 Cleaning of the Grinding Mechanism
After opening the grinder cover the grinding mechanism with the
discs can be vacuumed. Check for foreign objects in the grinding
gear.
Do not change any grinder settings. The discs
could be damaged when re-assembling the
grinder.
Carefully vacuum the grinder casing. Take care not to damage any
cables.
7.5 Grinding Disc Exchange
Grinding disc replacement should only be carried out by authorised specialists or a customer service centre. The „Repair manual
K30 TWIN grinding disc replacement and basic adjustment“ can be
downloaded for replacing grinding discs.
Grinding disc replacement may also be carried out using a replacement (AT) integrated grinder. To do this, order an AT integrated
grinder. On receipt of the AT integrated grinder, remove your integrated grinder from the K 30 TWIN according to chapter 7.6 and
install the AT integrated grinder into the K 30 TWIN. Return your old
integrated grinder in the packaging.
7.6 Removal of The Integrated Grinder
For safety reasons the interior grinders are fixed to the casing’s
ground plate.
7.6.1 Disconnect the main plug. Close and remove the hoppers.
Place the grinder on its back and unscrew the hex nuts of the motors (three each). Store the nuts and washers in a safe place. Reposition the grinder on its rubber feet
7.6.2 Take off the grinder cover (see chapter 7.2)
7.6.3 Release the motors‘ plug-in connectors. Carefully pull the integrated grinder out of the casing.
Do not change any grinder settings. The discs
could be damaged when re-assembling the
grinder.
8. Trouble Shooting For Operating Faults
8.1 Safety Devices of the Grinder
Thermal overload circuit breaker
The motor of the grinder is protected by a thermal overload circuit
breaker which interrupts the motor‘s electric circuit in the event of
electric overload. The display shows an alarm signal. Pressing the
PROG-button or the right single shot button releases the grinder
back to operation mode.
21
HORECA | GASTRO GRI N DER
The user has no influence whatsoever on this
circuit breaker. If the circuit breaker trips repeatedly an authorised service partner must be consulted as the motor‘s winding may be damaged.
Motor protector
A thermo switch is built into the motor’s winding to block the motor in case of overheating. The display shows an alarm signal. Let
the motor cool down for approx. 30 minutes. The switch will connect automatically when the winding is functional again.
Magnetic switch in the grinder’s lid
The lid of the grinder is secured with a magnetical switch. The
grinder only operates with the lid closed. In case the grinder cover
is opened with the main switch ON there will be an alarm signal in
the display (chapter 8.3). Only closing the cover and pressing the
PROG-button will clear the alarm.
8.2 Operating Fault
Defect
Cause
The grinder hums The spout is
but does not
clogged.
grind.
Remedy
Set grinding fineness to
„coarse“ and trigger the
grinding process. The grinder will then grind itself free.
Afterwards, return the setting to the desired grinding
fineness.
Grinding is set too Turn the grinding finefine.
ness setting to the right,
to „coarse“, and trigger the
grinding process. The grinder will then grind itself free.
Afterwards, return the setting to the desired grinding
fineness.
A foreign object
is in the grinding
mechanism.
Clean the grinding mechanism as described and remove the foreign object.
Observe the safety instructions!
The grinder does The grinding time Reset the grinding time.
not grind, the dis- is set to 0.
play is lit, single
cup is pre-selected.
22
HORECA | GASTRO GRI N DER
Defect
Cause
The grinder does
not start, the
display is not lit.
The main plug is Insert the main plug into
not inserted.
the socket.
Remedy
The pre-fuse has Check the pre-fuse. Restore
tripped.
the pre-fuse to its initial
state or replace it. Determine whether other devices are connected to this
fuse.
In the case of other malfunctions or continued faults, please
contact your dealer or your authorised customer service centre.
8.3 Alarm Signals Showing in The Display
Several sensors have been built into the grinder in order to control
operation and to protect the motor and the grinding gear. The following alarm signals can show in the display:
Alarm Record
Cause
LOSS DATA
• Saved data was • Press PROG-button. Grinders are not blocked.
lost.
GRINDER X
BLOCKED
• Current
consumption
higher than
limit.
• Motor blocked.
• Foreign object/
beans blocking
the grinder.
• Jammed spout.
• Exploring coil
on power board
malfunctioning.
Correction
User:
• Press PROG-button. The
other grinder can be used
again.
• Turn grind adjustment of
blocked grinder to coarse.
Switch off and back on
the grinder, start grinding, the grinder grinds
itself free. Reset the grind
adjustment to the desired
espresso setting.
• Clean the spout. Take off
the cover and check the
interior grinder’s spout
(position of flat spring).
• Interchange the grinders‘
plugs at the power board
to determine the cause of
the malfunction. (grinder
or board)
• Check current consumption in service-menu point
7. (desired value at idle
operation: I < 3,5A
23
HORECA | GASTRO GRI N DER
Alarm Record
TRIAC GRINDER X OUT OF
WORK
GRINDER X
FAN BLOCKED
Cause
• Triac not
interconnected
(optical coupler
defective).
• Grinder’s plug
not connected.
• Fuse defective.
• Triac defective.
• Capacitor
defective.
• Temperature
sensor in the
motor winding
defective (0A)
• Circuit board
failure.
Correction
Alarm Record
Service technician:
• Test exploring coil on
power board. If applicable
change power board.
GRINDER X
• Fan runs
FAN TOO SLOW
with reduced
frequency for
more than
three seconds.
• Foreign object
is blocking the
fan.
User:
• Press PROG-button. The
other grinder can be used
again.
• Check grinder’s plug for
correct position.
• Check capacitors‘ connections and correct position.
• Interchange the grinders‘
plugs at the power board
to determine the cause of
the malfunction. (grinder
or board)
Service technician:
• Interchange capacitors
and test
• Check optical coupler (disassemble power board)
• Check triac (disassemble
power board)
• Foreign object • Check fan for foreign
is blocking the
objects.
fan.
• Interchange the fans‘
• Plug at procesplugs at the processor
sor board not
board to determine the
connected.
cause of the malfunction.
• Fan defective.
(fan or socket)
• Exchange fan.
CLEAN GRINDER X
Cause
Correction
• Check fan for foreign
objects.
• Interchange the fans‘
plugs at the processor
board to determine the
cause of the malfunction.
(fan or socket)
• Exchange fan.
• Cleaning coun- • Press PROG-button. Grindter has reached
ers are not blocked.
the pre-set
• Clean the grinder (with
alarm limit.
GRINDZ or unscrew,
• Counter was
vakuum, brush)
not reset after • Reset cleaning counter in
last cleaning
software user menu (chapprocess.
ter 9) or
• Set cleaning limit higher
in software service menu
(chapter 6) or
• Switch off the cleaning
alarm in software service
menu (chapter 6).
• Recommendation: adjust
the cleaning alarm to the
weekly amount of shots
taken for a regular reminder to clean the grinder.
24
HORECA | GASTRO GRI N DER
Alarm Record
Cause
Correction
COVER OPEN
• Magnet switch
open.
• Grinder’s cover
open.
• Switch’s plug
not connected
at the processor board.
• Strand of
switch defective.
• Magnet switch
defective.
• Contact magnet in cover
missing.
• After closing the magnet
switch press PROG-button.
Grinders are not blocked.
• Check the plug/socket
of the switch for correct
position.
• Bridge the contact in order
to rule out defective processor board.
• Test new magnet switch
• Glue in a new contact
magnet into the cover.
LOW VOLTAGE
9. Spare Parts
Spare parts are usually ordered from your customer service centre
or your local dealer. To ensure quick and correct processing of your
order, the following information is absolutely essential:
1.
Type designation, serial number and voltage of the grinder (on
the rating plate underneath the grinder).
2.
An exact description of the part to be replaced or the article
number.
• Main power
• Switch off and on the
board runs at
grinder.
35% under nor- • Check mains voltage.
mal operation.
Check junction box.
• Power consumption at
outlet too high.
• Mains voltage
too low.
25
HORECA | GASTRO GRI N DER
10. Wiring Diagram 100-120V / 50/60Hz
26
HORECA | GASTRO GRI N DER
10. Wiring Diagram 200-230V / 50/60Hz
27
HORECA | GASTRO GRI N DER
10. Wiring Diagram 240V 50Hz
28
HORECA | GASTRO GRI N DER
12. Warranty Conditions
11. Certificate
1. The warranty period is 1 year from the date of purchase.
EC Declaration of Conformity
The manufacturer:
2. The warranty covers all damages that can be attributed to inferior materials or defective workmanship. Corresponding grinders
will be repaired or replaced free-of-charge, with the exception
of transport or freight charges. Transport is the responsibility of
the customer. Therefore, avoid damages with all returns by correct packing.
MAHLKÖNIG GmbH & Co. KG
Tilsiter Straße 142
D - 22047 Hamburg
Tel.: +49 (0) 40 69 69 40 - 0
Fax: +49 (0) 40 69 39 72 - 1
hereby declares that the below mentioned product:
product type:
device for food processing
machine description:
Coffee grinder
machine typ:
K30 Twin
3. The grinder may only be opened for cleaning purposes in accordance with the Operating Instructions.
is in compliance with the following directives and regulations:
•
•
•
•
•
The provisions of the Machinery Directive
The Low Voltage Directive
The EC Electromagnetic Compatibility Directive
The Directive on the restriction of use of certain
hazardous substances in electrical and electronic equipment
The EU chemicals regulation (REACH – Regulation)
2006/42/EG
73/23/EWG
2004/108/EG
2011/65/EU
(EG) Nr. 1907/2006
Supplements in Europe:
Regulation 1935/2004
Requirements for materials and
the objects with Food comes into
contact
Documentation Agent:
Sven Erdmann
Address of the proxy documentation:
See the address of the manufacturer
Done in Hamburg on:
01.08.2013
Function of subscriber:
General Manager
Name of signatory:
Philipp Baumberger
Signature
MAHLKÖNIG GmbH & Co. KG, Amtsgericht Hamburg HR A 85 074; Persönlich haftende Gesellschafterin:
Beteiligungsgesellschaft MAHLKÖNIG mbH, Eingetragen Amtsgericht Hamburg HR B 45 324,
Geschäftsführer: Nils Erichsen, Philipp Baumberger, Jochen Christoph
Dresdner Bank AG (BLZ 200 800 00) Kto. 383 780 400, Postbank Hamburg (BLZ 200 100 20) Kto. 253 89-203,
Commerzbank AG (BLZ 200 400 00) Kto. 21 10 294, Ust. Id. Nr.: DE 118 37 22 65
4. This warranty does not cover damages which have occurred
through: Improper usage, improper maintenance, lack of servicing, usage for purposes other than those intended, incorrect
installation, incorrect voltage, breakage, natural wear or for reasons beyond our sphere of influence.
5. In order to maintain the warranty, only original spare parts and
accessory parts may be used.
6. Observe in addition our General Delivery Conditions in their respective current version.
7. The manufacturer is in no way liable for consecutive or secondary damages.
8. The warranty does not cover costs resulting from repairs conducted by non-authorized personnel.
29
HORECA | GASTRO GRI N DER
NOTES
HORECA | GASTRO GRI N DER
NOTES
HORECA | GASTRO GRI N DER
MAHLKÖNIG GmbH & Co. KG
Tilsiter Straße 142
D- 22047 Hamburg, Germany
Tel.: 040 / 69 69 40-0
Fax: 040 / 69 39 721
[email protected] ; www.mahlkoenig.de
June 2013
Subject to change without prior notice!!
The professional art of grinding
since 1924