1
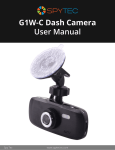
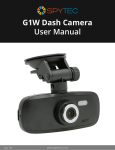
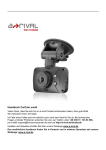
User Manual Product description: 1)UP button 2)MENU 3)DOWN button 4)USB interface 5)Camera 6)Speaker 7)OK button 8)MODE 9)Power button 10)Display screen 11)TF slot 12)Night Vision light 13)Bracket hole 14)Reset hole 15)MIC Button and interface function description: 1)UP button Short press on this button in standby and recording status can zoom in digital. Choose up function in MENU item. 2)MENU button Shortly press on this button to show the settings menu. 3)DOWN button Short press on this button in standby and recording status can zoom out digital. Choose down function in MENU item 4)USB data interface Connect to PC with data cable for Data transfer Connect to external power to charge battery or provide working power. 5)Camera 120°wide-angle Lens; 6)Speaker Video playback, voice monitor, operating sound warning 7)OK button Confirmation button for video recording and taking photo; In recording mode, press this mode to start video recording, re-press to stop; In photo mode, short press to take a photo. In menu mode it means confirmation button. 8)MODE Short press on this button to shift among “photo mode, REC mode or playback mode” 9)POWER ON/OFF Power switch: continuous press for power on/off, shortly press for night vision light on/off. 10)Screen View window 11)TF slot Slot for memory card 12)LED flash light The night vision light can be turned on by pressing the "POWER" button. 13)Mounting Install the device at vehicle front window with the adapter 14)Slot for Reset Use this to restart when crash 15)MIC Special function description Support recording start and shutdown synchronization with auto and save the video files after connect to the car power supply G-sensor function When gravitational acceleration reach 6g(1g=9.80m/s), the video will be saved in the form of EVE File automatically. This file won’t be deleted Seamless loop recording, don’t leak second SOS file When recording short press "M" to enforce saving the current video, when cycle recording, the file won’t be deleted REC/photo operation features Power on/off Long press on “power on/off” button to start, the Indicator light will shine when power is on Then long press again on “power on/off” button to shut down and the indicator light will go out Notice: video device will automatically power off after warning of low battery REC mode Short press on “M” button shift to REC mode, REC icon is on the top left corner Short press on “OK” mode to start recording, flashing red dot on REC icon indicate the recording is on the way Photo mode Short press on “M” button shift to photo mode, a photo icon is on the top left corner Then short press on “OK” button to take a photo, screen flash one time means photo completed USB mode Connecting USB to PC, press on DVR, on the USB menu there are two modes to choose 1: USB-Disk Mode Choose this mode you can save file of video or photo. 2: PC-Camera Mode Choose this mode DVR will be used as an USB Web Cam for real time video chat or photo taking. Video/photo playback and delete 1. Power on the DVR and press record button to stop recording. 2. Short press ON/OFF button twice to enter playing model. 3. Press button or button to choose the recorded file to play back or review. 4. If want to delete the file, press menu button after stop playing files, then enter the delete mode. 5. Press button or button to choose the “delete” or “format”. 6. Press menu button and it will close the operation. REC operation options Resolution Use this option to set the video mode, the greater detail of the image contains, the greater storage space required. DVR recording resolution supports the following six modes 1080FHD 1920 x 1080 1080P 1440 x 1080 720P 1280 x 720 WVGA 848 x 480 VGA 640 x 480 QVGA 320 x 240 In the recording function menu, press button to select ' Resolution ' option and press the OK button to enter the sub-menu, press the button to select camera resolution, press the OK button to confirm and return to menu. Loop Recording If the memory card is full recording of the earliest file will be deleted. loop recording feature will automatically put the current time from the oldest part of the image file deleted to get some space, through this way to make the recording continues. In the recording function menu, press button to select the ' loop recording ' option and press the OK button to enter the sub-menu, press button to select Off / 1 Minute / 3 Minutes / 5 Minutes, then press the OK button to confirm and return to menu. EV EV values can be adjusted according to different light conditions, you can maximize the screen brightness. In the recording function menu, press button to select ' EV ' option and press the OK button to enter the sub-menu, press button to select +2.0 / +5 / 3 / +4 / 3 / +1.0 / +2 / 3 / +1 / 3 / +0.0 / -1 / 3 / -2 / 3 / -1.0 / -4 / 3 / -5 / 3 / -2.0, then press the OK button to confirm and return to menu. Motion Detection When turned on motion detection function, the sensor will sense change of an object, the DVR will automatically start recording when object moving, recording process, if there is moving object, DVR will stop recording after 5 seconds. In the recording function menu, press button to select the ' Motion Detection ' option and press the OK button to enter the sub-menu, press button to select On / Off, press the OK button to confirm and return to menu. Audio The video recording could be set up with sound or without sound. In the recording function menu, press button to select ' Audio ' option and press the OK button to enter the sub-menu, press button to select On / Off, press the OK button to confirm and return to menu. Date Stamp Turn on this function, time label will appear in a video side. In the recording function menu, press button to select ' Date Stamp ' option and press the OK button to enter the sub-menu, press button to select On / Off, press the OK button to confirm and return to menu. G-sensor When the gravity acceleration reaches (1g = 9.80 m / s ^ 2), DVR will automatically save the video of the accident, they were protected file will not be deleted. In the recording function menu, press button to select the ' G-sensor ' option and press the OK button to enter the sub-menu, press button to select 2G / 4G / 8G / Off, press the OK button to confirm and return to menu. Button Sound In the recording function menu, press button to select ' Button Sound ' option and press the OK button to enter the sub-menu, press button to select On / Off, press the OK button to confirm and return to menu. Camera operation options Timer In the camera options function menu, press button to select the ' Timer ' option, press the OK button to enter the sub-menu, press button to select Single / 2S Timer / 5S Timer / 10S Timer, press the OK button to confirm and return to menu. Resolution Use this option to set the size of the shooting image, the greater detail of the image contains, the greater storage space required. Camera supports the following resolutions 12M 4032 x 3024 10M 3648 x 2736 8M 3264 x 2448 5M 2592 x 1944 3M 2048 x 1536 2MHD 1920 x 1080 VGA 640 x 480 1.3M 1280 x 960 In the camera options function menu, press button to select the ' Resolution ' option and press the OK button to enter the sub-menu, press button to select the desired resolution, then press the OK button to confirm and return to menu. Sequence Open this function to support continuous shooting five images. In the camera options function menu, press button to select ' Sequence ' option, press the OK button to enter the sub-menu, press button s to select On / Off, press the OK button to confirm and return to menu. Quality In the camera options function menu, press button to select ' Quality ' option and press the OK button to enter the sub-menu, press button to select Fine/ Normal / Economy, then press the OK button to confirm and return to menu. Sharpness Use this option to adjust the different image effects and sharpness. In the camera options function menu, press button to select the ' Sharpness ' option, press the OK button to enter the sub-menu, press the button to select Strong / Normal / Soft, press the OK button to confirm and return to menu. White Balance Based on the current lighting conditions, use this option to adjust the hue. Use this option to correct color difference under different lighting conditions. When the white balance is set to Auto, DVR will automatically compensate for different lighting conditions In the camera options function menu, press button to select the ' White Balance ' option, press the OK button to enter the sub-menu, press the button to select Auto / Daylight / Cloudy / Tungsten / Fluorescent, press OK button to confirm and return to menu. Color You can choose to shoot standard and bright colors of image effects, Special effects like retro shades of black and white images are optional. In the camera options function menu, press button to select the ' Color ' option, press the OK button to enter the sub-menu, press button to select the color / B&W / Sepia, then press the OK button to confirm and return to menu. EV EV values can be adjusted according to different light conditions, you can maximize the screen brightness. In the recording function menu, press button to select ' EV ' option and press the OK button to enter the sub-menu, press button to select +2.0 / +5 / 3 / +4 / 3 / +1.0 / +2 / 3 / +1 / 3 / +0.0 / -1 / 3 / -2 / 3 / -1.0 / -4 / 3 / -5 / 3 / -2.0, then press the OK button to confirm and return to menu. ISO According to different light conditions and select the corresponding ISO value. In the camera options menu, press button to select ' ISO ' option and press the OK button to enter the sub-menu, press button to select Auto / 100 / 200 / 400, then press the OK button to confirm and return to menu. Anti-Shaking In the camera options menu, press button to select the ' Anti-Shaking ' option and press the OK button to enter the sub-menu, press button to select On / Off, press the OK button to confirm and return to menu. Quick Review In the camera options menu, press button to select the ' Quick Review ' option and press the OK button to enter the sub-menu, press button to select 2 Seconds / 5 Seconds, press the OK button to confirm and return to menu. Date Stamp Turn on this function, time label will appear in a video side. In the recording function menu, press button to select ' Date Stamp ' option and press the OK button to enter the sub-menu, press button to select On / Off / Set Date/Time, then press the OK button to confirm and return to menu. REC/photo operation settings Set Date/Time Select Settings menu to enter the time, date settings, you can switch between the year / month / day / time back and forth In setting function menu, press button to select ' Set Date/Time ' option and press the OK button to enter the sub-menu, press button to adjust the year / month / day /, then press the OK button to confirm and return to menu. Auto Power Off In setting function menu, press button to select ' Auto Power Off ' option and press the OK button to enter the sub-menu, press button to select Off / 2 Minutes / 5 Minutes / 10 Minutes, then press the OK button to confirm and return . Language In setting function menu, press button to select ' Language ' option and press the OK button to enter the sub-menu, press button to select English / French / Spanish / Portuguese / German / Italian / Simplified Chinese / Traditional Chinese / Russian / Japanese / Polish. press the OK button to confirm and return to menu. Light Frequency Set the appropriate current Light frequency. In setting function menu, press button to select the ' Light Frequency ' option and press the OK button to enter the sub-menu, press button to select 50Hz / 60Hz, press the OK button to confirm and return to menu. Screen Saver In setting function menu, press button to select ' Screen Saver ' option and press the OK button to enter the sub-menu, press button to select 1 Minute / 3 Minutes / 5 Minutes / Off, then press the OK button to confirm and return to menu. Light Set Infrared night vision lights up at night to support the role of light, effectively within 0.5 m In setting function menu, press button to select ' Light Set ' option and press the OK button to enter the sub-menu, press button to select On / Off, then press the OK button to confirm and return to menu. Image Rotate When need to flip the screen, in the setting function menu, press button to select ' Image Rotate ' option, press the OK button to enter the sub-menu, press the button to select On / Off, then press the OK button to confirm and return to menu. Note: just flip the screen, DO NOT support Flip of recording video Format Formatting will erase all data. In setting function menu, press button to select ' Format ' option and press the OK button to enter the sub-menu, press button to select Cancel / Confirm, and then press the OK button to confirm and return to menu. Default Setting Use this function to reset all settings back to the default values. In setting function menu, press button to select the ' Default Setting ' option and press the OK button to enter the sub-menu, press button to select Cancel / Confirm, and then press the OK button to confirm and return to menu. Firmware Version In setting function menu, press button to select the ' Firmware Version ' option and press the OK button to enter the sub-menu and view the current software version number of DVR. Press the OK button to return to menu. Battery instruction Battery indicator for charging status Batterieanzeige für den Ladestatus Full battery slightly low battery low battery battery empty Charging The red indicator light up when charging, the entire charging time is about 180 minutes, and the red indicator light automatically off when charging completed. A. Working by the built-in Li-ion battery Charging way: (1) Charging by the car charger (2) Charging by connecting to computer by USB cable B. Working by the USB car charger When the car powers on, the DVR will start recording automatically; 10 minutes after the car powers off, the DVR will save the files and power off. Notice: Video instrument can only use 5V car power supply, or it may cause device damage. This products Car power can only be used in 12V/14V When working by car charger, we have to close the DVR by long pressing the ON/OFF button or cutting of the power of the device. Remark: when appear crash because of improper operation, you can remove battery or press “reset” button to restart. Products specifications Features HD camera, HD video recording LCD screen size 1.5LTPS Camera 120 A + grade high-resolution ultra wide - angle lens Russian, Japanese、French, Italian, German, Spanish, English, Language Chinese (simplified) and Chinese (Traditional), Korean, etc… Files formats AVI Recording video format M-JPEG Color Standard Continuous loop video seamless loop recording, don’t leak second Automatically power Support auto ignition boot, turn off shutdown on/off Motion Detection Support Function Time synchronization Support (Y/M/D/H/M/S) Carrier media Built-in memory ( total: 64 MB) Photo mode 5 million Photo format JPEG Memory card micro SD (max 32GB) MIC Support stereo Built-in Support Infrared night vision Support Video output AV-OUT / HDMI Video format PAL / NTSC Current frequency 50HZ/60HZ 1:USB-Disk USB function 2:PC-Camera Power interface 5V 800mA Battery 300mAh Built-in Trouble shooting: For problems in normal operating situation, please try these methods below: Can’t take photo and recording Check if the micro SD card has enough space or is locked? Automatically stop when recording Use the compatible high-speed micro SD card with SDHC because of big HD video data, the high-speed micro SD card have identifying of C4 and C6 Appear “files error” when replay photo or video Uncompleted files because of TF card storage error, please use formatting function to format your TF card Unclear video Checks if there are any dirt or fingerprint; and use lens paper to clear the camera Lance. Black image when recording sky or water scene Scenes with big contrast will influence the automatic exposure function of camera; you can adjust “EV” in setting mode to correct. Color is not perfect in cloudy day and outdoor light Set the “Light set” function to automatic cross stripe interference in image Because of wrong “light frequency”, please set it to 50Hz or 60Hz according to the local power supply frequency Crash Restart by pressing shortly on” RESET” button after crash