1
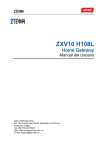
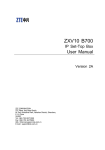
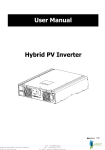
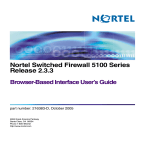
ZXV10 H108L Home Gateway
User Manual
Version 1.0
NO.55, Hi-Tech Road South,Shenzhen, P.R.China
Postcode:518057
Technical Support Website: http://support.zte.com.cn
Customer Support Center:
E-mail: [email protected]
LEGAL INFORMATION
Copyright © 2010 ZTE CORPORATION.
The contents of this document are protected by copyright laws and international treaties. Any reproduction or distribution of this document or any portion of this document, in any form by any means,
without the prior written consent of ZTE CORPORATION is prohibited. Additionally, the contents of
this document are protected by contractual confidentiality obligations.
All company, brand and product names are trade or service marks, or registered trade or service
marks, of ZTE CORPORATION or of their respective owners.
This document is provided “as is”, and all express, implied, or statutory warranties, representations
or conditions are disclaimed, including without limitation any implied warranty of merchantability,
fitness for a particular purpose, title or non-infringement. ZTE CORPORATION and its licensors shall
not be liable for damages resulting from the use of or reliance on the information contained herein.
ZTE CORPORATION or its licensors may have current or pending intellectual property rights or applications covering the subject matter of this document. Except as expressly provided in any written
license between ZTE CORPORATION and its licensee, the user of this document shall not acquire any
license to the subject matter herein.
ZTE CORPORATION reserves the right to upgrade or make technical change to this product without
further notice.
Users may visit ZTE technical support website http://ensupport.zte.com.cn to inquire related information.
The ultimate right to interpret this product resides in ZTE CORPORATION.
Revision History
Revision No.
Revision Date
Revision Reason
R1.1
20100325
Abridged version
R1.0
20100118
First Edition
Serial No. SJ-20100115161948-001
Publishing Date: 20100325
1
1
Safety Instructions
During Installation and Application
l
Use the power adapter delivered with the product. Other power adapter may make the
device unable to work normally or even damage the device.
l
Check load capacity of power socket and power cable. Overloading of power socket or
broken power cable may cause an electric shock or fire. It is recommended to check cables
periodically and replace the broken one immediately.
l
Appropriate space for heat dissipation is required to prevent the product from overheating.
l
Keep the product away from heat sources. Do not expose the device to high temperature
environment and direct sunlight.
l
Keep the product away from moisture or vapor. Do not splash any fluid on the product.
l
Do not place the product on any unstable surface.
l
Switch OFF and unplug this product carefully when it is not in use or before cleaning. Pay
attention to the high temperature on the surface of the transformer.
l
Delay between switching OFF and switching ON should be more than 3 seconds.
l
Do not block the heat dissipation opening of the product.
l
When the product is not used for a long period of time, unplug the power cord.
l
Watch out the children especially when they are using the device without any custody.
l
If any abnormal phenomenon appear on this product (such as smoke, weird sound and/or
smell), unplug the power adapter.
l
Do not use the device in the thunderstorm.
For Service
Do not attempt to disassemble, repair, or open this product, which will cause you lose the warranty services. Contact qualified service personnel in case of problems, especially under the
following conditions:
l
The power socket or cable is damaged.
l
Liquid is splashed into the product.
l
The product is exposed to rain or water.
l
The product does not work normally when the operating instructions are followed.
l
The product is dropped or struck, causing the product damaged.
2
2
Introduction
2.1 Product Overview
Thank you for using ZXV10 H108L (hereafter referred to as H108L) Home Gateway.
H108L can serve as the center of a home network where various devices can share the Internet
connection to provide data, communication, and entertainment services.
The delivery of services needs the support of local operators, contact local operators for more
information.
2.2 Introduction to Indicators
Indicators on the front panel are used to show the status of H108L, which is shown in the figure
below.
Indicators on the front panel are described in the table below.
Indicator
Status
Constantly
on
Description
The power is connected and switched on.
Power
Off
Flashing
The power is not connected or the device fails to
function
The device is functioning.
Run
Off
Constantly
on
Flashing
The device fails to function.
The connection is established and the IP address is
allocated.
Data is being transmitted.
The following problems may be present:
Internet
Off
Constantly
on
DSL
Flashing
Off
l
The system is not powered on.
l
ADSL connection is not established.
l
The IP or PPP session is terminated due to a
reason other than Idle Timeout.
l
ADSL is in the bridge mode only.
ADSL connection is established.
ADSL connection is being established.
ADSL connection is not established.
3
Indicator
Status
Constantly
on
LAN1–LAN4
WLAN
WPS
Flashing
LAN connection is established.
Data is being transmitted.
Off
LAN connection is not established.
On
WLAN RF is switched on.
Flashing
Data is being transmitted.
Off
WLAN RF is switched off.
On
WPS is switched on and functioning. The indicator
will turn off in five minutes.
Slowly
flahsing
Fast flashing
USB1/USB2
Description
Negotiation is in process through WPS.
WLAN terminal’s WPS access encountered an error.
Off
Device failure or not in use.
On
USB storage device connected.
Flashing
Off
Identifying USB storage devices or performing data
read/write.
Non-USB storage device connected.
Notes:
The quantity of USB indicators ranges from 0 to 2 depending on the actual product
model.
2.3 Introduction to Sockets and Buttons
l
Sockets and buttons on the rear panel of H108L
The sockets and buttons on the rear panel of H108L are as follows:
The description of sockets and buttons on the rear panel of H108L is as follows:
Name
Function
Description
Power
Power socket
Connects to standard power adapter to obtain DC
power supply.
Reset
Reset button
When the device is operating, keep pressing the
button for more than 5 seconds to restore the default
settings. Then the system restarts automatically.
4
l
Name
Function
LAN1–LAN4
Ethernet
ports
DSL
DSL socket
Description
Connects to PC’s network adapter or other network
device via RJ-45 cable.
Connects to ADSL cable or splitter via RJ-11
telephone line.
Sockets and buttons on the side panel of H108L
Socket and buttons on the side panel of H108L are as follows:
The description of sockets and buttons on the side panel of H108L is as follows:
Name
Function
Description
On/Off
Power switch
WLAN
WLAN RF switch
WPS
WPS access
switch
Switches on or off WPS access.
USB1/USB2
USB port
Connects USB storage devices.
Switches on or off power supply.
keep pressing the button for more than 5 seconds
to switche on or off WLAN RF.
Notes:
The quantity of USB ports ranges from 0 to 2 depending on the actual product
model.
3
Installation
3.1 Installing Device
Appropriate space for heat dissipation is required to prevent the device from overheating. Do
not place the device close to heat sources or under direct sunlight. Do not block the heat dissipation opening.
1. Placement: Place the device at a place where its surface is plane and where there will be
less obstacles when communicating with the wireless terminals to ensure the best signal
strength. It is recommended to use wireless terminals in the room where H108L is placed
or the immediate room.
2. H108L adopts the ADSL uplink mode to get connected to the Internet. It is recommended
to connect the device as the approach shown in the following figure.
5
3. If a telephone is required to be installed before the splitter, make sure to connect a voice
filter properly to the Line socket of the splitter, and then connect the telephone to the filter.
Connect other sockets as the above figure.
Notes:
Please use the power adapter delivered with the device.
might be damaged.
Otherwise the device
3.2 Setting Preparations
3.2.1 Checking PC Settings
It is recommended to turn off VPN and firewalls on your PC.
The following uses Microsoft IE as an example to introduce the steps to disable IE proxy service.
1. Select [Tools→Internet Options] in the browser. Then the Internet Options window pops
up.
2. In the Internet Options window, select Connections tab and click LAN Settings.
3. Uncheck Use a proxy server for your LAN in the pop-up window. Then click OK to submit.
3.2.2 Configuring TCP/IP
The following uses Windows XP as an example to introduce the steps to configure TCP/IP.
1. In the Windows taskbar, select [Start→Control Panel].
2. In the Control Panel window, double-click Network Connection.
3. In the Network Connection window, right-click Local Area Connection. In the pop-up
menu, click Properties. Then the LAN Properties dialog box pops up.
4. Select Internet Protocol (TCP/IP) and click Properties. Then the Internet Protocol
(TCP/IP) Properties dialog box pops up.
5. There are two approaches to configure TCP/IP. However, the first approach is recommended.
6
l
First approach: Acquire an IP address automatically from H108L via DHCP.
a. In the Internet Protocol (TCP/IP) Properties dialog box, check Obtain an IP address automantically and Obtain DNS server address automatically.
b. Click OK to save configuration.
l
Second approach: Specify a static IP address for PC.
a. In the Internet Protocol (TCP/IP) Properties dialog box, check Use the following
IP address to set the IP addresses of PC and H108L to the same network segment,
in the form of 192.168.1.x (x is an integer between 2 to 254).
For example, IP is set to 192.168.1.2, subnet mask is set to 255.255.255.0, and
both default gateway and DNS server are set to 192.168.1.1.
b. Click OK to save configuration.
3.3 Configuring Wireless Connection
1. The PC is able to connect to WLAN network when it is equiped with wireless network card.
2. Before the PC is able to get connected with a WLAN network, the installation and configuration of wireless network card must be completed.
3. The wireless network card will search for wireless networks automatically after installation
and configuration is completed. The PC will be ready for use after search succeed. If
encryption is enabled on H108L, users will be prompted for corresponding encryption key.
3.4 Restoring Default Settings
If the device fails to function or users forget their login password due to incorrect configurations,
the problem can be resolved by restoring default settings.
Refer to the label on the bottom of device for detailed default setting parameters.
1. When the device is operating normally, keep pressing the Reset button for more than 5
seconds (using a needle or a pin).
2. The system will restore default settings and restart automatically.
4
WEB Configuration
4.1 Login/Logout
H108L provides Web-based configuration, which enables users to configure and manage
H108L via Web browser.
1. Type http://192.168.1.1 (the default IP address of the LAN-side interface of H108L) in the
address bar of IE browser and press Enter. Then the Login page shown in the following
figure pops up.
7
2. Input username and password (default username and password are admin and admin) and
click Login to enter H108L page.
3. Click Logout at the top-right corner of corresponding page to exit.
4.2 Network Configuration
4.2.1 Creating WAN Connection
1. Select [Network→WAN→WAN Connection] to open the WAN Connection page as
shown in the figure below.
2. Set the parameters according to the description below.
Parameter Name
Description
Connection Name
The default value is Create WAN Connection. Users
can select created network connections from the
drop-down menu.
Type
Type of connection. Select WAN connection type from
five options including PPPoE, PPPoA, Static (need the
operator to provide IP address), DHCP and Bridge
Connection. The default value is PPPoE.
New Connection Name
Contains 1 to 256 characters.
8
Parameter Name
Description
Enable NAT
Enable/disable Network Address Translation (NAT). This
function can be configured in route mode only. It cannot
be configured in bridge mode.
Enable VLAN
Enable/disable VLAN configuration. VLAN ID and 802.1p
are used to define to which VLAN the device belongs
as well as the priority.
VLAN ID
802.1p
VLAN ID of data packets at WAN interface. The value
ranges from 1 to 4094.
Deals with priority, suitable for multiple WAN connections
only. The value ranges from 0 to 7. The default value is
0, which indicates no priority set. The greater the value
is, the higher the priority is.
VPI/VCI (Virtual Path/Channel Identifier) identifies virtual
path and virtual channel of a link.
VPI/VCI
In the case of first-time configuration, select Create, and
then configure the VPI/VCI values. Otherwise, select a
previously used VPI/VCI values from the drop-down list.
New VPI/VCI
Configures VPI/VCI values, which range from 0 to 255
and from 0 to 65535 respectively. Both of which are
provided by the ISP.
Encapsulation Type
The protocol encryption type, which supports LLC and
VCMUX.
Service Type
Configuration of ATM QoS which imposes restrictions on
uplink traffic. Four types are available: CBR, RT-VBR,
nRT-VBR and UBR.
Username/Password
Username and password for WAN connection
authentication. Both of which are provided by the ISP.
Authentication Type
Authentication protocol type. Options: Auto, PAP and
CHAP. The value is Auto by default.
Connection Trigger
Connection triggering mode. Options: Always On, On
Demand, and manual. The mode is Always on by default.
Idle Timeout
The default value is 1200 seconds. It can be set when
the Connection Trigger is set to On Demand only.
3. Click Create to create connection.
9
4.2.2 WLAN Configuration
1. Select [Network→WLAN→Basic 11n ] to open the WLAN Basic Parameter page, as
shown in the figure below.
2. Set the parameters according to the description below.
Parameter Name
Enable Wireless RF
Enable Isolation
Mode
Country/Region
Band Width
Description
Enable/disable WLAN RF.
Enable/disable internal isolation.
Wireless communication mode, including
Mixed (802.11b+802.11g) and Mixed
802.11b+802.11g+802.11n.
Country or region where the device to be used.
Band width to be set. Options: 20MHz and 40MHz.
The value is 20MHz by default. Configurable when
Mixed (802.11b+802.11g+802.11n) is enabled only.
Wireless signal channel. Select from auto and integ
ers from 1 to 13 according to the country code. The
default value is Auto.
Channel
SGI Enable
Beacon Interval
Wireless channel used in the communication between
the wireless access point and wireless station, which
channel to use depends on the local administration.
All stations communicating with H108L must use the
same channel.
Enable/disable SGI. Configurable when 802.11n
mode is enabled only.
The default value is 100ms.
10
Parameter Name
Description
Transmitting power level. Options: 100%, 80%, 60%,
40% and 20%. The default value is 100%.
Transmitting Power
QoS Type
Transmitting Power indicates the ration of the output
power to the maximum power. The higher the power
is, the longer the transmitting distance is.
The default value is WMM.
3. Click Submit button to complete WLAN configuration.
4.2.3 WLAN Security Configuration
1. Select [Network→WLAN→Security] to open the WLAN Security Configuration page.
2. Configure parameters on the basis of the following description.
Parameter Name
Choose SSID
Authentication Type
WPA Passphrase
WPA Group Key Update
Interval
Description
The default value is SSID1.
Options: Open System (indicating no encryption),
shared key, WPA-PSK, WPA2-PSK and
WPA/WPA2-PSK.
WPA encryption key, which contains 8 to 63
characters.
The interval of WPA group key update. The default
value is 600 seconds.
WPA entryption algorithm, which supports TKIP, AES
and TKIP+AES.
WPA Encryption Algorithm
If users want to enable TKIP or TKIP+AES encryption
algorithm, please firstly enable Mixed (802.11b+802.
11g) wireless communication mode.
Available encryption methods include WPA encryption, WEP encryption, and no encryption.
11
l
WPA encryption
Wi-Fi Protected
WPA/WPA2–PSK.
Access
(WPA)
includes
WPA-PSK,
WPA2–PSK,
and
a. Select WPA-PSK, WPA2–PSK or WPA/WPA2–PSK from the drop-down list of Authentication Type option to enable WPA encryption.
b. Set the parameters according to the description above.
l
WEP encryption
Wired Equivalent Privacy (WEP) is a widely used WLAN security protocol.
a. Select Shared Key from the drop-down list of Authentication Type option to open
the page as shown in the following figure.
b. Set the parameters according to the description below.
Parameter Name
Description
WEP Encryption
Enable/disable WEP encryption. The encryption
is disabled by default.
WEP Encryption Level
WEP Key Index
WEP Key1–WEP Key4
The length of WEP encryption key is 64bit or
128bit.
Index of WEP encryption key.
WEP encryption keys. 64 bit WEP encryption
key corresponds to 5 ASCII characters or
10 hexadecimal characters. 128bit WEP
encryption key corresponds to 13 ASCII
characters or 26 hexadecimal characters.
3. Click Submit button to complete WLAN security configuration.
12
5
Troubleshooting
You may encounter some problems when installing or using H108L. Please try the following
solutions. If the problem still exists, please contact the service provider for help.
Problem
Solution
The power indicator is off
after the device is switched
on
Use standard power adapter, such as the power adapter
delivered with the device. Make sure that the adapter is
connected properly to both H108L and the power socket.
The LAN indicator is off after
Ethernet cable is connected
Make sure that the Ethernet, PC, and H108L are correctly
connected, and that the PC and H108L are switched on.
The DSL indicator is off after
telephone line is connected.
Make sure that the telephone line in use is standard line
(delivered with the device) and all devices are correctly
connected according to the previous description. Check
whether the cables are properly plugged in. Please allow 60
seconds for H108L to establish connection to the operator.
The DSL indicator flashes
slowly after telephone line is
connected
Indicates that H108L failed to get connected with the
DSLAM system of the operator. Please make sure that
H108L is correctly connected according to the previous
solutions. If a telephone is installed before the splitter,
please make sure that the splitter is correctly installed.
l
Make sure that the WLAN RF is switched on, and the
WLAN indicator is on.
l
Check whether the wireless network card is correctly
configured.
l
Check whether the network name, encryption mode,
and encryption key stored in the PC are consistent with
the settings of H108L.
l
Check whether the IP address of H108L(192.168.1.1 by
default) can be pinged successfully from the PC. If cann
ot, please check the Ethernet connection and whether
the indicator status is normal.
l
It is recommended to set the IP address and DNS server
address to be obtained automatically.
l
It is recommended to disable all running firewall or secu
rity software.
l
Disable the proxy server of the Web browser.
l
Check whether the indicator status is normal.
WLAN cannot be connected
PC is unable to access the
network
13
6
Specification
Physical Specification
l
Size
Excluding bracket: 200mm * 168mm * 36mm (length * width * height)
Including bracket: 200mm * 168mm * 75mm (length * width * height)
l
Weight
Excluding bracket: 300g (excluding power adapter)
Including bracket: 360g (excluding power adapter)
Electric Specification
l
Non-USB Scenario
Power supply: Input 220V AC/50Hz, output 12V AC/750mA
Power: 9W
l
USB Scenario
Power supply: Input 220V AC/50Hz, output 12V AC/1A
Power: 12W
Environmental Requirements
Temperature: 0℃- 45℃, humidity: 5%-95%.
Qualifications
CCC, Network Access License, Wi-Fi, Radio Transmitter Model Authorization.
ZTE CORPORATION reserves the right to upgrade or make technical change to this product
without further notice.
14
ZXV10 H108L Home Gateway
User Manual
Version 1.0
NO.55, Hi-Tech Road South,Shenzhen, P.R.China
Postcode:518057
Technical Support Website: http://support.zte.com.cn
Customer Support Center:
E-mail: [email protected]