Transcript
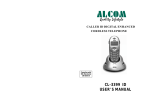
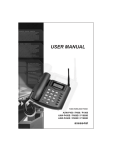
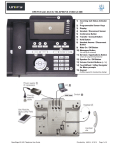
M AIN F EATURES
LCD D ISPLAY L AYOUT
I NSTALLING THE TELEPHONE
1, Insert the end of the handset cord into the cord jack,and the other end into
! FSK/DTMF Caller ID
! Incoming call log records up to 68 calls
! Outgoing call log records up to 20 last dialed numbers
! 8 one-touch memory
! On hook pre-dialing
! Lock feature
! Redial
! Pulse or Tone dialing mode
! Mute function
! Speakerphone
the jack in the left part marked:
at the base unit
2, Plug line cord in the jack marked
M
on the base unit, and the other end
into telephone line wall outlet
S ETTING D ATE L AYOUT
88 88 88
IN
SPK
UP
D
SET
OUT
8888888888888888
MANUAL
Setting finished
DEL
1. Rotate the wall mounting knob
as shown in the following layout
Parts checklist
Outgoing call
Wall mounting
location
slide out
EX29446CE-A
Rotate 1800
replace
Lock, new call,repeat call,mail
1. Press the SET button to confirm when unit display
2. Then the unit will display
---- (not programmed) or programmed local
area code. The first digit of the area code flashes.
3. Press the UP or DOWN button to edit or modify it to 0 through 9.
4. When finished the first digit edit, press the SET button to enter the menu to edit
The second digit, and continue with programming.
UP
OUT
DIAL
STORE
MEM
Phone number display
DEL
UP
DOWN
MUTE
SET
OUT
DIAL
DELETE BUTTON
ONE-TOUCH REDIAL
Pressing this DEL button during Incoming and Outgoing Call ID review will delete the
number shown from the record.
DEL button is also used as EXIT mode during setting up of date, time, Local Area code and
PABX code.
DOWN
The Local Area Code setting allows up to a maximum of 5-digit code. After setting the
Local Area Code, incoming call within your telephone exchange area will
automatically be filtered to remove the Local Area Code that matches.
Incoming call
Press the REDIAL button will automatically redial the last number you dialed.
Exit from operation
S ETTING L OCAL A REA C ODE
WALL MOUNTING I NSTALLATION
Pressing Speaker button will activate speaker operation. Pressing Speaker button
again will hang-up the call. During the conversation, picking up handset will
automatically switch the conversation to the handset
Press the OUT call key to enter the outgoing calls reviewing state. Press up or down
button to review the out going calls. During the reviewing of your out going record,
pressing speaker button or picking up the handset will dial out the displayed telephone
number.
REDIAL
UP
Speakerphone
B EFORE Y OU B EGIN :
REVIEWING OUTGOING CALLS
DEL
If you get a busy tone when dialing, press the REDIAL button, the unit will
automatically redial the number you just dialed.
FLASH
During conversation, pressing Flash button will momentarily interrupt the telephone
conversation to access telephone company services.
WHILE ON-HOOK
RECEIVING INCOMING CALL
REDIAL
STORE
FLASH
REDIAL
keep this unit in place when the telephone is vertical
FLASH
SETTING PABX CODE
Week display
W ALL MOUNTING : The knob is designed to
The PABX code setting allows up to a maximum of 2-digit PBX code. Make sure the
unit is not locked.
T ELEPHONE F EATURES S ETUP
on the wall.
1.Base unit 2.Handset 3. Handset cord
4. Line cord
5. Mechanical lock
2.
N OTE : If you find any of theparts missing, please contact your local
shop where you buy this product right away
I NTRODUCTION
Install the base unit to the wall and then plug one end of line cord into the
junction box and the other end into modular telephone line jack marked
3.
Fix the telephone in the wall as the following layout
I NSTALLATION
I NSTALLING AND R EPLACING THE B ATTERIES
1. When the telephone is in standby (idle), press the SET button for 2s until the
display shows
.
2. Press the UP or DOWN button to modify the setting as shown.
3. Press the SET button again to confirm your entry.
4. Press the SET button again to edit the next setting item.
5. Repeat Item 2, Item 3 and Item 4 until all setting are entered
6. Press the DEL button to exit anytime during the setup. The last setting entry in
this exit will not be saved.
time setting ;
5-digit for Local area code setting *
When the unit is idle, press the MUTE button to adjust display contrast levels.
During conversation press the MUTE button will prevent the other party from hearing
you. Press MUTE again will resume normal conversation.
RINGER VOLUME LEVEL
WHILE OFF-HOOK
REVIEWING INCOMING CALL AND OUTGOING
CALL
Caller ID records and for storing the numbers you use for memory dialing.
MEMORY DIALING
S ETTING F LOW L AYOUT
local telephone company, to subscribers of Caller ID or similar caller
installing or replacing the batteries
! Identify callers before you answer the phone.
! View the time and date of each incoming call.
! Record up to 68 Caller ID messages sequentially.
SET
Specific installation please reference
DOWN
to the bottom of base unit
UP
! Never install telephone wiring during lightning storm
! Never touch un-insulated telephone wires or terminals, unless the telephone
B ASE L AYOUT
DOWN
line has been disconnected at the network interface.
PABX C ODE :
UP
OUT
DIAL
When using behind PABX that requires dialing a separate number to connect to
external lines. This PABX code when set will automatically insert to the front
part of the normal telephone number when you make a call.
DEL
! Temporarily disconnect any equipment connected to the phone, such as
faxes ,other phones or modems.
LOCAL AREA CODE:
DOWN
UP
OUT
DIAL
STORE
MEM
SET
SET
MUTE
STORE
1, Open the battery compartment door
2, Insert three batteries into battery compartment.
REDIAL
M emory Dial Button
If you are not going to use the telephone for more then
the unit.
REDIAL
MEM
Depending on the Caller ID service you get from your local telephone company, the
signal received by the unit will automatically update the TIME and DATE. If your
telephone time and date are not updated you can manually set it.
FLASH
3, Close the battery compartment door
30 days,remove the batteries because they may leak and cause damage to
During conversation, press the UP or DOWN button to review incoming call number
or press OUT then UP button to review the outgoing call number.
FLASH TIME SETTING
MUTE FUNCTION
Use the FLASH switch located at the bottom of the unit to select flash time 600ms,
300ms or 100ms.
During conversation press the MUTE button will prevent the other party from
hearing you. Press MUTE again will resume normal conversation.
PABX C ODE A PPLICATION
Users can select P (PULSE) or T (TONE) dialing mode according to requirements
from the local telephone company service.
Two-touch memory:
In on-hook mode:
1.Press MEM button.
2.Press [0].....[9] to select memory location.
3.Go-Off-hook or Press SPEAKER button to dial out the numbers
In Off-hook mode:
1.Press MEM button.
2.Press[0].....[9] to select memory location and directly dial out the numbers.
IDD LOCK
1. To lock, insert the key into the IDD lock and rotate clockwise until the arrowhead
pointing to the red dot. All telephone number starting with first digit 0 cannot be
dialed.
2.To unlock, rotate the key anti-clockwise until the arrowhead point to the green dot.
All telephone numbers can be dialed out.
Green dot
FLASH
1.
2.
3.
4.
Press the SET button to enter DATE/TIME setting
When you are finished, the year in display flashes.
Press the UP or DOWN button to modify.
When finished, press the SET button to enter the month edit mode.
(as same as year setting).
5. Press the SET button again to modify the day, hour and minute in turn.
When using SET button to confirm the setting of last digit in minute,
the seconds in display will automatically start from 00
6. When finished, the display will automatically show the current week and calendar
Red dot
Unlock state
Red dot
Lock state
Green dot
S ETTING D ATE AND T IME
I NSTALLING B ATTERIES
I MPORTANT :
You may adjust speakerphone volume level during conversation.
This code is the region code that identifies your telephone exchange area. If your
caller ID number received includes this Local Area Code you may remove this code
from the Caller ID the unit received by setting the same Local Area Code..
DEL
DOWN
MUTE
In On-hook mode:
1.Press[M1].....or [M8] button.
2.Go-Off-hook or press SPEAKER button to dial out the
selected number.
In Off-hook mode:
1.Press [M1].....or [M8] button to directly dial out the selected number
Exit from operation
designed for wet locations.
and short circuit. If you are not going to use the telephone for a few days,
remove the batteries because they can leak and damage this unit.
Setting finished
DEL
! Use caution when installing or modifying telephone lines
! Never install telephone jacks in wet location unless the jack is specifically
C AUTION : Do not expose to rain or water in case of electric shock
SET
1
Your Caller ID phone enables you to:
SPEAKERPHONE VOLUME
One-touch memory:
UP
Disconnect the phone cord from the wall outlet before
You may select ringer volume level to HI, MID or LO.
PULSE TONE FUNCTION
2-digit for PABX code with setting *
Your caller ID phone stores and displays specific information, provided by your
C AUTION :
MEMORY STORE
You can store a number up to16 digits in eight one -touch memory [M1].....[M8]
or ten two-touch memory [0].....[9],from On-hook mode or Off-hook mode.
Press STORE button, numbers up to 16 digits, STORE, [M1].....[M8] or [0]....[9].
T HERE ARE T HREE O PTIONS S ETTING :
Your Caller ID phone uses 3 AA-Size alkaline batteries for receiving and storing
identification services.
1. Press the SET button to confirm when LCD displays
.
2. Then the display shows
---- . (not programmed) or programmed
PABX code The first digit of PABX code flashes.
3. Press the UP or DOWN button to set or modify it to 0 through 9.
4. When finished the first digit edit, press the SET button to enter the menu to
Edit the second digit, and continue with programming.
NOTE:Batteries must be installed for memory storing and dialing.
UPDATING THE CALL NUMBER IN MEMORY
Repeat one-touch memory or two-touch memory store operation to update the new
phone number.
User can enter the telephone number first and check the number to be dialed, like
review incoming or outgoing records, before picking up the handset or press the
speaker button. The displayed number shall be dialed.
CONTRAST AND MUTE
SET
MEM
ON-HOOK PRE-DIALING
The unit will display the caller's telephone number on the display. Please make
sure you have subscribed to your local telephone company for the Caller ID service.
DOWN
MUTE
Used equipment must be disposed of in compliance with current
environment protection regulations. You should return it to your
reseller or disposes of it in an approved recycling centre.
DOWN
NEW REPEAT MAIL SUN MON TUE WED THU FRI SAT
Date,time
USER
SET
SPEAKERPHONE OPERATION
REVIEWING INCOMING CALLS
Press DOWN or UP button to review incoming call. This telephone unit is capable
of storing up to 68 incoming calls. When 68 records are reached new calls will be
recorded and old calls will be deleted automatically.
DIAL BACK
THE
CALLER
During the reviewing of your incoming caller ID record, pressing speaker button or
picking up the handset will dial out the displayed telephone number.
After setting 1-digit or 2-digit PABX code in the menu, if call number is 6-digit or
more, the unit will automatically insert PABX code in front of the number every time.
During dialing, the unit will pause for a 1s after dialing the PABX code. If the IDD
0 is locked and PABX code is set, the number will be dialed with PABX code
inserted and the IDD 0 will still be locked. The IDD 0 is lock at the second
digit of the dialing when PABX code is set and Lock is active.
TROUBLESHOOTING
N O D IAL T ONE I N THE H ANDSET
Make sure line cord and handset coil cord securely plugged in
Make sure the telephone network linked and can be used normally
N O R ING OR O NCE R INGING THE P HONE
C UTOFF
Make sure the junction box and line cord are well connected or poor contact
due to web and line breakage
You may have too many extension phones on your line. Unplug some
extension phones and try to dial again.
N OISE IN C ONVERSATION
The line cord and coil cord may be loose, dropped off or be affected with damp
The junction box may be get rusty
N O C ALLER I D
Make sure the batteries are properly installed and connected
Make sure you have subscribed to caller ID service from your local telephone
Company
EX29446CE-A
0000 xxxx
Printed in China
Alcatel Logo and Alcatel name are trademarks of Alcatel and used under
license by Thomson.