1
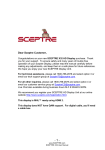
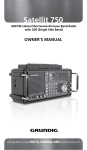
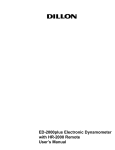
Mod. AIRWAVE AWV001 (Video Sender)
0700
USER MANUAL
Wireless A/V Sender
AV Linker 2
Congratulations! The Wireless A/V Sender you have just purchased is
manufactured to the highest standards and will give you years of trouble-free
use.
The Wireless A/V Sender allows you to distribute any kind of video signal (digital
or analogue set-top boxes, DVDs, satellite receivers, VCRs etc.) or cable
program (via your VCR.) throughout the house without the need for extra wiring,
running cables or drilling holes.
For example, you can enjoy the freedom of watching Pay-TV or a film from your
living-room video recorder on your bedroom TV.
The original remote controls of your video sources can be used to control the
video sources remotely from your bedroom.
The Wireless A/V Sender is based on wireless RF technology that offers you
in-home portability. Because it is wireless it is more susceptible to outside
interference than for instance cabled signals. This interference may come from
sources that include microwave ovens or other TV Links in the vicinity.
To enable you to enjoy the best possible performance, the Wireless A/V Sender
has a channel selector switch, which enables you to select the channel that
provides optimum viewing. Pure wireless home convenience!
Important information
Please read the following instructions carefully,
and retain this booklet for future reference.
• Requirement: SCART connector on each video source, and the second TV.
• Two RCA - SCART cables are supplied. If you intend to connect a video
source and/or TV input that uses RCA connectors you will have to purchase
additional RCA - RCA cables.
• Video source: any satellite receiver; Pay-TV decoder box (either digital or
analogue), video recorder (VCR), DVD; camcorder, etc.
Safety precautions
• Do
• Do
• Do
not use this product in damp places or close to water.
not expose this product to extreme heat.
not open this product.
In the event of technical difficulties take it to your retailer.
• Do not cover this product.
• Only connect the AC power adapters to a power supply of
220-240 VAC/ 50Hz.
• Only use the AC power adapters included or a type that complies with safety
standard EN60950 and that has the following specification: 9V DC/ 300 mA.
• Inadequately protected or sensitive electronic equipment may be affected by
the use of this product. This interference may lead to damage to either
equipment. Please check whether or not surrounding equipment may affect
this product before you start using it.
Packing contents
Please check that the following items are packed in the Wireless A/V Sender
box. They are provided to help you set up and use your Wireless A/V Sender.
• Transmitter unit
• Receiver unit
• Two AC power adapters
• Two SCART/RCA audio/video
• Remote control IR cord
• User manual
cables
Functional overview
A) Transmitter unit
1. Power light
Lights red (at the left) when power is switched on.
2. Remote control receiver light
Blinks red (at the right) when a remote control signal is received.
3. ON/OFF switch
Switches the transmitter unit on and off.
4. DC9V
DC power supply socket for connection to the mains
5. A/V source input connectors
For connecting to an RCA or SCART enabled video source.
VIDEO (yellow) - video input connector
R-AUDIO-L - left (L/white) and right (R/red) audio input connectors
6. Channel switch
Selects the desired frequency channel of the audio/video signal.
7. IR
For connecting the remote control IR cord if the video source does not
respond to signals from the remote control.
8. AC power adapter
1
2
8
IR
4
7
5
A) Transmitter
6
3
B) Receiver unit
9. Power light
Lights red (at the left) when power is switched on.
10. Remote control receiver light
Blinks red (at the right) when a remote control signal to be transmitted to the
video source via the transmitter is received.
11. ON/OFF switch
Switches the receiver unit on and off.
12. DC 9V
DC power supply socket for connection to the mains
13. TV output connectors
For connection to an RCA or SCART enabled TV.
VIDEO (yellow) - video output connector.
R-AUDIO-L - left (L/while) and right (R/red) audio output connectors
(R-red / L-white).
14. Channel switch
Selects the desired frequency channel of the audio/video signal.
The number of channels you can select may vary per country.
15. AC power adapter
9
10
15
12
13
A) Receiver
14
11
Connection
Setting up the transmitter unit
IR
1. Position the transmitter unit beside the video source
with the front panel. Keep video sources and the
transmitter unit in a distance, since some video source
with frequency leakage that may affect video
transmission.
2. Connect the SCART connector of the SCART/RCA
cable supplied to the SCART output of the video
source.
3. Connect the audio/video plugs at the other end of the
cable to the A/V INPUT connectors on the transmitter
unit.
Be sure to insert the yellow plug into the yellow video
input and the white and red audio plugs into the left (L)
and right (R.) audio inputs.
4. Connect the AC power adapter to a mains socket and
to the DC 9V supply socket of the transmitter unit.
Setting up the receiver unit
1. Position the receiver unit close to the second TV.
The front of the receiver unit should be positioned so
that remote control commands can be received.
2. Connect the SCART connector of the SCART/R.CA
cable supplied to the SCART input of the second TV.
3. Connect the audio/video plugs at the other end of the
cable to the TV OUTPUT connectors on the receiver
unit.
Be sure to insert the yellow plug into the yellow video
input and the white and red audio plugs into the left (L)
and right (R.) audio inputs.
4. Connect the AC power adapter to a mains socket and
to the DC 9V supply socket of the transmitter unit.
Channel selection
Set the CHANNEL switches on both units to channel 1.
If interference occurs (e.g. degraded image) set both
switches to another channel.
Both units must always be set to the same channel.
Test operating video sources on your
second TV
1. Make sure transmitter, receiver and video source are
switched on and that a tape or DVD is inserted and
playing in the video source.
2. Switch on the second TV and select the A/V channel.
3. Check if the A/V content is shown on the second TV.
4. Point the remote control of the connected video source
at the receiver.
5. Change the program number (up/down) or toggle
between play and stop
6. Check if the remote control receiver light on the
receiver unit blinks red.
♦ This indicates that it has received the remote control
command.
7. Check if the red remote control receiver light on the
transmitter unit blinks red.
♦ This indicates that it has received the remote control
command from the receiver unit.
If the remote control receiver light does not blink, try
repositioning the transmitter and/or receiver units.
♦ The remote control receiver light on the transmitter
unit should now blink when a remote control
command is given on the receiver side.
If you still cannot operate a video source remotely,
connect the remote control IR cord.
Operation
Wirelessly operating video sources on your
second TV
1. Switch on the video source (VCR, DVD player)
connected to your TV (TV1) and insert a video tape or
DVD.
2. Switch on the second TV
3. Select the SCART input (EXT or A/V) on your second
TV
(See User Manual of your TV.)
4. Set the ON/OFF switch on both transmitter and
receiver to ON
♦ You can now watch the video source on your second
TV.
5. Use the video source's remote control to select the
cable program on the VCR that you would like to watch
on your second TV.
The remote control must be aimed at the receiver.
Note.' If you cannot operate a video source remotely,
connect the remote control IR cord.
Wirelessly watching cable programs on your
second TV (TV2) using your VCR
1. Make sure the VCR is connected to the cable TV
network and to the transmitter unit.
2. Switch on the VCR
3. Switch on the second TV
4. Select the SCART input (EXT or A/V) on your second
TV
5. Use the VCR's remote control to select the cable
program on the VCR to be watched on the second TV.
6. Press Program Up / Down on the remote control to
select another cable program.
Additional features
Using the remote control IR cord
If the video source does not respond to remote control
commands, the remote control IR cord should be
connected.
1. Ensure that the transmitter unit is switched off.
2. Connect the IR cord to the IR connector of the
transmitter unit.
3. Locate the position of the IR sensor on the video
source.
Normally it is located on the front panel, positioned to
the left or right of the display. (See the User Manual of
your VCR, DVD or SAT box.)
4. Remove the adhesive tape from the IR light and fix the
IR light on the IR sensor of the video source.
Note:
• Placing the IR light 5-10cm in front of the video
source instead off precisely on the device makes
finding the exact location less critical.
• Particular brands and types of TV react to remote
signals by making a command is given.
• If you are still having problems getting your
configuration to work correctly check ‘Trouble
shooting’
• It is possible to control devices of most brands, but
some devices from Bang and Olufsen may not be
controlled remotely.
Troubleshooting
If a fault occurs, first check the points listed below. If you are unable to remedy a
problem by following these hints, contact your dealer.
Never try to open the set yourself as this will void the guarantee.
First, check all cable to ensure that they are connected correctly.
Problem
Solution
No picture on TV2 ‧ Ensure that both units are switched on
(both red power lights are lit).
‧ Select the EXT or A/V channel ON TV2.
‧ Activate the video source you would like to watch
(set-top box: power on; VCR/DVD: playback).
‧ Select the same channel on the receiver and transmitter
units, using CHANNEL switches.
‧ If a VCR is used as the video source, ensure that the
correct SCART connector of the VCR is being used.
(Ext.1 or Ext.2 Check VCR User Manual).
Bad picture/sound ‧ Move the receiver unit around on the surface it is
quality on TV2
positioned on, Centimeter by centimeter until you get
good picture and sound quality.
‧ Carry out the same procedure for the transmitter unit.
‧ Change both units to another frequency channel, using
CHANNEL Switches.
‧ Make sure that both units use the same frequency
channel.
‧ Reduce the distance between the transmitter and
receiver units.(lessthan30metres)
The cable
‧ Disable the auto standby mode of the VCR. (Check
program you are
VCRs User Manual)
watching
disappears after
several minutes
Wrong picture on ‧ Select the EXT or A/V channel on TV2
TV2
‧ Activate the video source you would like to watch
(set-top box: power on; VCR/DVD: playback).
‧ It is possible that a signal from another Wireless A/V
Sender is being picked up. Switch to another channel on
both units, using CHANNEL switches to receive your
own signal.
Make sure that the same channel is selected on both
units!
‧ Aim the remote control directly at the receiver unit and
ensure that there are no obstacles in between.
The red remote control receiver light should be blinking.
‧ Ensure that there is no other wireless device (e.g.
headphones) interfering with the remote control.
‧ The maximum operating distance between the remote
control and the receiver unit is 5 meters. Make sure you
are within this range.
‧ Check if the remote control receiver light on the
transmitter unit blinks when a remote control command
is sent.
If not, reposition the transmitter unit and ensure that
transmitter and receiver are more then 5 meters apart.
‧ Move the transmitter on top of the video source, which
has the radiation to affect IR remote control.
‧ If the remote control receiver light on the transmitter is
blinking dimly it is possible you may be picking up
interference signals.
Try to switch off the devices causing this
(e.g. wireless headphones, speakers, RF control
signals).
‧ Align the transmitter unit with the video source(s) you
want to control.
‧ Install the remote control IR cord.
‧ Reposition the remote control IR cord light on the video
source, or place the light 5-10 cm in front of the video
source.
Buzzing sound
‧ Move the receiver unit around on the surface, centimeter
when using the
by centimeter, until the buzzing sound disappears.
remote control
‧ Move the transmitter unit around, centimeter by
centimeter,
‧ Until the buzzing sound disappears. In some cases you
will not be able to overcome this problem.
S-VHS video gives ‧ Select CVBS video output format for your S-VHS VCR
black & white
(Check VCRs User Manual).
pictures only on
2nd TV
DVD player gives ‧ Select CVBS video output format for your DVD player
no pictures on
(Check DVD players User Manual).
nd
either 2 TV
Audio/video
‧ Reposition the receiver and/or transmitter unit.
interference/poor ‧ Move the unit(s) centimeter by centimeter, over the
reception on TV2
surface where it is (they are) positioned.
‧ Switch both units to another frequency channel.
No control of
video sources
from TV2
General notes
‧ Picture and sound quality is influenced by the use of microwave ovens.
Other wireless systems (Bluetooth, wireless LANs, etc.) can also adversely
influence the quality of picture and sound, and vice versa.
‧ The Wireless A/V Sender is a Radio Frequency (RF) based product.
As such its performance can suffer the same kinds of interference as
GSMs, portable radios and other RF-based products.
‧ The Wireless A/V Sender is not limited to just one room or house.
You can use it anywhere in or around the house. Consequently, anybody
in the vicinity of your house (up to the maximum operating range)
who also owns a Wireless A/V Sender set to the same channel, can watch
the same programs that are playing on your video source.
‧ In order to prevent the mixing of remote control commands it is not
advisable to use a TV as a video source.
‧ Some built-in VCRs (TV-VCR combination) cannot be used with the
transmitter unit (depends on brand and type).
‧ Video sources cannot be controlled remotely if the carrier frequency of the
IR signal is outside the operation window of 32kHz to 40kHz.
‧ Radio wave safety: When switched on, the Wireless A/V Sender transmits
and receives radio waves. The Wireless A/V Sender complies with the
standards that are defined for it.
‧ The Wireless A/V Sender has an operating range of up to 100 meters in
open air. Walls, ceilings and other large objects may limit the useable
operating range to about 30 meters in the house.
Technical specifications
General
Video standards
supported
Power supply
Operating consumption
Transmitter unit Audio input:
Video input:
Dimensions:
PAL/NTSC/SECAM
220~240V AC/50Hz
3W(both transmitter and receiver
unit)
Stereo audio (white/red RCA
connectors)
CVBS (yellow RCA connector)
14.4cm(W)x10.4cm(D)x5.4cm(H)
Receiver unit
Stereo audio (white/red RCA
Audio input:
connectors)
Video input:
CVBS (yellow RCA connector)
Operating range
Up to 100 meters in open air;
up to 30 meters indoors
Dimensions
14.4cm(W)x10.4cm(D)x5.4cm(H)
2.4GHz
Audio/Video
Carrier frequency:
Four (maybe fewer, depending on
Transmitter
Number of channels:
local regulations)
FM
Type of modulation:
<10Mw
Transmission power:
Built-in
Antennas:
Remote control Carrier frequency:
433.92MHz
transmission
Type of modulation:
AM
<10Mw
Transmission power:
Range of IR reception: Up to 5 meters
Carrier frequency range 32kHz ~ 40kHz
Remote control IR cord: Yes, one infrared light