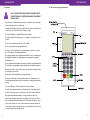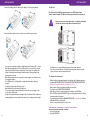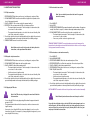
1
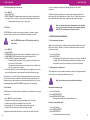
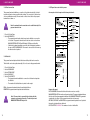
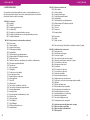
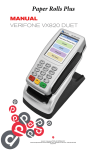
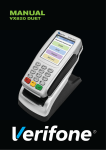
USER GUIDE
Payment terminal Verifone VX670
USER GUIDE
Payment terminal Verifone VX670
TABLE OF CONTENTS:
1. GETTING STARTED
1.1 Important...................................................................................... 4
1.2 The structure of the payment terminal ............................................. 5
1.3 How to connect the cords............................................................... 6
1.4 How to connect the charging dock.................................................. 6
1.5 Battery.......................................................................................... 7
1.6 SIM card ....................................................................................... 9
1.7 How to test the connection ............................................................. 9
2. DAY-TO-DAY USE
2.1 GENERAL
2.1.1 How to replace the paper roll............................................10
2.1.2 Keypad........................................................................... 11
2.1.3 How to navigate through the menus .................................. 11
2.2 HOW TO MAKE TRANSACTIONS
2.2.1 Chip transactions.............................................................12
2.2.2 Magnetic stripe transactions.............................................12
2.2.3 Skipping the PIN code......................................................12
2.2.4 How to void a transaction..................................................13
2.2.5 How to enter a card number manually................................13
2.2.6 How to make a copy of the receipt.....................................14
2.2.7 Return.............................................................................14
2.2.8 Cashback........................................................................14
2.3 RAPORTS AND BANK CONNECTION
2.3.1 How to print a batch report...............................................15
2.3.2 How to print a monthly report............................................15
2.3.3 Bank connection..............................................................16
2.3.4 Blacklist..........................................................................16
2.3.5 Report items and what they mean.....................................17
2.3.6 Issue report.....................................................................18
2.3.7 Issue acknowledgment.....................................................19
2.4 VERIFICATION CODES.............................................................20-21
3. SETTINGS
3.1 Payment terminal settings..............................................................22
3.2 How to print the parameters...........................................................22
3.3 Batch time....................................................................................22
3.4 Cashier number............................................................................23
3.5 Language.....................................................................................23
3.6 Power options...............................................................................23
3.7 How to change the time and date...................................................23
4. DOWNLOADS
4.1 How to download software.............................................................24
4.2 Downloading the parameters.........................................................24
4.3 Downloading the certificate...........................................................25
5. SPECIAL VERSIONS
5.1 Cash receipt.................................................................................26
5.2 How to withdraw cash ...................................................................26
5.3 Extra amount................................................................................27
5.4 VAT..............................................................................................27
5.5 Mandatory authorization................................................................28
5.6 Preauthorization ...........................................................................28
5.7 Invoice.........................................................................................28
5.8 Multicashier version......................................................................29
6. OTHER VERSIONS
6.1 Shared use by multiple entrepreneurs.............................................30
7. ERRORS
7.1 Messages on the display...............................................................31
7.2 Messages on the receipt................................................................32
7.3 Other exceptions..........................................................................32
7.4 Maintenance................................................................................33
8. TECHNICAL DETAILS ...................................................................... 34
9. CONTACT INFORMATION ................................................................ 35
9.1 Returning the Payment terminal.....................................................35
1. GETTING STARTED
1.1 Important
!
1. GETTING STARTED
1.2 The structure of the payment terminal
Note: If these instructions are not followed and the
payment terminal is therefore damaged, the warranty
does not apply.
•• Protect the power cord and transformer from dust, moisture and other contaminants.
If they are damaged, they must not be used.
•• The payment terminal must not be connected to the same socket as a device without
a transformer or to a transformer whose voltage is too high.
•• Use only the original power supply with the payment terminal.
•• The payment terminal is neither waterproof nor dustproof. It is intended for indoor
use only.
•• Do not use the terminal near water or in moist conditions.
•• Do not use the terminal in temperatures below zero.
•• Do not insert any foreign objects in the payment terminal’s reader slots or cable
ports. This might seriously damage the terminal.
•• Use only paper designed for use with the payment terminal so as to avoid paper jams
and damage to the printer. Low-quality paper may cause paper jams or generate
harmful paper dust.
•• Do not use thinner, trichloroethylene or ketone-based solvents to cleaning the terminal.
These substances may damage the payment terminal’s plastic or rubber components.
•• Never spray cleaners or other solutions directly onto the display or keypad. Instead,
use a cleaning cloth or the like.
•• Always switch off the terminal before removing the battery.
•• Do not remove the power cord when a payment transaction is being processed,
since this might prevent the transaction from being saved in the payment terminal’s
memory.
•• To activate GPRS, press F2 when the terminal is in the start display.
•• To switch on the payment terminal, press the green button for about five seconds.
•• To switch off the terminal, press the red button for about five seconds. (Note that
the payment terminal keeps beeping for as long as the button is pressed.)
•• Please note that the payment terminal’s Li-ion battery is hazardous waste. Do not
dispose of the battery with combustible waste. The battery must be taken to a hazardous waste collection area or sent to the manufacturer for appropriate disposal.
•• If the payment terminal is damaged, please contact maintenance. You must not try
and repair the payment terminal by yourself.
4
5
1. GETTING STARTED
1.3 How to connect the cords
1. GETTING STARTED
Place the payment terminal onto the charging dock.
1. Plug the adapter to the power cord and the power cord to the transformer and put
the plug in a socket.
Connect the adapter to the slot on the left at the bottom of the terminal.
1.4 How to connect the charging dock
Note: The charging dock is a supplementary device not included
in the standard delivery.
Connect the power cord to the charging dock as shown in the picture. Connect the
power cord to the transformer and put the plug in a socket.
1.5 Battery
Note: The battery must be calibrated before you start using the
payment terminal.
Plug the power cord to the terminal or place the terminal onto the charging dock.
1. Press keys F2 and F4 simultaneously.
•• The following text appears on the display: SYSTEM MODE ENTRY PASSWORD.
2. Enter the password: 1 ALPHA ALPHA 6 6 8 3 1 and press Enter.
•• The following text appears on the display: SYS MODE MENU 1.
3. Press LILA2 three times.
4. Select BATTERY STATUS F0.
5. Select BATT CONDITIONER F4. •• Note: If BATT CONDITIONER is not found in the menu, the battery need
not be calibrated.
•• The payment terminal starts to charge the battery, and a line is moving on
the display.
•• It takes about 16 to 20 hours to charge the battery full.
•• When the battery is full, the text FULL CHARGE appears on the display.
6. Press the (red) Cancel button, until you see the text:
•• SYS MODE MENU 1.
7. Select RESTART F0.
•• The payment terminal is restarted and the start display is opened.
6
7
1. GETTING STARTED
To remove the battery, press the button on the battery. This releases the battery.
1. GETTING STARTED
1.6 SIM card
For data transfer, the VX670 payment terminal uses a GPRS connection in
Sonera’s mobile network. The SIM card in the payment terminal is ready for use.
Note: If you suspect or have noticed there is something wrong with
the SIM card, please contact Sonera Customer Service.
To insert the battery, put it in position and press down until it snaps into place.
•• In normal use, the battery should be recharged whenever the charge is 20 % or lower.
•• When the payment terminal is in the start display and is not connected to a power
supply, the text B:99 is displayed at the bottom of the display. This indicates the
charge of the battery in percentages. When the battery is being recharged, the
percentage is not shown.
•• When the payment terminal is connected to a power supply, it automatically starts
to recharge the battery.
•• The LED light next to the display blinks orange, when the battery is being recharged.
•• The light turns green when the battery is full.
•• When the battery is nearly empty, the light is red.
•• You can always keep the payment terminal connected to a power supply, as this
has no effect on battery life.
•• Ideally, let the payment terminal recharge at night. The battery is then full when the
working day begins, and automatic batch transmission can be performed at night.
8
•• The SIM card slot is located under the battery of the payment terminal.
•• Place the card in the SIM card slot with the chip facing down and the truncated
corner of the chip card in the appropriate place.
1.7 How to test the connection
•• When you switch on the payment terminal for the first time, the following text appears on
the display: KIELTOLUETTELO PUUTTUU, HALUATKO PÄIVITTÄÄ KIELTOLUETTELON?
Blacklist missing update blacklist yes=enter/no=cancel
•• When you press Enter, the terminal established a connection.
•• The display says CONNECTING PLEASE WAIT.
•• When the connection has been established, the display says SUCCESS.
•• First LÄHETYS and then VASTAANOTTO appears on the payment terminal’s display.
A running number is displayed.
•• The payment terminal retrieves MAKSUPÄÄTEPALAUTE Host parameters, AID and
BIN tables, EMV keys and blacklist.
•• After this, the payment terminal is ready for use.
If the connection is not working, see section 7 for instructions.
You can also test the connection as follows:
1. Press LILA1 and Enter.
2. Select SEND BATCH.
9
2. DAY-TO-DAY USE
2.1.1 How to replace the paper roll
2. DAY-TO-DAY USE
2.1.2 Keypad
1. Pull the release latch upwards to unlock the cover of the paper compartment.
2. Open the cover.
3. Remove the old paper roll from the paper compartment.
4. Place a new paper roll in the compartment. Make sure the paper feeds from the
underside of the roll towards the front of the terminal.
5. Insert the edge of the paper into the tear bar slot and close the paper compartment
cover.
6. The payment terminal now displays the text PAPER INSERTED PLEASE PRESS
ANY KEY. Press Enter.
F0
F1
F2
F3
F4
F5
ALPHA
1
2
3
4
7
5
6
9
*
8
0
#
2.1.3 How to navigate through the menus
•• To navigate through the menus, use the LILA1 and LILA2 keys.
•• To confirm your selection, press Enter.
•• To go back to the previous menu, press Cancel. To return to the start display, press
the Cancel key repeatedly.
•• In the menus, press keys F0 to F5 to make a selection.
•• When you want to go to the Transactions or Parameters menu, the payment terminal prompts you to press Enter.
10
11
2. DAY-TO-DAY USE
2.2 HOW TO MAKE TRANSACTIONS
2. DAY-TO-DAY USE
2.2.4 How to void a transaction
2.2.1 Chip transactions
1. ENTER AMOUNT: Enter the amount in euros, including cents, and press Enter.
2. PLEASE INSERT CARD: Insert the card with the chip up in the chip reader, at the
front of the payment terminal.
3. VISA Fx / BANK Fx: The customer selects the payment method.
4. ENTER PIN: The customer enters the PIN code and presses Enter.
•• The terminal prints two receipts. The first receipt is for the merchant, the
second one is for the customer.
•• The payment terminal prompts you to check the customer’s identity, if the
rules of the card product so require.
5. Press Enter, check the customer’s identity, write the last four digits of the customer’s
personal identity number on the receipt and indicate his/her identity card type.
6. REMOVE CARD: Remove the card from the reader.
Note: Make sure the card is in the reader slot during the entire
transaction, or the operation will be aborted.
Note: You can void only transactions that are in the payment
terminal’s memory.
1. Press MENU F1.
2. Select VOID.
3. ENTER RECEIPT NUMBER: The payment terminal shows the number of the previous
receipt. Press Enter to accept it, or enter another receipt number and press Enter
4. PLEASE INSERT CARD: Insert the card in the reader or swipe the card.
•• The terminal prints two receipts. The first receipt is for the merchant, the
second one is for the customer.
•• If necessary, ask the customer to sign the receipt.
TRANSACTION NOT FOUND: The receipt number you entered is wrong or the
transaction has already been transmitted to the bank, in which case it is no longer
in the payment terminal’s memory.
2.2.5 How to enter a card number manually
2.2.2 Magnetic stripe transactions
1. ENTER AMOUNT: Enter the amount in euros, including cents, and press Enter.
2. PLEASE INSERT CARD: Swipe the card through the reader.
3. VISA Fx / BANK Fx: Select the payment method.
•• The terminal prints two receipts. The first receipt is for the merchant, the
second one is for the customer.
•• Ask the customer to sign the receipt.
•• The payment terminal prompts you to check the customer’s identity, if the
rules of the card product so require.
4. Press Enter, check the customer’s identity, write the last four digits of the customer’s
personal identity number on the receipt and indicate his/her identity card type.
2.2.3 Skipping the PIN code
1. Press MENU F1.
2. Select MANUAL ENTRY.
3. ENTER CARD NUMBER: Enter the card number and press Enter.
4. ENTER EXPIRY DATE xx/xx: Enter the expiry date of the card and press Enter.
5. VISA Fx / BANK Fx: Select the payment method.
6. ENTER AMOUNT: Enter the amount in euros, including cents, and press Enter.
7. DIAL? YES/NO: Select YES.
•• The terminal prints two receipts. The first receipt is for the merchant, the
second one is for the customer.
•• Ask the customer to sign the receipt.
•• The payment terminal prompts you to check the customer’s identity, if the
rules of the card product so require.
8. Press Enter, check the customer’s identity, write the last four digits of the customer’s
personal identity number on the receipt and indicate his/her identity card type.
NOT ALLOWED: The number of the card in question cannot be entered manually.
Note: If the PIN code step is skipped, the merchant is liable for
the transaction.
12
•• You can skip the PIN code step by pressing Enter when the payment terminal
prompts for PIN.
•• The payment terminal then verifies the transaction, and the customer needs to
sign the receipt.
•• Some cards do not allow the PIN code step to be skipped. In such a case, the
transaction is aborted. (For example, if you are paying with a foreign card, you can
never skip the PIN code step.)
Note: Manually entered transactions must always be verified.
If you skip the verification step by selecting NO, the terminal prompts you for a
verification code. Call the verification centre, type in the number they give you,
and press Enter. You can also skip this step by entering 9999. In this case, your
company is liable for the transaction.
13
2. DAY-TO-DAY USE
2.2.6 How to make a copy of the receipt
1. Press MENU F1.
2. Select PRINT COPY.
3. RECEIPT NUMBER: The payment terminal shows the number of the previous receipt. Press Enter to accept it, or enter another receipt number and press Enter.
•• The payment terminal prints a copy of the receipt.
customer’s identity. Both receipts must be signed by the customer and the
salesperson.
Cashback transactions are indicated on a separate line in the payment terminal’s
batch report, with the Cashback amount on a line of its own. The purchase amount is
found at the Debit or Credit purchases, depending on the method of payment.
Note: A cashback transaction is allowed only in connection with
purchases, and it must be made with a chip card and confirmed
with a PIN. The transaction must always be verified.
2.2.7 Return
The RETURN function can be used at any time. However, if you want to change a
transaction made on the same day, use the VOID function (page 13) instead.
Note: The RETURN function is NOT available for debit card
transactions.
1. Press MENU F1.
2. Select RETURN.
3. ENTER AMOUNT: Enter the amount in euros, including cents, and press Enter.
4. PLEASE INSERT CARD: Insert the card in the reader or swipe the card.
5. VISA Fx / BANK Fx: Select the payment method.
•• The terminal prints two receipts. The first receipt is for the merchant, the
second one is for the customer.
•• The payment terminal prompts you to check the customer’s identity, if the
rules of the card product so require.
6. Press Enter, check the customer’s identity, write the last four digits of the customer’s
personal identity number on the receipt and indicate his/her identity card type.
Return without a card: Press F1 when the payment terminals asks you to insert the
card. The terminal asks you to enter the card number and expiry date. Please note
that there are cards whose numbers cannot be entered manually. In such a case, the
payment terminal displays NOT ALLOWED and goes back to the start display.
2.3 REPORTS AND BANK CONNECTION
2.3.1 How to print a batch report
When you print a batch report from the payment terminal, the terminal does not transmit the transactions to the bank. If you want to transmit the transactions, see the instructions on page 16.
1. Press LILA1 and Enter.
2. Select PRINT BATCH.
•• The payment terminal prints a report on the day’s transactions, classified by
card type. Please note that the payment terminal automatically resets the
report after the transactions have been successfully sent to the bank.
2.3.2 How to print a monthly report
The monthly report can also be used for example as a shift report. The payment terminal
collects transactions in the report until the report is reset.
Note: You must always print the report before resetting it.
2.2.8 Cashback
How to print a monthly report:
Cashback refers to transactions where you withdraw money simultaneously as you pay
for purchases.
1. Press LILA1 and Enter.
2. Select MONTHLY REPORT.
3. Select MONTHLY REPORT again.
•• The payment terminal prints a report itemized by card.
1. Press MENU F1 and select Cashback.
2. Payment amount: Enter the total amount of the purchases. Press Enter.
3. Cashback amount: Enter the cashback amount. Press Enter.
4. Pleace insert card. The customer inserts a chip card into the reader.
5. Enter PIN: The customer enters a PIN code and presses Enter.
The payment terminal verifies the transactions and prints out receipts. Check the
14
2. DAY-TO-DAY USE
How to reset the monthly report:
1. Press LILA1 and Enter.
2. Select MONTHLY REPORT.
3. Select RESET REPORT.
•• The payment terminal resets the report.
15
2. DAY-TO-DAY USE
2. DAY-TO-DAY USE
2.3.3 Bank connection
2.3.5 Report items and what they mean
The payment terminal establishes a connection to the bank automatically, if a batch
transmission time has been specified in the settings. The connection to the bank can
also be established manually, if the automatic connection has failed or the payment
terminal has not been on.
An example of a batch report and the items printed on it.
Note: An automatic bank connection can be established only if the
payment terminal is on.
1. Press LILA1 and Enter.
2. Select SEND BATCH.
•• The payment terminal prints a batch report and establishes a connection
to the bank. The payment terminal sends the transactions and retrieves
MAKSUPÄÄTEPALAUTE, AID and BIN tables, EMV keys and blacklist.
•• If the batch has been transmitted successfully, the following text is printed on
the report: BATCH SENDING OK. If there are no transactions in the memory,
the above text is not printed.
2.3.4 Blacklist
The payment terminal updates the blacklist automatically via the bank connection.
The blacklist can also be updated manually, if it is not found on the payment terminal.
1. Press LILA4 and Enter
2. Select DOWNLOAD
3. Select FROM HOAST
4. Select BLACKLIST
5. Select FULL/UPDATE
•• The payment terminal established a connection to the bank and updates
the blacklist.
•• The number of blacklisted items is printed on the receipt.
FULL = the payment terminal retrieves the entire blacklist base
UPDATE = the payment terminal updates the blacklist base
Note: The merchant is responsible for checking that the
payments are forwarded correctly. The batch report and
MAKSUPÄÄTEPALAUTE help in this.
16
Items on the report:
BATCH SENDING OK means that the batch has been sent successfully.
MAKSUPÄÄTEPALAUTE: information on the previous batch. The payment terminal retrieves
this data only if it has been generated in the bank. No MAKSUPÄÄTEPALAUTE is generated
on weekends or holidays or if the payment terminal has not been used.
AID TABLE, BIN TABLE and EMV KEYS: the payment terminal updates these, if updated
information is retrievable from the bank.
KIELTOLUETTELO BLACKLIST: the number of cards on the blacklist.
17
2. DAY-TO-DAY USE
2. DAY-TO-DAY USE
2.3.6 Issue report
The terminal sends all transactions forward from its memory to Point reporting. From
this service the batches are forwarded daily to the chosen bank or credit card company. If any problems occur during the forwarding of the batches, the terminal will print
out information about the situations on an issue report. In order to save paper, the
terminal will print out 20 issues at the most.
Here are listed all the types of issues that can be printed on the issue report, and also
the proper actions that will fix the problem. The issue report will be printed from the
terminal during a batch sending until the issues are acknowledged or fixed. The term
”batch receiver” refers to the bank or credit card company to which the batch is
forwarded from Point reporting.
•
•
18
PARTLY REJECTED = Part of the transactions that the batch contains have been
rejected by the receiver.
Actions = Contact the batch receiver and check why the batch has been partially rejected. When the batch has been processed the issue can be rejected from
Point reporting or from the terminal.
PENDING = The batch is waiting to be forwarded to its receiver.
Actions = No actions required. The batch will be automatically forwarded.
•
OLD TRANSACTIONS = Over 20 days old transactions have been sent to Point
reporting.
Actions = The batch can be forwarded by Point. Contact Point’s customer
service. If the transactions have already been processed through other ways, the
issues can be acknowledged from Point reporting or from the terminal.
PAYMENT OVERDUE = Payment to the bank account has been delayed.
Actions = Contact your own bank and acknowledge the issues from Point reporting or from the terminal.
2.3.7 Issue acknowledgement
•
NOT SENT, CONTAINS DUPLICATES = The batch has not been sent forward
because it contains duplicate material.
Actions = Contact your own bank and check the duplicates that the batch
contains. If the batch must be sent again, it will be done by Point. Please
contact Point’s customer service about the issue. If the batch has been
processed through other ways, the issue can be acknowledged from Point
reporting or from the terminal
•
MISMATCH IN PAYMENT = The batch sum does not match with the bank statement.
Actions = Contact your bank and acknowledge the issue from Point reporting or
from the terminal.
SENT TO BANK FAILED = Sending of the batch to the receiver has failed.
Actions = Contact the batch receiver (bank / credit card company) and check why
the sending has failed. If the batch must be sent again, it will be done by Point.
Please contact Point’s customer service. If the batch has been processed in the
bank, the issue can be acknowledged from Point reporting or from the terminal.
•
ALL REJECTED = The batch has been rejected by the receiver.
Actions = Contact the batch receiver and check why the batch has been rejected.
If the batch needs to be sent again, it will be done by Point. Please contact Point’s
customer service. If the batch has already been processed through other ways,
the issue can be acknowledged from Point reporting or from the terminal.
•
•
•
SENT TO BANK, REPORT OVERDUE = The batch has been forwarded to the
receiver, but the report has been delayed.
Actions = Contact the batch receiver and confirm that the batch has been
successfully received. Acknowledge the issues from Point reporting or from the
terminal.
1. Press FUNC and Enter.
2. Select FUNC ande choose ISSUE REPORT F2
3. Select ACKNOWLEDGE ISSUE F3.
4. ISSUE ID: Type in the four-digit number that is next to the issue and press Enter.
The terminal connects to Point reporting, acknowledges the issue and displays on the
screen ISSUE ACKNOWLEDGED.
If the acknowledgment fails, the screen displays COULD NOT ACKNOWLEDGE ISSUE.
NOTE! Once an issue is acknowledged, it cannot be in any cases
sent again. Acknowledging an issue is always the responsibility of
the Merchant.
19
2. DAY-TO-DAY USE
2.4 VERIFICATION CODES
If a transaction is rejected by the verification centre, a code indicating the reason of
rejection is printed on the receipt. Transactions can be rejected based on a notification
received from a bank or credit card company.
000-099 Acceptance
000 Accepted
001 Check ID
002 Accepted for partial amount
003 Accepted (VIP)
005 Accepted, account type defined by card issuer
006 Accepted for partial amount, account type defined by card issuer
007 Accepted, chip update
100-199 No sales permit, card need not be confiscated
100 Not accepted
101 Card has expired
102 Suspected card forgery
103 Call the payment recipient
104 Card with limit
105 Call the recipient’s security department
106 Allowed number of PIN attempts exceeded
107 Call the card issuer
108 Check the card issuer’s special terms and conditions, verify manually
109 False payment recipient identifier
110 False amount
111 False card number
112 PIN required
113 Commission not acceptable
114 Account type not found
115 Required action not supported
116 Not enough funds
117 False PIN
118 Unknown card
119 Transaction not allowed for card holder
120 Transaction not allowed for payment terminal
121 Exceeds withdrawal limit
122 Security violation
123 Exceeds time limit for withdrawals (too often)
124 Violation of law
125 Card not yet valid
126 False PIN block
127 False PIN length
128 PIN key synchronization error
129 Suspected fraud
20
2. DAY-TO-DAY USE
200-299 Rejected, confiscate card
200 Not accepted
201 Card has expired
202 Suspected card forgery
203 Contact the payment recipient
204 Card with limit
205 Call the recipient’s security department
206 Allowed number of PIN attempts exceeded
207 Special case
208 Lost card
209 Stolen card
210 Suspected fraud
300 Succeeded
306 Failed
307 Failed, form error
400 Transaction rejected. Cancellation of verification accepted. Try again.
900-999 Verification failed, system error
902 Faulty transaction
903 Enter the transaction again
904 Form error, try again
905 Transaction cannot be routed to recipient
906 Temporary service break in card issuer’s systems
907 No connection to card issuer
908 Message cannot be routed
909 System error
910 No connection to card issuer
911 No connection to card issuer
912 Card issuer unavailable
913 Dual transaction transmission
914 Original transaction cannot be traced
915 Control error, card issuer’s systems temporarily unavailable
916 MAC error
917 MAC synchronization error
918 Data transmission keys unavailable
919 Decryption key synchronization error
920 Security program error, try again
921 Security program error, no transaction
922 Unknown message number
923 Transaction is being processed
930 Payment terminal error, wrong date
1Z3
0Y1
0Y3
1Z1
Unable to connect to verification centre, try again
Offline accepted, no verification
Offline accepted, verification failed
Offline rejected
21
3. SETTINGS
3. SETTINGS
3.1 Payment terminal settings
3.4 Cashier number
The settings are described in greater detail below. The section concerned is specified
in brackets.
If you have more than one payment terminal, it is important to distinguish between
the different terminals based on their cashier number. The cashier number is printed
on the receipts, which helps to find the right payment terminal in case a transaction
needs to be tracked down at a later stage.
1. To access the Settings menu, press LILA4 and Enter.
2. Select EDIT.
1. Go to KASSANUMERO CASHIER NUMBER in the Settings menu.
2. Enter a desired cashier number with three digits. For example, 001, 002, etc.
BATCH TIME (3.3)
CASHIER NUMBER (3.4.) TCP/IP PARAMETRIT
LANGUAGE (3.5)
EXTRA AMOUNT (5.3) CASH RECEIPT (5.1) POWER OPTIONS (3.6)
AUTH. MANDATORY (5.5) TIME SETTINGS (3.7) VAT (5.4) PREAUTHORIZATION (5.6) MULTICASHIER VER (5.8)
Time for automatic batch transmission
Cashier number of the payment terminal
DHCP / FIXED IP (NOT IN USE)
The language options available
Settings of the Extra (Tip) function
YES/NO
Powersave settings of the payment terminal
YES/NO
Time and date
YES/NO
YES/NO
YES/NO
3.5 Language
1. Go to LANGUAGE in the Settings menu.
2. Select Finnish, Swedish or English.
3.6 Power options
1. Go to VIRRANSÄÄSTÖ POWER OPTIONS in the Settings menu.
SHUT DOWN TIMER = Time after which the terminal switches off, given in seconds
(for example, 180 = 3 min). The payment terminal does not switch off if it is being
recharged. Further, the payment terminal does not switch off, if a screensaver is in
use. If you want to turn off the sleep mode, type 0.
ONLINE BAT PERCENT = The minimum battery charge enabling the terminal to
function, given as a percentage (for example, 20).
SLEEP TIMER = Time after which the payment terminal’s screensaver is activated,
given in seconds (for example, 90 = 1.5 min). The screensaver will not be activated,
if the payment terminal is being recharged. If you want to turn off the screensaver,
type 0.
3.2 How to print the parameters
1. Press LILA4 and Enter.
2. Select PRINT and PARAMETERS.
•• The payment terminal prints a list of parameters, which shows the settings
of the payment terminal. Save the printed list for later use.
3.3 Batch time
•• The payment terminal establishes a connection to the bank automatically, if a
batch transmission time has been specified in the settings and the payment terminal
is on at that time.
•• The batch time should preferably be set to be after the opening hours. Avoid setting
the batch time on the hour.
1. Go to LÄHETYSAIKA BATCH TIME in the Settings menu.
2. Enter a desired batch time with four digits. For example, 0315.
3.7 How to change the time and date
1. Go to AIKA ASETUKSET TIME SETTINGS in the Settings menu.
2. Select ADJUST CLOCK.
3. Select the item you want to change and change it.
4. Press Enter.
If you want to turn off the batch time function, type 9999 here. You will then
have to send the batches to the bank manually.
22
23
4. DOWNLOADS
4.1 How to download software
Note: Software may be downloaded only at the equipment manufacturer’s request.
When software is being downloaded, the payment terminal must
be in place and recharging. Downloading is not recommended in a
moving vehicle, for example, as it may be easily interrupted.
Before downloading, send the transactions from the payment terminal to the bank:
1. Press LILA1 and Enter.
2. Select SEND BATCH.
4. DOWNLOADS
4.3 Downloading the certificate
Note: The equipment manufacturer has already downloaded the
certificate onto the terminal.
1. Press LILA4 and Enter
2. Select DOWNLOAD
3. Select DOWNLOAD CERTIFICATE
•• The certificate is downloaded and the text SUCCESSFUL CERTIFICATE
DOWNLOAD is printed on the receipt.
After the software, parameters must also be downloaded onto the terminal. For instructions, see 4.2.
1. Press LILA4 and Enter.
2. Select APPLICATION DOWNLOAD.
3. Select APP + PARAMS / PELKKÄ OHJELMA. Or only application.
•• The payment terminal downloads the application. A dashed line appears on
the display; as the download progresses, the dashed line is replaced by stars.
APP + PARAMS = After the application, the payment terminal also downloads the
parameters.
PELKKÄ OHJELMA ONLY APPLICATION = The payment terminal downloads only
the application; the parameters need to be downloaded separately.
4.2 Downloading the parameters
Note: Parameters may be downloaded only at the equipment
manufacturer’s request.
1. Press LILA4 and Enter
2. Select DOWNLOAD
3. Select FORM LOADPOINT
4. Select PHONE
•• The payment terminal downloads the parameters. A dashed line appears
on the display; as the download progresses, the dashed line is replaced by
stars. The text SUCCESSFUL PARAMETER DOWNLOAD is printed on the
receipt.
When the parameters have been downloaded, always establish a connection to
the bank:
1. Press LILA1 and Enter.
2. Select SEND BATCH.
24
25
5. SPECIAL VERSIONS
5.1 Cash RECEIPT
5.3 Extra amount
The cash receipt function is used when the customer pays in cash and you want to
make a receipt with the payment terminal. Cash transactions are also included in the
batch report.
The Extra amount function can be used for example in restaurants, if you want to give
the customer an opportunity to tip the waiter.
The cash receipt can be activated in the Settings menu (page 22).
Extra can be activated in the Settings menu (page 22).
How to make a cash receipt:
1. Press MENU F1.
2. Select CASH RECEIPT
3. Select CASH RECEIPT SALE.
4. ENTER AMOUNT: Enter the amount in euros, including cents, and press Enter.
5. ALV %: Enter the VAT rate and press Enter.
•• The payment terminal prints receipts.
Options:
NO = Extra not in use
ONLY BEFORE = Extra can be entered only during the transaction
ONLY AFTER = A line for Extra is printed on the receipt, and the extra amount is
entered separately into the terminal
UNRESTRICTED = The payment terminal prompts for Extra during the transaction,
and a line for it is printed on the receipt.
How to void a cash receipt sale:
1. Press MENU F1.
2. Select CASH RECEIPT
3. Select VOID
4. ENTER AMOUNT: Enter the amount in euros, including cents, and press Enter.
5. ALV %: Enter the VAT rate and press Enter.
•• The payment terminal prints receipts.
5.2 How to withdraw cash
The cash withdrawal function can be used when the customer wants to withdraw cash
from the cash desk. In such a case, you make a transaction and give the customer cash from the cash desk. The merchant receives a 50 cent compensation for the
transaction. In other words, if the customer wants to have €10.00 in cash, you enter a
€10.50 transaction and give the customer €10.00 in cash.
Note: Cash can be withdrawn only with debit cards. The use of the
cash withdrawal function must be agreed on with the bank.
1. Press MENU F1.
2. Select CASH WITHDRAW.
3. ENTER AMOUNT: Enter the amount in euros, including cents, and press Enter.
4. PLEASE INSERT CARD: Insert the card in the reader or swipe the card.
5. VISA Fx / BANK Fx: Select Bank.
6. ENTER PIN: If the card is a chip card, the customer enters the PIN code and
presses Enter.
•• The payment terminal prints two receipts. The first receipt is for the merchant,
the second one is for the customer.
•• The payment terminal prompts you to check the customer’s identity, if the
rules of the card product so require.
7. Press Enter, check the customer’s identity, write the last four digits of the customer’s
personal identity number on the receipt and indicate his/her identity card type.
26
5. SPECIAL VERSIONS
Note: If the customer pays with a chip card, Extra can be entered
only during the transaction.
How to enter Extra into the terminal separately:
The customer has written an amount at the Extra line on the receipt. The amount must
be entered into the terminal separately during the same day.
1. Press MENU F1.
2. Select EXTRA.
3. ENTER RECEIPT NUMBER: The payment terminal shows the number of the previous receipt. Press Enter to accept it, or enter another receipt number and press
Enter.
4. EXTRA: Enter the amount and press Enter.
•• The payment terminal prints a receipt.
5.4 VAT
When you are entering a transaction, the payment terminal prompts you for VAT. Enter
the appropriate VAT rate.
When this function is in use, the payment terminal indicates the VAT separately on the
receipt.
The VAT function is activated in the Settings menu (page 22).
27
5. SPECIAL VERSIONS
5. SPECIAL VERSIONS
5.5 Mandatory authorization
5.8 Multicashier version
If mandatory verification is in use, the payment terminal verifies all transactions automatically irrespective of the amount or card.
The multicashier function can be used for example in restaurants when it is necessary
to distinguish between sales by different waiters.
Mandatory verification is activated in the Settings menu (page 22).
•• When the multicashier function is in use, the payment terminal prompts you for
CASHIER NUMBER when you are entering a transaction.
•• Enter a number between 1 and 99.
•• The cashier number is printed on the receipt.
5.6 Preauthorization
Advance verification allows for example car rental agencies and hotels to check the
operation of the card.
The multicashier function is activated in the Settings menu (page 22).
Advance verification is activated in the Settings menu (page 22).
1. Press MENU F1.
2. Select PREAUTHORIZATION.
3. PLEASE INSERT CARD: Insert the card in the reader or swipe the card.
4. VISA Fx / BANK Fx: Select Debit.
5. ENTER AMOUNT: The payment terminal suggests EUR 1. Press Enter.
6. ENTER PIN: If the card is a chip card, the customer enters the PIN code and
presses Enter.
•• The payment terminal contacts the verification centre and makes a cover
reservation and then cancels it.
5.7 Invoice
The invoice function works in the same way as the cash receipt (section 5.1).
The only difference is that the text Invoice is printed on the receipt.
How to make an invoice:
1. Press MENU F1.
2. Select INVOICE.
3. Select INVOICE.
4. ENTER AMOUNT: Enter the amount in euros, including cents, and press Enter.
•• The payment terminal prints receipts.
How to void an invoice:
1. Press MENU F1.
2. Select INVOICE.
3. Select VOID. VOID INVOICE
4. ENTER AMOUNT: Enter the amount in euros, including cents, and press Enter.
•• The payment terminal prints receipts.
28
29
6. OTHER VERSIONS
7. ERRORS
6.1 Shared use by multiple entrepreneurs
7.1 Messages on the display
The payment terminal service is also available for shared use by multiple entrepreneurs. In this version, one and the same payment terminal is used by multiple users,
and the money is directed to different accounts.
BLACKLIST MISSING No blacklist is found in the payment terminal. See
section 2.3.4 for instructions on how to download
the blacklist.
HOW TO PRINT A LIST OF USERS:
1. Press LILA4.
2. Select PRINT.
3. Select USERS.
USE MAG CARD The payment terminal cannot read chip cards. Use
the magnetic stripe reader.
USE CHIP The card has an EMV chip. Use the chip card reader.
The payment terminal prints a list of the payment terminal users. The list includes user
numbers, receipt texts and member shop numbers.
PIN LOCKED The PIN code of the card has been locked. To unlock the PIN, contact the card issuer or insert the
card in an ATM and enter the PIN code.
APPLICATION LOCKED The application on the card is locked. The card holder must contact the card issuer.
HOW TO MAKE A PAYMENT TRANSACTION:
1. ENTER AMOUNT: Enter the amount in euros, including cents, and press Enter.
2. ENTER USER NUMBER: Enter the user number and press Enter.
3. PLEASE INSERT CARD: The customer feeds the card in the chip reader or the
salesperson reads the magnetic stripe.
4. VISA Fx / BANK Fx: The customer selects the payment method.
5. ENTER PIN: The customer enters a PIN code and presses Enter.
If the customer accepts the transaction with a PIN code, no signature is needed.
The payment terminal prints two receipts. One receipt is for the merchant, the other is
for the customer.
The payment terminal prompts you to check the customer’s identity, if the rules of the
card product so require.
JÄSENLIIKENUMERO PUUTTUU The card is not found in the selection of cards and
cannot thus be used for paying. Alternatively, no AID
and BIN tables can be found in the payment terminal. Contact the bank from the payment terminal
(see instructions at 2.3.3).
VIRHE
SERVICE NOT ALLOWED FOR
THIS CARD PRODUCT
6. Press Enter, check the customer’s identity, write the last four digits of the customer’s personal identity number on the receipt and indicate his/her identity card type.
DOWNLOAD NEEDED 7. REMOVE CARD: Remove the card from the reader. Make sure the card is in the
reader slot during the entire transaction, or the operation will be aborted.
No AID and BIN tables are found in the payment terminal. Contact the bank from the payment terminal
(see instructions at 2.3.3).
The card is not found in the selection of cards and
cannot thus be used for paying.
The application can no longer be found on the payment terminal. Contact Sonera Customer Service.
REPORTS:
Reports are printed in the same way as in the basic version, except that a batch report
is printed separately for each user.
Note: No monthly report is available in this version.
30
31
7. ERRORS
7. ERRORS
7.2 Messages on the receipt
7.4 Maintenance
CONNECTION ERROR = The payment terminal is unable to establish a connection.
See section 7.3 for instructions.
Never try to repair the terminal by yourself – always send it to a repair shop. If you suspect or know that the terminal is broken or damaged, contact Sonera’s technical corporate customer service.
BATCH SENDING ERROR = The payment terminal is unable to establish a connection.
See section 7.3 for instructions.
CHECK THE CONNECTIONS AND TRY AGAIN = The payment terminal is unable to
establish a connection. See section 7.3 for instructions.
PYYTÄMÄÄNNE AINEISTOA EI OLE (printed at MAKSUPÄÄTEPALAUTE) = The bank has
no ready-processed data for the terminal. This is the normal situation after a weekend
or holiday.
TAPAHTUMATIEDOSTO PUUTTUU (printed at MAKSUPÄÄTEPALAUTE) = The bank has
no ready-processed data for the terminal. This is the normal situation after a weekend
or holiday.
ERROR FILE NOT EXISTENT (printed at MAKSUPÄÄTEPALAUTE) = The bank has no
ready-processed data for the terminal. This is the normal situation after a weekend or
holiday.
If Sonera’s technical corporate customer service asks you to send the device to a repair shop, do as follows:
1. Pack the terminal so that it is well protected during the transport.
2. Enclose a note explaining what the suspected fault is and whether there are any
payment transactions in the terminal’s memory, and also give your contact details.
3. You need not send any cables with the terminal unless you want them to be
checked as well.
4. Send the terminal to the repair shop by mail. The postage is paid by the sender.
Sonera Payment Terminal equipment is maintained by Point Transaction Systems Oy.
Repair shop address:
Point Transaction Systems Oy / Huolto
Vanha Nurmijärventie 62 D
01670 Vantaa
OTA YHTEYS NEUVONTAAN (printed at MAKSUPÄÄTEPALAUTE) = The information
requests are different on the payment terminal and in the bank. Contact the bank’s
information desk.
7.3 Other exceptions
CONNECTION PROBLEM = The connection may be stuck. Switch the payment terminal
off and on, and then try to establish a connection by pressing F2. Make sure the SIM
card is properly in place.
TERMINAL DOES NOT READ CARDS = The reader may be stuck. Switch the terminal off
and on and try again. The reader may also be dusty. Clean the reader and try again.
POWER IF OFF = Switch on the terminal by keeping Enter pressed down. If the battery
is empty, recharge the payment terminal.
32
33
8. TECHNICAL DETAILS
Processor: Memory:
Display:
Readers: 32-bit microprocessor, ARM9
6 MB
Graphic 128x128 pixel white high-contrast LCD, light background
Magnetic stripe 3-track bi-directions. Chip cards ISO7816 1.8V 3V 5V,
memory and smart cards, EMV-certified.
SAM slots: 3
Keypad: 12 numeric keys with alphabet, 10 function keys and 6 selection keys
Ports: RS-232 and USB-capability
Connections: GPRS
Printer: Thermal graphic, 18 lps, paper roll width 57 mm, diametre 40 mm
Security: 3DES, DUKPT, Master/session key management, PED-certified, SSL,
WPA
Battery: 1800 mA lithium-Ion Smart
Size: Length 16.8 cm, max. width 7.8 cm, height 7 cm, weight 439 g
9. CONTACT INFORMATION
Customer service:
Sonera Corporate Customer Service (select 4)
0200 18818 (Mon–Fri 8.00am–4.30pm)
Sonera Technical Customer Service
Fault reports (select 2)
0206 90801
About Sonera Payment Terminal Service
www.sonera.fi/maksupaate
Orders of accessories:
•• via the Internet
www.sonera.fi/maksupaate/hallinta
•• by phone (Point Transaction Systems Oy)
09 477 433 44 (Mon-Fri 8.00am–4.00pm)
Verification services:
American Express Diners Club Luottokunta
Debit cards 0800 114 646
0800 955 55
09 696 4646
0100 3100
Banks:
Handelsbanken
Nordea
OP-Pohjola Group
Sampo
Savings banks / Aktia /
Local cooperative banks
Ålandsbanken
010 444 2545
0200 672 10
0100 051 51
0600 125 25
0100 4050
020 429 2910
9.1 Returning the Payment terminal
If you stop using the Sonera Payment Terminal service, the service must be cancelled
in writing on the sonera.fi website at the address www.sonera.fi/yhteydenotto, under
“Liittymä- ja palvelumuutokset” (changes in subscriptions and services).
The payment terminal must be returned to the address below.
Point Transaction Systems Oy
Laitepalautus / Sonera
Vanha Nurmijärventie 62
01670 Vantaa
34
35
Sonera Corporate Customer Service
0200 18818
(mobile phone charge / local network charge)
Sonera Technical Customer Service
0206 90801 (dial 2)