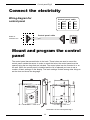
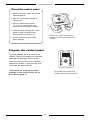
1
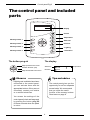
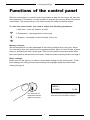
User Guide
Digital control panel Digi II
Model 1601-12
User Guide for the following
models of contactor boxes
WE3 2005-3
WE4 2005-4
WE5 2005-5
Control panel Digi II
Thank you for choosing quality
products from Saunatec
We think that our products will live up to your expectations and give you many hours of
enjoyment in your sauna. We want you, your family and your friends to have many
comfortable sauna baths and at the same time find new ways to enjoy sauna bathing. We
have taken today’s demands on sauna bathing into consideration and equipped the sauna
heater with many usable and unique functions. Among other things, the control panel has
four memory buttons, which can be pre-programmed to your personal favorite sauna bath.
Read this manual carefully. The manual is divided into two separate sections. The first is for
you as a user and the second is for the installer.
Saunatec is the world-leading producer of products for saunas and steam saunas. We
develop, produce and market products for saunas and steam saunas in the whole world.
Saunatec has the largest factories of sauna products in the world (Finland, Germany and
USA) and a well-developed net of retailers, both nationally and internationally. Our product
range consists of sauna- and steam rooms, electric and wood heaters, control panels and
sauna accessories.
Pentti Piisku, President, Saunatec Group OY
User Guide Digital control panel Digi II
Copyright © 2004. Saunatec Group OY. All rights reserved
2
Control panel Digi II
Information to the user
This user guide helps you to understand and use your new sauna products. We hope that
you read this manual carefully and that you respect the warning texts.
The user guide is divided into two sections: Information to the user and Information to
the installer. You, as a user, receive a thorough description of the workings of a sauna
heater, how to use the control panel and what you should keep in mind regarding
maintenance.
If you have questions or if you need help with the products, please turn to your local retailer.
Certain portions of the user guide are more important than others. At these portions we use
the following symbols:
!
Warning
Observe
Table of contents for the user
The control panel and included parts ........................ 4
Functions of the control panel
- Set the time and chose the language ................... 6
- Set the start time ................................................... 7
- Set the temperature ............................................... 8
- Set the duration ..................................................... 8
- Program and activate the memory buttons ........... 9
- Change the settings during the sauna bath ........ 10
- Calibrate the temperature .................................... 11
- Activate Smartsauna ........................................... 11
- Lock the control panel ......................................... 12
- Lock fan or lighting .............................................. 12
Alarm ........................................................................ 13
Connect the electricity .............................................. 14
Mount and program the control panel ...................... 15
3
Tips and advice
Control panel Digi II
The control panel and included
parts
Display
On/Off
Temperature
Memory button 1
Start time
Memory button 2
Duration
Memory button 3
* Lighting
Memory button 4
The button prog ok
Page upwards in the menu
Activate function (OK)
Page downwards in the menu
* Ventilation
The display
Start time
13:28
Duration
04:51
88O C
Temperature
Tips and advice
Observe
* If lighting and ventilation have been
The control panel gives you the
opportunity to set four separate
sauna baths. We recommend
that you utilize the useful
function of the memory buttons.
Read more on page 9.
connected to the control panel,
you can activate them with the
appropriate buttons. If they are not
connected, contact your retailer
or a certified electrician.
You access the settings of the
control panel (clock and language)
by pushing the button prog ok
for three seconds when the panel
is not on.
4
Control panel Digi II
Functions of the control panel
With the control panel, you set the time for the heater to start, for how long it will work and
the temperature in the sauna. It is also possible to program four memory buttons for special
sauna baths. This means that you only need to push one button to start the heater.
To start the sauna heater, you need to adjust the following parameters:
1. Start time – when the heater is to start.
2. Temperature – the temperature in the sauna.
3. Duration – the length of time the heater is to be on.
Memory buttons:
We recommend that you take advantage of the memory buttons when using your sauna.
You can easily enter your preferences on separate buttons. When it is time to take a sauna
bath you activate them with a single push. Each memory button has preset values when
the control panel is delivered from the factory. Read more about memory buttons on page 9.
Basic settings:
Before you use the sauna, you need to set the basic settings on the control panel. These
basic settings are setting the time and choosing the language. Read more about basic
settings on page 6.
MENU 1
CLOCK:
You easily set the
temperature with the
digital control panel.
12:00
You set the time by programming in the menumode. See more information on page 6.
5
Control panel Digi II
Set the time and chose the
language
The control panel returns automatically to the off-mode from the menu-mode if you do not push
a button within three seconds. If a change is done it must be approved with the prog ok button
before the control panel resumes off-mode, otherwise the change is not saved.
Set the time
Chose language
Make sure that the control panel
is in off-mode before you set the
time
Make sure that the control panel
is in off-mode before you chose
language.
1. Push the button
prog ok for three
seconds
1. Push the button
prog ok for three
seconds
The display shows:
2. Page to Menu 2 by pushing
the button prog ok
MENU 1
CLOCK:
12:08
The display shows:
MENU 2
2. Set the time with the
arrow buttons
LANGUAGE:
ENGLISH
3. Chose the new
language with the
arrow buttons
3. Approve the new
time with the button
prog ok
4 Approve the new
language with the
button prog ok
Observe
If there is a power failure of more than 20 minutes, the time is deleted from the
control panel. Then you have to reprogram the setting.
The control panel has five languages to chose from: Finnish, English, Swedish,
German and Dutch.
6
Control panel Digi II
Set start time, temperature and
duration
1
Tips and advice
Set the start time
By holding the arrow button
depressed the values are
paged up or down fast.
The start time is the time that the
heater turns on, for example 18:30.
1. Start the panel with the
On/Off button
The background lighting
is lighted
2. Push the button
prog ok
The display shows earlier chosen
settings, for example:
14:00
70O C
01:30
3. Push the button for
start time
The display shows:
START TIME:
14:00
4. Set start time, for example
18:30, with the arrow
buttons
5. Approve the start time
with the button prog ok
The display shows:
18:30
70O C
01:30
6. Start the heater by
pushing prog ok for
three seconds.
7
Control panel Digi II
2
3
Set the temperature
Set the duration
The temperature is the temperature that the heater produces in the
sauna, for example 80° C.
Duration is the time that the heater
will operate. Maximum duration is
six hours.
1. Push the button for
the temperature
1. Push the button for
start time
The display shows:
The display shows:
TEMPERATURE:
ON-TIME:
70O C
01:30
2. Set the temperature
with the arrow buttons,
for example 80° C
2. Enter duration with
the arrow buttons,
for example 30 minutes
3. Approve the temperature with the button
prog ok
3. Approve the duration
with the button
prog ok
The display shows:
The display shows:
18:30
80O C
18:30
01:30
80O C
01:30
4. Start the heater by
pushing prog ok for
three seconds.
4. Start the heater by
pushing prog ok for
three seconds.
Turn on the
lightning
Activate ventilation
1. Push the button for
ventilation
1. Push the button for lighting
The display shows:
The display shows:
8
Control panel Digi II
Program and activate the
memory buttons
The digital control panel has four
memory buttons. As a user you have
the opportunity to set four separate
sauna bath programs. Each program
has its owns adjustments, and you
activate them with just a push of a
button.
Program a
memory button
1. Enter a duration on the control
panel
2. Enter a temperature on the
control panel
3. Push one of the memory
buttons
4. Push the button prog ok
Memory
buttons
Activate a memory
button
When the control panel is delivered
from the factory the memory buttons
are pre-set. It is a good idea, however,
to change the settings so that you get
the sauna bath of your choice. Set the
temperature and duration of the sauna
heater according to earlier instructions
(see page 10).
1. Start the control panel with the
On/Off button
2. Push one of the memory buttons
Check a memory
button
The preset values of the memory
buttons are:
Duration:
Temperature:
1. Make sure that the control panel
is in Off-mode. The display is
not lighted.
Two hours
Button 1: 60O C
Button 2: 70O C
Button 3: 80O C
Button 4: 90O C
2. Push a memory button and read
the settings. The display is
lighted.
9
Control panel Digi II
Change the settings during the
sauna bath
The instructions below show how to change the settings during the sauna bath. You may
want to lower the temperature or shorten the duration.
Change the
temperature
Turn off the sauna
1. Push the On/Off button
The display shows:
1. Push the button for
temperature
14:00
2. Set the new temperature
with the arrow buttons
3. Approve the new
temperature with the
button prog ok
Change the
duration
Observe
To change the settings during the
sauna bath does not change the
values in the memory buttons.
The change only affects the
ongoing sauna bath.
1. Push the button for
duration
2. Set the new duration
with the arrow buttons
3. Approve the new
duration with the
button prog ok
10
Control panel Digi II
Calibrate the temperature
If you have a thermometer inside the sauna that does not show the same temperature as that
which has been entered on the control panel, you can make a calibration (Offset). This means
that you adjust the control panel and the thermometer after the same scale. That the temperatures
differ is due to the fact that the warmth in the sauna is not exactly the same in all spaces.
Example:
Your thermometer inside the
sauna shows 84°C and your
control panel is set on 80°C. The
difference is thus + 4°C. By
setting OFFSET: T1 on – 4°C, the
control panel will show the right
temperature.
Calibrate the temperature
Make sure that the control panel is in Offmode before you calibrate the temperature.
1. Push the button prog ok for
three seconds
2. Page to the menu 3 with the
button prog ok
3. Calibrate the temperature with
the arrow buttons
4. Approve the temperature with
the button prog ok
Activate Smartsauna
Smartsauna is a function that measures the temperature in the sauna and computes the length of
time the heater will take to heat the sauna to the temperature that is set on the control panel. The
function only works when it is activated and in conjunction with a time setting.
Example:
You have had a hard day at work
and wish to relax with a sauna
bath directly when you come
home. When you arrive home at
16:00, you want the sauna to be
ready for you. By activating the
function Smartsauna the control
panel computes when the heater
should start, in order to warm up
the sauna to the temperature you
have chosen on the control panel.
Activate Smartsauna
Make sure that the control panel is in Offmode before you activate Smartsauna.
1. Push the button prog ok for
three seconds
2. Page to the menu 4 with the
button prog ok
3. Chose Smartsauna ON with
the arrow buttons
4. Approve the activation with
the button prog ok
11
Control panel Digi II
Lock the control panel
When a control panel is locked
it is not possible to start the
heater. This might be suitable in
situations where you wish to
have control of the sauna, for
example when children are
playing in the vicinity and you
want to hinder that the heater
is turned on by mistake.
Lock the control panel
Make sure that the control panel is in Offmode before you lock the control panel.
1. Push the up arrow
2. Push the down arrow
3. Push the fan button
The display show: LOCKED
Remove the lock with the same combination.
Lock the fan or lighting
When the fan or lighting is
locked, it is impossible to cut
off the ventilation or turn off
the light in the sauna. The light
cannot be turned off and the
ventilation cannot be cut off
before the lock has been
removed.
Lock the fan or light
Make sure that the control panel is in Offmode before you lock the fan or lighting.
1. Push the fan button or
the lighting button
2. Push the up arrow
3. Push the down arrow
4. Push the fan button
The display show: LOCKED
Remove the lock with the same combination.
Observe
Do not pause more than one second when
pushing the buttons, as you are activating
or deactivating the locks.
12
Control panel Digi II
Alarm
When there is an alarm situation, the control panel stops the heating, and the cause for the
alarm is shown on the display of the control panel.
Alarm
Display
What to do
The cable of the
temperature sensor
is broken.
ALARM
T1 CABLE OFF
Check the cable to and
from the sensor.
The temperature sensor
is triggered.
ALARM
CLEAR T1
Check the cause. Reset
the sensor by pushing
the reset button with a
screwdriver.
13
Control panel Digi II
Connect the electricity
Control panel cable
A1
A2
A3
A4
A5
Control panel cable
White
Brown
Green
Yellow
Grey
B1
B2
B3
B4
B5
Pink
Blue
Red
Black
Violet
A 1 23 4 5 B1 23 4 5
Heater or
contactor box
A 1 23 4 5 B1 23 4 5
Wiring diagram for
control panel
Mount and program the control
panel
The control panel has several holes in the back. These holes are used to mount the
control panel outside the sauna. In order to reach the holes, the control panel must be
opened using the two keys that are included. The control panel can be mounted in or on
the wall. When the control panel is installed and the lid is replaced you have to set a
number of basic settings on the display. The basic settings include among other things to
set the time and chose the language.
Dimensions of the control panel Digi II
14
Control panel Digi II
Mount the control panel
1. Mark on the wall where the control
panel should sit
2. Use the control panel opener to
open the lid.
3. Set the sheet-metal screws,
4,2 x 13 mm, in the holes and
screw the control panel in place.
4. Lead the cable through the control
panel so that it is placed right
before the lid is put back on.
Open the lid of the control panel by
inserting the control panel openers on
the side.
5. Put the lid back on and set the
basic settings.
Program the control panel
The basic settings are to be done by the
installer. They include setting the clock and
choosing the language. After a power
failure of more than 20 minutes the basic
settings are deleted. In that case the user
must reset the basic settings.
Instructions to program the basic
settings of the control panel are to
be found on page 6.
The installer must set the basic
settings. They are found at page 6.
15
314 SYRA 13A
Produced by Conclusion Sweden AB - www.conclusion.se
PL 72 02201 ESPOO, Finland / PL 15 10901 HANKO, Finland
Homepage: www.saunatec.fi - E-mail: [email protected]