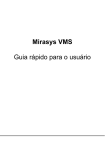
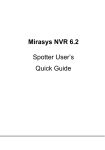
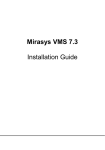
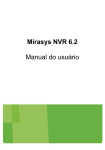
1
nvr_quick_en.book Page i Friday, September 12, 2008 2:46 PM
Mirasys NVR
Software Installation and Use
Quick Guide
nvr_quick_en.book Page ii Friday, September 12, 2008 2:46 PM
© 2006-2008 Mirasys Ltd. All rights reserved.
No part of this document may be reproduced for any purpose, even in part.
TRADEMARKS
Mirasys, Mirasys DINA, Mirasys N, Mirasys V, Mirasys NVR, Mirasys NVR Pro and
Mirasys NVR Enterprise are the trademarks of Mirasys Ltd.
Microsoft and Windows are either trademarks or registered trademarks of Microsoft
Corporation in the United States and/or other countries.
Other product and company names may be the registered trademarks of their
owners.
COPYRIGHT
Portions of this software are copyrighted by others, as follows:
DirectSkin OCX
WindowBlinds: DirectSkin™ OCX © Stardock®
log4net
Copyright 2001-2008 The Apache Software Foundation
MD5
Copyright (C) 1991-2, RSA Data Security, Inc. Created 1991. All rights reserved.
License to copy and use this software is granted provided that it is identified as the
"RSA Data Security, Inc. MD5 Message-Digest Algorithm" in all material mentioning
or referencing this software or this function.
License is also granted to make and use derivative works provided that such works
are identified as "derived from the RSA Data Security, Inc. MD5 Message-Digest
Algorithm" in all material mentioning or referencing the derived work.
RSA Data Security, Inc. makes no representations concerning either the
merchantability of this software or the suitability of this software for any particular
purpose. It is provided "as is" without express or implied warranty of any kind.
These notices must be retained in any copies of any part of this documentation and/
or software.
Windows Media Format Components
This product includes technology owned by Microsoft Corporation and under a
license from Microsoft Licensing, GP. Use or distribution of such technology outside
of this product is prohibited without a license from Microsoft Corporation and/or
Microsoft Licensing, GP as applicable.
Xerces
This product includes software developed by the Apache Software Foundation
(http://www.apache.org/).
Copyright © 1999 The Apache Software Foundation. All rights reserved.
nvr_quick_en.book Page iii Friday, September 12, 2008 2:46 PM
CONTENTS
DEFAULT USER NAME AND PASSWORD ................................... 1
BEFORE YOU BEGIN .......................................................... 1
SYSTEM COMPONENTS ....................................................... 2
INSTALLATION................................................................. 2
Removing previous software version ...................................2
Installing new software version .........................................2
Getting a license key .....................................................3
Installing client programs ................................................4
Setting the IP address to system configuration files .................5
CONFIGURATION .............................................................. 5
Configuring the system ...................................................5
Adding cameras ............................................................6
Configuring cameras ......................................................6
General settings .......................................................6
Motion detection settings ...........................................7
Scheduler ...............................................................8
Profiles ......................................................................9
Users ...................................................................... 11
MONITORING................................................................. 12
User interface ........................................................... 12
Real-time monitoring ................................................... 13
Working with group windows (device windows) .................... 14
Using layouts ............................................................. 16
Controlling dome cameras ............................................. 16
Playback .................................................................. 17
Multiview playback ................................................. 17
Search ..................................................................... 18
Activity Search ...................................................... 18
Multiview search .................................................... 19
Bookmarks ................................................................ 20
Image tools ............................................................... 20
Export ..................................................................... 20
Playing video clips .................................................. 22
NOTES......................................................................... 23
nvr_quick_en.book Page iv Friday, September 12, 2008 2:46 PM
nvr_quick_en.book Page 1 Friday, September 12, 2008 2:46 PM
Default user name and password
DEFAULT USER NAME AND PASSWORD
User name: Admin
Password: 0308
The default username and password should not be used even in closed
networks. Please ensure that the default username and password are not
in use after the system has been installed.
BEFORE YOU BEGIN
This guide is an abbreviated version of the NVR help document set. It
includes the following topics to get you started:
•
•
•
•
Installing the NVR software
Adding IP cameras
Basic settings
Basic use
MORE INFORMATION: For more information about installing, configuring,
and using the system, please refer to the following guides:
•
Installation guide. How to install other devices, for example, dome
cameras.
• Administrator’s guide. How to use Mirasys NVR System Manager for
configuring the system settings.
• User’s guide. How to use Mirasys NVR Workstation for video and audio
surveillance.
The guides are on the DVMS Installation CD in PDF format. You can also
access the Administrator’s Guide by clicking Help in Mirasys NVR System
Manager. You can access the User’s Guide by clicking Help in Mirasys NVR
Workstation.
NOTE: The Mirasys NVR 5.0 software is NOT compatible with previous
Mirasys NVR (or V/N) licenses. When upgrading an older system to Mirasys
NVR 5.0, it is important to update the license key to version 5.0 BEFORE
installing the 5.0 software.If the software is upgraded before the license
key is updated, all recorder specific information (including profiles and
stored material) will be lost. Please see “Getting a license key” on page 3
for information on updating the license key.
1
nvr_quick_en.book Page 2 Friday, September 12, 2008 2:46 PM
Mirasys N Series
SYSTEM COMPONENTS
The Mirasys NVR series system has these components:
•
•
•
One to five network video recorders (NVRs).
Master Recorder (one of the NVRs). All system configuration data is
stored on the Master Recorder.
Client programs:
•
Mirasys NVR System Manager. Use this program for configuring the
system and for creating user accounts and user profiles.
• Mirasys NVR Workstation. Use this program for real-time
monitoring and for playing back recorded video.
The client programs can be used locally on the NVR or over a network from
any computer.
INSTALLATION
REMOVING PREVIOUS SOFTWARE VERSION
If there is a previous version of the recorder installed, follow these
steps:
1
Back up system and recorder settings in System Manager.
2
Remove the recorder and the applications (DVMS) in Add or Remove
Programs.
3
Install the new software version.
4
Restore the settings.
INSTALLING NEW SOFTWARE VERSION
Make sure that .NET Framework 2.0 and all critical updates have been
installed on the computer. You can install them by using Windows Update.
2
nvr_quick_en.book Page 3 Friday, September 12, 2008 2:46 PM
Installation
To install the NVR software:
1
Put the DVMS Installation CD into the CD drive. The setup program
starts automatically. You can also start the setup program by doubleclicking the file dvms_X.X.exe (X.X is the version number).
2
By default, the setup program installs the recorder and the
applications System Manager and Workstation.
3
Select the destination folder and click Next.
4
In the Installation Configuration dialog box, specify the IP address of
the Master Recorder. Click MASTER_RECORDER, click Set, and type
the IP address or DNS name of the NVR. Use the default 127.0.0.1 for
systems with one NVR. Then click Next.
5
After DirectX 9.0c installation has started, select I accept the
agreement and click Next.
Click Next.
6
Select the video standard and click Next.
7
Click Next to start the installation. When the NVR has been installed,
the dialog box Recorder has been successfully installed is shown. Click
Finish.
GETTING A LICENSE KEY
After the installation, the NVR supports only one IP camera. You need a
license key to get the full functionality. For the license key, send the MAC
address of the NVR and the serial number of the NVR software to Mirasys.
The serial number is on the cover of the DVMS Installation CD.
NOTE: The Mirasys NVR 5.0 software is NOT compatible with previous
Mirasys NVR (or V/N) licenses. When upgrading an older system to Mirasys
NVR 5.0, it is important to update the license key to version 5.0 BEFORE
installing the 5.0 software.If the software is upgraded before the license
key is updated, all recorder specific information (including profiles and
stored material) will be lost.
3
nvr_quick_en.book Page 4 Friday, September 12, 2008 2:46 PM
Mirasys N Series
To get a license key:
1
Click the DVMS System Manager icon on the computer desktop to start
the System Manager program.
2
The License Information dialog box is automatically shown when you
start the program for the first time. Copy the MAC address and send it
by e-mail together with the serial number of the software to
[email protected]. In return, you will receive the license key.
3
Start System Manager and click the Update License Key button in the
License Information dialog box. Type the license key. The system is
updated and System Manager closed. Next time you log on to System
Manager, all cameras are available.
NOTE: The default unregistered license is limited to 60 days, after which
a valid license key is required. Unless a valid license key is not added to
the system within 60 days after the installation, the system will cease to
operate.
INSTALLING CLIENT PROGRAMS
The system can be used from any computer that has access to the same
network as the NVR and that has the client programs installed.
4
nvr_quick_en.book Page 5 Friday, September 12, 2008 2:46 PM
Installation
To install the client programs:
1
Put the DVMS Installation CD into the CD drive. The setup program
starts automatically. If the setup program does not start
automatically, you can also start it by double-clicking the file
dvms_X.X.exe (X.X is the version number).
2
By default, the setup program installs the recorder and the
applications System Manager and Workstation. Open the menu next to
Recorder and select Entire feature will be unavailable.
3
Select the destination folder and click Next.
4
In the Installation Configuration dialog box, specify the IP address of
the Master Recorder. Click MASTER_RECORDER, click Set, and type
the IP address or DNS name of the Master Recorder in the Property
Value box. The Master Recorder can be any of the NVRs in the system,
but note that all client programs in a system should use the same
Master Recorder. Then click Next.
5
When the NVR has been installed, the dialog box Recorder has been
successfully installed is shown. Click Finish.
Then click Next.
SETTING THE IP ADDRESS TO SYSTEM CONFIGURATION FILES
If the the recorder will function as the Master Recorder of a system, and if
it will be accessed over a network, you have to set the recorder’s IP
address through the System Manager application.
5
nvr_quick_en.book Page 6 Friday, September 12, 2008 2:46 PM
Mirasys N Series
To set the IP address through System Manager::
1
Start System Manager locally on the Master Recorder as instructed in
the Administrator’s Guide.
2
In the System tab, click Change recorder addresses.
3
Click on Local Recorder.
4
Click the Change recorder address button.
5
Type the new IP address or DNS name of the recorder into the New
recorder address field.
6
Click OK.
NOTE: You only need to set the local IP address for the Master
Recorder of a system if the recorder can be accessed over a
network. If the recorder is accessed locally, there is no need to set
the address.
CONFIGURATION
Use the Mirasys NVR System Manager program to configure the system
settings. Only users with administrator’s rights are allowed to change
settings.
CONFIGURING THE SYSTEM
To configure the system:
1
Start System Manager.
2
Add IP cameras on the Recorders tab. For more information, see
“Adding cameras” on page 6.
3
After adding the cameras, the system starts to record video using the
default settings. If necessary, you can change the camera settings on
the Recorders tab. For more information, see “Configuring cameras”
on page 6.
4
The system has one default profile “Service”, which contains the
camera channels and other devices specified by the license key. If
necessary, you can edit the default profile and add other profiles on
the Profiles tab. See “Profiles” on page 9.
5
The system has one default user, “Admin”. You can add other user
accounts on the Users tab and assign profiles and user rights to them.
6
nvr_quick_en.book Page 7 Friday, September 12, 2008 2:46 PM
Configuration
ADDING CAMERAS
To add IP cameras to the NVR:
1
In the camera’s internal settings, give the camera a static IP address,
a user name, and a password. See the camera manual for details.
2
Start System Manager.
3
Click the Recorders tab and double-click Hardware settings.
4
On the Video tab, click Add. The Configure IP Camera dialog box is
shown.
5
Do the following and click OK:
•
•
•
•
6
Select the model of the camera or video server from the list, or
select Automatic camera search to automatically configure the
camera. Automatic camera configuration works currently for all
ACTi, Arecont Vision and IQEye IP cameras, and for all Axis IP
cameras with three digits in their model name. Whenever possible,
Automatic camera configuration should be preferred.
Type the IP address of the camera or video server.
Type the port number, which is usually 80.
Type the user name and password that were set in the camera’s
internal settings.
A link to the camera’s settings is shown in the Settings column. You
can click the link to access the camera’s internal settings.
NOTE: For a list of supported cameras, see the file ip_cameras.pdf on the
DVMS Installation CD.
CONFIGURING CAMERAS
After adding IP cameras to the system, adjust their frame rates,
resolutions and other parameters in Camera Settings.
To change camera settings:
• On the Recorders tab, double-click Cameras.
General settings
To rename a camera:
• On the General tab, select the camera and then type the new name
in the Name text box.
7
nvr_quick_en.book Page 8 Friday, September 12, 2008 2:46 PM
Mirasys N Series
To disable cameras that are not used:
• Select the camera or cameras and then clear the check box In use.
To change the frame rate, image quality, or resolution:
• Select the camera and then change the settings under Video quality.
Motion detection settings
By default, video is recorded when the system detects motion in the
camera scene. You can create custom motion detection masks for each
camera on the Motion Detection tab. For example, if there is movement
in the camera scene that you do not want to trigger recording, you can
exclude those areas from motion detection. On the Scheduler tab of the
camera settings you can select which mask to use during each hour of the
week.
A mask contains these parameters:
•
•
•
Selected areas. The system detects motion in areas that are painted
red.
Detection sensitivity.
Minimum quantity of movement.
To edit a mask:
1
Select the camera from the camera list.
2
Click the mask that you want to edit.
3
To change the name of the mask, click Change Mask Name and type
a new name for the mask.
4
Paint the areas red where you want the system to detect movement
and remove the red from areas where you want to ignore movement.
Use the pen tool and the other drawing tools. For example, use the
Eraser to remove red from areas where you want to ignore movement.
5
Set the detection sensitivity.
6
Set the minimum quantity of movement.
7
Select the motion detection method, comparative or adaptive motion
detection.
8
To test the settings, click the Turn Motion Counter On/Off button
. Detected motion is shown in red in the image, and the counter
increments each time motion is detected. Adjust detection sensitivity
and the required quantity of movement as necessary.
8
nvr_quick_en.book Page 9 Friday, September 12, 2008 2:46 PM
Configuration
Motion detection method
You can use one of these two motion detection algorithms:
Comparative detection compares an image to the image before it. If the
differences exceed the set limits, the system detects motion. You can use
comparative motion detection in most conditions. However, if there is a
lot of movement in the background, for example, rain, moving leaves, or
changes in light levels, use adaptive motion detection.
Adaptive detection compares each image to a background image. The
system learns the background image and the movement that belongs there
automatically. Thus, the system does not interpret, for example, moving
leaves, as motion.
Sensitivity and quantity
The system detects motion when:
•
•
Pixels change more than the set limit (Sensitivity).
The required number of pixels change (Quantity).
If there is a lot of background noise in the image, for example, changes in
lighting conditions, decrease sensitivity by dragging the slider to the left
or increase the quantity limit by dragging the slider to the right.
Scheduler
On the Scheduler tab, you can select which mask to use during each hour
of the week. You can also turn recording off for specified hours and specify
different schedules for holidays.
PROFILES
A profile specifies the cameras and other devices that a user is allowed to
access. The system has one default profile “Service”, which contains the
devices that the license key specifies. You can use the default profile as
such or modify it freely, for example, group together cameras that are at
the same location. You can also add other profiles.
9
nvr_quick_en.book Page 10 Friday, September 12, 2008 2:46 PM
Mirasys N Series
The following figure shows the default profile and a modified profile:
Default profile on the left and a modified profile on the right.
10
nvr_quick_en.book Page 11 Friday, September 12, 2008 2:46 PM
Configuration
To edit the default profile or add a new profile:
1
On the Profiles tab, do one of the following:
•
Click the Edit Profile button in the
lower-right corner of the navigation
pane.
•
2
Click the Add Profile button
in
the lower-left corner of the navigation pane. The Add Profile
dialog box is shown.
On the General tab, type a name and a description of the profile.
Make sure that the Active check box is selected. If you want to
temporarily disable a profile, clear the check box.
3
On the Devices tab, specify a tree structure for the profile:
•
To add a group to a profile, click the Add Device Group button
below the Selected devices pane.
To change the name of a group, click the device group and type a
name for it in the Name box in the Device properties section.
• Add as many device groups as necessary. A new device group is
always added below the selected device group.
Add devices to the profile:
•
4
•
•
•
Select the source: a recorder or a profile. Available devices are
shown in the left pane.
Click the device group where you want to add a device.
Select the device that you want to add and then click the right
arrow. You can also drag a device from the left pane to the right.
In User rights, select the functions that the user can activate.
•
• NOTE: To add more than one device at the same time, you can
5
select a device group from the left pane and then click the right
arrow. Alternatively, drag the device group from the left pane to
the right.
To save the profile, click OK.
USERS
There are three types of user accounts in the system:
Users are allowed to log on to Workstation but not to System Manager.
11
nvr_quick_en.book Page 12 Friday, September 12, 2008 2:46 PM
Mirasys N Series
Users with monitoring rights are allowed to log on to System Manager and
monitor the system on the System tab, but they are not allowed to change
the settings.
Administrators are allowed to log on to System Manager and change all
settings, for example, to change camera settings or add new profiles or
user accounts.
Each user must have at least one profile that sets the user’s rights in the
system. One user can have five profiles at the most.
To edit a user account:
1
Click the Add User button
in the lower-left corner of the Users
tab. The Add User dialog box is shown.
2
Do the following:
•
•
•
•
•
•
•
3
Type a name for the account in the User name box.
To add a password to the account, click Edit and type the password
two times.
Type an optional description about the user account.
Set the user’s rights in the system.
Select the profile or profiles you want to assign to the user. Click
the arrow buttons or drag the profiles from the left pane to the
right.
TIP: To select more than one profile at a time, keep the SHIFT or
CTRL key pressed.
Select the user interface language for the user.
To protect the program, you can use an automatic lock or
automatic logoff. If the user does not use the program for the
specified time, the program is locked or the user is logged off. The
user can also manually lock the Workstation program at any time.
Click OK to save the new user account.
MONITORING
Use the Mirasys NVR Workstation program for monitoring real-time video
and playing back recorded video. You can use the program on the same
computer where the NVR is installed or over a network from any computer
where the client programs have been installed.
To start Mirasys NVR Workstation:
• Double-click the DVMS Workstation icon on the computer desktop.
12
nvr_quick_en.book Page 13 Friday, September 12, 2008 2:46 PM
Monitoring
USER INTERFACE
The Navigator on the left contains profiles and devices. A profile specifies
the devices that you have access to. Select the profile that you want to
use from the drop-down menu. After selecting the profile, you can access
the devices, for example, cameras, shown in the profile tree.
To change user interface language:
1
On the menu bar, click User and choose User Settings.
2
The User Settings dialog box is shown.
3
Choose the language from the menu and click OK.
13
nvr_quick_en.book Page 14 Friday, September 12, 2008 2:46 PM
Mirasys N Series
REAL-TIME MONITORING
To monitor real-time video from one camera:
1
Select the profile that you want to use from the Navigator.
2
Right-click the camera and choose Show Real-Time View from the
menu.
To monitor real-time video from multiple cameras:
Right-click a camera group icon and choose Show Real-Time View.
This opens a window that contains a real-time video view from all the
cameras in that group.
•
14
nvr_quick_en.book Page 15 Friday, September 12, 2008 2:46 PM
Monitoring
WORKING WITH GROUP WINDOWS (DEVICE WINDOWS)
Automatic layouts
You can use automatic view layouts to quickly organise the contents of the
device window.
1
Right-click on the device window and select View Mode.
2
Select the layout from the layout list, or select Dynamic to disable
automatic layouts.
NOTE: If you use automatic layouts, you cannot change the shape or
dimensions of the device window. To change the shape of the device
window, select Dynamic from the layout list.
To change the shape of a device window:
• Put the mouse pointer on the edge of the device window, and drag the
edge to the direction you want.
To change the dimensions of a device window:
• Drag the device window from one corner or from one edge. Each
device view is scaled accordingly.
15
nvr_quick_en.book Page 16 Friday, September 12, 2008 2:46 PM
Mirasys N Series
To move a device view away from a device window:
• Right-click the device view and choose Move Apart or drag the view
from the device window to the work space.
To close a view from a device window:
Right-click on the device view and choose Close.
•
To change the order of the devices views:
• Drag a view to a new position.
To add a device view:
• Drag the device or device group from the Navigator or from the work
space to the device window.
16
nvr_quick_en.book Page 17 Friday, September 12, 2008 2:46 PM
Monitoring
USING LAYOUTS
You can save different user interface layouts for easy access. A layout
specifies the windows that are shown and their dimensions and positions.
In addition, a layout remembers the profile that was used to create the
layout and possible image filters.
To save a layout:
1
Arrange the windows the way you want them in the layout.
2
On the toolbar, click Save Layout.
3
Type a name for the layout.
4
Click OK.
To apply a layout:
• Select the layout from the Saved Layouts list. The selected layout is
applied. The profile that was used to create the layout also becomes
active.
CONTROLLING DOME CAMERAS
Dome cameras (PTZ cameras) are shown with the dome camera icon
on the Navigator.
To activate dome control:
Right-click on the camera view, and choose Dome Control from the
menu. The zoom, iris, and focus controls appear on the camera view.
•
To pan and tilt the camera:
• Click on the video view and keep the mouse button pressed.
To adjust zoom, focus, and iris:
• Click and hold the zoom, focus, or iris control on the dome camera
view.
To move a camera to a preset position:
• Right-click the dome camera on the Navigator, point to Select
Position and then select the position that you want to move the
camera to.
To start a camera tour:
• Right-click the dome camera on the Navigator, point to Camera Tours
and then click the tour that you want to start.
17
nvr_quick_en.book Page 18 Friday, September 12, 2008 2:46 PM
Mirasys N Series
PLAYBACK
To play back video from one camera:
• Right-click a camera on the Navigator and choose Show Playback
View.
Multiview playback
You can play back synchronized video from as many as eight cameras.
A
B
C
A. Save and print images B. Playback controls C. Search Tools
To play back video from multiple channels, do one of the following:
• Right-click on a device group icon on the Navigator and choose Show
Playback View.
• Right-click on a camera on the Navigator or right-click on a real-time
video view and choose Show Playback View. Then drag other cameras
to the playback view from the Navigator or from the work space.
18
nvr_quick_en.book Page 19 Friday, September 12, 2008 2:46 PM
Monitoring
SEARCH
When you want to find recorded video, there are three search methods to
choose from:
•
•
•
Motion search
Activity search
Time search
Use Motion Search to find images with movement in a specified area of the
camera scene.
Use Activity Search to quickly find recorded video and audio using a bar
graph.
Use Time Search to find the nearest recorded image from the specified
time point.
This guide shows how to use Activity Search.
Activity Search
To show Activity Search:
• Right-click the camera on the Navigator and choose Activity Search.
The Activity Search window shows recorded video or audio as a bar graph.
19
nvr_quick_en.book Page 20 Friday, September 12, 2008 2:46 PM
Mirasys N Series
The horizontal axis shows the time, and the vertical axis shows the
quantity of recorded video or audio. By looking at the height of the bars,
you can immediately see if there has been activity in the camera scene.
This requires that recording is based on motion detection or audio
detection.
If video or audio is recorded continuously, the bars are all of the same
height. To find events from continuous recordings, try using Motion Search.
To use Activity Search:
1
Click the Months tab and then click the month (vertical bar) that you
want to examine. Then click the Days tab to choose the day, and then
the Hours and Minutes tabs (if necessary) to select the hour and the
minute.
2
The selected bar is shown in yellow, and the first image of the bar is
shown in the video view.
3
To play back video or audio, use the playback controls in the Device
Window.
NOTE: To find the right image, you can move from image to image using
the Next and Previous buttons.
Multiview search
You can show as many as eight video or audio views in Activity Search at
the same time.
20
nvr_quick_en.book Page 21 Friday, September 12, 2008 2:46 PM
Monitoring
To add a camera or audio channel to the search window:
• Drag the camera or audio channel from the Navigator or the work
space to the search window.
To remove a camera or audio channel from the search window:
Drag the view away from the search window or right-click on the view
and choose Close.
•
BOOKMARKS
When you use Motion Search, the program adds found events to the
Bookmarks list. In addition, you can manually add images or audio samples
to the list for easy retrieval.
A B C D
Bookmarks list. A. Shows the bookmarked image or audio sample B. Saves the
bookmark C. Deletes the selected bookmark or bookmarks D. Deletes all
unsaved bookmarks
To bookmark an event:
• Right-click on a video view in playback mode and choose Add to
Bookmarks.
IMAGE TOOLS
You can enhance real-time and recorded video by using the image tools.
For example, you can adjust brightness or contrast. These image tools are
available: sharpen, reduce noise, find edges, grayscale, equalize,
deinterlace, mirror, and flip.
To use the image tools:
• Right-click on the video view that you want to enhance and choose
Image Tools.
21
nvr_quick_en.book Page 22 Friday, September 12, 2008 2:46 PM
Mirasys N Series
EXPORT
To print an image:
1
Find the image that you want to print.
2
Click Export and then Print Image. The image is sent to the default
printer.
To export an image:
1
In playback mode, click Export and then Save Image. The Save Image
dialog box is shown.
2
First select the target disk and then the target folder. To create a new
folder in a currently open folder, click the New Folder button. To
move up to a higher level folder, click the Up button.
3
Type a name for the image, choose the image format, and then click
OK.
To export a media clip:
1
To save on a CD or DVD, put the disc into the disc drive. To save on a
removable device, plug the device in.
NOTE: If the Windows dialog box Blank disk is shown, select No
action. The recorder will write the clip to the disc automatically.
2
Open a playback view from the cameras that you want to export a clip
from. If you want to export a synchronized clip from more than one
channel, the playback views must be in the same device window.
3
Use a search tool to find the image that you want to start the media
clip from. For more information, see “Search” on page 18.
4
Click the Export button in the playback panel and choose Save Clip.
The Media Clip Settings dialog box is shown. Do the following and
then click OK:
•
•
•
Select where you want to save the clip.
In File Name, type a file name for the clip.
In Length, set the length of the clip.
NOTE: If you have cleared the option Always show this dialog box before
saving a media clip in Media Clip Settings, the program will export all
clips automatically with the given settings.
22
nvr_quick_en.book Page 23 Friday, September 12, 2008 2:46 PM
Monitoring
To export alarm specific data:
1
To save on a CD or DVD, put the disc into the disc drive. To save on a
removable device, plug the device in.
NOTE: If the Windows dialog box Blank disk is shown, select No
action. The recorder will write the clip to the disc automatically.
2
Open the Alarms window.
3
Find the alarm from which you want to export data in the New or
Search tabs.
4
Click the Export button in the lower right corner of the Alarms
window.
5
Click the Export button in the playback panel and choose Save Clip.
The Media Clip Settings dialog box is shown. Do the following and
then click OK:
•
•
•
Select where you want to save the clip.
In File Name, type a file name for the clip.
In Length, set the length of the clip.
NOTE: If you have cleared the option Always show this dialog box before
saving a media clip in Media Clip Settings, the program will export all
clips automatically with the given settings.
To change media clip settings:
1
On the menu bar, click User and choose Media Clip Settings.
2
Type or select the necessary settings.
Playing video clips
Video clips are exported as Windows Media files (WMV). They can be
played using Mirasys Media Player or Windows Media Player 10.
To play a media clip from a CD or DVD using Mirasys Media Player:
• Put the CD or DVD into the CD/DVD drive. Mirasys Media Player starts
automatically and starts to play the clip.
To play a media clip using Windows Media Player 10:
• Right-click the media clip file (WMV file), choose Open With and then
Windows Media Player. The clip starts to play automatically.
23
nvr_quick_en.book Page 24 Friday, September 12, 2008 2:46 PM
Mirasys N Series
NOTES
24
nvr_quick_en.book Page 25 Friday, September 12, 2008 2:46 PM
Notes
25
nvr_quick_en.book Page 26 Friday, September 12, 2008 2:46 PM
Mirasys N Series
26
nvr_quick_en.book Page 27 Friday, September 12, 2008 2:46 PM
Notes
27
nvr_quick_en.book Page 28 Friday, September 12, 2008 2:46 PM
Mirasys N Series
28
nvr_quick_en.book Page 29 Friday, September 12, 2008 2:46 PM
Notes
29
nvr_quick_en.book Page 30 Friday, September 12, 2008 2:46 PM
Mirasys N Series
30
nvr_quick_en.book Page 31 Friday, September 12, 2008 2:46 PM
Notes
31
nvr_quick_en.book Page 32 Friday, September 12, 2008 2:46 PM
Mirasys N Series
32
nvr_quick_en.book Page 33 Friday, September 12, 2008 2:46 PM
Notes
33