1
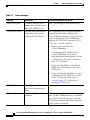
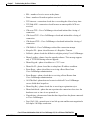
7
C H A P T E R
Troubleshooting the Cisco IP Phone
Cisco IP Phones include diagnostic screens that enable you to collect information
that can assist you in troubleshooting problems in your IP telephony network.
These sections provide details about these tools and how to use them:
•
Obtaining Status, Model, and Version Information, page 7-1
•
Resetting the Cisco IP Phone, page 7-12
•
Erasing Local Configuration, page 7-13
•
Updating Firmware Version, page 7-14
•
Resolving Startup Problems, page 7-15
•
Resolving Known Issues, page 7-25
Obtaining Status, Model, and Version Information
On Cisco IP Phones, you can obtain status information about the current call and
the network, and verify the phone model and installed firmware version.
This section covers these topics:
•
Displaying Statistics for Current Call, page 7-2
•
Viewing Status Messages, page 7-3
•
Displaying Network Statistics, page 7-8
•
Verifying Model and Serial Number, page 7-10
•
Verifying Firmware Version, page 7-11
Cisco IP Phone Administration Guide for Cisco CallManager 3.2, Cisco IP Phones 7960/7940/7910
78-10453-04
7-1
Chapter 7
Troubleshooting the Cisco IP Phone
Obtaining Status, Model, and Version Information
Displaying Statistics for Current Call
If you experience problems during an active call, you can collect information
during that call. This information provides useful troubleshooting information
that might assist you in resolving these problems and preventing them from
occurring during future calls.
Cisco IP Phone 7960/7940
During the call, press the ? button twice rapidly. The following information
displays:
•
RxType—Type of voice stream received (RTP streaming audio) (G.729,
G.711 u-law, G.711 A-law, or Link16k).
•
RxSize—Size of voice packets (in milliseconds) in the receiving voice stream
(RTP streaming audio).
•
RxCnt—Number of RTP voice packets received since voice stream was
opened (which is not necessarily identical to those received since the call
began because the call might have been placed on hold).
•
TxType—Type of voice stream transmitted (RTP streaming audio) (G.729,
G.711 u-law, G.711 A-law, or Link16k).
•
TxSize—Size of voice packets (in milliseconds) in the transmitting voice
stream.
•
TxCnt—Number of RTP voice packets transmitted since voice stream was
opened (which is not necessarily identical to those received since the call
began because the call might have been placed on hold).
•
Avg Jtr—Estimated average RTP packet jitter (dynamic delay a packet
encounters when going through the network) observed since the receiving
voice stream was opened.
•
Max Jtr—Maximum jitter observed since the receiving voice stream was
opened.
•
RxDisc—Number of RTP packets in the receiving voice stream that have
been discarded (bad packets, too late, and so on).
•
RxLost—Missing RTP packets (lost in transit).
Cisco IP Phone Administration Guide for Cisco CallManager 3.2, Cisco IP Phones 7960/7940/7910
7-2
78-10453-04
Chapter 7
Troubleshooting the Cisco IP Phone
Obtaining Status, Model, and Version Information
Troubleshooting Tips
•
The RxType/TxType indicates which codec is being used for the call between
this phone and the other device. If they do not match, verify that the other
device supports the codec conversation or that a transcoder is in place to
support the service.
•
The size of the sound samples (RxSize/TxSize) should match on both
devices.
•
If you are experiencing gaps in your voice calls, check the AvgJtr and MaxJtr
values. A large variance between the two values might indicate a problem
with jitter on the network or periodic high rate of network activity.
For additional information, see the Using the 79xx Status Information For
Troubleshooting tech note available from Cisco.com:
http://www.cisco.com/warp/customer/788/AVVID/telecaster_trouble.html
Viewing Status Messages
Use the status messages to diagnose network configuration problems. You can
access these messages at any point, even if the phone has not completed its startup
process.
Cisco IP Phone 7960/7940
Procedure
Step 1
Press settings.
Step 2
Use the Navigation button to select Status.
Step 3
Press the Select soft key.
Step 4
Select Status Messages.
Step 5
Press the Select soft key.
Step 6
The status messages screen might display any of the messages described in
Table 7-1.
Cisco IP Phone Administration Guide for Cisco CallManager 3.2, Cisco IP Phones 7960/7940/7910
78-10453-04
7-3
Chapter 7
Troubleshooting the Cisco IP Phone
Obtaining Status, Model, and Version Information
Table 7-1
Status Messages
Message
Explanation
Possible Explanation and Action
BootP server used
The phone obtained its IP
address from a BootP server
rather than a DHCP server.
None. This message is informational only.
CFG file not found
The name-based and default
configuration file was not
found on the TFTP Server.
The configuration file for a particular phone is
created when the phone is added to the
Cisco CallManager database. If the phone has
not been added to the Cisco CallManager
database, the TFTP server generates a CFG
File Not Found response.
•
Phone is not registered with
Cisco CallManager.
You must manually add the phone to
Cisco CallManager if you are not
allowing phones to auto-register. See the
“Adding Phones Manually” section on
page 2-12 for details.
•
If you are using DHCP, verify that the
DHCP server is pointing to the correct
TFTP server.
•
If you are using static IP addresses, check
configuration of the TFTP server. Refer
to the “Configuring TFTP Options”
section on page 5-21 for details on
assigning a TFTP server.
CFG TFTP Size Error The configuration file is too
large for file system on the
phone.
Power cycle the phone.
Checksum Error
Obtain a new copy of the phone firmware and
place it in the TFTPPath directory. You should
only copy files into this directory when the
TFTP server software is shut down, otherwise
the files may be corrupted.
Downloaded software file is
corrupted.
Cisco IP Phone Administration Guide for Cisco CallManager 3.2, Cisco IP Phones 7960/7940/7910
7-4
78-10453-04
Chapter 7
Troubleshooting the Cisco IP Phone
Obtaining Status, Model, and Version Information
Table 7-1
Status Messages (continued)
Message
Explanation
DHCP timeout
DHCP server did not respond.
DNS timeout
DNS server did not respond.
DNS unknown host
Duplicate IP
DNS could not resolve the
name of the TFTP server or
Cisco CallManager.
Another device is using the IP
address assigned to the phone.
Possible Explanation and Action
•
Network is busy—the errors should
resolve themselves when the network
load reduces.
•
No network connectivity between the
DHCP server and the phone—verify the
network connections.
•
DHCP server is down—check
configuration of DHCP server.
•
Errors persist—consider assigning a
static IP address. Refer to the
“Configuring IP Settings” section on
page 5-14 for details on assigning a static
IP address.
•
Network is busy—the errors should
resolve themselves when the network
load reduces.
•
No network connectivity between the
DNS server and the phone—verify the
network connections.
•
DNS server is down—check
configuration of DNS server.
•
Verify the host names of the TFTP server
or Cisco CallManager are configured
properly in DNS.
•
Consider using IP addresses rather than
host names.
•
If the phone has a static IP address, verify
that you have not assigned a duplicate IP
address. Refer to the “Assigning an IP
Address” section on page 5-14 section for
details
•
If you are using DHCP, check the DHCP
server configuration.
Cisco IP Phone Administration Guide for Cisco CallManager 3.2, Cisco IP Phones 7960/7940/7910
78-10453-04
7-5
Chapter 7
Troubleshooting the Cisco IP Phone
Obtaining Status, Model, and Version Information
Table 7-1
Status Messages (continued)
Message
Explanation
Possible Explanation and Action
Error update locale
One or more localization files
could not be found in the
TFTPPath directory or were
not valid. The locale was not
changed.
Check that the following files are located
within subdirectories in the TFTPPath
directory:
•
Located in subdirectory with same name
as network locale:
– tones.xml
•
Located in subdirectory with same name
as user locale:
– glyphs.xml
– dictionary.xml
– kate.xml
– dictionary.xml
IP address released
The phone has been
configured to release its IP
address.
The phone remains idle until it is power
cycled or you reset the DHCP address. Refer
to the “Modifying DHCP Settings” section on
page 5-9 section for details.
Load ID incorrect
Load ID of the software file is Check the load ID assigned to the phone
of the wrong type.
(Cisco CallManager > Device > Phone).
Verify that the load ID is entered correctly.
Load rejected HC
The application that was
This error only occur s if you were attempting
downloaded is not compatible to install a version of software on this phone
with the phone’s hardware.
that did not support hardware changes on this
newer phone.
Check the load ID assigned to the phone
(Cisco CallManager > Device > Phone).
Re-enter the load displayed on the phone (see
the “Verifying Firmware Version” section on
page 7-11 to verify the phone setting).
Cisco IP Phone Administration Guide for Cisco CallManager 3.2, Cisco IP Phones 7960/7940/7910
7-6
78-10453-04
Chapter 7
Troubleshooting the Cisco IP Phone
Obtaining Status, Model, and Version Information
Table 7-1
Status Messages (continued)
Message
Explanation
No default router
DHCP or static configuration
did not specify a default
router.
No DNS server IP
Name was specified but DHCP
or static IP configuration did
not specify a DNS server
address.
Possible Explanation and Action
•
If the phone has a static IP address, verify
the default router has been configured.
Refer to the “Assigning Default Router”
section on page 5-15 section for details.
•
If you are using DHCP, the DHCP server
has not provided a default router. Check
the DHCP server configuration.
•
If the phone has a static IP address, verify
the DNS server has been configured.
Refer to the “Assigning DNS Servers”
section on page 5-19 section for details.
•
If you are using DHCP, the DHCP server
has not provided a DNS server. Check the
DHCP server configuration.
Programming Error
The phone failed during
programming.
Attempt to resolve this error by power cycling
the phone. If the problem persists, contact
Cisco technical support for additional
assistance.
SEPDefault.cnf.xml
or SEPmacaddress
Name of the configuration file. None. This is an informational message
indicating the name of the file.
TFTP access error
TFTP server is pointing to a
directory that does not exist.
•
If you are using DHCP, verify that the
DHCP server is pointing to the correct
TFTP server.
•
If you are using static IP addresses, check
configuration of TFTP server. Refer to
the “Configuring TFTP Options” section
on page 5-21 for details on assigning a
TFTP server.
Cisco IP Phone Administration Guide for Cisco CallManager 3.2, Cisco IP Phones 7960/7940/7910
78-10453-04
7-7
Chapter 7
Troubleshooting the Cisco IP Phone
Obtaining Status, Model, and Version Information
Table 7-1
Status Messages (continued)
Message
Explanation
Possible Explanation and Action
TFTP file not found
The requested load file (.bin) Check the load ID assigned to the phone
was not found in the TFTPPath (Cisco CallManager > Device > Phone).
directory.
Verify that the TFTPPath directory contains a
.bin file with this load ID as the name.
TFTP timeout
TFTP server did not respond.
•
Network is busy—the errors should
resolve themselves when the network
load reduces.
•
No network connectivity between the
TFTP server and the phone—verify the
network connections.
•
TFTP server is down—check
configuration of TFTP server.
Displaying Network Statistics
Use the network statistics to obtain information about the phone and network
performance.
Cisco IP Phone 7960/7940
Procedure
Step 1
Press settings.
Step 2
Use the Navigation button to select Status.
Step 3
Press the Select soft key.
Step 4
Select Network Statistics.
Step 5
Press the Select soft key.
The following list defines components of text messages that might display on the
phone’s LCD screen:
•
Rcv—number of packets received at the phone.
•
Xmt—number of packets transmitted from the phone.
Cisco IP Phone Administration Guide for Cisco CallManager 3.2, Cisco IP Phones 7960/7940/7910
7-8
78-10453-04
Chapter 7
Troubleshooting the Cisco IP Phone
Obtaining Status, Model, and Version Information
•
REr—number of receive errors at the phone.
•
Bcast—number of broadcast packets received.
•
TCP-timeout—connection closed due to exceeding the allowed retry time.
•
TCP-Bad-ACK—connection closed because an unacceptable ACK was
received.
•
CM-reset-TCP—Cisco CallManager closed and initiated the closing of
connection.
•
CM-closed-TCP—Cisco CallManager closed and initiated the closing of
connection.
•
CM-aborted-TCP—Cisco CallManager closed and initiated the closing of
connection.
•
CM-NAKed—Cisco CallManager refused the connection attempt.
•
KeepaliveTO—phone closed because of a Keepalive Timeout.
•
Failback—phone closed due failback to a higher priority Cisco CallManager.
•
Phone-Loading—phone closed to upgrade software. This message appears
only if TFTP fails during software upgrade.
•
Phone-Keypad—phone closed due to a **#** reset.
•
Phone-Re-IP—phone closed due to a duplicate IP address condition.
•
Reset-Reset—phone closed due to receiving a Reset/Reset from
Cisco CallManager administration.
•
Reset-Restart—phone closed due to receiving a Reset/Restart from
Cisco CallManager administration.
•
All-CMs-Bad—phone detected a state in which all Cisco CallManager
servers failed their keepalives.
•
Phone-Reg-Rej—phone closed due to receiving a registration reject.
•
Phone-Initialized—phone has not experienced a connection close since the
hardware reset or since it was powered on.
•
Elapsed time—the amount of time that has elapsed since the phone connected
to Cisco CallManager.
•
Port 0 Full, 100—network port is in a link up state and has auto-negotiated a
full-duplex 100 Mbps connection.
Cisco IP Phone Administration Guide for Cisco CallManager 3.2, Cisco IP Phones 7960/7940/7910
78-10453-04
7-9
Chapter 7
Troubleshooting the Cisco IP Phone
Obtaining Status, Model, and Version Information
•
Port 0 Half, 10—the network port is in a link up state and has auto-negotiated
a half-duplex, 10-Mbps connection.
•
Port 1 Full, 100—the PC port is in a link up state and has auto-negotiated a
full-duplex 100-Mbps connection.
•
Port 2 Down—PC port is in a link down state.
Cisco IP Phone 7910
Procedure
Step 1
Press settings.
Step 2
Press 7 (Phone Info).
Step 3
Use the Navigation button to display the available information:
•
Application Load ID
•
Boot Load ID
•
Ethernet Port 1
•
Ethernet Port 2 (on the Cisco IP Phone 7910+SW)
•
Last Call Information (Codec Type)—Type of voice stream received (RTP
streaming audio) (G.729, G.711 u-law, or G.711 A-law).
Verifying Model and Serial Number
You can verify the model and serial number on Cisco IP Phones.
Cisco IP Phone 7960/7940
Procedure
Step 1
Press settings.
Step 2
Use the Navigation button to select Status.
Cisco IP Phone Administration Guide for Cisco CallManager 3.2, Cisco IP Phones 7960/7940/7910
7-10
78-10453-04
Chapter 7
Troubleshooting the Cisco IP Phone
Obtaining Status, Model, and Version Information
Step 3
Press the Select soft key.
Step 4
Select Model Information.
Step 5
Press the Select soft key.
The following information displays:
•
Model Type
•
Serial Number
Cisco IP Phone 7910
Procedure
Step 1
Press settings.
Step 2
Press 4(Model Information).
The following information displays:
•
Model Type
•
Serial Number
Verifying Firmware Version
On the Cisco IP Phones, you can verify the firmware version loaded on the phone.
Cisco IP Phone 7960/7940
Procedure
Step 1
Press settings.
Step 2
Use the Navigation button to select Status.
Step 3
Press the Select soft key.
Cisco IP Phone Administration Guide for Cisco CallManager 3.2, Cisco IP Phones 7960/7940/7910
78-10453-04
7-11
Chapter 7
Troubleshooting the Cisco IP Phone
Resetting the Cisco IP Phone
Step 4
Select Firmware Versions.
Step 5
Press the Select soft key.
The firmware statistics display the following information:
•
Application Load ID
•
Boot Load ID
•
Version
•
Expansion Module 1
•
Expansion Module 2
Cisco IP Phone 7910
Procedure
Step 1
Press settings.
Step 2
Press 4(Model Information).
Step 3
The following information displays:
•
Application Load ID
•
Boot Load ID
Resetting the Cisco IP Phone
If you reset the phone, any changes made that have not been saved are lost and set
back to default settings.
Cisco IP Phone 7960/7940:
Press **#** to reset the Cisco IP Phone 7960, and the phone cycles through
normal startup procedures.
Cisco IP Phone Administration Guide for Cisco CallManager 3.2, Cisco IP Phones 7960/7940/7910
7-12
78-10453-04
Chapter 7
Troubleshooting the Cisco IP Phone
Erasing Local Configuration
Cisco IP Phone 7910
Press **#** to reset the Cisco IP Phone 7910.
Erasing Local Configuration
If you want to erase all locally stored configuration options, you can erase the
configuration and restore settings to their default values, including enabling
DHCP.
Caution
Erasing the local configuration removes all user-defined changes made locally on
the Cisco IP Phone. If you choose this option, these settings are set back to their
default values.
Cisco IP Phone 7960/7940
Procedure
Step 1
Press settings.
Step 2
Use the Navigation button to select Network Configuration.
Step 3
Press the Select soft key.
Step 4
Scroll to Erase Configuration.
If the configuration is not set to be erased, the option displays as:
Erase Configuration No
Step 5
Press the Yes soft key to erase the configuration.
Step 6
Press Save.
Cisco IP Phone Administration Guide for Cisco CallManager 3.2, Cisco IP Phones 7960/7940/7910
78-10453-04
7-13
Chapter 7
Troubleshooting the Cisco IP Phone
Updating Firmware Version
Cisco IP Phone 7910
Procedure
Step 1
Press settings.
Step 2
Press 6 (Network Configuration).
Step 3
Use the down volume key to select Erase Configuration.
If the configuration is not set to be erased, the option displays as:
Erase Configuration
NO
Step 4
Press * to edit.
Step 5
Use the down volume key to select Yes.
Step 6
Press # to save.
Updating Firmware Version
You can only update the firmware version using the Cisco CallManager
Administration application; you cannot update the firmware from the
Cisco IP Phones directly.
Before You Begin
Read the “Read Me” files included with Cisco software updates. These files
provide important updated information about installing and configuring the new
software.
Procedure
Step 1
Obtain an updated phone load.
You can download the latest available software from the Cisco Service & Support
Software Center:
http://www.cisco.com/kobayashi/sw-center/sw-voice.shtml
Step 2
Install the update.
Cisco IP Phone Administration Guide for Cisco CallManager 3.2, Cisco IP Phones 7960/7940/7910
7-14
78-10453-04
Chapter 7
Troubleshooting the Cisco IP Phone
Resolving Startup Problems
Step 3
From the Cisco CallManager Administration choose System > Device Defaults.
Locate the Device Type field corresponding to the model IP Phone (IP Phone
7910, IP Phone 7960 or IP Phone 7940).
Step 4
Enter the new device load in the Load Information field.
You can typically locate this information in the Read Me file distributed with the
software update.
•
Cisco IP Phone 7960/7940—begins with P003
•
Cisco IP Phone 7910—begins with P004
the device loads for each phone according to the read me file.
Step 5
Click Update.
Step 6
From Cisco CallManager Administration, choose System > CallManager
Group.
Step 7
From the Cisco CallManager Group list, choose the group you want to update.
Step 8
Click Reset Devices.
Resolving Startup Problems
After installing a Cisco IP Phone into your network and adding it to
Cisco CallManager, the phone should start up as described in “Verifying the
Phone Startup Process” section on page 3-9. However, if the phone does not
appear to be starting up properly, these sections can help you resolve the problem:
•
Symptom: Cisco IP Phone Does Not Start Up and LCD Screen Does Not
Display, page 7-16
•
Symptom: Cisco IP Phone Not Registering with Cisco CallManager,
page 7-17
•
Symptom: Cisco IP Phone Resetting, page 7-21
Cisco IP Phone Administration Guide for Cisco CallManager 3.2, Cisco IP Phones 7960/7940/7910
78-10453-04
7-15
Chapter 7
Troubleshooting the Cisco IP Phone
Resolving Startup Problems
Symptom: Cisco IP Phone Does Not Start Up and LCD Screen
Does Not Display
If you connect a Cisco IP Phone into the network port, the LEDs should light up
and messages should appear on the LCD display (see the “Verifying the Phone
Startup Process” section on page 3-9 for information on the normal startup
process). If the phone does not proceed through this normal startup process, you
must determine if the phone is functional or if anything else in the configuration
is causing the phone to not start up properly.
To determine whether the phone is functional, you must eliminate any other
potential problems, such as faulty cables, network outages, lack of power, and so
on. Follow these suggestions to systematically eliminate these other causes.
Procedure
Step 1
Step 2
Step 3
To verify that the network port is functional:
a.
Exchange the Ethernet cables with cables you know are functional.
b.
Disconnect a functioning Cisco IP Phone from another port and connect it to
this network port to verify the port is active.
c.
Connect the Cisco IP Phone that will not start up to a different, known good
network port.
d.
Connect the Cisco IP Phone that will not start up directly to the port on the
switch, eliminating the patch panel connection in the office.
To verify that the phone is receiving power:
a.
Verify that the electrical outlet is functional.
b.
If you are using in-line power, use the external power supply instead.
c.
If you are using the external power supply, switch with a unit you know to be
functional.
If after attempting these solutions, the LCD screen on the Cisco IP Phone persists
in not displaying any characters for at least 5 minutes, contact a Cisco technical
support representative for additional assistance.
Cisco IP Phone Administration Guide for Cisco CallManager 3.2, Cisco IP Phones 7960/7940/7910
7-16
78-10453-04
Chapter 7
Troubleshooting the Cisco IP Phone
Resolving Startup Problems
Symptom: Cisco IP Phone Not Registering with
Cisco CallManager
If the phone proceeds past the first stage (LED buttons flashing on and off) and
continues to cycle through the messages displaying on the LCD screen, then the
phone is not starting up properly.The phone cannot successfully start up unless it
is connected to the Ethernet network and it has registered with a
Cisco CallManager server.
These sections can assist you in determining the reason the phone is unable to start
up properly:
•
Identifying Error Messages, page 7-17
•
Registering the Phone with Cisco CallManager, page 7-18
•
Checking Network Connectivity, page 7-18
•
Verifying TFTP Server Settings, page 7-18
•
Verifying IP Addressing and Routing, page 7-19
•
Verifying DNS Settings, page 7-19
•
Verifying Cisco CallManager Settings, page 7-20
•
Cisco CallManager and TFTP Services Are Not Running, page 7-20
•
Creating a New Configuration File, page 7-21
Identifying Error Messages
As the phone is cycling through the startup process, you can access status
messages that might provide you with information about the cause of the problem.
On the Cisco IP Phone 7960/7940, press settings > Status > Status Messages to
display these errors and refer to the “Viewing Status Messages” section on
page 7-3 section for a list of potential errors and their explanations and solutions.
Cisco IP Phone Administration Guide for Cisco CallManager 3.2, Cisco IP Phones 7960/7940/7910
78-10453-04
7-17
Chapter 7
Troubleshooting the Cisco IP Phone
Resolving Startup Problems
Registering the Phone with Cisco CallManager
Registration with a Cisco CallManager server can only be successful if the phone
has been added to the server or if auto-registration is enabled. Review the
information and procedures in the “Adding Phones to the Cisco CallManager
Database” section on page 2-10 to ensure that the phone has been added to the
Cisco CallManager database.
To verify that the phone is in the Cisco CallManager database, use Device > Find
from Cisco CallManager to search for the phone based on its MAC Address.
Verify the MAC address to search for by pressing settings > Network
Configuration > MAC address on the phone.
If the phone is already in the Cisco CallManager database, its configuration file
might be damaged. Refer to the “Creating a New Configuration File” section on
page 7-21 for assistance.
Checking Network Connectivity
If the network is down between the phone and the TFTP server or
Cisco CallManager, the phone cannot start up properly. Ensure that the network
is currently up-and-running.
Verifying TFTP Server Settings
The Cisco IP Phone uses the TFTP server setting (settings > Network
Configuration > TFTP Server 1) to identify the Cisco CallManager server. If
this setting is incorrect, the Cisco IP Phone might continually cycle while
attempting to contact the identified TFTP Server.
If you have assigned a static IP address to the phone, you must manually enter this
setting. Refer to the “Configuring IP Settings” section on page 5-14.
If you are using DHCP, the phone obtains the address for the TFTP server from
the DHCP server. Check the IP address configured in Option 150. See
Configuring Windows 2000 DHCP Server for Cisco Call Manager on Cisco.com:
http://www.cisco.com/warp/customer/788/AVVID/win2000_dhcp.html
You can also enable the phone to use an alternate TFTP server (settings >
Network Configuration > Alternate TFTP Server). This is particularly useful
if this phone was recently moved from a different location, such as a test lab to a
production network.
Cisco IP Phone Administration Guide for Cisco CallManager 3.2, Cisco IP Phones 7960/7940/7910
7-18
78-10453-04
Chapter 7
Troubleshooting the Cisco IP Phone
Resolving Startup Problems
You must unlock the network settings before you can assign an alternate TFTP
server (see “Accessing the Network Configuration Settings” section on page 5-2).
Verifying IP Addressing and Routing
You should verify the IP addressing and routing settings on the IP Phone. If you
are using DHCP, the DHCP server should provide these values. If you have
assigned a static IP address to the phone, you must enter these values manually.
On the Cisco IP Phone, press settings > Network Configuration and check for
the following problems:
•
DHCP Server—has no address
If you have assigned a static IP address to the phone, you do not need to enter
a value here. However, if you are using a DHCP server, this field must have a
value. If it does not, check your IP routing and VLAN configuration. See
Troubleshooting Switch Port Problems on Cisco.com:
http://www.cisco.com/warp/customer/473/53.shtml
•
IP address, subnet mask, or default router—have no addresses
If you have assigned a static IP address to the phone, you must manually enter
these settings. Refer to the “Configuring IP Settings” section on page 5-14.
If you are using DHCP, check the IP addresses distributed by your DHCP server.
See Understanding and Troubleshooting DHCP in Catalyst Switch or Enterprise
Networks on Cisco.com: http://www.cisco.com/warp/customer/473/100.html#41
Verifying DNS Settings
If you are using DNS to refer to the TFTP server or Cisco CallManager, you must
ensure you have specified a DNS server (settings > Network Configuration >
DNS Server 1). You should also verify that you have a CNAME entry in the DNS
server for the TFTP server and Cisco CallManager system.
You must also ensure that DNS is configured to do reverse look-ups. The default
setting on Windows2000 is to perform forward-only look-ups.
Cisco IP Phone Administration Guide for Cisco CallManager 3.2, Cisco IP Phones 7960/7940/7910
78-10453-04
7-19
Chapter 7
Troubleshooting the Cisco IP Phone
Resolving Startup Problems
Verifying Cisco CallManager Settings
On the Cisco IP Phone, press settings > Network Configuration > CallManager
1, 2, 3, 4. The Cisco IP Phone attempts to open a TCP connection to all the
Cisco CallManager servers that are part of the assigned CallManager group. If
none of these fields have IP addresses or state “Active” or “Standby”, the phone
is not properly registered with Cisco CallManager. Refer to the “Registering the
Phone with Cisco CallManager” section on page 7-18 for tips on resolving this
problem.
Cisco CallManager and TFTP Services Are Not Running
If the Cisco CallManager or TFTP services are not running, phones might not be
able to start up properly. However, in this case, it is likely that you are
experiencing a system-wide failure. Rather than being isolated to one phone that
is experiencing problems, in this situation many or all phones and other devices
are not able to start up properly.
If the Cisco CallManager service is not running, all devices on the network that
rely on it to make phone calls will be affected. If the TFTP service is not running,
many devices will not be able to start up successfully.
Procedure
Step 1
From the Cisco CallManager Administration window, choose Application >
Cisco CallManager Serviceability.
Step 2
Choose Tools > Control Center.
Step 3
From the Servers column, choose the primary Cisco CallManager server.
The window displays the service names for the server that you chose, the status
of the services, and a service control panel to stop or start a service.
Step 4
If a service has stopped, click the Start button.
The Service Status symbol changes from a square to an arrow.
Cisco IP Phone Administration Guide for Cisco CallManager 3.2, Cisco IP Phones 7960/7940/7910
7-20
78-10453-04
Chapter 7
Troubleshooting the Cisco IP Phone
Resolving Startup Problems
Creating a New Configuration File
If you continue to have problems with a particular phone, despite all attempts at
resolution, the configuration file might be corrupted. You can manually create a
new configuration file by following the procedure below.
Procedure
Step 1
From Cisco CallManager, select Device > Phone > Find to locate the phone
experiencing problems.
Step 2
Choose Delete to remove the phone from the Cisco CallManager database.
Step 3
Search the hard drive of the Cisco CallManager server for files named
SEP*.cnf.xml. This file should be in a folder containing the configuration files for
all the registered phones.
Step 4
Make a copy of a configuration file for a functional phone of the same type as the
problematic phone. For example, if the phone experiencing problems is a Cisco
IP Phone 7960, make a copy of a configuration file for another phone of this
model.
Step 5
Rename this to match the name of the configuration file for the problematic
phone.
Use the convention SEP<MAC address>.cnf.xml, where <MAC address> is the
MAC address for the deleted phone.
Step 6
Replace the old configuration file with the new one you created.
Step 7
Add the phone to Cisco CallManager database. See the “Adding Phones
Manually” section on page 2-12 for details.
Step 8
Power cycle the phone.
Symptom: Cisco IP Phone Resetting
Once a Cisco IP Phone has properly started up and registered with
Cisco CallManager, you can reset it, forcing it to go through the startup process.
At times, you might want to intentionally do this. For example, if you want to
Cisco IP Phone Administration Guide for Cisco CallManager 3.2, Cisco IP Phones 7960/7940/7910
78-10453-04
7-21
Chapter 7
Troubleshooting the Cisco IP Phone
Resolving Startup Problems
force a firmware upgrade from Cisco CallManager on to the phone. Anytime a
phone has to load a new image, it has to restart itself and re-register with
Cisco CallManager using the new image
However, if users report that their phones appear to be resetting during calls or
while idle on their desk, you should investigate the cause. If the network
connection and Cisco CallManager connection are stable, the Cisco IP Phone
should not reset on its own.
Typically, the cause of the phones resetting can be categorized by problems
connecting to the Ethernet network or to Cisco CallManager. These sections can
help you identify the cause in your network:
•
Verifying Physical Connection, page 7-22
•
Identifying Intermittent Network Outages, page 7-22
•
Verifying DHCP Settings, page 7-23
•
Checking Static IP Address Settings, page 7-23
•
Verifying Voice VLAN Configuration, page 7-23
•
Verifying that the Phones Have Not Been Intentionally Reset, page 7-23
•
Eliminating DNS or Other Connectivity Errors, page 7-24
Verifying Physical Connection
Verify that the Ethernet connection to which the Cisco IP Phone is connected is
up-and-running. For example, check if the particular port or switch to which the
phone is connected is down.
Identifying Intermittent Network Outages
Intermittent network outages affect data and voice traffic differently. Your
network might have been experiencing intermittent outages without detection, but
data traffic can resend lost packets and verify packets are received and
transmitted.
However, voice traffic cannot recapture lost packets. Rather than retransmitting a
lost network connection, the phone resets and attempts to reconnect its network
connection.
Therefore, if you are experiencing problems with the voice network, you should
investigate whether an existing problem is simply being exposed at this point.
Cisco IP Phone Administration Guide for Cisco CallManager 3.2, Cisco IP Phones 7960/7940/7910
7-22
78-10453-04
Chapter 7
Troubleshooting the Cisco IP Phone
Resolving Startup Problems
Verifying DHCP Settings
This procedure can help you verify if the phone has been properly configured to
use DHCP.
Procedure
Step 1
Verify that you have properly configured the phone to use DHCP. See the
“Modifying DHCP Settings” section on page 5-9 for details.
Step 2
Verify that the DHCP server has been set up properly.
Step 3
Verify the DHCP lease duration. Cisco recommends that you set it to 8 days.
Note, however, that Cisco IP Phones send messages with request type 151 to
renew their DHCP address leases. If the DHCP server expects messages with
request type 150, the lease is denied, forcing the phone to restart and request a new
IP address from the DHCP server.
Checking Static IP Address Settings
If the phone has been assigned a static IP address, verify that you have entered the
correct settings. See the “Configuring IP Settings” section on page 5-14.
Verifying Voice VLAN Configuration
If the Cisco IP Phone appears to reset during heavy network usage (for example,
following extensive web surfing on a computer connected to same switch as
phone), it is likely that you do not have a voice VLAN configured.
Isolating the phones on a separate, auxiliary VLAN increases the quality of the
voice traffic. See “Understanding How the Cisco IP Phone Interacts with the
Cisco Catalyst Family of Switches” section on page 2-2 for more details.
Verifying that the Phones Have Not Been Intentionally Reset
If you are not the only administrator with access to Cisco CallManager, you
should verify that no one else has intentionally reset the phones.
Cisco IP Phone Administration Guide for Cisco CallManager 3.2, Cisco IP Phones 7960/7940/7910
78-10453-04
7-23
Chapter 7
Troubleshooting the Cisco IP Phone
Resolving Startup Problems
You can check whether a Cisco IP Phone 7960/7940 received a command from
Cisco CallManager to reset by pressing settings > Status > Network Statistics
on the phone.
If the phone was recently reset one of these messages appears:
•
Reset-Reset—phone closed due to receiving a Reset/Reset from
Cisco CallManager administration.
•
Reset-Restart—phone closed due to receiving a Reset/Restart from
Cisco CallManager administration.
Eliminating DNS or Other Connectivity Errors
If the phone continues to reset, follow this procedure.
Procedure
Step 1
Reset the phone to factory defaults. See the “Resetting the Cisco IP Phone”
section on page 7-12 for details.
Step 2
Modify DHCP and IP settings.
a.
Disable DHCP. See the “Modifying DHCP Settings” section on page 5-9 for
details.
b.
Assign static IP values to the phone. See the “Configuring IP Settings”
section on page 5-14 for details. Use the same default router setting used for
other functioning Cisco IP Phones.
c.
Assign TFTP server. See the “Configuring TFTP Options” section on
page 5-21 for details. Use the same TFTP server used for other functioning
Cisco IP Phones.
Step 3
On the Cisco CallManager server, verify that the local host files have the correct
Cisco CallManager server name mapped to the correct IP address. See the
Configuring The IP Hosts File on a Windows 2000 CallManager Server on
Cisco.com:
http://www.cisco.com/warp/customer/788/AVVID/cm_hosts_file.html
Step 4
From Cisco CallManager, select System > Server and verify that the server is
being referred to by its IP address and not by its DNS name.
Step 5
From Cisco CallManager, select Device > Phone and verify that you have
assigned the correct MAC address to this Cisco IP Phone.
Cisco IP Phone Administration Guide for Cisco CallManager 3.2, Cisco IP Phones 7960/7940/7910
7-24
78-10453-04
Chapter 7
Troubleshooting the Cisco IP Phone
Resolving Known Issues
Step 6
To verify the MAC address on the phone, see the “Verifying Network Settings”
section on page 5-3.
Step 7
Power cycle the phone.
Resolving Known Issues
Refer to the following tables for troubleshooting some common issues that might
occur on you Cisco IP Phones:
Table 7-2
•
Table 7-2 describes restrictions or other known troubleshooting suggestions
for the Cisco IP Phone models 7960, 7940 and 7910.
•
Table 7-3 describes restrictions or other known troubleshooting suggestions
for the Cisco IP Phone 7914 Expansion Module.
Cisco IP Phone Troubleshooting
Summary
Explanation
Daisy-chaining IP phones
Do not connect an IP phone to another IP phone through the
access port. Each IP phone should directly connect to a switch
port. If you connect IP phones together in a line
(daisy-chaining), a problem with one phone can affect all
subsequent phones in the line. Also, all phones on the line share
bandwidth.
Poor quality when calling digital cell In Cisco CallManager, you can configure the network to use the
phones using the G.729 protocol
G.729 protocol (the default is G.711). When using G.729, calls
between an IP phone and a digital cellular phone will have poor
voice quality. Use G.729 only when absolutely necessary.
Prolonged broadcast storms cause IP Prolonged broadcast storms (lasting several minutes) on the
phones to re-register
voice VLAN cause the IP phones to re-register with another
Cisco CallManager server.
Cisco IP Phone Administration Guide for Cisco CallManager 3.2, Cisco IP Phones 7960/7940/7910
78-10453-04
7-25
Chapter 7
Troubleshooting the Cisco IP Phone
Resolving Known Issues
Table 7-2
Cisco IP Phone Troubleshooting (continued)
Summary
Explanation
Moving a network connection from
the phone to a workstation
If you are powering your phone through the network
connection, you must be careful if you decide to unplug the
phone’s network connection and plug the cable into a desktop
computer.
Caution
The computer’s network card cannot receive power
through the network connection; if power comes
through the connection, the network card can be
destroyed. To prevent this, wait 10 seconds or longer
after unplugging the cable from the phone. This
gives the switch enough time to recognize that there
is no longer a phone on the line, and to stop
providing power to the cable.
Changing the telephone
configuration
By default, the network configuration options are locked to
prevent users from making changes that could impact their
network connectivity. You must unlock the network
configuration options before you can configure them. See the
“Accessing the Network Configuration Settings” section on
page 5-2 for details.
Phone resetting
The phone resets when it loses contact with the
Cisco CallManager software. This lost connection can be due to
any network connectivity disruption, including cable breaks,
switch outages, and switch reboots.
LCD display issues
If the display appears to have rolling lines or a wavy pattern, it
might be interacting with certain types of older fluorescent
lights in the building. Moving the phone away from the lights,
or replacing the lights, should resolve the problem.
Dual-Tone Multi-Frequency (DTMF) When you are on a call that requires keypad input, if you press
delay
the keys too quickly, some of them might not be recognized.
Cisco IP Phone Administration Guide for Cisco CallManager 3.2, Cisco IP Phones 7960/7940/7910
7-26
78-10453-04
Chapter 7
Troubleshooting the Cisco IP Phone
Resolving Known Issues
Refer to the following table if you are having difficulty using your
7914 Expansion Module.
Table 7-3
Expansion Module Troubleshooting
Problem
Solution
No display on the
7914 Expansion Module
Verify that all of the cable connections are correct.
Lighted buttons on the first
7914 Expansion Module are all
red.
Verify that the 7914 Expansion Module is defined in
Cisco CallManager.
Lighted buttons on the second
7914 Expansion Module are all
amber.
Verify that the 7914 Expansion Module is defined in
Cisco CallManager.
Verify that you have power to the Expansion Module(s).
Cisco IP Phone Administration Guide for Cisco CallManager 3.2, Cisco IP Phones 7960/7940/7910
78-10453-04
7-27
Chapter 7
Troubleshooting the Cisco IP Phone
Resolving Known Issues
Cisco IP Phone Administration Guide for Cisco CallManager 3.2, Cisco IP Phones 7960/7940/7910
7-28
78-10453-04