1
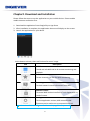
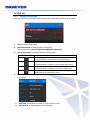
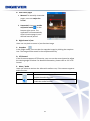
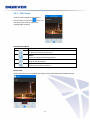
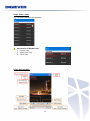
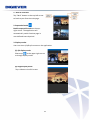
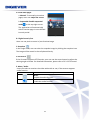
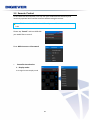
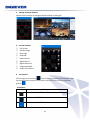
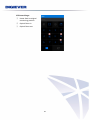
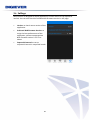
DIGIMobileV2 User Manual v2.2 Information in this document is subject to change without notice. 2014 © Copyright, DIGIEVER Corporation. All rights reserved. 1 Table of Contents CHAPTER1. OVERVIEW ....................................................................................................................... 1 CHAPTER2. DOWNLOAD AND INSTALLATION..................................................................................... 2 CHAPTER3. USAGE ............................................................................................................................. 3 3.1 NVR CONFIGURATION .................................................................................................................. 3 3.1.1 Add NVR Manually ............................................................................................................ 3 3.1.2 EZ Search in LAN ................................................................................................................. 5 3.2 NVR LIST......................................................................................................................................... 7 3.2.1 Layout Introduction............................................................................................................ 7 3.2.2 Liveview Monitoring .......................................................................................................... 8 3.2.3 PTZ Control ....................................................................................................................... 11 3.2.4 Playback ........................................................................................................................... 12 3.3 FAVORITES .............................................................................................................................. 16 3.3.1 Add Favorites ................................................................................................................... 16 3.3.2 Monitor Channels from Favorites .................................................................................... 17 3.4 EVENT LOG ............................................................................................................................ 20 3.4.1 Search Event Log .............................................................................................................. 20 3.4.2 Event Notification ............................................................................................................ 21 3.5 REMOTE CONTROL ................................................................................................................. 22 3.6 SETTINGS................................................................................................................................. 25 APPENDIX: COMPARISON TABLE BETWEEN DIGIMOBILE AND DIGIMOBILE V2................................... 26 I Chapter1. Overview DIGIMobile V2 is a mobile video surveillance application designed to remotely monitor the videos from DIGIEVER NVR and to view live footage through mobile devices. No matter where you are, you can use it to monitor videos in real-time quality and to quickly find our recorded videos. In addition, this application allows you to do quick trouble shooting through NVR event log list. DIGIMobile V2 is the second version of DIGIMobile with more useful features and intuitive interface. It is highly recommend to using the application with NVR firmware 2.1.x.52 or above. System Requirements Operating system iOS: DIGIMobileV2 supports iOS 7.0 or above. For best performance, it is suggested to use iPhone 5/ iPad 3 or above models. Android: DIGIMobileV2 supports Android 4.0 or above. Features Live view *View videos from multiple phones at the same time *Support H.264 and up to 30 FPS in single view *Display mode: 1/4/6 and sequential mode *Support PTZ control *Support pitch to zoom *Support audio Playback *Quick playback methods: Event playback and continuous playback *Playback speed control: Fast forward and slow motion *Frame by frame playback and rewind *Support pitch to zoom and audio *Time bar Others *Quickly add NVR in LAN via EZ Search *Directly control NVR liveview on local display *Quick event sorting method *Instant event notification *Quick monitor from favorites 1 Chapter2. Download and Installation Please follow the steps to use the application on your mobile device. Please enable mobile Internet connection first. 1. Download the application from Google Play or App Store. 2. After installation is complete, the application shortcut will display on the screen. 3. Launch the application on your device At the bottom column, there are fiveicons for users’ usage. Icon Description NVR list: To add and edit NVR and to do remote monitoring and playback Favorites: To save channels you like for quick monitoring. Event Log: To check camera’s event information from NVR Remote Control: To control NVR liveview interface of local display with no need of mouse Settings: To view application version, NVR recommended firmware version and to set up sequential interval. Note. Icon in blue background indicates the page where you are. 2 Chapter3. Usage After installing the application on your mobile device, please connect to NVR server by adding NVR Manually or using EZ Search in LAN. 3.1 NVR Configuration 3.1.1 Add NVR Manually Users can add NVR to remotely monitor and view playback video anytime and anywhere. To connect NVR device, please tap and Please fill in NVR information: Title, IP Address, Port, NVR account and password. Then, tap “Save.” After saving NVR information, the application will bring you to NVR page. 3 Connecting Status The status icon can inform users of NVR connecting status in NVR page. Status icon Description Connecting: The application is connecting to the NVR server. Successfully Connected: The application is ready to start remote monitoring. No Connection: The application is unable to connect to NVR server. Wrong account or Password: NVR account or password is error. NVR Information NVR information allows users to check and modify NVR information. 4 3.1.2 EZ Search in LAN Users can use EZ Search to easily find NVRs in the LAN and can add it to your mobile device directly. To add NVR in LAN, please tap and Tap “Search” to search NVRs in the same LAN The application will display all NVRs in the same LAN. Please tap one NVR to add. The application will automatically add NVR with NVR Title, IP address and Port. Please enter NVR Account and Password. Then, tap “Save” to add NVR information. Note: User can edit the desired title based on requirements. 5 After saving NVR information, the application will bring you to NVR page. Please check NVR status icon! The application is ready to start remote monitoring with icon Note: The default title of each connected NVR is from “Mac Address” of each NVR. Connecting Status The status icon can inform users of NVR connecting status in NVR page. Status icon Description Connecting: The application is connecting to the NVR server. Successfully Connected: The application is ready to start remote monitoring. No Connection: The application is unable to connect to NVR server. Wrong account or Password: NVR account or password is error. NVR Information NVR information allows users to check and modify NVR information. 6 3.2 NVR List 3.2.1 Layout Introduction After successfully connecting to NVR, NVR list will display NVR information as below. 1. 2. Title: to display NVR name NVR information: to display NVR’s information. The naming rule is [account]:[password]@[NVR IP Address] Connecting status: to display NVR connecting status 3. Status icon Description Connecting: The application is connecting to the NVR server. Successfully Connected: The application is ready to start remote monitoring. No Connection: The application is unable to connect to NVR server. Wrong account or Password: NVR account or password is error. NVR information: to display NVR information. Users can edit NVR information in this page. 4. 5. 6. Add NVR: To add NVR manually or via EZ Search in LAN Delete NVR: To delete NVR on the application 7 3.2.2 Liveview Monitoring By tapping NVR title or IP address, users will be directed to remote monitoring. At the bottom column, there are three icons for users’ usage. Icon Description Event Playback: Playback a five- minute recorded video in various channel and types Continuous Playback Continuously playback normal videos in one camera channel Sequential mode: Enable or disable sequential mode 1. View other pages 1) Manual: To manually view other pages, users can swipe the screen. Swipe Screen 8 2) Sequential mode: The application will automatically switch liveview page in user-defined interval period. Icon Description Disable Sequential Mode Enable Sequential Mode 2. Display modes Users can view 1/4/6-split screen on the application. 1) 4/6 display modes Please tap at the upper right corner to change display mode. 2) Single display mode Tap a video to view full screen. 9 A. View other pages a. Manual: To manually view other pages, users can swipe the screen. b. Sequential: User may enable sequential mode on the bottom right corner. The application will automatically switch liveview page in userdefined interval period. B. Digital zoom in/out Users can use pinch to zoom in/ out liveview image. C. Snapshot In the single mode, user can take the snapshot image by clicking the snapshot icon. The image will be stored in the cell phone directly. D. PTZ Control If the IP camera supports PTZ function, user can use the control panel to adjust the viewing angle as below. For detailed information, please refer to 3.2.3 PTZ Control E. Mute / Audio Users can select to monitor the video with audio or not, if the camera supports audio function. Icon Description Mute: Disable the audio function. Audio: Enable the audio function. 10 3.2.3 PTZ Control If the IP camera supports PTZ function, PTZ icon will turn into blue . User can use the control panel to adjust the viewing angle as below. Function Description Icon Description Optical zoom out: To adjust PTZ camera to zoom out Home: To back to original monitoring position Preset position: To go to preset position Optical zoom in: To adjust PTZ camera to zoom in. Action note Action note allows user to know the function that users executed as below picture. 11 3.2.4 Playback The application offers two playback methods for users to playback recorded videos. 1. Event Playback Event playback is a useful method to quick playback a specific video if users would like to playback video in a specific time. Event playback allows users to playback a five- minute recorded video in various channel and types. Please tap icon to enter playback page. Step1. Search Select Start time, End time, Channel and Event type to search recorded video file. Then, click “Search” button to search files. Note: Users can search files more than one day. Users can select many channels and event types to playback recorded videos. Channel: Select desired channels and tap “ Back” to playback page Event Type: Select desired event types and tap “ Back” to playback page 12 Step2. Select a video Tap a recorded video to start playback Introduction of Playback List: 1. Camera title 2. Video Start Time: 3. Event Type Step3. Start Playback 13 Frame by frame playback Step1: Pause the video Step2: Tap “Next Frame” or “Previous Frame” 2. Continuous Playback Continuous playback allows users to continuously playback videos in normal recording type in one camera channel. Note: Continuous Playback can playback one recording type, normal recording. Please tap icon to start channel playback Step1. Setup Select Date, Start time, End time and Channel to search recorded video file. The default start time is from 00:00 and default end time is the time when users entering channel playback page. Step2. Play Tap “Play” button to play videos. Users may move the time bar to the desired time. 14 Frame by frame playback Step1: Pause the video Step2: Tap “Next Frame” or “Previous Frame” 15 3.3 Favorites Favorites allows users to keep track of the channels you monitor frequently by storing them as favorites in DIGIMobile App. Users can view, add and organize your favorites Note: Please make sure the NVR that you would like to add to favorites is online. 3.3.1 Add Favorites Tap to make a favorite list on the top-right corner and name the new list. Then, tap “OK” button to add new list. After successfully add new list, DIGIMobile will direct you to NVR list to design your own unique list. Please tap one NVR to enter its available channel. Then, add desired channels based on its channel name. The channel that you add will be marked in . Note: On the bottom of the page, users can use “Unselect All” and “Select All” button to quickly add all channels. Then, tap “Back” button on the topleft corner to add other NVR channels. 16 Note: A message will pop up when the NVR is offline. Finally, please tap “Save” button to save all the settings. DIGIMobile will direct you to your favorite main page. You can tap the list to start monitoring. Note: To reorganize your favorite list, please tap . Note: To delete the favorite list, please tap “Edit” button on topleft corner. 3.3.2 Monitor Channels from Favorites Tap one of the favorite lists to start monitoring. 17 1. Back to Favorites Tap “Back” button on the top-left corner to back to your favorite main page. 2. Sequential mode Enable sequential mode on the topright corner. The application will automatically switch liveview page in user-defined interval period. 3. Display modes Users can view 1/4/6-split screen on the application. (1) 4/6 display mode Please tap at the upper right corner to change display mode. (2) Single display mode Tap a video to view full screen. 18 A. View other pages a. Manual: To manually view other pages, users can swipe the screen. b. Sequential: Enable sequential mode on the top-right corner. The application will automatically switch liveview page in user-defined interval period. B. Digital zoom in/out Users can use pinch to zoom in/ out liveview image. C. Snapshot In the single mode, user can take the snapshot image by clicking the snapshot icon. The image will be stored in the cell phone directly. D. PTZ Control If the IP camera supports PTZ function, user can use the control panel to adjust the viewing angle as below. For detailed information, please refer to 3.2.3 PTZ Control E. Mute / Audio Users can select to monitor the video with audio or not, if the camera supports audio function. Icon Description Mute: Disable the audio function. Audio: Enable the audio function. 19 3.4 Event Log Event Log is designed to let users check NVR’s event log information (the latest 100 event list) such as motion detected, connection and disconnection. In event log page, the application will smartly pop-out event notification when an event is triggered. 3.4.1 Search Event Log Please tap a connecting NVR to check log information. The connected NVR will display with a status icon. Back Refresh Quick Sorting : to set up list arrangement. The application offers four types of sorting methods: Time, Channel number, Channel name and Event type. Users can quickly and easily discover desired event information. : to back to NVR list : to update the latest event log list Note: Default sorting is by time. 20 3.4.2 Event Notification When user is in event log page, the application will smartly pop-out event notification when an event is triggered. With this feature, users can immediately notice event information from different NVRs. Note: To enable event notification, it is necessary to stay in event log page. 21 3.5 Remote Control In the same LAN environment, user can use your mobile device to directly and intuitively operate local liveview interface without using the mouse. Note: This feature is available when NVR and your mobile device are in the same LAN. Please tap “Search” and one NVR that you would like to control. Enter NVR Account and Password. Controller Introduction: 1. Display mode: To change liveview display mode 22 2. Change liveview window Please use arrow keys to change liveview window in blue grid. 3. Control bottons: ① ② ③ ④ ⑤ ⑥ ⑦ ⑧ ⑨ Full Screen Previous Page Next Page Snapshot Mute/ Sound Digital Zoon in Digital Zoom out Sequential Mode Enable PTZ Control 4. PTZ Control PTZ icon will turn into blue if the IP cameras supports PTZ function. User can tap PTZ icon to control PTZ function, which PTZ icon will turn into blue ground . PTZ Status: Icon Description Camera with no PTZ Function Camera with PTZ Function Enable Camera’s PTZ Function 23 PTZ Control Page: ① ② ③ Home: Back to original monitoring position Optical Zoom in Optical Zoom out 24 3.6 Settings Setup section is designed to display application version and to set up sequential interval. You can also check the suitable NVR firmware version in this page. Version: to check recent version of the application Preferred NVR Firmware Version: to enjoy the best performance of the application, please use appropriate NVR firmware version 2.1.x.52 or above. Sequential Interval: to set up sequential interval in sequential mode. 25 Appendix: Comparison Table between DIGIMobile and DIGIMobile V2 Liveview Playback Event Others Older APP New APP Channel 1、6 1、4、6 Sequential Mode O O Sequential interval setting - O Landscape O O PTZ Control O O Digital Zoom O O Snapshot O O Single in H264 - O Pitch to zoom - O Audio - O Playback Control O O Continuous Play O O Quick playback O O Event search - O Time bar O O Landscape O O Digital Zoom O O Audio - O Instant Event Notification - O Quick Sorting Method - O EZ search - O DDNS O O Favorites - O 26