1
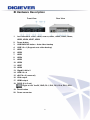
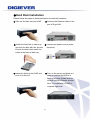
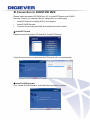
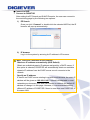
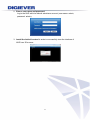
Network Video Recorder Quick Installation Guide DS-8200-RM Pro Series DS-8209/8212/8216/8220/8225/8232-RM Pro Quality Service Group July , 2013 Information in this document is subject to change without notice. © Copyright 2013, DIGIEVER Corporation. All rights reserved. 1 Quick Installation Guide Thank you for choosing DIGISTOR Network Video Recorder. The following quick guide will lead you to complete the installation and configuration of the NVR. Please read the following description carefully. Pre-installation Notice Please make sure the following items are prepared for installing DIGOSTOR DS-8200-RM Pro Series. Network connection Configuration of network cameras Compatibility of network cameras Computer for configuring DIGISTOR 1-8 hard disks Compatibility of hard disk with DIGISTOR 1 slotted screwdriver and 1 Philips screwdriver *For camera compatibility, please check our website http://www.digiever.com/support/compatibility.php System Requirements The following are minimum system requirements for a personal computer to operate the DIGISTOR in better performance: Operating System Microsoft® Windows® XP (32-bit)/ Vista/ 7(32 and 64-bit) Browser Microsoft® Internet Explorer 7.0 or above (32-bit) CPU For channels under 16 : Intel ® Dual core CPU 3.0 GHz or above For channels over 16: Intel® i5/i7 CPU 3.3 GHz or above Network Minimum 10/100 Ethernet (Gigabit Ethernet is recommended) Note: * User is suggested to connect cameras and NVR with Gigabit switch. Memory For channels under 16 : DDR3 4G or above For channels over 16: IDDR3 8G or above 2 Graphics Adapter AGP or PCI-Express, minimum 1024×768, 16 bit colors, 1G memory or above Note: It is highly recommended to use a graphics adaptor which provides higher than resolutions 1024 x 768 in order to experience the full benefits of the software. Make sure the display DPI setting is set to default at 96DPI To set DPI value, right-click on desktop, choose “Settings” tab >> “Advanced” >> “General.” CD-ROM Drive It is necessary to read the operating instructions in the provided CD-ROM. Adobe Reader It is necessary to read the operating instructions in the provided CD-ROM. The audio function will not work if a sound card is not installed in the PC. Audio may be interrupted depending on network traffic. 3 Package Contents NVR Network Video Recorder Power Cord Ethernet Cable Screw Bag Product CD 4 Hardware Description Front View 1. Rear View LED indicators: LAN1, LAN2, eSATA, HDD1, HDD2, HDD3, HDD4, HDD5, HDD6, HDD7, HDD8 2. Power button 3. USB BACKUP button - Auto video backup 4. USB 3.0 x 1 (Support auto video backup) 5. HDD1 6. HDD2 7. HDD3 8. HDD4 9. HDD5 10. HDD6 11. HDD7 12. HDD8 13. Gigabit LAN x 2 14. USB 2.0 x 4 15. eSATA x 2 (reserved) 16. VGA output 17. HDMI output 18. DI/DO (4 in 2 out) Right to left: Vcc5V, GND, DI-1, DI-2, DI-3, DI-4, DO1, DO2 19. Reset button 20. Power connector 5 Hard Disk Installation Please follow the steps as illustrated below to install the hardware: Take out the disk tray from NVR. Connect the Ethernet cable to the port of Giga LAN. Install the hard disk in each tray Connect the power cord to power and lock the disk with four screws. connector. Ensure the disk holes match the holes at the base of disk tray. Insert the disk tray into NVR and Turn on the server and there is a push it to the end. beep to indicate the NVR is in booting process. Please wait for minutes until NVR beeps another time. The installation of NVR is complete right now. 6 Connection to DIGISTOR NVR Please insert the product CD-ROM on a PC to install EZ Search and S-NVR Decoder. Finally, you can start Quick Configuration on a web page. Install EZ Search for finding NVR in the network. Install S-NVR Decoder. Connect to the configured NVR and install the ActiveX control. Install EZ Search Please execute the product CD and click “Install EZ Search.” Follow the instructions to install and the EZ Search will run automatically. Install S-NVR Decoder Click “Install S-NVR Decoder” and follow the instructions to setup. 7 Connect to NVR 1. Connect to DIGISTOR After setting the EZ Search and S-NVR Decoder, the user can connect to the monitoring page by the following two options: 1) EZ Search Once you click “Connect” or double click the selected NVR list, the IE browser will pop up automatically. 2) IE browser Log in to the system by entering its IP address in IE browser. Note: There are 2 methods to set network: Obtain an IP address automatically (NVR Default) Obtain an available dynamic IP address assigned by a DHCP server. If this option is selected, DIGISTOR will automatically obtain an available dynamic IP address from the DHCP server once it connects to the network. Specify an IP address If there is no DHCP server existing in network environments, the static IP address will be given as 192.168.1.245. It should be adaptable in most networking environment, and user can choose to maintain the default IP address or change it in this page. However, it’s recommended setting different IP address of DIGISTOR if there is more than one DIGISTOR in the same LAN. 8 2. Enter a user name and password Log in the NVR with the default administer account (user name: admin, password: admin). 3. Install the ActiveX control in order to successfully view the interface of NVR from IE browser 9 Quick configuration After you install the ActiveX control, the system will direct you to set Quick Configuration in 5 steps. Follow the instructions of the Overview of wizard to complete the system setup. Once the five steps of Quick Configuration are complete, you can click “Start Liveview” to start monitoring. For further details of Quick Configuration, please refer to the user manual. When the live view is displayed, you have successfully installed the DIGISTOR NVR. Congratulations! 10