1
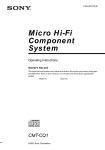
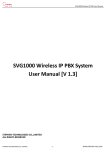
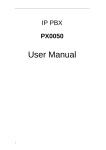
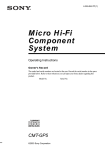
PX0210 User Manual
1
Contents
1. Introduction ..................................................................................................................................................................................................................... 3
2. Features .......................................................................................................................................................................................................................... 3
2.1 Main Features: ................................................................................................................................................................................................. 3
2.2 Protocols Supported......................................................................................................................................................................................... 3
3.Hardware Specification .................................................................................................................................................................................................... 4
3.1 Front Panel....................................................................................................................................................................................................... 4
3.2 Rear Panel ....................................................................................................................................................................................................... 5
3.3 Packing list ....................................................................................................................................................................................................... 5
4. Installation instruction for Multi-function Access Setting ................................................................................................................................................ 5
4.1 Dynamic IP Address......................................................................................................................................................................................... 5
4.2 Static IP Address.............................................................................................................................................................................................. 5
5. Web configuration ........................................................................................................................................................................................................... 6
6. PX0210 Network Connection Mode Setting.................................................................................................................................................................. 7
6.1 PPPoE Connection .......................................................................................................................................................................................... 7
6.2 Bridged Mode ................................................................................................................................................................................................... 9
6.3 DHCP connection............................................................................................................................................................................................. 9
6.4 Static IP connection ......................................................................................................................................................................................... 9
6.5 Configuration Saving ........................................................................................................................................................................................ 9
7. Wireless Settings .......................................................................................................................................................................................................... 10
8. VoIP Settings ................................................................................................................................................................................................................ 12
9. Dialing Rule................................................................................................................................................................................................................... 13
Appendix A:Frequently Asked Questions....................................................................................................................................................................... 24
1. If power on the PX0210 and the ‘PWR’ light is off, how can I do? ................................................................................................................... 24
2. If the PX0210 can not make a dial to log on the Internet, how can I do?......................................................................................................... 24
3. I modified the IP address of our PX0210, but I forget it, how can I do? ........................................................................................................... 24
4. I have modified the settings of PX0210, but the settings seems not active, how can I do?............................................................................. 24
5. If the PX0210 can not register the VoIP server, how can I do? ....................................................................................................................... 24
Appendix B:The specification of WLAN......................................................................................................................................................................... 25
2
1. Introduction
PX0210 is a high quality multifunction wireless access device with a wide variety of features, including:
1) ADSL2/ADSL2+ Modem
2) IEEE 802.11 b/g WLAN Wireless Access Point (Wireless LAN: 54Mbps)
3) Router with NAT functions, in support of dynamic and static router.
4) VoIP phone connection, SIP Protocol.
5) Firewall
High-speed data transferring feature will be of a great facility for user, such as surfing on line, bulks of file
downloading, on line meeting, high-definition digital movies, enjoying MP3, photo viewing and gaming,
etc. In addition, a new feature of SIP phone is also available.
2. Features
2.1 Main Features:
z
z
z
z
z
z
z
z
z
z
z
z
z
auto-adjustable Ethernet port (10/100M)
SIP Phone function, making IP call via regular phones.
User-friendly configuration interface, easy operating procedure.
VPN: support ordinary communication IPSec; support PPTP traversing
Pre-setup many popular gaming port transfer, automatically complete the port setup.
DHCP server
Compatible with all Ethernet standard protocols.
ADSL: Industry standard, highly compatible ADSL port.
Support IP address filter, DMZ, etc.
Visual viewing of system configuration and status.
Support 8 PVCs
Support 8 PPPoE connections
54Mbps high-speed wireless data transfer, compatible with IEEE 802.11b, IEEE 802.11g,
frequency used: 2.4GHz
z Automatic upgrading, manual software upgrading function also available.
2.2 Protocols Supported
z
z
z
z
z
z
z
z
z
ITU G.992.1、ITU G.992.2 、ITU G.992.3、ITU G.992.5
ANSI T1.413 Issue 2
IEEE 802.11b, IEEE 802.11g
RFC 1483 bridge
RFC 1483 router
ATM (RFC 1577)-based traditional SIP(Session Initiation Protocol)
ATM (RFC 2364)-based point-to-point protocol
Ethernet (RFC 2516)-based point-to-point protocol
VoIP:RFC 3261 SIP(Session Initiation Protocol)
3
3.Hardware Specification
PX0210 has many faucets and indicator lights, shown as below.
3.1 Front Panel
PX0210 Front Panel contains 8 indicator lights to indicate the working status of the system as
shown in the figure below:
Indicator
Status
Description
off
Power is off.
on
Power is on.
PWR
LAN
on
Ethernet is connected.
off
Ethernet is disconnected.
Blink
Ethernet traffic is flowing.
Blink
Incoming Calls
Blink
ACT
ADSL is sync.
on
ADSL is on.
off
ADSL is off.
on
SIP is registered successfully.
off
SIP is not registered,
off
WLAN is off.
on
WLAN is on.
CALL
off
No Incoming Call
VoIP
off
Before the first phone pickup or SIP
service is not activated.
on
SIP service is activated and the phone
has been picked up.
PHONE
Blink
WLAN
Blink
The device is upgrading.
UPGRADE
off
The device is not upgrading.
4
WLAN traffic is flowing.
3.2 Rear Panel
PX0210
back
Description:
z
z
z
z
z
plane
Interface
Power: AC 12V Power Adapter
LAN: Ethernet port to connect
PC, HUB, or Switch etc
Reset: to load factory setting
FXS: Phone port, connect to the
regular phone
ADSL: ADSL Telephone line for
modem
3.3 Packing list
Name
quantity
remark
Power supply
1
DC 12V/1A
Telephone Line(two
core RJ11)
2
Network line
1
Equipment
1
User manual
1
Splitter
1
4. Installation instruction for Multi-function Access Setting
PX0210 enable Router mode for user to access and user should set the as followings. Also user should get
necessary information or parameter from ISP and VoIP service provider. If needed, user can contact the
provider for this information.
4.1 Dynamic IP Address
Using one network line to connect the PC and PX0210 or by wireless access, under dynamic IP address
mode, the equipment can automatically get the IP address IP (192.168.1.x/255.255.255.0).
4.2 Static IP Address
Setting the PC’s IP address to 192.168.1.x (x: any value from 3 to 254), subnet mask address: 255.255.255.0,
Gateway address: 192.168.1.1 to visit the webpage for configuration.
5
5. Web configuration
5.1 Start IE explorer on your PC and input IP address: http://192.168.1.1 (default IP Address)
5.2 System will prompt for ‘User name’ and ‘Password’. Factory default for user name and password is
‘Admin’. Click on ‘Log In’ to enter as shown below:
5.3 After the verification of user name and password, user will be directed to the web page as shown below
(Version Information will be based on the exact version published).
6
PX0210 system homepage: Home, Setup, Advanced, Wireless, Tools, Status, Wizard and Help.
6. PX0210 Network Connection Mode Setting
PX0210 enables six (6) network access modes: 1) DHCP, 2) Static IP, 3) PPPoE, 4) RAS, 5) PPPTP, and 6)
Heart Beat Signal. PX0210 supports all modes above to be saved in the system.
Before connection setting, please inquiry the local service provider and read the following instruction.
After connection setting, please remember to save the configuration to take the setting effective.
6.1 PPPoE Connection
Click on ‘Setup’, ‘New Connection’ to build up the PPPoE connection, as shown on picture below:
A. Choose ‘PPPoE’ under ‘Type’ click box
B. Input the ‘Username’ and ‘Password’
C. Under the ‘Name’ box Input the Name of connection (No number and space allowed)
7
All the parameter or information needed on this webpage should inquiry the local service provider.
Setting details
A. User Name: Account needed to visit PPPoE service, offered by DSL or ISP service provider
B. Password: Password needed to visit PPPoE service, offered by DSL or ISP service provider
C. On Demand: Under On-Demand mode, ADSL connection will be connected only if there is Request
from the LAN, If no request, the connection will be automatically broken down after ‘Idle timeout’ time
D. Idle timeout: conjunction using with ‘On Demand’, if no connecting request within ‘n’ second, PPPoE
connection will be broken down. If ‘Idle timeout’ is ‘0’, connection will be always enabled.
E. Keep Alive: If ‘On-Demand’ disabled, ‘Keep Alive’ value will be the waiting time before breaking
connection. Value of ‘0’: connection always enabled.
F. Default Gateway: connection setting as default router connection
G. MTU: Maximum Transmission Unit of the DS, value from 128 to 1500
H. Enforce MTU: Check this box if you experience problems accessing the Internet over
a PPPoE. connection
I.
Debug: enable PPPoE connection debug, discussed in the following section
Note:
z
z
z
Disable Enforce MTU maybe affect MSN message application
Enforce MTU mode is commended on a PPPoE connection
Click on the ‘Apply’ to temporarily save the connection configuration. Permanent saving please refer
to ‘6.6 configuration saving ‘
8
6.2 Bridged Mode
Click on ‘Setup’,’ New Connection’ to build up a Bridged connection, as shown on picture below:
A. Choose ‘Bridge’ under ‘Type’ click box
B. Under the ‘Name’ box Input the Name of connection (No number and space allowed)
All the parameter or information needed on this webpage should inquiry the local service provider.
6.3 DHCP connection
Need service provider support, please inquiry SP about these settings
6.4 Static IP connection
Need service provider support, please inquiry SP about these settings
6.5 Configuration Saving
PX0210 supports all modes above to be saved in the system.
Click on ‘Apply’ to temporarily save the configuration information. Click on ‘Tool’, ‘System Commands’ and
‘Save all’ to save configuration as shown on the picture below.
9
7. Wireless Settings
This chapter introduces the steps of how to make the device access the wireless LAN. There are some
solutions of wireless LAN such as: Point to Point communication with 2 PCs which have Wireless LAN Cards,
Or, the users use multi-PCs to make communication through our device’s wireless part.
Click ‘WIRELESS’ button on the menu -> Start from ‘Configuration’ and setup as the instruction in the picture.
Instructions:
10
a) AP: Click the AP to enable the wireless communication function.
b) SSID: SSID (Service Set Identifier) all wireless devices on a WLAN must employ the same SSID in order
to communicate with each other. The default value is ParaAP. The entire device in the wireless network
should use SSID.
c) Hidden SSID: If the user clicks this item to hide the SSID, the other devices can not get the SSID of
PX0210 by active scan.
d) Channel B/G: Set the wireless channel of the PX0210, all the other device in this wireless network should
select the same channel. (The range is 1~11)
e) 802.11 Mode: Comply with IEEE 802.11b, IEEE 802.11g. The user can select one protocol from these.
The default value is ‘Mixed’.
Note:
z
The Configuration menu includes some settings of advanced values. If the user edit these default
settings will affect the wireless transmission, please use the default values.
z
Press ‘Apply’ to do a temporary save. If the user needs to save the values after reset the PX0210, please
refer to the ‘6.6 Save the Settings’.
z
If the user need to active the settings, the user should reset the PX0210: Select ‘TOOLS’ -> ‘ System
Commends’->‘Restart Access Point’, then the PX0210 will JUST reset the AP module. If the user need to
reset the PX0210, click the ‘Save All’ to save all settings and than click the ‘Restart’
11
8. VoIP Settings
PX0210 supports VoIP function. The user should inquire the VoIP access information from local VoIP
service provider. Then the user can select ‘WIZARD’ on the homepage to start ‘SIP Setup’.
Customer should get the information shown in the figure from VoIP service provider:
z
Caller ID: Input the ID which needs to be authorized by local VoIP service provider.
z
SIP Registration Server IP: Input the IP address which needs to be provided by local VoIP
service provider.
z
SIP Registration Server Port: Input the port number which needs to be provided by local VoIP
service provider.
z
SIP Authentication Username: Input the user name which needs to be provided by local VoIP
service provider.
z
SIP Authentication Password: Input the user password which needs to be provided by local
VoIP service provider.
z
SIP Proxy Server IP: Input the SIP Proxy Server IP address which needs to be provided by
local VoIP service provider.
z SIP Proxy Server Port: Input the SIP Proxy Server Port number which needs to be provided by
local VoIP service provider.
Press ‘Apply’ to confirm the setting. If input the wrong values, click ‘Cancel’ to re-input. After
editing the SIP configuration, please save and restart the PX0210. Then the PX0210 will use the
new configuration to register.
Note: Above settings of VoIP will be available when the device has been connected with Internet and
ADSL has obtained IP address. (Especially when ADSL dial successfully or the Static IP address
is available). Confirm that the settings has been finished and then press ‘ Save’, then the user
need to wait for about 30 minutes to make sure all the values has been stored in the PX0210.
Otherwise, the setting values will be lost after reset the device.
12
9. Dialing Rule
PX0210 allows the user chooses the dial rule on VoIP mode or standard PSTN dialing rule. Please follow the
rules below to make an IP phone call:
z
For emergency phone number, e.g. 110, 119, 120, dial them directly.
z
To dial out using VoIP, please press your telephone number, e.g. 075586224704. Then press
‘#’ or wait 5 seconds then the system will dial out with VoIP mode automatically.
z
To dial out using PSTN,
o
Press ‘#’ first.
o
After hear dial tone, press telephone number.
Note: If there is one incoming call from PSTN or VoIP network, the phone which is connected to the PX0210
will ring..
13
IP-PBX Setup
Click WIZARD. Figure 14 shows the WIZARD page.
Figure 14 PBX Wizard Page
PBX General
Through PBX General, users can setup some general settings as follows.
Figure 15 shows the default General page.
• Enable PBX: Select this checkbox to enable PBX functionality. This option is enabled by default
• PBX is listening at port: user can change the SIP port, the default port number is 5070
• Enable PBX NAT: if PX0210 runs under a NAT environment, select this checkbox
• External IP of PBX: if PX0210 runs under a NAT environment, enter the external IP address of PBX
• Password for customizing switchboard: user can access the customization switchboard system by dialing phone
number“7777”, then user would be required to press the password, the default password is 314159, user can change the
password here
• Password for non-local FXO user: non-local user can’t use the FXO of PX0210 to call out unless he knows this password,
the purpose of the password is to restrict non-local user
Note: To validate the changes permanently, please click Apply, Save, Restart buttons.
14
Figure 15 PBX General Page
Local Extension
Through PBX Basic Setup, users can add or delete an extension.
Figure 16 shows the default PBX Local Extension page.
• “1-20”, “21-40”, “41-60”……denote the scope of local user number
• New extension number: extension number that user want to add or delete, such as “201”, “202”
• Password: the password of local extension is used to verify the identity of local extension
• Voicemail password: the password is required when users access voicemail
• Email address: The voicemail can be forwarded to this email address, and it will be attached as a “GSM” or ‘WAV” format
file in the email. And the voicemail is also stored on PX0210, which can be accessed by dialing “7777”.
15
Figure 16 PBX Local Extensions
ADD A LOCAL EXTENSION
Follow the following procedures to add a local extension:
1. On the WIZARD page, click Local Extension.
2. Select “Add” checkbox.
3. Enter your extension number, password, voicemail password and Email address (Optional) in the corresponding fields.
4. Click Apply, Save, Restart PBX buttons to validate the changes permanently
DELETE A LOCAL EXTENSION
Follow the following procedures to delete an extension:
1. On the WIZARD page, click Local Extension.
2. Select the extension number which you want to delete from Select User menu, and then select “Delete” checkbox.
3. Click Apply, Save, Restart PBX buttons to validate the changes permanently.
Exterior Line
Through PBX Exterior Line, PX0210 can also be registered to remote SIP servers or another PX0210 as a client, so local
uses can communicate with exterior line users.
16
Figure 17 PBX Exterior Line
Figure 17 shows the default PBX Exterior Line page.
New registration server name: Description to this registration, you can input anything here, like “broadvoice”, “local office”,
etc.
• Phone number: the phone number that PX0210 is used as a client.
• Authentication Name: Input when remote SIP server requires authentication.
• Password: Input when remote SIP server requires authentication.
• Server address: The IP address or domain name of the SIP server. This information should be obtained from VoIP service
provider.
• Server port: The port number of the SIP server.
• Dialing prefix: When local users want to make a call to exterior line SIP user, they must dial this prefix first. (The prefix
must be a number which starts with ‘0’, such as 0, 01,02,03……User can set all these prefix to the same number as ‘0’ .
When ‘0’ has been used, please don’t use ’01’ , ‘02’ ……)
Note: The maximum number of exterior registration servers is 20.
ADD AN EXTERIOR SIP SERVER
Use the following procedures to add an exterior SIP server:
1. On the WIZARD page, click Exterior Line.
2. Select Add checkbox.
3. Enter New registration server name, Phone number, Server address, Server port, Local number, Dialing prefix, if needed,
with Authentication Name and Password in the corresponding fields .
4. Click Apply, Save, Restart PBX buttons to validate the changes permanently.
17
DELETE AN EXTERIOR SIP SERVER
Use the following procedures to delete an exterior SIP server:
1. On the WIZARD page, click Exterior Line.
2. Select the exterior SIP server which you want to delete from Select Exteror Line pop-up menu, then select Delete
checkbox.
3. Click Apply, Save, Restart PBX buttons to validate the changes permanently
PBX Dial Plan
Through PBX Dial Plan, users can customize the dial plan for the incoming calls from exterior SIP users and PSTN users.
18
Figure 18 PBX Dial Plan
Figure 18 shows a sample of PBX Dial Plan page.
• Primary Destination: when there is a incoming call from exterior line, user can set the first response destination, such as
switchboard or certain phone number
• Alternative Destination: when there is a incoming call from exterior line, if the first response is unavailable in 20 seconds,
the call would be forwarded to the alternative destination
PBX Utilities Setup
Through PBX Utilities, users can select a SMTP server to relay email.
NOTE: You must enter a valid SMTP server to make “voicemail to email” functionality works. Besides this, a WAN
connection is needed to deliver your email successfully.
Figure 19 shows the default PBX Utilities page.
• SMTP server address: enter a SMTP mail server name, such as “smtp.sohu.com”, ”mail.vanaccess.com”
• SMTP server port: the SMTP mail server port, usually it is 25.
• SMTP username: your SMTP username.
• SMTP password: your SMTP password
19
Figure 19 PBX Utilities
PBX Status Display
• Click STATUS page, then click PBX clients on the left column, users can view PBX status of registered clients, Figure 20
shows a PBX clients status page for an example.
• Click STATUS on the top main page, then click PBX registrations on the left column, users can view PBX registration
status. Figure 21 shows a PBX registrations status page for an example.
• Click STATUS on the top main page, then click PBX Channel Status on the left column, users can view current PBX
channels status. Figure 22 shows a PBX Channels Status page for an example.
NOTE: A channel means a conversation between different users.
Figure 20 PBX clients status
20
Figure 21 PBX registrations status
Figure 22 PBX Channels Status
Appendix Dialing Rules
For an example, figure 23 shows a network topology structure of PX0210
21
Figure 23 A sample of PX0210 network topology structure
A dialing flow is showed as following.
22
23
Appendix A:Frequently Asked Questions
1. If power on the PX0210 and the ‘PWR’ light is off, how can I do?
(1) It may be the problem about the connection of cable line. Please check whether the cable line has been
used between the PX0210 and power socket.
(2) If the connection is correct, the problem maybe happened on the hardware. Please contact with local
service provider.
2. If the PX0210 can not make a dial to log on the Internet, how can I do?
(1) Please check the ‘CD’ light, if the CD light is twinkling, it means the link can not be active, please check the
telephone line.
(2) If the ‘CD’ light keep lighting, but the PX0210 can not log on the Internet. So it’s maybe the problem about
the network card or dialup software. Please check the user name, password and the parameter of PVC
which are provided by local service provider.
(3) If above suggestion can not help you to resolve the problem, please contact with local ADSL service
provider.
3. I modified the IP address of our PX0210, but I forget it, how can I do?
(1) Refer to the 4.1; check the IP address of the gateway in your PC. The IP address of the gateway should be
the IP address of PX0210.
(2) The default IP address is 192.168.1.1, the user can press ‘RESET’ button to recover the settings to the
default settings. But the user’s setting will be lost. The operation steps: use the pen or pin and insert them into the
RESET hole and press the button 3 times and keep this procedure for 1 one second. Then the ADSL will restart
automatically. When the CD light begins to twinkle, this means the IP address of PX0210 has been recovered to
192.168.1.1.
4. I have modified the settings of PX0210, but the settings seems not active, how can I do?
Please note the steps of setting up the PX0210: (1) Modify the settings, (2) Apply, (3) Save, (4) Restart the
PX0210. The new settings will be active after above steps.
5. If the PX0210 can not register the VoIP server, how can I do?
(1) Please verity the register information: user name, password. Please check this with local VoIP service
provider.
(2) If the register information is correct, but the PX0210 still can not log on. Please try to close the firewall
software in the PC and log on the VoIP server again.
24
Appendix B:The specification of WLAN
Standards
IEEE 802.11b/g
Frequency Range
2.40G-2.4835G
802.11b:DBPSK,DQPSK, CCK
Modulation Schemes
802.11g:BPSK,QPSK,16QAM,64QAM
Transmit Power (Max)
20dBm
Connection
numbers
50~80Pcs/AP (Proposal)
11 (US and Canada)
Channel
AP Capacity
13 (EU and China)
14 (Japan)
1, 2, 5.5, 11, for 802.11.b
Transmit Rate
6, 9, 12, 18, 24, 36, 48, 54 for 802.11g
1 Mbps
DBPSK @ 0.81Mbps
2 Mbps
DQPSK @ 1.58Mbps
5.5 Mbps
CCK @ 4.07Mbps
6 Mbps
[email protected]
9 Mbps
[email protected]
11 Mbps
CCK @ 7.18Mbps
12 Mbps
BPSK @8.31 Mbps
18 Mbps
[email protected] Mbps
24 Mbps
[email protected] Mbps
36 Mbps
[email protected] Mbps
48 Mbps
[email protected] Mbps
54 Mbps
64QAM @26.12 Mbps
Payload
Security
64-bit/128-bit WEP, WPA, 802.1X
Customer Contorl
MAC Layer
MAC filter
Support
Idle MAC filter
Support
DHCP client and
Static IP
Support
802.1X, Radius
Client
Support
DHCP Server
Support
MAC Filter
Authority
Mode (Ethernet interface)
Router, Bridge, PPPoE client
Ethernet Interface type
10/100Mb Auto- negotiation IEEE802.3
25
Range Coverage
(m)
Outdoor
120~400
Indoor
35~100
Antenna type
Internal Diversity with Connector
WEB, Telnet, TFTP
Network Management
Session(arp/ping)
26