1
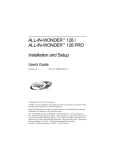
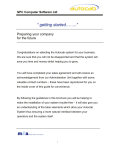
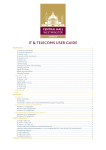
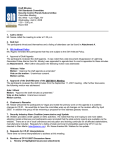
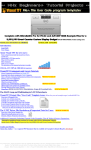
NOMADA
USER MANUAL V2.0
USER’S MANUAL
interstage
Phistersvej 31, 2900 Hellerup, Danmark
Telefon 3946 0000, fax 3946 0040
www.interstage.dk
- pro audio with a smile
NOMADA
INDEX:
1. BLOCK DIAGRAM AND GENERAL FEATURES
2. GENERAL VIEW OF THE DEVICE
3. AUDIO INPUTS AND OUTPUTS
4. COMMUNICATIONS
5. POWER SUPPLY
6. OPERATIONS MANUAL
7. CONFIGURATION MICROSWITCHES
8. MULTIPLEX MODE OPERATION
9. FREQUENTLY ASKED QUESTIONS
10. TECHNICAL SPECIFICATIONS
USER MANUAL V2.0
NOMADA
USER MANUAL V2.0
1.- BLOCK DIAGRAM AND GENERAL FEATURES
NOMADA is a truly portable audio-codec. Compact, lightweight, easy to use and
with all you need for external communications (live reports, sports transmissions,
commentators) in digital ISDN quality.
Utilising both B channels of the ISDN² basic rate interface (BRI), NOMADA
provides two full-duplex circuits of communications, one in G722 (program) and the
other in G711 (cue/talkback) mode, with the flexibility to adopt different
configurations. Additionally, using powerful on-board Digital Signal Processing
(DSP) technology, NOMADA is the first audio-codec to incorporate an echo
canceller which eliminates the problems caused when an N-1 (or ‘clean-feed’)
configuration is not available.
To better understand the NOMADA, it is necessary to know how it is built by taking
a look at the Block Layout. NOMADA has three different parts:
a) Audio inputs and outputs.
b) ISDN Terminal adapter (S0 interface).
c) A G722 codec and a G711 codec.
a) Audio inputs and outputs
NOMADA provides two transformer balanced mic inputs (MIC2, switchable
mic/line) each with independent headphone outputs which allow the
commentator to monitor the “return” and “sent” signals. Inputs and outputs
have independent level control.
b) ISDN Terminal Adapter (S0 interface).
NOMADA has a built-in ISDN terminal adapter (TA) capable of handling the
two B channels available in a Basic Rate ISDN interface.
c) G722 and G711 codec.
NOMADA, with its ability to handle communications through both B channels
of the ISDN² basic rate interface (BRI), provides two audio encoderdecoders to simultaneously receive and send audio through those channels.
One uses the G722 standard for high voice quality (7KHz), normally the
program signal. The other is a G711 channel whose main application is to
set up a command or co-ord channel.
NOMADA
USER MANUAL V2.0
This command channel can be set up with any telephone handset, either
digital (ISDN telephone or any other codec handling G711) or using analog
telephone network. In describing the operation of NOMADA we will cover
communication through both 64 Kbps lines (or ‘B’ channels).
For ease of use, NOMADA provides an analogue external telephone
connection which can access either line for flexibility in handling the
command channel as well as handling the setup of the device.
NOMADA
USER MANUAL V2.0
2.- GENERAL VIEW OF THE DEVICE
FRONT PANEL
4
3
1
2
1.- MIC1 and MIC2/LINE input level controls
2.- HP1 and HP2 headphone output level controls. Each headphone output
with independent level control, for the “local” signal (send) and "Return"
signal.
3.- Connector for external telephone.
4.- Meter (send)
RIGHT SIDE PANEL
5
6
7
8
5.- MIC1 and MIC2/LINE input connectors.
6.- MIC/LINE selector for MIC2/LINE input.
7.- HP1 and HP2 headphone connectors.
8.- Configuration microswitches.
9.- ISDN connect.
9
NOMADA
USER MANUAL V2.0
KEYPAD AND LEDS
11
16
13
10
15
14
12
10.- Dialling keypad.
11.- Function keys:
CALL: Dialling
END: Call ending
RDIAL: Dialling last number dialled through line 1 (G722).
DTMF: Sending DTMF tones through line 1 (G722).
12.- LED indicators of line status:
ISDN STATUS:
Unlit: line disconnected.
Lit: line connected.
Flashing: call in progress or incoming call detected.
AUDIO SYNC:
Lit: audio synchronised.
13.- LED indicators of external telephone status:
PH1: Lit - telephone is using line 1 (G722).
PH2: Lit - telephone is in its default state, i.e. using line 2 (G711).
14.- ECHO: Key to activate (associated LED lit) or deactivate (LED off) the echo
canceller. LED flashing indicates that the canceller is activated but in the adjusting
phase.
NOMADA
USER MANUAL V2.0
15.- Keys to “MUTE” MIC1 and MIC2/LINE inputs. LED lit indicates that the input
is active.
16.- Battery and Power supply indicator.
BACK PANEL OF THE DEVICE
20
10
19
10
18
11
17.- External power supply input.
18.- Start up switch.
19.- Connection contacts for batteries.
20.- Fixing points for the battery-holder.
17
10
NOMADA
USER MANUAL V2.0
3.- AUDIO INPUTS AND OUTPUTS
NOMADA provides two mic inputs (MIC1 and MIC2). The second, MIC2, is
switchable mic/line using the associated switch near its input connector. Each mic
input has a headphone output (HP1 and HP2). Each output has a sum signal (MICI
and MIC2/LINE) (send) and a received audio signal through communications line 1
(Return), that is, the decoded signal in G722 mode. This signal will not be available
until the decoder is synchronised, as indicated by LED “AUDIO SYNC” (line 1).
Since input MIC1 and output HP1 can work under G711, there could be two
signals in the headphone output, that is, the MIC 1 signal and the one decoded
from line 2 (communication in G711 mode). So, the commentator who works with
MIC1/HP1 will be able to participate in G722 (PROGRAM) and G711 (CO-ORD),
being able to switch between them and having control of the communication in
each of the lines (establish, reception and ending call).
You can also use an analogue external telephone as audio interface, via the
front panel RJ11 connector. This telephone has free access to line 2, to which it is
connected by default, sharing communication with the commentator on MIC1/HP1,
when he is also using this line. However, the use of line 1 (G722 or PROGRAM)
has limited access to the telephone to avoid involuntary interference with the
PROGRAM signal, as we will see later.
4.- COMMUNICATIONS
NOMADA has a built-in ISDN terminal adapter handling the two B (64Kbps)
channels available in a Basic Rate ISDN interface (S0 interface). When we refer to
line 1 and line 2, we are referring to each of the B channels respectively. Line 1 will
always be associated with the G722 codec, and line 2 the G711 codec. Therefore,
independent of the B channel we are using, the data calls, i.e. in G722 mode, will
be made or received through line 1, and voice calls (from digital or analogue lines,
G711 mode) through line 2.
Line 1 working in G722 mode, i.e. high voice quality (7kHz) is, by default,
associated with the corresponding mic inputs and headphone outputs and referred
to as the PROGRAM line. Line 2, in G711 mode i.e. telephone quality (3.1kHz) is
assigned to the external telephone and identified as the CO-ORD line. The
commentator on MIC1/HP1 can access this line without affecting line 1
(G722/PROGRAM), being able to switch from one to the other.
NOMADA
USER MANUAL V2.0
5.- POWER SUPPLY
NOMADA has an external power supply input of 12V or can be powered
using the supplied NiMH battery pack. NOMADA automatically recognises when
external power is connected and disconnects the input from the battery pack. The
unit has a circuit for automatic recharge of batteries when external power supply is
connected.
Batteries need to be charged before use. Time 4 hours approx.
POWER AND BATTERY LED’s
BATT
OFF
FLASHING
POWER
ON
ON
ON
ON
ON
FLASHING
External Power supply.
External power supply and battery pack
are connected to the unit whilst batteries
are recharging. LED will stop flashing
when this operation is finished.
Battery pack connected and not in “low
Battery” status (last 30 minutes).
Batteries discharged. At this point the
operation time will last 30 minutes.
6.- OPERATION
6.1.- STARTING UP
To switch on, put the back panel switch in ON position. The startup
sequence takes a few seconds during which time keypad LEDs flash. When the
startup sequence has successfully completed a warning tone is sent to the
headphone outputs and the telephone to signify that the equipment is ready to be
used.
6.2.- ESTABLISHING A CALL IN G722 MODE: “CALL” KEY.
By default, NOMADA connects the MIC1 and MIC2/LINE inputs to the
encoder G722 and the HP1 and HP2 headphone outputs to the decoder G722, that
is both audio inputs and outputs are prepared to establish a communication in
G722 mode through one of the available channels in the Basic Rate ISDN.
NOMADA
USER MANUAL V2.0
Press the CALL key, dial the number, and press the CALL key again. The
sequence is as follows:
CALL < number to dial> CALL
The line1 “ISDN STATUS” LED will flash until communication is made then
stay on throughout the call. When the G722 decoder synchronises the line1
“AUDIO SYNC” LED will light.
During dialling each key produces a corresponding multifrequency tone,
monitored by the headphone outputs and telephone, so the user has a positive
feedback of the number dialled. To re-dial the last dialed number press the
REDIAL key. This number remains while the unit is powered but is not stored in the
non-volatile memory of the unit.
6.3.- MAKING A CALL IN G722 MODE (LINE 1) USING THE PHONEBOOK.
NOMADA provides a ten number phonebook for easier dialing. Simply press
the “CALL” key then * and the location of the number to call followed by the “CALL”
key.
CALL < * i> CALL
LOCATION IN PHONEBOOK
PROGRAMMING THE PHONEBOOK
1.- Lines must be disconnected.
2.- Press # and the location in the phonebook where you want to store the
number.
3.- Tap in the number.
4.- Save it by pressing the # key again.
# <i> < number to save> #
At each press of the numeric keypad a multifrequency tone is produced in
the headphone outputs and the telephone for confirmation. NOMADA will indicate
that this number has been stored by a corresponding sequence of “beeps” heard
by the headphones and telephone.
NOMADA
USER MANUAL V2.0
6.4 RECEIVING A CALL IN G722 MODE: “CALL” KEY
Calls in G722 mode come in through line 1. When a call is detected the
“ISDN STATUS” LED for line 1 will flash and a beep is sent to the headphone
output Return (return signal) and the telephone handset, to alert all users. There is
a different warning tone for each line.
There is also a buzzer which can be turned on/off using the configuration
microswitches (see chapter 7 - CONFIGURATION MICROSWITCHES)
To pick up, press the CALL key. Once communication has been established
the Line 1 “ISDN STATUS” LED will light and stay lit throughout the call. The Line 1
“AUDIO SYNC” LED lights when the received audio is synchronised. You can also
configure NOMADA for automatic answer through line 1 by a microswitch (see
chapter 7 CONFIGURATION MICROSWITCHS).
6.5 ENDING CALL IN G722 MODE : “END” KEY
Press and hold the “END” key for at least 1 second to end the call.
6.6 SENDING MULTIFREQUENCY TONES THROUGH LINE 1
There is a key that allows the user to send multifrequency tones for remote
control functions. These tones can only be sent through line 1 (G722) so line 1
must be connected and MIC1/HP1 not associated with line 2 (G711). The process
is as follows:
1.- Press “DTMF” key.
2.- Then press DTMF code to send.
Sent DTMF tones will be monitored through Return headphone output and
telephone handset.
6.7.- ESTABLISHING A CALL IN G711 MODE (LINE 2)
Line 2 to the G711 codec is only accesible by the commentator connected to
audio input/output 1, i.e. MIC1/HP1. Thus one of the commentators can access the
‘co-ord’ channel.
The commentator associated to MIC1/HP1 has two options
concerning the signal heard at the “Return” output of PH1 when
connected to the ‘co-ord’line: to only hear the return of the ‘co-ord’
line or to hear both, the return of the ‘co-ord’ line and the return of
the program line (G722) (see configuration microswitches).
NOMADA
USER MANUAL V2.0
The process is very simple and allows the commentator access to one or the other
line without losing the call in either which will be made independently whether or
not line 1 (G722 or program) is connected. To call, press the ‘*’ and ‘2’ key followed
by the number then the “CALL” key.
* 2 < number to dial > CALL
A tone is for each key pressed is heard through the headphone output and
telephone handset as confirmation.
When NOMADA detects the sequence *2, the LEDs for line 2 (ISDN
STATUS and AUDIO SYNC) will flash to indicate the unit is ready to make the call.
If the user waits more than 15 seconds before pressing any key
NOMADA will abort the sequence, stop flashing the LEDs and return
the input and output MIC1/HP1 to line 1.
Pressing the # key returns the person connected to line 1 (G722). If line 2 is
connected it will stay connected i.e. both lines connected simultaneously, so the
keys ‘* 2’ and ‘#’ allow you to ‘toggle’ between the two lines i.e. ‘program’ and ‘coord’.
6.8 RECEIVING A CALL IN LINE 2 (G711)
When a voice call (G711) is received, the “STATUS ISDN” LED associated
to line 2 will flash. To answer press *2 on the dialling pad and line 2 will be
connected. The “ISDN STATUS” LED will stay lit during the whole communication.
For incoming calls, a warning signal at the “Return” headphone output can be
activated depending on the position of the configuration microswitch nº 6.
6.9 ENDING A CALL IN LINE 1 (G711)
When line 2 is connected to the input and output MIC1/HP1, pressing the
“END” key for 1 second at least will disconnect the line and the line 2 “STATUS
LINE” LED will switch off. If line 1 is connected, this input and output will be
connected immediately.
6.10 ECHO CANCELLER: "ECHO" KEY
Communications through ISDN codecs can introduce a significant delay,
making it difficult for a commentator to concentrate when speaking if monitoring a
return signal which includes their own voice.
NOMADA
USER MANUAL V2.0
To solve the problem an N-1 (‘clean-feed’ or ‘mix-minus’) configuration is used that
returns the program signal minus the commentator. However, it is not always
possible to do this. NOMADA solves the problem by including an echo canceller
which uses the on board digital signal processor (DSP) to estimate the delay
automatically and then cancel from the return signal the signal sent by the
NOMADA (i.e. the commentator). NOMADA calculates the delay and adapt its
parameters automatically for cancellation, to avoid the distraction of hearing
yourself with delay.
Adjustment of the canceller.
Once connected, with audio syncronized, activate the echo canceller by
pressing and holding the “ECHOC” key for at least one second. (Note: If the audio
line is not syncronized or MIC1/HP1 are associated to line 2 (G711), pressing
ECHOC has no effect). NOMADA starts its adjustment sequence, automatically
calculating the delay by sending/receiving a proof signal (a burst of white noise).
This signal must be returned from the remote end without changing its level
otherwise there will be a delay in the adjustment process or even make it
impossible to calculate.
The associated LED will flash whilst calculating and stay lit on completion
whereupon the sent signal will disappear from the return signal. Any change in
level at the remote end will produce temporary “false” inputs that will be
immediately detected (checking every 0.5 seconds if the canceller works perfectly)
and reactivate the adjustment process, sending the proof signal.
Once established the user can deactivate/activate the canceller as required.
Each time the user activates it, the same process starts, but if still connected, the
canceller will retain its original values.
Once the adjustment has been made, the user should check, speaking by
phone and listening to the return, that the canceller correct. Activate and deactivate
the canceller by pressing “ECHO” noting how the return signal is cancelled when
activated.
The canceller only works in line 1 (G722) and it does not work in
MULTIPLEX mode.
NOMADA
USER MANUAL V2.0
IMPORTANT CONSIDERATIONS ABOUT THE ECHO CANCELLER:
1.- The echo canceller works by comparing the sent signal with the received
signal to find the delay.
The time taken to adjust depends on the ‘round trip’ delay of the ‘sent’ signal and
on the non-adjustment of levels in the audio loop at the remote end.
2.- The delay range that NOMADA can handle is configurable by
microswitchs (see chapter 7 CONFIGURATION MICROSWITCHS)
3.- The “local sum” option allows, whilst echo cancellation is in effect, the
local commentator’s signal to be added (summed) with the programme return. This
is configurable by microswitchs (see chapter 7, CONFIGURATION
MICROSWITCHS).
6.11 EXTERNAL TELEPHONE
There is an RJ11 connector on the front panel for using a standard analogue
telephone. This telephone can set up an independent ‘co-ord’ circuit of audio input
and output lines MIC1/HP1 and MIC2/HP2. The telephone is associated with line 2
by default, i.e. working in G711 mode. Its performance is very simple and allows
access to the G711 codec by the commentor connected to MIC1/HP1. Additionally,
it can make calls through line 1 in G722 mode although this is restricted to avoid
interference with the program line.
USING LINE 2 (G711)
Making calls through line 2 (G711):
Connect a telephone handset to the front panel and enter the following key
sequence on its keypad:
* 2 <number> *
As each key is pressed a DTMF tone signal is sent to the headphone
outputs for confirmation.
The line 2 “ISDN STATUS” LED will flash until the call is connected at which
point it will stay lit throughout the call. To abort the call, hang up the phone.
NOMADA
USER MANUAL V2.0
The telephone user can confer with the commentator connected to
MIC1/HP1 by pressing the * key on the dialling pad when line 1 is connected. This
will give an advising tone at the “return” headphone output.
If line 2 is used by the commentator connected to MIC1/HP1, as the
telephone is by default connected to line 2, can intervene in the
conversation. In this case the communication can only be ended
with the END key.
Answering calls received through line 2 :
If there is a G711 voice call the line 2 “ISDN STATUS” LED will flash. To
answer, pick up the phone and press ‘* 2’ on the dial pad. Once connected the
“ISDN STATUS” LED will stay lit throughout.
Ending line 2 communication from the telephone:
If the call was made through the telephone just hang up, since it is by default
connected to line 2 (G711) and it can intervene in the communications through that
line established by the commentator connected to MIC1/HP1. The “ISDN
STATUS” LED associated line 2 will go off.
If the commentator connected to MIC1/HP1 is utilising line 2, end
communication using the END key.
USING LINE 1 (G722)
Making a call through line 1 (G722):
Line 1 is accessible from the telephone only if the two lines are
disconnected. The procedure is similar to that of line 2, i.e. dial the sequence:
*1 <number> *
As each key is pressed a DTMF tone signal is sent to the headphone
outputs for confirmation.
Answering calls received through line 1:
The telephone can answer a call received through line 1 (G722) as long as
line 2 (G711) is disconnected. To connect just press ‘*1’ on the telephone keypad.
Once connected you can disconnect the phone by pressing the ‘#’ key of the
telephone. This will not disconnect the call but transfer audio to the inputs and
NOMADA
USER MANUAL V2.0
outputs of the commentators and revert the phone to its default state, associated to
the audio of line 2 (G711) The PH2 LED will light and the PH1 LED go off.
Once control of line 1 (G722) has been relinquished by the telephone it
cannot be regained.
Ending a call on line 1 from the telephone:
The telephone cannot end a communication through line 1, which can only
be aborted by pressing and holding the “END” key.
6.12 LOCAL NUMBER
Local number allows you to assign a specific number to Nomada if the ISDN
line supports multiple numbering (MSN). This way, we can guarantee that only
calls made to this number will connect. To program the local number carry out the
following sequence:
1.- Make sure that the lines are disconnected.
2.- Press and hold the “ECHO” key for at least one second, when a 'beep'
will be heard through the headphone and telephone.
3.- Enter the last six digits (ISDN2E) or last one digit (ISDN2) of the desired
number from the MSN sequence
4.- Press the “ECHO” key again to store the number – a confirmation ‘beep’
will be heard. Local number is not saved in the non volatile memory, so
must be entered each time Nomada is switched on.
Using local number can create confusion if the local number
programmed is not correct as the device will not answer any calls. If
you suspect this, cancel local number by pressing ECHO twice
whilst both lines are disconnected.
NOMADA
USER MANUAL V2.0
7.-CONFIGURATION MICROSWITCHES
1 2
3 4
5 6 7 8
UP
DOWN
There is a group of microswitches on the side panel, by the audio
connectors, for changing some NOMADA configuration parameters. FOR
CHANGES TO TAKE EFFECT IT IS NECESSARY TO SWITCH THE NOMADA
OFF AND ON AS THESE MICROSWITCHES ARE ONLY READ AT POWER UP.
SW1.- UP
DOWN
Acoustic signal (buzzer) deactivated.
Acoustic signal (buzzer) activated.
SW2.- UP
DOWN
Manual answer mode on line 1 (G722).
Automatic answer mode on line 1 (G722).
SW3 .- Selects “MULTIPLEX” operation mode as explained in chapter 8. This is a
special configuration status which changes the operating philosophy of the
NOMADA.
UP
DOWN
MULTIPLEX mode deactivated.
MULTIPLEX mode activated.
SW4 .- Selects the delay range of the echo canceller.
SW4
UP
DOWN
DELAY RANGE
0-100 ms.
250-350 ms.
SW6.- Deactivates, at the “return” output of PH1 and PH2, the warning signal of an
incoming call through the ‘co-ord’line.
UP
DOWN
Warning signal activated
Warning signal deactivated
SW7.- Activates the sum of the program channel at the output of headphone PH1
when MIC1 is connected to the ‘co-ord’line.
UP
DOWN
Sum deactivated
Sum activated
NOMADA
USER MANUAL V2.0
8.- MULTIPLEX MODE OPERATION
This mode is enabled through one of the configuration microswitches (see
chapter 7 CONFIGURATION MICROSWITCHES).
In this mode, the external telephone cannot carry out any action (call,
answer...), but can confer with the main commentator.
When one line is connected operation will be normal, except for the use of
the telephone already mentioned; but with two lines connected, the effect will be
such that all participants on both lines will be able to listen to each other,
establishing a multiple conference, including a commentator using the external
analogue telephone, but only for sending and receiving audio.
9.-FREQUENTLY ASKED QUESTIONS
-
Why can’t I disconnect line 1 (G722) with the telephone?
The telephone can never disconnect line 1 (G722), even though you made a
call with the telephone through this line and the PH1 LED is lit. Use the END
key.
-
Why can’t I disconnect line 2 (G711) with the telephone?
If the call was made using the Nomada keypad, the telephone will not be
able to hang up line 2. It will only be able to do so where the communication
has first been made from the telephone through line 2 (G711), by hanging up (*2), or making a call through that line (*-2-number to dial-*).
If MIC1/HP1 are connected to line 2 (G711), the telephone cannot hang up
that line. Use the END key.
-
Why can’t I pick up the phone or make a call through line 2 (G711) using
the telephone?
If the PH1 LED is on, that is you are communicating through line 1 (G722) using
the telephone, it is not possible to carry out any action on line 2 (G711), no call,
no hang up.
-
Why isn’t it possible to answer or make a call through line 1 (G722) using
the telephone?
You can only make a call or pick up through line 1 (G722) using the telephone
when line 2 (G711) is disconnected.
NOMADA
USER MANUAL V2.0
-
Why can’t I answer or make a call through line 2 (G711) with the front
keypad?
If the PH1 LED is on, that is, you are communicating through line 1 (G722)
using the telephone, you won’t be able to carry out any action on line 2 (G711)
using the front keypad, no call, no hang up; to do so release line 1 (G722) of
the telephone by pressing its ‘#’ key.
-
Is it possible to call/recall or pick up the call through line 1(G722) when
MIC1/HP1 is associated to line 2 (G711) and this line is connected?
Yes. In fact you can maintain the communication through line 2 (G711) while
the device takes charge to set the communication requested through the other
line. The way to proceed to call/recall or pick up the call through line 1 (G722) in
this case is the same as in any other.
-
Why doesn’t the canceller start the search phase when I press the
"ECHO" key with line 1 connected?
If you have MIC1/HP1 associated to line 2 (G711) or the audio in line 1 (G722)
is not synchronised, pressing the "ECHO" key will have no effect.
-
Why doesn’t the search phase of the canceller end?
If your ISDN path is routed through satelite, there will be a minimum delay of
250 ms. Configure an correct delay (see Chapter 7). To do this, you must end
the communication, switch off the device, configure the microswitch (in this
case SW4), switch on and connect again.
If the remote end doesn’t return the sent signal unmodified in level, the
canceller might lose the delay, and never leave this phase.
-
Why, when controlling line1 (G722) by phone, can the remote end not hear
the commentators but the commentators can hear them?
When the telephone is controlling line 1 (G722), only the audio coming from the
telephone is coded, not that of the mics, but the decoded audio through line 1
(G722) reaches the headphones as well as the telephone.
NOMADA
USER MANUAL V2.0
10.- TECHNICAL SPECIFICATIONS
AUDIO:
Mic inputs:
•
•
•
•
•
XLR female connector, transformer balanced.
Input impedance 2k.
Sensitivity –65 dBu to –25 dBu
THD < 0.1%.
Frequency response <0.5 dB (30Hz-15KHz).
Line input (as Mic except):
•
•
Input impedance 10k.
Sensitivity +20 dBu to –20 dBu.
Headphone outputs:
•
•
•
Combo connector.
Impedance < 50 ohms.
Maximum level: +12 dBu over 600 ohms.
COMPRESSION ALGORITHMS:
•
•
G722: Synchronisation for statistical framing.
G711: A-Law.
ISDN:
•
•
•
S0 interface
RJ45 Connector
EURO_ISDN.
DIMENSIONS
•
210x210x45mm
WEIGHT
•
3kg.
interstage
Phistersvej 31, 2900 Hellerup, Danmark
Telefon 3946 0000, fax 3946 0040
www.interstage.dk
- pro audio with a smile