1
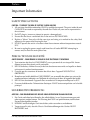
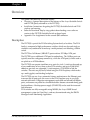
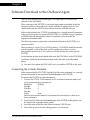
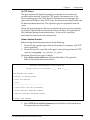
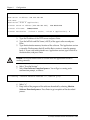
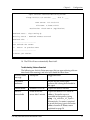
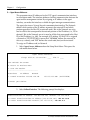
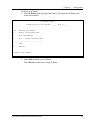
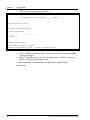
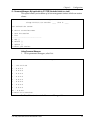
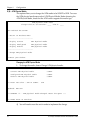
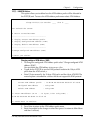
Avaya
Installation Guide
P117F(R)
STACKABLE ETHERNET SWITCH WITH ATM
UPLINK
Preface
Important Information
SAFETY PRECAUTIONS
CAUTION – TO REDUCE THE RISK OF ELECTRIC SHOCK AND FIRE
1. All servicing should be undertaken ONLY by qualified personnel. The parts inside the unit
CANNOT be serviced or repaired by the end user. Please call your service representative
for assistance.
2. Do NOT plug in, turn on or attempt to operate a damaged unit.
3. Ensure that the chassis ventilation slots in the unit are NOT BLOCKED.
4. Replace a “blown” fuse only with the same type and rating as is marked on the safety label
adjacent to the power inlet housing the fuse.
5. DO NOT operate the unit in a location where the maximum ambient temperature exceeds
50ºC.
6. Be sure to unplug the power supply cord from the wall socket BEFORE attempting to
remove and/or check the main power fuse.
PRECAUTIONS DE SECURITÉ
AVERTISSEMENT – POUR RÉDUIRE LE RISQUE DE CHOC ÉLECTRIQUE ET D’INCENDIE
1. Tout entretien doit être fait UNIQUEMENT par un personnel de service qualifié. Aucun
élément ne peut être réparé par un particulier.
2. NE PAS brancher, allumer ou essayer de faire fonctionner une unité sur laquelle un doute
existe quant à son bon fonctionnement.
3. S’assurer que les ouvertures d’aération du châssis dans l’appareil NE SONT PAS
OBSTRUEES..
4. Remplacer un fusible défaillant UNIQUEMENT par un modèle du même type suivant les
recommandations indiquées sur l’étiquette de securité posée dans le logement du fusible.
5. NE PAS faire fonctionner l’appareil dans un endroit où la temperature dépasse les 50ºC.
6. S’assurer de débrancher l’alimentation électrique AVANT toute manipulation sur le fusible
principal.
SICHERHEITSVORKEHRUNG
ACHTUNG – ZUR VERHINDERUNG DES RISIKOS VON ELEKTRISCHEM SCHLAG UND FEUER
1. Die Geräte enthalten keine Bauteile, die außerhalb des Avaya Servicezentrums gewartet
oder repariert werden können. Die Wartung darf NUR von qualifiziertem, technischem
Personal durchgeführt werden.
2. NIEMALS ein beschädigtes Gerät einschalten, oder versuchen es zu bedienen.
3. Vergewissern Sie sich, dass die Chassis Ventilationsöffnungen des Gerätes NICHT
BLOCKIERT sind.
P117F(R) Stackable Switch Installation Guide
1
Preface
4.
5.
6.
2
Safety Instructions
Austauschen einer durchgebrannten Sicherung NUR mit der gleichen Sorte und
Belastbarkeit wie sie auf der Sicherheitsaufschrift markiert ist. Die Aufschrift befindet sich
neben der Stromzufuhr wo sich auch der Sicherungskasten befindet.
Bedienen Sie das Gerät NICHT an einer Stelle an der die Umgebungstemperatur 50ºC
übersteigt.
Ziehen Sie das Netzkabel raus, BEVOR Sie versuchen die Hauptsicherung zu kontrollieren
oder auszutauschen.
P117F(R) Stackable Switch Installation Guide
Chapter 1
Overview
This guide is divided into four main sections:
• Overview: A general description of the features of the Avaya Stackable Switch
and P117FR (jointly referred to as the P117F(R)).
• Installation: Instructions for getting the P117F(R) Stackable Switch and P110
stack up and running.
• Software Download: Step-by-step guide to downloading a new software
version to the P117F(R) Stackable Switch on-board agent
• Appendix: Pin Assignments for the console RJ45 connector.
Description
The P117F(R) is part of the P110 Switching System family of switches. The P110
family is composed of high-performance switches which may be used singly or
stacked in any combination to make up a multi-protocol, non-blocking, scalable
switch.
The P117F has 16 Ethernet (10BASE-T) ports and one 155 Mbps ATM port.
The P117FR has an additional ATM port for redundancy. The 10 Mbps ports are
typically used for workgroup connectivity, while the ATM port(s) can be used as
an uplink to an ATM backbone.
The P117F(R) can operate standalone or as part of a stack. A stack can be made up
of any combination of two, three or four P110 switches, and up to 32,000 MAC
addresses per stack are supported. A stack requires a P110 NMA to link the
switches. The units are physically linked using the P110 Exoplane, which makes
up a multi-gigabit, non-blocking backplane.
The P117F(R) can use Avaya automatic fairness mechanism on the Ethernet ports
to ensure that all ports gain fair access to the P110 Exoplane even at very high
network utilization. Congestion management works both on full and half duplex
ports, and ensures no packet loss should the buffers become saturated during peak
load conditions. A backup power supply (P110 BUPS) can be used for increased
fault tolerance.
P110 switches are fully manageable using MSNM, the Avaya SNMP-based
management system (or CajunView), and may be monitored using the SMON
Manager Switch Monitoring Application.
P117F(R) Stackable Switch Installation Guide
3
Chapter 1
4
Description
P117F(R) Stackable Switch Installation Guide
Chapter 2
Installation
Setting the DIP switches
First, set the DIP switches. The position of the switches depends on the application.
The drawing below shows the default positions of the DIP switches on the rear
panel of the P110 switch.
Figure 1
•
The P117F(R) Stackable Switch Rear Panel Showing the
DIP Switches in their Default Positions
LSV – Last SW Version: The on-board agent of the P117F(R) can use either the
latest downloaded software or a “Basic” version. The Basic version is factory
loaded.
Ensure the Use Switch is set to the OFF position.
Once you have set the DIP switch, you may proceed with the physical installation
of the switch.
Table 1
DIP Switches on the P117F(R) Stackable Switch
Switch
Function
OFF
ON (Default)
LSV
Last SW Version
Use the “Basic”
software
version. This is
known as
Bank A
Use the latest
downloaded
agent software.
This is known
as Bank B
USE SWITCH
Not applicable, for future use only
P117F(R) Stackable Switch Installation Guide
5
Chapter 2
Installation
Installing the P117F(R) Stackable Switch
The procedure for getting the P117F(R) Stackable Switch up and running depends
on whether the switch is to operate in standalone or as part of a stack.
Standalone Operation - Plug ‘n’ Play
Getting the P110 switch working is quick and easy:
1. Connect the power cable to the switch,
2. Connect the cables to the front panel ports,
The switch is now fully operational.
To ensure proper ventilation, ensure that the P110 NMA slot is closed.
Keep the P110 Exoplane cables that came with the P110 switch in a safe place. You
will need them when you add another switch to the P110 stack.
The P117F(R) contains an on-board agent. The Software Download section on page
13 explains when you need to upgrade the on-board software to a higher version.
Stacking Operation
Before beginning to operate with the P117F(R) you need to allocate it an IP
address. Please refer to Agent Access Address on page 22.
To make the P117F(R) work as part of a stack the P110 NMA with the correct
software version is required. See the P117F(R) Stackable Switch Release Notes for
the required version. Also the on-board agent must have the same agent version
number as the P110 NMA.
To check what software version you have, see the agent configuration window in
CajunView (on UNIX) or MSNM or CajunView Manager (on Windows), or see the
setup main menu of the P110 NMA.
1. Turn off the main power to the stack, by individually switching off each
switch.
2. Place the P110 NMA in the top switch of the stack if it is not already there.
3. If the P110 NMA and P117F(R) on-board agent contain the latest software
version, go to step 4.
If the P110 NMA does not contain the latest software version, you have to
perform software download of the latest version. The software is on the
diskette that came with the P117F(R). Download is performed via the Software
Update Manager in MSNM or in CajunView or via TFTP using a terminal –
details can be found in the P110 NMA Installation Guide. (The download
procedure itself is the same as that described in Software Download on
page 18 of this document).
If the P117F(R) on-board agent does not contain the latest version, perform the
download as described in Software Download to the On-Board Agent on
page 13.
6
P117F(R) Stackable Switch Installation Guide
Chapter 2
4.
5.
Installation
Place the P117F(R) or other P110 switches in the stack. The P110 NMA must be
in the top switch of the stack.
To ensure proper ventilation, ensure that all empty P110 NMA slots in the
stack are closed.
Connect P110 switches using the supplied P110 Exoplane cables, as shown in
Figure 2. A switch connects to its upper neighbor through two Exoplane
cables, and to its lower neighbor through another two Exoplane cables. Make
sure you securely fasten the cables to the connectors.
Cabling Requirements:
• For correct operation, the P110 Exoplane must be fully connected, with all
units powered up. In a stack configuration, the P110 NMA must be installed
and connected to the P110 Exoplane.
Failure to observe this requirement will cause the P110 units to block all traffic
on attached stations and segments.
• When using the P114T or P114F in the stack, make sure all switches in the
stack are connected using P110 Exoplane cables (part number 108362203, with
white connectors and marked C/S:B) of the type supplied with the new P110
switch. Extra cables can be ordered from your local Avaya representative.
Figure 2
6.
7.
8.
Rear view of a P110 stack, showing how the switches are linked via the P110
Exoplane cables. A P110 NMA resides in the uppermost switch.
Two terminators are supplied with the P110 NMA. Insert the two terminators
into the lowest two connectors at the bottom of the stack, as shown in Figure 2.
Turn on the mains power to the stack, by individually switching on each
switch.
Connect the cables to the front panel ports.
P117F(R) Stackable Switch Installation Guide
7
Chapter 2
Installation
The P110 NMA and the on-board agent in all P110 switches (e.g., P117F(R) and
P113F) must have the same version number.
8
P117F(R) Stackable Switch Installation Guide
Chapter 2
Installation
Rack Mounting
P110 switches slot into a standard 19-inch rack. If the switches are to be rack
mounted, first place them in the rack, then connect the P110 Exoplane, as follows:
1. Snap open the ends of the front panel to reveal the fixing holes.
2. Slot the switch into the rack. Insert the switches into the rack so that the
switches in a logical stack lie directly on top of each other. Ensure that the P110
screw holes are aligned with the rack hole positions exactly as shown in Figure
3 Stacking them in this way will allow the switches to be easily connected
using the Exoplane cables.
3. Secure the switch in the rack using the screws. Use one screw on each side. Do
not overtighten the screws to avoid damaging the plastic.
Figure 3
4.
5.
P110 rack mounting arrangement
Connect the P110 Exoplane cables, as described above, and as illustrated in
Figure 2.
Snap closed the hinged ends of the front panel.
P117F(R) Stackable Switch Installation Guide
9
Chapter 2
Installation
Diagnostics
Tables 2 and 3 explain the meaning of the P117F diagnostic LED indicators.
10
Figure 4
The P117F Front Panel LEDs and Buttons
Figure 5
The P117FR Front Panel LEDs and Buttons
P117F(R) Stackable Switch Installation Guide
Chapter 2
Table 2
Button
Installation
Meaning of the P117F Front Panel Buttons
Function
Meaning
Select
The buttons determine what function will be displayed by the 17 Port
LEDs (the top two rows of LEDs).
The five Function LEDs (above the Select buttons) show which
function is currently displayed by the Port LEDs. The Port LEDs can
display either Link, Collision, Transmit, Receive or Full Duplex.
If, for example, the Link (LNK) LED is lit, then LEDs 1 to 17 will
display the Link status of every port.
(For P117FR ATM port LEDs, see also Table 4).
Press left or right button to toggle the Port LED display between functio
Reset
Table 3
Press and hold both buttons simultaneously for two seconds to reset
the entire P110 stack. In a Reset, all LED indicators turn on. Pressing
Reset does not affect configuration settings.
Meaning of the P117F(R) Stackable Switch front panel LEDs
LED Indicator
Function
Status
Meaning
PWR
Power
OFF
ON
Blink
Mains power not connected
Mains power connected
Working on back-up power supply
NMA
Agent
OFF
ON
No agent in this module
This module contains an active agent
RED NMA
Reserved for future use
OPR
CPU
Operation
Function LED
OFF
Blink
CPU is OK
CPU is faulty
Port LED
(1 to 17)
LNK
Link status
OFF
ON
Blink once
Blink
twice
Port Disabled
Port is enabled and link is OK
Link Test Fail
Partition (Ethernet only)
COL
Collision
OFF
ON
No Collision (ATM is always OFF)
Collision occurred on line (Ethernet
only)
Tx
Transmit to
line
OFF
ON
No activity
Data transmitted
Rx
Receive
from line
OFF
ON
No activity
Data Received
FDX
Half/Full
OFF
Half duplex connection to port
P117F(R) Stackable Switch Installation Guide
11
Chapter 2
Installation
LED Indicator
Function
Status
Meaning
ON
(Ethernet only)
Full duplex connection to port
(ATM is always ON)
duplex
Table 4
Meaning of the additional P117FR front panel LEDs
LED
Indicator
Function
Status
Meaning
M
Master port
(Upper ATM
connector)
Port LEDs
for the
ATM ports
These Port LEDs indicate status
according to the functional LEDs (see
Table 3)
OFF
Redundancy is disabled. Upper port
active
S
Secondary port
(Lower ATM
connector)
R
Redundancy status
ON
Blink
Redundancy is enabled. Upper port
active
Redundancy is enabled, and secondary
port (Lower ATM connector) is active
12
P117F(R) Stackable Switch Installation Guide
Chapter 3
Software Download to the On-Board Agent
The P117F(R) contains an on-board agent. This agent does not use the same
software as the P110 NMA.
When you receive the P117F(R), its on-board agent comes pre-loaded with fully
functional software. New software is made available at regular intervals. You
should make sure that all P110 units contain the latest available software.
Software download to the P117F(R) is performed via a console terminal connected
to the serial port on the rear panel of the P117F(R) or via SNMP using a CajunView
or MSNM network management station. Instructions can be found in the
appropriate documentation.
The following sections explain how to download software to the P117F(R) via a
console terminal.
When working in a stack (2, 3 or 4 P110 switches), a P110 NMA should be inserted
into the topmost switch of the stack and the appropriate software version
downloaded separately to it. The software is on the diskette that came with the
P117F(R).
For instructions on how to download software to the P110 NMA, see the P110 NMA
Installation Guide (the download procedure itself is the same as that described
below).
You must first update the P110 NMA before you add the P117F(R) to the stack.
Connecting the Console Terminal
Software download to a P117F(R) Stackable Switch can be performed via a console
terminal connected to the serial port labeled Console on the P117F(R).
To connect the P117F(R) to a console terminal:
1. Turn on the VT52 or VT100 terminal (or PC in terminal emulator mode) and
set its communication parameters to:
Baud Rate:
9600 bps
Start Bit:
1
Data Bits:
8
Stop Bit:
1
Parity:
none
Refer to your console terminal’s user manual for instructions on how to set
these parameters.
2. Insert the RJ-45 cable into the Console port of the P117F(R) (cable pinouts can
be found in the Appendix to this guide).
3. Insert the other end of the cable into the terminal’s RS-232 port.
4. Press Enter to verify that the cabling process was successful.
P117F(R) Stackable Switch Installation Guide
13
Chapter 3
Configuration
Software Download Summary
Below is a procedure checklist for successfully configuring a P117F(R) for SNMP
management. Instructions for each item in the list can be found in the pertinent
sections of this guide.
If necessary, enter an IP address for the P117F(R), and reset the switch.
If you’re using routers, set up a default gateway.
Perform software download.
Set SNMP Community
Setup Menus
Setup Main Menu
A series of menus guides you through the configuration process. After the switch
enters setup mode, the first screen of the setup session is automatically displayed.
It shows the current configuration of the agent.
Underlined spaces in the example screens represent variables.
Description of Agent Parameters
S/W Version: ____
Slot #: ____
HUB Type: Cajun P110
Trap Community Name: _________
Read/Write Communities:
1. _______________
4. _______________
2. ______________
5. ______________
Interfaces
Physical Address
InBand Interface: 00:40:0d:00:00:05
3. ___________
IP Address
Netmask
000.000.000.000 000.000.000.000 (0x00000000)
>> Enter 0 to return to the previous menu or <CR> to continue:
14
P117F(R) Stackable Switch Installation Guide
Chapter 3
Configuration
Press Enter to view the Setup Main Menu.
Notes:
•
•
•
The following Setup Main Menu is correct for a stand-alone P117F(R) module
without an NMA agent card inserted.
An NMA module is required in a stack configuration. In this case options 5
and 6 are set via the P110 NMA setup menus and options 8 through 15 are
renumbered 6 to 12.
The “ATM Redundancy” option appears only in the P117FR. The numbering
of the menu items will change accordingly.
Setup Main Menu
Cajun P117F S/W Version: ____
Slot #: ____
0. Return to Agent Description screen
------------------------------------1. Reset the Module
2. Software Download ...
3. Agent Access Addresses ...
4. IP Routes ...
5. SNMP Community ...
6. Permanent Managers ...
7. Module Advanced Configuration ...
8. (5.) UNI Version ...
9. (6.) ATM Physical Media ...
10. (7.) ILMI/ATM Address ...
11. (8.) LECS ATM address ...
12. (9.) ELAN configuration ...
13. (10.) ATM Redundancy...
14. (11.) Set ATM port parameters to their default values
15. (12.) Set Ethernet Ports’ parameters to their default values
>>>Enter your choice:
P117F(R) Stackable Switch Installation Guide
15
Chapter 3
Configuration
How to Navigate through the Setup menus
• All Setup menus conform to the following display conventions:
This symbol
Means
...
This item has a sub-menu
[ ]
This item has a sub-menu to insert parameter values
1, 2, 3,
etc.
•
Denotes a sequence number. To select an item from any menu,
type its sequence number
Setup sub-menus display the following standard functions:
This function
Means
Return to
Previous
Menu
Go back one menu level
List
List the current values for the selected parameter
Save the
Session
Save and store changes to the selected parameter, and activate
changes.
When saving the session, the changes become active (no need
for reset), and stored in the non-volatile memory.
This is needed when assigning an IP address and ATM
parameters to the Agent. In other cases, the Agent will activate
new parameter values, when the user chooses the "Save the
Session" option.
Reset the
Agent
•
If you forget to save changes or reset the agent when necessary, the following
warnings will remind you to do so before exiting the relevant sub-menu of the
Setup session:
This WARNING
16
Means
No save since last
change. Save? y/[n]:
Type <y> to save parameter changes. If you
type <n> all changes will be lost.
* IP address was changed.
Reset the agent!!!
Agent must be reset in order to activate IP
changes. Reset may be done after each change
or at the end of the entire Setup session.
P117F(R) Stackable Switch Installation Guide
Chapter 3
Configuration
Parameter configuration
The following sections provide step-by-step instructions for configuring each
parameter.
•
•
•
In many module configuration menus, the following parameters are displayed:
Display Current Version shows the active configuration.
Display Configured Version shows the new configuration which will
take effect after a reset has been made.
Display Default Version shows the system default configuration.
<CR> — Refresh The Screen
Type Enter to clear the screen and re-display the current displayed Menu with the
updated parameters.
1 — Reset the Module
If you have changed certain parameters of the P117F(R), the P110 NMA or other
switches in the stack, you must reset the agent before you exit the Setup session.
The following lists the resets you must initiate and the resets performed
automatically by the agent.
Resets the user must initiate
Resets performed automatically
by the agent
After setting ATM port
parameters to their default
values
The first time you set VLANs
Change in the “Use switch”
or any other DIP switch of
any other switch
Set Ethernet ports’ parameters to
their default values
After changing the LSV DIP
Switch position
Resetting does not affect any other parameters. You will be asked to confirm the
reset before it is executed.
Reset the Agent. *Confirm?*
y/[n]:
P117F(R) Stackable Switch Installation Guide
17
Chapter 3
Configuration
2 — Software Download
General
When you receive the P117F(R), its on-board agent comes pre-loaded with fully
functional software. New software is made available at regular intervals. You
should make sure that all P110 units contain the latest available software.
The P110 on-board agent software is stored in flash memory and can be upgraded
via software download using the TFTP protocol.
In the P110 on-board agent, the flash memory contains two independent software
versions: the "Basic" and the "Application" version. The Application version is the
one that the P117F(R) will use in normal operation. If the Application version is
found to be faulty, the Basic version will be used instead if a failure occurs during
download.
Caution: Download the Basic version only when the new Application version is
working correctly. This will ensure that if there is a problem with the application
version, the agent will be able to switch to a valid Basic version.
18
P117F(R) Stackable Switch Installation Guide
Chapter 3
Configuration
The TFTP Process
The agent software file should be placed on a computer that can be located
anywhere on the network. During the TFTP process, the computer acts as the
Server and the agent as the Client. From the Terminal, the user configures the
agent with the IP address of the TFTP server, the file name to be downloaded, and
the download destination bank. The Agent then gets the specified file from the
server.
During the download process the user can monitor the process status parameters
by using the Monitor Software Download Process sub menu. The agent remains
fully functional during the download process. At the end of a successful
download, the whole stack resets automatically.
Software Download Procedure
Before starting the download procedure, do the following:
1. Ensure that the supplied agent software file resides on a computer with TFTP
server capabilities.
2. Ensure that the file is accessible to the agent. Contact the agent from the TFTP
server by typing ping <ip_address_of_agent>.
Download software to the agent as follows:
1. Select Software Download from the Setup Main Menu. This opens the
Software Download menu shown below.
Software Download Menu (Using TFTP/IP)
Visage 16155(R) S/W Version:_____
Slot #:_____
<CR> Refresh the screen
0. Return to Previous Menu
1. Save the Session
2. List
--------------------------------3. TFTP Server and File parameters
4. Start Software Download process
5. Monitor Software Download process
>>>Enter your choice:
2.
Select TFTP Server and File parameters from the Software Download menu.
This opens the menu shown below.
P117F(R) Stackable Switch Installation Guide
19
Chapter 3
Configuration
TFTP Server IP address: 000.000.000.000
File Name: __________
Destination: Flash B (Application)
>>>Enter Server IP address [000.000.000.000]:
>>>Enter File Name:
>>>Enter Destination
3.
4.
5.
135.49.60.115
/home/v16155
(1-Flash A (Basic), 2-Flash B (Application)): 2
Type the IP address of the TFTP server and press Enter.
Type the full Path and File Name (v16155) of the agent software and press
Enter.
Type the destination memory location of the software. The Application version
is stored in Flash memory bank B, and the Basic version is stored in memory
bank A. If you wish to download a new Application version, type 2-Flash B as
the destination, and press Enter.
Caution: Do not download the Basic version until the Application version is
working correctly.
6.
7.
Select “Save the Session”.
Select Start Software Download process. You will get a warning and a
confirmation prompt, as follows:
*** Warning – Perform Software Download ***, Confirm [y/n]?
8.
9.
20
Select “y”.
Keep track of the progress of the software download by selecting Monitor
Software Download process. Press Enter to get an update of the download
process.
P117F(R) Stackable Switch Installation Guide
Chapter 3
Configuration
Agent Software Download Monitoring Screen
Visage 16155(R) S/W Version: ____
Slot #: ____
TFTP Server: 135.49.60.115
File Name: c:/home/v16155
Destination: Flash Bank B (Application)
Download State : tftp-running-ip
Activity Status : Download Process Started
Download Size
:
-------------------------<CR> Refresh the screen
0
Return
to previous menu
------------------------->>>Enter your choice:
10. The P110 will now automatically Reset itself.
Troubleshooting Software Download
The following are Activity Status messages that can appear during software
download, their meanings, and what you should do about them:
Activity Status
message
Description
file format
unknown
Suggested action
Ensure that the correct agent
software file is being downloaded to
the agent
file not found
Failure of TFTP Get
Type in the correct filename
server is
unreachable
Failed to find the
server after 1 minute
Type in the correct TFTP Server IP
address. Ensure the server is
accessible to the agent by typing
ping <ip_address_of_agent>.
Alternatively, if a router is required
to reach the server, type in the router
address from the IP Routes menu
explained on page 24.
P117F(R) Stackable Switch Installation Guide
21
Chapter 3
Configuration
3 — Agent Access Addresses
This parameter stores IP addresses for the P117 agent’s communication interfaces
in stand-alone mode. The interface addresses facilitate communication between the
agent and the management station. By assigning an IP address to the agent
interface, you make that interface available for agent-manager communications.
The agent also stores a Netmask for each communication interface. The Netmask
defines which portion of the IP address represents the network ID and which
portion represents the Host ID (or network node). Bits in the Netmask are set to
one for all bits that correspond to the network portion of the IP address (i.e., 255 in
decimal). Bits in the Netmask are set to zero for all bits that correspond to the Host
ID of the IP address (i.e., 000). For example, if IP address 135.49.60.115 is assigned
a Netmask of 255.255.255.000, it means that “135.49.60” defines the network (in
this case, a subnet), and “115” defines the actual node (host) on that network.
To assign an IP address and/or Netmask:
1. Select Agent Access Addresses from the Setup Main Menu. This opens the
sub-menu shown below.
Agent Access Addresses
Visage 16155(R) S/W Version: ____
Slot #: ____
<CR> Refresh the screen
0. Return to Previous Menu
1. Save the Session
--------------------------------Interfaces
IP Address
Netmask
2. InBand Interface 149.049.150.101
255.255.255.000
(0xffffff00)
>>>Enter your choice:
2.
Select InBand Interface. The following prompt line displays:
InBand Interface IP address: 149.049.150.101, netmask: 255.255.255.0.
>>> Enter InBand Interface IP address [149.49.150.101]: 149.49.39.85
>>> Enter InBand Interface netmask [255.255.255.0]: 255.255.0.0
22
P117F(R) Stackable Switch Installation Guide
Chapter 3
3.
4.
5.
6.
Configuration
Type the new IP address as shown in the example above and press Enter.
Leading zeroes may be omitted.
After the IP address is accepted, the Netmask prompt is automatically
displayed. The prompt has a default value based on the IP address.
Type the new Netmask value in the correct format or press Enter to accept the
default value.
Type 0 to return to the main menu.
Changes to IP Addresses and Netmasks require you to reset the agent. You
may reset the agent now, or at the end of the entire Setup session.
P117F(R) Stackable Switch Installation Guide
23
Chapter 3
Configuration
4 — IP Routes
When the P117F(R) is in stand-alone configuration and is connected to one side of
a router (on one network) and the file containing the new software is located on
the other side of the router (on a different network), you must set up a
communication path via the IP Routes parameter. An IP Route determines which
gateway (i.e., router) will be used to communicate with the P117F(R).
Whenever the agent sends a packet to a management station that does not reside
on the same network, the agent searches an internal table to determine via which
router the packet should travel. Part of this internal table is built from the data you
enter for the IP Routes parameter. The IP Routes parameter correlates host or
network destination addresses (of management stations) with gateway addresses.
You may define multiple IP Routes from the agent to the management station. As
the agent searches the IP Routes table, it will select the gateway that was added
last. If that gateway is unavailable, it will proceed to the gateway added before the
last one, and so on.
You may also define a default gateway for all management stations rather than
define a specific gateway for each possible destination. If the agent cannot find a
particular network or host destination address in its IP Routes table, it will use the
default gateway (the default gateway is correlated with destination address
000.000.000.000). If the agent cannot find a particular network or host destination
address and no default gateway has been defined, the packet will not be sent.
If an agent or P110 stack does not appear on a management station as expected, it
may be as a result of the agent not including this station in its IP Route table. Ping
the agent to see if the agent is active. The agent and stack may be operating
normally even though the management station is not communicating with the
agent.
To define an IP route, you must supply:
• The IP address of the station or the network (not subnet)
• The IP address of the gateway (router).
24
P117F(R) Stackable Switch Installation Guide
Chapter 3
Configuration
To define an IP Route:
1. Select IP Routes from the Setup Main Menu. This opens the IP Routes submenu shown below.
IP Routes menu
Visage 16155(R) S/W Version: ____
<CR>
Refresh the screen
0
Return to previous menu
1
Save the Session
2
List - static routing table
Slot #: ____
--------------------------------3
Add[]
4
Delete[]
>>>Enter your choice:
2.
Select Add to define a new IP Route.
Select Delete to remove an existing IP Route.
P117F(R) Stackable Switch Installation Guide
25
Chapter 3
Configuration
3.
Type the destination address of a host (IP address of the management station)
or a network (IP of management network) as shown in the menu below and
press Enter. For a default gateway, leave the destination address as 000.000.000.000.
IP Route parameters menu
Visage 16155(R) S/W Version: ____
<CR>
0
Slot #: ____
Refresh the screen
return to the previous menu
------------------------------------------------------------------------Destination
Gateway
1
154.32.74.12
149.43.63.123
2
154.32.74.53
149.43.69.1
000.000.000.000
149.43.63.123
10
000.000.000.000
000.000.000.000
11
000.000.000.000
000.000.000.000
3
...
>>>Enter route destination address (nnn.nnn.nnn.nnn): 150.61.23.18
>>>Enter route gateway IP address (nnn.nnn.nnn.nnn): 135.49.50.1
4. Type the Gateway IP address (address of the router) and press Enter.
5. To review your changes, select the List command.
6. To save your changes select Save the Session.
7. Type 0 to return to the Setup main menu.
Changes to IP Routes do not require you to reset the agent.
26
P117F(R) Stackable Switch Installation Guide
Chapter 3
Configuration
5 – SNMP Community (Not applicable for P117F(R) Stackable Switch in a stack)
This parameter defines the trap, read-only and read-write communities. The
community name can be up to 24 characters in length.
The default community for all three options is public.
SNMP Community Menu
Visage 16155(R) S/W Version: ____
Slot #: ____
<CR> Refresh the screen
0. Return to Previous Menu
------------------------------------1. Trap Community []
2. Read-Only Community []
3. Read-Write Community []
>>>Enter your choice:
Select Trap Community to change the Trap community (the SNMP community to
which traps are sent):
Trap Community Menu
Visage 16155(R) S/W Version: ____
Slot #: ____
<CR> Refresh the screen
0. Return to Previous Menu
1. Save the Session
--------------------------------2. Update []
P117F(R) Stackable Switch Installation Guide
27
Chapter 3
Configuration
1.
Select Update to change the community:
Trap Community Menu
Visage 16155(R) S/W Version: ____
Slot #: ____
<CR> Refresh the screen
0. Return to Previous Menu
1. Save the Session
--------------------------------2. Update []
>>>Enter your choice: 2
Trap Community name is: public
>>>Enter Trap Community name (24 char):hardware-alpha
2.
3.
4.
Enter the community name (or Enter to leave it unchanged).
Select “0. Return to Previous Menu” to return to the previous menu without
saving the changes.
Select “1. Save the Session” to save the changes, then “0. Return to Previous
Menu” to return to the previous menu.
A similar procedure is used to change the Read-Only and Read-Write
communities.
28
P117F(R) Stackable Switch Installation Guide
Chapter 3
Configuration
6 – Permanent Managers (Not applicable for P117F(R) Stackable Switch in a stack)
This option allows you to define up to ten management stations which can receive
alarms.
Permanent Managers Menu
Visage 16155(R) S/W Version: ____ Slot #: ____
<CR> Refresh the screen
0. Return to Previous Menu
1. Save the Session
2. List
--------------------------------3. Add []
4. Delete []
5. Update []
>>>Enter your choice:
Listing Permanent Managers
1. To list permanent managers, select List:
Permanent Managers
1
- 149.49.42.90
2
- 0.0.0.0
3
- 0.0.0.0
4
- 0.0.0.0
5
- 0.0.0.0
6
- 0.0.0.0
7
- 0.0.0.0
8
- 0.0.0.0
9
- 0.0.0.0
10
- 0.0.0.0
>>>Enter CR to continue:
2.
Press Enter to return to the Permanent Managers Menu.
P117F(R) Stackable Switch Installation Guide
29
Chapter 3
Configuration
Adding Permanent Managers
1. To add permanent managers, select Add:
2. Type in the IP address of the permanent manager and press Enter.
Deleting Permanent Managers
1. Select Delete from the Permanent Managers Menu:
2. Select the index number (1 - 10) of the permanent manager you wish to delete
and press Enter.
Updating Permanent Managers
1. Select Update from the Permanent Managers Menu:
2. Select the index number (1 - 10) of the permanent manager you wish to update
and press Enter.
3. Enter the new IP address and press Enter.
4. Press Enter to return to the Permanent Managers Menu.
30
P117F(R) Stackable Switch Installation Guide
Chapter 3
Configuration
7 – Module Advanced Configuration (Not applicable for P117F(R) Stackable Switch in a stack)
This option is not currently implemented.
8 (5) – UNI Version
This option determines the UNI version used for the P117F(R). Before changing the
UNI Version check that the ATM switch supports this version.
To display or update the UNI version select UNI Version:
UNI version menu
Visage 16155(R) S/W Version: ____
Slot #: ____
<CR> Refresh the screen
0. Return to Previous Menu
-----------------------------1. Display current UNI version
2. Display configured UNI version
3. Display default UNI version
-----------------------------4. Change configured UNI version
>>>Enter your choice:
Changing the UNI Version
1. Select “Change configured UNI version”:
Current UNI version
: 3.1
Configured UNI version
: 3.1
Default UNI version
: 3.1
>>> Enter new version (0 for 3.0, 1 for 3.1): 0
>>> PRESS Enter to continue:
2.
3.
Enter the new version (0 for UNI version 3.0 or 1 for UNI version 3.1) and
press Enter (to cancel, do not enter a value and press Enter).
Press Enter to return to the UNI version menu.
You will need to reset the unit in order to implement the change.
P117F(R) Stackable Switch Installation Guide
31
Chapter 3
Configuration
9 (6) – ATM Physical Media
This option allows you to change the ATM media to be SONET or SDH. To access
the ATM physical media menu select ATM Physical Media. Before choosing the
ATM Physical Media, check that the ATM switch supports this media type.
ATM physical media menu
Visage 16155(R) S/W Version: ____
Slot #: ____
<CR> Refresh the screen
0. Return to Previous Menu
----------------------------1. Display Current
ATM Physical Media
2. Display Configured
ATM physical media
3. Display Default
ATM physical media
----------------------------4. Change ATM physical media
>>>Enter your choice:
Changing the ATM Physical Media
1. To change the media, choose Change ATM physical media:
Current ATM Physical media
: SONET
Configured ATM Physical media
: SONET
Default ATM Physical media
: SONET
>>> Enter new value : SDH or SONET :
SDH
Updated. Now SDH
*** WARNING *** - ATM physical media changed. Reset the agent !!!
>>> PRESS Enter to continue:
You will need to reset the unit in order to implement the change.
32
P117F(R) Stackable Switch Installation Guide
Chapter 3
Configuration
10 (7) – ILMI/ATM Address
This option allows you to define how the ATM address prefix will be allocated to
the P117F(R) unit. To access the ATM address prefix menu select ATM Address:
ILMI/ATM address menu
Visage 16155(R) S/W Version: ____
Slot #: ____
<CR> Refresh the screen
0. Return to Previous Menu
-------------------------------------1. Display current ATM address prefix
2. Display configured ATM address (ILMI)
3. Display default ATM address (ILMI)
-------------------------------------4 Change configured ATM address (ILMI)
>>>Enter your choice:
Changing configured ATM address (ILMI)
1. To change the configured ATM address prefix select “Change configured ATM
address (ILMI)”.
You can define the ATM address in two ways: either
• Type 0 for the P117F(R) to use the ILMI protocol to obtain the 13-byte ATM
prefix from the ATM switch, or
• Enter 19 bytes manually: the 13-byte ATM prefix and the 6-byte ATM ESI. The
manual option is intended for switches that do not support the ILMI protocol.
Current ATM address prefix
: 39.00.00.00.00.00.00.00.00.6f.07.c0.cb
Configured ATM address
: using ILMI
Default ATM address
: using ILMI
>>> Enter ATM address (xx.xx ... 19 bytes, 0 for using ILMI) :
39.00.00.00.00.00.00.00.00.5a.07.cf.cb
>>> PRESS Enter to continue:
2.
3.
Press Enter to return to the ATM address prefix menu.
Reset the module for the changes to take effect (press 0 to return to Main Menu
and then 1 to Reset).
P117F(R) Stackable Switch Installation Guide
33
Chapter 3
Configuration
11 (8) – LECS ATM Address
This option allows you to change the LECS ATM address. This address is derived
using the following algorithm:
1. Address entered by the user
2. ILMI (if the user has not entered a value)
3. Well-known address (WKA)
4. VP0 VC17
It is therefore not necessary to enter the well-known address in this screen.
To access the LECS ATM address menu select the LECS ATM address option:
LECS ATM address menu
Visage 16155(R) S/W Version: ____
Slot #: ____
<CR> Refresh the screen
0. Return to Previous Menu
-------------------------------------1. Display LECS ATM address
2. Display configured LECS ATM address
3. Display Default LECS ATM address
-------------------------------------4. Change configured LECS ATM address
>>>Enter your choice:
Changing the Configured LECS ATM address
1. To change the configured LECS ATM address select Change configured LECS
ATM address:
LECS ATM address
: 47.00.79.00.00.00.00.00.00.00.00.00.00.00.
a0.3e.00.00.01.00
Configured LECS ATM address : using ILMI/WKA/PVC
Default LECS ATM address
: using ILMI/WKA/PVC
>>> Enter LECS ATM address (xx.xx ... 20 bytes, 0 for using ILMI/WKA/PVC) : 0
>>> PRESS Enter to continue:
34
P117F(R) Stackable Switch Installation Guide
Chapter 3
2.
3.
4.
Configuration
Enter the new address and press Enter. If you enter “0” as the new address, the
procedure will use the ILMI, WKA or PVC in that order, as explained at the
top of the page.
Press Enter to return to the LECS ATM address menu.
Reset the module for the changes to take effect (press 0 to return to Main Menu
and then 1 to Reset).
Enter a specific address only for an ATM switch that does not support ILMI
protocol or P.V.C.’s and its LECS address is not Well-Known Address (WKA).
12 (9) – ELAN Configuration
This option allows you to display ELAN/VLAN associations and display and
change the default ELAN name. To access the ELAN configuration menu select
ELAN configuration:
ELAN Configuration menu
Visage 16155(R) S/W Version: ____
Slot #: ____
<CR> Refresh the screen
0. Return to Previous Menu
----------------------------------1. Display ELAN/VLAN associations
2. Display default ELAN information
----------------------------------3. Change default ELAN name
>>>Enter your choice:
P117F(R) Stackable Switch Installation Guide
35
Chapter 3
Configuration
Display ELAN/VLAN associations
1. To view current ELAN/VLAN assocations select Display ELAN/VLAN
associations. An example is shown here:
ELAN/VLAN Associations:
Index
Vlan
Elan
Assoc
LecIF
Status
Status
IfIndex
----------------------------------------------------------------------1
0
default
Active
Operational
1028
2
1
elan1
Active
Operational
1029
4
3
elan3
Active
Operational
1030
5
4
elan4
Active
Operational
1031
6
5
elan5
Active
Operational
1032
7
6
elan6
Active
Operational
1033
8
7
elan7
Active
Operational
1034
9
8
elan8
Active
Operational
1035
10
9
elan9
Active
Operational
1036
>>>Press Enter to continue:
These parameters allow you to view the status of the connection between each
LEC and its ELAN.
The Association Status column will always display “Active”. This column is
reserved for future use.
The “LecIf” status column displays the status of the LEC. The status may be
one of the following states:
2.
36
•
Initial State
•
Initial Registration
•
Configure
•
BUS Connect
• Operational
• Join
Press Enter to return to the ELAN configuration menu.
P117F(R) Stackable Switch Installation Guide
Chapter 3
Configuration
Displaying Default ELAN information
The default ELAN is the ELAN associated with VLAN 0.
1. To display the default ELAN information, select Display default ELAN
information:
Default ELAN information (VLAN = 0):
Association:
1
Elan name:
default
Assoc Status:
Active
LecIf Status:
operational
IfIndex:
1028
Enter CR to continue:
2.
3.
The Association value is the Index value which appears in the left-hand
column of the ELAN/VLAN associations list.
Press Enter to return to the ELAN configuration menu.
Changing the Default ELAN Name
1. To change the default ELAN name select Change default ELAN name:
ELAN information for VLAN = 0:
Association:
1
Elan name:
default
Assoc Status:
Active
LecIf Status:
operational
IfIndex:
1028
>>> Enter new default ELAN name: alpha
>>>Enter CR to continue:
2.
3.
Enter the new default name and press Enter.
Press Enter to return to the ELAN configuration menu.
P117F(R) Stackable Switch Installation Guide
37
Chapter 3
Configuration
13 (10) – ATM Redundancy
This menu only appears for the P117FR, which has a redundant ATM port.
This menu enables and disables the redundancy mechanism. Redundancy can be
Enabled or Disabled, and the Active port can be either the Upper or the Lower
port.
ATM Redundancy menu
S/W Version: _______
Slot #: 1
<CR> Refresh the screen
0. Return to Previous Menu
----------------------------------------1. Display Current redundancy parameters
2. Display Default redundancy parameters
----------------------------------------3. Set redundancy parameters to their default values
----------------------------------------4. Change redundancy mode
>>>Enter your choice:
•
•
•
•
38
To display Current Redundancy Parameters, select 1.
To display Default redundancy parameters, select 2.
To set redundancy parameters to their default values, select 3.
You must Reset the module after changing to the default values.
To change redundancy mode, select 4.
P117F(R) Stackable Switch Installation Guide
Chapter 3
Configuration
14 (11) – Set ATM Port Parameters to their Default Values
This option returns the ATM port parameters to their default values.
ATM port default values:
UNI Version
: 3.1
Physical Media
: SONET
ATM Address
: Using ILMI
LECS ATM Address
: Using ILMI/WKA/PVC
ELAN Configuration
: default ELAN
Default Redundancy Mode: ENABLE
Default Active ATM Port: UPPER
*** Set ATM port to default values ***
15 (12) – Set Ethernet Port Parameters to their default values
This option returns Ethernet port parameters such as VLAN number and enable
status to their default values. It does not affect agent access parameters such as IP
addresses, IP Routes, and Permanent Managers. It does not set the ATM port
parameters to their default values.
Use this option if, for example in using device management, you accidentally
disabled the port to which the management station is connected. If you disable the
Ethernet port to which the management station is connected you will no longer be
able to contact the P117F(R) from the device manager.
>>>Enter your choice:
***WARNING*** Port parameters were changed. Reset the agent!!!
>>>PRESS Enter to continue:
P117F(R) Stackable Switch Installation Guide
39
Chapter 3
40
Configuration
P117F(R) Stackable Switch Installation Guide
Chapter 4
Terminal Connector Pin Assignments
Figure 6
Terminal port – RS-232 Wiring Connection to Console Terminal
P117F(R) Stackable Switch Installation Guide
41
© 2003 Avaya Inc. All rights reserved.
All trademarks identified by the ® or TM are registered trademarks or trademarks, respectively, of Avaya Inc. All other
trademarks are the property of their respective owners.
Document number: 130001 Rev. A