1
1. - WARNING
•
•
•
•
•
•
•
•
•
•
•
•
•
•
•
•
•
•
•
•
•
The warranty of the heater will not cover any damage caused by non observance of any of these instructions.
This guide must be kept and given to any new owner.
This appliance can be used by children aged from 8 years and above and persons with reduced physical, sensory or mental capabilities or lack of
experience and knowledge if they have been given supervision or instruction concerning use of the appliance in a safe way and understand the
hazards involved. Children must not play with the appliance. Cleaning and user maintenance must not be made by children without supervision.
Children aged from 3 years and less than 8 years shall only switch on/off the appliance provided that it has been placed or installed in its
intended normal operating position and they have been given supervision or instruction concerning use of the appliance in a safe way and
understand the hazards involved. Children aged from 3 years and less than 8 years shall not plug in, regulate and clean the appliance or perform
user maintenance.
Children of less than 3 years should be kept away unless continuously supervised.
CAUTION: Some parts of this product can become very hot and cause burns. Particular attention has to be given where children and
vulnerable people are present.
Should the heater be moved and reinstalled, it is essential that the work is carried out by a competent electrician.
The use of these heaters is forbidden in any area where there is a presence of gases, explosives or inflammable objects.
Neither the connecting cable nor any other object must come into contact with the hot unit.
Check that the voltage shown on the rating plate on the heater is the same as the voltage of the supply to which connection is to be made.
WARNING: In order to avoid overheating, do not cover the heater. Do not use this heater to dry clothes.
The air outlet at the top of the thermal radiator and the air inlet at the bottom are provided to ensure the most efficient operation of the appliance.
They also protect the heater from overheating; therefore, it is essential that at no time are they covered.
This heater should be switched off at the isolating switch before any repair work is carried out. This action should also be taken during the times
of the year when heat is not required.
The thermal radiator should not be installed just below an electrical socket or in front of a socket outlet.
The appliance must be installed in such a way that switches and other control devices cannot be touched by a person using a bath or shower.
The installation must be carried out in accordance with the current electrical regulations.
2
The heater is fitted with a flexible cable size 3 x 1.00 mm for electrical connection. It may be used to connect the heater to the fixed wiring of the
premised through a suitable connection box positioned adjacent to the heater. This appliance must be earthed.
The supply circuit to the heater must incorporate a double pole isolating switch having a contact separation of at least 3 mm.
If the flexible supply cord is damaged, it must be replaced by a repair workshop recognised by the manufacturer, in order to avoid hazard.
All models are supplied with an electrical interrupt cut-out. This will switch off the heater if, for any reason, it overheats. Should the cut-out
operate, turn the heater off and remove the cause for the overheating. The cut-out will be reset automatically.
The presence in the air of particles of smoke, dust and other pollutants could, in time, discolour the walls and surfaces around the heater.
2. - INSTALLATION INSTRUCTIONS
Shelf
- Open the package and check that it is the correct model and it is in good condition.
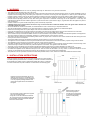
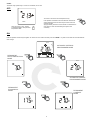
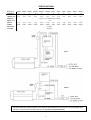
- To obtain optimum performances it is necessary to maintain a minimum clearance of
15 cm between the radiator and any inflammable material as furniture, curtains etc.
- The rest of clearances required to maintain are indicated on the following figure:
Mínimum 15cm
Closest
object to
the left
end
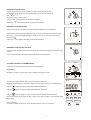
Position and fix the brackets at the correct
distance from the floor. It is possible to use
the radiator as measuring unit by positioning
it on two polyester package elements and
placing two supports above as indicated on
the figure:
Closest
object to the
right end
Mínimum
15cm
Mínimum 10cm
Mínimum 25cm
Control panel side
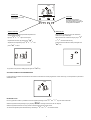
Mark the fixing points on
the wall using a pencil
through the two fixing holes
in the square brackets and
perform corresponding
bores.
- The studs and screws to attach the supports
are in the accessories bag.
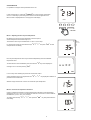
- Hang the unit on the hooks of the brackets.
- By turning the screw the metallic square will
go downwards, retaining the heater. Repeat
this on the other bracket.
2