1
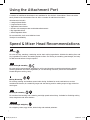
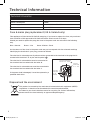
User Guide
GCSM_IM_B.indd 1
09/05/2014 12:49
1
GCSM_IM_B.indd 2
09/05/2014 12:49
Contents
Safety Warnings & Advice
3
4
Your GoChef™ Stand Mixer
Using GoChef™ Stand Mixer
5-6
Before first use
5
Placing the Bowl on the Stand Mixer
5
Choosing your mixer head
5
Fixing an attachment to the Main Shaft
5
Fitting the Splash Guard
6
Switching on
6
When you have finished
6
Using the Attachment Port
7
Speed & Mixer Head Recommendations
7
Capacity & Time Recommendations
8
Cleaning & Care
8
Technical Information
9
Fuse & mains plug replacement
Guarantee
9
10
2
GCSM_IM_B.indd 3
09/05/2014 12:49
Safety Warnings & Advice
DO NOT use the GoChef™ Stand Mixer for any purpose other than those described in this manual.
Always switch off before adding or removing attachments.
Avoid contact with moving parts. To prevent damage or injury, keep hands, hair, clothing and
utensils away from the mixer head during operation.
Intended for domestic use only.
Never leave the Stand Mixer unattended when in operation, especially around young children.
DO NOT leave the Stand Mixer plugged-in when not in use. Always unplug before cleaning.
DO NOT use any part that has become damaged.
DO NOT use to perform more than one task at a time. DO NOT use an attachment and a mixer
head simultaneously.
DO NOT use if the power cable or plug is damaged.
DO NOT attempt to repair the Stand Mixer, power cord or plug if they become damaged. Repairs
must only be made by a qualified service engineer.
Suitable for a wall mains socket only. Do not use with an extension cord or other adaptor.
DO NOT immerse the Stand Mixer, the power cord or the plug in water or in any other liquid.
DO NOT allow the power cord to hang over the edge of a countertop or sink, or to come close to
any heated surfaces.
DO NOT operate the appliance for more than 10 minutes at one time. Allow at least 30 minutes
rest before next use.
Use only on an even, level surface, with plenty of space available around the Mixer.
This appliance can be used by children aged from 8 years and above and persons with reduced
physical, sensory or mental capabilities or lack of experience and knowledge if they have been
given supervision or instruction concerning use of the appliance in a safe way and understand the
hazards involved. Children shall not play with the appliance. Cleaning and user maintenance shall
not be made by children without supervision.
3
GCSM_IM_B.indd 4
09/05/2014 12:49
Your GoChef™ Stand Mixer
Attachment Port & Cover
Main Shaft
Lift Switch
Speed Dial
Bowl
Retractable Power Cable
Suction Feet
Bowl Socket
Whisk
Pouring Funnel
Beater
Dough Hook
Splash Guard
4
GCSM_IM_B.indd 5
09/05/2014 12:49
Using GoChef™ Stand Mixer
Before first use
Wash the bowl, mixer heads and splash guard in warm, soapy water. Allow to dry fully before first use.
Placing the Bowl on the Stand Mixer
Ensure the Stand Mixer is unplugged
before adding/removing attachments.
Turn the Lift Switch to the left. The top
half of the Stand Mixer will rise, lifting up
the Main Shaft.
There are four nodes on the base of the
bowl. Line these up with the four slots
in the Bowl Socket and push the Bowl
down. Turn clockwise to fix in place.
Note: It is best to add your ingredients
before placing the Bowl in the Bowl Socket,
although you can add ingredients during
use with the help of the Pouring Shield.
Choosing your mixer head
You have a choice of three mixer heads:
Beater: Ideal for making cakes, biscuits, pastry, icing, fillings and mashed potato.
Whisk: For eggs, cream, batters, light sponges, meringues, cheesecakes, mousses and soufflés.
Dough Hook: For yeast dough mixtures.
See speed and mixer head recommendations (page 7) for more details.
Fixing an attachment to the Main Shaft
On the top of each mixer head is a round socket with a square
groove cut into it. With the top of the Stand Mixer still raised,
locate the raised node on the Main Shaft.
Slide the mixer head onto the Main Shaft, ensuring the square
groove slides over the raised node. Twist the attachment
clockwise to fix in place.
To change the mixer head, simply twist anti-clockwise to remove.
Once the mixer head is fitted, push down on the top of the Stand
Mixer to lower the Main Shaft and the mixer head into the bowl.
When lowering the top, be careful not to trap your fingers in the
gap between the top and bottom parts of the Stand Mixer.
5
GCSM_IM_B.indd 6
09/05/2014 12:49
Using GoChef™ Stand Mixer
Fitting the Splash Guard
The Splash Guard ensures that liquid or powder
ingredients don’t spit and spill out of the bowl during
mixing. It also helps you to add further ingredients to the
bowl during mixing.
If you wish to use the Splash Guard, remove the Pouring
Funnel (if necessary) from the Splash Guard. With the
Main Shaft lowered and with a mixer head already in
place, slide the Splash Guard around the Main Shaft.
Rotate the opening in the Shield so it is positioned
roughly at the front of the bowl.
Re-insert the Pouring Funnel by locating the raised bar on each side and sliding them into the two
slots on each side of the Splash Guard opening.
Switching on
To turn the Stand Mixer on, simply twist the Speed Dial clockwise to ON.
Regardless of your ingredients or recipe, it is best to stay on the ON setting for a few rotations
just to blend your ingredients a little without any risk of significant spitting or spilling.
Once your ingredients have started to blend, you can raise the speed to the level you require.
Please Note: Do not operate the appliance for more than 10 minutes at one time. Allow 30
minutes between heavy loads and extended periods of operation. As a safety feature the
Stand Mixer will turn off if there is a risk of overheating. Unplug and allow to cool before
using again.
When you have finished
Return the Speed Dial to OFF. Remove the Splash Guard, if used, by lifting out the Pouring Funnel
and sliding the Guard out.
Use the Lift Switch to raise the top of the Stand Mixer and the Main Shaft.
To remove the Bowl, twist anti-clockwise and lift. To remove the mixer head, simply twist anticlockwise and slide off.
Please Note: The Bowl and the mixer head may become hot during mixing. Use oven gloves to
remove if using a high speed setting over a long period.
6
GCSM_IM_B.indd 7
09/05/2014 12:49
Using the Attachment Port
A number of additional attachments are available for the GoChef™ Stand Mixer. These can all be
easily fitted to the Attachment Port to offer a number of additional functions.
Attachments include*:
• Lasagne Sheet Roller
• Linguine Pasta Cutter
• Tagliatelle Pasta Cutter
• Grinder with sausage maker and kebab attachments
• Big Vegetable Slicer
• Small Vegetable Slicer
For more details, visit www.JMLdirect.com
*Subject to availability
Speed & Mixer Head Recommendations
ON
Stirring
For slow stirring, mashing, combining and to start mixing ingredients. Suitable for adding flour and
dry ingredients to batter and adding liquids to flour. For mixing or kneading yeast doughs, but only
for 60 seconds before rising to speed 1.
1–2
Slow mixing & kneading
For slow mixing and mashing. Suitable for mixing and kneading yeast dough and heavy batter;
mashing potatoes and other vegetables; to cut shortening into flour; and to mix thin batters.
Knead dough on setting 1 only.
3
Mixing & beating
For mixing, beating and medium-speed cake mixing. Suitable for semi-hard batters, such as
cookies and biscuits; for combining sugar and shortening; and for adding sugar to egg whites for
meringues.
4–5
Beating & creaming
For medium-fast beating and creaming, and high-speed cake mixing. Suitable for finishing mixing
cake, doughnuts and other batters.
6 – MAX
Fast beating & whipping
For whipping cream, egg whites, boiled icing and mashed potatoes.
7
GCSM_IM_B.indd 8
09/05/2014 12:49
Capacity & Time Recommendations
Attachment
Whisk
Dough Hook
Beater
Food
Maximum
Operating
time
Cream
250ml
5 minutes
Egg white
8pcs
3 minutes
Mix for 30 seconds on
the ON setting, then
turn to setting 2 for a
further 2 minutes*
Water
330ml
Olive oil
2 tablespoons
Salt
1 teaspoon
Sugar
3 tablespoons
Milk powder
2 tablespoons
Bread flour
560g
Yeast
1 teaspoon
Flour
100g
Caster sugar
100g
Margarine
100g
Egg
2pcs
Note: We recommend
using warm water for
the best results
5 minutes
*Do not use your Stand Mixer to knead dough continuously for more than 4 minutes or exceed
setting 2, as this may affect the operation of the Stand Mixer and its performance. The maximum
amount of flour used for kneading dough should not exceed 800g (with approx. 400ml of warm
water). For larger dough mixes such as this, use the Beater in the ON position for 30 seconds and
then use the Dough Hook on setting 1 for 1 - 2minutes.
Cleaning & Care
Make sure you unplug the Stand Mixer before cleaning.
To clean the bowl, mixer heads and splash guard, wash in warm, soapy water. Allow to dry fully
before using again.
The Stand Mixer and all included parts are NOT dishwasher safe.
To clean the Stand Mixer, wipe down with a clean, dry cloth. DO NOT get the Stand Mixer wet.
8
GCSM_IM_B.indd 9
09/05/2014 12:49
Technical Information
Technical Information
Non-stick bowl volume
4.5 litres
Power consumption
700W
Power supply
AC 220-240 V ~ 50-60Hz
Model number
LW-6827G2
Fuse & mains plug replacement (UK & Ireland only)
This appliance is fitted with a BS 1363 13-amp plug. If you have to replace the fuse, only use those
that are ASTA or BSI approved to BS 1362 and with a rated current of 13 amps.
Should you need to replace the plug; the wires in the power cord are coloured in the following
way:
Blue – Neutral
Brown – Live
Green & Yellow – Earth
As the colours of the wires in the power cord may not correspond with the coloured markings
identifying the terminals in your plug, proceed as follows:
The wire that is coloured green & yellow must be connected to the terminal in the plug that is
marked with the letter E or by the earth symbol
.
Connect green/yellow
lead to ‘E’ or - Earth
The wire that is coloured blue must be connected to
the terminal that is marked with the letter N.
E
The wire that is coloured brown must be connected to
the terminal that is marked with the letter L.
If the power lead is damaged, it must be replaced by a
qualified electrician.
Connect
brown lead
to ‘L’ - Live
L
Connect
blue lead
to ‘N’ Neutral
N
Disposal and the environment
This product is covered by the waste electrical and electronic equipment (WEEE)
regulations. It should not be discarded with normal household waste,
but taken to your local collection centre for recycling. For further information,
please contact the local authority or approved disposal agency.
9
GCSM_IM_B.indd 10
09/05/2014 12:49
Guarantee
This product is unconditionally guaranteed for one year against all defects of workmanship and
materials. This guarantee does not affect your statutory rights. If you have any problems or
queries about this product please contact JML.
UK Customer Services: 0800 781 7831 (Freephone)
ROI Customer Services: 041-978 0003 (Local rate)
10
GCSM_IM_B.indd 11
09/05/2014 12:49
Distributed by JML
JML, Unit 1 Eastside, Port of Tyne, South Shields. NE33 5SP.
UK Customer Services: 0800 781 7831 (Freephone)
ROI Customer Services: 041-978 0003 (Local rate)
E-mail: [email protected] Web: www.jmldirect.com
©JohnMillsLtd/MB/05.14/LT/B
GCSM_IM_B.indd 12
09/05/2014 12:49