1
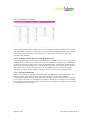
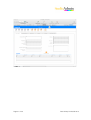
User Guide version 2.0
1 Introduction
4 2 Executive Summary
4 2.1 Customer relationship management
4 2.2 Quotes, Purchase Orders, Purchase Invoices and Sales Invoicing
4 2.3 Jobs
4 2.4 Users and passwords
5 2.5 Reports
5 2.6 Export to Sage
5 3 How StudioAdmin is put together
6 4 Automatic Saving
6 5 Features of StudioAdmin
7 5.1 Menu options
7 5.2 Button Bar
7 5.3 Companies
8 5.4 Correspondence
9 5.4.1 Email ...........................................................................................................................9 5.4.2 Letter Entry ...............................................................................................................10 5.4.3 Fax Entry...................................................................................................................11 5.4.4 Call Logs...................................................................................................................11 5.5 Standard Paragraphs
12 5.6 Marketing
12 5.6.1 Creating marketing messages ...................................................................................13 5.6.2 Step Two- Select Contacts. ......................................................................................13 5.6.3 Step Three – Testing! ................................................................................................14 5.6.4 Step Four – Send messages .....................................................................................14 5.6.5 Creating letters directly from the marketing letter .......................................................14 5.7 Product Price List
15 5.8 Quotes
16 5.8.1 Quote Specification ...................................................................................................16 5.8.2 Quote Cost Breakdown.............................................................................................17 5.8.3 Create PO’s from Quote............................................................................................18 5.8.4 Create a Job from the quote screen ..........................................................................18 5.8.5 Create an Invoice from Quote....................................................................................18 5.8.6 Email Quote ..............................................................................................................18 5.9 Purchase Orders
19 5.9.1 Emailing Purchase Orders .........................................................................................20 5.10 Jobs
20 5.10.1 Job Budget List.........................................................................................................22 5.11 Job Time
22 5.11.1 Sundry Job Costs .....................................................................................................24 5.11.2 Closing a Job ............................................................................................................24 5.12 Job Status’s
25 5.13 Creative Calendar Dates – Week Planner
25 5.14 Time Sheets & Expenses
26 5.15 Expense Sheets
27 5.16 Invoices
28 5.16.1 Emailing Invoices.......................................................................................................28 5.16.2 Exporting to Sage .....................................................................................................28 5.17 Statements
29 5.18 Purchase Invoices
30 5.19 Despatch Notes
31 Page 2 of 39
Data Artistry Limited © 2010
5.19.1 Email Despatch Note.................................................................................................31 5.20 Set up Users
32 5.21 Reports
33 5.22 Preferences
34 5.22.2 Emailing directly from FileMaker ................................................................................35 5.22.3 Important Note about setting up preferences ............................................................36 5.23 Finding or Searching
36 5.23.1 FileMaker Search Help ..............................................................................................38 6 Summary
39 Page 3 of 39
Data Artistry Limited © 2010
1
Introduction
StudioAdmin is a FileMaker Pro™ based database that covers all the essential processes
required to administrate a studio.
StudioAdmin is ideally suited to the growing business because of its content and price.
Encompassing all aspects of running a studio, from winning new business, to the raising of
purchase orders and job tracking.
This administration tool will allow information across the company to be shared1, giving quick
access to everyone in the company and truly allowing teamwork. Any paperwork generated by a
company should be keyed only once, but the details can be used time and again.
Developed over many years with input from a variety of businesses, we think StudioAdmin
covers the essential everyday tasks. One thing that we pride ourselves on is the interface, simple
to navigate with clean, clearly labelled buttons, making StudioAdmin a part of your day without
making it what you do!
2
Executive Summary
StudioAdmin has an incredible amount of features encompassing all aspects of running a studio,
from the initial logging of potential clients’ details through to final invoice.
2.1
Customer relationship management
Address and company contacts are kept alongside any correspondence – including emails, and
are visible to all using StudioAdmin.
The database features marketing emails and letters to be sent to many contacts at once.
Personalising the correspondence and recording which marketing messages have been sent
against the company record.
2.2
Quotes, Purchase Orders, Purchase Invoices and Sales Invoicing
Quick generation of day-to-day paperwork. Quotes can be produced with or without the use of
standard price lists, purchase orders can be generated directly from quote or independently and
directly from supplier records. Purchase Invoices can be entered into StudioAdmin and linked
back to Purchase Orders.
Sales Invoices raised in a matter of minutes, again with or without origination from quote. Each
of these aspects has a ‘direct to email’ facility making the ‘paperless’ office an ever-closer
prospect.
2.3
Jobs
The job section links all other aspects together so that you can easily see costs associated to a
job, invoices and delivery notes raised. There are some other useful job features such as Week
Planner (a diary feature), recording of sundry items e.g. colour copies or couriers.
1
Applies to multi-user version only
Page 4 of 39
Data Artistry Limited © 2010
2.4
Users and passwords
All users of StudioAdmin must have a record within the system. This governs which areas of the
system to which they have access. It is also a useful facility for recording employees’ home and
contact details.
There isn’t a limit to the amount of users that can access StudioAdmin, but every user must
have a password.
2.5
Reports
Every section of the database has a list view that summarises the ‘numbers’. For example the
purchase order list shows total net, total vat and total gross. Any search performed will
summarise e.g. a range between two dates. Lists appear for quotes (potential business);
purchase orders; and invoices. There are also many pre-programmed reports.
2.6
Export to Sage
There is an export function so that once Purchase Invoices and Sales Invoices have been
entered or raised, these can then be exported ready to import into Sage Accounts2
2
Designed to work with Sage Line 50
Page 5 of 39
Data Artistry Limited © 2010
3
How StudioAdmin is put together
Once any data is keyed into the database e.g. a company address, it can be used time and
again. Selected for an invoice or linked to a quote. The diagram shows how data is crossreferenced; the colours indicate the ‘flow’ of data.
4
Automatic Saving
The automatic saving has been turned off requiring you to save each time you make changes to
a record, however this can be changed by going to the layout setup when in layout mode (a
super user privilege only) and checking the option ‘save record changes automatically’.
This means that your never have to remember to save what your doing, but the flip side of this is
there is only a limited amount of time to undo any mistake, using either the undo (Edit Menu) or
the revert record option, found under the Records Menu last item. Revert becomes unavailable
once you have ‘entered’ the record by clicking outside the fields or hitting the return or enter
key.
Please note that each layout works independently, should you decide to save automatically you
will need to this for each layout.
Page 6 of 39
Data Artistry Limited © 2010
5
Features of StudioAdmin
5.1
Menu options
5.2
Button Bar
Throughout the database main navigation is done using the button bar as shown below. This is
split into two parts. There are navigation forward and back buttons and home button in the
coloured strip across the top where the place name is also shown.
The level below those buttons is consistence throughout the database, however the function
does change according to which area of the database you are working within e.g. if in the
companies section of the database clicking ‘new’ will create a new company record.
The ‘List’ button toggles to a ‘detail’ button when you switch between the two views. Delete,
Search and Print buttons do exactly as the name suggests, the search options will be reviewed
in more detail later in this guide. The ‘Show all’ button refers to showing all the records, this
option can only be used after a search or when a button that selects a specific group of records
to display e.g. performing a find. Clicking ‘Show all’ will bring all records back into view after
viewing a selected few.
You can also use the FileMaker Status bar across the very top of the screen to move through
records by clicking on the book pages.
Those are the basic buttons that apply throughout StudioAdmin, other buttons will be clearly
labelled and all buttons have a cancel option, so don’t be afraid to click on an option to try it.
One final point is that there are arrows pointing at things, clicking the arrow will take you to view
Page 7 of 39
Data Artistry Limited © 2010
the item that it points at e.g. will take you to view company contact details as shown.
5.3
Companies
All sections of the database have lists similar to that shown below.
Clicking on a row will display the companies’ information in more detail. The tabbed headings
across the top will display that part of the companies’ detail e.g. Correspondence will list all
correspondence with the company record being viewed.
The bottom - contacts section - allows for multiple contacts within each company and clicking
the ‘Expand contacts’ button will allow you to view those as a list and search individual names to
produce labels, envelopes, Christmas cards, or export the list.
Page 8 of 39
Data Artistry Limited © 2010
5.4
Correspondence
When you click on any of the correspondence buttons [
] one of four types of
correspondence screens appear, email, call, letter or fax entry. When you print the letter or fax
options the layout is transformed to appear as your normal stationery even though when you
create your correspondence the standard entry screens are shown.
5.4.1
Email
The email button will mostly be used for emails that you generate from your database going out
to your client. It is a good idea to record important business messages from here to clearly
record the contact with your client. StudioAdmin is not set up to receive messages back into the
database – the responses to any messages you send will be returned to your normal inbox in
the email client of your choice, but even starting an email conversation here means that it is easy
to refer back to your standard messages if you need to. There is no reason why you shouldn’t
also open a message record, to copy back to the database something that you may have
received in to your standard inbox.
One final point to make about sending emails from the database is that these messages can be
viewed by any user3 using the database, unlike your standard email inbox, which is only available
to the user logged in and the message creator.
There is also an option to send HTML Emails2 however they are pasted into the HTML message
field and would need to be created outside of your database. These can also be saved as
templates but require the SMTPit plug-in to send them, unlike the standard email messages that
use your normal email client e.g. Outlook or AppleMail to send the message.
3
Multi-user versions only
Page 9 of 39
Data Artistry Limited © 2010
5.4.1.1
Composition Helper
The composition helper (shown on the right in the screen above) lists the templates that are
available from standard paragraphs. Clicking on a template name shows a quick preview in the
bottom right section, then clicking on the arrow to the left of that preview will insert the text into
the body of your correspondence, you can then add, or edit this text in whatever way you wish.
5.4.2
Letter Entry
All of the correspondence entry screens look similar, but when you click the print button the
correspondence is formatted with your company logo and in a print style. These screens are
only to assist with entry and to accommodate extra items like ‘subject’ on the letter. This is used
in the tabbed section correspondence in the company record to make it easy to review each
contact that has been made without having to drill down further to review the actual letter or
other item of correspondence.
5.4.2.1
Template
The correspondence entry screens have a ‘Template’ button. When you have typed an entry
that you feel would be useful to keep, click this button to retain the body of the correspondence
as a standard paragraph, making it available for use with other correspondence records and
marketing.
Page 10 of 39
Data Artistry Limited © 2010
5.4.3
Fax Entry
The fax entry shown above works just as all the other items of correspondence. Click on the
print button to transfer the entry into a print format with company logo. It is then possible to fax
directly from the database however this is dependent upon a system level fax utility being
available, if this is available you will be able to select the fax device from your list of printers.
5.4.4
Call Logs
Call logging is a crucial part of sales and contact relationship management. This section isn’t
complicated, log the call as either received or outgoing, give it a title (for the benefit a easy
review within the client record) and type as much or as little detail about your conversation as
you feel necessary. The composition helper is there to use for repetitive entries even within this
section.
Page 11 of 39
Data Artistry Limited © 2010
5.5
Standard Paragraphs
Text that you often repeat when writing to clients or suppliers can be kept within the standard
paragraphs section. This may be a regular sign off to an email, a company introduction letter, or
other marketing texts, whole letters or just paragraphs that you use regularly. It will then appear
in the correspondence composition helper templates list, making a letter or email easy to build
by selecting various pieces of text that you keep under this section.
5.6
Marketing
There are two ways of marketing using the Studio Admin database, Marketing Letters and
Marketing Emails. The principles of creation are the same for both sections, only the delivery
method differs.
Page 12 of 39
Data Artistry Limited © 2010
5.6.1
Creating marketing messages
5.6.1.1
Step One – Create a new message
Create the message by clicking on the new button is the usual way. Enter a ‘from’ email address
and a ‘test email to’ address. These are not entered automatically as it is likely you will use a
specific account to send marketing emails from that differs from your standard email address – if
you don’t you should consider this as a way of working. The test address ideally should be an
external email account that will allow you to see the message in the style that your recipients
would see the message.
5.6.1.1.1
HTML Messages
There is no HTML editor within the database; usually this will be copied in from another source.
Please note that the full file path to any images used within the message must be included in the
html. Alternatively you can embed the images in each message by using the ‘inline’ option,
which basically attaches the image files to each message sent out. The inline method is only
recommended if the images are few and of a very small size.
5.6.1.1.2
Rich text messages
This is found by clicking the Std Email tab. Please note that by entering a message into the body
of this section over-rides the html option and only rich text will be sent.
There are some additional features within this section, the ability to insert key fields into the
subject line or body of your message.
At the top right of the email entry screen can be found the buttons as shown above. By clicking
directly on the substitute options the text is inserted as chosen. Just prior to the message being
sent it is checked for these options and the appropriate field data inserted. Generally the full
name and company are correct, but be wary of doing this without knowing that your data is
good, check that salutations and correct names have been input before sending these type of
messages, or instead of looking like you are sending a personal message, it will look like a mail
merge and that would defeat your purpose.
5.6.2
Step Two- Select Contacts.
By clicking this button you will be taken to the company record in ‘find’ mode, you will be
required to enter your criteria e.g. Client or simply those contacts with the ‘marketing’ option
selected, but these are not your only choices it can be any search available to you.
Important note: Irrespective of whether you chose the ‘marketing’ option only those contacts
with this selected will be marked to receive your marketing mail out. In this way you can ensure
that any request you may receive from a company to ‘remove from marketing’ can be complied
with by un-checking this box.
Page 13 of 39
Data Artistry Limited © 2010
5.6.3
Step Three – Testing!
Once back in the global email record, ‘Email recipients’ list shows all those marked to receive
your new message. Check through this list to ensure that all have a good email address and
then you are ready to test to a specified email address. We recommend an external account
(one outside of your office norm) to see how your message might be received. Especially with
the html version you will need to test to ensure that your images and code are being received
accurately.
Click the test message button to send a single email to the test to address.
5.6.4
Step Four – Send messages
OK you are now ready to send your messages. We recommend that you DO NOT send from
your standard email address, set up an account specifically for this purpose. Why? Well unless
you are dogmatic in your checking of data chances are you are going to get a few ‘bounce
backs’ in other words messages that state unknown email address etc. and unless you want to
wade through these to get your normal email… well, just something to bear in mind.
All this is set up and good to go, then click the ‘Send all emails’ button.
You can view ‘View records’ from the marketing letter and use the book at the top to see
individual records to reprint or resend.
5.6.5
Creating letters directly from the marketing letter
This is still a four-stage process just as per the marketing email.
5.6.5.1
Step One – Create a new global letter
Click on the ‘New’ button within this section to create your message. Please note that you can
include pictures on your letter to make it a little more interesting than the norm.
5.6.5.2
Step Two – Select Contacts
Search the company’s section to pull out those records to receive your global letter.
5.6.5.3
Step Three – Preview
A quick check of the printed look and output using the preview button, before you print
hundreds or more of these letters!
5.6.5.4
Step Four – Print All
Just as per the global emails, your output is as good as your original input, so make sure that
your companies are entered well and are correct to ensure you are not wasting paper!
You can view ‘View records’ from the marketing letter and use the book at the top to see
individual records to reprint or resend.
5.6.5.5
Add a picture to your letter
There are six picture boxes to work on the first two pages only. Click in any of
those boxes, go to the ‘Insert’ Menu > Picture… and select from your filed
pictures. JPEGs will work best here, but you can use the formats shown right.
Page 14 of 39
Data Artistry Limited © 2010
5.7
Product Price List
The price list can be whatever applies to your company. This can be something tangible or a
service or function e.g. A4 Colour Scan or an hourly rate for a specific task, whatever will allow
you to quote quickly and efficiently and work out your margins.
Clicking on any item will allow you to view the product in more detail. There is provision for
including images to more easily identify products.
Page 15 of 39
Data Artistry Limited © 2010
5.8
Quotes
When entering a quote selecting a client will pull through all their address details and allow you
to select from a list of contacts from that company record or simply type in a new name in the
‘F.A.O.’ field. This will link it back to the company record so you can see a complete history of
quotes sent to that company.
When you enter a quote it will show the detail above, however when you print or pdf (via email)
the quote for your client, only client relevant information is shown, of course in your company
style, and without the in-house details like your purchase price.
There are two tabbed sections within the quote details.
5.8.1
Quote Specification
This tab allows you to input complete specifications with fields to enter the spec, studio and
print briefs separately (as shown above). If you prefer to print these details with a price summary
without the cost breakdown, use the print or email buttons from this screen.
Page 16 of 39
Data Artistry Limited © 2010
5.8.2
Quote Cost Breakdown
The entries bring in unit costs from the price list table, however you can also enter items without
a default code typing in your own description and unit cost, or over writing a cost that has been
looked up from the price list allowing you flexibility when quoting.
5.8.2.1
How the section headers work
So that the printed quote can be sub-summarised you must select a section header and if you
wish, enter a description to follow the header on the printed quote. The Section headers can be
edited to suit your way of working or an individual quote. Once used the total will sub-summarise
so you may not be able to see all the costs in the screen above without changing to the other
sub sections used.
Page 17 of 39
Data Artistry Limited © 2010
5.8.3
Create PO’s from Quote
You can generate or view a PO by clicking on the PO number box in the cost items, any items
sourced from the same supplier will be put together onto a single PO from that quote.
5.8.4
Create a Job from the quote screen
Click the Job button to pass the final quote details into a new job record.
5.8.5
Create an Invoice from Quote
To generate an invoice from the quote click the ‘Inv.quote’ button, this will pull through all details
onto an invoice, mark the quote as invoiced and record the invoice number against the quote in
the top right so that you know it has been invoiced.
5.8.6
Email Quote
The ‘Email’ button will PDF the quote and attach it to an email. StudioAdmin will pause once the
email has been created to give you a chance to personalise your message, although some
standard text is already input to the email for you.
Page 18 of 39
Data Artistry Limited © 2010
5.9
Purchase Orders
Purchase Orders can be created in two different ways: Manually by clicking the new button
within the Purchase Orders section of StudioAdmin and entering a supplier, ship to etc..
Mainly though the Purchase Order will be generated directly from the Quotes, by clicking on the
PO box to the far right of the item in the body of the quote. If there is more than one item
sourced from the supplier they will all be included in a single PO. The PO number is recorded in
the quote against the item line.
For sections of the database that require a client printed version, the entry screens look and feel
just like the rest of Studio Admin as it is easier for you to see what is required when entering
details. However the print out’s are formatted to reflect your company style as shown in the
example above.
You can search PO’s just as any section, allowing you to pull out records specific to a supplier
or date range, maybe both, or any combination of criteria. The list in the Purchase Order section
has summary fields, meaning that it will total the found records, basically this is very quick
customised reporting within the Purchase Order section.
All summary lists total, specifying individual searches will allow you to break out sets of figures
e.g. search by a supplier and further identify records by date. Searching within FileMaker is very
powerful and effectively gives you a multitude of reports.
Page 19 of 39
Data Artistry Limited © 2010
5.9.1
Emailing Purchase Orders
The ‘Email’ button will PDF the PO and attaches it to an email. Studio Admin will pause once the
email has been created to give you a chance to personalise your message, although some
standard text is already input to the email for you.
5.10 Jobs
The job list always shows by default live jobs. These are coloured according to the Job Status
table (see Job Status section for further details on what this entails).
Clicking on any job in the list takes you into the job details screen.
The job details are further broken down into tabbed sections: Correspondence; Quotes;
Purchases; Sundries; Invoices; and Time. Each of these tabs will show the data that has been
created in relation to the job e.g. all time sheet information can be found under the Time tab and
Page 20 of 39
Data Artistry Limited © 2010
these figures are totalled in the budget summary and the budget list. The same applies to other
costs associated to the job.
The main details also have their own tabs on that tabbed header, team / brief; creative calendar;
additional files and budget summary. The fields are appropriate to the tab under which they
reside, so the budget summary will show you a breakdown of the costs that apply to the job
being viewed.
Under the additional files it is possible to add documents outside of FileMaker, maybe Office
documents with briefs or costs, PDF examples or graphic images that apply to the job. Double
clicking on the file will launch it.
Page 21 of 39
Data Artistry Limited © 2010
See also Creative Calendar Dates [Week Planner] for further details about the key dates entered
under the creative calendar tab.
5.10.1 Job Budget List
The budget list shows the financial status in list form, the figures are also shown on the main job
details screen.
Clicking the Excel button will allow you to save the list being viewed as an Excel document, but it
should be noted that for Super Users it is possible to do this from the file menu for any list that
you are viewing.
5.11 Job Time
Page 22 of 39
Data Artistry Limited © 2010
When time is entered onto individual time sheets, the entries automatically filter through to the
appropriate job and summarise accordingly.
Page 23 of 39
Data Artistry Limited © 2010
5.11.1 Sundry Job Costs
Sundries are entered directly onto the job record, unlike purchase orders, that take you to
another screen to create them. They can be entered with the assistance of the price list or
directly into the line itself, typing into the description, quantity and the unit price.
5.11.2 Closing a Job
Please use the ‘Close Job’ button when a job is complete. This updates the status, close date
and time sheet inclusion field to remove the job number from further time entries. Using this
button does not mean the record is removed, but by updating it in this fashion it no longer
appears in the live job list and simply remains in the background.
Page 24 of 39
Data Artistry Limited © 2010
5.12 Job Status’s
The job status’s can be set up entirely as you want to define them, copy and paste your colour
blocks from any graphics application, or from within a blank FileMaker database.
NOTE: It is recommended that you retain “Job Complete” as this will be used irrespective of
whether it is in this list or not when the ‘Close Job’ button is used in the Job record and this
ensures that it remains in the drop down list for searching within jobs.
NOTE 2: It is also recommend that you use pale colours as it will be easier to read your job list
details off of a lighter background.
5.13 Creative Calendar Dates – Week Planner
On a separate job details tab section there is provision to enter tasks, the start and end date and
to whom they are assigned.
The last line is always blank ready to assigned the next item.
When the User record is set up there is a check box as to whether or not the user should
appear on the creative calendar, as not every user would need to be included.
When you click on the calendar button on the job details screen the week planner appears, it
lists every user that is required to appear on the creative calendar and shows by default the
current weeks’ jobs i.e. those key dates or tasks that fall inside this weeks date range, see
example below.
Page 25 of 39
Data Artistry Limited © 2010
It appears in preview mode, click the ‘exit preview’ button to edit the dates or tasks in this view.
To change the week, again having exited the preview mode, click on the date and up will pop
the date box allowing a new date to be entered.
5.14 Time Sheets & Expenses
When clicking the time sheet and expenses button from the menu the screen below appears
allowing you to review all your previous time sheet and expense forms, as well as being able to
create new time or expense sheets as long as you have posted any that are open already.
Time Sheets are entered weekly to ensure that it is as quick as possible, this means that those
users who only need to enter time need not wade through other aspects of the database to
input time. They can update a single record with multiple jobs.
Only ‘Live’ jobs will appear in the drop down list for entering a job number.
NOTE: the time sheet start date can be found in the User record.
Page 26 of 39
Data Artistry Limited © 2010
The ‘unpost’ option is only available to super users. In order to create a new time sheet any
unposted time sheets must first be posted.
5.15 Expense Sheets
The expenses section works in a very similar fashion to the time sheets. Any costs assigned to a
job number will appear under the ‘sundries’ section of the job and automatically show in the
budget summaries. Use the last blank line to enter the details of your expense.
Page 27 of 39
Data Artistry Limited © 2010
5.16 Invoices
The best place to create an invoice is from within the quote record. This will automatically setup
the client, contact, items and quoted cost details. You can if you wish simply click ‘new’ from
within invoices, but the first method is by far the quickest if you have a quote set up.
You can search Invoices just as any section, allowing you to pull out records specific to a client
or date range, maybe both, or any combination of criteria. The list in the Invoice section has
summary fields, meaning that it will total the found records, basically this is very quick
customised reporting within the Invoices.
5.16.1 Emailing Invoices
The ‘Email’ button will PDF the Invoice and attaches it to an email. Studio Admin will pause once
the email has been created to give you a chance to personalise your message, although some
standard text is already input to the email for you.
5.16.2 Exporting to Sage
Studio Admin has been set up to export Invoice records to a CSV file in the format that Sage
Accounting will import. This enables you to pass your data over to your accountant so that they
do not need to re-key details. Two files are created in your documents folder on your hard disk,
Customers[date].csv and Invoices[date].csv, only customers that haven’t already been imported
will be exported to the customer csv file, so if there are only existing customers this export will
not be repeated.
Page 28 of 39
Data Artistry Limited © 2010
Upon clicking the Sage button from the main Invoices List, the above screen will appear listing
those invoices that haven’t been exported. All of the fields shown must be complete, it is for this
reason that you are required to ‘mark’ the records you wish to export. Only those ‘marked’ will
be exported, so any that are not complete can be skipped and the record completed later. In
the example above the last record would cause Sage to error when importing and skip the
whole import. This is because it is missing an account reference and a nominal code, both of
which are essential for linking to other parts of Sage. The account reference links to the
customer record and the nominal codes are set up to allow you to enter sales into specific
sections for reporting and final accounts. See the Sage help or your accountant, for more details
about how you should complete these fields.
5.17 Statements
The statement list shown above will allow you another way of finding out what is outstanding in
payments from your customers. You can search out using date ranges all statements sent out in
a specified period.
Clicking on Run monthly statements will allow you to pick a month, all invoices that fall within
that month and those that are outstanding will be included on the statement to your customer.
Once all are generated the ‘Print List as Statements’ will then allow you to print the whole batch.
Page 29 of 39
Data Artistry Limited © 2010
5.18 Purchase Invoices
Within the Purchase Invoice List you can enter details to tie the invoice back to an existing PO or
skip that field and enter details without that information. Selecting a supplier will show PO’s
created for that supplier and enter from the drop down list, or again you can type directly into
the field without using the drop down list.
This list can also be exported in a format ready to import into Sage 50, however supplier details
are not exported so these must already be setup within Sage for this to work properly.
Page 30 of 39
Data Artistry Limited © 2010
5.19 Despatch Notes
A despatch note can be created from an invoice, this will pull through all of the products on the
invoice directly onto the despatch note without you re-keying this detail.
However there may be occasion where you haven’t yet raised an invoice or that you are sending
something that is without charge, in which case to create a despatch note click the new button
from within the despatch section. All details must be manually entered. There are fields to
specify exactly how many items you are delivering and how many are expected. How many
remaining will be automatically calculated.
Once again, the entry screen conforms to the database format, but the print (or email with PDF)
retains the printed in the style of your companies’ stationery.
5.19.1 Email Despatch Note
The ‘Email’ button will PDF the Despatch Note and attaches it to an email. Studio Admin will
pause once the email has been created to give you a chance to personalise your message,
although some standard text is already input to the email for you.
This may seem a little strange given the idea is generally to attach the note to the goods when
they are being shipped, however if something is going directly from the supplier you may wish to
send your paperwork in this fashion, or perhaps you wish to send this directly to your supplier so
they may include your paperwork for you.
Page 31 of 39
Data Artistry Limited © 2010
5.20 Set up Users
The Users button will take you to a list of StudioAdmin’s users. Before anyone can access the
database they must be set-up with a user name and password. From the User List click on any
name to view their details, depending upon your access privileges will be the details that you are
able to see, basic users can only see name and address details of any user. A user with ‘Super
User’ privileges can see and set-up names, passwords, employee start dates and create new
users.
Clicking the ‘new’ button will take you to a basic details screen and once they have been
entered your new user is set-up and ready to go, although it is good practise to complete the
rest of the details.
There are a few extra features to take note of within this section:
• Include on the creative calendar; any user with this checked will appear on the calendar
even if no work is assigned, as this helps with planning.
• Time sheets; this allows you to see all time sheets for every user if you have privileges to
access this aspect of the database.
• Expense sheets, works as time sheets.
Page 32 of 39
Data Artistry Limited © 2010
5.21 Reports
The following reports are available pre-scripted within StudioAdmin:
• Sales Invoices, by Client
• Purchase orders, by Supplier
• Purchase Invoices, by Supplier
• Jobs in Progress
• Hours By Job, by User
• Hours By Job, by Department
• Hours By Job, by employment type
With the exception of ‘Jobs in Progress’ that simply lists all the live jobs on the system, all other
reports are produced for the date range that you specify in the screen shown above.
Page 33 of 39
Data Artistry Limited © 2010
5.22 Preferences
The Preferences button from the main menu will take you to the screen shown above.
Completing the details here will filter through to all the ‘stationery’ aspects of Studio Admin e.g.
Purchase Orders in Print or PDF mode. This means that should you change your address or
phone number it will instantly filter through to every printed layout throughout the system.
Preferences have tabbed sections of which there are four. Main details as shown above.
5.22.1.1 Preferences Account Codes / Invoicing Terms / Default Currency
Your invoice terms can be set up in this section so that for all new invoices the terms appear
exactly as you wish to phrase them. The default is ‘Strictly 30 days net’ but please change this
to suit your own purposes.
Page 34 of 39
Data Artistry Limited © 2010
Default currency can also be changed here, simply enter the accounting symbol.
Also there are VAT codes here, the example shown is set up to suit a final Sage export, however
you can code as suits you if you have no need for this facility. This section gives you flexibility to
choose different VAT rates for quotes, invoices and purchase orders. In addition it allows for new
rates to be introduced by simply entering a new code and rate in the last blank line.
The Nominal Codes are for accounting purposes, so you only need set these up if exporting is
required, enter new codes into the last blank line.
5.22.2 Emailing directly from FileMaker
There are also preferences for email. It is possible with the addition of SMTPit plug-in to email
directly from FileMaker, this is only utilised when sending HTML messages (standard emails
send via your normal email client application e.g. AppleMail or Outlook). This is where you input
your mail settings.
The above screen shows all of the SMTP options, these can be found from your standard email
client under the SMTP account settings. It is very much a case all trial and error, there are a
plethora of email methods and your mail server will require a combination of the settings above,
although that which is shown generally works, substituting your Host name.
However if you find that these settings don’t work, try a different port number or authentication
type, there are only a few options here so it shouldn’t take long to work out the correct one.
Important Note: Sometimes the use of a SMTPit Pro requires the setting up of mail relaying. If
you get this error when first attempting to send mail from StudioAdmin, please refer directly to
the SMTPit Pro help at: http://www.cnsplug-ins.com/faq.htm?product=SMTPit%20Pro
Page 35 of 39
Data Artistry Limited © 2010
5.22.2.1 Preferences – Buttons
Under the Buttons tab within preferences you can change the buttons for yourself. Click on the
field, Insert Menu > Picture… to enter your own buttons. PNG or RGB JPEG files work the best
here and you should also import the image at the correct size to ensure that it works well
throughout the database.
5.22.3 Important Note about setting up preferences
These are global fields and are therefore not designed for changes on the fly. If you are running
FileMaker server it needs to be closed, then open the database in a single copy of FileMaker i.e.
not hosted, make the changes, then re-open in FM Server again. As these are 'global' fields it
means that if you make changes when the database is hosted it merely applies it for you and for
that session only. If you host using a client copy of FileMaker ensure you are the only user
accessing the system before applying changes so that you do not get unexpected results.
5.23 Finding or Searching
There are many ways to ‘get back’ information from your database, but all involve searching or
using the reports. The ‘Search’ option may appear simple - it is, but using a variety of
techniques can extract whatever information you may need, including ‘everything but’ searches
if you use the omit option. For example if you wanted to find all the companies in your database
bar suppliers, then chose search, enter ‘supplier’ under the category and select the ‘omit’ option
in the status bar as shown below.
Page 36 of 39
Data Artistry Limited © 2010
Page 37 of 39
Data Artistry Limited © 2010
5.23.1 FileMaker Search Help
The FileMaker help is extensive on this subject and definitely worth checking out, but the most
important part has been extracted here into this document.
Page 38 of 39
Data Artistry Limited © 2010
6
Summary
StudioAdmin has lots to offer in a straightforward manner. There are no hoops to jump through
before you can start using it, just set up the preferences page with your company name and
address and jump in. The benefits of easy administration will be revealed within days of using the
system allowing you to get on with your real job.
We wish you much success with both the use of this software and running your business.
Page 39 of 39
Data Artistry Limited © 2010