1
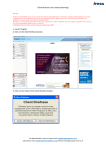
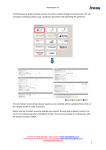
Client Briefcase User Guide (Exporting)
Warning;
We have no responsibility to you or any party for the contents of any Application or documents, including without limitation any
security configurations, we are not liable for any viruses and corruption of data, or damage caused as a result of using our
documents and guidelines, we do not endorse any documents and applications.
We make no warranty that the document will meet your requirements or will be compatible with your computer equipment or
that your use of it will be uninterrupted, timely, secure or error-free.
(c) All Rights Reserved. IFonline Limited trading as Trigold January 2009
When you click on the client briefcase button on the left hand side, the following
screen will show up.
1. Click on export to client briefcase
2. Put a tick in all the clients you wish to export, in the checkbox, and then click on
the export button.
3. If you wish to include all associated documents and applications for the selected
clients leave the ticks in place. If you wish to change the path where the file is to be
stored, select the button to the right of the filename, and chose the preferred
destination. The default location and filename is shown below. Then click ok on this
screen
4. This will show the following screen. A new file will now be created, where you
specified in the filename in section 3.
5. You then click on close on the following screen. This will reopen prospector.
6. You then transfer the new file that has been created which would have been created
in you chosen location in section 3. Transfer this file to the machine you need to
import the client on. E.g. using a memory stick, shared network drive, email.
Please download the document on importing from client briefcase.