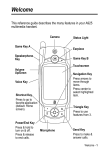
1
3 services user guide for your
e616V
This way. 3 services user guide.
3 Customer Services
Hutchison 3G UK Ltd
PO Box 333
Hemel Hempstead
HP2 7YW
United Kingdom
three.co.uk
Published by Hutchison 3G UK Limited. All rights in this publication are reserved and no part may be
reproduced without the prior written permission of the publisher. © 2004 Hutchison 3G UK Limited.
A Hutchison Whampoa company. Registered office: 9 Queen Street, Mayfair, London W1J 5PE.
Hutchison 3G UK Limited trading as 3 is a service provider and has provided the information in this user
guide concerning what you might expect from 3 services. NEC Corporation Ltd is the manufacturer of the
NEC e616V handset and has provided the information on its features and use set out in this user guide.
The contents are believed to be correct at the time of going to press, but any information, products or
services mentioned may be modified, supplemented or withdrawn. The provision of any products and
services by Hutchison 3G UK Limited is subject to 3’s customer terms (available at three.co.uk).
The customer terms will take precedence if there is any discrepancy with this publication.
‘3’ and related images, logos and names referred to in this publication are trademarks of the Hutchison
Whampoa group of companies.
Designed and produced by Dutton Merrifield Ltd, Bristol.
This publication is printed on fully recyclable paper.
DM04151 April04 v1.0 99538
e616V
Welcome to 3.
User guides can be daunting things, can’t they?
But don’t worry, we’ve made this one as
simple as possible.
Your guide is designed to do two things.
First there’s an explanation of how to use
your new NEC e616V, so finding
your way around the handset will soon
become second nature. Then there’s
an introduction to the wide range of
services offered by 3, to make sure
you get the best from them.
If all you want to do is power up and
get going, that’s fine. But if you want
to know more about what you can
do with 3, you’ll find it here.
Check three.co.uk for the latest updates
to this user guide.
Contents
1.
Get ready to go
2.
Your handset explained
3.
Getting going
4.
Making and receiving calls
5.
Contacts and media centre
6.
Today on 3
7
Messaging
8.
Appointments and Synchronisation
9.
Security
10. NEC’s Health and General Safety information
11. Troubleshooting, Index and Useful numbers
e616V
The sections in blue all relate
to your new NEC e616V.
Those in red describe 3 services.
inside back cover
First things first.
There are a couple of things you need to
do before you can use your new handset –
installing your SIM and battery, and charging
your handset up. This section tells you how.
1.1 – 2 > Installing the SIM
1.3
> Installing and charging the battery
1.4
> Charging the battery
1.5
> Battery use
1.6
> Installing a memory card
1
Get ready
to go.
Installing the SIM
Your SIM (Subscriber Identity
Module) contains your phone
number, service details and
contacts, and must be inserted
into your handset.
If the SIM is removed, your
handset becomes unusable
until a valid one is inserted.
The holder for your SIM is
located underneath the battery.
Always disconnect the charger
and other accessories from
your handset before inserting
and removing your SIM.
Your 3 SIM may only be used
in handsets which are enabled
for 3 services. Any attempt to
use the SIM in other handsets
may result in serious damage
to the handset and may
SIM
5 Replace the battery by
placing the ridge at the
side into the side of your
handset. Push the battery
down into position and
snap it into place.
2 Remove the battery.
e616V
3 Insert your SIM into the
holder, ensuring the gold
plate is facing down and the
card is positioned as shown.
4 Slide the SIM securely
into its SIM holder before
replacing the battery.
1 Pull out the release lock at
the top of the battery.
1.1
prevent you from being able
to use it, including making
emergency calls. In these
instances, we are not
responsible for any such
damage or usage problems.
Get ready to go
Get ready to go
e616V
1.2
Installing the battery
Charging the battery
The battery is not fully charged
when you buy your handset
but there may be enough
power in the battery to turn
the handset on. Before you can
use your handset properly, you
need to install and charge the
battery as shown here.
When charging the battery,
always close the handset.
Make sure the battery is
installed and charge it using
the NEC charger supplied.
Your handset is designed
to be used only with the
manufacturer’s battery and
battery charger.
How to install the battery
1 Ensure the handset is
switched off.
2 Insert battery by placing the
ridge at the side into the side
of your handset.
3 Push the battery down
into position and snap it
into place.
How to remove the battery
Pull out the release lock at
the top of the battery and
lift the battery away from
your handset.
The recommended battery
charge time is approximately
two hours. Stop charging if not
completed within five hours.
Battery power may decrease
when the handset is in use,
even if the handset remains
connected to the charger.
How to charge the battery
The battery must be charged at
room temperature between
0°C (32°F) and 45°C (113°F).
3 To remove the charger, tilt
the plug upward and pull
it away from the handset
I/0 connector.
A battery that has not been
used for a long period of time
needs to be completely
discharged by leaving the
handset turned on. Then
recharge it 2 or 3 times
before reaching full capacity.
The battery can be charged
whenever you wish without
affecting the performance
of the handset.
2 Plug the charger into an
electrical outlet. The red
LED indicator on the outside
of the handset will light up
when charging is in progress
and go off when charging
is complete.
Get ready to go
A warning alarm will sound
for approximately 10 seconds.
Press
to turn off the
alarm. After approximately
1 minute the power will turn
off automatically.
The volume level of the lowpower warning alarm depends
on the ringtune volume level
on standby and the ear piece
volume during a call.
Your handset will automatically
switch off if the battery power
is too low.
I/O connector
For USB cable
or charger
e616V
When the battery runs out,
the following image will blink
on the handset’s screen:
If low power occurs during a
call, you will see the warning
image and hear an intermittent
alarm, and your call will
be disconnected after
approximately 60 seconds.
1 First rotate the rubber
protective cover, then
connect the charger plug to
the handset I/O connector.
1.3
Low battery alarm
The battery’s power levels
(4 levels) are indicated by
the following icons:
Get ready to go
e616V
1.4
Battery use
Installing a memory card
Your handset can support a Memory Stick Duo™ (memory card) with up to 128MB.
Battery performance depends
on many factors, including
signal strength, the features
and / or settings you select
and use, and your voice,
data and other application
usage patterns.
Battery care
To prevent injuries or burns,
do not allow metal objects to
contact or short-circuit the
battery terminals.
To maximise your
battery’s performance
Always use NEC Original™
batteries and battery chargers.
NEC’s handset warranty does
not cover damage caused from
using non-NEC batteries and /
or battery chargers.
New batteries or batteries that
have been stored for long
periods of time may require
a longer charge time.
If you don’t intend to use the
battery for a long period of
time, remove it from the
handset and store it in a
place with low humidity
and low temperature.
Over extended periods of time,
batteries gradually degrade
and require longer charging
times. This is normal. If you
charge your battery regularly
and notice a decrease in talk
time or an increase in charging
time, then it’s probably time to
buy a new battery.
Extending battery life
● Turn off your handset
screen’s backlight
The backlight uses power.
To turn it off, see page 3.6.
You can use this memory
card to store photos, videos
or audio, calendars, To Do
entries and contact entries
(as vCard files).
How to install
the memory card
Always switch off the handset
before inserting or removing
the memory card.
How to remove
the memory card
1 Push the memory card into
the slot. This will release the
card from the slot.
Avoid the Vibrate
ring setting
Your handset’s Vibrate
setting uses more power
than a standard ring sound
or the Silent setting.
To change alert profiles,
see page 3.7.
Please read important
instructions on the memory
card in Section 10 – NEC’s
health and general safety
information.
Push the memory card fully
into the Memory Stick Duo™ slot
on the side of your handset,
as shown below.
2 Carefully pull the memory
card out of the slot.
●
How to format
the memory card
Before you can use the
memory card, you need
to format it:
1 Press
2 Scroll to
The rechargeable batteries that
power your handset must be
disposed of properly and may
need to be recycled. Refer to
your battery’s label for battery
type. Contact your local
recycling centre for proper
disposal methods. Never
dispose of batteries in a fire
because they may explode.
3 Scroll to Memory Card Tool
4 At Format mem. card
press
5 Press Yes
Formatting the memory card
will erase all previously
stored data.
Maintain the battery at or
near room temperature
when charging.
1.5
e616V
Get ready to go
Get ready to go
e616V
1.6
There’s tons of stuff you can do on your handset
– if you know how.
This section helps you to get to know your
handset. It shows you how to navigate around
functions, which keys do what, and what each
of the symbols and icons mean.
2.1 – 2 > Getting to know your NEC e616
2.3 – 4 > Your handset’s start screen
2.5 – 6 > Your handset’s keys and navigation
Your
2
handset
explained.
Getting to know your NEC e616
Familiarise yourself with its features.
Camera (front)
Speaker
Earpiece
Front display
screen
Screen
Left soft box
displays a variety
of prompts.
Right soft box
displays a variety
of prompts.
Options menu key
Left soft key
activates the prompts
displayed on screen
in the left soft box.
Microphone
Camera light
Right soft key
activates the prompts
displayed on screen
in the right soft box.
LED indicator
Triangle key
opens the browser to
3 services, connecting
you to a world of
communications,
information and
entertainment.
Menu key
takes you to the task menu
from any screen.
Send key
to make voice calls and
view outgoing calls
End key (On / Off power)
to end calls and services.
Camera (back)
Volume
keys
Headset
connector
Keypad
Clear key
I/O connector
for USB cable or charger.
Internal antenna
2.1
e616
Your handset explained
Memory
Stick Duo
card slot
Your handset explained
e616
2.2
Your handset’s start screen
Your handset’s screen is divided into four basic displays: the icon
indicator bar; a central window that includes the start screen; the prompt
bar; and the shortcut icons display. Each of these is described below:
1 The icon indicator bar
The icon indicator bar shows
what operations are taking
place and reminds you of
battery and signal strength.
This appears through all
activity. The table opposite
gives a brief explanation of
the icons and their functions.
2 The start screen
The central window of your
start screen displays an
image of your choice.
When in use, this screen
will display all of your
functions and services.
Icon
Description
Battery level – indicates the amount of power in your battery.
Weak
Strong
Message – indicates when you have a new text, multimedia or video message.
Signal strength – indicates the strength of your handset’s connection with
the network. You cannot make or receive calls when the
’no signal’
indicator is displayed.
3G network – indicates whether you are in the 3 video service area. When outside
the 3 video service area, your handset roams onto
the voice and picture
network or another network when abroad.
3 services connection – indicates connection available for 3 services, including
multimedia messages.
USB is connected – indicates whether you are connected via USB cable to a PC.
Memory card – indicates a memory card has been inserted into handset.
Bluetooth connection – indicates the Bluetooth connection has been activated.
Global Positioning Service
3 The prompt bar
4 Shortcut icons
Shortcuts to applications from the start
screen. Your handset comes with eight
shortcuts already in place which can be
changed. See page 3.8.
The prompt bar displays
various prompts in the soft
boxes. These are activated
by pressing the appropriate
soft key under each one.
Connected
Connection failed
Multitasking – indicates the number of tasks you are carrying out simultaneously,
depending on the amount of simultaneous tasks being performed on your handset.
Handset profile
Meeting profile
Outdoor profile
Car profile.
Vibrate on – indicates whether the vibrate function is on or off.
Alarm clock – indicates whether an alarm has been set.
Calls diverted
2.3
e616
Your handset explained
Your handset explained
e616
2.4
Your handset’s keys and navigation
4
10
1 The Triangle key
This key is your one-touch
access to Today on 3 and a
world of communications,
information and entertainment.
(See Section 6.)
2 The Navigation key
This key acts like a joystick, it
allows you to scroll through
the screen menus to names,
numbers, features and
services. It also becomes your
directional control for games.
5 4-way Navigation
indicator
This group of icons indicates
what navigational movements
are available at the start screen
when using the Navigation key.
Press the Triangle key to access
3 services, scroll through the
menus by pressing up or down
on the Navigation key (services
will be highlighted row by
row). When you are within a
service, you can move between
pages by pressing left and right
on the Navigation key.
This key is used to take and
save pictures and videos.
6 The Enter key
3 The Menu key
This key takes you to the main
menu from any screen.
Once you have scrolled to your
desired choice, use the Enter
key to select it. This function
can be used in the majority
of screens.
4 The Option key
This key is a link to an additional
function or operation. You can
use this when you see three
dots on the bottom screen.
2.5
e616
Your handset explained
5
7 The Send key
10
6
This key is used to make
and answer calls and view
outgoing calls.
3
7
8 The End key (On / Off power)
1
2
9
8
This key is used to turn your
handset on and off (press for
2 secs) and to end calls and
close down applications.
9 The Clear key
This key has two functions. It will
take you back to your previous
screen (not while in 3 Services)
and when in a text entry screen,
it acts as a delete key.
10 Soft keys
The left and right soft keys
activate the prompts that
appear in the soft boxes
directly above them on the
screen. These prompts change
according to the screen content.
Shortcuts
In the majority of menu screens there will be a number,
to
, to the right of each option.
Pressing the corresponding number on your keypad takes you straight to your desired screen, and
saves you from having to scroll and select that option. See pages 3.1 and 3.2.
Your handset explained
e616
2.6
Now you know your way around your handset,
we’ll show you how to do things like setting the
time and date, adjusting settings, choosing
your personal profiles – and turning your
handset on and off!
It starts with a quick explanation of how to
follow the detailed instructions so you can get
going right away.
And there are some nifty shortcuts too.
3.1 – 2 > How to use this guide
3.3
> Turning your handset on and off
3.4
> Setting the time and date
3.5
> Copying contacts from your SIM to your handset
3.6
> Setting the handset screen’s backlight timeout
3.7
> Choosing ringtunes and alert profiles
3.8
> Creating your own shortcuts
3.9
> Displaying your handset number
3.10
> Choosing a text entry method
3.11
> Text entry shortcuts
3.12
> General shortcuts
Getting going.
3
How to use this guide
Example page
This guide gives you a visual shorthand, a written explanation, and an
example of what you see every time you do something.
Choosing ringtunes and alert profiles
Your handset rings or vibrates to notify you of an incoming call, message or event.
You can set different profiles, ringtunes and vibrations. Your profile is displayed above
the prompt bar at the start screen.
The hand icon indicates what buttons / keys you press en route to a
destination screen for the service you require.
From the start screen
Confirming or
performing an action
The steps required to
arrive at a destination
Some steps start with the
4-way arrow symbol .
This represents scrolling with
the Navigation key to a
function (menu items and
services are shown as a name
and / or an icon).
Toolbox
Calendar
Shortcuts
or
(
...9...1...
)
Settings
Handset settings
You will be prompted on
your handset's screen by
options such as Add,
Cancel, Link this, New,
OK etc. These indicate
which entry to scroll to
or the soft keys required
to complete the action.
An alternative way to get straight to a chosen destination is to press the menu key followed by a
selection of numbers. Next to most menu items there are numbered options. Using the keypad to
key in the shortcut number sequence (
to
) saves you from having to scroll to the service
or function by showing you exactly what you need to press to reach your desired screen.
Handset profile
Standard profile
or
(
...8...1...1...2...
From the start screen
●
Press
●
Scroll to
●
At Handset settings press
●
At Handset profile press
●
The eye icon indicates what you will see at the destination screen.
●
To change profiles:
and press
3.1
e616
Getting going
●
Press
●
At Handset profile press
●
Scroll to your preferred profile: Standard /
Meeting / Outdoor / Car
Scroll to Ring volume / Ringtunes / Illumination /
Vibration pattern and press
Scroll to your preferred profile: Standard /
Meeting / Outdoor / Car
Turning off the keypad tone:
●
Press
●
Scroll to
●
At Handset settings press
and press
●
At Handset profile press
●
Select your preferred profile and press
●
Scroll to Standard profile and press
●
Press OK
●
Scroll to Other settings and press
●
At Key tones scroll to Off and press
The brain icon indicates a written explanation of the entire function.
The text under the brain icon is split into two sections. First, an explanation of the steps needed to get to
the service or function. Then, below the arrow icon, a description of how to use that service or function.
)
3.7
e616
Getting going
Getting going
e616
3.2
Turning your handset on and off
Setting the date and time
Ensure that your SIM is in your handset and the battery is charged.
After turning your handset’s power on for the first time, you will be asked to set your
home (local) time. You need to set the date and time before you can use your Calendar
and other functions. Once set, this will also help the speed of 3 services.
(2 seconds)
To turn your handset on:
To turn your handset off:
Press and hold the End key
(On / Off power) until the
power is on.
Press and hold the End key
(On / Off power) until the
power is off. There may be
some delay while the handset
powers down. Do no re-power
the handset during this time.
The term ‘press and hold’ is
equivalent to a key press time
of approximately 2 seconds.
From the start screen
Yes
From the start screen
●
●
●
Press
●
●
Your handset screen displays Do you wish to
set the home time?
Press Yes
At
enter the date (day / month / year)
Scroll to
and enter the current time
(24 hour clock)
If you are in the summer time zone:
●
Scroll to
●
Press OK
and press
To change the time:
3.3
e616
Getting going
●
Press
●
Scroll to
●
Scroll to Date and time and press
and press
Getting going
e616
3.4
Copy contacts from your SIM to your handset
Setting your handset screen’s backlight timeout
If you have any contacts stored on your SIM card, we recommend you first copy them
to your handset. Doing this makes it easier for you to access your contacts.
This is a power saving feature that turns off your handset screen’s backlight when it
is inactive for a selected idle time. Your screen reactivates if you press a key or receive
a call. The default setting is 15 seconds.
From the start screen
Contacts
Settings
Folder
Handset settings
USIM contacts
Handset profile
Standard profile
or
●
Press
●
At
To copy all the contacts from SIM
to handset:
●
Press
●
●
Scroll to Folder and press
●
●
Scroll to USIM contacts and press
●
Press
●
Scroll to Copy and press
press
(
From the start screen
●
Press
Scroll to All contacts and press
●
Scroll to
Scroll to Handset contacts and press
●
At Handset settings press
●
At Handset profile press
●
Scroll to Standard profile press
Note: Copying contacts from your SIM card
to your handset will take about 60 seconds.
You cannot copy your contacts onto the SIM
card from your handset.
...8...1...1...2...
)
●
●
and press
●
●
Scroll to Backlight and press
Scroll to Backlight time and press
to delete current settings
Enter your preferred backlight time out
eg 10 (secs)
Press OK
To copy the current contact:
●
Scroll to This contact and press
3.5
e616
Getting going
Getting going
e616
e616
3.6
Choosing ringtunes and alert profiles
Creating your own shortcuts
Your handset rings or vibrates to notify you of an incoming call, message or event.
You can set different profiles, ringtunes and vibrations. Your profile is displayed above
the prompt bar at the start screen.
You can create shortcuts to your most frequently used services, eg Calendar, which will
then feature on your screen’s desktop or the Quick Menu link.
From the start screen
Toolbox
Handset profile
Calendar
Link this
or
From the start screen
●
Press
●
At Handset profile press
●
●
To change ringtune profile:
Scroll to your preferred profile: Standard /
Meeting / Outdoor / Car
Turning off the keypad tone:
●
Press
●
Scroll to
At Key tones scroll to Off and press
●
Press
●
Scroll to
●
At Handset settings press
●
At Handset profile press
●
and press
●
Scroll to your preferred profile: Standard /
Meeting / Outdoor / Car
Scroll to Ring volume / Ringtunes / Illumination /
Vibration pattern and press
At Handset settings press
●
At Handset profile press
●
Select your preferred profile and press
●
Scroll to Standard profile and press
●
Press OK
●
Scroll to Other settings and press
e616
Getting going
Press
●
Scroll to
●
At Calendar press Link this
and press
●
3.7
●
●
(
...9...
)
To change the order of your shortcuts:
and press
At Add to Home press
To use your shortcuts from the start screen:
●
Press
●
Scroll to your preferred shortcut
●
Press
●
Press
●
Scroll to your preferred shortcut
●
Press Move
●
Scroll left or right and press Place
To add to Quick Menu:
●
Scroll to Add to Quick Menu
Getting going
e616
e616
3.8
Displaying your handset number
Choosing a text entry method
A shortcut to display your 3 phone number.
While writing a message, entering contact details, and appointments etc, you will need
to select an appropriate text entry method.
There are four types of
text entry:
a text box. The symbol input
mode is activated by pressing
the
key.
• Multitap Text (ABC) Input
Using ABC mode
• T9® Text Input
Use the keypad to enter
letters, numbers, symbols,
and other characters with the
mode. Press the same key
repeatedly to cycle through
available characters.
Text entry rules
Contacts
• Numeric Input
or
●
Press
●
At
●
Press
(
press
...5...
• Symbol Input
)
The multitap, T9® and numeric
input modes can be changed
by pressing Mode when within
●
Scroll to Folder and press
●
Scroll to Own number and press
Entry Method
Description
Multitap Text
Input
You press each key as many times as needed to display the character
you want to enter.
T9® Text
Input
You press each key only once, even if the character you want is not the
first character on the key.
Numeric
Input
If you want to input a series of numbers, you need to change to NUM
mode or press and hold the particular key for three secs.
Symbol Input
By pressing the
key in the or mode, the Symbol Input
mode will be turned on. Select the symbol by using the Navigation key
to scroll up, down, left or right and select the corresponding number on
your keypad.
3 phone number:
●
3.9
e616
Getting going
If you do not press a key for
two seconds, the character in
the block cursor is accepted,
and the cursor moves to the
next position.
At Own no. (1)
Getting going
e616
e616
3.10
Text entry shortcuts
General shortcuts
Use the chart below as a guide for entering numbers, letters, symbols, spaces
and other characters.
Use the chart below as a guide for general navigation shortcuts and key functions.
Key
Key
Function
Function
To create messages
Today on 3. Also returns you to Today on 3 from any browser page
Moves the cursor left or right, up or down
Z–A list of your contacts – from the start screen
A–Z list of your contacts – from the start screen
When editing text, switches between ABC (multitap)
NUM (numeric) and T9 (predictive text) .
Missed calls list – from the start screen
,
Calls received list (including missed calls)
Deletes 1 character
Deletes entire text
(3 secs)
To access your video clips, press
and scroll to
Inserts a space
To access your audio files, eg songs, press
and scroll to
Enters 0–9
Volume setting (on the left side of your handset)
Switches between shift and caps
Switches to the symbol mode
New line
(3 secs)
(5 secs)
1
Switches task when multitask activated
Sets the profile (Standard, Meeting, Outdoor and Car)
Back to previous screen (not on Today on 3)
(3 secs)
Enters 0–9 (when in T9 and ABC mode)
To copy, cut and paste text
3.11
e616
Getting going
Option key is a link to an additional function or operation.
You can use this when you see three dots on the bottom screen
Getting going
e616
3.12
T +44 (0)117 317 9293
F +44 (0)117 317 9294
This finished artwork has been checked and approved for production by
on behalf of Dutton Merrifield
Date
on behalf of Client
Date
T +44 (0)117 317 9293
F +44 (0)117 317 9294
INTERNAL SIGN-OFF
Any new/retouched imagery?
■ (Y/N)
Cromalin?
■ (Y/N)
This finished artwork has been checked and approved for production by
IMPORTANT – PLEASE NOTE THAT FINAL APPROVAL IS THE
RESPONSIBILITY OF THE CLIENT.
Client
Account Director/Client Services Director
Date
Designer/Creative Director
Date
Copywriter
Date
Artworker
Date
Artworker 2
Date
Account Handler
Date
Job Name
Job Number
Contact Name
Finished Size/Format
No of Pages
Colours
Special Requirements
Choosing ringtunes and alert profiles
Your handset rings or vibrates to notify you of an incoming call, message or event.
You can set different profiles, ringtunes and vibrations. Your profile is displayed above
the prompt bar at the start screen.
From the start screen
Settings
This page isnt
to be printed
but is part of
or (
the document
Handset settings
Handset profile
Standard profile
From the start screen
●
Press
●
Scroll to
●
At Handset settings press
●
At Handset profile press
●
●
To change profiles:
and press
●
Press
●
At Handset profile press
●
Scroll to your preferred profile: Standard /
Meeting / Outdoor / Car
Scroll to Ring volume / Ringtunes / Illumination /
Vibration pattern and press
Scroll to your preferred profile: Standard /
Meeting / Outdoor / Car
Turning off the keypad tone:
●
Press
●
Scroll to
●
At Handset settings press
and press
●
At Handset profile press
●
Select your preferred profile and press
●
Scroll to Standard profile and press
●
Press OK
●
Scroll to Other settings and press
●
At Key tones scroll to Off and press
3.7
e616
Getting going
You can make and receive both voice and
video calls on your new NEC e616V. The
following pages show you how.
They also tell you about a range of useful
functions that make it really easy to
manage your calls.
4.1
> Making a voice or video call
4.2
> Receiving a voice or video call
4.3
> Making a call from Contacts
4.4
> Grouptalk
4.5
> Caller ID
4.6
> Diverting incoming voice, video and fax calls
to an alternative number
Making and
receiving calls.
4
Making a voice or video call
Receiving a voice or video call
By entering the number.
When a voice or video call is made to your handset, the handset will ring or
vibrate, depending on your settings.
Incoming call
From the start screen
(number)
From the start screen
●
To take a voice call off hold:
Enter the number including the full area code.
To delete a digit press
. To delete all digits
press and hold
for a few seconds.
●
Press
to make a voice call
●
Press
To hide your image during a video call:
●
Press
●
At Use photo instead press
to make a video call
To put a voice call on hold:
●
To show your image:
●
Press
●
At Use live video press
Press Hold
4.1
2.1
Making and receiving calls
Incoming call
●
Press
To put a voice call on hold:
to answer the call
●
Press Hold
To take a voice call off hold:
or
●
Press Retrieve
●
Press
to finish the call
●
Press Retrieve
To hide your image during a video call:
●
Press
●
At Use photo instead press
To show your image:
●
Press
●
At Use live video press
Making and receiving calls
4.2
Making a call from Contacts
Grouptalk
It’s easy to call anyone whose number you have stored in your Contacts.
You can talk with up to two other people simultaneously.
From the start screen
From the start screen
(down)
(number)
(Enter first letter of contact)
(to preferred contact)
From the start screen
●
Press
to finish the call
●
Scroll down
●
Enter the first letter of the name of the contact
Making a call from your Recent Calls list
●
Scroll to your preferred contact
From the start screen
●
Press
Dialled calls list:
●
to make a voice call
or
●
●
Press
to make a video call
Press
Received calls list:
●
Press
(left)
To make calls from Missed Calls list:
●
4.3
2.3
From the start screen
Making and receiving calls
Press
(right)
●
Enter the first person’s number, including
the full area code
Press
to make the call
To drop one of the calls:
●
Press
●
Scroll to Grouptalk
●
Scroll to the number / name you wish to drop
●
Press Drop
Once the first call is connected:
●
Enter the second person’s number, including
the full area code
To finish both calls:
●
●
Press
to make the call
Press
The first call will be placed on hold
●
Press
●
Scroll to Join calls and press
Making and receiving calls
4.4
Caller ID
Handy if you don’t want the person you’re calling to know it’s you.
Diverting incoming voice, video and fax calls to
an alternative number
You can divert all your incoming calls to another number (such as your Voicemail)
or divert them only when your handset is busy, out of coverage or unavailable.
Settings
Settings
Supplementary
Supplementary
or
(
Call forwarding
)
...8...6...
or
●
Press
●
Scroll to
●
Scroll to Supplementary and press
and press
(
●
At Send my caller ID press
From the start screen
●
Scroll to Withhold and press
●
Press
●
Scroll to
●
Scroll to Supplementary and press
●
Scroll to Call forwarding and press
The next person you call will not see your
caller ID. For subsequent calls your Caller ID
will be shown.
)
...8...6...3...
●
●
and press
●
At Turn on press
Scroll to the type of call you want to divert:
Voice / Video / Fax / Data and press
Scroll to your preferred divert option: All calls /
If no answer / If busy / If unreachable
●
Enter the alternative number
●
Press OK
Note: Video calls can only be diverted to another
3 video mobile number. To check your number,
see page 3.9.
4.5
2.5
Making and receiving calls
Making and receiving calls
4.6
These days it’s not just one phone number you
need to remember, there are people’s home
and work numbers, mobile numbers, and
email addresses.
Luckily, you can store them all on your handset
using Contacts.
Your handset also provides you with far more
than a way to make and receive calls. The media
centre on your NEC e616V lets you take a photo or
a video clip, and play downloaded audio clips.
5.1
> Storing a contact
5.2
> Editing a contact
5.3
> Searching and deleting a contact
5.4
> Copy contacts from your SIM to your handset
5.5
> Copying contacts from your handset memory to your SIM card
5.6
> Taking a photo and setting it as your wallpaper
5.7
> Making a video, playing or deleting a video clip
5.8
> Play an audio clip
Contacts and
media centre.
5
Storing a contact
Editing a contact
Your Contacts will give you quick access to names, numbers and email addresses. You
can also store a number to your Contacts when dialling by pressing Add after all the
digits are visible on the screen.
It’s easy to keep up to date with changes to your contacts’ details.
From the start screen
From the start screen
(down)
(number)
Enter first letter of contact
Add
(to preferred contact)
From the start screen
●
●
Enter the contact number, including the full
area code or mobile code
Press Add
To add additional contact details – second
number, email or image:
●
Press
●
At
●
Press
press
●
At Name enter contact’s name and press
●
Scroll to Edit contacts and press
●
Scroll to Category
●
Scroll to relevant field to edit and press
●
Press OK
●
●
Scroll right to select Mobile / Home /
Office / Other
Press OK to store the contact
5.1
e616V
Note: You can only add an image to a contact
stored in your handset memory.
Contacts
From the start screen
To add an image to your contact:*
and press OK
●
Scroll down
●
Scroll to
●
Enter the first letter of the name of the contact
●
Scroll to Image files and press OK
●
At My photos press
●
Scroll to your preferred image and press
●
Press OK
●
●
Scroll to the contact you want to edit and
press
twice
Scroll to the relevant field(s) to edit
and press
●
Edit the contact
●
Press OK twice to store the changed contact
*You first need to take a picture.
See page 5.6 for details.
Contacts
e616V
5.2
Searching and deleting a contact
Copy contacts from your SIM to your handset
You can access your contact details in a matter of seconds.
Contacts
Contacts
(name)
Folder
●
Press
●
At
To delete a contact’s number:
●
Enter the first letter of the name of the contact
press
To completely delete a contact:
●
Press
●
Scroll to your preferred contact and press
●
At
●
Scroll to the number you want to delete
●
Press
●
Scroll to All contacts and press
●
Press
●
Scroll to Folder and press
●
Scroll to Handset contacts and press
●
Scroll to Delete and press
press
●
Scroll to your preferred contact
●
At Selected data press
●
Scroll to USIM contacts and press
●
Press
●
Press Yes
●
Press
●
Scroll to Delete
●
Scroll to Copy and press
●
At Selected data press
●
Press Yes
Note: Copying contacts from your SIM card
to your handset will take about 60 seconds.
To copy the current contact:
●
5.3
To copy all the contacts from SIM
to handset:
e616V
Contacts
Scroll to This contact and press
Contacts
e616V
5.4
Copying contacts from your handset memory to
your SIM card
When copying contacts from handset memory to the SIM card, not all contact details
(eg pictures) will be copied to the SIM card.
Taking a photo and setting it as your wallpaper
You can take photos and store them in a library on your handset. If you insert a memory
card all pictures are automatically stored onto it. To use your camera’s light, press
and select Camera light.
From the start screen
Camera
Contacts
Photo
Folder
Handset contacts
●
Press
●
At
●
Press
●
Scroll to Folder and press
●
At Handset contacts press
press
From the start screen
Press
●
Press
left
●
Press Camera
●
Press
●
Scroll to Copy and press
●
Press Photo
●
Scroll to
●
Scroll to your preferred picture
To copy the current contact:
●
Scroll to This contact and press
To copy all the contacts from handset to SIM:
5.5
e616V
Contacts
Viewing and deleting a photo:
●
and press
●
Point the camera at your subject
●
Press
●
Press
●
Scroll to Delete and press
●
Press Yes
to take photo
To set a picture / image as a wallpaper:
●
Scroll to All contacts and press
●
Press
●
At USIM contacts press
●
Scroll to
●
Scroll to your preferred picture and press
●
Press
●
Scroll to Set as Wallpaper and press
and press
Note: To switch the camera view between back
and front, press
and at Switch Camera
press
Contacts
e616V
5.6
Making a video, playing or deleting a video clip
Play an audio clip
You can send video clips of up to 11 seconds to other 3 customers. To use your camera’s
light, press
and select Camera light.
If you have songs stored on your handset or memory card, you can use your handset as
an MP3 player and listen to the songs.
From the start screen
Camera
Play music
From the start screen
●
●
Point the camera at your subject – your
handset’s screen acts as the viewfinder
●
Press
to start – you will hear a start sound
●
Press
right to zoom
●
●
●
Press
●
Scroll to
At My video press
●
At Select file press
Scroll to your preferred clip and press
●
Press Card
●
Scroll to your preferred clip and press
To play a video clip:
Press Camera
Press
to stop or allow it to run to
11 seconds
Press In to look towards yourself and Out
to look away from yourself
●
Press
●
At
●
●
and press
press
To delete a video:
●
Scroll to your preferred clip and press
●
Scroll to Delete and press
●
Press Yes
Note: To switch the camera view between back
and front, press
and at Switch Camera
press
5.7
e616V
Contacts
Contacts
e616V
5.8
Here’s where the real fun starts – behind the
Triangle key. One press takes you to 3’s huge
line-up of communication, information and
entertainment services.
Today on 3 starts you off with an overview of all the
latest on 3. Where you go from there is up to you.
6.1 – 2 > Understanding the Triangle key
6.3
> Getting to know the Services screen
6.4
> Today on 3
6.5 – 8 > The service icons
6.9
> Using the quick link icons
6.10
> Accessing the football services
6.11
> How to set Goal Alerts for your football team
6.12
> Downloading and storing a goal from an alert
6.13
> Extras – ringtunes
6.14
> Finding a game
6.15
> Playing a game
6.16
> Setting your favourite locations
6.17
> Using Quick Map
6.18
> Using A to B
6.19
> Using My Nearest
6.20
> Viewing the latest news
6.21
> Setting up a financial portfolio
Today on 3.
6
Using Today on 3
The key to 3 Services is the Triangle
key on your handset. It unlocks a
world of entertainment and
information that offers the thrill of
Premiership goals, Atari games and MTV videos,
plus the power of maps, directories and breaking
news. And much more. Read on.
Watch the hottest music videos, interviews and
best bits of MTV, or catch Pete Tong’s Fast Trax
for the latest from the dance scene.
Play great games.
Watch Barclaycard Premiership and UEFA Champions
League video match highlights, plus keep up to date
with the latest news from a range of other sports.
One press of
and you’re straight into Today
on 3 – the fastest way to find exactly what’s new
in the world of 3.
Today on 3 brings you the
pick of the day’s video,
audio and text stories on one
revolving screen. With
a few clicks, you’re straight
into the story.
In the morning, you get the
latest news, sports and
entertainment stories.
Later in the day, dip in and find everything
from MTV news and tomorrow’s weather to
the latest mobile games and ringtunes.
And you’re one click away from the full menu
of 3’s great services.
The
at the top of the Today on 3
screen gives you access to Search, Help and
Close menus.
Use loads of other useful services, like news
and weather, quick maps and video messaging.
There’s something funny going on.
6.1
Today on 3
Today on 3
6.2
Getting to know the Services screen
Today on 3
Today on 3 is the first screen you will see after pressing . It brings you the pick
of the day’s video, audio and text stories. The content is updated throughout the day,
seven days a week.
You can also select
at the top of the Today on 3 screen,
where you’ll find colourful icons like those below.
Each icon represents a 3 service you can select.
You can scroll through the Services screen by
pressing the Navigation key down. When you are
within a service, you can move between pages
by pressing left and right on the Navigation key.
When you reach the bottom left icon of the
handset’s Services screen, the next three icons
will appear. This is repeated until all remaining
icons have been displayed.
The
at the top of the screen allows you to
reorder, remove or add services. You can
personalise your Services screen by moving your
favourite and most often-used services to the top.
●
Press
To select the Services screen:
●
Scroll to your preferred service home page
There are two ways to download and play clips:
Quickplay is a faster way of watching videos.
The video won’t be stored on your handset.
This is available on some 3 services, eg News
and Top Shelf.
Save & Play content is downloaded and stored
on your handset.
To return to the ‘Today on 3’ screen from
any browser page, press
.
eg
Scroll to
●
Scroll to your preferred service icon, eg
home page.
Or
Scroll down to the story image / headline
and press
This will take you to the story.
To select Search / Help icon:
●
Scroll to
●
Scroll to Search / Help and press
Today on 3
and press
To return to Today on 3 from any page:
●
6.3
and press
and press
This will take you to the
●
●
Press
Today on 3
6.4
The service icons
The service icons
These service icons provide quick access to the best video clips and latest updates
within a service.
The key to 3 services.
Here are the service icons and a brief description of the services that lie behind them.
Football
Comedy
Showbiz
Catch up on the latest
Barclaycard Premiership and
UEFA Champions League action
in ‘Video Action’. See selected
goals, highlights and previews.
Get live score updates minutes
after the ball hits the back
of the net.
There’s something to suit
every taste here.
Keep up with who’s who in
the land of A-list celebrities.
Celebrity interviews supplied
by FHM will give you plenty
to talk about.
Take a trip down memory lane
and search through video clips
of classic Barclaycard
Premiership action. Relive those
golden moments (some of
which you might want to forget)
from Barclaycard Premiership
history updated weekly.
The best stand-up comedy
from Jongleurs.
Original and quirky mobile
animations, exclusive to 3.
Angry Kid – once seen,
never forgotten.
Iconic moments from classic
comedy that you’ll want to
relive over and over again.
Keep up with the kings and
queens of pop, rock and R’n’B.
Watch and listen to the
national forecast every day and
find out whether the brolly or
sunblock is required.
6.5
Today on 3
Box office chart – excerpts
from the top ten movies of
the week, updated weekly.
New releases and Pick of
the week – the best movies
of the week.
Music
Weather
Movies
Bringing you all the latest
videos and reviews. Let MTV
entertain you.
News
Sport
Games
Keep up to date with the
breaking stories from Reuters,
ITN and 2dayuk. Watch ITN
Headlines updated regularly
throughout the day.
Keep your eye on the latest
sports events brought to you
by ITN, TEAMtalk and Allsports.
Features include video and
text news bulletins with links
to Cricket, Rugby Union,
Rugby League, Tennis, Golf,
F1, Horse Racing, Boxing,
Athletics, Snooker etc.
Seriously good gaming.
Download and play to test
your mind and reflexes with
everything from fast-paced
shoot-’em-ups to retro action
and classic word brainteasers.
In-depth coverage of the day’s
biggest event in ‘Special
Report’, updated once a day.
Round-up of the highs and
lows from the City every
morning in ‘Business News’
(only available Monday
to Friday).
Plus, look up past features
in the news archive; amuse
yourself with the quirkiest
stories from around the world;
and get the Lotto results
straight after the draw.
Horoscopes
Extras
Stand out from the crowd.
Transform your handset
with original ringtunes
and imaginative screen
wallpaper designs.
Want to see what your future
holds? Find out with weekly
and monthly horoscopes from
celebrity astrologer Claire
Petulengro. Claire combines
ancient Romany wisdom with a
dynamic and modern approach
to astrology, so make sure you
don’t miss her predictions for
the days ahead.
Catch Pete Tong’s Fast Trax
for the latest from the
dance scene.
Today on 3
6.6
The service icons
The service icons
The key to 3 services.
(continued from previous page)
The key to 3 services.
(continued from previous page)
Find
Quick Map
Finance
Message Maker
Alerts
Business Finder
Unfamiliar surroundings?
3 will help you find your place.
Call up a Quick Map of your
current or any other location
in Britain, then zoom in or out
for more details.
Keep track of the latest market
movements for informed
financial decisions, check share
prices and review UK indices.
Use the portfolio tool to track
your shares and, hopefully,
calculate your profits.
Have more fun with your
messages with these exclusive
cartoons and slideshows.
Send special greetings and
jokes for any occasion or just
to say ‘Hello’.
If it’s important to you – get an
alert. From knowing when your
team scores to whether you’ve
just won the lottery.
With around 2 million British
businesses in the 3 Business
Finder, you’re sure to find what
you’re looking for. Search by
name or business type, and
get the address and telephone
details. You can even get
a map and directions.
Travel
Top Shelf
A to B
My Nearest
Find what you want, when you
want it. Whether it’s the nearest
bank, pub or restaurant, results
arrive as an easy to read colour
map. You can also get the
address, and telephone
number if you need to call.
Find out how to get from
A to anywhere within easy
walking distance. Enter the
‘from’ and ‘to’ addresses and
get a full pedestrian map with
directions or a detailed route
plan, using language and
landmarks you’re familiar with.
Mail
As long as your mates have
got suitable handsets or email
access, you can send mail
containing any combination
of photos, audio, short video
clips and text.
Slideshows and videos from
Playboy, Mayfair, Escort,
MenOnly, Club International
and Mens World. Top Shelf is
only available to customers
over the age of 18 and a PIN
number is required.
3 has teamed up with
Lastminute.com to bring you
a booking service for flights,
hotels and holidays. You can
also reserve restaurant seats,
book entertainment tickets or
buy unusual gifts – what are
you waiting for?
Many services are updated regularly. Check out our
timetable on three.co.uk for more information.
Note: Some of these services may not be available
in the voice & picture service area.
For details, see the ‘Little book of stuff’.
6.7
Today on 3
Today on 3
6.8
Using the quick links icons
Accessing the football services
All links for Movies, Music, Showbiz and Weather can be accessed in a similar way.
This example shows how to access Comedy.
Enter into a world of football services, including news, match reports, live scores and video
clips. Exclusive FA Premier League content and UEFA Champions League goal action.
Football
Comedy
●
Press
●
At
press
To access the video clip again:
●
Scroll to
and press
●
Press
●
Scroll to Multimedia Centre and press
●
Scroll to Play video and press
At Select file press
●
Scroll to your preferred category and press
●
●
Select your preferred video clip and press
●
To view the clip without downloading:
●
At Quickplay press
To save the clip and watch:
●
Scroll to Save & play and press
●
Press Yes to watch the downloaded news clip
6.9
Today on 3
Scroll to the clip you want to view
and press
●
Press
●
At
●
Scroll to
press
and press
Choosing goal alerts for a team means that you
will receive alerts for all goals, half-time and
full-time scores for league games that your
chosen team plays in.
You can also keep up to date with the latest news
of your favourite football club with our news
alerts service. Only available for Premier League,
English Division 1, Rangers, and Celtic.
You can choose to receive the following
video alerts for Premier League teams for
the 2003 / 2004 season.
●
●
●
Goals scored in the Pay-Per-View match in
which your team is playing.
Half-time highlights from the Pay-Per-View
match in which your team is playing.
Full-time highlights from all Premier League
matches in which your team is playing.
The Pay-Per-View matches are those matches
that are shown live on satellite or cable television
for which subscribers must pay an additional
fee to watch.
Today on 3
6.10
How to set Goal Alerts for your football team
Downloading and storing a goal from an alert
To alert you to goals, half-time and full-time results, including Premier League video
action alerts for the 2003 / 2004 season. This feature is only available after you have set
up your alerts.
If you set up an alert for your favourite Premier League team, 3 will send you a text
message containing a link to the latest video, to keep you right up to date with the action.
Msg
Inbox
Football
preferred alert message
Alerts
highlighted link
●
Press
●
At
press
●
Scroll to
and press
●
Scroll to Alerts and press
●
●
Scroll to your preferred league or division
and press
Scroll to your preferred team check box
and press
●
Scroll to your preferred alert type and press
●
Scroll to Continue and press
●
Press Msg
To view the goal clip without downloading:
●
At Inbox press
●
●
Scroll to your preferred alert message
●
At the highlighted link press
To save the goal clip and watch:
Your handset will display the latest scores.
●
Scroll to Save & play and press
At the highlighted score link press
●
Press Yes to watch the downloaded clip
●
Your handset will display You have successfully
chosen Football Goal alerts service.
●
6.11
Today on 3
Scroll to Done and press
your alert
to confirm
At Quickplay press
Note: You can only receive video goals for
Premier League clubs.
Today on 3
6.12
Extras – ringtunes
Finding a game
Personalise your handset from our range of polyphonic ringtunes.
Download a game to your handset, from fast-paced shoot-’em-ups to retro action and
classic brainteasers.
Extras
Games
Ringtunes
●
Press
●
At
●
Scroll to
●
Scroll to Ringtunes and press
●
press
Scroll to Buy ringtune and press
●
Press
●
Press Yes / No to play the ringtune
●
At
press
To play the game, see page 6.15.
●
Scroll to
and press
●
Scroll to your preferred game and press
Each game has specific information about what
constitutes a single play of that game. Check the
Game information page for your game.
and press
Scroll to your preferred style of ringtune and
press
to see the list of available ringtunes
●
Scroll to your preferred ringtune and press
●
Scroll to Sample ringtune and press
●
Scroll to Hear sample and press
●
Press Quit
●
Press
6.13
●
(text)
Note: To set the downloaded ringtune,
see page 3.7.
●
Your handset will display a brief description
of the game.
Scroll to Select Download and press
Note: If you receive an incoming call, message,
or alert during gaming, your game automatically
pauses and can then be continued after your
call / message / alert.
<--- query?
Today on 3
Today on 3
6.14
Playing a game
Setting your favourite locations
Play a game you have already downloaded.
We recommend that you set your favourite locations upfront. This will save you from
having to enter them each time you use the service. So whenever you use Quick Map,
Find or A to B, your favourite locations will appear in a drop down menu.
Java
your preferred game
Find
●
Scroll to
●
Scroll to your preferred game and press
and press
●
At the selected game press
●
Press
●
Your game will automatically play
●
At
●
Scroll to
●
At Set my locations press
●
Scroll to Add location and press
●
At the query box press
Note: If you receive an incoming call, message,
or alert during gaming, your game automatically
pauses and can then be continued after your
call / message / alert.
●
Today on 3
and press
●
Scroll to the address you entered and press
●
Scroll to Rename and press
●
Scroll to the query box and press
●
●
●
6.15
press
Enter your preferred postcode or address.
Ensure that each line of the address is
comma separated, eg Baker Street, London,
and press OK
●
Enter the name for the preferred location,
eg home, and press
Scroll to Done and press
Scroll to Done below About my locations
and press
Note: A maximum of 5 favourite locations
can be stored.
Scroll to Add and press
Today on 3
6.16
Using Quick Map
Using A to B
An easy way to access an area map of your choice.
Get directions to where you want to go, from where you are now or from another location.
Quick Map
A to B
© Crown Copyright 2003
●
Press
●
At
press
Option 2
●
Scroll to
and press
●
●
You have two options to select a location:
●
Option 1
●
Scroll to My locations and press
●
Scroll to your preferred location and press
Scroll to the query box and press
Enter your preferred postcode or address. Ensure
that each line of the address is comma separated,
eg Baker Street, London, and press
Scroll to Find and press
●
Press
●
At
press
This instruction follows on from setting point
A. You are now required to set point B.
●
Scroll to
and press
Option 1
Set point A: You have two options
to set your desired start location:
Option 1
Zoom in and out
Pan up and down
Scroll to your preferred location and press
Option 2
●
●
●
Scroll to My locations and press
Scroll to your preferred location and press
Option 2
●
A map showing the area you have selected
will be displayed and your zoom out icon will
be highlighted.
Today on 3
Scroll to My locations and press
●
●
Pan right and left
6.17
●
●
Scroll to the query box and press
●
Scroll to the query box and press
Enter your preferred postcode or address. Ensure
that each line of the address is comma separated,
eg Baker Street, London, and press
Scroll to By foot and press
Enter your preferred postcode or address. Ensure
that each line of the address is comma separated,
eg Baker Street, London, and press
Today on 3
6.18
Using My Nearest
Viewing the latest news
Find a bank, restaurant, florist, or whatever you need, wherever you are. This example
shows how to find your nearest florist.
Keep up to date with news as it breaks.
News
Find
My Nearest
Florists
© Crown Copyright 2003
●
Press
●
At
press
Option 2
●
Scroll to
and press
●
Scroll to My Nearest and press
●
Scroll to Florists and press
●
●
●
You have two options to select a location:
Option 1
●
At My locations press
●
Scroll to your preferred location and press
6.19
Today on 3
Scroll to the query box and press
Enter your preferred postcode or address. Ensure
that each line of the address is comma separated,
eg Baker Street, London, and press
●
Press
●
At
press
●
Scroll to
and press
●
Scroll to your preferred news clip and press
Scroll to Find and press
A map showing the area you have selected
will be displayed and your zoom out icon will
be highlighted.
To view more news:
To view the news clip without downloading:
●
At Quickplay press
●
Scroll to World / National / Regional /
Oddly Enough and press
To set up a Lotto alert:
●
Scroll to Lotto results and press
●
Scroll to Lotto alert and press
●
Scroll to Set this alert and press
●
Scroll to OK and press
To save the news clip and watch:
●
Scroll to Save & Play and press
●
Press Yes to watch the downloaded news clip
Today on 3
6.20
Setting up a financial portfolio
Keep track of your stocks and shares.
Portfolio
My Portfolio
●
Press
●
At
●
Scroll to
●
At My Portfolio press
●
press
and press
●
Scroll to Proceed and press
●
At the query box press
●
Enter the name of your portfolio
●
Scroll to Submit and press
●
Scroll to My Portfolios and press
●
6.21
Today on 3
Your handset will display You currently have
no Portfolio, would you like to set one up?
At Your portfolio name press
rename, or delete a portfolio
to add shares,
With 3, as well as sending a text, you can send a
multimedia message by attaching video clips
and images, as well as audio.
Plus, our Mail service means you get all your
voicemail, email and faxmail conveniently
stored in one place.
7.1
> Setting up and listening to your Voicemail
7.2
> Creating and sending a text message
7.3
> Setting up your username
7.4
> Setting up your email profile
7.5
> Addressing a message using Contacts
7.6
> Capturing and sending a photo or video clip as a multimedia message
7.7
> Creating and sending a multimedia message
7.8
> Browsing into Mail
7.9
> Setting up your POP3 Email account
7.10
> Creating and sending emails – direct
7.11
> Accessing your handset email inbox
Messaging.
7
Setting up your Voicemail
Creating and sending a text message
Choose your PIN and record greetings by calling in from your handset. You can access your
mail from any phone by calling 07782 333123 or +447782 333123 when calling from
abroad, and entering your 3 phone number eg (07782 XXXXXX) and your new 4-digit PIN.
From the start screen
From the start screen
Msg
(123)
New
Text message
From the start screen
●
Enter 123
●
Press
●
to make the call
Once connected to 3, follow the voice
prompt and:
●
Choose a new 4-digit PIN and press
●
Confirm your new PIN and press
You will then be asked to record your name.
Your recorded name will be used to identify
messages you send to other 3 subscribers.
7.1
Messaging
Say your name clearly and press
You will then be asked to record a personal
greeting that callers will hear when they
reach your mailbox.
●
Say your greeting clearly and press
●
Press
to finish the call
To listen to your voicemail:
●
Enter 123
●
Press
to make the call
●
Press
to finish the call
From the start screen
●
Enter message and press
●
Press Msg
●
Scroll to
●
Press New
●
Press
●
At Text message press
and enter the contact details
or
and press Find
●
Scroll to
●
Scroll to the preferred contact and press
●
Press Use
●
Press Send
Note: To add more than one contact for the
text message, repeat Find and Use again.
Messaging
7.2
Setting up your username
Setting up your email profile
To use 3’s email service, you’ll first need to choose a username.
Once you have chosen a username, you need to set up email settings on your handset.
After this you can start sending and receiving emails on your handset.
From the start screen
Mail
Msg
Settings
●
●
Press
Scroll to
●
and press
Scroll to Enter Username and select a username,
eg johnsmith
If the username has already been taken, enter
another one. Try adding a number to your
username.
Once your username, eg johnsmith, is accepted,
your email address will be [email protected]
●
Scroll to Done and press
●
At Yes press
Note: We recommend you choose your username
carefully as it is an important element of your
Mail service.
7.3
Messaging
From the start screen
●
Press Msg
●
Press
●
Scroll to Settings and press
●
Scroll to Email and press
●
At Email server one press
To create and receive mail on your handset
Email application, you must enter your username,
password and return address.
Mandatory information – requiring your set up
Setting
Description
Name
Enter your 3 phone number in
international format without
plus (+), eg 447782XXX XXX.
Password
Enter your 4-digit PIN as setting
up your voicemail.
Email address Enter your full email address
– eg [email protected]
(same as your username)
Note: When entering user ID and password, ensure
that you have selected 123 mode. Press Mode.
Messaging
7.4
Addressing a message using Contacts
This is a shortcut for sending a text, video or multimedia message.
Capturing and sending a photo or video clip as
a multimedia message
You can record up to 11 seconds of video.
From the start screen
From the start screen
(down)
Camera
Photo
(first letter of contact)
(preferred contact)
Msg
From the start screen
●
At My videos press
From the start screen
●
Scroll down to your Contacts list
●
Scroll to your preferred video clip and press
●
●
Enter the first letter of your contact
●
Press OK and then press Send
●
Scroll to your preferred contact and press Msg
To send a text message:
To send a multimedia message:
●
Scroll to Multimedia msg press
●
Enter the text of your message and press
●
At Text message press
●
Press
●
Enter message and press
●
At Insert Item press
●
Press Send
●
Scroll to Image / Music / Sound / Video press
To send a video message:
to insert images, audio or video
●
Open the media folder
●
Scroll to Video message and press
●
Scroll to your preferred media file and press
●
Scroll to
●
Press OK and then press Send
●
and press
At Video files press
7.5
Messaging
Point the camera at your subject – your handset’s
screen acts as the viewfinder. (If you want to take
a photo, press Photo.)
●
Scroll to
and press
enter the contact details
●
Scroll to
and press Find
●
Scroll to your preferred contact and press
●
Press Use
●
Press OK
●
Press Send
●
Press Camera
Press
(left) to zoom
or
To capture a video:
●
Press
(press
run to 11 seconds)
to stop or allow it to
●
Press Send
●
Scroll to Video msg and press
Note: To add more than one contact for the
multimedia message, repeat Find and Use again.
Messaging
7.6
Creating and sending a multimedia message
Browsing into Mail
You can send text, photos and audio clips as a multimedia message.
From the 3 browser, you can also view emails and headers of voicemails and faxmails.
You can also create new emails to send.
From the start screen
Mail
Msg
New
Multimedia msg
●
Press OK
●
Press Msg
●
Scroll to
●
Create and send email messages
●
Press New
●
Scroll to your preferred contact and press
●
View email, voicemail and faxmail in your inbox
●
Scroll to Multimedia msg press
●
Press Use
●
View sent, draft and trash folders
●
Press OK
●
Create and manage personal folders
●
Press Send
●
View, add and manage Contacts
●
Print mail to any fax machine
From the start screen
●
Enter text of message and press
●
Press
●
At Insert item press
●
Scroll to Image / Music / Sound / Video press
●
Open the media folder
●
Scroll to your preferred media file and press
7.7
and press Find
to insert images, audio or video
Messaging
●
Press
●
Scroll to
From the browser you can:
and press
Note: To add more than one contact for the
multimedia message, repeat Find and Use again.
Messaging
7.8
Setting up your POP3 Email account
Creating and sending emails – direct
You can use your handset to collect emails stored in your other email accounts once
you have completed the configuration to access them.
Using the email application on your handset.
From the start screen
Mail
Msg
New
Settings
Email
Manage other Mail
Add new account
●
Press
●
Scroll to
●
Scroll to
●
Scroll to Settings and press
●
Scroll to Manage other Mail and press
●
Scroll to Add New Account and press
7.9
and press
and press
Messaging
Enter details of the other email accounts as
required (information is provided by your email /
internet service provider). Once you have set up
details of your other accounts, you can collect
mail from these accounts by selecting Check for
new mail from the Mail home page.
From the start screen
●
Write your message and press
●
Press Msg
●
Scroll to
●
Press New
●
Press
●
Scroll to Email and press
and enter the email address
or
●
●
Press Find
Scroll to your preferred contact with email
address and press
●
Scroll to the email address and press Use
●
Press OK
●
Press Send
●
Press Yes
Messaging
7.10
Accessing your handset email inbox
From the start screen
Msg
From the start screen
To reply to the email:
●
Press Msg
●
Press Reply
●
Scroll to 3mail and press
To download an attachment:
●
Scroll to your INBOX and press
●
Press Attach.
●
Scroll to your preferred email and press
●
Scroll to your preferred attachment and press
To save an attachment:
●
7.11
Messaging
Press Save
Going to the dentist? Got a hot date? Use your
handset’s Calendar feature to remind you of
your appointments.
Another big plus of your NEC e616V is that you
can connect it to a Bluetooth™ headset and
have the freedom to make and receive calls
handsfree and wire-free.
You can also connect to a computer to transfer
your Contacts and Calendar information to your
PC, so they’ll be safe should your handset ever
be lost or stolen.
8.1
> Storing an appointment in the Calendar
and setting the alarm
8.2
> How to set an alarm
8.3
> Connecting and activating a Bluetooth headset
8.4
> Transferring files
8.5
> PC synchronisation
8.6
> Installing PC File Transfer software
8.7 – 8 > Transferring files from PC to handset
8.9 – 10 > Installing Intellisync software
Appointments and
synchronisation.
8
Storing an appointment in the Calendar and
setting the alarm
How to set an alarm
You can use your handset as an alarm clock.
The Calendar lets you schedule and organise events such as appointments and meetings,
and you can review your schedule of appointments by the week or by the day.
Toolbox
Toolbox
Calendar
Alarm clock
or
(
...9...1...
)
or
●
Press
●
Scroll to
●
At Calendar press
●
●
Press New
●
●
At Appointment press
●
●
●
●
Deleting an appointment from your Calendar:
and press
●
At Contents, enter the details of
your appointment
●
●
At Calendar press
Press
and
preferred month
to move to your
Scroll to your preferred appointment date and
press
Press Delete
Press Yes
Press
(
...9...3...
)
●
Press
●
Scroll to
To cancel the alarm once you have set it:
●
Scroll to Alarm clock and press
●
At Alarm1 press Edit
●
Press Turn off
●
Edit the alarm time
●
Press OK
and press
●
Press Off
To turn the alarm off when it is going off:
●
●
Scroll to each relevant field to enter the
appropriate details and press
Press OK
Scroll to each relevant field to enter the
appropriate details and press
Press OK
8.1
e616V
Appointments & synchronisation
Appointments & synchronisation
e616V
8.2
Connecting and activating a Bluetooth headset
Transferring files
Before placing calls with your Bluetooth headset, you must first set up the headset to
work with your handset. Once you do this, your handset will remember the headset’s ID.
See your Bluetooth headset user guide for details.
The NEC e616V PC File Transfer software (you’ll find this on the CD that comes with
your handset), enables you to transfer personal content such as Contacts and Calendar
appointments between your handset and PC / laptop.
Important note on
restrictions on file transfer
●
Connections
Bluetooth
or
(
...7...1...
)
●
●
●
Press
●
Scroll to
●
At Bluetooth press
●
and press
●
At All devices press
●
Scroll to Search and press
e616V
●
Enter device passkey, eg 0000
●
Press
You may only transfer
content appearing on
3 services if 3 advise
this is allowed.
Other content such as music
and football are copyright
protected. You are not
permitted to transfer this
content without the owner’s
consent. Illegal transfer
of content without this
consent will breach the
terms of your 3 agreement.
twice
To activate Bluetooth:
You’ll also need to set up your handset with the
Bluetooth headset – see your Bluetooth headset
user guide for details. In most cases, you’ll need to
press and hold the Multifunction Button (MFB)
until the indicator lights up – then release it.
8.3
Select your Bluetooth headset’s name and
press
You may transfer personal
content that you have
created, such as Contacts
and Calendar appointments,
as well as photos and
videos you have taken.
●
Press
●
Scroll to
●
At Bluetooth press
●
At All devices press
●
and press
Select your Bluetooth headset name
and press
Appointments & synchronisation
Appointments & synchronisation
e616V
8.4
PC synchronisation
The NEC e616V PC File
Transfer and synchronisation
software on the CD-ROM that
comes with your handset
allows you to access your
Installing PC File Transfer software
The NEC e616V PC File Transfer software must be installed to enable files to be
transferred between your handset and a PC / laptop.
personal information from
both your PC and handset, as
well as providing a backup of
your personal files.
How to install
the NEC e616V PC File
Transfer software
System requirements
Item
Requirements
Operating System (OS)
Windows® 98 Second Edition, Windows 2000 Professional
or Windows XP Home Edition / Professional.
CPU
Pentium® II 233MHz or more (or compatible CPU).
Memory
128MB (256MB or more recommended).
Monitor
800 x 600 pixels, high colour (16 bit or more recommended).
Other hardware
USB port and CD-ROM drive required.
1. Start Windows®. Ensure
other applications on your
PC are closed and that your
handset is not connected
to your PC.
2. Place the NEC e616V ‘Tools
and Utilities’ CD-ROM into
the CD-ROM drive.
3. The installation should
automatically begin.
If not, carry out the
following steps:
●
Hard disk space
●
WP-TCP setting software
5MB or more.
NEC e616V PC File Transfer software
7MB or more.
●
●
Microsoft®, MS, and Windows® are either registered trademarks or trademarks of Microsoft Corporation in the United States and / or
other countries. Windows 2000 Professional is an abbreviation for Microsoft® Windows® 2000 Professional operating system. Windows
XP Home Edition / Professional is an abbreviation for Microsoft® Windows® XP Home Edition / Professional.
●
The ‘Tools & Utilities’ CD-ROM enclosed in your handset box contains the following:
●
USB driver – enables you to
connect your handset to
your PC using a USB cable.
This driver will automatically
install when you connect the
handset to the PC for the
first time.
8.5
e616V
●
NEC e616V PC File Transfer
software – enables you
to transfer files between
your handset and a PC via
a USB cable.
Appointments & synchronisation
●
Intellisync for NEC e616V
software – allows you to
synchronise the Calendar,
Contacts and To do items
between your handset
and your PC.
●
Click My Computer
Click NEC e616V
Anglo-Italy
Choose the correct flag
to select your language
●
●
Follow the on-screen
instructions until the
installation is complete
Click Quit
Connecting your handset
to your PC
You will only need to install
these drivers once.
You may need to restart
your PC to complete the
installation.
1. Connect the handset to the
PC using the USB cable
provided.
Uninstalling the NEC e616V
PC File Transfer software
2. Your PC will detect the
new hardware and the
Windows® Hardware Wizard
will automatically start.
Should you wish to uninstall
the NEC e616V PC File Transfer
software for any reason, do
the following:
1. Open Control Panel.
2. Double-click the ‘Add /
Remove Programs’ icon.
3. Delete NEC e616V PC File
Transfer from the list.
Click e616V PC File
Transfer
Choose Click to install
the e616V PC File
Transfer software
3. Click Next to continue.
4. When prompted for the
location of the driver, make
sure the CD-ROM option is
selected. When the relevant
driver is found, click Next
to continue until completed.
This process will repeat until
the following have been
fully installed:
●
NEC e616V USB controller
●
NEC e616V USB Modem
●
NEC e616V USB Obex Port
●
The Install Wizard starts
with the message
‘Welcome to the Install
Wizard for e616V PC
File Transfer’
Appointments & synchronisation
NEC e616V USB
Command Port
e616V
8.6
Transferring files from PC to handset
To transfer audio files from
your PC to your handset, you
will need to format the files to
make them compatible with
the software on your NEC
e616V handset.
Please note that we do not
supply the software enabling
you to do this. You will need
to obtain the appropriate rights
to use such software if you
wish to do so.
Use of such software must
always be in accordance with
our terms and conditions
and in accordance with the
software supplier’s terms
and conditions.
Starting the NEC e616V PC
File Transfer software
3. Carry out the following
instructions on your
handset:
●
●
●
●
Press
Scroll to External
connection and select
Scroll to USB and select
Scroll to Handset memory
and select
Transferring files which are
already on your handset
will result in duplication.
Duplicate files will need to
be manually deleted from
the handset.
Transferring files from handset to PC
5. Select Send (PC -> Handset)
and click OK.
6. Select the PC folder where
the file is stored and carry
out the following
instructions on your PC:
●
●
Click Add to locate file
Select your preferred
file(s)
●
Click Open
●
Click Upload
●
The file will be sent
●
Click OK when transfer
is complete
Follow steps 1–3 from
‘Transferring files from PC to
handset’ on page 8.7 and then
continue with the following:
4. Select the type of file to
be received (Contacts,
schedule, melody, video,
audio, image or voice)
from the main screen.
Note: When transferring videos
or images, you must select the
correct folder on the NEC e616V
to transfer from. This can be
either Folder:VIDEO for videos
you have downloaded or
Folder:MY VIDEO for videos that
you have transferred in the past
or created using the handset.
6. Choose a file receive
option and click OK.
7. Select the PC folder to
save the file:
●
●
5. Click an icon or select the
type of file to be received
from the File menu. To
select individual files,
select Receive selected
file (Handset -> PC)
if available.
To use the folder
displayed on the Select
received folder screen,
click OK.
To change the folder,
click Select and choose
another folder and
click OK.
8. When Received is displayed
on your PC, the file
download is complete.
Click OK to continue.
4. Select the type of file to be
sent (video, image, audio,
Contacts, Calendar, To do,
voice or other files) from
the main screen on your PC.
1. Connect your NEC e616V
handset to the PC using
the USB cable.
2. Start the NEC e616V PC File
Transfer software on your
PC (eg, with the command
Start->Program>) and
the main NEC e616V PC
File Transfer screen
should appear.
8.7
e616V
Appointments & synchronisation
Appointments & synchronisation
e616V
8.8
Installing Intellisync software
Installing Intellisync software
The Intellisync software must be installed to enable Contacts, Calendar and To do
synchronisation between your handset and a PC / laptop.
(continued from previous page)
How to install
the NEC e616V
Intellisync software
To configure the PC with
MS Outlook
1. Start Windows®. Ensure
other applications on your
PC are closed and that your
handset is not connected
to your PC.
2. Place the NEC e616V Tools
and Utilities CD-ROM into
the CD-ROM drive.
3. The installation should
automatically begin.
If not, carry out the
following steps:
●
●
●
●
●
●
8.9
●
●
Follow the on-screen
instructions until the
installation is complete
Click Quit
4. Restart your PC to complete
the installation.
Once you have restarted your
PC, you will need to configure
the software. Note that
Intellisync Lite will only work
with Microsoft Outlook for local
synchronisation.
From the Configuration screen,
you can synchronise your
Contacts, Calendar or To do list
with MS Outlook.
To synchronise them all, just
check the box Use MS Outlook
for all supported sections.
To perform a
synchronisation
1. Connect your NEC e616V
handset to the PC using
the USB cable.
2. The first time you
synchronise, you must set
up the synchronisation
subject on the handset by
doing the following:
●
●
●
Press
Scroll to External
connection and select
Scroll to Synchronisation
and select
●
For Contacts, use server 4
●
For Calendar, use server 5
●
For To Do, use server 6
●
Scroll to the required
synchronisation task
and press Select
This will start the
synchronisation. If any
changes need to be
made, a dialogue box
will appear on the PC to
ask you to confirm the
changes. Press Accept to
agree to these changes.
Click My Computer
Click NEC e616V
Anglo-Italy
Choose the correct flag
to select your language
Click Intellisync for
NEC e616V
Choose Click to install
the Intellisync for
NEC e616V software
The Install Wizard starts
with the message
‘Welcome to the Install
Wizard for Intellisync Lite
for NEC e616V’.
e616V
Appointments & synchronisation
Appointments & synchronisation
e616V
8.10
Now you’ve got your new handset, make sure you
take precautions to prevent it from being used by
someone else in case it’s ever lost or stolen.
This section shows you how to lock the keypad
and set an unlock code.
9.1
> Setting the PIN code
9.2
> Changing your handset Call Barring password
9.3
> Auto-locking your handset
9.4
> Changing your handset lock security code
9
Security.
Setting the PIN code
Changing your handset Call Barring password
Your PIN (Personal Identification Number) code protects the information stored on
your SIM. We recommend that you change your PIN from the default to a new PIN.
You can control the way your handset is used by restricting outgoing or incoming calls,
including international numbers or calls while roaming.
Settings
Settings
Security
Supplementary
Set codes
Call restrictions
Activate PIN1
or
or
(
●
Press
●
Scroll to
●
Scroll to Security and press
●
Scroll to Set codes and press
●
At Activate PIN1 press
9.1
...8...5...2...1...
and press
e616V
)
●
At Enable press
●
Press
●
Enter the default code (0000) and press OK
●
Scroll to
●
Press
●
●
(
...8...6...4...
)
●
Scroll to Change password and press
●
Enter the default code (0000) and press OK
Scroll to Supplementary and press
●
Enter a new code
Scroll to Call restrictions and press
●
Re-enter the new code and press OK
and press
To change your PIN:
Security
●
Scroll to New PIN1 and press
●
Enter the default code (0000) and press OK
●
Enter a new code
●
Scroll to the next text box
●
Re-enter the new code and press OK
Security
e616V
9.2
Auto-locking your handset
Changing your handset lock security code
You can set your handset to auto-lock, locking it every time you turn it off. You’ll need
a code to unlock it, so if you lose your handset no one else will be able to use it
without the code.
Settings
Settings
Security
Security
or
(
...8...5...
Set codes
)
New handset code
or
●
Press
●
Scroll to
●
Scroll to Security and press
and press
●
At Locks press
●
Press
●
Scroll to Auto lock and press
●
Scroll to
●
At On press
●
●
Enter the default code (0000) and press OK
To unlock the auto lock:
9.3
e616V
Security
●
Scroll to Auto lock and press
●
Scroll to Off and press
●
Enter the code and press OK
(
...8...5...2...6...
)
●
Enter the default code (0000) and press OK
●
Enter the new code
Scroll to Security and press
●
Scroll to next text box
●
Scroll to Set codes and press
●
Re-enter the new code and press OK
●
Scroll to New handset code and press
and press
Note: If you change the code and then do
not remember it, you will need to send your
handset to 3 to unlock it. All stored data on your
handset will be erased. Call 3 Customer Sevices
on 0870 7330 333 for details.
Security
Security
e616V
13.4
9.4
10.1
> Emergency services
10.1
> General Care
10.5
> Declaration of conformity from NEC
NEC’s health &
general safety
information.
10
A message from your handset manufacturer NEC
A message from your handset manufacturer NEC
(continued from previous page)
Emergency services
To make an emergency call
in any country
●
●
●
●
Ensure that your e616V is on
and in service.
Press Start key
to return to the Home screen
if needed.
Press 112 (or 999 within UK
or 000 in Australia) followed
by the Start key
.
(When the SIM card is not
inserted or when the dial
lock function is on, just press
the Softkeys (SOS).)
Follow instructions received
and do not end call until told
to do so.
Tell the operator which service
you require: Police, Ambulance,
Fire Brigade, Coastguard or
Mountain Rescue Service.
Give your position and, if
possible, remain stationary
to maintain contact.
The 112 emergency number
service is available on every
digital network service, while
in the UK an alternative is 999
and in Australia 000. Note
that these can only be used
with a valid SIM.
10.1
e616V
Due to the nature of the
cellular system, the connection
of emergency calls cannot
be guaranteed.
●
General care
A handset contains delicate
electronic circuitry, magnets,
and battery systems. You
should treat it with care
and give particular attention
to the following points:
●
●
●
●
●
Do not allow the handset,
battery or accessories to
come into contact with
liquids or moisture at any
time. Do not immerse in
any liquid.
●
●
●
Do not place anything in
the folded handset.
Do not paint the handset.
Do not drop, throw, or
subject the handset to
rough treatment.
Do not place the handset
alongside computer disks,
credit cards, travel cards and
other magnetic media. The
information contained on
disks or cards may be
affected by the handset.
●
●
NEC’s health and general safety information
Do not leave the handset or
the battery in places where
the temperature could
exceed 60°C, eg on a car
dashboard or a window sill,
behind glass in direct
sunlight, etc.
●
Do not remove the handset’s
battery while the handset is
switched on.
Take care not to allow
metal objects, such as coins
or keyrings to contact
or short-circuit the
battery terminals.
Do not dispose of battery
packs in a fire. The handset’s
Li-ION batteries may be
safely disposed of at a Li-ION
recycling point. For more
specific battery and power
supply information, see
pages 1.4 and 1.5.
Do not put the handset’s
battery in your mouth, as
battery electrolytes may
be toxic if swallowed.
Do not attempt to dismantle
the handset or any of its
accessories.
●
●
●
●
●
●
This equipment is fitted with
an internal battery that can
only be replaced by a
qualified service engineer.
There is a risk of explosion if
the battery is replaced with
an incorrect battery type.
Dispose of the used battery
in accordance with the
manufacturer’s instructions.
●
●
●
Do not put a battery into a
microwave oven, dryer, or
high-pressure container.
Do not contact battery
directly to an electric outlet
or cigarette lighter charger.
Use only authorised
charger units.
●
Do not pierce battery with a
sharp object such as a needle.
When the battery is
thrown away, be sure it
is non-conducting by
applying vinyl tape to
the (+) and (-) terminals.
Do not disassemble or
modify the battery.
Do not solder a
battery directly.
●
●
Stop using the battery if
abnormal heat, odour,
discolouration, deformation,
or abnormal condition is
detected during use, charge,
or storage.
the handset near heat
sources (such as a heater)
or too close to the edge
of a table.
●
Do not use with a damaged
or deformed battery.
In the unlikely event of a
battery leak, take care to
keep the battery discharge
away from your eyes or skin.
If the leakage does come
into contact with the eyes or
skin, please flush thoroughly
in clean water and consult
with a doctor.
Remove an expired
battery from equipment
immediately.
The earpiece may become
warm during normal use.
Also, the handset itself may
become warm while the
battery is being charged.
When a handset is set to
Vibration mode, the vibration
can sometimes cause the
e616V handset to move.
Be careful not to place
NEC’s health and general safety information
●
●
●
Use an anti-static cloth to
clean the handset. Do not
use an ordinary dry cloth or
electrostatically charged
cloth. Do not use chemical
or abrasive cleaners as these
could damage the case.
Remember to recycle. The
cardboard packing supplied
with this handset is ideal
for recycling.
Remember to make backup
copies of all important data
on your handset.
Third party equipment. The
use of third party equipment,
cables or accessories, not
made or authorised by NEC,
may invalidate the warranty
of your cellphone and also
adversely affect the phone’s
safety/operation.
e616V
10.2
A message from your handset manufacturer NEC
A message from your handset manufacturer NEC
(continued from previous page)
(continued from previous page)
Safety
Hospital safety
The use of mobile phones
is not allowed in some
radiation sensitive areas, such
as hospitals, research centres
and airplanes. The user is
responsible to power-off the
device. If there is any
uncertainty, the battery
should be removed.
Aircraft safety
●
●
Do not use the handset on
the ground without the
permission of the
ground staff.
e616V
Switch off your phone and
remove its battery in areas
where the use of handsets
is prohibited. Follow the
instructions given by the
respective medical facility
regarding the use of
handsets on their premises.
General safety
●
Switch off your phone and
remove its battery when
inside or near aircraft. The
use of handsets in aircraft is
illegal. It may be dangerous
to the operation of the
aircraft and it may disrupt
the cellular network. Failure
to observe this instruction
may lead to suspension or
denial of cellphone service
to the offender, or legal
action, or both.
10.3
●
●
●
●
●
●
●
●
Observe “Turn off mobile”
signs, such as those near
petrol stations, chemicals
or explosives and turn off
handset/device.
If you have a heart condition,
be careful with the settings of
call vibration or tone volume.
Do not allow children to
play with the handset,
charger or batteries.
Do not use the handset
where blasting is in progress.
The operation of some
medical electronic devices,
such as hearing aids and
pacemakers, may be affected
if a handset is used next to
them. Observe any warning
signs and the manufacturer’s
recommendations.
Do not leave the battery
pack empty or disconnected
for a long time, otherwise
some data may be initialized.
Your phone contains metal
which may cause you an itch,
a rash or eczema depending
on your constitution or
physical condition.
Take care not to put your
phone in the back pocket of
your trousers or skirt and
then sit on it. Also, do not put
your phone at the bottom of
a bag where it may be
subject to excessive weight
or pressure. Doing so may
damage the LCD and
camera lens and cause
them to malfunction.
●
●
●
●
Road safety
●
●
●
NEC’s health and general safety information
You MUST exercise proper
control of your vehicle at
all times. Give your full
attention to driving.
Observe all of the
recommendations contained
in your local traffic safety
documentation.
Pull off the road and park
before making or answering
a call if driving conditions
so require.
●
You MUST NOT stop on the
hard shoulder of a motorway
to answer or make a call,
except in an emergency.
Switch off your handset at
a refuelling point, such as a
petrol station, even if you are
not refuelling your own car.
Do not store or carry
flammable or explosive
materials in the same
compartment as a
radio transmitter.
Electronic vehicle systems,
such as anti-lock brakes,
speed control and fuel
injection systems are
not normally affected by
radio transmissions. The
manufacturer of such
equipment can advise if it
is adequately shielded
from radio transmissions.
If you suspect vehicle
problems caused by radio
transmissions consult your
dealer and do not switch on
the handset until it has been
checked by qualified
approved installers.
Check if local laws and/or
regulations restrict the use
of handsets while driving.
Vehicles equipped
with an air bag
An air bag inflates with great
force. Do not place objects,
including either installed or
portable wireless equipment, in
the area over the air bag or in
the air bag deployment area. If
in-vehicle wireless equipment
is improperly installed and the
air bag inflates, serious injury
could result.
Third party equipment
The use of third party
equipment, cables or
accessories, not made or
authorised by NEC, may
invalidate the warranty of your
handset and also adversely
affect the handset’s operation.
For example, use only the NEC
mains cable supplied with the
AC charger.
Service
The handset, batteries and
charger contain no userserviceable parts. We
recommend that your handset
be serviced or repaired by an
authorised service centre.
NEC’s health and general safety information
Please contact 3 Customer
Services on 333 from your
handset or 0870 7330 3332
from any other phone for advice.
Efficient use
The handset has an internal
antenna. For optimum
performance with minimum
power consumption, please do
not cover the internal antenna
area with your hand. Covering
the internal antenna affects call
quality, may cause the handset
to operate at higher power
level than needed, and may
shorten talk and standby times.
Radio frequency energy
Your handset is a low-power
radio transmitter and receiver.
When it is turned on, it
intermittently receives and
transmits radio frequency (RF)
energy (radio waves). The
system that handles the call
controls the power level at
which the handset transmits.
e616V
10.4
A message from your handset manufacturer NEC
A message from your handset manufacturer NEC
(continued from previous page)
(continued from previous page)
International Commission on
Non-ionising Radiation
Protection (ICNIRP). Health
Physics, vol.74. pp, 494-522,
April 1998.
Exposure to radio
frequency energy
The handset is designed not to
exceed the limits for exposure
to RF energy set by national
authorities and international
health agencies.* These limits
are part of comprehensive
guidelines and establish
permitted levels of radio wave
exposure for the general
population. The guidelines
were developed by
independent scientific
organisations such as ICNIRP
(International Commission on
Non-ionising Radiation
Protection) through periodic
and thorough evaluation of
scientific studies. The limits
include a substantial safety
margin designed to assure the
safety of all persons, regardless
of age and health, and to
account for any variations
in measurements.
*Examples of radio frequency
exposure guidelines and
standards that the handset is
designed to conform to:
●
ICNIR. “Guidelines for limiting
exposure to time-varying
electric, magnetic, and
electromagnetic fields (up to
300 GHz)”.
10.5
e616V
●
●
●
●
99/519/EC, EU Council
Recommendation on the
limitation of exposure to the
general public to
electromagnetic fields 0 Hz300 GHz. Official Journal of
the European Communities,
July 12, 1999.
ANSI/IEEE C95.1-1992.
“Safety levels with respect
to human exposure to radio
frequency electromagnetic
fields, 3 kHz to 300 GHz”.
The Institute of Electrical and
Electronics Engineers Inc.,
New York, 1991.
FCC Report and Order, ET
Docket 93-62, FCC 96-326,
Federal Communications
Commission (FCC),
August 1996.
Declaration of conformity
We declare under our sole
responsibility that the
product(s) detailed in this
manual, and in combination
with our accessories, conform
with the essential requirements
of European Union Directive
1999/5/EC Radio and
Telecommunications Terminal
Equipment Directive
requirements 3.1(a), 3.1(b), 3.2.
A copy of the “Declaration of
Conformity” certificate can be
found on www.neceurope.com
●
●
●
●
Notices on memory
card usage
●
●
Radiocommunications
(Electromagnetic Radiation
Human Exposure) Standard
1999, Australian
Communications Authority
(ACA), May 1999.
Use only “Memory Stick Duo”
(up to 128MB) in the
NEC e616V.
Always insert/remove the
memory card while the
handset power is off. If
you remove the memory
card while an application
is writing into it, it may
be damaged.
Make sure to insert the
memory card in the right
direction otherwise the
device may be damaged.
●
●
●
If damage cannot be fixed
by the check disk function,
format the memory card.
The memory card cannot be
used for recording copyrightprotected data, such as
music, because it is not
equipped with MagicGate (a
copyright protection system).
Even if this memory card is
used with “Memory Stick
PRO” compliant products, the
data read/write speed of this
medium will not change.
Always insert the memory
card with the read-only
lock unlocked.
– You use the memory card
in a location subject to the
effects of static electricity
or electric noise.
●
●
●
●
●
●
NEC’s health and general safety information
We recommend that you
make a backup copy of
important data that you
record on the memory card.
To make a backup, copy the
data to a PC hard disk, etc.
– Under direct sunlight.
– Very humid or subject to
corrosive substances.
●
●
Do not write forcefully on
the label.
Carry and store the memory
card in its case.
To avoid damage or
contamination, do not
touch the connector of the
memory card.
Prevent dust, dirt, and/or
foreign objects from getting
into the adaptor.
Do not strike, bend, or drop
the memory card.
Do not disassemble or
modify the memory card.
Do not store the memory
card in a location that is:
– Extremely hot, such as in
a car parked in the sun.
●
●
When you set the read-only
lock to “LOCK,” data cannot
be recorded, edited, or
erased. Use this lock function
when using the card with
other devices, such as a PC.
Use a sharp object, such as a
ballpoint pen, to move the
read-only lock.
●
– You remove the memory
card or turn off the unit
while it is reading or
writing data.
●
●
Data may be damaged if:
Data read/write speed may
vary depending on the
combination of the memory
card and “Memory Stick Duo”
compliant product you use.
Do not insert the memory
card directly into standard
“Memory Stick” compliant
products.
Insert the memory card fully
in to the adaptor until it
clicks into place. Otherwise,
it will not operate correctly.
Copyright notice
●
The video/audio recordings
you make/download are
protected by copyright laws.
They are for personal use
only and must not be
otherwise used without
the permission of the
copyright owner.
Do not allow the memory
card to get wet.
NEC’s health and general safety information
e616V
10.6
A message from your handset manufacturer NEC
(continued from previous page)
Bluetooth®
●
●
●
●
●
This product complies with
Bluetooth® Specification
Ver1.1. It can establish
a dialup and headset
connection using
Bluetooth® technology.
In countries where the
use of Bluetooth® wireless
technology is not allowed,
you must ensure that the
Bluetooth® function is
set to OFF.
Use of Bluetooth®
technology is prohibited
on board aeroplanes.
The Bluetooth word, mark
and logos are owned by the
Bluetooth SIG, Inc. and any
use of such marks by NEC
is under license. Other
trademarks and trade
names are those of their
respective owners.
10.7
e616V
●
●
●
Bluetooth® can be used
within a range of
approximately 10m. Because
of the nature of radio waves,
this range varies depending
on location and the receiver.
When using Bluetooth®
headset, the sound quality
may drop as the distance
from the handset
becomes further.
Note that when the settings
of this product are reset,
Bluetooth® registration
information is also deleted.
Note that the handset must
be switched on to use
Bluetooth®. Before use,
always ensure that the use
of a handset is not
prohibited and will not
cause interference or danger.
NEC’s health and general safety information
Troubleshooting,
index and useful
numbers.
11.1 – 2 > Troubleshooting
11.3 – 4 > Index
11.5
> Useful numbers
11
Troubleshooting
Problem
Solution
Problem
Solution
Your handset does not turn on.
The battery level indicator should have at least one bar
showing
. If it doesn’t, recharge your battery.
(See page 1.4.)
The screen says:
Please enter your four digit
security code.
Enter the manufacturer’s security code number (default is 0000).
(See page 9.4.) If this fails, call 3 Customer Services on
0870 7330 333.
Your handset screen shows
Emergency calls only.
If necessary, turn off your handset and make sure that
you have inserted a valid SIM. (See pages 1.1-2.)
You cannot zoom.
The zoom function is only available when the file size is set
as Mail or CLI.
You cannot make calls.
The signal strength indicator should have at least
one bar showing . If it doesn’t, move to an area with
a stronger signal.
You cannot hear others on
your handset.
While on a call press the volume key up.
Has the handset been damaged,
dropped, or did it get wet? Was a
non-NEC battery charger used?
Dropping your handset, getting it wet or using a
non-NEC battery charger can damage the handset.
The handset’s limited warranty does not cover damage
caused from using non-NEC original accessories.
See the Care3 section of the Little Book of Stuff for more details.
,
To change: press Camera, press Photo, press
scroll to Size, scroll to X-Large / Large / Mail / CLI
The handset does not ring.
If you see
in the screen, then the ringer is turned off.
Also, the ringer may be set to Silent even though your
handset is set to a ring alert profile.
You tried to place a call
and heard an alternating
high / low tone.
Your call did not reach the network. You may have called the
number too soon after turning your handset on. Wait until your
handset’s screen shows either
or
at the top of your
screen before making a call.
You cannot make / answer calls.
Check that your handset’s screen shows at least one bar
showing at the top of your screen before making a call.
Avoid electrical or radio interference, and obstructions such as
bridges, parking garages, or tall buildings. Your handset may
also have the Call Barring feature turned on. If you know the
unlock code, you can change this setting in the security menu
(See page 9.2). Also, check your SIM is installed and working.
Your handset was stolen / lost.
Report a stolen / lost handset to the police and to 3 Customer
Services on 0870 7330 333. Calls to this number are charged
at the national rate.
You pressed
happened.
Be sure to press and hold
(On / Off) for two seconds until
the screen appears and you hear an audible alert (this could
take a couple of seconds). If nothing happens, check that the
battery is charged. (See page 1.4.)
Your handset has poor reception
and drops calls.
Make sure you have a signal
. Stay clear of any
obstructions such as bridges, parking garages, or tall buildings.
Call 3 Customer Services 0870 7330 333 to obtain the PIN
unblocking (PUK) code.
You want to see your most
recently made and received calls.
To see the most recent calls press the Navigation key left for
calls received or press
for calls made.
, but nothing
The screen says:
SIM Blocked.
11.1
e616V
Troubleshooting
Troubleshooting
e616V
11.2
Index
A
A to B location
Alarm clock
Alert
Audio clips
6.7, 6.18
8.2
6.8
5.8
B
Battery
Bluetooth
Business Finder
1.3 – 1.5
8.3
6.7
– storing a contract
– copy a contact between
SIM and handset
– copy a contact
between handset
and SIM
– setting SIM card
contact as default
Charging the battery
5.5
3.5
1.4
Calendar (appointment)
– setting up
8.7
– deleting
8.7
Caller ID
4.5
Calls
4.1 – 4.21
– barring password
– call waiting
4.7
– divert
4.6
– Grouptalk
4.4
– hold, putting on
4.1 – 4.2
– making voice and video 4.1
– from contacts list
4.3
– from previous calls lists 4.3
– receiving voice
and video
4.2
Camera
5.5
Comedy
6.5, 6.9
Contacts
5.1 – 5.9
– address a message from 7.5
– deleting
5.3
– editing
5.2
– image with entry
5.2
– searching for
5.3
3.4
Email
– accessing
– create and send mail
– inbox
– listening to email
– setting up
– setting up POP3
7.8
7.10
7.11
7.1
7.4
7.9
F
File transfer
Finance
Football
– downloading goal
alerts
– news and video
– setting alerts
8.4
6.7
6.12
6.10
6.11
G
Troubleshooting
P
T
Handset
– features
– lock
Health and safety
Help menu
Horoscopes
PC File Transfer
8.6 – 8.8
PIN code
9.1
Photo – deleting, taking,
viewing
5.6
Power – On / Off
3.3
Profiles
3.7
Portfolio – setting up
(stocks & shares)
6.21
Text
– creating and sending
7.2
– entry method
3.10
– messaging
9.2
– notes
11.11
Time
3.4
Today on 3
6.1 – 6.4, 6.8
Top Shelf
6.8
Travel
6.8
Triangle key
2.5, 6.1
Troubleshooting
11.1 – 11.2
2.1 – 2.2
9.3
10.1 – 10.5
6.2
6.6
I
K
Keypad – tone off
Keys
– navigation
E
Games
H
Intellisync software 8.9 – 8.10
Date
e616V
5.4
D
C
11.3
5.1
Q
Quick Map
3.7
2.5 – 2.6
2.5 – 2.6
Ringtunes
S
Mail (voice, fax and email)
– accessing email 6.7, 7.8, 7.10
– inbox
7.11
Message Maker
6.8
Memory card
1.6
Movies
6.5, 6.9
Multimedia messaging –
creating and sending 7.5, 7.7
Music
6.5, 6.9
Screen backlight
Searching for
information
Security lock code
Setting locations
Shortcut
– creating
– keypad
– general
– text entry
SIM
Sport
Start screen
Showbiz
News
My Nearest
6.5, 6.20
6.8, 6.19
U
R
M
N
6.7, 6.14
3.6, 6.13
3.6
6.2
9.4
6.16
3.8
2.6, 3.1
3.12
3.11
1.1 – 1.2
6.6
2.3 – 2.4
6.5, 6.9
Useful numbers
11.5
User guide – how to use it 3.1
Username – setting up
7.3
V
Video
– deleting, playing,
taking,
5.7
– messaging
9.3, 9.5 – 9.6
Voicemail
– listening to
7.1
– setting up
7.1
Volume, key
2.2
W
Wallpaper
Weather
5.6
6.5, 6.9
O
6.6, 6.14 – 6.15
Own number
3.9
Troubleshooting
e616V
11.4
Useful numbers
Contact
Handset
Other phone
3 Customer Services
333
0870 7330 333
Mail (Voicemail,
Email and Faxmail)
123
07782 333 123
ThreePay top-up
444
0870 7330 444
Directory enquiries
118 333
International directory
enquiries
118 313
Disabled & elderly
enquiries
195
Emergency calls*
999
*112 is the international standard emergency number from your handset.
Contact Centre
3 Customer Services
Hutchison 3G UK Ltd
P.O. Box No 333
Hemel Hempstead
HP2 7YW
United Kingdom
Email: [email protected]
Website: three.co.uk Fax: 0870 7330 334
For customers with contracts, calls to 333 are free from your
handset while 0870 numbers are charged at your national rate.
For ThreePay customers, calls to 444 are free but 333 and 0870
numbers are charged from your inclusive voice minutes
allowance or at your national rate.
11.5
e616V
Troubleshooting
999