1
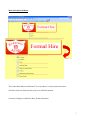
GCE ICT
Data Processing
Assignment
User Guide
Database
1
Background & Aims and Objectives
Elegant Attire is a small local family business set in Northern Ireland.
The company specialise in formal Hire for both men and women. Their customer base is
largely focused on A Level students and they cater for all the needs for the Christmas or end
of year affairs. Elegant Attire is very aware that this is an extremely important occasion and
aspires to ensure full satisfaction of their customers.
They have always used a paper based system but as their company is expanding they have
found it necessary to introduce ICT to help them with their orders and invoicing.
There has been, on a few occasions that stock has not been returned on time to have it
washed and ready for another big formal. They are hoping that this new system can create
easily reminders to send to those A- level students who may forget the return date of what
they hired.
2
Hardware and Software Requirements
Hardware
Hardware Item
Processor
Specification
1.8GHz, 800MHz, 1MB cache
Hard Disk 20GB
20GB
RAM
1024MB
Graphics Card
128MB
Monitor
1024 * 768 resolution
CD Drive
Standard Qwerty keyboard
Mouse
Software
Software Item
Windows
Specification
Vista, professional, Home
Microsoft Access
2003 or later
3
Opening the Database
From the desktop load Microsoft Office Access.
In this case it is found under the start menu – Core Programs - Microsoft Office Access.
4
Select from the Main Menu File and then scroll down to select Open
Choose the Location where the file is stored. The database is called GCE ICT.
5
Enter the Password
The following dialogue box will appear
The password is: password
Enabling all the functions within the database
A dialogue box will appear then and you will be required to click Open
6
Main Switchboard/Menu
This is the Main Menu Switchboard. You can choose various options from here.
All other forms are linked to this point to avoid disorientation.
Customer, Employee and Stock have further submenus.
7
Customer Menu
After selection of the Customer Option from the Main Menu switchboard, you will be
directed to the customer sub menu where you choose options specific to dealing with a
customer.
There are three options to choose from in relation to dealing with customer details.
Add Customer: This is an ideal method of adding new customers’ details to be stored and
can be used later to make an order.
Search for a Customer: Also it is possible to search for customer details if you require
contacting them by phone or checking their address.
Delete a Customer: Likewise if a customer informs the company that they no longer want to
be a customer it is recommended that they their details are removed from the system.
8
Add a Customer
Upon selection of the option Add a Customer from the Customer sub menu you are brought
to the Add a Customer data entry form.
Take note that you are not required to enter a customer number, this option is disenabled.
The system will calculate the customer number.
9
Filling in the details on the Add a Customer data entry form.
Field
Data Accepted
Forename
You can add text to this field. Any name is acceptable up to a
length of 15 characters. E.g. Mary
Surname
You can add text to this field. Any name is acceptable up to a
length of 15 characters. E.g. Boyle
House Number
You can add a number to this field. Any number is acceptable
up to a length of 15 characters. E.g. 12
Street
You can add text to this field. Any name is acceptable up to a
length of 15 characters. E.g. High Street
Area
You can add text to this field. Any name is acceptable up to a
length of 15 characters. E.g. Belfast
Postcode
Contact Number
You must enter a postcode into this field. E.g. BT78 0LL
You can add a number to this field. Any number is acceptable
up to a length of 8 digits. E.g. 91235478
Gender
This is a list box and you have two options to select from. Male
and Female
10
Adding the record
After you select the final field Gender the Add Customer button will appear and you can
click on this and all the details will be added to the database system. You have the option to
add another customer.
If at any time you want to finish or have made a mistake and selected the wrong menu option
you can simply click the return to Main Menu button
11
If you are aware of a customer number then you can quickly search for customer details
using the search facility.
Type the Customer number into the dialogue box e.g. 8
Press ok
You will be brought to the customer search details page where you can read the record you
searched for.
12
Delete a Customer
When you find the
customer you wish
to delete click this
button
Click on these buttons to browse
through the customer records or
select from the list box
You are required to click yes if you are willing to delete the record
13
Stock Main Menu
There are three options to choose from in relation to dealing with customer details.
Add Stock Item: This is an ideal method of adding new Stock details to be stored and can
be used later to make an order.
Search for a Stock Item: Also it is possible to search for stock details if you require
contacting them by phone or checking their address.
Delete a Stock Item: Likewise if a stock item is discontinued it is recommended that the
details are removed from the system.
Returned Stock Order: You can choose this option when stock that has been hired, is
returned.
Update all stock prices by 1%: This will update all prices of stock by 1%
Print Letters for overdue stock: This will print all letters for posting to those customers
who have not returned items ordered.
14
Stock Main Menu
Stock Main Menu
Add a Stock Item
Fields
Details
Stock Item
This is generated by the
computer
Stock Item
You can add text to this field.
Name
Any name is acceptable up to
a length of 15 characters. E.g.
Brand Name
You can add text to this field.
Any name is acceptable up to
a length of 25 characters. E.g.
Description
description of the garment
Price
You can only numbers to this
field.
Supplier
This must be chosen from a
list
Sizes available
This must be chosen from a
list
Add Stock Item
Click the add stock item to
add details.
15
Search Stock
Instructions
Type the stock number into the dialogue box e.g. 8
Press ok
You will be brought to the stock search details page where you
can read the record you
Delete Stock Item
Instructions
Use the navigation keys to browse through the stock records.
When you find the stock item you wish to delete click the
delete button
Returned Stock Order
Instructions
All fields are disabled with exception to the Returned tick box.
You will be able to tick this box if the order items have been
returned.
16
Updating the Stock by 1%
Message received
Action
You will be asked do you want to The price field of all
update the Price field of all stock
stock will be increased
by 1%
Print letter for overdue stock
Printing Message
Action
The report will be sent to the printer for overdue stock.
17
Making an Order
Not all data entry items are displayed.
Each item appears when you select the previous item, this ensures that you enter data into all
necessary fields
Choosing the employee choice
Choosing the customer choice
Entering the date hired
18
When all items are displayed
Field
Details
Order Number
Order Number is generated by the computer
Employee
You are required to select an employee. This is the person who
makes the customer order
Customer
You are required to select a customer.
If it is a new customer you will need to go to the add customer
page.
Date Hired
Enter a value date into the date hired field.
Stock Item
Choose a stock item from the list
Quantity
Enter the number of stock items required
Add Stock item to order
Add the stock item to the order.
You can add multiple items to an order
19
Browse Orders
Customer Details
Order Details Tabs
This for can be used to browse through all orders.
It is grouped by Customer Number. The Customer details are displayed and all the customer
orders can be viewed.
Using the tab options you can view all the items relevant to that order.
You can use the Next Order and Previous Order to go back and fourth through the orders.
20
Letters for Over Due Stock
This option will create letters for all customers who have over due stock items in their
possession.
All items circled will be updated for each customer.
It will calculate when the item should have been returned and how many days it is overdue.
The outstanding balanced is also calculated.
21
This option will be generate an invoice from the Orders.
There will be an invoice for each order created.
The order number will be displayed.
The Customer details will appear.
All stock Items created will be displayed.
The total price for all stock items for each order only will be totalled.
The vat will be calculated at 17.5% percent of the total price.
The Price plus vat will be the total price plus vat.
22
This report displays all orders that were ordered in the last seven days.
It can be used by managers to see what employees have taken orders.
The most recent stock that is order can be viewed and the quantities. It can be used for
statistics.
23
Changing the Password
If you plan to change your password you need to open the database and change the option on
opening to exclusive.
On the main menu select Tools then Security then Unset Database Password
24
You are required to verify the current password.
On the main menu select Tools then Security then Set Database Password
25
Type the new password in twice. The next time you open the database is will use this new
password.
26
Troubleshooting
Entering the Wrong password
When loading the database initially. If you accidentally enter the wrong password you will
get the following error message.
Enter the appropriate password to continue
Error Message for incorrect password
27
Trouble Shooting on the Add a Customer Form
Field
Forename
Error Message
Data Accepted
This means that the field
contains no data.
You should add text to this
field.
Any
name
is
acceptable up to a length of
15 characters. E.g. Mary
Surname
This means that the field
contains no data.
You should add text to this
field.
Any
name
is
acceptable up to a length of
15 characters. E.g. Boyle
House
Number
This means that the field
contains no data.
You should add a number to
this field. Any number is
acceptable up to a length of
15 characters. E.g. 12
Street
This means that the field
contains no data.
You should add text to this
field.
Any
name
is
acceptable up to a length of
15 characters. E.g. High
Street
28
Area
This means that the field
contains no data.
You should add text to this
field.
Any
name
is
acceptable up to a length of
15 characters. E.g. Belfast
Postcode
This means that the field
contains no data.
You should enter a postcode
into this field. E.g. BT78
0LL
Contact
This means that the field
Number
contains no data.
You should add a number to
this field. Any number is
acceptable up to a length of
8 digits. E.g. 91235478
29
Field
Error Message
Reason
Forename
You have typed in a
Forename with 16 characters.
Only 15 allowed
Surname
You have typed in a surname
with 16 characters. Only
allowed 15 characters.
House
Number
You have typed in a house
number with 6 numbers.
Only allowed 5 numbers
Street
You have typed in a Street
with 16 characters. Only
allowed 15 characters.
Area
You have typed in a Area
with 11 characters. Only
allowed 10 characters
Postcode
You have typed in a
Postcode with 8 characters.
Only allowed
30
Type in a Contact number
with 11 numbers
Contact
Number
Gender
This should be a drop down value
Surname
Select a Gender
You are not allowed to type
anything other than digits in
this field.
Error Messages when deleting records
For example when deleting a Customer, if the customer have made an order then it is
necessary to delete the order first before the database will allow the deletion of the customer.
In doing this it ensures that no stock is on hire to a customer that does not exist.
This error message is security as it lets you know this customer has placed an order.
Order must be deleted first.
31
Error Messages on the Make an Order
There are two fields that may return error messages when making an Order. They are:
•
Date Hired
•
Quantity
The first is the Date Hired Field.
If you receive this message it means that the date is probably in the past.
Just delete and enter an appropriate date. It should be today s date or a date in the current
week.
This message refers to a date that does not exist e.g. the 13th month. Remove the value and
re-enter an appropriate date.
32
The second is the Quantity Field.
You entered a value less that 0 or greater than 20. You can delete this value and enter an
appropriate quantity.
Stock Item
You are not allowed to choose the same Stock Item more than once in an order.
Just choose another Item.
33