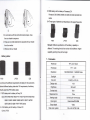
1
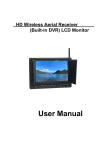
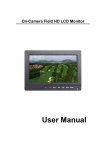
HD Wireless Aerial Receiver
(Built-in DVR) LCD Monitor
User Manual
Product lntroducton:
HD wireless aerial receiver (buittin DVR) LCD monitor is a new
multi-function product; adopt advancad integrated circuits and
highauality new HD LCD monitor. lt integrates a high-sensitivity
wirebss receivers, video recorders, highdefinition monitor, nol only
can conduc{ on-site wireless receiver, video, you can also shoot
seamless video playback. The unit is also equipped with battery
date. can extemal battery for pouer. The machine casing compact,
easy
b
operate, can be used for aerial ground station, car video
mnitors (tachograph), security monitoring, baby monitors,
photography vionfinder, construction site video surveillance.
AdvedFing and other venues.
A
,o r*ur. b€t
use of the unit, please read the use!'s
mennlcarcfully.
CAUTION
1.
Plece use the adapter and battery attached
in the accossory.
2. Do nol e)Ao6e this product to direct sunlight, heat or humid
conditbns
3. f€ep aurayfrom sforE light while using this produc.t so as to
ohin
the dearest and lhe most colorful pic{ure. Please use sun
shade
furfte outdoor necessary
4. Pl€ase avc*l heaw impaci or drop on the ground.
5. Do not use chemical solutions to clean this unit. Please simply
wipe with a dean sofi doth to keep the brightness of the 6urface.
6. Wrthout adjustable component in the unit, please do not take
apart or repair the unit by yoursoff, to avoid damage the product.
;
tr{l
xi
Product feature:
a Set DVR, wireless receiver, a monitor for the integration of
FI
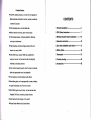
CONTENTS
Multifu nc{ional combination machine, compacl, suitable for
I
a variety of purposes
e DVR seamless video, save the latest data
{. Product description
a Motion detection recording, save memory space
2. DVR (Video)
a 5.8G wireless receiver, 8-channel salection, effectively
3.
avoid signal interference
a High brightness, contrast, antiglare screen with a sun
.
Wreless transmit teceiver operation
4. Operatlon instruction
5. Sun shade
installation------18
and remove
shade, sun clearly visible
6. Battery plates
with VIDEO input, output, HDMI input, suitable for a
7- Parameters
variety of sources. Can be used as video, photography
8. Trouble
Mewfinder, advertising machine.
9.
a Color Control Systems support, enter the menu to manually
Select the appropriate format, and adaptable
a F ont headphone monitor playback audio effects
a Rear batlery plate, can
be equipped with a variety of battery,
i,lo porver to facilitate use of the site in country
a Wth VIDEO signal output function, can be used as video
Phybad( DVR host, connecting multiple monilors.
a
anstruction---7
ffir
Hac* and white images / mono switch
a Pkiure Screen Markers and Center Marker
-16
--
-_-_--*24
shooting
Accessories
-------*28
22
26
l.
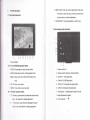
Producldescription:
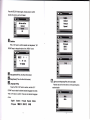
1.1 Front panel
instruction:
9. MENU: Monitor menu key, under a signal input mode, press
this button to call up the menu, and the current menu and
sub-menu item to confirm the adjustment
10. SOURCUEXIT: lnput signal selection or exit the menu
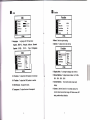
1.2 Rear battery plate instruction:
111098?65{321
1. Power indicator
*
2
7A
- 6 is for DvR(Video)operation button
2. REC/OK: Recording starl, stop I function confirm
1. Antenna input port
3. MODE: Mode button to enter / exit the playback mode
2,
3.
4. MENU: Menu key to enter / exit the DVR (Video) m6nu
mode
5. UP: UP button, up an option
6. DOWN: Down button, down one option
*7 - 10 monitor operatlon button
7. +: Volume up, press this key to increase the volume control,
menu
8 -:
ilem selection for settings adjustment
Volume down, press this key to decrease the volume
@ntrol, menu item selection for settings adiustment
Wireless receiver frequency channel selection
AUDIO-IN:A Audio signal input
4.
HDMI-IN: HD HDMI signal input
5.
5.
7,
VIDEO-OUT: Composite video signal output
VIDEO-IN: Composite video signal input
Power switch "-"lndicates that the power is tumed,
'o'means Disconnect the power
8.
Power inputjack -
*C*'
1.3
Side panel instruction:
2. DVR (Video) Operation instruction:
When the monitor's "V|DEO]N" and "AUDIO-IN" has access to
the appropriate srgnals or "RF" wireless receiver transmitter has
been reliably received video signal transmitted over and check the
TF card has been reliably into the slot (monitor without the HDMI
input, there is no video function)
2.1 After the device is turned on, make sure the monitor "video"
G
l.
Wireless receiver porl
2.
3.
4.
Wireless receiver trequsncy channel option switch
(video signal) or "RF" (radio frequency signals) channel has an
input signal and select the appropriate channel. Machine to enter
the recording function.
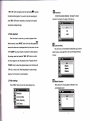
2.2 DVR (Video) bufton instruction:
Audio input port
'1.4 TF
Video input port
54
card slot:
321
1.
REC/OK: Video start, stop/function confirm
2.
MODE: Mode button to enter/ exit the playback mode
3. MENU: Menu key to enter / exit the DVR (Video) menu mode
4.
UP: Up key, the menu up an option
5. DOWN: Down, down
a menu option
2.3 Recording start:
The monitor input signal selection "video" (video signal) or "RF"
(radio frequency signals) channel, the monitor screen will display
TF Card Slot
the corresponding channel of the screen, press the
'RFC, OK'button will appearwhen the
thd start recording begins.
red
flashing(D, ms3nlng
lEilResotution
lf you want to stop the recording and
pIess "REC I OK' button. Recording or recording by time period
Dl(720X576),VGA(6/OX,|80)QVGA
(
320r240),The higher
resolution, the sharper, the larger of the file size.
paragraphs packaged storage.
2.4 Video playback:
Vvhen the video for some time, you need to playback video
efiects observed, press "MODE" button at the top left
appear$l,
because the video store is packaged stored by time period, can use
"UP / DOWN" keys to go forward or backward to selecl playback
file package, select and press the "REC,
OK' button to confirm,
@l
Loop recordtng
SD card is full, it will overwrite the oldest files cycle, and the
system uses a unique algorilhm, SD card DVR longer life than
ordinary
the device begins to enter the playback mode. Playback with the
'DOWN' button to select the playback speed, return fast
'UP" key in order to exit. When fast playback
play with
!r:,i-l#:i1r.ij:1.ffi .i:t.r*L-il'B,iE$
tii$rdt.s
SMlilrlis
{OMhr(.s'
is muted trumpet,
playing at normal rate for a voice broadcast.
2.5 Video settings:
Press "MENU" button to enter the video settings menu
@ mofion Detection
After opened, the moving object is detected, it will
Automatically record.
Resolulion
Loop recording
Molion Detection
lDate Stamp
$$*Eiiffiffii:E--ffi.T+E
On
E**',
[He
B ,o{on
and time can be superimposed onto the video, you can
detection sensftivity
Can be adjusted according to the actual situation
not stack.
wffisxffi&.E\RE
*RtrB1$-:.Rffiffi.1\..8+\1:
trLdllm
Or
Lcrr
2,6 Advanced Settings
El
Continuous twice pre6s the "MENU" button to enter the MENU
Recoroing Video
You can choose to record video directly to a file or not record
in the advanced Settings option
Format
ffi,!\t{ffi-Effi*
Date/Time
Or
Auto Power Oll
Beep Sound
E
1."n"
E
0u"111,
The higher the image quality, image clearer, the file will be
tt
ger
rormatting
Flrst use, in order to optimizc tfte tile system, VCR will
roquire customeE to $ormat again. Once formetted files will be
lost.
After entering format mode, press "REC/OK' button to confirm,
the menu prompts
,===SEffi,-E+.
r*tu
NdBl
Sftl
Press the REC/OK'button again, choose cancel or confirm
wheher the memory card is formatted
El
o"r"n,*"
"REC / OK' button to confirm selection and adjustment, ',Up /
DOWN" keys to change the date or time, "MENU', to exit
re/ stl
I I 15 t22.
YY/ }IT,VDD
El
1u6
lIEl ,*O
E
power otf (This unit without this function)
gornd (This
Fil
unit without this tunction)
[r!J
L"ngu"g"""tting
Refresh rate and the time taken to set the grid frequency
Press the 'REC / OK' button to confirm, with the ,,Up
/
DOWN" keys to select the desired national languag€, then press
"REC / OK' button to confirm. There are nine national languages
choice
English Deutsch Frangois Espanol
Portusues l[f+t ffift+t B*tF
Light source frequency(This unit is not used)
ltaliano
synchronization
@
o,r.*
Oubut formats PAL / NTSC for option depends on country to set
Delete
Protect
I
Note: lf after set the Tv output forma6, image cannot be
j
synchronized, or even can't bring up th€ DVR menu, is the
DVR output formats are not synchronizod to the monitot
fomat due, if lhis occurs, you can call up the monitot menu,
enter the monu of "function" to set "Formaf in the
Delete single
corresponding format option
El
oeraunsettings
Erase Thls?
Restore the factory default Settings
$s!ffi,.:
OK
I
Return mstu 3ettlng
erc
?o deloults,
T
OK
2.7 Playback menu Settings
Delete All
Erase Thl!?
Press the "MODE" button, in the top left of the screen will display
EI
liLjil, press the DVR menu key "MENU',, and enter the playback
,'REC
menu settings. (At this point if you press the
/ OK, button to
enter the playback, unable lo enter the playback menu settings)
11
ffi*Eox
EB p6..5on,
This unil ofiers eight receiver channels for setting ,it can accept
to save the contents of the lock protection to
simultaneously eight transmitters and receivers together work, lo
pfe\rent mbuse deleted and lost
avoid co-channel interference
(Frequency range of each region are different, please check
UnlocI culrcnt
Lock All
Unlock All
the unit's paste instructions).
ffiEiifttE
cHl cH2 I CH3 cH4tcHSlcH6
!! qiltF! !?1il?E!qltFF t9lHtFHlt?;3
ffiiEriE
./,S.
3. Wircless
transmission receive operation
cH7
cH8
EE
12
Hor"t During select channels must be supporting
the transmitter
3.2 Wireless Receiver:
Turn on the monitor power switch, press the button on the
monitor "SOURCE / EXIT" Select "RF", if the time transmitter has
worked, receiver and transmitter frequency in agreement, lhe
-
receiver will receive the signal sent from the transmitter and
displayed on the monitor
Take the form a complete set of the antenna assemble on the unit's
antenna input ports, the assembly should secure, locked on the
Note: The effect of receiving tfie dbtanco has a great
relationship with the reception power of the transmitter and
the receiver venues, lf the reception is poor, the antenna can
hrckle.
be replaced with three leaves, four leaf antenna or panel
3.1 Chtnnel selection
Urts8le.s transmitbr channel and receiver channel must be
corEbtent otherwise it will not receive a transmitter
l('illy
lignd-
16
antenna, Replace the antenna should pay attention to the
antenna and receiving the same frequency.
l?
a.
Opor.tilu hrstructions
4. SOURCE/EXIT: The input signal switch button. Vvhen
:
entering the menu operation for menu exit button
THs rpnilor with HDMI, VIDEO, AUDIO input and VIDEO output
port suitable br
a variety ol usage environments. From VIDEO,
AUDIO DVR video input can be entered recording(HDM| without
recoding function), VIDEO ouQut signal can be straight-through
vi.leo signal , can also be the DVR replay video signal (consistent
4.2
ilenu instructions
Press "MENU" to enter the menu, use
select'colo/', select
the
button to
it and press "MENU" button to confirm, enter
the 'Colof' submenu Operation, use the "+" or "-" button select the
adjustment item. After selected adjustment item, press the "MENU"
with the image displayed on the screen).
once again to confirm, then use the "+" or "-" button to adjust or
choose specific parameters. After adjusting the value or setting,
tl.l Button instructions:
press "MENU" to confirm, press "SOURCE
i EXIT'key to exit the
OSD menu.
Gl coto.
Color.
4
1.
*:
sridrb*
cffi
Hu.
Serdd
This unit in working condition without displaying the
menu, press it the volume up . Menu is displayed, this
Ctrk
button as a menu item selection. ln the submenu item
60
rcl
-:l
rc50
rc$
!o
Fr.ld
adjustment is determined, this button as value up
adjustment or adjustments selection
2.
-:
This unit in working condition without displaying
the menu, press it the volume down . Menu i6
displayed, this button as a menu item selection. In the
submenu item adjustment is determined, this button as
value down adjusknent or adiustmenB selection
3.
ilENU
:
Press " MENU " button, pop up OSD menu,
press this bufton again to enter the sub-menu, then
press once adjusted for the sub-menu item to confirm,
then, you can press the button
"{''
or
"-"
to adiust the
\€lue adjustrnent or selection, press MENU to confirm.
l8
x
Brightness: To adjust the image's brightness.
X Contrast: To adjust the brightest and darkesl ratio
of the
image, please note the sense of picture when adjust, proportion too
large or small, will make the picture lose the color of showy.
XHue: On NTSC Mdeo mode, the image color tint
diftrence
is adjustable by tint.
X Saturation: To adjust color concentration
xcheck Fi6ld: Switch on/off Check Field (Red. Green.
Blue, Monochromatic and Color)
I
E
o"o
runction
Func{ion
osD
Legunoc En{il.h
BPdthr rc50
vPorfr* rc60
ofi
oso1ln out
otr
T@lpmnl
R€d
Sldm
DirPhyRdio
Scnffllelffi
Cfttr L*tn
Cs*.
1H6+I.
Efffi.
0ll
XReset: Backto original setting.
x System: To adjusl color video format
X Language: Languages for OSD as below:
English.
00*
0ll
NTSC"
NTSC,
Eepafiol'
;lI5Ct
16. t"
Frangois. ltalla no. Deutsch
*e!?g,l. Pycc.
Portuguesa
Function
Hffi
I
HB4*
NTsC,
X Dlsplay Ratio:
X
H
Poeltion,
X V Positlonr
To adiust the OSD position in horizontal.
To adjust the OSD position in vertical.
X OSD Timeout:
X Transparent,
To adjust the clock.
To adjust the level of transparent.
To change the display ratio 16:9/4:3.
X Screen lllarkercr
To adjust screen marker
(ofi, 96%,
93o/o, 9OYo' 85Yo' 800/o)
X Centre MarkeEr
To set centre mark (cross mark)
display
X Carnera
: Use the Canon 5 d ll or similar camera, the
monitor video has real-time images. NO black screen, NO
delay, perfect without distortion.
(D the sun shade's hanging claw and the monitor's sun
shade slot should be aligned around inserted balanced to
ffi
Foct.
slide down.
Sound
@ By equilibrium of sliding down to match up the sun shade
otr
and monitor.
@ Please follow steps, otheruise will damage the cover,
please do not press the UR panel of the sun shade, if
not, unable open the cover.
X Volume:
X
t'
To adjust the volume.
s\-az
z-R
p-\
Focus :As an auxiliary functions (tn HDMI mode )when
4'
used as the camera vieMinder.
X Ver,1.0: Software version number
@
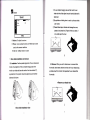
5. Sun shade installation and remove
5.1 lnstallation: Posilive parallel alignment ofthe sun shade and
5,2 Remove: When you want to shade cover is removed from
monitor, the pro.iection of the sun shade hanging claw at the
the monitor, hands were clenched monitor and the sun shade, drag
monitor sun shade slot (see the monitor front view marked '17),
up shade cover from monilor, that separates the sun shade from
pay attention to the positton should be aligned around inserted
the monitor-
balanced slide down.
I
I
I
rRemove sun shade viewr
.K";3
z\A)
oSun shade installation view
o
6.3 D28 battery slot for battery of Panasonic DV
Panasonic D55 D54S D54SE D40 D35 D33 D32 D2B D2S D22
series
6.4 Three types of batteries corresponding to the upp6r three slots
tr
(,
Oln accordance with the instructions below steps, close
the sun shade in sequence
F970
@ Drag up sun shade balanced to separates the sun shade
D28
Remark: Different specifications of the battery capability is
from the monitor.
different. The working time for the monitor will be different. Higher
@ Remove the sun shade
II
s
LP.E6
capability (working time) will be longer
Battery plates:
F970
7.
Parameters
TFT LCD 7.0inch
LP.E6
D28
ccording to the different requirements of battery for the customers
ttached different battery plate slots. NO requirements, the factory
efaults assembly F970 battery plate.
.1 F970 battery slot for battery of Sony DV
Sony F970 F960 F950 T930 F770 T750 F730 F570 F550 F530
QM91D QM91 QMgOD QMgO QM71D QM71 OMTOD
QM70 QM51D QM51 FM7'1 FM70 series
.2 LP-EO battery slot for battery of Canon DV
Canon LP-E6
21
PAL4.43 / NTSC-3.58
480i /480p /576i /576p
HDMI support format
720p 11080i
/1
080p (50/60H2)
Headphone output
stereo 3.5mm
Input voltage
DC:6-24V
Power consumotion
DVR recordinq resolution
D1
@ Check whether it is caused by the discrepanry for the DVR
=8W
playback of video system and monitor system. lf that, please
enter into ihe monitor "Funclion" menu for "Format,, option to
maximum 32G
DVR Recorded video
AVI
format
select the corresponding standard.
8.2 l{O picture after put on the power
5.8 G broadband FM audio and video
synchronization rec€iving (other frequencies
optional)
paste instructions)
RF wireless receiving
typical value -90dBm
sensilivitv
f
Frequencv stabiliW
Unit size (mm)
1
100 oom
89(L)x1 34(W)x50(H)mm
Unit weioht
476 o
1l+20
@ Check signal cable contact are in good condition, a monitor is
synchronized with the input signal, and can press the
"SOURCE/EXIT" give it a try. lf in the RF channet, ptease check
8 channel (difierent frequency range for
difrerent region, see specific ofthe machine's
lnstallation melhod
is in black and white or monochrome image or other
condition.
(720x576)VGA(&0X480)QVGA/,32Or240\
DVR sup0ort TF card
RF receiving frequency
(DPlease check monitor's "colo/'from lhe menu ',monochrome,,
thBad mounting holes in the monitor
easy to install on the tripod
Wor*ing temperature_
-20-50c
Storage temperature
-30-65C
to see if the transmitter has been work.
@Check signal cable connecting, and make sure use the
standard adapter connect the monitor. lf power supply by battery
please check the battery whether fully charged.
8.3 lmages are not synchronized, DVR can't enter the menu
O The DVR playback system and monitor system are different,
can enter the monitor'Yunction" menu, and select the right video
format in the "formaf'option.
@me Rf signal
is too weak.
8.tt Piayback the video without sound
8. Trouble
@No open the audio recording in the DVR menu seftings
shooting
8.1 Only black and white or monochrome
picture
OPlease check saturation. brightness & contrast adjustment
e)Volume control did not open, can press the volume bufton ,'+,,
try increasing the volume.
@Recording under the 'VIDEO" input state, but 'AUDIO" is not
AUDIO input signal at the same time.
E.5 Open the RF, no signal detected
OTransmitter
is working properly or not.
@lf transmifter frequency matches with the receiver frequency
band
@lf customer change the receiving antenna, please note that
must be matched with the transmitter, otherwise may cause
receiving sensitivity is low even can't receive signals
r
Remark: lf there are still other problems, please contact with our
related deals.
9. Accessorieg
pcs
User manual
1
Sun Shade
lpcs
Battery plate (F970)
'lpcs
Optional,
Pourer adapter
1
pcs
TF card
1
pcs
*
lf there are changes without prior notice.