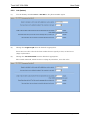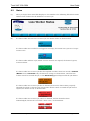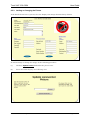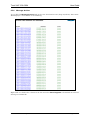
1
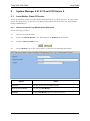
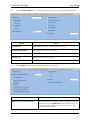
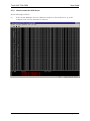
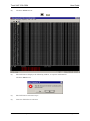
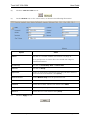
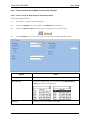
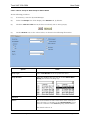
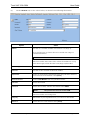
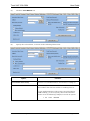
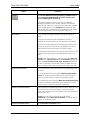
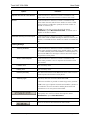
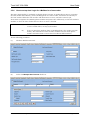
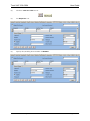
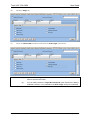
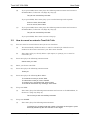
Trust 24x7 2.02.0004
(System Manager Version 4.01.0173)
User Guide
Issue 1.01 – 14 January 2011
Trust 24x7 2.02.0004
User Guide
CONTENTS
Changes from Issue 1.00 ........................................................................................... 4
1 Introduction ........................................................................................................... 5
1.1
1.2
1.3
1.4
1.5
1.6
1.7
What Trust 24x7 does .................................................................................................................... 5
Overview of how to use Trust 24x7 ................................................................................................ 5
Trust 24x7, LoneWorker, Lone Worker, Lone worker or lone worker ............................................ 5
Block Diagram ................................................................................................................................ 6
Overview of how to set up Trust 24x7............................................................................................ 7
What you must know before you read this manual ........................................................................ 8
System Manager – User Reference Guide .................................................................................... 8
2 System Manager 4.01.0173 and VCII Server 4 ..................................................... 9
2.1 Lone Worker Class Of Service ....................................................................................................... 9
2.1.1 How to set up the Lone Worker Class Of Service ...................................................................... 9
2.1.2 How to restart the VCII Server .................................................................................................. 12
2.2 Lone Worker Mailboxes ............................................................................................................... 14
2.2.1 How to set up a Mailbox that is a Member of the PC Desktop Alert Group .............................. 14
2.2.2 How to set up a Mailbox that is a Member of the Phone Alert Group ....................................... 15
2.2.3 How to set up a Mailbox for an Alert Group .............................................................................. 16
2.2.4 How to use the Group Editor to set up Alert Groups ................................................................ 18
2.2.4.1 How to set up an Alert Group for PC Desktop Alerts ............................................................. 18
2.2.4.2 How to set up an Alert Group for Phone Alerts ...................................................................... 22
2.2.4.3 How to specify Shift Patterns ................................................................................................. 25
2.2.5 How to set up Mailboxes for Lone Workers .............................................................................. 29
2.2.6 How to set up Auto Login for a Mailbox for a lone worker ........................................................ 34
3 How to use Trust 24x7 ........................................................................................ 38
3.1
3.2
3.3
3.4
How to set up a Trust 24x7 Job and record a message .............................................................. 38
How to cancel or extend a Trust 24x7 Job................................................................................... 39
How to change your PIN or record an information only message ............................................... 40
How to Intentionally Invoke an Alert ............................................................................................. 42
4 Phone Alert ......................................................................................................... 43
5 Desktop (PC) Alert .............................................................................................. 44
6 How to set up the SMS Text Message Facility .................................................... 47
6.1 SMS Gateway Account ................................................................................................................ 47
6.2 Identicom Templates .................................................................................................................... 47
6.2.1 General...................................................................................................................................... 47
6.2.2 Job (Amber) .............................................................................................................................. 48
6.2.3 Emergencies (Red Alert) ........................................................................................................... 49
6.3 How to Register a lone worker to use the SMS Interface ............................................................ 49
6.4 Alarm Groups ............................................................................................................................... 49
7 How to use the SMS Text Message facility ......................................................... 50
7.1
7.2
7.3
7.4
How to Start a Job ........................................................................................................................ 50
How to Extend a Job .................................................................................................................... 50
How to Cancel a Job .................................................................................................................... 50
How to intentionally Issue an Alert ............................................................................................... 51
8 Trust 24x7 Web 2.02.0004 .................................................................................. 52
8.1
Login............................................................................................................................................. 52
Issue 1.01 – 14 January 2011
Page 2 of 75
Trust 24x7 2.02.0004
User Guide
8.2 Status ........................................................................................................................................... 53
8.2.1 Lone Worker Details (overview) ................................................................................................ 54
8.2.2 Lone Worker Details (detailed) ................................................................................................. 55
8.2.3 Adding or Changing the Picture ................................................................................................ 56
8.2.4 Play Lone Worker Message ...................................................................................................... 58
8.2.5 Display Lone Worker Text Message ......................................................................................... 59
8.2.6 Message Archive ....................................................................................................................... 60
8.2.7 Alarm Audit ................................................................................................................................ 61
8.3 Reports ......................................................................................................................................... 63
8.3.1 Lone worker .............................................................................................................................. 64
8.3.2 Site Code .................................................................................................................................. 67
8.4 Users ............................................................................................................................................ 67
8.5 Admin ........................................................................................................................................... 68
8.5.1 Site Codes ................................................................................................................................. 68
8.5.1.1 Add ......................................................................................................................................... 69
8.5.1.2 Edit ......................................................................................................................................... 70
8.5.1.3 Delete ..................................................................................................................................... 72
8.5.2 Alarm Reasons .......................................................................................................................... 73
8.5.2.1 Add a New Reason ................................................................................................................ 74
8.5.2.2 Edit an Existing Reason ......................................................................................................... 74
Issue 1.01 – 14 January 2011
Page 3 of 75
Trust 24x7 2.02.0004
User Guide
Changes from Version 2.02.0004 – Issue 1.00
Section 2.1.1 (Page 9)
Issue 1.01 – 14 January 2011
Amended the explanation of the Archive lone worker messages
parameter.
Page 4 of 75
Trust 24x7 2.02.0004
User Guide
1 Introduction
1.1
What Trust 24x7 does
Trust 24x7 enables your organisation to implement a system that can alert you when an
employee who works alone may be in difficulty or danger. It raises an alarm in the following two
circumstances.
(1)
Trust 24x7 automatically raises an alarm if an employee does not confirm safe completion
of an assignment.
(2)
Trust 24x7 enables an employee to raise an alarm if he/she becomes at risk or in danger,
and/or requires assistance.
1.2
Overview of how to use Trust 24x7
(1)
A lone worker telephones Trust 24x7, and when prompted enters his/her (four-digit) ID
number and a PIN.
(2)
The lone worker then starts a Trust 24x7 job, records a voice message that contains full
details of the task such as location, travel route, duration etc. and specifies a time or
duration by which he/she expects to finish the task.
(3)
If the lone worker takes longer than anticipated to complete the task, he/she can
(repeatedly) call Trust 24x7 to extend the time of completion.
(4)
After the lone worker completes the task, he/she telephones Trust 24x7 again, to cancel
the Trust 24x7 job.
NOTE If the lone worker does not cancel the job, Trust 24x7 calls the lone worker, shortly
before the job expires, to prompt the lone worker to either cancel the job or extend
the time of completion.
(5)
If the lone worker fails to cancel the Trust 24x7 job, or deliberately raises an alarm,
Trust 24x7 sends the recorded voice message to a first alert group.
(6)
One member of this group must acknowledge and respond to the message.
This can be a phone group, or a PC group if you have the optional Desktop Alert module.
(7)
If nobody responds, Trust 24x7 can then send the recorded voice message to a second
alert group.
(8)
One member of this group must acknowledge and respond to the message.
(9)
If nobody responds, Trust 24x7 can attempt to re-contact the first alert group.
1.3
Trust 24x7, LoneWorker, Lone Worker, Lone worker or lone worker
Trust 24x7 was formerly known as VC LoneWorker. The legends and options of the application
vary between LoneWorker, Loneworker, Lone Worker, Lone worker and lone worker. For
consistency in this document lone worker (all lower case) refers to a person that works alone,
and, Lone Worker (initial capitals) refers to legends and options of Trust 24x7, irrespective of
whether the words are actually capitalised and/or elided.
Issue 1.01 – 14 January 2011
Page 5 of 75
Trust 24x7 2.02.0004
1.4
User Guide
Block Diagram
The following diagram shows the main components of a typical Trust 24x7 system.
Telephone
System
PABX
VCII
computer
(tower or rack
server fitted with
a telephone
interface card)
F
I
R
E
W
A
L
L
with
VC LoneWorker
I
N
T
E
R
N
E
T
Computer Network
PC with
PC with
PC with
Internet Explorer
Internet Explorer
Internet Explorer
and
and
and
VC Desktop
Integration
VC Desktop
Integration
VC Desktop
Integration
Issue 1.01 – 14 January 2011
Page 6 of 75
Trust 24x7 2.02.0004
1.5
User Guide
Overview of how to set up Trust 24x7
The following illustration shows a typical configuration of mailboxes for Trust 24x7.
7000
7001
PC Group
1000
Phone Group
1001
Members
8000 8001
8002 8003
Members
9000 9001
9002 9003
Trust 24x7 requires the following four categories of mailboxes. The numbers shown on the left
are the initial numbers of the four categories of mailboxes shown in the illustration above.
7000
Lone worker mailboxes
1000
Group mailboxes
8000
Desktop (PC) Alert group member mailboxes
9000
Phone Alert group member mailboxes
The illustration above shows Trust 24x7 configured as follows.
The ID of the technician is 7000 and Trust 24x7 sends an alert to the desktop (PC) group
1000. If nobody in this group responds to the alert, Trust 24x7 sends the alert to the
phone group 1001. If, nobody in that group responds to the alert, Trust 24x7 sends the
alert back to the desktop (PC) group 1000.
The ID of the vet is 7001 and Trust 24x7 sends an alert to the phone group 1001. If
nobody in this group responds to the alert, Trust 24x7 sends the alert to the desktop (PC)
alert group 1000. If, nobody in that group responds to the alert, Trust 24x7 sends the
alert back to the phone group 1001.
Issue 1.01 – 14 January 2011
Page 7 of 75
Trust 24x7 2.02.0004
User Guide
Each lone worker has a mailbox, which provides the lone worker access to Trust 24x7 The lone
worker also has a designated alert group, to which Trust 24x7 sends an alert if the lone worker
does not confirm successful completion of a task, or deliberately raises the alarm.
Before a lone worker starts a task he/she telephones Trust 24x7 and enters his/her ID number
(that is the mailbox number) and a PIN. The lone worker initiates a Trust 24x7 job, specifies a
time, by which he/she expects to complete the task and records a message (that is stored in the
lone worker’s mailbox).
The lone worker then does the task. If he/she does not confirm completion of the task by the
preset time, or the lone worker raises the alarm, VC Lone worker distributes the recorded
message to the lone worker’s designated alert group, which distributes it to each member
mailbox. If nobody responds to the alert, Trust 24x7 escalates the alert and sends it to the lone
worker’s designated escalation group, which in turn distributes it to each member mailbox. If,
still, nobody responds to the alert, Trust 24x7 sends it back to the lone worker’s alert group.
NOTE
1.6
Each of these groups can be a phone alert group or a PC desktop alert group. The
alert is passed from one group to another group according to the Panic To
parameter. See Section 2.2.4.1 (Page 18) and Section 2.2.4.2 (Page 22).
What you must know before you read this manual
This manual assumes that you know the following:
(1)
You know how to use the implementation of Windows®, under which the System
Manager runs;
(2)
You know how to use a typical Windows® application, such as one or more Microsoft®
Office® applications.
(3)
The System Manager (software) edits all the system parameters that the VCII Server
uses. In many cases it effectively edits lists of information.
You must understand how to use search, navigation and edit facilities to edit lists of
information. The System Manager – User Reference Guide illustrates these facilities
and buttons.
(4)
You must know how to use the System Manager.
1.7
System Manager – User Reference Guide
This document provides the specific details of how you use the System Manager (software) to set
up and administer Trust 24x7. However, you may need to refer to the System Manager – User
Reference Guide, for further information.
Issue 1.01 – 14 January 2011
Page 8 of 75
Trust 24x7 2.02.0004
User Guide
2
System Manager 4.01.0173 and VCII Server 4
2.1
Lone Worker Class Of Service
If your system does not have a Lone Worker Class Of Service, you must create it. You must then
restart the VCII Server, as Section 2.1.2 (Page 12) describes. You then create the Lone Worker
Groups and Mailboxes.
2.1.1
How to set up the Lone Worker Class Of Service
Do the following procedure.
(1)
Start the System Manager.
(2)
Select the Class of Service view. This displays the General tab, by default.
(3)
Click the ADD RECORD button.
(4)
On the General tab, set the values below, as shown in the following illustration.
Option
Value
Reference
Set this to the next available number
Class Of Service Name
Set this to Lone Worker.
Operation
Select Lone Worker from the pull down menu.
Issue 1.01 – 14 January 2011
Page 9 of 75
Trust 24x7 2.02.0004
(5)
User Guide
On the Autoattendant tab, set the values below, as shown in the following illustration.
Option
Value
Autoattendant
Select this check box, so that it contains a tick.
All other check boxes
Deselected, so that they are empty.
Rings To Answer
Set this to 0 (ZERO).
Transfer Type
Do not set this, leave it blank.
Blind Transfer Mode
Do not set this, leave it blank (or set to Standard).
(6)
On the Misc1 tab, set the Lone Worker options you require.
Option
Request site code for lone worker
Issue 1.01 – 14 January 2011
Value
If this check box is selected, so that it contains a tick, a
mailbox with the Lone Worker Class Of Service plays a
request after the mailbox greeting to request the Site
Code of the lone worker.
Page 10 of 75
Trust 24x7 2.02.0004
User Guide
Option
Archive lone worker messages
Value
If this check box is selected, so that it contains a tick, all
lone worker messages are archived. The default archive
directory is as follows.
C:\VCONNECT\ARCHIVE
To change this to another directory, do the following two
steps.
(1)
Specify the directory through the Installation
Menu option Miscellaneous Data. For details
refer to the System Manager User Reference
Guide.
(2)
Change the following line in the LW.INI file.
ArchivePath=C:\VCONNECT\ARCHIVE
Don’t alarm on bad login password
(7)
If this check box is selected, so that it contains a tick,
Trust 24x7 does NOT issue an alert if a lone worker
enters an incorrect PIN or no PIN.
Close (Exit) the System Manager.
Issue 1.01 – 14 January 2011
Page 11 of 75
Trust 24x7 2.02.0004
2.1.2
User Guide
How to restart the VCII Server
Do the following procedure.
(1)
If the System Manager runs on a different computer to the VCII Server, go to the
computer that runs the VCII Server software.
Issue 1.01 – 14 January 2011
Page 12 of 75
Trust 24x7 2.02.0004
(2)
Click the STOP button.
(3)
The VCII Server displays the following window, to request confirmation.
User Guide
Click the Yes button.
(4)
The VCII Server software stops.
(5)
Start the VCII Server software.
Issue 1.01 – 14 January 2011
Page 13 of 75
Trust 24x7 2.02.0004
User Guide
2.2
Lone Worker Mailboxes
2.2.1
How to set up a Mailbox that is a Member of the PC Desktop Alert Group
Do the following procedure.
(1)
If necessary, start the System Manager.
(2)
Select the Mailbox view. This displays the General tab, by default.
(3)
Click the ADD RECORD button.
(4)
On the General tab, set the values below, as shown in the following illustration.
Option
Value
Mailbox
Set this to a suitable number. See Section 1.5 (Page 7).
Forename(s)
Set this to PC Desktop Alert or the person’s forename(s).
Surname
Set this to Member or the person’s surname.
Department
Select an appropriate department from the pull down menu or
leave this set to the default value (none).
Class Of Service
Select Mailbox Only from the pull down menu.
Extension
Leave this blank.
Password
Leave this as ****, which is the default value 8888.
Company
The name of your organisation or you can leave this blank.
Deliver to
Leave this set to the default value (none).
Issue 1.01 – 14 January 2011
Page 14 of 75
Trust 24x7 2.02.0004
(5)
User Guide
Select the Desktop tab and set the values below, as shown in the following illustration.
Option
Value
Desktop Notify
Leave this blank or 0 (ZERO).
Display Text
Leave this blank or 0 (ZERO).
DTI Enable
Select this check box, so that it contains a tick.
Outlook Enable
Leave this check box unselected, so that it is empty.
Integration E-mail
Leave this blank or 0 (ZERO).
(6)
Click the Apply button.
2.2.2
How to set up a Mailbox that is a Member of the Phone Alert Group
Do the following procedure.
(1)
If necessary, start the System Manager.
(2)
Select the Mailbox view. This displays the General tab, by default.
(3)
Click the ADD RECORD button.
Issue 1.01 – 14 January 2011
Page 15 of 75
Trust 24x7 2.02.0004
(4)
User Guide
On the General tab, set the values below, as shown in the following illustration.
Option
Value
Mailbox
Set this to a suitable number. See Section 1.5 (Page 7).
Forename(s)
Set this to Phone Alert or the person’s forename(s).
Surname
Set this to Member or the person’s surname.
Department
Select an appropriate department from the pull down menu or
leave this set to the default value (none).
Class Of Service
Select Extension Only – No Mailbox from the pull down menu.
Extension
Set this to the extension number of the phone.
Password
Leave this as ****, which is the default value 8888.
Company
The name of your organisation or you can leave this blank.
Deliver to
Leave this set to the default value (none).
(5)
Click the Apply button.
2.2.3
How to set up a Mailbox for an Alert Group
Do the following procedure.
(1)
If necessary, start the System Manager.
(2)
Select the Mailbox view. This displays the General tab, by default.
Issue 1.01 – 14 January 2011
Page 16 of 75
Trust 24x7 2.02.0004
User Guide
(3)
Click the ADD RECORD button.
(4)
On the General tab, set the values below, as shown in the following illustration.
Option
Mailbox
Value
Set this to a suitable number. See Section 1.5 (Page 7).
It is good practice to choose this to be outside the range of
extension numbers.
Forename(s)
Set this to PC Desktop Alert or Phone Alert.
Surname
Set this to Group.
Department
Select an appropriate department from the pull down menu or
leave this set to the default value (none).
Class Of Service
Select Mailbox Only from the pull down menu.
Extension
Leave this blank.
Password
Leave this as ****, which is the default value 8888.
Company
The name of your organisation or you can leave this blank.
Deliver to
Leave this set to the default value (none).
(5)
Click the Apply button.
Issue 1.01 – 14 January 2011
Page 17 of 75
Trust 24x7 2.02.0004
2.2.4
User Guide
How to use the Group Editor to set up Alert Groups
2.2.4.1 How to set up an Alert Group for PC Desktop Alerts
Do the following procedure.
(1)
If necessary, start the System Manager.
(2)
Select the Groups view. This displays the General tab, by default.
(3)
Click the ADD RECORD button (if there are already one or more groups).
(4)
On the General tab, set the values below, as shown in the following illustration.
Option
Value
Group Type
Select LW Desktop from the pull down menu.
Group Number
Select the mailbox that you set up for the PC Desktop Alert
Group [see Section 1.5 (Page 7)].
Announce
Leave this set to the default value No.
Issue 1.01 – 14 January 2011
Page 18 of 75
Trust 24x7 2.02.0004
User Guide
Option
Value
This is the number of times that Trust 24x7 attempts to issue
the alert to a member of the Group Number group, before it
escalates to the Panic to group, which follows.
Retries
The default value is 1.
Panic to
If you also set up a mailbox for another alert group, either a
Phone Alert Group or another PC Desktop Alert Group [see
Section 1.5 (Page 7)], you can select it.
Confirm Request
Leave this check box unselected, so that it is empty.
Dynamic Group
Leave this check box unselected, so that it is empty.
Play Twice
Leave this check box unselected, so that it is empty.
Linear UCD
Select this check box, so that it contains a tick, to call members
of the alert group [see Section 5 (Page 44)] in order according to
the Members tab, General subsidiary tab, Sequence parameter.
(5)
Click the Apply button.
(6)
Click on the Members tab.
(7)
This tab view itself contains three subsidiary tab views General, Timings and AMIS. This
step describes how to use just the General subsidiary tab to specify members.
NOTE Section 2.2.4.3 (Page 25) describes how to use the Timings subsidiary tab together
with the General subsidiary tab to specify members with shift patterns.
You do not need to use the AMIS subsidiary tab.
Issue 1.01 – 14 January 2011
Page 19 of 75
Trust 24x7 2.02.0004
User Guide
Do the following procedure to add a member.
(a)
Click the ADD RECORD button (if there are already one or more members).
(b)
Specify the following.
Option
Value
Mailbox
Select a PC Desktop Alert Member from the pull down menu.
Phone
Leave this blank or set to 0 (ZERO).
Sequence
This defines the order in which the message is distributed to the
PC Desktops of the members of the group. Set this to 1, 2, 3 etc.
to define the order. You can set more than one person to the
same value to define a priority, so that Trust 24x7 attempts to
issue an alert to any member with sequence set to 1, then to any
member with sequence set to 2, then to any member with
sequence set to 3, and so on.
To utilise a sequence you must select the General tab,
Linear UCD check box
If there is no specific order, you leave this as 1 (ONE) for every
member.
Issue 1.01 – 14 January 2011
Page 20 of 75
Trust 24x7 2.02.0004
User Guide
Option
Value
This check box MUST be selected, so that it contains a tick.
Active
NOTE
If someone is temporarily unavailable, due to holiday, illness etc., you edit
these details and deselect the Active check box, so that it is empty.
(c)
Click the Apply button, on the Members tab.
(d)
Repeat Steps (a) to (c) to add further members.
Issue 1.01 – 14 January 2011
Page 21 of 75
Trust 24x7 2.02.0004
User Guide
2.2.4.2 How to set up an Alert Group for Phone Alerts
Do the following procedure.
(1)
If necessary, start the System Manager.
(2)
Select the Groups view. This displays the General tab, by default.
(3)
Click the ADD RECORD button (if there are already one or more groups).
(4)
On the General tab, set the values below, as shown in the following illustration.
Option
Value
Group Type
Select Lone Worker from the pull down menu.
Group Number
Select the mailbox that you set up for the Phone Alert
Group [see Section 1.5 (Page 7)].
Announce
Leave this set to the default value No.
Retries
This is the number of times that Trust 24x7 attempts to
issue the alert to a member of the Group Number group,
before it escalates to the Panic to group, which follows.
The default value is 1.
Issue 1.01 – 14 January 2011
Page 22 of 75
Trust 24x7 2.02.0004
User Guide
Option
Value
Panic to
If you also set up a mailbox for another alert group, either a
PC Desktop Alert Group or another Phone Alert Group
[see Section 1.5 (Page 7)], you can select it.
Confirm Request
Leave this check box unselected, so that it is empty.
Dynamic Group
Leave this check box unselected, so that it is empty.
Play Twice
Leave this check box unselected, so that it is empty.
Linear UCD
Select this check box, so that it contains a tick, to call
members of the alert group [see Section 4 (Page 43) in order
according to the Members tab, General subsidiary tab,
Sequence parameter.
(5)
Click the Apply button.
(6)
Click on the Members tab.
(7)
This tab view itself contains three subsidiary tab views General, Timings and AMIS. This
step describes how to use just the General subsidiary tab to specify members.
NOTE Section 2.2.4.3 (Page 25) describes how to use the Timings subsidiary tab together
with the General subsidiary tab to specify members with shift patterns.
You do not need to use the AMIS subsidiary tab.
Do the following procedure to add a member.
(a)
Click the ADD RECORD button (if there are already one or more members).
Issue 1.01 – 14 January 2011
Page 23 of 75
Trust 24x7 2.02.0004
(b)
User Guide
Do either of the following to specify a Phone Alert member.
Option
Mailbox
Phone
Issue 1.01 – 14 January 2011
Value
Do either of the following.
(a)
Select a Phone Alert Member from the pull down menu
(as shown below) and leave Phone blank or set to 0
(ZERO).
(b)
Leave this blank or set to (none) and set Phone to an
extension number or an external phone number.
See Mailbox above.
Page 24 of 75
Trust 24x7 2.02.0004
User Guide
Option
Value
This defines the order in which the message is distributed to the
PC Desktops of the members of the group. Set this to 1, 2, 3 etc.
to define the order. You can set more than one person to the
same value to define a priority, so that Trust 24x7 attempts to
issue an alert to any member with sequence set to 1, then to any
member with sequence set to 2, then to any member with
sequence set to 3, and so on.
Sequence
To utilise a sequence you must select the General tab,
Linear UCD check box
If there is no specific order, you leave this as 1 (ONE) for every
member.
This check box MUST be selected, so that it contains a tick.
Active
NOTE
If someone is temporarily unavailable, due to holiday, illness etc., you edit these
details and deselect the Active check box, so that it is empty.
(d)
Click the Apply button, on the Members tab.
(e)
Repeat Steps (a) to (d) to add further members.
2.2.4.3 How to specify Shift Patterns
The Timings tab enables you to specify the days and times when Trust 24x7 can attempt to
deliver an alert to a member of a group. The following example illustrates how to use it to specify
a member with shift patterns.
Issue 1.01 – 14 January 2011
Page 25 of 75
Trust 24x7 2.02.0004
User Guide
(1)
Add a member as Section 2.2.4.1 (Page 18) and Section 2.2.4.2 (Page 22), Step (7),
Sub-Step (c) describes.
(2)
Click the Timings tab.
This example will specify the times for someone who work a morning shift on Monday,
Tuesday and Wednesday, and an afternoon shift on and Thursday, Friday and Saturday.
(3)
Specify the morning shift on Monday, Tuesday and Wednesday.
Issue 1.01 – 14 January 2011
Page 26 of 75
Trust 24x7 2.02.0004
(4)
User Guide
Click the Apply button, on the Members tab.
Issue 1.01 – 14 January 2011
Page 27 of 75
Trust 24x7 2.02.0004
User Guide
(5)
Click the General tab (next to the Timings tab) and click the ADD RECORD button.
(6)
Specify the same mailbox again.
(7)
Click the Timings tab and specify the afternoon shift.
Issue 1.01 – 14 January 2011
Page 28 of 75
Trust 24x7 2.02.0004
(8)
Click the Apply button, on the Members tab.
2.2.5
How to set up Mailboxes for Lone Workers
User Guide
Do the following procedure.
(1)
If necessary, start the System Manager.
(2)
Select the Mailbox view. This displays the General tab, by default.
(3)
Click the ADD RECORD button.
Issue 1.01 – 14 January 2011
Page 29 of 75
Trust 24x7 2.02.0004
(4)
User Guide
On the General tab, set the values below, as shown in the following illustration.
Option
Mailbox
Value
Set this to a suitable number. See Section 1.5 (Page 7).
It is good practice to choose this to be outside the range of
extension numbers.
NOTE
This mailbox number is the lone worker’s UserID.
The lone worker must enter this, unless the mailbox is set up
with Auto Login, which Section 2.2.6 (Page 34) describes.
Forename(s)
Set this to the forename(s) of the lone worker.
Surname
Set this to the surname of the lone worker.
Department
Select an appropriate department from the pull down menu or
leave this set to the default value (none).
Class Of Service
Select Lone Worker from the pull down menu.
Extension
Leave this blank.
Password
Leave this as ****, which is the default value 8888.
NOTE
This password is the lone worker’s PIN.
The lone worker can change this.
Company
The name of your organisation or you can leave this blank.
Deliver to
Leave this set to the default value (none).
Issue 1.01 – 14 January 2011
Page 30 of 75
Trust 24x7 2.02.0004
User Guide
(5)
Click the Lone Worker tab.
(6)
Specify the values below, as shown in the following illustration.
Option
Function
Lone Worker Alarm Group
Set this to a suitable number. See Section 1.5 (Page 7).
Callback
The mobile phone number of the lone worker or a land
line number that the lone worker is working close to.
If your implementation of Trust 24x7 provides GPS or
GSM tracking, you must specify this in international
format as in the following example, but with no spaces.
+ 44 7777
Issue 1.01 – 14 January 2011
123 456
Page 31 of 75
Trust 24x7 2.02.0004
Option
User Guide
Function
To use the SMS text message facility you MUST have a
Voice Connect SMS Gateway account. Contact your
Account Manager to set this up.
This button enables a lone worker to use SMS text
messages instead of voice calls to initiate, extend and
cancel Trust 24x7 jobs. (You must first enter the number
of the mobile phone in the Callback box.) Click on this
button and wait ten minutes. For full details of the SMS
text message facility refer to Section 6 (Page 47).
Alarm Delay
If you specify a Callback number you must specify a
delay.
If the lone worker does not immediately answer a
callback, Trust 24x7 waits for the duration of the delay.
If the lone worker answers the call-back and enters the
correct pin, but does not cancel or extend the job, then
Trust 24x7 issues an alert after the delay period.
If the lone worker answers the call-back but enters no pin
or an incorrect pin, Trust 24x7 immediately issues an
alert.
NOTE. Refer to Section 2.1.1 (Page 9). If on the Class Of
Service view, Miscellaneous tab, Lone Worker group, you
select the Don’t alarm on bad login password check box,
so that it contains a tick, Trust 24x7 does NOT issue an
alert if a lone worker enters an incorrect PIN or no PIN.
Fixed Period (minutes)
If you specify this, Trust 24x7 uses it as a default period
for a job.
If you do NOT select the check box Must accept default
period (so that it is empty) Trust 24x7 offers an extra
option to a lone worker, to select the default period.
If you DO select the check box Must accept default period
(so that it contains a tick) Trust 24x7 constrains a lone
worker, to set a job for the default period only.
Maximum Period (minutes)
This specifies a maximum period for a Trust 24x7 job. If a
user tries to set up a job for longer than this period,
Trust 24x7 rejects the job and prompts the lone worker to
set up a new job.
NOTE. You can also set this through the menu
Installation, option Miscellaneous Data, in which case it
applies to all lone workers.
Must accept default period
Issue 1.01 – 14 January 2011
See Fixed Period (minutes) above.
Page 32 of 75
Trust 24x7 2.02.0004
User Guide
Option
Function
Request site code for Lone Worker
If this check box is selected, so that it contains a tick,
Trust 24x7 asks the lone worker to enter a Site Code.
No PIN
If this check box is selected, so that it contains a tick,
Trust 24x7 does not ask the lone worker to enter a PIN
when it issues a callback to prompt the lone worker to
extend or cancel a job.
NOTE. You can also set this through the menu
Installation, option Miscellaneous Data, in which case it
applies to all lone workers.
Send SMS warning near end of job
If this check box is selected, so that it contains a tick,
Trust 24x7 sends an SMS message 5 minutes before a job
expires, to remind the lone worker to cancel or extend the
job.
Tracking Settings
Tracking Enabled
If this check box is selected, so that it contains a tick,
Trust 24x7 enables tracking of the mobile phone, by GPS
for a GPS enabled phone and GSM for a normal phone. It
then sends SMS text messages to Trust 24x7 that report
the position of the phone.
Allow Locate Request
If this check box is selected, so that it contains a tick,
Trust 24x7 permits a user to request the location of the
lone worker.
Location Icon
Not currently used.
History Icon
Not currently used.
Interval (seconds)
The interval between each SMS that Trust 24x7 receives,
which reports the location of the phone.
Tracking Type
This may offer one or both of GPS and GSM.
GPS uses satellite to provide a relatively precise position.
GSM is the type of phone network and enables a phone to
be tracked to an area around a mobile phone network
transmitter. It is less precise than GPS.
This button enables you to select a GPS Schedule. You
can specify one or more of these through the menu
Maintenance, option GPS Schedules.
Identicom Unit
Refer to the Trust 24x7 Identicom User Guide.
Issue 1.01 – 14 January 2011
Page 33 of 75
Trust 24x7 2.02.0004
2.2.6
User Guide
How to set up Auto Login for a Mailbox for a lone worker
The Auto Login facility is available on digital phone systems. It enables Trust 24x7 to recognise
the CLI (Caller Line Identity) of the (mobile) phone of a lone worker, and hence the identity of
the lone worker. When the lone worker calls Trust 24x7 to start, extend or cancel a job,
Trust 24x7 recognises the (mobile) phone number and passes the call directly to the lone worker’s
mailbox, so that the lone worker does not have to enter a UserID.
NOTES
(1)
This facility can also be configured so that the lone worker does not have
to enter a PIN either, as Step (7) describes.
(2)
If two or more lone workers share a (mobile) phone, they cannot use this
facility. The VCII detects that the lone workers have the same phone
number and asks them to enter their UserID and PIN numbers.
Do the following procedure.
(1)
Click the Dial Forward tab.
(2)
Select the Multiple Dial Forward check box.
Issue 1.01 – 14 January 2011
Page 34 of 75
Trust 24x7 2.02.0004
(3)
Click the ADD RECORD button.
(4)
Set Sequence to 1.
(5)
Specify the (mobile) phone number in Number.
Issue 1.01 – 14 January 2011
User Guide
Page 35 of 75
Trust 24x7 2.02.0004
(6)
Click the Flags tab.
(7)
Clear the Call On Dial check box and select the Auto Login check boxes.
NOTE
User Guide
(1)
If you select the Login (No Password) check box, the lone worker does not
have to enter the PIN either.
(2)
You can always select the Login (No Password) option because it is always
available. However, it only operates if the Auto Login check box is selected.
Issue 1.01 – 14 January 2011
Page 36 of 75
Trust 24x7 2.02.0004
(8)
User Guide
Click the Apply button, on the Dial Forward tab.
Issue 1.01 – 14 January 2011
Page 37 of 75
Trust 24x7 2.02.0004
3
How to use Trust 24x7
3.1
How to set up a Trust 24x7 Job and record a message
(1)
Dial the access number for Trust 24x7 and enter your Trust 24x7 UserID.
(2)
Trust 24x7 plays the following announcement.
User Guide
Please enter your PIN.
(3)
Enter your Trust 24x7 PIN.
(4)
Trust 24x7 plays the following announcement.
Thank you.
(5)
Trust 24x7 plays the following Main Menu.
To enter a new job, Press ONE.
To change your Lone Worker PIN, Press FOUR.
To record an information only message, Press FIVE.
(6)
You press ONE.
(a)
Trust 24x7 plays the following announcement.
Please enter the length of the job in minutes or press HASH (#) and enter the
time as four digits.
(b)
Enter the length of the job in minutes, as TWO digits, i.e. in the range 01 to 99, or
press the HASH (#) key and enter a time, as four digits, by which you expect to
complete the job, for example 1430 for 2:30pm.
(c)
Trust 24x7 plays the time.
(d)
Trust 24x7 plays the following announcement.
If this is correct, press ONE.
Or to re-enter, press TWO.
(e)
IF you press TWO, Trust 24x7 returns to Step (b).
IF you press ONE, Trust 24x7 plays the following announcement.
Please record your message.
(f)
Trust 24x7 sounds a tone.
(g)
Record your message. Press STAR (*) to finish recording.
(h)
Trust 24x7 plays the following announcement.
If this is correct, Press ONE.
Or to review, Press TWO.
Issue 1.01 – 14 January 2011
Page 38 of 75
Trust 24x7 2.02.0004
(k)
User Guide
If you press ONE, Trust 24x7 plays the following announcement and returns to
the Main Menu, in Section 3.2 (Page 39), Step (6).
The job was successfully recorded.
If you press TWO, Trust 24x7 plays your recorded message and responds.
If this is correct, Press ONE.
Or to re-record, Press TWO.
(n)
If you press ONE, Trust 24x7 plays the following announcement and returns to
the Main Menu, in Section 3.2 (Page 39), Step (6).
The job was successfully recorded.
If you press TWO, Trust 24x7 returns to Step (f).
3.2
How to cancel or extend a Trust 24x7 Job
(1)
You can cancel or extend a Trust 24x7 job in two situations.
(2)
(a)
You intentionally call Trust 24x7, to cancel or extend a job. Dial the access
number for Trust 24x7 and enter your Trust 24x7 UserID.
(b)
Trust 24x7 calls you, shortly before a job expires, to prompt you to cancel or
extend the job.
Trust 24x7 plays the following announcement.
Please enter your PIN.
(3)
Enter your Trust 24x7 PIN.
(4)
Trust 24x7 plays the following announcement.
Thank you.
(5)
Trust 24x7 plays the following Main Menu.
To cancel the current job, Press TWO.
To extend the current job, Press THREE.
To change your Lone Worker PIN, Press FOUR.
To record an information only message, Press FIVE.
(6)
You press TWO.
(a)
Trust 24x7 plays the following announcement and returns to the Main Menu, in
Section 3.1 (Page 38), Step (6).
The current job was successfully cancelled.
(7)
You press THREE.
(a)
Trust 24x7 plays the following announcement.
To extend your job either enter the number of minutes as two digits or press
HASH (#) followed by the new end time as four digits.
Issue 1.01 – 14 January 2011
Page 39 of 75
Trust 24x7 2.02.0004
User Guide
(b)
Enter the length of the job in minutes, as TWO digits, i.e. in the range 01 to 99, or
press the HASH (#) key and enter a time, as four digits, by which you expect to
complete the job, for example 1430 for 2:30pm.
(c)
Trust 24x7 plays the time.
(d)
Trust 24x7 plays the following announcement.
If this is correct, press ONE.
Or to re-enter, press TWO.
(e)
IF you press TWO, Trust 24x7 returns to Step (b).
IF you press ONE, Trust 24x7 plays the following announcement.
To record a new message, Press ONE.
To leave the existing message, Press TWO.
(f)
IF you press TWO, Trust 24x7 plays the following announcement and returns to
the Main Menu in Step(6).
The current job was successfully updated.
IF you press ONE, Trust 24x7 plays the following announcement.
Please record your message.
(g)
Trust 24x7 sounds a tone.
(h)
Record your message. Press STAR (*) to finish recording.
(k)
Trust 24x7 plays the following announcement.
If this is correct, Press ONE.
Or to review, Press TWO.
(m)
If you press ONE, Trust 24x7 plays the following announcement and returns to
the Main Menu in Step(6).
The current job was successfully updated.
If you press TWO, Trust 24x7 plays your recorded message and responds.
If this is correct, Press ONE.
Or to re-record, Press TWO.
(n)
If you press ONE, Trust 24x7 plays the following announcement and returns to
the Main Menu in Step(6).
The current job was successfully updated.
If you press TWO, Trust 24x7 returns to Step (g).
3.3
How to change your PIN or record an information only message
(1)
Dial the access number for Trust 24x7 and enter your Trust 24x7 UserID.
Issue 1.01 – 14 January 2011
Page 40 of 75
Trust 24x7 2.02.0004
(2)
User Guide
Trust 24x7 plays the following announcement.
Please enter your PIN.
(3)
Enter your Trust 24x7 PIN.
(4)
Trust 24x7 plays the following announcement.
Thank you.
(5)
Trust 24x7 plays the Main Menu, which ends with the following two options.
To change your Lone Worker PIN, Press FOUR.
To record an information only message, Press FIVE.
(6)
You press FOUR.
(a)
Trust 24x7 plays the following announcement.
Please enter your new PIN.
(b)
As you enter each digit of your 4-digit PIN, Trust 24x7 announces each digit.
(c)
Trust 24x7 plays the following announcement.
Please enter your new PIN again.
(d)
As you re-enter each digit of your 4-digit PIN, Trust 24x7 announces each digit.
(e)
Trust 24x7 plays the following announcement.
Your PIN has been changed.
(f)
Trust 24x7 returns to the Main Menu.
You press FIVE.
(a)
Trust 24x7 plays the following announcement.
Please record your message. This will not log you on or set an alarm.
(b)
Trust 24x7 sounds a tone.
(c)
Record your message. Press STAR (*) to finish recording.
(d)
Trust 24x7 plays the following announcement.
If this is correct, Press ONE.
Or to review, Press TWO.
(e)
If you press ONE, Trust 24x7 returns to the Main Menu.
If you press TWO, Trust 24x7 plays your recorded message and responds.
If this is correct, Press ONE.
Or to re-record, Press TWO.
(f)
If you press ONE, Trust 24x7 returns to the Main Menu.
If you press TWO, Trust 24x7 returns to Step (b).
Issue 1.01 – 14 January 2011
Page 41 of 75
Trust 24x7 2.02.0004
3.4
User Guide
How to Intentionally Invoke an Alert
A lone worker can intentionally invoke an alert, to initiate the escalation procedure, if the lone
worker requires assistance or encounters an emergency situation.
To intentionally invoke an alert, do one of the following.
(1)
Call Trust 24x7, enter your ID number, but do NOT enter a PIN.
(2)
Call Trust 24x7, enter your ID number, and enter an incorrect PIN.
NOTE
(3)
Refer to Section 2.1.1 (Page 9). If on the Class Of Service view, Miscellaneous tab,
Lone Worker group, you select the Don’t alarm on bad login password check box,
so that it contains a tick, Trust 24x7 does NOT issue an alert if a lone worker enters
an incorrect PIN or no PIN.
Do NOT cancel a Trust 24x7 job, and allow it to expire.
Section 4 (Page 43), which follows, and Section 5 (Page 44) describe what happens when
Trust 24x7 issues an alert.
Issue 1.01 – 14 January 2011
Page 42 of 75
Trust 24x7 2.02.0004
4
User Guide
Phone Alert
If a lone worker fails to cancel or extend a Trust 24x7 job before it expires, or intentionally
invokes an alert [see Section 3.4 (Page 42)], Trust 24x7 attempts to issue an alert to one member
of the Alert Group(s). See Section 1.2 (Page 5). If there is a Phone Alert Group it calls each
member in turn. When a member answers a call, the call proceeds as follows.
(1)
Trust 24x7 plays the following announcement.
This is an alarm call from the lone worker system.
(2)
Trust 24x7 plays the message recorded by the lone worker.
(3)
Trust 24x7 plays the following announcement.
To acknowledge this call, Press ZERO.
To repeat the message and acknowledge the call, Press ONE.
(4)
If you press ONE, Trust 24x7 replays the lone worker’s message and returns to Step (3).
If you press ZERO, Trust 24x7 plays the following message and ends the call.
The call was accepted.
Issue 1.01 – 14 January 2011
Page 43 of 75
Trust 24x7 2.02.0004
5
User Guide
Desktop (PC) Alert
If a lone worker fails to cancel or extend a Trust 24x7 job before it expires, or intentionally
invokes an alert [see Section 3.4 (Page 42)], Trust 24x7 attempts to issue an alert to one member
of the Alert Group(s). See Section 1.2 (Page 5). If there is a Desktop Alert Group it issues an alert
to each member in turn. When a member responds to an alert, the response proceeds as follows.
(1)
The Desktop Integration Alert displays a window similar to the following.
(2)
If you click on the Reject button, the above window closes and Trust 24x7 tries to issue
the alert to another member of the group.
If you click the Accept Alert button, Desktop Integration Alert displays the following
request for confirmation. Click the Yes button.
Issue 1.01 – 14 January 2011
Page 44 of 75
Trust 24x7 2.02.0004
(3)
User Guide
The Desktop Integration Alert displays a window similar to the following.
The OK button is initially disabled and greyed out. You must click at least one of the
other three buttons to enable the OK button.
If you click the More Details button, Trust 24x7 displays the details of the lone worker,
similar to that shown in Section 8.2.2 (Page 55).
If you click the Play message on PC button, the Desktop Integration Alert plays the
message recorded by the lone worker in Microsoft® Windows® Media Player.
If you click the Play message on phone button, the Desktop Integration Alert displays
the following window, into which you key your extension (or phone) number to listen to
the message recorded by the lone worker.
Issue 1.01 – 14 January 2011
Page 45 of 75
Trust 24x7 2.02.0004
(4)
User Guide
Click the OK button.
Issue 1.01 – 14 January 2011
Page 46 of 75
Trust 24x7 2.02.0004
6
User Guide
How to set up the SMS Text Message Facility
You can configure Trust 24x7 to enable lone workers to issue SMS text messages to start, extend
and cancel Trust 24x7 jobs.
Trust 24x7 implements the SMS text message facility through the facilities provided for the
Identicom unit, which the Trust 24x7 Identicom User Guide describes.
6.1
SMS Gateway Account
To use the SMS text message facility you require a Voice Connect SMS Gateway Account.
(1)
Contact your account manager to set one up.
(2)
The Trust 24x7 Identicom User Guide describes how to configure Trust 24x7 to use it.
COSTS
6.2
(a)
Each SMS text message that a lone worker sends to Trust 24x7 is charged
at the rate agreed with your provider, which will appear on the mobile
phone bill.
(b)
There is a further cost of 1p for each message. This is the cost for each
text message that the SMS Gateway receives.
Identicom Templates
If you wish to use the SMS text message command to extend a job, as Section 7.2 (Page 50)
describes, you must first set up and use an Identicom template. Most of the parameters are not
relevant for an ordinary mobile phone, but the System Manager constrains you to enter a value
in all boxes. The following illustrations show you what to enter. Refer to the Trust 24x7
Identicom User Guide for further details and how to apply the template.
6.2.1
General
(1)
Enter SMS Facility or something similar in the Template Description.
(2)
Use the dummy number 07777 – 123 456 for the phone numbers.
Issue 1.01 – 14 January 2011
Page 47 of 75
Trust 24x7 2.02.0004
6.2.2
Job (Amber)
(1)
Use the dummy number 07777 – 123 456 for the phone number again.
(2)
Change the Length of job from the default if appropriate.
User Guide
Trust 24x7 uses this value if the lone worker does not specify a time, as Section 7.1
(Page 50) describes.
(3)
Change the Job extend time from the default if appropriate.
The extend command, which Section 7.2 (Page 50) describes, uses this value.
Issue 1.01 – 14 January 2011
Page 48 of 75
Trust 24x7 2.02.0004
6.2.3
Emergencies (Red Alert)
(1)
Use the dummy number 07777 – 123 456 for the phone number again.
6.3
How to Register a lone worker to use the SMS Interface
User Guide
Refer to Section 2.2.5 (Page 29), parameters Callback and Register for SMS Interface.
6.4
Alarm Groups
(1)
The lone worker can ONLY alert to a PC Desktop Alert Group.
(2)
That alert group can ONLY pass an alert to another PC Desktop Alert Group.
(3)
When a member of the alert group receives an alert, he/she must press the More Details
button. This invokes the Trust 24x7 web interface, which displays the text message that
Section 7.1 (Page 50) describes.
Issue 1.01 – 14 January 2011
Page 49 of 75
Trust 24x7 2.02.0004
User Guide
7
How to use the SMS Text Message facility
7.1
How to Start a Job
(1)
Send a SMS text message with the details of your job to the following number.
07797 805 452
(2)
You must put one the following commands, followed by a space, at the beginning of the
SMS text message, to specify the duration of the job.
Command
7.2
Length of Job
Command
Length of Job
.30t
30 minutes
.1t
1 hour
.45t
45 minutes
.2t
2 hours
.60t
60 minutes (1 hour)
.3t
3 hours
.75t
75 minutes
.4t
4 hours
.90t
90 minutes
.5t
5 hours
.6t
6 hours
.7t
7 hours
.8t
8 hours
.9t
9 hours
How to Extend a Job
Send the following SMS text message
.e
to the following number.
07797 805 452
NOTES
7.3
(1)
The case is unimportant, i.e. it can be .E or .e.
(2)
You MUST first set up and use an Identicom template to utilise this
command. Refer to the Trust 24x7 Identicom User Guide.
How to Cancel a Job
Send the following SMS text message
ok
to the following number.
07797 805 452
NOTE
The case is unimportant, i.e. it can be OK, Ok or ok.
Issue 1.01 – 14 January 2011
Page 50 of 75
Trust 24x7 2.02.0004
7.4
User Guide
How to intentionally Issue an Alert
Send the following SMS text message
help
to the following number.
07797 805 452
NOTE
The case is unimportant, i.e. it can be HELP, Help or help.
Issue 1.01 – 14 January 2011
Page 51 of 75
Trust 24x7 2.02.0004
8
Trust 24x7 Web 2.02.0004
8.1
Login
User Guide
Do the following procedure.
(1)
Start your web browser (such as Internet Explorer) and browse to your Trust 24x7 Web
start page.
NOTE Voice Connect inform you of the address of the start page of Trust 24x7 Web
when we install the Trust 24x7 software.
Trust 24x7 Web displays a view similar to the following.
(2)
Click on the Click here to enter link or wait.
Trust 24x7 Web displays the following login view.
(3)
Key in your Username and Password and click the Login button.
Issue 1.01 – 14 January 2011
Page 52 of 75
Trust 24x7 2.02.0004
User Guide
8.2
Status
(1)
After you login, Trust 24x7 Web displays a view similar to the following. The blue buttons
indicate lone workers that do NOT have an active job.
(2)
If a lone worker does not have an active job, the button is blue as shown below.
If a lone worker has recorded a ‘not logged in’ message, the button has a picture of a tape
cassette on it.
If a lone worker initiates a job, which is active and has not expired, the button is green,
as shown below.
If a lone worker has an active job that has expired and Trust 24x7 has issued a Callback
(Mailbox view, Loneworker tab), the button is orange, as shown below, until the lone
worker cancels or extends the job, or the Alarm Delay period elapses and the job alarms.
If a lone worker has an active job that is alarmed, because the lone worker purposely
initiated the alarm, or because the lone worker did not cancel or extend the job when it
expired, the button is red, as shown below.
If a lone worker has an active job, which is alarmed, and the alarm has been
acknowledged, the button is red with a white cross, as shown below.
Issue 1.01 – 14 January 2011
Page 53 of 75
Trust 24x7 2.02.0004
User Guide
If a lone worker is in a designated hazardous area, the button has a yellow triangle, as
shown below.
The yellow triangle can appear on a button indicating an active job, i.e. green, orange, red
or red with a white cross.
It cannot appear on a button that is blue.
(3)
Click on a button to display the details of the lone worker. Trust 24x7 Web displays a
view similar to the following.
8.2.1
Lone Worker Details (overview)
Click on the links to access further details.
(1)
The Display Lone Worker Details link displays a view similar to that shown in (the next)
Section 8.2.2 (Page 55).
(2)
The Play Lone Worker Message link displays a view similar to that shown in
Section 8.2.3 (Page 56).
(3)
The Display Lone Worker Text Message link displays a view similar to that shown in
Section 8.2.5 (Page 59).
(4)
The Message Archive link displays a view similar to that shown in Section 8.2.6
(Page 60).
(5)
The Alarm Audit link displays a view similar to that shown in Section 8.2.7 (Page 61).
Issue 1.01 – 14 January 2011
Page 54 of 75
Trust 24x7 2.02.0004
8.2.2
User Guide
Lone Worker Details (detailed)
This view enables you to view and edit the details of the lone worker.
(1)
If you edit any details click the Update button shown below to save the amended details.
(2)
If you clicked on the More Details button as Section 5 (Page 44) describes to display this
view, you can click on the Back button shown below to display the view shown in
Section 8.2.1 (Page 54).
Issue 1.01 – 14 January 2011
Page 55 of 75
Trust 24x7 2.02.0004
8.2.3
User Guide
Adding or Changing the Picture
If the details do not have a picture, the view displays the image shown below by default.
To add an image or change the image, do the following procedure.
(1)
Click the Update Picture link under the picture area.
(2)
Trust 24x7 Web displays the following view.
Issue 1.01 – 14 January 2011
Page 56 of 75
Trust 24x7 2.02.0004
User Guide
(3)
Click the Browse button.
(4)
Trust 24x7 Web displays the standard Windows file browser window.
(5)
Select the image file and click the Open button.
IMPORTANT
(6)
(1)
The image file must be either a JPG or a BMP file.
(2)
The size of the image file must be less than 800K.
(3)
The name of the image file must be no more than 18 characters.
Trust 24x7 Web inserts the file’s pathname in the box to the left of the Browse button.
Issue 1.01 – 14 January 2011
Page 57 of 75
Trust 24x7 2.02.0004
(7)
Click the Upload selected file button.
(8)
Trust 24x7 Web briefly displays the following window.
(9)
Trust 24x7 Web displays the uploaded image.
8.2.4
Play Lone Worker Message
User Guide
Right click the Play Lone Worker Message link on the view that Section 8.2.1 (Page 54) shows,
and select Save Target As to download the current message as a WAV file.
Issue 1.01 – 14 January 2011
Page 58 of 75
Trust 24x7 2.02.0004
8.2.5
User Guide
Display Lone Worker Text Message
If you click the Play Lone Worker Message link on the view that Section 8.2.1 (Page 54) shows,
Trust 24x7 Web displays a view similar to the following.
Issue 1.01 – 14 January 2011
Page 59 of 75
Trust 24x7 2.02.0004
8.2.6
User Guide
Message Archive
If you click the Message Archive link on the view that Section 8.2.1 (Page 54) shows, Trust 24x7
Web displays a view similar to the following.
Right click on a link in the column on the left and select Save Target As to download an archived
message as a WAV file.
Issue 1.01 – 14 January 2011
Page 60 of 75
Trust 24x7 2.02.0004
8.2.7
User Guide
Alarm Audit
If you click the Play Lone Worker Message link on the view that Section 8.2.1 (Page 54) shows,
Trust 24x7 Web displays a view similar to the following.
To record details of an alarm do the following procedure.
(1)
NOTE
Click on a link in the column on the right to display the details for an alarm, similar to
the following. This has two scrollable text boxes, into which you can record comments.
Each has an upper and lower part: the upper part is a read only record of all recorded
text; the lower part enables you to add text.
The two titles above the boxes are defined in an INI file. The engineer that
installs Trust 24x7 does this.
Issue 1.01 – 14 January 2011
Page 61 of 75
Trust 24x7 2.02.0004
(2)
User Guide
Click in the lower part of one of the boxes.
Trust 24x7 highlights the text “Add new detail here”.
(3)
Key in the text.
Issue 1.01 – 14 January 2011
Page 62 of 75
Trust 24x7 2.02.0004
(4)
User Guide
Click the Update button, to the right of the box.
Trust 24x7 adds the text to the upper part of the box.
You cannot now edit or delete this text.
(5)
Repeat the procedure to add further text.
(6)
Click the Back button to return to the list of alarms.
8.3
Reports
If you click the Reports button on the Status view [that Section 8.2 (Page 53) describes],
Trust 24x7 Web displays the following menu. Click on the appropriate link.
Issue 1.01 – 14 January 2011
Page 63 of 75
Trust 24x7 2.02.0004
8.3.1
User Guide
Lone worker
If you click on the Lone worker link [as Section 8.3 (Page 63) describes], Trust 24x7 Web displays
a calendar view for the current month similar to the following.
Do the following procedure.
(1)
If you wish the report to start on a date in a month before the current month, click on the
blue triangle to the left of the month and year, one or more times until Trust 24x7 Web
displays the required month.
Issue 1.01 – 14 January 2011
Page 64 of 75
Trust 24x7 2.02.0004
(2)
Click on the start date.
(3)
Specify the end date.
User Guide
If necessary, click on the blue triangle to the right of the month and year, one or more
times until Trust 24x7 Web displays the required month.
Click on the end date.
Issue 1.01 – 14 January 2011
Page 65 of 75
Trust 24x7 2.02.0004
User Guide
(4)
Click the Submit button.
(5)
Trust 24x7 Web displays the report.
(6)
You can click on a lone worker’s UserID, in the column at the left, to display a report for
the individual lone worker, similar to the following.
NOTE
The mouse cursor does not change, when you move it over a lone worker’s
UserID.
Issue 1.01 – 14 January 2011
Page 66 of 75
Trust 24x7 2.02.0004
8.3.2
User Guide
Site Code
If you click on the Site Code link [as Section 8.3 (Page 63) describes], Trust 24x7 Web generates
and displays a report of Trust 24x7 jobs ordered by Site Code, similar to the following.
8.4
Users
If you click the Users button on the Status view [that Section 8.2 (Page 53) describes], Trust 24x7
Web displays a list of users similar to the following.
If you click on a link at the left, Trust 24x7 Web displays the view that Section 8.2.2 (Page 55)
describes.
Issue 1.01 – 14 January 2011
Page 67 of 75
Trust 24x7 2.02.0004
8.5
User Guide
Admin
If you click the Admin button on the Status view [that Section 8.2 (Page 53) describes],
Trust 24x7 Web displays the following sub-menu.
8.5.1
Site Codes
If you click on the Site Codes link [shown in Section 8.5 (Page 68)], Trust 24x7 Web displays a
view similar to the following, which enables you to maintain the list of sites.
Issue 1.01 – 14 January 2011
Page 68 of 75
Trust 24x7 2.02.0004
User Guide
8.5.1.1 Add
Do the following procedure.
(1)
Key in the details of the new site.
(2)
Click the Add button.
Issue 1.01 – 14 January 2011
Page 69 of 75
Trust 24x7 2.02.0004
(3)
User Guide
Trust 24x7 Web adds the new site and displays the amended list of sites.
8.5.1.2 Edit
To change the details of a site, do the following procedure.
(1)
Click on the Edit link against the site code, of the site that you wish to change.
Issue 1.01 – 14 January 2011
Page 70 of 75
Trust 24x7 2.02.0004
(2)
Change any details as necessary.
(3)
Click the Submit button.
(4)
Trust 24x7 Web displays the changed details.
Issue 1.01 – 14 January 2011
User Guide
Page 71 of 75
Trust 24x7 2.02.0004
User Guide
8.5.1.3 Delete
To delete the details of a site, do the following procedure.
(1)
Click on the Delete link to the right of the site that you wish to delete.
(2)
Trust 24x7 Web displays a request for confirmation of the deletion, similar to the
following.
(3)
Click the OK button.
Issue 1.01 – 14 January 2011
Page 72 of 75
Trust 24x7 2.02.0004
(4)
Trust 24x7 Web deletes the site and displays the amended list of sites.
8.5.2
Alarm Reasons
User Guide
If you click on the Alarm Reasons link [shown in Section 8.5 (Page 68)], Trust 24x7 Web displays
a view similar to the following, which enables you to maintain the list of reasons for an alarm.
Issue 1.01 – 14 January 2011
Page 73 of 75
Trust 24x7 2.02.0004
User Guide
8.5.2.1 Add a New Reason
Do the following procedure.
(1)
Click the Add new reason button. Trust 24x7 displays the following prompt for
confirmation.
(2)
Click the Yes button. Trust 24x7 adds a blank reason, which you must now edit, as the
following Section 8.5.2.2 describes.
8.5.2.2 Edit an Existing Reason
Do the following procedure.
(1)
Click the link Edit against a reason. Trust 24x7 displays the following view.
Issue 1.01 – 14 January 2011
Page 74 of 75
Trust 24x7 2.02.0004
(2)
Edit the details. (Trust 24x7 highlights the Save Changes button.)
(3)
Click the Save Changes button.
(4)
Click the Back button.
Issue 1.01 – 14 January 2011
User Guide
Page 75 of 75