1
Easikey® Manager
User Guide
17362 Ver 1.1
May 2001
PAC INTERNATIONAL LTD, 1 Park Gate Close, Bredbury, Stockport, SK6 2SZ, England
Tel: +44 (0) 161 406 3400. Fax: +44 (0) 161 430 8658
www.pac.co.uk
Issue Record
Version
Date
Details
V1.0
May 01
Original Release
V1.1
May 01
Updated for expanded toolbar and new reports.
17362 Ver 1.1
ii
Easikey® Manager
Version 1.1
May 2001
Changes are periodically made to the product, these changes will be incorporated into new
editions of this manual. PAC INTERNATIONAL LTD shall not be liable for errors contained
herein or for any consequential damages connected with the use of this material.
Copyright and Protective Notices
1. The copyright of this document and the associated drawings is the property of PAC
INTERNATIONAL LTD, and is issued on condition that it is not copied, reprinted or
reproduced, nor its contents disclosed, either wholly or in part, without the consent in writing
of, or in accordance with the conditions of a contract with PAC INTERNATIONAL LTD.
2. The publication of information in this document does not imply freedom from patent or other
protective rights of PAC INTERNATIONAL LTD, or others.
3. Performance figures and data quoted in this document are typical, and must be specifically
confirmed by PAC INTERNATIONAL LTD before they become applicable to any tender,
order or contract.
Training and Technical Support
Training courses covering the installation and use of all PAC products are regularly held at
PAC INTERNATIONAL LTD, Stockport. For further information on course availability, or to
discuss your specific requirements, contact the Training Manager at the address below.
It is strongly recommended that any persons installing or commissioning PAC products
attend a suitable training course beforehand.
Technical Support for all PAC products is available during normal office hours:
8:00am to 6:00pm Monday to Friday, excluding public holidays.
Tel: 0161 406 3400
International +44 161 406 3400
Fax: 0161 430 8658
International +44 161 430 8658
This service is provided primarily for the use of trained engineers. End users of PAC products
should first of all contact their installation or maintenance company before contacting PAC.
PAC INTERNATIONAL LTD
1 Park Gate Close
Bredbury
Stockport
SK6 2SZ
England
17362 Ver 1.1
iii
Easikey® Manager
IMPORTANT:
When installing the PAC equipment the following should be noted:
HEALTH AND SAFETY
Installation must wired in accordance with National Wiring Regulations (BS7671, IEE
National Wiring Regulations in the UK). Failure to do so can result in injury or death by
electric shock.
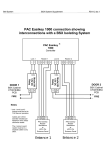
It must also comply with any local Fire, Health and Safety regulations. A secured door
that may be part of an escape route from an area must be fitted with:
• A fail-safe lock (A) so that the door will be released if the power fails. Ideally a
magnetic lock should be used as these are less likely to jam or seize.
• A normally-closed break-glass or manual pull (B) in the lock supply wiring so that in
an emergency the fail-safe lock can be immediately depowered.
B
A
The controller must be earthed.
Isolate the controller supply before working on the controller.
CABLING
The cabling used in the PAC Access Control Systems (six wire bus, reader cables, etc.) are not
prone to electrical interference. However, you should avoid routing cable close to heavy load
switching cables and equipment. If this is unavoidable, cross the cable at right angles every 3.36.6ft/1-2m to reduce the interference.
17362 Ver 1.1
iv
Easikey® Manager
Table of Contents
1. Introduction .............................................................................................................................. 1
2. Easikey Manager Main Window.............................................................................................. 1
3. Easikey Manager Toolbar ....................................................................................................... 2
4. Block Functions ....................................................................................................................... 3
5. Flat Functions .......................................................................................................................... 4
5.1 Add Flat................................................................................................................................ 4
5.2 Edit Flat: Flat Details ............................................................................................................ 4
5.3 Edit Flat: Resident Details.................................................................................................... 4
6. Token Functions ...................................................................................................................... 6
7. Viewing Reports....................................................................................................................... 7
7.1 Unused Resident Tokens .................................................................................................... 7
7.2 Transaction Analysis............................................................................................................ 7
7.3 Health and Abscondance.....................................................................................................8
7.4 Excessive Use ..................................................................................................................... 9
7.5 Periodic Use....................................................................................................................... 10
8. Staff Functions....................................................................................................................... 11
8.1 View Staff........................................................................................................................... 11
8.2 Add Staff Member .............................................................................................................. 11
8.3 Edit Staff Member .............................................................................................................. 11
8.4 Delete Staff ........................................................................................................................ 11
9. Dial Functions ........................................................................................................................ 12
9.1 Dial Schedule..................................................................................................................... 12
9.2 Dial Now............................................................................................................................. 12
9.3 Communications Error Log ................................................................................................ 12
10. Backing Up Easikey Manager ............................................................................................. 14
11. Restoring a Backed Up Easikey Database ........................................................................ 14
12. Delete Events ....................................................................................................................... 14
13. Setup Functions................................................................................................................... 14
14. Import Door Controller Database ....................................................................................... 15
14.1 Installer Operations.......................................................................................................... 15
14.2 Import Database Facility ..................................................................................................15
14.3 User Operations............................................................................................................... 16
15. Initialise and Download....................................................................................................... 18
17362 Ver 1.1
v
Easikey® Manager
This page is intentionally left blank.
17362 Ver 1.1
vi
Easikey® Manager
Introduction
1. Introduction
This User Guide covers all the functions that are normally carried out by the end user of the
Easikey Manager software. It does not cover those functions which would normally be carried
out by the Installer during the installation process.
Access to all the Easikey Manager functions is provided by:
1.
A toolbar with buttons along the top of the Main window.
2.
A series of drop-down menus on the Main window.
When you move the pointer over a button in the toolbar the button function is displayed in a
yellow pop up box and the status bar along the bottom of the Main window.
2. Easikey Manager Main Window
When the Easikey Manager software is first accessed the following window is displayed.
The window displays the following information:
•
The names of all the blocks being administered.
•
The number of updates outstanding for each block.
•
The names of the flats in the selected block.
Note
Updates are pieces of information that the user has entered onto the system that have not
yet been sent to the door controller (the door controller controls access) e.g. when a new
resident has moved into a flat.
To send outstanding updates immediately rather than waiting for the next scheduled time select
Dial Now from the Controllers menu.
An expanded toolbar is displayed by selecting Show Installation Options from the View menu:
When the mouse pointer is placed over a toolbar icon a description of what it does is displayed.
17362 Ver 1.1
1
Easikey® Manager
Easikey Manager Toolbar
3. Easikey Manager Toolbar
The Easikey Manager toolbar contains the following icons:
Create New Block. This is used to create a new block. *
Edit Selected Block. This is used to amend details for an existing block or to remove
a block from the system.
Delete Selected Block. This is used to delete the selected block. *
Create New Flat in Selected Block. This is used to create a new flat in the selected
block. *
Edit Selected Flat. This is used to amend details for an existing flat including
adding/deleting residents
Delete Selected Flat. This is used to delete the selected flat.
Edit Staff Members. This is used to add new staff members, delete or change details
for existing members.
Search Database for Token Code. This is used to find out who a token has been
issued to. For example, if a token is found and handed in, this feature can be used to
find out who owns the token so that it can be returned to the resident who lost it.
Set Dial Schedule. This is used to specify when the Easikey Manager software
contacts the controllers to update the database.
Dial Selected Block. This is the same as Dial Now in the Controller menu and is
used to send database changes to and receive events from controllers rather than
having to wait for the scheduled dial.
View Communications Error Log. This is used to display errors produced during
communication and is enabled only if errors are encountered.
Delete Events from Database. This is used to delete all events prior to a specified
date from the database.
Help. This is used to display help information.
Notes
1. Icons marked with an asterisk (*) are only visible when the Show Installation Options
is selected from the View menu.
2. Also, selecting Show Installation Options will display the menu items New and Edit in
the Edit menu. These menu items correspond with the icons that appear.
17362 Ver 1.1
2
Easikey® Manager
Block Functions
4. Block Functions
The Installer generally creates blocks. Each block requires door controller addresses and phone
numbers.
To edit details of an existing block:
1.
Click on the block to be edited in the list of blocks displayed in the left-hand side of the
Main window.
2.
Click on the Edit Block button in the toolbar to display the Edit Block window showing
details of the block selected.
3.
Change details as required.
4. Click OK.
Note
If changes are required to the Controller tab it is recommended that this be done by the
Installer.
17362 Ver 1.1
3
Easikey® Manager
Flat Functions
5. Flat Functions
5.1 Add Flat
Notes
1. A new flat can only be added to existing blocks.
2. This section also covers the resident functions because residents are associated with
flats.
To add a new flat:
1.
Click on the block you want to add the flat to (existing blocks are displayed in the left-hand
side of the Main window) - a list of flats already added to the selected block is displayed.
2.
Click on the New Flat button in the toolbar to display the New Flat window.
3.
Enter the Flat Name in the box provided.
4.
Enter any extra information in the boxes provided.
If you already know who is to occupy the flat then the residents can be added at the same
time as follows:
5.
Click on Residents at the top of the window to display the residents.
6.
Click New to display the Add Resident window.
7.
Enter the Resident’s Name in the box provided.
8.
Enter the Token Code in the box provided (if known) or present the token/card to the
desktop reader to automatically enter the code.
9.
Enter the Peg Colour (if pegs are being used).
10.
Click OK to go back to the New Flat window.
11.
Click New to add more residents or OK to return to the Main window. Note that if you now
select the block the flat name is shown in the list of flat names for that block.
5.2 Edit Flat: Flat Details
To edit flat details:
1.
Click on the block containing the flat you want to edit to (existing blocks are displayed in the
left-hand side of the Main window) and a list of flats for the selected block is displayed on
the right-hand side of the Main window.
2.
Click on the name of the flat you want to edit.
3.
Click on the Edit Flat button in the toolbar to display the Edit Flat window containing
details of the selected flat.
4.
Edit the Flat Name and any extra information as required.
5.3 Edit Flat: Resident Details
To edit resident details:
1.
Click on Residents at the top of the window to display a list of residents associated with the
selected flat.
2.
Click New to display the New Resident window to add the details for a new resident by:
•
Entering the resident’s name in the box provided.
•
Issuing a token to the resident by entering the Token Code in the box provided (if
known) or presenting the token/card to the desktop reader to automatically enter
the code.
•
Entering the Peg Colour for the new token (if applicable).
or
17362 Ver 1.1
4
Easikey® Manager
Flat Functions
Click on a name from the list of existing residents and click Delete to remove the
resident.
or
Click Edit to display the Edit Resident window to edit the details for the selected
resident by:
•
Changing the Resident’s Name, if required.
•
Issuing a new token to the resident by entering the Token Code in the box
provided (if known) or presenting the token/card to the desktop reader to
automatically enter the code.
•
Entering the Peg Colour for the new token (if applicable).
or
Click Move to display the Move Resident window which allows you to move the
selected resident to another flat by:
3.
•
Clicking on the down-arrow (!) to display the list of flats in the block.
•
Clicking on the required flat.
•
Clicking OK to transfer the resident’s details to the selected flat.
Click OK. This takes you back to the Edit Flat window.
4. Repeat the procedure for other residents or click OK to return to the Main window.
Notes
1. You can only move residents between flats in the same block.
2.
17362 Ver 1.1
The Move function is also used when importing a database from an Easikey/Easikey
1000 controller, see Section 14.
5
Easikey® Manager
Token Functions
6. Token Functions
This feature allows you to find out who owns a token and is used, for example, to locate the
owner of a found token.
To search for a token:
1.
Click on the Token Search button on the toolbar to display the Search for Token
window.
2.
Present the token to the desktop reader and the token code is displayed in the box.
3.
Click OK to display details of the resident/staff associated with the token.
17362 Ver 1.1
6
Easikey® Manager
Viewing Reports
7. Viewing Reports
Easikey Manager can generate 5 different types of reports from the contents of the database.
Unless specifically stated, all reports described below have a Date and Time Range field that
can be set to either:
•
A specified date, between specified times.
•
Between two specified dates, and between specified times.
or
7.1 Unused Resident Tokens
This feature generates a report listing all keys that have not been used: This provides a useful
way of monitoring residents who may, for example, be housebound.
Reports can only be generated on a specific date or between two specified dates.
To generate an Unused Token report:
1.
Select Unused Resident Tokens from the Reports section of the File menu.
2.
Select the required date range.
3.
Click OK to generate the report.
7.2 Transaction Analysis
This option is used to report on specified events or all events that are generated by the door
controllers.
The operator can select events from a list, whether is it just one or many events to report on.
Alternatively, the operator can use the Select all Events option without having to go down the
list selecting each one individually.
To generate an Transaction Analysis report:
1.
Select Transaction Analysis from the Reports section of the File menu.
Event Types Reported
Exit Authorised
Entry Authorised
Access Authorised
Free Exit
Request to Exit
Request for Entry
Unauthorised Access
No Access: Level
No Access: Locked Out
No Access: Pass Back
Door Left Open
Door Closed
Anti-Tamper Alarm
Alarm Cleared
Automatic Lock
Automatic Unlock
Editor On
Editor Off
Local Alarm Accepted
No Access: Unknown ID
Alarm Acknowledged
RTE Button Held Down
Repeated Token Use
PIN Reader Duress Alarm
Duress Alarm Acknowledged
Unit Closed Down
Unit Started Up
Lock On Authorised
Lock Off Authorised
17362 Ver 1.1
7
Easikey® Manager
Viewing Reports
2.
Select the transactions required.
3.
Select the required date and time range.
4.
Select OK to generate the report.
Because of the vast number of events that are generated from normal day-to-day use, the report
allows an operator to input a date/time for a specified day or date range. This will help when
trying to narrow the search to a specific date and time.
7.3 Health and Abscondance
This feature allows a report based on flats not being accessed. This provides a useful way of
monitoring residents who may, for example, be housebound.
To generate a Health and Abscondance report:
1.
Select Health and Abscondance from the Reports section of the File menu.
2.
Select the required date range.
Note
Only dates can be entered, the time fields are disabled.
3.
Select OK to generate the report.
17362 Ver 1.1
8
Easikey® Manager
Viewing Reports
7.4 Excessive Use
This feature allows a report based on excessive use, which are events greater than or equal to a
used-defined value. It allows report options of Detailed and Summary, where the former option
will cause all excessive events to be displayed by name, and the latter will list the total number of
all excessive events.
1.
Select Excessive Use from the Reports section of the File menu.
2.
Select the number of excessive events.
3.
Select the required date and time range.
4.
Select the required Report Type of either Detailed or Summary.
5.
Select OK to generate the report.
17362 Ver 1.1
9
Easikey® Manager
Viewing Reports
7.5 Periodic Use
This feature allows a report based on periodic events, which are defined as occurring every user
defined number of days.
When reporting on periodic use, the operator has the option to decide what is deemed periodic,
e.g. gaining entry to a block/flat once every 7 days over a 4 week period.
With this information in mind, the operator is able to change the periodic number to a value they
choose and input a date/time for a specified day or date range.
17362 Ver 1.1
10
Easikey® Manager
Staff Functions
8. Staff Functions
There are two types of staff member which can be defined for the Easikey Manager system:
1.
Staff. These are people such as cleaners, maintenance staff, etc. who need to have
access to the different blocks in the system.
2.
Operators. Operators have the same access rights as Staff but they can also use their key
to access the Editor in the Easikey 1000N controllers. Normally only a few staff will be
added as Operators.
8.1 View Staff
To view staff added to the Easikey Manager system, simply click on the View Staff button in the
toolbar. This displays the Staff Members window which contains details all staff assigned to the
system.
8.2 Add Staff Member
To add a new member of staff to a block:
1.
Click on the View Staff button in the toolbar to display the Staff Members window with
details all staff currently in the system.
2.
Click New to display the New Staff Member window.
3.
Enter a name in the Name box.
4.
Present the token to be used by the new staff member to the administration reader to add
the token code to the database.
5.
Select a Peg Colour, if applicable, from the drop-down list.
6.
Click the Operator check-box if the new staff member is to be an Operator.
7.
Click OK to return to the Staff Members window.
8.
Click OK to accept the changes and return to the Main window.
8.3 Edit Staff Member
To edit details for an existing member of staff:
1. Click on the View Staff button in the toolbar. This displays the Staff Members window
which details all staff assigned to the selected block.
2. Click on a Staff Member from the list to select.
3. Click Edit to display the Edit Staff Member window.
4. Amend details as required (e.g. new key issued).
5. Click OK to store your changes and return to the Staff Members window.
6. Click OK to return to the Main window.
8.4 Delete Staff
To delete a staff member from a block:
1.
Click on the View Staff button in the toolbar. This displays the Staff Members window
which details all staff assigned to the selected block.
2.
Click on the Staff Member (to be deleted) from the list to select.
3.
Click Delete. This will display a message asking if you are sure.
4.
Click OK to delete and return to the Staff Members window.
5.
Click OK to return to the Main window.
17362 Ver 1.1
11
Easikey® Manager
Dial Functions
9. Dial Functions
There are three dial functions provided in the Easikey Manager system:
1.
Setup Dial Schedule. This allows you to specify when the controllers in the system are
contacted to send updates to the controllers and receive event data from the controllers.
This is normally setup by the Installer when the system is commissioned but is included
here as the User may want to change the schedule at a later date.
2.
Dial Now. This allows you to override the dial schedule and to send any updates to the
selected controller straight away without waiting for the next scheduled download.
3.
Communications Error Log. This is a list of any errors that have occurred during the
communications process and the time and date at which they took place.
9.1 Dial Schedule
To set up the dial schedule:
1.
Click on the Set Dial Schedule button in the toolbar or select Dial Schedule from the
Controllers menu.
2.
Enter a Start and End time in the boxes provided – all updates to the controllers will be
made between the specified times.
3.
Enter a Maximum Duration in the box provided - this is the maximum length of time that
will be spent communicating with each controller.
9.2 Dial Now
This feature allows you to override the Dial Schedule you have set up and to ‘force dial’
all controllers on the selected block at any time. This will normally only be done if urgent
changes have been made to the database.
To force dial a controller:
1.
Click on the required block in the Main window.
2.
Click on the Dial Now button in the toolbar or select Dial Now from the Controllers menu.
9.3 Communications Error Log
This button will display a list of any errors that have been encountered during the dial up
process. It can be used in the diagnosis of any communication problems.
The log can also be displayed by selecting View Communications Errors on the View menu.
The log is cleared by selecting Clear Communications Errors on the View menu or Clear
Errors on the log. The errors are not stored on the hard disc; they are removed when Easikey
Manager is exited.
Note
Errors must be cleared/accepted as they occur.
17362 Ver 1.1
12
Easikey® Manager
Dial Functions
To obtain further information about an error, (e.g. block and controller number) the database
log.txt file in the Easikey Manager directory can be viewed using a text editor (e.g. Notepad).
17362 Ver 1.1
13
Easikey® Manager
Backing Up Easikey Manager
10. Backing Up Easikey Manager
Many man-hours of effort go into setting up an Easikey Manager system, much of which could
be lost, if the PC were stolen or permanently broken. To avoid this eventuality it is best to
backup the Easikey Manager database regularly and keep a copy at a remote location.
CAUTION
Shut down Easikey Manager before copying the database file. Failure to do so could lead
to unpredictable results and may damage your database.
The database is called EasikeyManager.mdb and, if you used the standard installation directory,
should be located in Program files/PAC International/Easikey Manager/Data/EasikeyManager.mdb.
Use Windows Explorer to locate it.
To keep a safe copy:
•
Copy it to removable media such as a floppy disk.
•
Copy it to a network drive at a remote location.
•
Email it to a remote location (check the security of this method with your service provider).
•
Use your usual backup procedure to keep a copy.
When you are finished, restart Easikey Manager.
11. Restoring a Backed Up Easikey Database
To restore the database:
1. Close down Easikey Manager
2. Use Windows Explorer to open the Program files/PAC International/Easikey Manager/Data/
directory.
3. Right click on the old EasikeyManager.mdb database and select Rename.
4. Rename it to something like EasikeyManager.old and keep this as an emergency copy.
5. Copy the EasikeyManager.mdb that you want to restore into the data directory
6. Start Easikey Manager.
12. Delete Events
This facility allows you to delete events in the Easikey Manager database which were generated
before a specified date.
To delete old events:
1.
Click File in the menu bar.
2.
Select Delete Events from the dropdown menu to display the Delete Old Events window.
3.
Click on the down arrow (!) to the right of the date to display the calendar showing the
current month.
4.
Click the left/right arrows ("#) at the top of the calendar to step through the months.
5.
Click on a date when you have selected the correct month (all events generated before
this date will be deleted).
6.
Click OK to delete events.
13. Setup Functions
The configuration of hardware, such as modems, pIPers and interface kits is described in detail
in 17361 Easikey Manager Installation Guide.
17362 Ver 1.1
14
Easikey® Manager
Import Door Controller Database
14. Import Door Controller Database
This operation will typically only be done once on new systems (provided regular backups are
kept) and will only need to be done on new sites where the hardware is being upgraded from
Easikey 99s and/or Easikey 1000s to Easikey 1000Ns.
Importing a controller database into the Easikey Manager system is a joint operation between
the Installer and the User. The sequence and responsibilities are as follows:
1. Install the Easikey Manager software.
Installer
2. Add all staff members manually to Easikey Manager.
*
User
3. Create and commission all blocks in the system in Easikey Manager
Installer
4. Perform uploads from old Easikeys using upload software.
Installer
5. Upgrade to Easikey 1000Ns.
Installer
6. Import uploaded databases into “undefined” flats in Easikey Manager.
Installer
7. Add the required flats to Easikey Manager.
User
8. Edit the resident details.
User
9. Move residents to the flats.
User
10. Initialise the controllers from Easikey Manager.
Installer
11. Download to the controllers.
Installer
*
Always add staff members to Easikey Manager before uploading the controller databases.
Their records will not be overwritten. If you do not take this step the staff tokens will be
allocated to the 'undefined' flat as residents in a single block, this will prevent them from
gaining access to multiple blocks and you will need to delete their record and re-add them as
staff.
14.1 Installer Operations
Note
These are described in detail in 17361 Easikey Manager Installation Guide.
The import procedure carried out by the Installer automatically creates an additional flat called
‘undefined’ in the selected block and places all the information uploaded from the controller into
this flat. For each entry in the controller database, the following information is assigned to a
resident:
•
Name. This comprises the name given by the Installer to identify the controller and
the number of the key in the controller database (1-99 for Easikey).
•
Token Code. This is the unique ID for the token assigned to the resident.
•
Peg Colour. This is set to <none> because the controller does not record the peg
colour.
14.2 Import Database Facility
This feature allows you to import the resident’s information from existing Easikey/Easikey 1000
controllers when you upgrade to Easikey Manager with Easikey 1000N controllers.
The import process imports all residents in the controller database into one flat. You then use
the Move button to move each resident to the required flat. It is therefore recommended that you
create the flats before importing the database.
The import process consists of:
1.
Upload the database from the existing controller (Easikey/Easikey 1000) to a laptop PC,
refer to the 17363 Easikey Manager Upload/Upgrade kit for details
2.
Transfer the uploaded file from the laptop to the PC running the Easikey Manager
software.
3.
Import the information into Easikey Manager and edit the information as required.
17362 Ver 1.1
15
Easikey® Manager
Import Door Controller Database
Import Database
The database file will be FILENAME.CSV where FILENAME is the name given to the file when
the information was uploaded (normally this will be the block name or something similar that
uniquely identifies the controller). Once the file has been transferred to the PC running the
Easikey Manager software, the information is imported as follows:
1.
Run Easikey Manager if it is not already running.
2.
Click File in the menu bar.
3.
Select Import Database from the drop-down menu. This displays the Open dialog box.
4.
Select the folder on the PC you have copied the upload file to (PAC recommend you copy
it to the root directory for ease).
5.
Scroll through the folders/files until you find the file and click on the file name to select it.
6.
Click Open. This displays the Delete Residents from Block window with the following
options:
Delete existing residents
Continue without deleting
Cancel Import
7.
Click the appropriate button (usually Continue without deleting) to start the import.
When the import is done you are returned to the Main window where you can see a new
flat called ‘undefined’ has been created in the selected block.
8.
Click on the flat to select it and check that the residents have imported successfully.
14.3 User Operations
Once the controller database has been imported to Easikey Manager the user should:
1.
Add staff before the databases are imported* (see Section 8.2).
2.
Edit the resident details and add names.
3.
‘Move’ resident records to the relevant flats.
4.
Delete the undefined flat.
5.
Initialise and download to the controllers.
*
Always add staff members to Easikey Manager before uploading the controller databases.
Their records will not be overwritten. If you do not take this step then the staff tokens will be
allocated to the 'undefined' flat as residents in a single block, this will prevent them from
gaining access to multiple blocks and you will need to delete their record and re-add them
as staff.
To edit resident details:
1.
Click on a block. The associated flats display in the left-hand pane.
2.
Click on the ‘undefined’ flat to select it.
3.
Click the Edit Flat button to display the Edit Flat window.
4.
Click on the first entry (key 01) in the list and click Edit to edit details for the resident.
5.
Refer to the Easikey/Easikey 1000 Record Sheets for the name of the resident for Key 1.
6.
Enter the resident’s name in Resident Name box (from records - Easikey record sheet or
the Easikey 1000 database printout).
7.
If appropriate, click on the down arrow (!) by the Peg Colour box and select a colour.
8.
Repeat steps 5-7 for all the other keys.
To move residents to flats:
1.
Click on the first entry in the list (e.g. John Smith) to select it.
2.
Refer to the occupancy records to determine which flat John Smith occupies.
3.
Click on the Move button to display the Move Resident window.
17362 Ver 1.1
16
Easikey® Manager
Import Door Controller Database
4.
Click on the down arrow (!) to display a list of flats in the block.
5.
Click on flat occupied by John Smith (scroll down the list of flats if necessary).
6.
Click OK to move John Smith to the specified flat.
7.
Repeat steps 1-6 for all residents in the ‘undefined’ flat.
8.
Click OK to return to the Main window.
To finish and delete the undefined flat:
1.
Click on the ‘undefined’ flat to select it.
2.
Click the Delete Flat button on the toolbar to delete the flat from the block.
3.
Initialise and download as described in the next section..
17362 Ver 1.1
17
Easikey® Manager
Initialise and Download
15. Initialise and Download
Initialise and download performs the following functions:
•
Initialise – clears the database of the selected controller.
•
Download – downloads information from the Easikey Manager database to the
selected controller.
Note
Initialise and Download are normally only carried out when a controller is first
commissioned.
To initialise/download:
1. Select the block containing the controllers you want to initialise/download information to.
2. Click Controllers in the menu bar on the Main window.
3. Select Initialise or Download… from the dropdown list. This displays the Initialise and
Download window with a list of controllers for the selected block.
4. To select, hold down the CTRL key and click on the controllers.
5. Click OK to initialise controllers or initiate download.
17362 Ver 1.1
18
Easikey® Manager