1
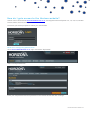
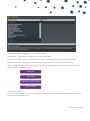
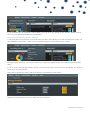
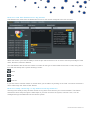
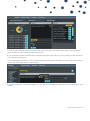
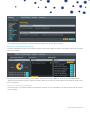
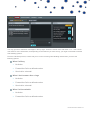
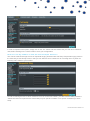
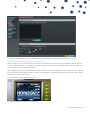
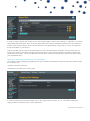
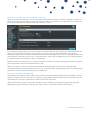
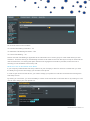
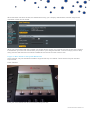
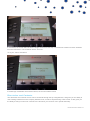
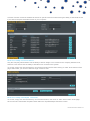
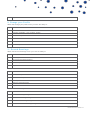
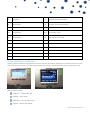
Horizon End User Guide Contents How do I gain access to the Horizon website? ........................................................... 4 How do I change my password? .................................................................................................. 4 Logging in as the End User ............................................................................................................ 5 How do I customise my Dashboard? ........................................................................................... 5 How do I initially configure my user access? ............................................................................... 5 The Dashboard............................................................................................................................... 6 How do I make a telephone call using “Click to Dial” ................................................................... 7 How do I setup Call forwarding? .................................................................................................. 7 How do I manage my profile status? ............................................................................................ 8 How do I adjust my call profiles? ................................................................................................. 9 How do I view Call Statistics for my phone? .............................................................................. 10 How do I setup “twinning” of my mobile with my landline? ........................................................ 10 How do I search the directory? .................................................................................................. 12 How do I change my details? ..................................................................................................... 12 Call Setup ..................................................................................................................................... 13 How can I handle incoming calls? .............................................................................................. 13 How do I blacklist a caller?......................................................................................................... 15 How do I change my incoming call settings? ............................................................................. 16 How can I be notified of missed calls to my number? ................................................................ 16 How do I set my number to find me over multiple devices? ...................................................... 17 How do I setup a Busy Lamp on my device? ............................................................................. 18 How do I setup speed dials? ...................................................................................................... 19 How do I change my outgoing call settings?.............................................................................. 20 How can I change my Call Transfer settings? ........................................................................... 21 How can I enable Call Waiting? ................................................................................................. 21 How do I use a Hot Desk at a Site? ........................................................................................... 22 Login to Hot Desk on Polycom Handsets .................................................................................. 23 Directories and Contacts .............................................................................................................. 24 How do I setup a new contact? .................................................................................................. 25 How do I setup a multiple contacts? .......................................................................................... 25 How do I delete a contact?......................................................................................................... 27 How do I set up call recording? .................................................................................................. 27 How do I pause and resume call recording? .............................................................................. 28 Remote Office .............................................................................................................................. 29 How do I access the Company Voice Portal? .............................................................................. 29 What Menu Options are available in the Voice Portal? ............................................................. 29 1 -Voice Messaging ...................................................................................................................... 30 2- Change your Profile ................................................................................................................. 32 3 – Record Greetings ................................................................................................................... 32 4 – Change Call Forwarding Options ........................................................................................... 33 6 – Make a call from your number................................................................................................ 33 7 – Access a Hot Desk device if this Voice Portal is assigned to one ......................................... 33 8 – Change your Pass Code ........................................................................................................ 33 9 – Exit ......................................................................................................................................... 33 # - Repeat the Menu .................................................................................................................... 34 What Short Codes can I use on my phone? ................................................................................ 34 Cisco “Soft Key” additions ............................................................................................................ 35 Alternative Number Presentation ................................................................................................. 36 Optional Horizon Soft Clients ....................................................................................................... 37 How do I gain access to the Horizon website? Horizon can be accessed at www.unlimitedhorizon.co.uk, and supports Internet Explorer 6.0, 7.0, 8.0, 9.0, Mozilla FireFox, Safari, Chrome, and Opera. From here you will be prompted to submit your user details: How do I ch ang e m y pa ssw or d? Go to www.unlimitedhorizon.co.uk, log in and select "My Details". Select "Change Password". Enter your old password and new password in the relevant boxes and click "Change". Horizon End User Guide v1.8 Logging in as the End User How do I cu sto mi s e m y D as hbo a rd? The dashboard can be customised to ensure you achieve the best view for your specific needs. In order to do this, simply hover over the title of a section you want to move and drag it to your preferred place on the screen. How do I in iti al l y con f igu r e m y u se r a c ce s s? If you are logging in for the first time then you will be prompted to setup a few basic features to establish your user account. Your company administrator will have provided you with details on the features assigned to you and your number and user extension. If you would like further details on the features assigned and what they allow you to do, you can review under the “My Features” link on the homepage Horizon End User Guide v1.9 The standard features requested on your initial access are: Call Handling – decide how you would like to route incoming calls Twinning – the ability to phone a mobile device or another number if your phone or extension is dialled Change of password – change the password assigned to ensure this is unique to your user access Once completed and to ensure you are aware of all features available through the Horizon system we would advise reviewing the following areas. Dashboard Call Setup Directories and Contacts Remote Office The Dashboard From the Horizon dashboard you have the ability to influence a number of user settings as well as review your own call usage and performance Horizon End User Guide v1.9 How do I ma k e a t e le phon e c all u si ng “ Cl i ck to D ia l” There are a number of ways you can make a telephone call over the Horizon handsets, one of which is also the ability to “Click to Dial” from the Horizon system. “Click to Dial” means that the Horizon system will call the number of the account you are logged in as, and once answered, then connect you through to the number against which you have clicked the “Dial” button . This feature is available wherever a contact or directory entry is shown on the screen. How do I s etup C al l f orw a rdi ng? Call forwarding is the ability to redirect a call from delivering it to your handset, to delivering it to another number. This can be setup from the dashboard screen by selecting on the drop down box showing “Call Forwarding Inactive“ and you are then able to define a number, and update this field with this detail Horizon End User Guide v1.9 If you would then like to activate the call forwarding, you can do so by clicking on the “Activate” button at which point your calls will be forwarded to this destination. How do I ma na ge m y prof il e st at u s? A call profile allows the system to know what status you are in and manage your calls according to the rules you have defined for each status. These can be selected through the drop down menu for “Profile” Through simply clicking on one of these statuses the system will implement the call routing configured straight away. If you do not see the "Manage Profiles" button or the Profile drop down menu from your dashboard, this needs to be set up by an Administrator. Select the profile that you want to edit by clicking the corresponding "Edit" button. Make the changes which you wish to make and then click Save. Horizon End User Guide v1.9 How do I ad ju st m y c al l p rof il e s? In order to adjust a call profile you simply need to select the “Manage Profiles” button next to the Profile drop down list from the Dashboard home screen. From the following screens you then have the ability to either activate that profile or edit the settings assigned to it. The screen will also show which profile is currently in use through the status icon. By clicking on the “Edit” button you now have the ability to configure the call profile for the status selected, dependant if the call is answered or you are on the phone. To complete the process and to save the associated settings, ensure you click on the “Apply” button which will ensure the settings are saved for when you choose to select the profile. Horizon End User Guide v1.9 How do I v iew C a ll S t at i st ic s f or m y pho ne ? Call Statistics are visible from the Dashboard screen for the number assigned to the user account Within this section you have the ability to view the pie chart and hover over an area to see the percentage of calls either, Received, Placed or Missed. The Call Statistics also shows the contact or number for the type of called made for the last 10 calls, along with a time and date stamp and a symbol showing if it was: Missed Made Received If you then wish to call this contact or number back you are able to by clicking on the “Dial” icon which will action a return call through the “Click to Dial” feature. How do I s etup “ t w in ning” of m y mob il e w ith m y l an dl ine ? Twinning is the ability to setup another number to ring at the same time as your Horizon handset. This feature should have been setup through the initial steps of your first access to the system, however if not, it can be managed through the Dashboard of the Horizon system. Horizon End User Guide v1.9 In order to add a twinned device you simply need to fill in the name and number of the device you wish to twin, before clicking on “Add” to put it into the Twinning box. If you would like to delete a number that is “twinned”, this again can be done by simply clicking on the rubbish bin icon within the Twinning box. You are also able to implement a more customised twinning through the “Manage” icon. By clicking this it will put you into the “Call Setup” section of the system. If you then click on the “Advanced Settings” icon you will have the ability to customise the use of twinning on your number. Horizon End User Guide v1.9 To complete and implement the required twinning simply click on the “Save” button. How do I s ea r ch t h e dir e ct o r y? From the Dashboard screen of the Horizon system you have the ability to search the Company directory and also your own contacts. By typing in a name and clicking on the “Search” button this will bring back all contacts recognised within the “Directory and Contacts” section, where it will then allow you to use the “Click to Dial” functionality to make a call from your device. How do I ch ang e m y det ai ls ? As an End User, you have the ability to make basic changes to your information, as well as being able to change your password. Horizon End User Guide v1.9 In order to access this you simply need to select “My Details” from the user menus. Call Setup Within the Call Setup section of the Horizon system, you have the ability to control and implement a number of different services and features How c an I ha ndl e in c omin g c all s? To handle incoming calls you can use the user profiles to adjust your status and the call routing accordingly, or you can look to use the Call Handling screens to pre-define the settings you would like to apply. Horizon End User Guide v1.9 You may get some notification messages in the top right. These are a blue circle with either a ! or ? icon. Hover over these for more information, as depending on the features you have set up, you might not be able to edit the Call Handling options. From the Call Setup screen, ensure that you're on the Incoming Call Handling tab and then you have the following options: When I'm Busy No Action Forward the Call to a defined number Send call to voicemail When I don't answer after x rings No Action Forward the Call to a defined number Send call to voicemail When I'm Unreachable No Action Forward the Call to a defined number Horizon End User Guide v1.9 In order to adjust these settings simply click the relevant button and update the field, or search using the “Address Book” button before clicking on “Save” to implement the changes made. How do I bl ac k li st a ca ll e r? If you are constantly receiving marketing calls or other nuisance calls types from specific numbers, you have the ability to “Blacklist” a telephone number. To do this simple type in the number to be “Blacklisted” and click on the “Add” button to add them to the list. Please ensure you also click on the “Save” button to ensure this list is saved. When a number is blacklisted whenever they call, they will hear engaged tone or a similar network message preventing the call being delivered. Horizon End User Guide v1.9 If you would like to remove a number from your “Blacklist” then you can simply click on the rubbish bin icon in order to delete the number from the list. How do I ch ang e m y i nco min g ca ll sett ing s? There are a number of settings that can be changed within the Call Setup section: - Ability to reject withheld numbers - Enable or Disable music for calls on hold - Present the incoming caller ID for External Calls - Present the incoming caller ID for Internal Calls - Enable and Disable “DND” Do Not Disturb In order to implement these settings simply click on the corresponding switch to either say “On” or “Off” for the feature you would like to adjust before ensuring you click on the “Save” button to save your preferences. How c an I be not if ied of mi s se d ca ll s to m y n umb e r? As well as the missed call options on your allocated Horizon handset, you can also setup the Call Notify option under the Call Setup section. This service allows you to receive an email to your chosen email address for either all numbers that contact you or a specified list of numbers, to alert you to the fact there is a call. Horizon End User Guide v1.9 In order to implement this option, simply click on the “On” switch and then define how you wish to be notified of calls, before clicking on the “Save” button to save your configuration. How do I s et m y nu m be r t o f ind m e ov e r m ulti pl e d ev i c es ? This can be achieved through the use of sequential ringing located under Call Setup. Sequential ringing works in the same way a Hunt Group would, in that you can define a set of numbers for an incoming call to try when an incoming call is made to your number. As well as defining the time in which it takes to move on to the next number, you also have the ability under the “Advanced” button to implement this functionality only for specific numbers or for specific schedules you have setup. Horizon End User Guide v1.9 In all cases clicking on the “Save” button will ensure this settings are saved and applied to your number. How do I s etup a B us y L a mp on m y d ev i ce ? A Busy Lamp key gives you the ability to monitor a colleague's line to see if they are available to take a call that you may transfer to them, or to enable you to pick up their calls if part of a Call Pickup Group. (Please speak to your Company Administrator about these.) When implemented, the phone will show the user’s caller ID on the pre-defined line keys on your device. This line key can also be used as a speed dial to contact your colleague's number quickly when transferring a call or when needing to speak to them directly. For Cisco phones it will look like the below: For Polycom phones it will look like the below: Horizon End User Guide v1.9 When the assigned colleague is on the phone, their assigned line key will then show as red on the device, indicating that they are not free to take a call. For Cisco phones it will look like the below: For Polycom phones it will look like the below: In order to setup a Busy Line key, this must be done through the Horizon system under the Call Setup advanced section and at present can only be done by the Company Administrator. How do I s etup s pe ed di al s? A speed dial is the ability to type a single or combination of numbers to implement the calling of feature or contact. These can be setup through the “Speed Dial” option located under Call Setup. Horizon End User Guide v1.9 In order to setup a speed dial, simply click on the required digits to dial, and by clicking on “Add New” you will be able to add speed dial fields. Once you have defined the name and the destination (please note this could be a feature on/off switch using the short codes mentioned in the Appendices), simply click on “Save” to implement these speed dials on your device. Please note that you can also setup speed dials from your allocated Horizon handset, however these are not linked to the system. Therefore a locally stored speed dial on your handset will always overwrite a speed dial setup within the system. You should therefore choose which method you would like to implement and manage your speed dials from. How do I ch ang e m y out go ing c al l s etti ng s? There are a couple of outgoing call settings that you are able to implement through the Call Setup section under the “Settings” link - Enable Automatic Call Back - Withhold my number when making calls In order to change these settings simply click on the toggle switch to either “On” or “Off” before clicking the “Apply” button to implement your chosen preference. Horizon End User Guide v1.9 How c an I ch an ge m y C al l T r an sf er s ett ing s? When you have answered a call, you have the ability to transfer this through to another colleague or number. In doing so you also have the ability to setup Call Transfer settings to ensure the call is delivered successfully, and these can be adjusted and changed under the Call Setup section. For transferring calls yourself, you have the ability to implement transfer recall, which will send a transferred call back to you if a predefined number of rings result in no answer from the called destination. You can also implement a Busy Lamp, allowing a transferred call if met by an engaged tone to wait for a predefined number of seconds before returning the call to you. To implement this, simply click the toggle switch to “On” before defining the required criteria and clicking on “Save” to implement. Please note that at a network level, a call cannot ring for more than 3 minutes before being terminated, therefore your total number of seconds should be less than 180. Within the “Options” section you also have the ability to inhibit the ability of other users to transfer either consultative transfers or blind transfers to your device. To change these settings simply click on the toggle switch and click on “Save” to save and implement your preference. How c an I en ab l e Ca l l W ait ing? Call waiting is the ability to allow a caller to hear ringtone until the line being dialled becomes available. There is, however, a network limit of 3 minutes for a call to be ringing without answer, therefore the call would need to be answered prior to this time, otherwise the caller would not be connected. Within the Call Setup section, call transfer settings screen, Call Waiting can be simply implemented through adjusting the toggle switch and clicking on the “Apply” button to save and implement the changes. Horizon End User Guide v1.9 Or via short codes on the handset: To activate Call Waiting Persistent - *43 To deactivate Call Waiting Persistent - #43 To Cancel Call Waiting - *70 Please note that Call Waiting is applicable to the individual user of a hunt group for calls made directly to their extension. Therefore clicking on Call Waiting will allow a call made to the user directly to be kept on hold until the user becomes free, not clicking this option would mean engaged tone would be provided, where the user is receiving or has answered a Hunt Group call. How do I us e a Hot D es k at a Sit e? If your company administrator has setup a device at your Company’s sites for use as a hot desk then you have the ability to log into this and assign your number to this phone. In order to gain access to this device, you need to assign your profile to it and this can be achieved through the Call Setup screen. By clicking on “Hot Desk”, you have the ability to search a site and locate a Hot Desk device. By clicking on “Use” you can then assign your user profile to it. Horizon End User Guide v1.9 When this button has been clicked, the allotted time set by your company administrator, will then begin and a countdown of this can be viewed. When you have finished with the hot desk you should always ensure you come back to this section of the system to de-allocate your user from it and return your profile to your assigned handset. To do this simply click on “Stop Using” and this will ensure this hot desk is added back to the site for other users to use. Login to H ot De s k o n P ol yc om H and s ets At the moment, only two handsets are able to support Soft Key on handset. These are the Polycom 450 and Polycom 650. Press "GuestIn" Enter your Voice Portal User ID and Password and press OK Horizon End User Guide v1.9 If successful, the screen will look like the image across from this step. The time limit is based on those inherited from the Host device. The maximum limit is 12 hours. To log out, select "GuestOut" If invalid login credentials are entered 5 times, the account will be locked Directories and Contacts The directories and contacts screen can be accessed through the top navigation bar, and gives you the ability to view existing contacts from the company address book, as well as implementing “Click to Dial”. It also gives you the ability to add your own user contacts to the list which you can then use in speed dial setup. Horizon End User Guide v1.9 A full list of search criteria is available to search for specific users as well as having the ability to download the list if you wish to keep this somewhere else on your computer. How do I s etup a n ew co nt a ct ? Only the Company Administrator has the ability to add or assign a new contact to the company address book, however a user does have the ability to add their own contacts to the system. To do this, simply click into the Directory and Contacts section before then clicking on “Add” at the bottom of the page. Within here you can then define a single contact to add. How do I s etup a m ul t ipl e co nt a ct s? To do this, simply click into the Directory and Contacts section, then click on “Add” at the bottom of the page. Click on the blue 'Download Template' button within the 'Upload Multiple Contacts' section. Horizon End User Guide v1.9 Highlight the column with the telephone numbers and select 'format' - this should be changed to 'Text' which will allow the leading 0 to be retained when entered. Note: The number in column C is what will be added to Horizon so if the 0 is missing then this is what will be uploaded. Horizon End User Guide v1.9 Complete the three columns with the contact details. You should note the number column has a little green corner and the leading 0 is retained. Select 'Save as' and ensure the type is CSV (Comma delimited). Excel will ask if you want to save in this format and lose incompatible features - click 'Yes'. Go back to your Horizon account and select 'Browse' then select your template file. Click the blue 'Upload' button. Check the details are correct and click 'Confirm'. Confirmation is shown and the contacts will now appear in the user's directory both online and on their device. How do I de le t e a co nt a ct ? To do this, simply click into the Directory and Contacts section, then mark the contacts you would like to delete with a tick and click 'Delete Selected'. Confirmation is then shown. How do I s et up c al l r ec or din g? From the Call Groups drop down in the menu, select "Hunt Group". Horizon End User Guide v1.9 Select the Hunt Group you want to add Call Recording to by clicking the Edit button. Select "Call Recording" from the sub-menu. You can then select the Call Recording option you want for the user, which is either: Record for x% of calls Record On Demand Do not record calls You can choose the percentage of calls you want by free-typing a number between 0 and 100 into the text box. If you choose Record On Demand, to record a call, use the short code *1. How do I pa us e an d r es um e c al l re co rd ing ? It is possible to pause the call recording (while on a call) and then resume the call recording (while on call) provided your Administrator has given you permission to do this. The command is *3 to pause and *7 to resume. Horizon End User Guide v1.9 Remote Office Remote office is a very handy feature which allows you to receive calls no matter where you are. By clicking on the “Remote Office” link from the top navigation bar, you have the ability to define the number where your office is currently located. At any point you can adjust the number by typing in a new number and clicking on “Update”, or if you want to deactivate the service because you are now back in the office, this can be done through clicking on “Deactivate” When Remote Office is implemented all calls will be delivered to this other number in place of your usual number, and all Call Setup rules implemented will be actioned against it. What’s more if you then use the “Click to Dial” functionality with Remote Office activated, you are able to make calls from your user ID and ensure the billing of these calls is against your usual Horizon number. How do I access the Company Voice Portal? You are able to access the Voice Portal from your device by pushing the Voicemail Key or by typing *62. Once in the Voice Portal, you’ll be prompted to enter your pass code as assigned to you by your Company Administrator. You can also access the Voice Portal for your device by calling your extension or number, and when listening to your outbound message press * followed by your number and pass code. W hat M enu O pt ion s a re av ai l abl e in th e Vo ic e P ort a l? Once in the Voice Portal you will then have access to the following menu items: 1 – Access Voice Messaging 2 - Change your profile 3 – Record Greetings 4 – Change Call Forwarding Options 6 – Make a call from your number 7 – Access a Hot Desk device if this Voice Portal is assigned to one 8 – Change your PassCode 9 – Exit # - Repeat the Menu Horizon End User Guide v1.9 1 -Voice Messagin g Within the voice messaging menu you will have access to the following: Digit Action 1 Play Messages 2 Change Busy Greeting 3 Change No Answer Greeting 7 Delete all messages menu 8 Access message deposit menu * Return to previous menu # Repeat menu 1 - Play Messages menu Digit Action # Save Message * Return to Previous Menu 2 Play Message or Repeat Message 4 Play Previous Message 6 Play Next Message 7 Delete Message 8 Initiate Call to Sender 9 Listen to Addition Options While Playing Messages Digit Action 1 Skip Backwards 3 seconds 2 Pause/resume playback 3 Skip Forward 3 seconds 4 Skip to the beginning of the message 6 Skip to the end of the message 2 – Change Busy Greeting Horizon End User Guide v1.9 Digit Action 1 Record new Busy Greeting 2 Listen to current Busy Greeting 3 Revert to default Busy Greeting * Return to |Voice Messaging Menu # Repeat Menu 3 – Change No Answer Greeting Digit Action 1 Record new No Answer Greeting 2 Listen to current No Answer Greeting 3 Revert to default No Answer Greeting * Return to previous menu # Repeat Menu 7 – Delete All Messages menu Digit Action 1 Confirm Deletion * Cancel Deletion 8 – Message Deposit menu Digit Action 1 Enable message deposit 2 Disable message deposit (see subsequent menu items) 3 Listen to message deposit status * Return to previous menu # Repeat menu Disable message deposit menu Digit Action 1 Disconnect after greeting 2 Forward after greeting 3 Change greeting only forwarding destination * Return to previous menu Horizon End User Guide v1.9 # Repeat menu 2- Change your Profile Within the Change your profile menu you have the ability to: Digit Action 1 Activate “Available – In Office” Profile 2 Activate “Available – Out of Office” Profile 3 Activate “Busy” Profile 4 Activate “Unavailable” Profile 5 Activate “No Active” Profile * Return to previous menu 3 – Record Greetings Within the Record Greetings menu you have the ability to: Digit Action 1 Record your name 2 Record personalised greeting * Return to previous menu # Repeat menu Record Name menu Digit Action 1 Record new personalised name 2 Listen to current personalised name 3 Delete personalised name * Return to previous menu # Repeat menu Record Custom Greeting menu Digit Action 1 Activate custom greeting 2 Deactivate custom greeting 3 Record new custom greeting 4 Listen to current customer greeting Horizon End User Guide v1.9 * Return to previous menu # Repeat menu 4 – Change Call Forw arding Options Within the Call Forwarding menu you have the ability to: Digit Action 1 Activate Call Forwarding 2 Deactivate Call Forwarding 3 Change forwarding destination 4 Listen to forwarding status * Return to previous menu # Repeat menu 6 – Make a call from your number In order to make a call from your number via the Voice Portal Digit Action Enter the digits you wish to dial. While on a call press ## to terminate and make another call # Return to the previous menu 7 – Access a Hot Desk device if this Voice Portal is assigned to one In order to access a hot desk through your device you can: Digit Action 1 Check Hot desk status 2 Activate that hot desk 3 Deactivate that hot desk * Return to the previous menu # Repeat menu 8 – Change your Pass Code In order to change your pass code to the Voice Portal simply type in your new pass code and push the # key. 9 – Exit Allows you to exit the Voice Portal, or alternatively you can hang up from the device your using Horizon End User Guide v1.9 # - Repeat the Menu What Short Codes can I use on my phone? With the Horizon system you don’t just have to use the online web access to implement the required feature on your phone. Below is list of how you can activate, deactivate, and adjust a number of features on the Horizon service. *52* Anonymous Call Rejection (ACR) *53* Call Waiting *77 Anonymous Call Rejection Activation *43 Call Waiting Persistent Activation *87 Anonymous Call Rejection Deactivation #43 Call Waiting Persistent Deactivation #8 Automatic Callback Deactivation *54* Calling Line ID Delivery Blocking #9 Automatic Callback Menu Access *67 Calling Line ID Delivery Blocking per Call *72 Call Forwarding Always Activation *31 Calling Line ID Delivery Blocking Persistent Activation *73 Call Forwarding Always Deactivation #31 Calling Line ID Delivery Blocking Persistent Deactivation *21* Call Forwarding Always Interrogation *65 Calling Line ID Delivery per Call *21 Call Forwarding Always to Voicemail Activation *70 Cancel Call Waiting #21 Call Forwarding Always To Voicemail Deactivation *99 Clear Voice Message Waiting Indicator *90 Call Forwarding Busy Activation *57 Customer Originated Trace *91 Call Forwarding Busy Deactivation *55 Direct Voicemail Transfer *67* Call Forwarding Busy Interrogation *97 Directed Call Pickup *40 Call Forwarding Busy to Voicemail Activation *80 Diversion Inhibitor #40 Call Forwarding Busy to Voicemail Deactivation *78 Do Not Disturb Activation *92 Call Forwarding No Answer Activation *79 Do Not Disturb Deactivation *93 Call Forwarding No Answer Deactivation #58 Group Call Park *61* Call Forwarding No Answer Interrogation *66 Last Number Redial Horizon End User Guide v1.9 *41 Call Forwarding No Answer to Voicemail Activation *12 Location Control Activation #41 Call Forwarding No Answer to Voicemail Deactivation *13 Location Control Deactivation *94 Call Forwarding Not Reachable Activation *60 Music On Hold Per-Call Deactivation *95 Call Forwarding Not Reachable Deactivation *610 No Answer Timer *63* Call Forwarding Not Reachable Interrogation *71 Per Call Account Code *88 Call Park Retrieve *51* Selective Call Rejection (Blacklist) *68 Call Park Retrieve *75 Speed Dial 100 *98 Call Pickup *74 Speed Dial 8 *11 Call Retrieve *62 Voicemail Portal Access #92# Call Return Number Deletion *86 Voicemail Retrieval *69 Call Return Number Deletion Cisco “Soft Ke y” additions Soft key shortcut options are provided on the Cisco’s screen and will be displayed via a new arrow shown on the side of the screen. In order to browse through these other options, use the arrow key pad to scroll right or left. Options added include: RediaLC – Redial last call CallRet – Call return GrPickup – Group call pickup Pickup – Direct call pickup Horizon End User Guide v1.9 Park – Call Park GrPark – Group Call Park GetPark – Get parked call Alternative Number Presentation There are three options for number presentation from Horizon: - Presenting a number which has been assigned to the Company - Presenting a number which has been assigned to the Site - Presenting any number such as 01, 02, 03, 07, 08 and +44 numbers This functionality can be controlled at the user level, provided the company administrator has granted suitable permissions. This means, where users are working on specific marketing campaigns for example, they are in control of the number presented without the need to raise IT support requests. If this is selected a button will appear on your dashboard – as per below. When clicked, you can then access the screen to activate, and amend. Horizon End User Guide v1.9 Please note that where the service is not active, the previous defaults of either a company or site CLI will be presented for outgoing call for this user. Optional Horizon Soft Clients At present Horizon has the following chargeable soft clients that may be applied to a Horizon solution: Receptionist soft client Desktop soft client Mobile soft client Integrator soft client with optional CRM integration For more information on any of the soft clients, please see the appropriate, separate user guide. In all cases, the soft client would need to be allocated to a particular user by the company Administrator for Horizon. Horizon End User Guide v1.9