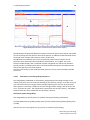
1
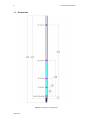
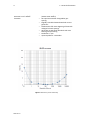
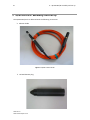
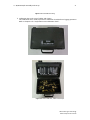
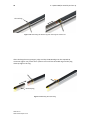
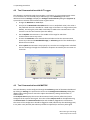
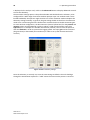
User Guide QL40 ELOG/IP – Normal Resistivity and Induced Polarization Probe Advanced Logic Technology sa Mount Sopris Instruments Bat A, Route de Niederpallen L-8506 Redange-sur-Attert Luxembourg 4975 E. 41 Avenue Denver, CO 80216 USA Phone : +352 23 649 289 Fax : +352 23 649 364 Email : [email protected] Web : www.alt.lu Phone : +303 279 3211 Email: [email protected] Web : www.mountsopris.com st V2013.07.31 Table of Contents 1 General Information ..................................................................................................... 1 1.1 Dimensions .................................................................................................................2 1.2 QL40-ELOG/IP Technical Specifications ......................................................................3 2 Measurement Principle ................................................................................................. 5 3 QL40 ELOG/IP assembly and set up................................................................................ 6 4 5 3.1 Note on use of the bridle .....................................................................................8 3.2 QL40 ELOG/IP set up ............................................................................................8 3.3 Notes on QL tool assembly.............................................................................. 10 3.4 QL40 stack assembly ........................................................................................ 10 Operating Procedure ....................................................................................................14 4.1 Quick Start ............................................................................................................... 14 4.2 Tool Communication with ALT Logger..................................................................... 15 4.3 Tool Communication with MATRIX ......................................................................... 15 4.4 Configuring Tool Parameters ................................................................................... 17 4.5 Recorded Parameters, Processors and Browsers .................................................... 18 4.5.1 Recorded parameters ...................................................................................... 18 4.5.2 MChNum Browser ........................................................................................... 19 4.5.3 IpWave Browser .............................................................................................. 20 4.5.4 MChCurve Browser.......................................................................................... 22 4.5.5 WellCAD Browser ............................................................................................ 23 Performance Check & Calibration .................................................................................24 5.1 6 Maintenance ...............................................................................................................27 6.1 7 Calibration procedure.............................................................................................. 24 Upgrading firmware ........................................................................................... 27 6.1.1 Checking the communication ................................................................. 27 6.1.2 Upgrading the firmware ............................................................................ 28 Troubleshooting.......................................................................................................30 Disassembly Instructions.................................................................................................... 30 8 Appendix ...................................................................................................................32 8.1 Parts list ................................................................................................................ 32 8.2 Bridle wiring configurations ............................................................................ 32 8.2.1 QL40-IS4 bridle configuration for 4 conductor wireline ................... 32 8.2.2 QL40-IS1 (MSI) and QL40-IS2 (GO1) bridle configurations for single conductor wireline ..................................................................................................... 33 1 - General Information 1 1 General Information QL stands for Quick Link and describes the latest line of stackable logging tools. This development is a joint venture of Mount Sopris Instruments (MSI) and Advanced Logic Technology (ALT). Innovative connections between tool elements (subs) allow users to build their own tool strings in the field. The Tool Stack Factory – a sophisticated extension of the acquisition software – provides a convenient way to configure tool strings for operation. Each sub has a Telemetry and Power supply element, the TelePSU, allowing them to operate individually without a separate telemetry sub. As a result all QL subs can be operated as standalone probes or in combination with other subs. The QL40-ELOG sub provides four normal resistivity measurements, plus spontaneous potential (SP) and single point resistance (SPR). The QL40-ELOG can be operated as a standalone probe with isolation bridle and bottom sub or can be stacked above or below another sub. In general, the isolation bridle must be located directly above the QL40-ELOG sub. Isolation from armor is a critical requirement that cannot be overemphasized when running any resistivity probe. Incorrect measurements will result if isolation is not adequate. The QL40-ELOG sub can be upgraded to a QL40-ELOG/IP sub upon request. In this configuration, the QL40-ELOG/IP provides four normal resistivity measurements, plus spontaneous potential (SP) and single point resistance. In addition, the IP function provides two digital Induced Polarization channels. The IP uses the 16 and 64 inch electrodes as receivers, and the current electrode as an IP charging source. The probe measures the injection and relaxation voltages on both measure electrodes as a function of time. This measurement is digitized and presented as 10 channels of time based data per depth interval for each spacing. In addition, a high resolution A/D further breaks each channel into 10 more discrete samples, providing a “full wave” presentation of the injection and relaxation decay. A chargeability curve is also derived from the measurement. Advanced Logic Technology Mount Sopris Instruments 2 1.1 1 - General Information Dimensions Figure 1-1 Tool general arrangement www.alt.lu 3 1 - General Information 1.2 QL40-ELOG/IP Technical Specifications Tool Diameter: Length: Weight: Max. Temp: Max.Pressure: 43mm (1.7”) with neoprene heat shrink 1.9m (74.8”) 9 Kg (19.8 lbs) 70°C (158°F) 200bar (2900 PSI) Power requirements: DC voltage at probe top Current source Nominal 120 VDC - Min.80 VDC – Max. 160 VDC 32V pp square wave (+:-16V) at up 500 mA Cable: Cable type: Digital data transmission: Compatibility: Mono, Coaxial, 4 or 7 conductor Up to 500 Kbits per second depending on wireline ALTlogger – BBOX – Matrix Electrode details: Current electrode Measure electrodes 50mm 304 stainless steel 18mm 304 stainless steel Electrode reference measuring point (from bottom of bronze knurled ring): Spontaneous Potential (SP) 1.69m 8” Normal 0.16m 16” Normal 0.26m 32” Normal 0.47m 64” Normal 0.87m Single Point Resistance (SPR) 0.06m Measurement specifications: Spontaneous Potential (SP) 8”-16”-32”-64”Normal Resistivities and Single Point Resistance o o o Range: +/- 18V Resolution: 0.5 mV Accuracy: +/- 2.5 mV o Range: 0.1 to 100.000 Ohm.m o Resolution: <0.04% of measured value (24 bi/0.5 ms ADC with real time downhole digital filtering o Accuracy: <1% of measured value from 1 to 5.000 Ohm.m <5% of measured value from 5.000 to 50.000 Ohm.m Advanced Logic Technology Mount Sopris Instruments 4 Induced Polarization (IP) measured on 16” and 64” electrodes 1 - General Information o o o o o o o User selectable injection/release times (100ms–250- 500ms) 10 equal time window chargeability per spacing Digitally controlled 8 watt downhole current generator Simultaneous full-wave digitizing of electrode voltages for both spacings 24 bit/0.5 ms ADC with downhole real-time filtering and processing Resolution: 1.2µV Input impedance: 1.4 M-Ohm Figure 1-2 Accuracy versus resistivity www.alt.lu 2 – Measurement principle 5 2 Measurement Principle The QL40-ELOG/IP has 5 electrodes which are used for measuring normal resistivity at 4 spacings, spontaneous potential, and single point resistance. The QL40-ELOG/IP sub must have an isolation bridle placed above it to provide a remote reference electrode for the normal resistivity channels, and a remote return for the injection current. The SP (spontaneous potential) is measured between the 64” normal measure electrode and armor. The data recorded as SP or VSP measures the natural voltages sensed by this electrode. These voltages can be related to both electrochemical and electrokinetic forces in the borehole. The electrochemical SP is developed when there is a difference between the formation fluid and borehole fluid salinities, and occurs normally when the measure electrode passes a clay or shaly zone, which acts as an ion selective membrane. The resulting current flow in a “cell” comprised of those three elements provides a negative SP if the borehole fluid is less conductive than the formation fluid. In fresh water zones, the SP is often positive. The electrokinetic SP can occur when borehole fluid mechanically invades porous and permeable formation, causing a current flow. The SPR is measured between the ”A” current injection electrode on the bottom of the probe and the isolated cable armor above the bridle. This SPR is a qualitative indication of the electrical resistance of the formation material immediately adjacent to the current electrode. The principal of measurement follows Ohm’s law, where R=V/I. As the current flows toward the armor return, the current density ( I/cross-sectional area) decreases dramatically. This means that the majority of the resistance measured is influenced by the material closest to the current electrode. For this reason, the SPR is very sensitive to small changes in resistance close to the borehole. The four Normal Resistivity measurements are made at the halfway between the “A” current injection electrode and each of the 4 “M” normal resistivity electrodes. The normal resistivity measurement includes a reference electrode, called “N”, which is assumed to be at electrical infinity compared to the measure electrodes. In this special application of Ohm’s law, V=IR still applies, but is re-written as R=V/I, where G is called the geometric factor, and is related to the A-M spacing between electrodes. In metric units, G is approximately 12.5 * AM spacing. Note that for normal resistivity measurements, 2 the result is true resistivity, ρ, expressed in ohm-m /m. It is important to remember that this application of Ohm’s law assumes that the formation is homogenous and infinite. Corrections for borehole size, borehole/formation fluid ratio, and bed thickness should be applied to get true formation resistivity. See appendix for references. The SPR and normal resistivity measurements are made using a 50 ms long +/-16V square wave downhole current generator, which can supply up to 500 mA of survey current. The polarity of the current is alternated between + and – relative to armor to prevent polarization of the electrodes. In the IP mode the QL40-ELOG/IP uses the 16 and 64 inch electrodes as receivers, and the current electrode as an IP charging source. The probe measures the injection and relaxation voltages on both measure electrodes as a function of time. This measurement is digitized and presented as 10 channels of time based data per depth interval for each spacing. In addition, a high resolution A/D further breaks each channel into 10 more discrete samples, providing a “full wave” presentation of the injection and relaxation decay. A chargeability curve is then derived from the measurement. Advanced Logic Technology Mount Sopris Instruments 6 3 – QL40 ELOG/IP assembly and set up 3 QL40 ELOG/IP assembly and set up The QL40 ELOG/IP sub is delivered with the following accessories: Isolation bridle Figure 2-1 QL40 Isolation bridle Isolated bottom plug www.alt.lu www.mountsopris.com 7 3 – QL40 ELOG/IP assembly and set up Figure 3-2 isolated Bottom Plug Calibration box, with a set of cables and clamps The calibration box is used to perform a calibration check before a logging operation. Refer to chapter 5 for “Performance and calibration check”. Figure 3-3 ELOG Calibrator, cables and clamps Advanced Logic Technology Mount Sopris Instruments 8 3.1 3 – QL40 ELOG/IP assembly and set up Note on use of the bridle The bridle is comprised of 8 meters of insulated cable with a remote electrode located at the top called the “reference potential electrode” or “fish”. The standard bridle is provided with a GO4 male or MSI single connection at the top end and QL40 female connection at the sub end. The bridle is electrically and mechanically compatible with the QL40 ELOG/IP and QL40 DLL3 subs. The function of the bridle is to maintain a separation between the source of current the injection electrode ” A” and the reference potential electrode in order to force the injected current to travel into the formation. The injected current returns to the cable armor beyond the bridle section. In most configurations, the QL40 ELOG/IP must be operated with an isolation bridle. Refer to the table below to review the different valid configurations: Acquisition system 3.2 Single conductor wireline Matrix Altlogger Always use the bridle Always use the bridle BBOX Always use the bridle 4 or 7 conductor wireline Always use the bridle Optional - 8m of insulated wireline and mud stake on surface can be used as a substitution of the bridle Optional - 8m of insulated wireline and mud stake on surface can be used as a substitution of the bridle QL40 ELOG/IP set up The QL40 ELOG/IP sub can be used as a standalone tool or in a tool string when combined with other subs. When used as a standalone tool, follow the assembly procedure below : 1. Screw the QL40 isolated bottom plug at the bottom end of the QL40 ELOG/IP sub www.alt.lu www.mountsopris.com 9 3 – QL40 ELOG/IP assembly and set up Figure 3-4 Attaching the QL40-Bottom Plug 2. Attach the isolation bridle at the top of the QL40 ELOG/IP sub 3. Insulate with tape the mechanical joint between the sub and bridle . It is important that all metal parts are covered with tape (at the exception of the injection and measuring electrodes!) to prevent a direct current return to this point rather than to the cable armor . Figure 3-5 bridle connection and isolation 4. Insulate the bridle/cable head connection above the fish and 7 meters of wireline above the cable head When the QL40 ELOG/IP is used in combination with other subs, the bottom and top subs must be fully covered with an insulating sleeve. Refer to chapter 3.3 below for complementary information on the QL tools assembly. Advanced Logic Technology Mount Sopris Instruments 10 3.3 3 – QL40 ELOG/IP assembly and set up Notes on QL tool assembly QL stands for Quick Link and describes an innovative connection between logging tools (subs) allowing the assembly of custom tool stacks. QL40 describes a specific family of logging tools. Each sub is equipped with its own telemetry board, power supply element and A/D converter, permitting operation either as a stand-alone tool or stacked in combination with other subs of the QL product family. The QL40 probe line accommodates two types of sub - Bottom Subs and Mid Subs. Bottom Sub A bottom sub is a tool that has at least one sensor that must be located at the bottom of the stack. It can be operated in combination with other QL subs connected to the top but it is not possible to connect another sub below. When used in stand-alone mode the bottom sub only needs the addition of a QL40 tool top adaptor that mates with the cable head. Mid Sub A mid sub is a tool that can be integrated anywhere within a stack of tools. When used at the bottom of a tool string a QL40 bottom plug must be used to terminate the string. If the mid sub is used as a stand-alone tool it needs a QL40 bottom plug at the lower end and a QL40 tool top adaptor at the top. 3.4 QL40 stack assembly A QL40 tool stack may be terminated by either a QL40 bottom sub or a QL40 bottom plug. At the top of the stack a QL40 tool top is required to connect the tool string to the cable head. Several tool tops are already available; special ones can be made on request. To assemble and disassemble the subs the C-spanner delivered with the tool must be used (Figure 3-1). It is recommended that before each assembly the integrity of the O-rings (AS216 Viton shore 75) is verified. Prime the O-rings with the silicon grease that was supplied with the subs. www.alt.lu www.mountsopris.com 11 3 – QL40 ELOG/IP assembly and set up C-spanner O-rings Figure 3-6 C-spanner and O-rings of QL connection The following example of a QL40-ABI, QL40-GAM and QL40-GO4 (Figure 3-2) describes how to replace the QL40-ABI with a QL40-Plug in order to run the QL40-GAM sub stand-alone. QL40-GO4 tool top QL40-GAM QL40-ABI Figure 3-7 Tool stack example To remove the QL40-ABI bottom sub attach the C-spanner to the thread ring as shown in Figure 3-3, unscrew the threaded ring, (anticlockwise about the tool axis when looking towards the bottom of the tool), and remove the QL40-ABI bottom sub. Advanced Logic Technology Mount Sopris Instruments 12 3 – QL40 ELOG/IP assembly and set up Thread ring Figure 3-8 Unscrewing the thread ring and removing the bottom sub After checking the O-ring integrity, align and slip the QL40-Plug over the exposed QL connector (Figure 3-4), attach the C-spanner and screw the threaded ring until the plug draws up tight to the ring. Bottom plug Figure 3-9 Attaching the QL40-Plug www.alt.lu www.mountsopris.com 13 3 – QL40 ELOG/IP assembly and set up The QL40-GAM can now be run stand-alone (Figure 3-12). Figure 3-10 QL40-GAM mid sub with tool top and bottom plug Advanced Logic Technology Mount Sopris Instruments 14 4 - Operating Procedure 4 Operating Procedure Note: Parts of the topics discussed in these sections below assume that the user is familiar with the LoggerSuite acquisition software. Refer to the corresponding operator manuals for more details. Information about assembly and configuration of tool stacks can be found in the same manuals. 4.1 Quick Start 1. Connect the QL40 ELOG/IP to your wireline and start the data acquisition software. 2. Select the relevant ELOG/IP tool from the drop down list (Figure 4-1) in the software’s Tool panel (if your tool is not listed check that your tool configuration file is stored in the designated folder on your computer). 3. In the Tool panel switch on the tool (click On button) and verify that the power indicator shows a valid (green) level. Figure 4-1 Tool panel The system goes through a short initialization sequence which sets the default parameters and communication settings held in the tool configuration file. The configuration returned by the tool is also checked during this procedure. (Setup tool communication as explained in chapter 4.4 if error message is displayed.) 4. On the Tool panel (Figure 4-1) click the Settings / Commands button to configure your tool for the ELOG and/or IP modes (see chapter 3.4 for details). 5. In the Acquisition panel (Figure 4-2) select the sampling mode (depth or time). Click on Settings and specify the corresponding sampling rate. Switch on the sampling (click the ON button). 6. Press the Record button in the Acquisition panel (Figure 4-3), specify a file name and start the logging. 7. During logging observe the controls in the Telemetry panel: • Status must be valid (green light); • Bandwidth usage in green range; • Memory buffer should be 0%; • Number of Data increases and number of Errors negligible. Figure 4-2 Acquisition panel Figure 4-3 Telemetry panel 8. To end the logging procedure press the Stop button in the Acquisition panel and turn off the sampling (click OFF button). 9. In the Tool panel power off the tool. www.alt.lu www.mountsopris.com 15 4 - Operating Procedure 4.2 Tool Communication with ALT Logger The telemetry provided through the ALTLogger is self-tuning. In case communication status is not valid the user can manually adjust the settings. In the Telemetry panel of the dashboard click on Settings to display the Configure Tool Telemetry dialog box (Figure 4-3). A procedure to achieve valid communication is given below: • Change the Baudrate to 41666 kbps. • Verify that the Downhole Pulse width knob is set on 20 (default value). This value is the preferred one and is suitable for a wide range of wirelines. For long wireline (over 2000m), increasing the pulse width could help to stabilize the communication. The reverse is true for short wireline (less than 500m). • Set the Uphole discriminators in the middle of the range for which the communication status stays valid. • Increase the Baudrate to the desired value and observe that the communication status stays valid and the Bandwidth usage (in Telemetry panel of the dashboard) is below the critical level. • When Uphole discriminators are properly set, store the new configuration as default. The tool should go through the initialisation sequence successfully the next time it is turned on. Figure 4-4 Tool communication settings 4.3 Tool Communication with MATRIX The tool telemetry can be configured through the Telemetry panel of the Matrix dashboard. By clicking on Settings, the operator has access to the Configure ALT Telemetry dialog box (Figure 3-5) providing various controls to adjust the telemetry settings and monitor its current status. The Analysis View displays the current discriminator levels (vertical yellow lines) and a histogram of the up-hole data signal. The scales of the Analysis View can be adjusted using the Vertical Scale and Horizontal Scale knobs and the linear / logarithmic scale buttons. The status of the configuration should be flagged as Valid (indicated by the LED being green). In any other case (LED red) the telemetry should be adjusted (we assume a pulse signal Advanced Logic Technology Mount Sopris Instruments 16 4 - Operating Procedure is displayed in the analysis view). Click on the Advanced button to display additional controls to tune the telemetry. The Automatic settings option is the preferred mode and should allow the telemetry to be configured for a wide range of wirelines without operator input. For wirelines with a more limited bandwidth, the operator might need to turn off the automatic mode and adjust the telemetry settings manually. In general, the gain setting should not be left in the automatic mode once a valid setting has been determined. Uncheck the box to disable automatic gain. For each wireline configuration, the discriminators (vertical yellow lines) for the positive and negative pulses must be adjusted in order to obtain a valid communication status (see Figure 4-5) for an example of a suitable discriminator position). There is also the option to alter the baudrate in order to optimize the logging speed. The input gain can be increased (long wirelines) or decreased (short wirelines) in order to set up the discriminator levels correctly. Figure 4-5 Matrix telemetry settings Once the telemetry is correctly set, store the new settings as default. The tool should go through the initialization sequence in “Valid” status the next time the power is turned on. www.alt.lu www.mountsopris.com 17 4 - Operating Procedure 4.4 Configuring Tool Parameters The Configure IP Tool Parameters dialog box can be opened by clicking on the Settings/Commands button in the Tool panel of the dashboard. The QL 40 ELOG/IP tool can be operated in two modes by turning the knob control on the Mode section (Error! Reference source not found.): The “Resis.Only” mode records the 8”, 16”, 32”, 64” normal resistivity, SP and SPR The “IP-100-250-500” modes record both the normal resistivity, SP, SPR and the IP responses on the 16” and 64” measure electrodes For IP measurements, the downhole current generator supplies a +/- 16VDC square wave pulse at up to 500 mA to each electrode. The user can select from three different injection / release times: 100ms, 250ms and 500ms. Each measurement cycle consists of an Injection phase of the selected time with a positive current followed by a release period of the same length during which the first set of 10 measurements is made, a second injection period of the selected time with a negative current followed by a release period during which the second set of 10 measurements is made. E.g. a complete measurement cycle at 250 ms injection / release time will take 1 sec. Shorter injection / release times can be chosen for high conductivity formations. If the chargeability of the rock is expected to be poor, a longer injection / release time can be chosen. In order to see the curves in the preview window, turn ON the Sampling in the Acquisition panel of the dashboard. When in IP mode the Full wave preview window (Error! Reference source not found.) shows the potential difference measured between short spaced (SS - 16”, blue curve) and respectively long spaced (LS -64”, red curve) electrodes and the reference during the two injection and release times. Controls on the left of the preview window provide options to zoom in/out, fit preview to window, scale the display linear / logarithmic and enable/disable the display of short spaced and long spaced curves. Advanced Logic Technology Mount Sopris Instruments 18 4 - Operating Procedure Figure 4-6 Mode and Injection / Release time selection The Advanced Settings dialog box (7) can be displayed by clicking on the Advanced button. Figure 4-7 Advanced Settings Dialog Box If this box is checked, the recorded data file will not include the full wave information. The default setting is to leave the box unchecked to enable the full wave recording. 4.5 Recorded Parameters, Processors and Browsers 4.5.1 Recorded parameters When measurements are made in IP mode each Release period is subdivided into ten time windows. The measurements made during the same time window in both Release periods will be combined into the final IP response output. The following data channels are recorded by the QL40 ELOG/IP tool (Table 1). Depending on the mode – IP or Resistivity – in which the tool is operated, different channels are recorded. Time Temperature VSP VSPR I V8 V16 V32 V64 www.alt.lu www.mountsopris.com [sec] Tool CPU temperature [°C] Voltage Self Potential Sensor [mV] Voltage Single Point Resistance Sensor [V] Injection Current [mA] Potential difference at 8” electrode [V] Potential difference at 16” electrode [V] Potential difference at 32” electrode [V] Potential difference at 64” electrode [V] 19 4 - Operating Procedure Vinj16 Vinj64 NbWinlin Tlin.n (n=1 to 10) WLin16.n (n=1 to 10) WLin64.n (n=1 to 10) Tinj TRel SPR N8 N16 N32 N64 IPlin16.n (n=1 to 10) IPlin64.n (n=1 to 10) IPFW16 IPFW64 Ma Potential difference at 16” during injection Potential difference at 64” during injection Number of windows used for measurement during Release Time for measurement in each window [ms] Average reading from same time windows during the two 16” Release periods. Average reading from same time windows during the two 64” Release periods. Injection time [sec] Release time [sec] Single Point Resistance [Ohm] 8” normal resistivity [Ohm-m] 16” normal resistivity [Ohm-m] 32” normal resistivity [Ohm-m] 64” normal resistivity [Ohm-m] Ratio of potential differences (Release over Injection) from each window at 16” electrode [mV/V] Ratio of potential differences (Release over Injection) from each window at 64” electrode [mV/V] Ratio of potential differences (Release over Injection) at 16” electrode over entire Release time [mV/V] Ratio of potential differences (Release over Injection)at 64” electrode over entire Release time [mV/V] Apparent Chargeability [ms] Table 1 Recorded data channels 4.5.2 MChNum Browser Figure 4-8 shows a typical example of the numerical values displayed in the MChNum browser Figure 4-8 MCHNum Browser Window VSP SPR N8 Spontaneous Potential [mV] Single Point Resistance [Ohm] 8” normal resistivity [Ohm-m] Advanced Logic Technology Mount Sopris Instruments 20 4 - Operating Procedure N16 N32 N64 Ma 16” normal resistivity [Ohm-m] 32” normal resistivity [Ohm-m] 64” normal resistivity [Ohm-m] Apparent Chargeability [ms] The other parameters listed in Table 1 can be displayed in real time if required. Right click on MChNum browser and click on “Display options” from the menu. Select in the “Display options properties” dialog box and add the additional channels to display. It is possible to change the format of decimal digits displayed for a channel. Select the channel and click on “Settings” to configure the number of digits after the period. Figure 4-9 Display options properties 4.5.3 IpWave Browser The IpWave Browser window consists of 3 panes (see A, B and C in Figure 4-9) www.alt.lu www.mountsopris.com 21 4 - Operating Procedure A C B Figure 4-10 IpWave Browser window with three different wave displays Pane A displays the potential difference measured at the 16” (blue curve) and 64” electrodes (red curve) during the two injection and release periods. In addition the Self Potential values measured at 16” and 64” electrodes are shown as base lines. Pane B shows a normalized view of the raw potential measurements and the two SP baselines, which have been subtracted before normalization. The “edged” line in the browser window displays the normalized response integrated over the 10 time windows. Pane C provides a combined view of the raw measurements during the two Release times and the average from each time window. Controls in the toolbar of the window provide options to zoom, scale and enable / disable the curves. 4.5.3.1 Calculation of IP Chargeability Response The chargeability, labeled Ma, is calculated by integrating the 10 average voltages in the release cycle (units are V-ms) and then dividing by the injection voltage. For a 250 ms inj/rel time, this means that the average release voltage, beginning with the first 25 ms window after injection is removed, is added to the next average release voltage from 25-50 ms, and so on, for those 10 cycles. The output Ma is presented for the SS (16”) spacing. The IPWave browser shows the same information for the LS (64”) channel. Calculation of Ma, Chargeability The chargeability for the SS channel is calculated using the following relationship: Formula=0.001*{ch12}*({ch49}+{ch50}+{ch51}+{ch52}+{ch53}+{ch54}+{ch55}+{ch56}+{ch57} +{ch58}), where ch12 is the release gate time (e.g. 25 ms for a 250 ms inj/rel setting, Advanced Logic Technology Mount Sopris Instruments 22 4 - Operating Procedure and ch49..ch58 are the normalized values for each gate, which is the gate average voltage, divided by the injection voltage. Figure 4-11 Release Decay Waveform – Chargeability (Ma) calculation 4.5.4 MChCurve Browser By default the MchCurve Browser window displays the curves shown in Figure 4-11 – SP, SPR, normal resistivity and the IP responses from 16” and 64” electrodes. www.alt.lu www.mountsopris.com 23 4 - Operating Procedure Figure 4-12 MchCurve Browser window 4.5.5 WellCAD Browser Figure 4-13 WellCAD browser Advanced Logic Technology Mount Sopris Instruments 24 5-Performance Check & Calibration 5 Performance Check & Calibration Calibrations are performed at the factory. Each QL40-ELOG/IP is delivered with a calibrated “sub” file that must be used for that specific tool. It is also possible to calibrate the tool before a field operation using the suitable ELOG Calibrator – see below: Figure 5-1 ELOG Calibrator 5.1 Calibration procedure A calibration box is supplied with the QL40 ELOG/IP to verify the tool performance. Refer to the procedure described below: 1. Assemble the tool sub(s) and connect to the wireline 2. Connect the cables and clamps between the ELOG Calibrator and QL40 ELOG/IP tool as per the diagram shown on the box: www.alt.lu www.mountsopris.com 25 5 - Performance Check & Calibration Figure 5-2 ELOG Calibrator configuration diagram 3. In the Tool Panel: Select the proper tool/stack; Turn tool power On 4. In the Acquisition Panel select Time and turn it On. 5. Verify the telemetry status in the Telemetry Panel. The LED must be green and status valid 6. Right click on MChNum browser 7. From the menu, uncheck "Use calibration" and click on "Calibration Settings" 8. For each resistivity channel (SPR, N8, N16, N32 and N64), follow the steps below: From the “Calibration Settings” dialog box select the calibration page of the resistivity channel to calibrate Figure 5-3 Example of calibration page Edit the first reference value (say 100 ohm.m) Connect the measuring electrodes on the ELOG Calibrator for this first reference resistivity value (100 ohm.m) Click on SAMPLE to get the corresponding value in cps Edit the second reference value (say 10,000 ohm.m) Connect the measuring electrodes on the ELOG Calibrator for this first reference resistivity value (10,000 ohm.m) Click on SAMPLE to get the corresponding value in cps Click on COMPUTE and then on STORE to save the calibration factors of the measured channel 9. The “IP” response can also be checked by connecting the injection (SPR), 16” and 64” electrodes for the IP measurement configuration. A chargeability of 10ms should be read in the MChNum browser. Advanced Logic Technology Mount Sopris Instruments 26 www.alt.lu www.mountsopris.com 5-Performance Check & Calibration 27 6-Maintenance 6 Maintenance Warning: Removing the electronic chassis from pressure housing without prior consultation with ALT/MSI will void the tool warranty. The QL40 series tools require periodic maintenance. Make sure the threads on the brass nut on the sub bottom are free of sand, mud or other dirt. A thin layer of anti-seize is recommended. When disassembling the sub string, dry the joint as it is separated to prevent fluid from entering the sub top and getting into the electrical connector inside. After replacing top and bottom protectors it is good to wash the probe off after each use. Never take the probe apart. This probe is very difficult to disassemble and requires special steps to be taken in order to gain access to the inside of the probe without damaging the electronics. If you have read this after attempting to disassemble the probe chances are the probe has experienced damage and will need to be sent to the factory to be repaired. Inspect o-rings occasionally and keep the threads on both ends of the probe clean, to minimize problems in the future. 6.1 Upgrading firmware In accordance with the ALT policy of continuous development the tool has been designed to allow firmware upgrades. Firmware upgrade procedure is as follows: 1. Confirm that the communication is valid. 2. Upgrade firmware 6.1.1 Checking the communication 1. Connect the tool to your acquisition system. 2. Start ALTLog/Matrix software. 3. In the Tool panel select the appropriate tool and turn on the power. 4. In the Communication panel, select Settings. Check baud rate is set to 41666 and communication status is valid (Figure 6-1 or Figure 6-2). Figure 6-1Tool communication settings - ALTLog Advanced Logic Technology Mount Sopris Instruments 28 6-Maintenance Figure 6-2 Tool communication settings - Matrix Warning: Telemetry must be tuned properly. Bad communication may abort the upgrade of the firmware! 6.1.2 Upgrading the firmware 1. Right Click on the tool preview in the ToolStack Manager view and select Upgrade Firmware from the context menu. Right Click www.alt.lu www.mountsopris.com 29 6-Maintenance 2. The following message will appear (Figure 6-3). Click Yes to validate your choice. Figure 6-3 Warning Message during firmware upload 3. Select and open the appropriate .hex file provided. The upgrade will start. 4. During the upgrade procedure, the following message is displayed: Figure 6-4 Firmware upgrade progress window 5. Once the upgrade has been successfully completed (Figure 6-5), click on OK to turn off the tool. Figure 6-5 Successful upgrade 6. Power on the tool to start the upgraded firmware. Note that the following error message (Figure 6-6) will appear at the end of the procedure when the tool firmware upgrade has failed or has been aborted. Verify the tool communication settings in this case. Figure 6-6 Error message Advanced Logic Technology Mount Sopris Instruments 30 7-Troubleshooting 7 Troubleshooting The QL40ELOG/IP probes require a proper current return to armor, and a proper isolation for approximately 7 meters above the probe for correct operation. The downhole tool current (I) must be a reasonable value to insure correct measurements are being made. This value will fluctuate from 10 mA in very high resistivity rock, to as much as 500 mA in very conductive rock. If such values are not obtained during logging, there may be a problem with the cable armor connections at the winch or logger. NEVER DIS-ASSEMBLE THE PROBE WITHOUT CONSULTING THE FACTORY FIRST Disassembly Instructions The QL40-ELOG/IP Probe should never be disassembled unless service is necessary. This is a very difficult probe to disassemble, and is highly recommended that any service be performed by Mount Sopris, ALT or a qualified technician. Observation To Do Tool not listed in Tool panel drop down list. - Do you have a configuration file? - Has the configuration file been installed with the LoggerSettings application (refer to LoggerSettings and LoggerSuite manuals for more information) Tool configuration error message when powering on the tool. - Check all connections. Tool panel - No current. - Verify that the wireline armour is connected to the logging system. Test your interface cable between winch and data acquisition system. - Adjust the telemetry settings for your wireline configuration (see chapter 3.2 or 3.3) and store the new settings as default. Apply the appropriate tool settings for your logging run (see chapter 3.4). - Verify cable head integrity. - Verify voltage output at the cable head (it should be 120V). Tool panel - Too much current ! Immediately switch off the tool ! (red area). -Possible shortcut (voltage low, current high): Check for water ingress and cable head integrity - wireline continuity. - Verify the interface cable between winch slip ring and data acquisition system is not loose at the connectors. Check for possible source of the short circuit. - If the above shows no issues, use test cable provided by ALT to verify tool functionality. - If the problem still occurs, please contact service centre. Telemetry panel - status shows red. www.alt.lu www.mountsopris.com - Verify the telemetry settings for your wireline configuration (see chapter 3.2 or 3.3). 31 7-Troubleshooting - If problem cannot be resolved contact [email protected] or [email protected] Telemetry panel - memory buffer shows 100%. - Indicates that the systems internal memory buffer is full. PC can’t receive incoming data streams fast enough. Ensure your PC has enough resources available. Telemetry panel – bandwidth usage shows 100%. - Set the baudrate to highest value allowed by your wireline configuration. (Overrun error message.) - Reduce logging speed or increase vertical sample step. Telemetry panel - large number of errors. - Verify the telemetry settings for your wireline configuration (see chapter 3.2 or 3.3). - Check bandwidth usage and telemetry error status. Advanced Logic Technology Mount Sopris Instruments 32 8-Appendix 8 Appendix 8.1 Parts list Item No. Qty Part No. Description 1 1 1673840 Silicone grease Molykote111 2 2 DIN 1810B 40-42 Hook wrench w.pin 3 6 55459 AS215-V-75° 4 1 L0034-086 Grease Lubriplate 8.2 Oring Viton shore 75° - 26.57 x 3.53 Bridle wiring configurations 8.2.1 QL40-IS4 bridle configuration for 4 conductor wireline Figure 8-1 Bridle bottom connection to tool Figure 8-2 Bridle top connection to cable head FISH – voltage reference electrode WL4 WL Armour WL3 WL1 www.alt.lu www.mountsopris.com 33 8-Appendix 8.2.2 QL40-IS1 (MSI) and QL40-IS2 (GO1) bridle configurations for single conductor wireline WL1 Figure 8-3 QL40-IS1 and IS2 bridle bottom connection to tool Figure 8-4 QL40-IS1 bridle top connection to cable head Figure 8-5 QL40-IS2 bridle top connection to cable head FISH – voltage reference electrode Not connected WL Armour Not connected WL1 Advanced Logic Technology Mount Sopris Instruments