1
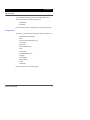
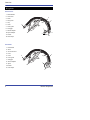
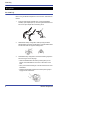
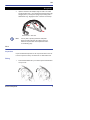
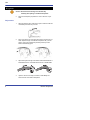
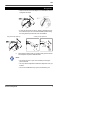
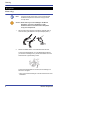
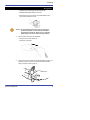
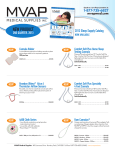
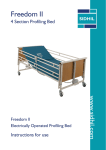
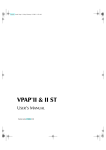
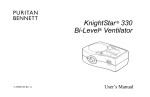
Breeze™ SleepGear™
User’s Guide
Contents
Overview ...................................................................................... 1
Components .................................................................. 1
Nasal Pillows .................................................... 2
DreamSeal ........................................................ 2
Indications for Use ......................................................... 3
Technical Data ............................................................... 3
Assembly ..................................................................................... 4
Use ............................................................................................... 5
Inspection ...................................................................... 5
Fitting ............................................................................. 5
Adjustment ..................................................................... 6
Cleaning ....................................................................................... 8
This manual is available online at: http://www.puritanbennett.com
Nellcor Puritan Bennett Inc. is an affiliate of Tyco Healthcare. Breeze,
SleepGear, and DreamSeal are trademarks of Nellcor Puritan Bennett Inc.
© 2007 Nellcor Puritan Bennett Corporation. All rights reserved.
Breeze SleepGear
i
Contents
English
Warnings
Warnings are identified by the WARNING symbol shown above and alert the user to
potential serious outcomes (death, injury, or adverse events) to the patient or user.
WARNINGS:
• Do not block or modify the vent hole(s).
• To ensure sufficient air for respiration, do not wear the Breeze SleepGear
until it is connected to a properly operating CPAP machine.
• At low CPAP pressures, flow through the vent hole(s) may be inadequate
to clear all exhaled gas from the Breeze SleepGear. Some rebreathing and
inhalation of carbon dioxide may occur.
• If you experience skin irritation, soreness or discoloration, eye
discomfort, gastric problems such as distention or bloating, nasal
irritation or dryness, excessive hair loss, or any discomfort from using
the Breeze SleepGear, discontinue use and consult your physician.
• If oxygen is used with the Breeze SleepGear or CPAP machine, turn
oxygen flow off whenever the CPAP machine is off.
Cautions
Cautions are identified by the CAUTION symbol shown above and alert the user to
exercise care necessary for the safe and effective use of the Breeze SleepGear.
Caution: By US Federal law, this device may be sold or used only as
ordered by a licensed physician.
Notes
Notes are identified by the NOTE symbol shown above and provide additional helpful
information.
ii
Breeze SleepGear
English
Overview
The Puritan-Bennett Breeze SleepGear (Single Patient Use) is
offered in two airway assembly configurations:
• Nasal Pillows
• DreamSeal
User information for both configurations is presented in this guide.
Components
The primary components that comprise the Breeze SleepGear are:
• Nasal Pillows (or DreamSeal)
• Shell
• Vent Hole Insert (DreamSeal only)
• Vent Hole(s)
• Wing Knob
• Pivot (DreamSeal only)
• Hose
• Hose Guide
• Clip (Nasal Pillows only)
• Outrigger
• Spine Adapter
• Swivel Adapter
• Cradle
• Halo Straps
Refer to the figures on the following page.
Breeze SleepGear
1
Overview
English
Nasal Pillows
1. Nasal Pillows
2. Vent holes
6
3. Shell
4. Wing knob
5. Clip
6. Hose
5
8
7
9
12
10
7. Hose guide
1
8. Outrigger
9. Swivel adapter
10. Spine adapter
11
4
2
11. Cradle
3
12. Halo straps
DreamSeal
1. DreamSeal
2. Shell
3. Vent hole insert
4. Pivot
5. Hose
6. Hose guide
7. Outrigger
7
8
9
8. Swivel adapter
11
1
9. Spine
10. Cradle
5
6
4
10
11. Halo straps
2
2
3
Breeze SleepGear
Overview
English
Indications for Use
This product is intended for use with devices that deliver continuous
positive airway pressure (CPAP) and bi-level positive airway
pressure in patients weighing at least 30 kg. Refer to the warnings
on page ii.
Technical Data
The following table provides the technical data for both the
Nasal Pillows and DreamSeal configurations.
Vent Flow, Pressure Range, and Materials
Parameter
Pressure Range
Vent Flow
Storage and
Operating Conditions
CPAP Pressure
(cmH2O)
3 – 30
with DreamSeal
with Nasal Pillows
3
13
17
5
16
20
8
21
25
10
23
28
12
25
31
15
28
35
18
31
39
20
32
41
25
34
47
30
38
53
—
Storage
Operating
Temp. Range
Relative Humidity
(noncondensing)
Materials
Flow Rate
(L/min)
-40°F to 158°F
(-40°C to 70°C)
Up to 95%
-41°F to 104°F
(5°C to 70°C)
Up to 95%
• Nasal Pillows: medical-grade silicone
• DreamSeal Perimeter Seal: medical-grade silicone
• Halo Straps: Velstretch®
Breeze SleepGear
3
Assembly
English
Assembly
Before using the Breeze SleepGear for the first time, assemble it as
follows:
1.
Insert the nasal airway assembly (item 1) into the SleepGear
assembly spine adapter (item 2). The hose guide slides back and
forth in the spine adapter with a ratcheting sound.
2
1
2.
Nasal Pillows airway configuration: While pinching the Nasal
Pillows between the thumb and forefinger, insert the Nasal Pillows
into the shell holes with a gentle rotating motion.
3.
DreamSeal airway configuration: Perform the following steps and
refer to the figure on the next page.
• Attach the DreamSeal to the shell by inserting the lip on the
bottom of the DreamSeal into the notch on the bottom of the
shell.
a
• Place your thumb and forefinger on the two raised circles on the
DreamSeal.
• Rotate the DreamSeal toward the shell and squeeze gently to
engage the two side latches.
4
Breeze SleepGear
Use
English
4.
Optional: Thread the halo straps through the slots in the cradle
(see figure below, item 1). Then thread the halo straps through the
outrigger (item 2) or through the optional clip accessory (item 3 –
Nasal Pillows only). Engage the Velcro® fasteners on the straps.
3
2
1
Nasal Pillows - Side View
Note:
You may wish to try fitting the Breeze SleepGear
without the halo straps first, then add the straps if a
better fit is required. Refer to the Adjustment section
on the following page.
Use
Inspection
Inspect the Breeze SleepGear and its components before each use
to ensure all parts are firmly connected and no visible leaks exist.
Fitting
1.
Breeze SleepGear
Insert the Nasal Pillows into your nostrils or place the DreamSeal
over your nose.
5
Use
English
Caution: Avoid excessive bending of the nasal airway
assembly when putting on the Breeze SleepGear.
2.
Place the cradle (back pad) below the curve at the back of your
head.
1.
Adjust the position of the cradle on the spine so that the cradle sits
comfortably at the base of your head.
2.
Place your hand on the spine and hold it firmly to the back of your
head. Adjust the length of the Breeze SleepGear with your free
hand by moving the nasal airway assembly toward your face.
Refer to the following figure.
3.
Adjust the height and angle of the shell so that the Nasal Pillows or
DreamSeal device is comfortable and there are no audible leaks.
4.
Optional: Use the halo straps, if needed, to add stability and
enhance the fit of the Breeze SleepGear.
Adjustment
6
Breeze SleepGear
Use
English
• Adjust the tension of the halo straps for a comfortable fit. Do not
overtighten the straps.
• If using the optional clip accessory, adjust by first lifting the clip;
then, slide the clip to one of the three available positions along
the hose guide that provides the most comfortable fit.
Using Halo Straps With Clip
5.
Closeup of Clip Adjustment
Pressurize the interface with your positive airway pressure device
and readjust as required to eliminate leaks.
Notes:
• The amount of force on your nose should be just enough to
prevent air leaks.
• You may need to readjust the fit of Breeze SleepGear when you
lie down.
• The use of humidification may improve comfort during use.
Breeze SleepGear
7
Cleaning
English
Cleaning
Note:
To prolong the life of the product, it is recommended that
the Breeze SleepGear be cleaned thoroughly at least
once per week.
Caution: Hand clean only. To avoid damage to the Breeze
SleepGear, never use a dishwasher or other
mechanical device to clean the Breeze SleepGear
or any of its components.
1.
Disconnect the back half of the nasal airway assembly (item 1)
where the hose guide attaches to the spine adapter (item 2).
2
1
2.
Remove the Nasal Pillows or the DreamSeal from the shell.
To remove the Nasal Pillows, pinch the Nasal Pillows between
your thumb and forefinger; then, pull the Nasal Pillows out of the
shell holes with a gentle rotating motion.
To remove the DreamSeal from the shell, do the following and
refer to the next figure.
• Place your thumb and forefinger on the two raised circles on the
DreamSeal.
8
Breeze SleepGear
Cleaning
English
• Squeeze gently to disengage the two side latches.
• Rotate the DreamSeal away from the shell.
• Disengage the lip on the bottom of the DreamSeal from the
notch on the bottom of the shell.
Caution: To avoid damaging the hoses when connecting or
disconnecting them, use the methods described in
the following instructions. Never pull on or twist the
ribbed portions of hoses. Refer to the figure below.
3.
Disconnect the hose at the swivel adapter:
• Grasp each hose at its rubber cuff.
• Gently pull hoses apart.
4.
Breeze SleepGear
Remove the vent hole insert from the DreamSeal shell. Slide your
fingernail under the end of the insert with the raised indicator
dot(s) and pull the insert up and out.
9
Cleaning
English
Caution: Do not immerse components with foam pads
attached. Do not sterilize. Do not use bleach-,
chlorine-, or aromatic-based solutions, scented oils,
or moisturizing, antibacterial, deodorizing, or
fragranced soaps to clean the nasal pillows, mask,
headgear, padding, or air tubing. Use of such
substances may cause hardening of your Breeze
SleepGear, thereby reducing the life of the product.
Caution: Do not expose the mask or tubing to direct sunlight.
Exposure to direct sunlight may cause deterioration
of the product.
5.
Wash the nasal airway assembly parts in warm, soapy water as
necessary to remove dirt, body oils, cosmetics, etc. Rinse them
thoroughly in clean running water and air dry on a clean,
absorbent surface. Foam pads may be wiped with a mild soap
applied to a moist cloth.
6.
To install the vent hole insert, align the indicator dot on the insert
with the dot on the shell. Press the vent hole insert into the
opening in the shell. Make sure the inner lip on the vent hole
insert is fully inserted into the shell.
7.
If you are using the halo straps, release the ends and pull the
straps through the outrigger and cradle slots. The cradle may be
separated from the spine adapter for cleaning.
8.
Extend the cradle (item 1) to its maximum adjustment and then
pull on the cradle more forcefully to separate it from the spine
adapter (item 2).
2
1
10
Breeze SleepGear
Blank Page
Puritan Bennett Corporation
4280 Hacienda Drive
Pleasanton, CA 94588 U.S.A.
Telephone Toll Free 1.800.255.6774
Authorized Representative
Tyco Healthcare UK LTD
154 Fareham Road
Gosport PO13 0AS, U.K.
© 2007 Nellcor Puritan Bennett Inc.
All rights reserved
Rx ONLY
Assembled in Mexico
10017598A-0207