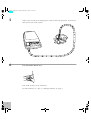
1
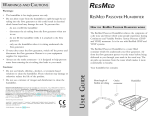
218043_1.book Page 1 Friday, February 15, 2002 11:53 AM VPAP II & II ST ® USER’S MANUAL Reorder number: 218043/2 02 02 218043_1.book Page 2 Friday, February 15, 2002 11:53 AM RESMED VPAP II & II ST ® USER’S MANUAL Reorder number: 218043/2 02 02 218043_1.book Page 3 Friday, February 15, 2002 11:53 AM Manufactured by: ResMed Ltd 97 Waterloo Road North Ryde NSW 2113 Australia Tel: +61 (2) 9886 5000 or 1 800 658 189 (toll free) Fax: +61 (2) 9878 0120 Email: [email protected] Distributed by: ResMed Corp 14040 Danielson Street Poway CA 92064-6857 USA Tel: +1 (858) 746-2400 or 1-800-424-0737 (toll free) Fax: +1 (858) 746-2900 Email: [email protected] ResMed (UK) Limited 67b Milton Park Abingdon Oxfordshire OX14 4RX UK Tel: +44 (1235) 862 997 Fax: +44 (1235) 831 336 Email: [email protected] ResMed Asia Pacific Ltd 97 Waterloo Road North Ryde NSW 2113 Australia Tel: +61 (2) 9886 5000 or 1 800 991 900 (toll free) Fax: +61 (2) 9889 1471 Email: [email protected] ResMed NZ Ltd PO Box 51-048 Pakuranga Auckland New Zealand Tel:+64 25 737 633 Fax:+64 9 239 0193 Email: [email protected] ResMed GmbH & Co. KG Rudolfstraße 10 D-41068 Mönchengladbach Deutschland Tel: +49 (0) 2161-3521-0, +49 (0) 180 22 22 668 (Kunden Service Center; 0.06 €/Anruf), +49 (0) 180 22 66 888 (Technische Service Line; 0.06 €/Anruf) Fax: +49 (0) 2161-3521-299 Email: [email protected] ResMed SA Parc de la Bandonnière 2, rue Maurice Audibert 69800 Saint-Priest France Tél: +33 (0) 4 37 251 251 Fax: +33 (0) 4 37 251 260 Email: [email protected] ResMed Sweden AB Industrigatan 2 S-461 37 Trollhättan Sverige Tel: +46 520 420 110 Fax: +46 520 397 15 Email: [email protected] ResMed Singapore Pte Ltd 57 Ubi Ave 1 #07-09 Ubi Centre Singapore 408936 Tel: +65 284 7177 Fax: +65 284 7787 Email: [email protected] ResMed Malaysia Sdn Bhd Suite E-10-20, Plaza Mon’t Kiara No. 2 Jalan 1/70C Mon’t Kiara 50480 Kuala Lumpur Malaysia Tel: +60 3 6201 7177 Fax: +60 3 6201 2177 Email: [email protected] US DESIGNATED AGENT: ResMed Corp EU AUTHORISED REPRESENTATIVE: ResMed (UK) Ltd Internet: http://www.resmed.com Protected by: EP(DE,FR,GB) 0088761, JP 1697822, US 4944310, US 5199424, US 5522382. Other patents pending. Copyright subsists in ResMed products. SULLIVAN, VPAP, AutoSet, AutoView, Bubble Cushion, Bubble Mask, HumidAire, Mirage, ResCap, SCAN, SmartStart, and Ultra Mirage are trademarks of ResMed Ltd. © Copyright ResMed Ltd 2002. All rights reserved. CONTENTS WARNINGS & CAUTIONS . . . . . . . . . . . . . . . . . . . . . . . . . . . . . . . . . 1 STEP 1—UNPACKING . . . . . . . . . . . . . . . . . . . . . . . . . . . . . . . . . . . . 3 OTHER REQUIRED COMPONENTS OPTIONAL ACCESSORIES 4 4 STEP 2—ASSEMBLY . . . . . . . . . . . . . . . . . . . . . . . . . . . . . . . . . . . . . 5 STEP 3—STARTING TREATMENT . . . . . . . . . . . . . . . . . . . . . . . . . . . . . 7 ALARM CANCEL BUTTON 9 LCD SCREEN . . . . . . . . . . . . . . . . . . . . . . . . . . . . . . . . . . . . . . . . . . 11 HELPFUL HINTS . . . . . . . . . . . . . . . . . . . . . . . . . . . . . . . . . . . . . . . . 13 CLEANING & MAINTENANCE . . . . . . . . . . . . . . . . . . . . . . . . . . . . . . . 15 SERVICING CONTENTS 218043_1.book Page i Friday, February 15, 2002 11:53 AM 16 TROUBLESHOOTING . . . . . . . . . . . . . . . . . . . . . . . . . . . . . . . . . . . . . 17 WARNINGS RELATED TO TREATMENT . . . . . . . . . . . . . . . . . . . . . . . . . . 21 SPECIFICATIONS . . . . . . . . . . . . . . . . . . . . . . . . . . . . . . . . . . . . . . . . 23 i 218043_1.book Page ii Friday, February 15, 2002 11:53 AM ii WARNINGS & CAUTIONS This manual contains special terms and icons which appear in the margins to draw the reader’s attention to specific and important information. WARNING Alerts the user to possible injury. ! CAUTION WARNINGS & CAUTIONS 218043_1.book Page 1 Friday, February 15, 2002 11:53 AM Alerts the user to possible equipment problems. ! NOTE i An informative or helpful note. Please read this manual carefully before use. This manual is intended for the user only. For clinical information, please refer to the Clinician’s Manual for this product. USER/OWNER RESPONSIBILITY The user or owner of this system shall be liable for any injury or property damage resulting from operation not in accordance with the instructions supplied, or maintenance/modifications carried out by unauthorized persons. INDICATIONS The VPAP II is intended for the treatment of obstructive sleep apnea (OSA) in adult patients (≥ 66 lb or 30 kg). CONTRAINDICATIONS The VPAP II and VPAP II ST should not be used in cases of severe respiratory failure where intubation is judged to be immediately necessary. VPAP therapy should be used with caution in the following cases: • Existing respiratory failure • Emphysematous bullae, pneumothorax, pneumomediastinum, or past history of the above (indicating risk of pneumothorax or further baro-trauma) • Decompensated cardiac failure or hypotension, particularly if associated with intravascular volume depletion • Massive epistaxis, or risk of recurrence if previous occurrence • Pneumoencephalus, recent trauma or surgery that may have caused cranionasopharyngeal fistula (risk of entry of air into cranial cavity) 1 218043_1.book Page 2 Friday, February 15, 2002 11:53 AM WARNINGS ! • Acute sinusitis, otitis media, or perforated ear drum. • Explosion hazarddo not use in the vicinity of flammable anesthetics. • THIS IS NOT A LIFE SUPPORT DEVICE. It may stop operating with power interruption, or if a fault occurs in the product. • Use only mask systems as recommended and supplied by ResMed. Other mask systems may not be compatible. • In the USA, Federal law restricts this device to sale by, or on the order of, a physician. • The mask should be worn only when the machine is turned on and operating properly. Explanation: exhaled air is flushed out of the vents when the machine is operating. If the unit is not operating, exhaled air will be rebreathed. The vent holes on the mask should never be blocked. • At low pressures, the flow through the exhalation ports may be inadequate to clear all exhaled gases. Some rebreathing may occur. • The airflow for breathing may be as much as 11°F (6°C) higher than room temperature. Caution should be exercised if the room temperature is higher than 95°F (35°C). • Do not drop or insert any objects into the air tubing or air outlet. • Do not open the flow generator case or attempt to adjust the unit. • If oxygen is used with this device, the oxygen flow must be turned off when the device is not operating. Explanation: When the device is not in operation, and the oxygen flow is left on, oxygen delivered into the ventilator tubing may accumulate within the device enclosure and create a risk of fire. • Always turn the flow generator on before the oxygen. • Always turn the oxygen off before the flow generator. • Oxygen supports combustion. Oxygen should not be used while smoking or in the presence of an open flame. OXYGEN USE WARNING ! NOTE i 2 At a fixed flow rate of supplemental oxygen flow, the inhaled oxygen concentration will vary, depending on the pressure settings, patient breathing pattern, mask selection, and leak rate. STEP 1 – UNPACKING 218043_1.book Page 3 Friday, February 15, 2002 11:53 AM STEP 1 – UNPACKING Check that you have the following items: VPAP II or IIST flow generator Air tube RESMED VPAP II & II ST USER’S MANUAL User’s Manual Power cord Carry bag 3 218043_1.book Page 4 Friday, February 15, 2002 11:53 AM OTHER REQUIRED COMPONENTS You will also need a ResMed mask system, which is supplied separately. VPAP flow generators are compatible with the following mask systems: Mirage® Mask WARNING ! Mirage® Full Face Mask Ultra Mirage® Mask Modular Mask Use only mask systems as recommended and supplied by ResMed. Other mask systems may not be compatible. OPTIONAL ACCESSORIES HumidAire™ heated humidifier WARNING ! 4 Passover humidifier Only ResMed humidifiers are compatible for use with VPAP flow generators. Do not use any other humidifier systems. STEP 2 – ASSEMBLY 1 CAUTION ! Place the flow generator on a table near the head of your bed. STEP 2 – ASSEMBLY 218043_1.book Page 5 Friday, February 15, 2002 11:53 AM Be careful to not place it where it can be bumped over, or where someone may trip over the power cord. 2 Plug the power cord into the power socket at the back of the flow generator. 3 Plug the other end of the power cord into an AC wall outlet. 4 Assemble your mask system. Please refer to the mask system user instructions. If you are using a humidifier, please refer to the connection instructions in the user’s manual supplied with the humidifier. 5 218043_1.book Page 6 Friday, February 15, 2002 11:53 AM 5 6 Connect one end of the air tubing to the outlet on the flow generator. Connect the other end to your mask system. Turn the power switch on (I). Your VPAP system is now assembled. To start treatment, see “Step 3 – Starting treatment” on page 7. 6 STEP 3 – STARTING TREATMENT 1 2 3 You should have assembled the flow generator and connected the air tubing (see “Step 2 – Assembly” on page 5). STEP 3 – STARTING TREATMENT 218043_1.book Page 7 Friday, February 15, 2002 11:53 AM Assemble your mask as described in the mask system user instructions, and put it on. Lie down and arrange the air tubing so that it is free to move if you turn in your sleep. * this configuration not possible with Mirage mask Figure 1 : Arranging the air tube CAUTION • Do not leave long lengths of air tubing around the top of your bed; they could twist around your head or neck while sleeping. • Make sure the area around the flow generator is clean (dust free) and clear of bedding, clothes, and any other potential blockages. ! 7 218043_1.book Page 8 Friday, February 15, 2002 11:53 AM 4 Start the flow generator in one of the following ways: MODE S IPAP 10.0 EPAP 8.0 IPAP max 2.0 MIN RESMED VPAPII Start/Stop button 5 10 20 Delay Timer buttons Alarm Cancel button Figure 2 : Control panel of the VPAP II START/STOP Press the Start/Stop button to start the air flow. The air will begin flowing slowly and build up to pressure in 10–15 seconds. OR DELAY TIMER If you have difficulty falling asleep with full pressure, you can use the Delay Timer. The airflow will start very gently while you fall asleep, and slowly increase to full operating pressure over a selected time period. You can select a delay time of 5, 10, or 20 minutes. Choose a delay time and press the corresponding button. The air will start to flow automatically. There is no need to push the Start/Stop button. If you have not yet fallen asleep after the delay period, you may press one of the Delay Timer buttons again. OR SMARTSTART® 8 This feature is set by your clinician. If SmartStart is enabled, the hand icon will appear on the LCD screen (see “LCD Screen” on page 11). The flow generator will automatically start when you breathe into the mask and stop when you remove it. If you want to use the Delay Timer, you will need to press a Delay Timer button to start treatment. However, the flow generator will still stop automatically. 5 NOTES i To stop treatment, simply press the Start/Stop button and remove your mask. If SmartStart is enabled, the flow generator will stop automatically when you remove your mask. If the Mask Alarm is enabled (the “M” icon appears on the LCD screen), SmartStart will not stop the flow generator automatically when you remove your mask. The mask alarm will activate. Use the Start/Stop button to turn the flow generator off before removing your mask. STEP 3 – STARTING TREATMENT 218043_1.book Page 9 Friday, February 15, 2002 11:53 AM Some masks or mask valve combinations may affect the operation of the SmartStart feature. If SmartStart does not trigger the operation of the flow generator, start the flow generator by pressing the Start/Stop button. ALARM CANCEL BUTTON The VPAP is equipped with an alarm to warn you when you are not receiving correct treatment. The alarm will activate: • if the VPAP detects a high mask leak and if the Mask Alarm option has been enabled by your clinician; • when excessively high temperatures cause the VPAP to overheat and switch from your prescribed bilevel treatment pressures to a single, constant pressure. MASK ALARM If your clinician has activated the Mask Alarm feature, the Mask Alarm will activate if it detects a high mask leak or if your mask has become totally dislodged from your face. The VPAP will illuminate an indicator light, sound a buzzer and display “MASK OFF ALARM” on the LCD screen. To stop the alarm, press the Alarm Cancel button or eliminate the cause of the leak. To eliminate the leak, reposition the mask on your face and/or check that the air tubing is connected properly to the mask and the flow generator. OVERHEATING In rare circumstances when the room temperature is above 95°F (35°C) and you have been breathing rapidly and there are large pressure changes, the air pump in the flow generator may overheat. The alarm will activate and display “O’HEAT ALARM” on the LCD screen. You can cancel the alarm by pressing the Alarm Cancel button. If the air pump does overheat, the VPAP will deliver a single, constant pressure for about 15 minutes to allow the pump to cool. When cool, the pump will automatically return to normal operation. If you prefer, press the Start/Stop button and remove your mask. Allow the flow generator to cool for about 15 minutes then resume your normal treatment. 9 218043_1.book Page 10 Friday, February 15, 2002 11:53 AM 10 LCD SCREEN The LCD screen will show the settings made by your clinician. You cannot modify any of the items shown on the display. Treatment settings SmartStart enabled Settings lock settings cannot be changed MODE IPAP EPAP IPAP max LCD SCREEN 218043_1.book Page 11 Friday, February 15, 2002 11:53 AM S 10.0 8.0 2.0 MIN M RESMED VPAPII Humidifier option Mask Alarm enabled Pressure indicator Message panel Figure 3 : Example of settings shown on the LCD screen NOTE i The items appearing on the LCD screen will vary depending upon the settings made by your clinician. 11 218043_1.book Page 12 Friday, February 15, 2002 11:53 AM 12 HELPFUL HINTS FIRST USE HELPFUL HINTS 218043_1.book Page 13 Friday, February 15, 2002 11:53 AM When you use your VPAP flow generator for the first time, you may feel an unusual sense of pressure when breathing. Even though the flow generator reduces the pressure when you breathe out, you may still need to consciously push out when breathing. This is normal and will occur automatically while you sleep. Take your time to adjust to this new sensation. Taking a few deep breaths may help. MOUTH LEAKS Try to keep your mouth closed, as air leaks from your mouth can be unpleasant. If you wake up during the night, the sensation of a mouth leak can be alarming. You should close your mouth and try to go back to sleep. Using the Delay Timer may also help. See “Delay Timer” on page 8. If mouth leaks continue to be a problem for you, talk to your clinician about ResMed’s Mirage Full Face Mask which is designed to prevent mouth leaks. GETTING UP If you get up during the night, remember to remove your mask. Always remember to replace the mask when you return to bed and turn the flow generator on again. See “Step 3 – Starting treatment” on page 7. DRYNESS Some people experience dryness of the nose, mouth, and throat during the course of VPAP treatment, especially during winter. A humidifier may be the best solution. ResMed produces two humidifier models that will humidify the air flow to relieve the symptoms. Contact your clinician for advice. MASK FITTING The Mirage mask does not need to be tightly fastened. The VPAP delivers the most effective treatment when the mask is well balanced and comfortable, without being pulled tight. A minor leak around the lower part of the face is preferable to overtightening the mask. However, any air leaks blowing near the eyes should be eliminated as they may cause eye irritation. If you have continuing problems trying to get a comfortable mask fit, do not hesitate to contact your sleep clinic or 13 218043_1.book Page 14 Friday, February 15, 2002 11:53 AM equipment supplier. They may be able to modify the cushion or mask, or they may suggest an alternative size or style from the wide range available. RUNNY/BLOCKED NOSE You may experience sneezing and a runny or blocked nose during the first few weeks of VPAP treatment, which may need treatment with a humidifier or nasal spray. Consult your clinician for advice. INTERNATIONAL USE Your VPAP flow generator is equipped with a universal input power supply enabling it to operate in other countries. It will operate on 110–240 V and 50–60 Hz. No special adjustment is necessary, but you may need an adaptor for the power outlet. Always remember to pack the detachable power cord. For more information, contact your equipment supplier. 14 CLEANING & MAINTENANCE DAILY Disconnect the air tubing and mask. Wipe the inside and outside of the mask and cushion with a clean damp cloth. CLEANING & MAINTENANCE 218043_1.book Page 15 Friday, February 15, 2002 11:53 AM Hang them up to dry in the shade—not in the sun, as the tubing may harden and crack over time. WEEKLY Handwash the mask and air tubing with pure soap. Do not use moisturizing, deodorizing, fragranced, or antibacterial soaps. Refer to the mask user instructions for further information. Handwash the headgear with pure soap and drip dry out of direct sunlight. Check the mask outlets for blockages. PERIODICALLY The exterior of the flow generator should be cleaned with a slightly damp cloth and mild detergent. WARNING ! CAUTIONS ! Beware of electric shock. Do not immerse the flow generator or power cord in water. Always unplug the flow generator before cleaning and be sure that it is dry before plugging it back in. Do not use bleach-, chlorine-, alcohol- or aromatic-based solutions, scented oils, moisturizing, deodorizing, fragranced, or antibacterial soaps to clean the VPAP or the mask system as these may damage or otherwise reduce the life of the product. The mask and air tubing are subject to normal wear and tear. Inspect them regularly for damage. 15 218043_1.book Page 16 Friday, February 15, 2002 11:53 AM REPLACING THE AIR FILTER STRIP The air filter strips should be replaced approximately every six months (or more often if they becomes noticeably dirty). To remove the air filters, slide out the air filter cover. Instructions on replacing the air filter strips are supplied with the new filters. Figure 4 : Removing the air filter cover NOTE Hypoallergenic filter strips are also available from ResMed to provide a higher level of filtration from airborne particles such as molds and pollens. CAUTION The air filter strips are not washable or reusable. i ! SERVICING The flow generator is designed to give you years of trouble-free operation. It will not require regular servicing provided that you clean and maintain it according to the instructions in this manual. If you feel that your unit is not performing properly, see “Troubleshooting” on page 17. If it is still not working properly, consult your equipment supplier or take it to an authorized service agent. CAUTION ! 16 Inspection and repair should only be performed by an authorized service agent. Under no circumstances should you attempt to service or repair the unit yourself. TROUBLESHOOTING Problem Possible cause Solution Flow generator does not start when you press the Start/Stop or Delay Timer button (and the LCD screen is blank) •Power cord is not connected properly •Check both ends of the power cord •Flow generator is not switched on •Switch on main switch at rear of unit •Power outlet may be faulty •Try another power outlet •Breath is not deep enough to trigger SmartStart •Take a deep breath in and out through the mask •Mask or mask/humidifier combination interfering with SmartStart triggering •Use Start/Stop button •Excessive leak •Adjust position of mask and headgear •Plugs may be missing from ports on mask; replace them •Air tubing not connected properly; connect air tubing firmly at both ends •Air tubing kinked or punctured; straighten or replace air tubing •SmartStart not enabled ( does not appear on the LCD screen) •Use Start/Stop button •Nasal cushion not fitted properly onto mask frame •Fit cushion properly •Mask and headgear straps not positioned correctly •Adjust position of mask and headgear (tighter is not always better) •Plugs missing from mask ports •Replace plugs •Nasal cushion torn or distorted •Replace cushion •Incorrect mask size •Obtain correct sized mask SmartStart is enabled but flow does not start when you begin breathing in the mask Air leaking around nose and eyes TROUBLESHOOTING 218043_1.book Page 17 Friday, February 15, 2002 11:53 AM 17 218043_1.book Page 18 Friday, February 15, 2002 11:53 AM Problem Possible cause Solution SmartStart is enabled, but the flow generator does not stop automatically when you remove your mask •Mask or mask/humidifier combination interfering with SmartStart triggering •Use Start/Stop button •Mask Alarm enabled (M appears on the LCD screen) •SmartStart will not stop the flow automatically when the mask alarm is enabled; use the Start/ Stop button •SmartStart not enabled ( does not appear on the LCD screen) •Use Start/Stop button •Humidifier used but the Humidifier option has not been enabled ( does not appear on the LCD screen) •Your clinician must enable the Humidifier option if you want to use a humidifier and SmartStart feature •Incompatible humidifier or mask system being used •Use only equipment recommended and supplied by ResMed •Flow generator incorrectly calibrated •Return to supplier for calibration •Incompatible humidifier or mask system being used •Use only equipment as recommended and supplied by ResMed •Humidifier used but Humidifier option has not been enabled ( does not appear on the LCD screen) •Your clinician must enable the Humidifier option if you want to use a humidifier and Mask Alarm feature Mask Alarm is enabled, but alarm does not activate when the mask is removed during treatment 18 Problem Possible cause Solution Flow generator delivers a single pressure instead of alternating between the two set pressures (and pressure indicator displays a constant level) •Rapid breathing and a room temperature above 95°F (35°C) have caused the motor to overheat •If you are comfortable with the constant pressure, let it run. The motor will cool down after about 15 minutes and resume normal operation •If the single pressure is uncomfortable, stop the unit by pressing the Start/Stop button and allow it to cool. You may resume normal operation when cool •Cool the room if possible, but do not direct the source of cold air toward the flow generator •Blocked air filter has caused overheating •Remove blockage •Blocked air inlet •Remove blockage •Delay Timer is in use •Wait for air pressure to build up gradually, or press the Start/Stop button to start immediately. If this is uncomfortable, see your clinician to have the start pressure increased •Air filter strips are dirty •Replace air filter strips •Air tubing is kinked or punctured •Straighten or replace air tubing •Air tubing is not connected properly •Check and tighten both ends of the air tubing •Plugs missing from the mask ports •Replace plugs Insufficient air flow delivered from the flow generator TROUBLESHOOTING 218043_1.book Page 19 Friday, February 15, 2002 11:53 AM 19 218043_1.book Page 20 Friday, February 15, 2002 11:53 AM 20 WARNINGS RELATED TO TREATMENT The VPAP flow generator is designed to help you have a good night’s sleep. However, you need to be aware of possible problems that may arise during the course of VPAP treatment. WARNING ! WARNINGS RELATED TO TREATMENT 218043_1.book Page 21 Friday, February 15, 2002 11:53 AM If you experience any of the following symptoms during your VPAP treatment, consult your clinician immediately: • headache • middle ear or sinus discomfort • chest pain • dryness of the nose, mouth or throat (The use of a humidifier may help. Your clinician or equipment supplier can advise you on the humidifiers available.) • feeling slightly bloated (This is usually the result of swallowing air while you are awake. Using the Delay Timer may help, but consult your clinician if the symptoms persist.) • air continually leaking out of the mouth while sleeping • recurrence of any sleep apnea symptoms while on VPAP Do not stop your VPAP treatment without the approval of your clinician. Always consult your clinician if you expect to be in a situation where you cannot use your VPAP for more than a few days. If you are admitted to a hospital or prescribed any other form of medical treatment, always inform the medical staff that you are being treated with VPAP. It is also important to contact the clinician who is following your VPAP treatment. If you experience an infection of the upper respiratory tract, middle ear or sinus, contact your clinician before continuing your VPAP treatment. You may be advised to stop treatment until the infection has cleared. If you continue with treatment during an infection, it is advisable to wash your mask and tubing more often. Skin irritation may occur from sensitivity to the materials in the mask or from too much tension in the headgear straps. A correctly fitted mask and optimum tension in the straps will often prevent skin irritation. If problems persist, contact your clinician for advice. 21 218043_1.book Page 22 Friday, February 15, 2002 11:53 AM 22 SPECIFICATIONS SULLIVAN® VPAP® II & II ST FLOW GENERATOR SPECIFICATIONS 218043_1.book Page 23 Friday, February 15, 2002 11:53 AM Dimensions (H x W x L): 5.7 x 9.5 x 13.8 in (142 x 240 x 350 mm) Weight: 7.7 lb (3.5 kg) Power Supply: Input range 110–240 V, 50–60 Hz, 200 VA, voltage is auto-selecting Storage Temperature: -4 to 140°F (-20 to 60°C) Operating Temperature: 41 to 104°F (5 to 40°C) Operating Humidity: 15 to 95% CYCLING (VPAP II ST ONLY) Breaths Per Minute (BPM): 5 to 30 Breathing Rate Accuracy: 1% Inspiratory to Expiratory Ratio (I:E) 1:9 to 1:0.1 (10 to 90% of breath period) DYNAMIC PRESSURE AND FLOW CHARACTERISTICS Pressure / Flow range IPAP: 2 cmH2O to 25 cmH2O at 130 L/min (measured at the end of standard 2m air tubing) EPAP: 2 cmH2O to 25 cmH2O at 130 L/min (measured at the end of standard 2m air tubing) Pressure Calibration Accuracy ± 1 cmH2O of the indicated control setting AIR OUTLET To fit standard 22mm tapered connection PRESSURE MEASUREMENT Internally mounted pressure transducer FLOW MEASUREMENT Internally mounted flow transducer 23 218043_1.book Page 24 Friday, February 15, 2002 11:53 AM IEC 601-1 CLASSIFICATIONS Class II Type CF Read Operating Manual before use/Lire le manuel d'utilisation avant emploi Class II (double insulated)/Classe II (double isolation) Type CF Applied Part/ Partie appliquée du type CF PRESSURE/FLOW CHARACTERISTICS FOR MASKS 20 18 16 Pressure (cmH2O) 14 12 10 8 6 4 2 0 0 5 10 15 20 25 30 35 40 45 50 55 60 65 Flow (L/min) Mirage Modular, Standard, Disposable Nasal Mirage Disp Full Face Ultra Mirage Mirage Full Face NOTE i 24 The manufacturer reserves the right to change these specifications without notice.