1
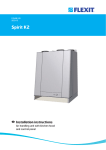
MIRA GEM 88 SHOWER CONTROL Installation & User Guide These instructions are to be left with the user CONTENTS Introduction ............................................................................................. 3 Important Safety Information ................................................................. 4 Pack Contents Checklist ......................................................................... 5 Dimensions ............................................................................................. 7 Specifications .......................................................................................... 8 1. Pressure Range .............................................................................. 8 2. Connections ..................................................................................... 8 3. Stored Water Temperature ............................................................... 8 4. Flow Rates ....................................................................................... 9 Installation Requirements .................................................................... 10 Typical suitable installations .............................................................. 11 Installation ............................................................................................. 16 Mira Gem 88 - Surface Mounted Shower Control ................................ 16 1. Rising and falling inlet supplies ...................................................... 16 2. Rear entry inlet supplies................................................................. 19 Mira Gem 88 B - Built-in Shower Control ............................................ 22 1. Solid or dry-lined wall structures .................................................... 22 2. Stud partition or dry partition wall structures................................... 26 3. Shower cubicle or laminated panel ................................................. 28 Refitting the Cavity Seal ....................................................................... 30 Reversed Inlets ...................................................................................... 32 Operation ............................................................................................... 33 Maintenance .......................................................................................... 34 Fault diagnosis .................................................................................. 34 General .............................................................................................. 35 Spare Parts ............................................................................................ 36 Accessories ........................................................................................... 40 Notes ...................................................................................................... 41 Customer Service .................................................................... Back Page 2 INTRODUCTION Thank you for purchasing a quality Mira product. To enjoy the full potential of your new product, please take time to read this guide thoroughly, having done so, keep it handy for future reference. A range of Mira 1/2" manual shower controls which provide independent selection of spray force and temperature. The Mira Gem 88 is available with a choice of surface mounted and built-in models. The Mira Gem 88 is not a thermostatic shower control and does not sense supply temperature or pressure variations. Therefore, inlet water temperatures and pressures especially the hot, should be relatively constant in order to maintain a stable showering temperature. The Mira Gem 88 is suitable for installation with the following packages:Gravity fed systems (balanced pressure hot and cold) Pumped systems (balanced pressure hot and cold) Unvented thermal store * (balanced pressure hot and cold) Unvented systems * (balanced pressure hot and cold) * Fitted with a pressure reducing valve (PRV) recommended to be set at 3.5 bar. The Mira Gem 88 is not suitable for mains pressure (cold) with gravity pressure (hot) or combination boilers/instantaneous water heaters. Shower controls covered by this guide: Mira Gem 88 Surface mounted shower control for connection to exposed pipework. Chrome or white colour models are available. The Mira Gem 88 is designed to be fitted with the pipe centres set at a distance of 153 mm for rear supply connection and the pipes centre set at a distance of 151 mm for rising / falling pipes connection (See the installation template provided). If the Mira Gem is replacing an existing shower, the distance between the pipe centres can vary from 149 to 154 mm to facilitate the installation. Mira Gem 88 B Built-in shower control for connection to concealed pipework. Chrome or white colour models are available. If you experience any difficulty with the installation or operation of your new shower control, then please refer to "Fault Diagnosis", before contacting Kohler Mira Limited. Our telephone and fax numbers can be found on the back cover of this guide. 3 IMPORTANT SAFETY INFORMATION Warning! 1. Products manufactured by us are safe and without risk provided they are installed, used and maintained in good working order in accordance with our instructions and recommendations. Caution! 1. Read all of these instructions. 2. Retain this guide for later use. 3. Pass on this guide in the event of change of ownership of the installation site. 4. Follow all warnings, cautions and instructions contained in this guide. 5. Anyone who may have difficulty understanding or operating the controls of any shower should be attended whilst showering. Particular consideration should be given to the young, the elderly, the infirm, or anyone inexperienced in the correct operation of the controls. 6. The temperature control can be turned from FULL HOT to FULL COLD. As such, turning the control to full hot will deliver water at the hot water storage temperature. 7. When this product has reached the end of its serviceable life, it should be disposed of in a safe manner, in accordance with current local authority recycling, or waste disposal policy. 4 PACK CONTENTS CHECKLIST 9 Tick the appropriate boxes to familiarize yourself with the part names and to confirm that the parts are included. 1. Mira Gem 88 Surface Mounted Shower Control 2 x Compression Nuts **2 x Olives 2 x Pipe Concealing Plates 1 x Mira Gem 88 Shower Control ** 4 x Concealing Caps (2 Spares) 1 x Installation Template ** 2 x Fixing Screws ** 1 x Flow Regulator ** 2 x Wall Plug ** 1 x 2.5 mm A/F Hexagonal Wrench ** Supplied in the component pack. 5 2. Mira Gem 88 Built-in shower control 1 x Mira Gem 88 B Shower Control With Building-in Shroud ** 2 x Fixing Screw ** 2 x Flow regulator ** 2 x Wall Plug ** 1 x 2.5 mm A/F Hexagonal Wrench 1 x Flow Lever 1 x Flow Control Bearing 1 x Grey Indicator Trim Bearing 1 x Concealing Plate Bracket Assembly 1 x Concealing Plate ** Supplied in the component pack. 1 x Indicator Trim 3. Documentation 1 x Installation & User Guide 1 x Customer Support Brochure 1 x Temperature Knob 6 DIMENSIONS 1. Mira Gem 88 Surface Mounted Shower Control 190 126 35 149 - 154 2. Mira Gem 88 Built-in shower control 35 91 172 50 - 68 Note! NOT TO SCALE - All dimensions are nominal and in millimetres 7 SPECIFICATIONS 1. Pressure Range Mira Gem 88 1.1 Minimum maintained pressure 0.1 bar (1.0 metre head) when used with Mira shower fittings. 1.2 Maximum maintained pressure 5 bar. 1.3 Maximum static pressure 10 bar. Mira Gem 88 B 1.4 Minimum maintained pressure 0.1 bar. 1.5 Maximum maintained pressure 5 bar. 1.6 Maximum static pressure 10 bar. 2. Connections Mira Gem 88 2.1 Inlet 15 mm compression. 2.2 Outlet 1/2" BSP male/15 mm Compression. Mira Gem 88 B 2.3 Inlet 1/2" BSP female. 2.4 Outlet 1/2" BSP female. 3. Stored Water Temperature 3.1 It is recommended that the temperature of stored water should never exceed 65°C. A stored water temperature of 60°C is considered sufficient to meet all normal requirements and will minimise the deposition of scale in hard water areas. 8 4. Flow Rates Mira Gem 88 with LC Response Shower Fittings 35 30 Sooth Flow Rate l/min 25 Start Force 20 Economy 15 10 5 0 0 50 100 150 200 250 300 Supply Pressure kPa Mira Gem 88 with HC Response Shower Fittings 35 30 Sooth Force Flow Rate l/min 25 Start 20 Economy 15 10 5 0 0 50 100 150 Supply Pressure kPa 9 200 250 300 INSTALLATION REQUIREMENTS Read the section 'Important Safety Information' first. Installation must be carried out in accordance with these instructions, and must be conducted by designated, qualified and competent personnel. 1. Installations must comply with UK Water Regulations/ Bye-laws (Scotland), and Building and Plumbing Regulations in force at the time of installation. 2. Layout and sizing of pipework must be such that when other services are used, pressures at the shower control inlets are maintained approximately equal and do not fall below the recommended minimum. 3. Do not install the product in a position in which service access is restricted. 4. Do not fit any form of flow control in the shower outlet. 5. Do not use excessive force when making connections. 6. Do not install the product in a position where it could become frozen. 7. Do not install the Gem 88 to an instantaneous water heater or combination boiler system. 8. The Mira Gem 88 is designed to be fitted with the pipe centres set at a distance of 153 mm for rear supply connection and the pipe centres set at a distance of 151 mm for rising / falling pipes connection (See the installation template provided). If the Mira Gem 88 is replacing an existing shower, the distance between the pipes centre can vary from 149 to 154 mm to facilitate the installation. 10 Typical suitable installations Key to symbols Float operated valve Twin impeller inlet pump Stop or servicing valve Tempering valve Shower control Mini expansion vessel Warning or overflow pipe Non-return Valve Drop tight pressure reducing valve (PRV) 1. Gravity fed showers - The shower control MUST be fed from a cold water storage cistern and hot water cylinder providing nominally equal pressures. Gravity Fed Showers 11 2. Pumped showers (inlet pumps) - The shower control can be installed with an inlet pump (twin impeller). The pump MUST be located on the floor next to the hot water cylinder. The hot water cylinder/vent pipes must be arranged as shown to achieve air separation. 90 ° 30 ° to 60 ° Pumped Showers (inlet pumps) 3. Pumped showers (outlet pumps) - The shower control can be installed with an outlet pump (single impeller). The pump MUST be located on the floor near to the shower control. The hot water cylinder/vent pipe must be arranged as shown to achieve air separation. 90 ° 30 ° to 60 ° Pumped Showers (outlet pumps) 12 4. Unvented mains pressure showers - The shower can be installed with an unvented, stored hot water cylinder. Only a "competent person" as defined by the Building Regulations may fit this type of system. For packages with no cold water take off after the appliance reducing valve, it will be necessary to fit an additional drop tight pressure reducing valve when the mains pressure is over 5 bar. The drop tight pressure reducing valve must be set at the same value as the unvented package pressure reducing valve. Note! An expansion vessel MUST be fitted (and regularly maintained) if any form of backflow prevention device is fitted, e.g. non-return valve or check valve. This will ensure that excess expansion or pulse pressures do not damage the product or the plumbing system. Safety devices not shown for clarity COLD Expansion Vessel HOT Reduced pressure to cold inlet of shower Reduced pressure to cold inlet of shower High Inlet Pressure High Inlet Pressure Reduced pressure to unvented cylinder Combined outlet PRV with internal non-return valves - Expansion vessel required. Reduced pressure to unvented cylinder Cold takeoff after PRV - Expansion pressure taken up by unvented cylinder expansion vessel. Unvented Mains Pressure Showers 13 5. Mains pressurised instantaneous hot water shower, heated from a thermal store - Packages of this type, fitted with a tempering valve can be used. A drop tight pressure reducing valve MUST be fitted if the supply pressures exceed 5 bar maintained. An expansion vessel MUST be fitted (and regularly maintained) if any form of backflow prevention device is fitted, e.g. non-return valve or check valve. This will make sure that excess expansion or pulse pressures do not damage the product or the plumbing system. The expansion vessel may already be fitted externally or internally within the thermal store (check with thermal store manufacturer). COLD HOT NOT SUITABLE FOR INSTANTANEOUS WATER HEATERS/COMBINATION BOILERS COLD GRAVITY HOT - MAINS PRESSURE COLD HOT 14 High pressure installations If water flow from the shower is too high or maintained pressure over 1 bar, the fitting of a flow regulator is recommended (as illustrated below). Exposed shower valves and BIV Fit the white 12 l/min flow regulator to the hose. Nipple Outlet Washer Flow Regulator Flow Regulator Hose BIR Products Fit the brown 12 l/min flow regulator. Flow Regulator Flow Regulator 15 INSTALLATION Mira Gem 88 - Surface Mounted Shower Control 1. Rising and falling inlet supplies 1.1 Determine whether the hot or cold water services will be connected to the shower control from the bottom (rising) or top (falling). Hose Retaining Ring 1.2 The Mira Gem 88 is supplied with inlet connections hot left, cold right and bottom outlet as standard. 1.3 Decide on a suitable position for the shower control. The position of the shower control and the shower fittings must provide a minimum gap of 25 mm between the spill-over level of the shower tray/bath and the handset. This is to prevent back-siphonage. 25 mm Minimum Spill-over Level Spirit Level 1.4 Use the installation template to mark the positions of the holes for the backplate. Note! For rising/falling supplies the distance between the pipe centres is 151 mm (See the installation template) 151 mm Installation Template Backplate 1.5 Loosen the backplate grub screws and using the 2.5 mm A/F hexagonal wrench provided, remove the backplate from the shower control body. 16 Grub Screw 1.6 Drill and suitably plug the two fixing holes. Secure the backplate to the wall by means of the screws provided. Backplate Screw 1.7 Install the hot and cold supply pipes. The distance between the pipe centres must be 151 mm. Wall Plug 1.8 Adjust the inlet elbow to accept falling or rising supplies as follows:- V Groove Grub Screw Using the 2.5 mm A/F hexagonal wrench loosen the grub screws and remove the inlet elbows. Make sure that the 'O' seal is on the inlet connector, not in the 'V' groove. 'O' Seal Inlet Elbow Turn the inlet elbows to the required position and refit onto the inlet connectors. Tighten the grub screws to fix the inlet elbows and fit the concealing caps. Concealing Cap 1.9 Locate the shower control body onto the backplate and secure by tightening the recessed grub screw using the 2.5 mm A/F hexagonal wrench. 17 Shower Control Body 1.10 Thoroughly flush the incoming hot and cold water supply pipes before connecting the shower control. Compression Nut Olive 1.11 Fit the compression nuts and olives over the supply pipes and then make the connection to the inlet pipework. Make sure that you protect the plated surfaces. Nipple 1.12 Turn on the water supplies to the shower mixer and check for any leaks. 1.13 Turn the flow lever 1/4 of a full turn anticlockwise for water flow. Operate temperature knob and make sure that the directional hot and cold indicators are correct. HOT = anticlockwise COLD = clockwise Note! If this is not the case, refer to section: Reversed inlets. Turn flow lever fully clockwise to stop water flow. 1.14 This completes the installation of the Mira Gem 88 for connection to rising and falling inlet supplies. 18 Temperature Knob Flow lever 2. Rear entry inlet supplies 2.0 The Mira Gem 88 is supplied with inlet connections hot left, cold right and bottom outlet as standard. 2.1 Decide on a suitable position for the shower control. The position of the shower control and the shower fittings must provide a minimum gap of 25 mm between the spill-over level of the shower tray/bath and the handset. This is to prevent back-siphonage. Hose Retaining Ring 25 mm Minimum Spill-over Level Spirit Level Installation Template 2.2 Use the installation template to mark the positions of the holes for the backplate and the pipes centre. 153 mm 2.3 Use a spirit level and a pencil to mark the route for the hot and cold water supply pipes at 153 mm centres. Note! If the Mira Gem is replacing an existing shower, the distance between the pipe centres is adjustable from 149 to 154 mm to facilitate installation. 2.4 Remove the plaster and brick/block to the required depth to conceal the pipework. 13 mm From Finished Wall Surface 2.5 Install the supply pipes. The pipes must project from the finished wall by 13 mm. Finish the surface of the wall as required. The recesses in the wall for the concealing plates must be 32 mm diameter x 10 mm deep. Backplate Screw Wall Plug 19 153 mm Centres 2.6 Loosen the backplate grub screw and using the 2.5 mm A/F hexagonal wrench provided, remove the backplate from the shower control body. 2.7 Drill and suitably plug the two fixing holes. Secure the backplate to the wall by means of the screws provided. 2.8 Fit the concealing plates over the pipework into the enlarged recess in the finished wall surface. 2.9 Thoroughly flush the incoming hot and cold water supply pipes before connecting the shower control. 2.10 Fit the compression nuts and olives to the supply pipes. 2.11 Align the valve over the backplate and inlet pipe work. If the pipe work and the nipples are not aligned, the nipples can be moved to achieve the alignment. This adjustment can achieve an alignment of the pipes centre between 149 - 154 mm. 2.12 Locate the shower control body onto the backplate and secure by tightening the grub screw using the 2.5 mm A/F hexagonal wrench (supplied). Make the connections to the inlet pipework. Protect the chrome plated surfaces when tightening the compression nuts. 20 Concealing Plate Supply Pipe Compression Nut Olive 2.13 Turn on the water supplies to the shower mixer and check for any leaks. 2.14 Turn the flow knob fully anticlockwise for water flow. Operate the temperature knob and make sure that the directional hot and cold indicators are correct. HOT = anticlockwise COLD = clockwise Note! If this is not the case, refer to section: Reversed inlets. Turn the flow knob fully clockwise to stop the water flow. 2.15 This completes the installation of the Mira Gem 88 for connection to rear entry inlet supplies. 21 Mira Gem 88 B - Built-in Shower Control The built-in shower control is designed to be concealed into a solid or dry-lined wall structure. A support bracket assembly (optional accessory) is available which can be used to fix the shower control into a shower cubicle, laminated panel, stud partition or dry partition wall. The building-in depth (to the finished wall surface) is between 50 and 68 mm. The building-in depth dictates how much of the flow and temperature control knob will be visible through the concealing plate when the installation is completed. A building-in shroud is supplied to protect the shower control during plastering and tiling and provides a reference for the building-in depth when chasing out the wall. The shower control is not supplied with any interconnecting pipework or plumbing fittings. Inlet and outlet threads are 1/2" BSP female parallel. The Mira Gem 88 is supplied with inlet connections hot left, cold right and bottom outlet as standard. 1. Solid or dry-lined wall structures 1.1 Make a recess in the wall large enough for the shower control, pipework and plumbing connections. Make sure that the building-in depth is correct. Backplate (Make sure is fitted level to the wall) Body Shroud Building-in Shroud 1.2 Remove the plastic building-in shroud. The two building-in shroud retaining screws should be screwed temporarily into the base for use later. Note! Do not remove the Body Shroud or Seal. If the cavity seal or shroud have been removed or are incorrectly fitted, refer to section: 'Refitting the Cavity Seal'. 22 Cavity Seal 45° Retaining Screws 1.3 Drill and plug the fixing holes. Using the screws provided, if appropriate, fix the shower control and backplate assembly into the recess, making sure that the two retaining screw holes are at 45° as illustrated. (Make sure that the shower control inlets are horizontal with the shower control outlet at the top). 1.4 Install the hot and cold supplies. 1.5 Thoroughly flush the incoming hot and cold water supply pipes before connecting the shower control. 1.6 Make the connections to the incoming hot and cold water supply pipes and outlet supply pipe using the appropriate fittings (install the shower outlet pipework). 1.7 Turn on the water supplies and check for any leaks. 1.8 Refit the plastic building-in shroud over the shower control body and secure with the two shroud retaining screws removed in instruction 1.2. Plaster and tile to the sides of the plastic building-in shroud (refer to illustration), when set remove the shroud, retain the screws for later use. Make sure that the supply pipework is able to maintain free movement in a solid wall and is protected, it is suggested that each pipe is concealed into a suitably sized conduit. Note! If the shower control is recessed too deep the two shroud retaining screws will not reach the backplate assembly and the shower flow control may foul the concealing plate. If the cavity seal or shroud have been removed or are incorrectly fitted, refer to section: 'Refitting the Cavity Seal'. 23 Fixing Screw Wall Plug Pipework Set Deeper Building-in Shroud Finished wall surface must be within these two lines Retaining Screws 1.9 Fit the concealing plate bracket assembly over the valve and fix to the wall with the two retaining screws (Take care not to damage the foam seal). 1.10 Fit the concealing plate over the valve. Make sure that the plastic clips are aligned centrally on the metal bracket recess as illustrated. The cut out must be facing downwards. Note! Do not silicone seal the concealing plate to the finished wall surface. Plastic Clips Concealing Plate Bracket Assembly Retaining Screw Concealing Plate Cut Out Black Drive Lugs 1.11 The black drive lugs should be at the 12 o'clock and 6 o'clock positions. Firmly push the flow control lever, with the handle pointing downwards over the black lugs. 1.12 Push the flow lever bearing into the recess on the flow control lever. 24 Black Drive Lugs Flow Control Lever Flow Lever Bearing 1.13 Lock the flow control lever in position by pushing the grey indicator trim bearing over the cartridge. The four clips on the inner edge of the grey indicator trim bearing should clip into the four cut outs in the cartridge. Note! Make sure that the larger of the four clips is fitted at the bottom. Tip! Fit the bottom clip first. Grey Indicator Trim Bearing Cut Outs For Clips Note! Make sure that the large clip is at the bottom 1.14 Locate the indicator trim over the splines of the cartridge. Make sure that the colour temperature graphics are at the top with cold in the clockwise position. 1.15 Make sure that the temperature knob is correctly aligned and push into position until it clicks. Clips Flow Control Lever Cold Hot 1.16 Install the shower fittings (refer to separate installation guide). 1.17 Turn the flow lever 1/4 of a turn anticlockwise for water flow. Operate the temperature knob and make sure directional hot and cold indicators are correct. Indicator Trim HOT = anticlockwise COLD=clockwise Note! If this is not the case refer to section: 'Reversed inlets'. Turn flow knob fully clockwise to stop water flow. 1.18 This completes the installation of the Mira Gem 88 B into solid or dry-lined wall structures. Temperature Knob 25 2. Stud partition or dry partition wall structures The support bracket (from Mira stocklist as an optional accessory) has been designed to allow the shower control to be installed into the front face of a stud partition wall and is recommended for this type of installation. However, installers may wish to consider other options such as fabricated rear supports using wooden noggins, however, these methods of fixing are beyond the scope of this guide. The building-in depth (to the finished wall surface) is between 50 and 68 mm. The building-in depth dictates how much of the flow and temperature control knob will be visible through the concealing plate when the installation is completed. The bracket must be fixed into a wall recess at an angle of 45° from horizontal. 2.1 Cut a 135 mm diameter hole in the panel and mark the fixing holes for the support bracket (if used) at 45°. Ø 135 mm 45o Make sure that the building-in depth is correct. Backplate Body Shroud Building-in Shroud 2.2 Remove the plastic building-in shroud. The two building-in shroud retaining screws should be screwed temporarily into the backplate for use later. Note! Do not remove the Body Shroud or Seal. If the cavity seal or shroud have been removed or are incorrectly fitted, refer to section: 'Refitting the Cavity Seal'. Cavity Seal Retaining Screws 26 2.3 Fit the shower control to the support bracket with the screws, nuts and washers supplied. Fix the support bracket and shower control in position using suitable fixing (not supplied). 4 mm Note! The support bracket requires a clearance depth of 60 mm, with a wall thickness of 4 mm. Wall thicknesses in excess of 4mm can be accommodated, but clearance will be required around the inlet and outlet connections to allow insertion of pipe and tightening of compression nuts. The raised portion on the building-in shroud can be used as a depth gauge, to allow a finished wall thickness between 4 and 21 mm. 4 - 21 mm 60 mm Clearance to allow pipe insertion Support Bracket Nuts 2.4 Drill and suitably plug the four marked fixing holes. Washers 2.5 Secure the support bracket to the wall with the screws and plugs provided. 2.6 Follow the shower control installation procedure as for "Solid or dry-lined wall structures": instructions 1.4 to 1.17 inclusive to complete the installation. 27 Retaining Screws 3. Shower cubicle or laminated panel The support bracket (optional) is recommended to fit the shower control into a shower cubicle or laminated panel 2 - 20 mm thick. The dimension from the bracket to the finished wall surface is 50 - 68 mm. 2 to 20 mm 3.1 Cut a 108 mm diameter hole in the panel and drill two 4.5 mm holes at 138 mm centres at an angle of 45° from the horizontal. Finished Wall Surface 50 to 68 mm Panel Fixing Screw Ø 4.5 mm Cubicle or Laminated Panel 108 mm 45o Backplate 3.2 Remove the plastic building-in shroud. The two building-in shroud retaining screws should be screwed temporarily into the backplate for use later. Note! Do not remove the Body Shroud or Seal. If the cavity seal or shroud have been removed or are incorrectly fitted, refer to section: 'Refitting the Cavity Seal'. Body Shroud Building-in Shroud Cavity Seal Retaining Screws 28 Support Bracket Nuts 3.3 Fit the shower control and the backplate to the support bracket with the screws, the nuts and the washers supplied. Washers Retaining Screws Support Bracket 3.4 Secure the bracket to the wall with the screws provided. 3.5 Follow the shower control installation procedure as for Solid or dry-lined wall structures instructions 1.4 to 1.7 and 1.9 to 1.17. Shower Control Screw 29 REFITTING THE CAVITY SEAL 1. 2. Unscrew and remove the two cartridge retaining screws and remove the cartridge from the body. Check that the seal on the base of the cartridge is clean and fitted. Seal Cavity Seal 3. Cut-out Screw Position Align the cut-outs on the cavity seal with the screw positions on the cartridge. Screw Position 4. Make sure that the pipe recesses on the cavity seal are aligned as illustrated. Pipe Recess Pipe Recess Cavity Seal Pipe Recess Raised Location Feature 30 5. 6. Place the cavity seal and the cartridge assembly on a flat surface. Screw Position Screw Position Align the cut-outs on the shroud with the screw positions on the cartridge. Push down firmly on the shroud while lifting the edge of the cavity seal over the lip of the shroud. Note! A wet soapy solution applied around the edge of the cavity seal will aid location. Shroud Cavity Seal 7. Note the raised locating feature on the cartridge, align this feature as shown with the recessed feature in the brass body. Push the cartridge firmly into position. Caution! If the cartridge is not positioned correctly the shower will leak from the body when the water supply is turned on. Apply a wet soapy solution before locating shroud Cavity Seal Pipe Recess Raised Locating Feature Recessed Feature 8. Secure the cartridge into position with the two cross head screws. Caution! Do not overtighten the screws as you may damage internal components. 31 Shroud Cut-Out REVERSED INLETS In the event that the temperature control is not functioning as described, anticlockwise HOT and clockwise COLD, then follow the instructions below. 1. Make sure the temperature control is positioned with the levers pointing down, as illustrated. Temperature Knob Removal 2. Unclip the temperature knob by hand to access the cartridge spindle. The arrow on the spindle must be in the upwards position. 3. Rotate the temperature spindle through 180° until the arrow points downwards to reverse the inlets. 4. Fit the temperature knob. 32 Arrow OPERATION Warning! The temperature control can be turned from FULL HOT to FULL COLD. As such, turning the control to full hot will deliver water at the hot water storage temperature. 1. Turn the flow control lever 1/4 of a full turn anticlockwise to turn the water on or clockwise to turn the water off. 2. Turn the temperature control knob in the direction of the red arrow for warmer water and in the direction of the blue arrow for cooler water, until the desired temperature of water is obtained. Flow Note! If this is not the case refer to section: Reversed inlets. Temperature 33 MAINTENANCE Fault diagnosis Read the section “Important Safety Information” first. Mira products are fully performance tested after assembly. In the unlikely event that you experience problems with your shower the following procedure will enable you to undertake basic fault finding before contacting Kohler Mira Limited for further assistance or spare parts as necessary. If after completing the checks no improvement in performance is experienced, then further investigation should be undertaken by the person responsible for installing your shower. Only competent persons should remove the cover of the shower control. Malfunction Cause Remedy Cold water flow from a) Hot water used up. Wait for the water to reheat. the shower handset. b) Low water temperature, Contact the person setting of hot water system responsible for installing (typically 60° - 65°C). your shower. c) Cold supply pressure too high Refer to section: relative to hot. Installation Notes for plumbing advice. No flow or low flow a) Spray plate blocked. Clean spray plate. rate from the shower b) Stop or servicing valve in Open valve/s. handset. supply pipe partially closed. c) Head of water below minimum Raise cistern or fit Mira required. pump. d) Wrong handset or spray Fit correct handset or plates for available pressure. change spray plates. Cold water when hot a) Reversed inlets. Refer to section: Reversed is selected or vice Inlets. versa. Too high flow when a) Mixer installed on a High Fit the flow regulator flow control is fully pressure system. supplied open. Note! This shower is not suitable for combination boilers or instantaneous water heaters. Drip from the shower a) Defective flow control Replace cartridge. Refer to handset. seals, possibly caused by section: Parts list. failure to flush pipework prior to installation. A small amount of water may be retained in the shower head after the shower control has been turned off. This may drain off over a period of minutes and should not be confused with a "Defective flow control". * * 34 General The Mira Gem 88 shower control is precision engineered to provide satisfactory performance provided that it is installed and operated in accordance with our recommendations contained in this guide. When installed in very hard water areas (above 200 p.p.m. temporary hardness) your installer may advise the installation of a water treatment device to reduce the effects of limescale formation. You may, if you wish, choose to engage the services of a Mira Service Engineer or Agent, the terms of which are outlined on the back page of this guide. 35 SPARE PARTS Mira 88 spare parts list 055.14 090.95 458.01 458.02 458.04 458.05 458.06 458.07 458.10 458.11 458.12 458.13 458.14 458.15 458.17 458.19 553.35 575.12 618.22 618.23 623.70 Backplate Assembly Pipe Concealing Plate - chrome Handle pack - chrome Handle pack - white Body trim pack - chrome - components identified 'A' Body trim pack - white - components identified 'A' Elbow pack - chrome Elbow pack - white Cartridge Inlet connector Body Component pack - Exposed chrome - components identified 'B' Component pack - Exposed white - components identified 'B' Seal pack - components identified 'C' Installation template Flow Regulators pack (Not illustrated) Nipple Assembly - chrome 2.5 mm A/F Hexagonal Wrench Grub screw Grub screw Compression Nut - chrome 36 Mira Gem 88 spare parts diagram 458.01 458.02 458.17 055.14 B B B B B 618.22 A 458.12 055.14 458.07 458.06 D C 572.12 090.95 B 458.11 618.23 C C A 553.35 623.70 458.10 458.04 458.05 37 Mira Gem 88 B spare parts list 052.11 079.61 458.01 458.02 458.08 458.09 458.10 458.12 458.16 458.18 458.19 458.20 575.12 618.23 Backplate Assembly Building-in Shroud Handle pack - chrome Handle pack - white Concealing plate assembly Concealing plate assembly Cartridge Body Concealing plate mounting kit - components identified 'D' Cavity seal Flow Regulators pack (Not illustrated) Component Pack - components identified 'E' 2.5 mm A/F Hexagonal Wrench Grub screw 38 Mira Gem 88 B spare parts diagram E 618.23 517.12 458.12 E 458.15 458.18 E 458.10 052.11 458.01 458.02 458.08 458.09 079.61 39 ACCESSORIES Support Bracket: Allows the shower control to be fitted into a shower cubicle, stud partition or dry partition wall. Available as optional accessory from your Mira stockist. DCV-H: An outlet double check valve, requiring a minimum inlet supply pressure of 0.5 bar, which has been designed to prevent the backflow or back-siphonage of potentially contaminated water, through shower controls which are fitted with a flexible hose as part of the outlet shower fitting. Available as an optional accessory from your Mira stockist. 40 NOTES 41 NOTES 42 NOTES 43 CUSTOMER SERVICE UKAS 1061361-W2-A 44 © Kohler Mira Limited, April 2006