1
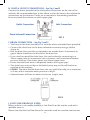
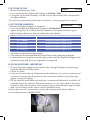
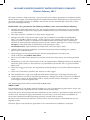
Model No.
MONARCH WATER
Installer & User Guide
Effective February 2012
The Ultimate Water Softener
with the 7 year Guarantee
‘Suppliers to H.M. the Queens Estate at Sandringham’
Monarch Water Ltd. Halesworth Road Bramfield IP19 9HS
T 01986 784759 F 01986 784769
[email protected] www.monarchwater.co.uk
MONARCH FREEFLOW SERIES WATER SOFTENER
PROGRAMMING & INSTALLATION INSTRUCTIONS
Thank you for choosing our water softener. Please read the following carefully,
which if followed correctly, should ensure the installation is trouble free.
A. PLANNING THE INSTALLATION
•
•
•
•
Always observe the water byelaws.
Ensure there is only one rising main.
Make sure you have allowed space for access to the unit for salt filling and for any possible maintenance in the future.
Check the water pressure and locate the rising main, a drain facility and a power supply. Be aware of condensation occurring in warm environments.
B. SITING THE SOFTENER – Fig 1
•
•
•
•
•
•
Where possible, this should be close to the rising main.
‘T’ off for a hard water drinking water facility and also an outside tap.
The distance between the softener and the drain should be as short as
possible, to ensure that both the drain and the overflow are not subject to freezing, or over 120 F.
If siting the softener within a kitchen cupboard, loft etc. ensure that the base/
floor is adequately supported.
If the softener is being installed in your loft, 1st, 2nd floor etc, it is recom
mended to house the softener within a 25-gallon plastic tank and insulate well.
The overflow on the plastic tank should be below the overflow of the softener and a minimum of ¾”in size. Failure to install the softener in a suitable tank will void the Guarantee.
C. NON-RETURN VALVE
In domestic applications i.e. house, bungalow, apartment, flat etc, a single check
valve should be fitted. All other applications require a double check valve.
D. DRINKING WATER FACILITY – See Installation Requirements Diagram
In compliance with U.K. Water Regulations a tap for drinking water purposes
should be left on the hard water supply.
E. MATERIAL CHECK LIST
•
•
•
•
The softener includes a 15mm installation kit for a conventional system
(storage tanks in roof).
For Combi boilers you will need additional Maxflow Hoses.
For a pressurised unvented system (22mm pipe work) you will need the PSK installation kit which includes Maxflow Hoses.
For 28mm supplies a full upgrade for the softener is available,
details on request.
IMPORTANT For GS models, only Maxflow hoses and Drain/Overflow hose are
included. Valve kits are available on request.
2
F. WATER PRESSURE TEST
•
•
•
•
•
It is IMPORTANT that a pressure check is carried out.
Low and high pressure can result in either damage to, or failure of the unit.
If daytime static water pressure* exceeds 3.5 bar (50psi) a 5 bar pressure limiter should be fitted. *50psi daytime pressure can reach nearly 100psi at night!
Minimum dynamic pressure must exceed 1.4 bar.
If in any doubt please call us on 01986 784 759
G. INSTALL BYPASS VALVES & NON-RETURN VALVE
Form an installation as per Fig 1 Below.
FIG 1
Checklist
✔ Access to drain
✔ Installation preferably on an outside wall ✔ Water pressure 1.5 – 5 bar (20 – 70psi)
✔ Access to incoming water supply
✔ Access to 3 pin socket
for the overflow
✔ Easy access to fill unit with salt
3
H. INLET & OUTLET CONNECTIONS – See Fig 2 and 3
Connect the hoses provided to the inlet/outlet connections on the rear of the
softener. We recommended you fit the ‘elbow’ end of the hose to the inlet/outlet
connections on the softener. Under no circumstances use washing machines
hoses or plumb the softener in solid copper pipe.
Outlet Connection
Inlet Connection
Drain Solenoid Connection
FIG 2
I. DRAIN CONNECTION – See Fig 2 and 3
•
•
•
•
•
•
•
•
The hose for the drain should be cut from the white unbraided hose provided.
Connect the drain hose to the drain solenoid connection using a jubilee
clip to fix.
Run the drain hose to either an upstand or an outside drain. A minimum air gap of 20mm should exist at the end of the drain line.
If you need to extend the drain hose, this can be done by connecting to a 15mm copper tube for a maximum run of 4 metres, with a minimum daytime pressure of 40 psi. Over 4mtrs please use 22mm copper tube.
Ensure that the drain hose is adequately fixed to the copper pipe.
The drain hose must not dip or be kinked in any way, as this will lead to an overflow of the machine.
UPHILL? The white flexible drain hose can run uphill internally, for a maximum of 3 feet, with a minimum water pressure of 40 psi.
Softened water will have no adverse effect on a septic tank.
FIG 3
J. FAST FLOW DRAIN KIT- (FFDK)
Where a drain is not readily available,a Fast Flow Drain Kit may be used and is
available from us.
Please note that the Fast Flow Drain Kit cannot be used on overflow connections.
4
K. OVERFLOW CONNECTION - Important
• The hose for the overflow should be cut from the white upbraided hose
provided.
• The overflow connection is the ½” hose spigot on the rear of the cabinet – no jubilee clip required.
• The overflow must be run downhill through an outside wall without kinks
or restriction.
• It is recommended the overflow hose be run to an outside gully whenever possible, leaving a clear 20mm air gap at the end of the hose.
• A 22mm copper protective sleeve through the outside wall will help prevent kinking of the hose.
L. TEST INSTALLATION FOR LEAKS
• Close Inlet and Outlet valves to the softener and open Bypass valve.
• Open mains stopcock slowly to flush the new pipe work.
This can be done using a ‘soft’ mains tap, i.e. utility room cold tap or wash hand
basin in a bathroom.
• Check all connections for leaks.
M. ELECTRICAL CONNECTION
With the power off, connect the transformer – supplied – to a continuous electrical supply. Push the flying lead from the transformer into the adaptor on the lead
coming from the controller.
N. OBTAIN YOUR WATER HARDNESS
• These instructions apply to the enclosed test kit only.
• Run hard water for approx. 1 minute and rinse the test tube well.
• Fill the test tube up to the 10ml level. Add 2 drops of the dark solution and mix gently. If the water sample contains hardness it will turn red.
• Add the dark solution in batches of 5 drops, holding the dropper bottle
at 45 degrees.
• Mix gently after each 5 drops.
• Count the drops needed until the colour of the sample in the test tube
changes from a dark red to a dark blue/green.
• You need this figure for when SETTING THE HARDNESS as per Q overleaf.
O. SETTING THE ELECTRONIC CONTROLLER
• Turn on power and the softener display will say WELCOME.
• The display will automatically alternate every 10 seconds between Time and Hardness.
• To finalise commissioning of the softener,
you need to set both Time (24hr clock in hours
and minutes) and the water Hardness as
determined by the amount of drops in your
water hardness test.
5
P. SET TIME OF DAY
•
•
•
Time:
8:00
Wait until display says Time >
Press Up arrow and display will change to Set Time : 8:00*
Using the Up or Down buttons, set the current time of day (24hr clock) whilst the figure flashes.
*This may have automatically advanced a few minutes – please programme as normal.
Q. SET WATER HARDNESS
•
•
•
•
•
•
Hardness:
10
Wait until display changes to Hardness >
Press Up button and display will change to Set Hardn:10
Again, using the Up or Down buttons, advance your water hardness figure whilst display flashes, as determined by the chart below.
Up to 30 drops
advance electronic display to 30
31 - 35 drops
advance electronic display to 35
36 - 40 drops
advance electronic display to 40
41 - 45 drops
advance electronic display to 45
46 - 50 drops
advance electronic display to 50
You have finished the programming
The display will now automatically revert back to the alternating display.
If at any time you need to reset any figure, wait until the display changes to the relevant setting and then re-programme as required.
R. FLUSH SOFTENER - IMPORTANT
• Turn on the water supply to the softener by closing the Bypass and opening both the Inlet and Outlet valves.
• Check for leaks.
• Leave a soft mains tap e.g. bathroom wash hand basin, to run for a minimum of 5 minutes to purge any air and ‘resin dust’ from the softener (resin dust may
appear orange in colour).
• Fill the softener with Tablet salt only (we recommend Hydrosoft), to within 3-4” from the top of the cabinet. The water softener is a ‘dry salt softener’ therefore will set its own level of water in the cabinet during the automatic regeneration.
• Add 1 litre of water to the salt on initial installation only.
If at any time you see excess water in the salt compartment, please call our
service department on 01986 784759.
6
S. CHECK WATER METER
If ever debris from the incoming water main blocks the water meter turbine the
turbine will not work. A competent DIY person can clean the turbine simply by
removing and cleaning.
The turbine (white fittings 54 & 55) is situated inside the outlet connection elbow
(see Fig 2) prior to where the outlet hose is connected. The turbine housing must
be kept in a horizontal position to ensure accurate readings of water consumption.
Fig 5 Meter Turbine Assembly
T. EXTRA REGENERATIONS
•
•
•
To start an automatic regeneration, press the left hand button (c/w two arrows) and release, DO NOT hold this button in.
An automatic regeneration will start shortly.
Please note that after a few minutes the Display will show “Regen Pending”.
“Regen Pending” will last 2 hours, and nothing will happen. Please do not
worry as this is normal and the regeneration will re-commence after this
programmed delay.
U. BLENDING CONTROL – Blue/Green Stains
All our water softeners are factory set to produce water that is 100% soft. If you
require slightly blended water – recommended on Combi/Condensing Boilers in
areas of hard water that have a green/blue build up in the scale – open the Bypass
valve slightly – until it takes 6/7 drops of the dark liquid to get a red to green
colour change as per the original water hardness test.
NOTE: This blended water setting can only be done when the softener is in Service.
Further Information
•
•
•
•
•
Do not worry if your softener regenerates during the day. This is the Self
Protect Programme initiating an additional regeneration, as the softener does
not have enough soft water to last you until the next programmed regeneration
of 2am.
A regeneration can last between 51 and 144 minutes depending on the model
During this time the softener goes into hard water bypass, ensuring a
continuous supply of water.
A Normal regeneration is programmed to 2am, a time when little, if any, water is being used.
To change the regeneration time, simply offset the Time Setting i.e. to have the
unit regenerate 2 hours later, set clock 2 hours slow- see P.
To ensure the softeners continuous operation, please do not let the salt drop below half way down in the cabinet.
7
GOING ON HOLIDAY?
•
•
•
•
Fig 6 shows the valves in the Service position (Bypass is closed and Inlet &
Outlet are open).
We highly recommend you bypass your softener and turn off the electrics
when going away on holiday.
Simply turn Inlet, Outlet and Bypass valves ¼ turn to put valves into
Bypass positions.
Upon your return, return valves to the Service position (as Fig 6 below) and regenerate softener – see section T above ref EXTRA REGENERATIONS
Fig 6
8
Hints and Tips about your new water softener…
1. Make sure the electricity supply is not turned off.
2. Please ensure that any appliances (washing machine etc.) used during ‘Economy 7’ time, do not begin their cycle between 11pm and 5am.
3. To ensure the highest efficiency is obtained, it is recommended that you top up the unit with Hydrosoft Tablet Salt on a weekly basis, to within 3-4 inches of the lid fill point. Filling your softener on a weekly basis is a lot easier to remember than monthly! Never let the salt go below half way down the cabinet, as this will affect the performance of the softener.
4. Power Cuts. Simply reset the time as per your instructions – see section P ref
SETTING THE TIME.
5. Bath and shower surfaces will become smoother – be careful, in particular the young and infirm – why not buy a bath mat?
6. Cut washing powder down by at least a 1/3rd or you will go into a kitchen/utility room full of suds!
7. Soft water will become available throughout your system in varying time spans. Conventional systems (tanks in your roof) will take anything from 4-10 days,
whilst mains fed Pressurised Systems will give soft water within 2-3 days.
8. Dishwashers – On most installations the dishwasher is to be connected to the
soft water. We recommend that you continue to add a small amount of salt to
the appliance as before, as this helps the salt holder in the appliance stay clean. We do not however recommend that crystal glass, solid silver or silver plated items are washed in your dishwasher as etching may occur. Less dishwasher
liquid may be required and in certain cases this will also apply to rinse aid.
On dishwashers connected to hard water, you should continue to put salt into
the dishwashers own softener. If in any doubt if your machine should have either hard or soft water, please contact your dishwasher manufacturer, but remember they want to sell you spare parts to replace those that get scaled up!
9. Steam Irons – We do not recommend the use of soft water in your steam iron as most are designed for hard water and to be periodically de-scaled. Alternatively
please use de-ionised water.
10.Outside Tap – It is recommended to leave your outside tap on mains hard water. Additionally, in the wintertime we recommend that this tap is isolated via an
internal valve to prevent freezing.
11.Existing scale – Soft water will immediately begin to de-scale your pipes and
appliances. Your hot water cylinder will take longer to de-scale than your pipe work; therefore you may notice different levels of soft water for some time
whilst the system is de-scaling. This is particularly noticeable in your bath
and shower.
12.Soft water and heating systems – Filling your heating system with softened water will have no adverse effect provided you use a corrosion inhibitor such as
Monarch SO-1 or Sentinel X100. If in any doubt your boiler should have either hard or soft water, please contact the boiler manufacturer, but remember they, like
your dishwasher manufacturer want to sell you spare parts to replace those that get scaled up!
Monarch recommends Hydrosoft Tablet salt in all their water softeners
9
MONARCH WATER DOMESTIC WATER SOFTENER GUARANTEE
Effective February 2012.
This water softener is fully covered by 7 year parts and 2 years labour guarantee for installation within
the hard water regions of mainland England as detailed on Monarchs National Service Coverage Area,
from date of original purchase. Installations outside this area are automatically covered by a 7 year
parts only ‘exchange’ warranty.
PLEASE NOTE - This guarantee has the following conditions, and is not covered by the following.
1. Damage caused by high water pressure, we strongly recommend a 5bar water pressure limiting valve on the inlet to your water supply, where daytime water pressure exceeds a static pressure
of 3.5 bar (50psi).
2. This water softener is suitable for a mains water supply only.
3.
Damage caused by a dirty mains water supply. The installation of an H1034 c/w APSR Debris
Filter – cost £73.00 inc VAT & postage – on the supply to your softener cancels this clause. The
majority of debris in water is caused by local authority work on the water main. If notified in
advance, by your local water authority, please put your softener onto ‘bypass’, see Fig 6 on page 8.
For Bypass: Close both Inlet & Outlet valves, and open Bypass valve.
For Normal Service: Open both Inlet & Outlet valves, and close Bypass valve.
4. Callouts due to incorrect installation. If you have any queries when installing your softener,
please call us on 01986 784759.
5. The wrong type of salt used and also the softener being allowed to run out of salt.
NOTE: In all cases use TABLET SALT ONLY.
6. The use of any other hoses than those provided. Under no circumstances use washing machine hoses.
7. The build-up of salt fines in the bottom of the salt compartment. Although Monarch recommends Hydrosoft, please note it is the customers’ responsibility to ensure the salt is of good condition when used.
8. The effect of aggressive water, the degradation and/or blinding of resin and/or chlorine attack on resin.
9. Under no circumstances plumb in the softener in solid copper.
10. The installation kit is only covered by the OEM twelve-month parts ‘exchange’ warranty only.
11. Compensation as a result of cancelled appointments, damage caused by, or incorrect installation of the water softener. In the unlikely event of a fault, put the softener onto Bypass, see 3 above
ref ‘For Bypass’ until an engineer calls.
THE ABOVE DOES NOT AFFECT YOUR STATUTORY RIGHTS
SERVICE CARE
The manufacturer of your water softener includes 45+ years of manufacturing experience, to give you
a water softener that is arguably the most reliable on the market today.
One of the aspects incorporated into the manufacture of your softener is ‘Prevention is better than cure’.
To these ends, Monarch strongly recommends a service every 2 years from date of installation, to
ensure the continued excellent operating efficiency you will come to expect.
We will of course inform you when this small service is due and arrange a convenient time for our
engineer to call.
Therefore please ensure that your guarantee card is returned once installation is complete.
10
Monarch National Service Coverage Areas - Effective February 2012.
The below postcodes (see map below) are automatically covered by a parts and labour
warranty as set out in the relevant sales brochure for the individual model/range.
B
BA
BH
BN
BS
CB
CM
CO
CT
CV
DN
DT
GU
GL
HP
IP
LE
LONDON inset
LU
LN
ME
MK
NG
NN
SN
SO
SP
SS
TN
NR
OX
PE
PO
RG
RH
SG
SL
IMPORTANT
Water softeners sold outside the above counties
are to be covered strictly
by a parts only ‘exchange’
warranty as determined
by the model/range of
softeners i.e. Monarch
Ultimate range with 7
years parts, Monarch GS
range with 5 years parts
and Plumbsoft with 5
years parts.
All parts sent back to
Monarch are at the
expense of the sending
parties. All repaired or
replaced items will be
returned to the sender
on a no charge basis
whilst covered by the
parts exchange guarantee.
Once the parts exchange
guarantee has expired,
Monarch reserves the
right to make a charge
for any postage/delivery,
labour and parts charges
that is deemed necessary.
Monarch will endeavour
to keep these charges at
the lowest cost whenever
possible.
11
EXTEND YOUR PARTS
GUARANTEE TO 10 YEARS?
Dear Customer,
Thank you for purchasing a Monarch Water Softener. Your support for our independent
family run company who offers you over 45+ years’ experience in water softeners is greatly
appreciated. Support such has yours has led us to being the UK’s leading independent
softener manufacturer.
With many makes to choose from in today’s market, we are pleased you have chosen to
buy from a British company not from our U.S. or foreign based competitors.
Your softener comes complete with a 7 year parts and 2 years labour guarantee. Every year,
each member of your household will use an incredible 58,000 litres of water, so you will
appreciate the amount of work your softener has to do in giving you lovely soft water during its lifetime.
Wouldn’t it be nice if with a one off outlay you could extend the parts guarantee to a full 10
years?
Special offer on extending your parts guarantee and SAVE £79.00 with a speedy reply!
An extended guarantee to cover all parts for the full 10 years is normally £158.00.
However, if you return your original guarantee card and a cheque for £79.00 (made out to
Monarch Water Ltd) in the envelope provided within 30 days of installation, you automatically comply for the 50% discount of £79.00.
Alternatively return your guarantee card as normal and ring our office on 01986 784759 with
your credit/debit details.
When we receive your payment we will then issue you with a new guarantee
This reduced price offer is only available if you take up this offer within 30 days of installation.
Notes:
1. Please note that by extending your guarantee after 30 days, the full rate will apply.
2. Please note that you can extend your guarantee at any time within the first 90
days from installation.
Once again many thanks for supporting Monarch Water
Yours faithfully,
MONARCH WATER
Effective February 2012.
12