1
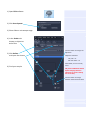
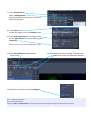
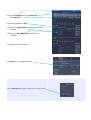
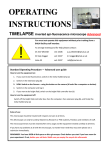
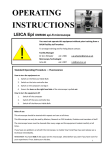
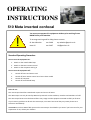
OPERATING
INSTRUCTIONS
510 Meta inverted confocal
!
You must not operate this equipment without prior training from a
BALM facility staff member.
To arrange training and for help please contact:
Dr Ann Wheeler
ext: 2406
[email protected]
Isma Ali
ext: 2407
[email protected]
Standard Operating Procedure
How to turn the equipment on:
1. Switch on the metal halide lamp
2. Switch on the Zeiss remote control
3. Switch on the computer and log in
How to turn the equipment off:
1.
2.
3.
4.
Switch off lasers and wait to cool
Switch off Zeiss remote control once lasers have cooled
Switch off computer
Switch off metal halide lamp
Rules of use:
This microscope should be treated with respect and care at all times.
This Microscope can only be used by Masters by Research or PhD students, Postdocs and members of staff.
The microscope lenses must be cleaned after every usage and the equipment treated carefully at all times.
If you have any problems at all with the microscope, no matter how trivial they may seem please see a
technician immediately.
REMEMBER: You have 5GB of disk space on this microscope. Check before you start if you have room for your
experiment. If not, delete your old data.
1) Open ZEN software
2) Click Start System
3) Place slide on microscope stage
4) In the Ocular tab
choose an objective
and a filter
5) Click Online
and open the shutter
Use this button to change the
objectives
Objectives available:
10x, 20x – air
40x, 63x, 100x – oil
6) Find your sample
Automated, do not move by
hand
NB: please LOWER THE STAGE
before changing between
objectives (to avoid crashing
lens onto slide)
Use this button to change
between the fluorescent filters
7) In the Acquisition tab
select a Configuration
and accept the prompt asking if you wish to
switch on the lasers
8) In the Laser menu
Switch the Argon laser from standby to on
9) In the laser properties (for the Argon laser)
Set the tube current to 6.1A by adjusting the
output (%)
NB. Ignore the warning about exceeding 50% output
10) Click Auto Exposure to generate an
initial image
11) Click Live to see the live image, and select the
SPLIT view to see the individual channels
12) Optimise the system by clicking Merged
Blue = Underexposed pixels
Red = Overexposed pixels
Adjust the Gain and Digital Offset so that the signal is within the dynamic range of the detectors (see below)
13) In the Channels menu click Show all
and Select all
14) Set the pinhole to 1AU
15) Alter the Digital offset so background is black
not blue
16) Alter the Gain (Master) so there are no
red pixels
17) Repeat for each channel
18) Stop the Live image aquisition
Click the Merged button again to return to the original colours
You can Crop your image
and change the position, size or rotation of the cropped area
by moving the crop box
Start scanning again and your cropped image will appear
19) In the Acquisition Mode menu
set the image capture parameters
Recommended acquisition:
Frame Size: 1024 x 1024
Speed: 7
Averaging number: 4
Bit depth: 8 bit
20) Click Snap
21) Save your image on the E: drive
(displayed in the top right of the workspace)
To export your images in TIF format, go to File, and Export.
Export as Raw data – single plane for overlay image.
Export as Full resolution image window for contents of the
image window (will vary depending on which tab is open).
When you have finished, transfer all your data to the Z network drive
PLEASE TIDY UP!!
Clean lenses, throw away used tissue/lens tissue, dispose of old slides in the yellow sharps bin