1
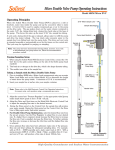
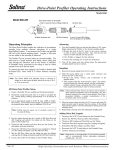
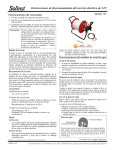
Interface Meter Operating Instructions
Model 122
Operating Principal
Field Measurements
The Solinst Model 122 Interface Meter has a narrow 5/8"
(16 mm) diameter probe. It is CSA approved for use in
hazardous locations Class 1, Groups C & D. It has an
infra-red circuit which detects the presence of a liquid. A
conductivity circuit differentiates between conductive liquid
(water) and non-conductive liquid (LNAPL or DNAPL
product).
Equipment Check
Before beginning any measurements, check the electronics and
battery condition by pushing the 'Start' button. A brief tone
and red light indicate that the meter is functional.
A flashing green light indicates the meter is on. It will
automatically turn off after 10 minutes to preserve battery life.
Using the Tape Guide
1. The tape guide has been designed to: improve accuracy
when reading interface measurements; to prevent tape being
cut by well casing; and to allow the tape and probe to hang
straight from the side of the well.
2. If interface measurements are being taken in a 2” dia.
well then simply fit the small end of the tape guide
onto the edge of the well casing.
3. The small end must be inserted if the Interface Meter is
to be suspended from the tape guide.
4. Insert the leg of the Interface Meter into the hole on the
Tape Guide.
5. Once inserted, rest the Interface Meter on the side of the
well casing.
Tape Guide
Measurement
point
Fit onto well
casing
Insert
Interface
Meter leg
through hole
PRODUCT: Steady Signals
WATER: Intermittent Signals
LR88701
Exia.
Class 1, Groups C and D.
Temperature Code T3C.
Max. ambient 50 deg C.
INTRINSICALLY SAFE
WARNING: Substitution of components
may impair intrinsic safety.
CAUTION: This device must be grounded
before introduction into the tank and remain
grounded until after complete
withdrawal from the tank.
Tape Guide: prevents tape
from scraping the top edge
of well casing
Model 122
Solinst Canada Ltd.
http://www.solinst.com
Tel: +1(905) 873-2255
(800) 661-2023
REPLACE BATTERIES
in non-hazardous area.
Use two 9V alkaline batteries:
Duracell MN1604
or Eveready 522.
Made In Canada
Interface Meter
ON
START
OFF
Interface Meter:
anchored to the well casing
with the tape guide for
stable operation.
High quality medium density
polyethylene tape: hangs
straight in the well for accurate
interface measurements.
Notes:
• When using the
tape guide, the
measuring point
is offset from the
top of casing
• To adjust your
measurements,
simply subtract
the amount
indicated on the
front of the tape
guide (eg. 6 cm or
2/10 ft.)
IMPORTANT
1. To meet safety requirements and to protect the
electronics from damage, always ground the meter
by attaching the grounding clip to the well casing or
to a suitable ground rod.
2. Push the 'Start' button. A brief tone and light indicate
that the meter is functional and the flashing green light
indicates that the meter is on. The meter automatically
turns off after 10 minutes. Press the 'Start' button as
necessary during operation to turn the meter back on.
3. Place the slotted part of the tape guide onto the edge of
the well casing. Lay the Interface Meter tape into the
groove on the top of the tape guide. Measurements will
be read at the apex of the V-notch on the tape guide.
Note:
When using the tape guide, remember to subtract
the compensation factor stamped onto the side of
the guide from each measurement.
4. A steady tone and light indicates a non-conductive liquid
(eg. product). An intermittent tone and light indicates a
conductive liquid (eg. water).
5. For floating product (LNAPL), take the air/product
interface measurement on the way into the liquid, and
the water/product interface on the way up. When passing
through product into water, some product may adhere to
the probe sensors due to surface tension. Therefore,
when water is detected below product, the probe should
be raised and lowered rapidly in a short vertical motion
to remove any product that may have been carried down
with the probe.
6. The water/product interface should then be measured
as the probe is raised very slowly back up. Once the
interface is detected the probe can be raised and
lowered in small increments to precisely determine the
interface.
7. Repeat measurements to confirm water/product interface.
8. To determine the thickness of product, subtract the
water/product interface from the product/air interface.
9. To determine if there is any sinking product (DNAPL) in
the well, continue lowering the probe slowly. If steady
signals activate, determine the top of the sinking layer by
reading directly from the tape. Continue lowering the
probe slowly until the tape slackens when the well bottom
is reached. Read the level directly from the tape and
subtract one from the other to determine thickness.
10. Upon completion of readings clean the tape and probe; as
described overleaf.
Cleaning and Maintenance
•
After each use, the tape should be wiped clean and carefully
rewound onto the reel.
Battery Replacement
The probe should be cleaned as follows:
• Wash probe thoroughly with a non-abrasive mild detergent.
DO NOT USE ANY SOLVENTS. Use a soft cloth
around the pins on the end of the probe to remove all
product. For the P2 Probe use the brush provided
through side and base holes to remove all product from
inner part of the probe.
USE LUKE-WARM, NOT HOT WATER. DAMAGE
TO PROBE MAY RESULT.
• Rinse probe thoroughly with distilled water, wipe dry
• Return the probe to the holder
Other suitable cleaning method:
Steam clean tape only
Push battery drawer in and up and then release. The battery
drawer should eject slightly, allowing it to be pulled out.
Replace the two 9V batteries with alkaline batteries.
Other General Tips:
1.
2.
3.
4.
Probe should be cleaned after each use.
Always use grounding cable
Do not drop probe: damage to probe tip may result.
If battery is weak, the start tone will not sound, and flashing
“green” light will be off. Replace both batteries.
5. Before storage, make sure the meter is turned off.
Troubleshooting
Instruments will not turn on:
1. Replace batteries.
2. Check the polarity of the batteries are correct in the
battery drawers.
3. Check 12-pin connector inside reel for loose wire/pin.
Access by removing three screws on faceplate. Ensure
instrument is laying on its back frame so the tape does
not unwind.
4. Push button could be faulty, please contact Solinst.
Instrument turns on, but immediately shuts
off, or instrument does not shut-off, except
after 10 min, automatic shutdown:
1. Check batteries, replace if necessary.
2. Dirt or debris may be causing the on/off buttons to stick.
Use short blast of air to try to free up buttons.
3. Check 12-pin connector inside reel for loose wire/pin.
Access by removing three screws on faceplate. Ensure
instrument is laying on its back frame so the tape does
not unwind.
4. Push button could be faulty, please contact Solinst.
Instrument does not detect liquid:
1. Check batteries, replace if necessary.
2. Clean probe tip-follow Cleaning/Maintenance Instructions.
3. Reel or probe circuitry could be damaged, please
contact Solinst.
Printed in Canada
10/02
Model 122
Page 2
When instrument is turned on, it immediately
sounds product tone or water tone:
1. Probe optical sensor may be dirty. Clean according to
Cleaning and Maintenance instructions.
2. Possible weak batteries, replace both.
3. Water has leaked into the probe. Remove three small
screws and slide the probe down from the tape portion
(remember polarity of the green and white wire). Dry out
probe, wipe and inspect o-ring, replace if necessary
and/or lubricate with silicon grease. Replace probe
remembering polarity.
4. Check 12-pin connector inside reel for loose wire/pin.
Access by removing three screws on faceplate. Ensure
instrument is laying on its back frame so the tape does
not unwind.
5. Reel or probe circuitry could be damaged, please contact
Solinst.
Chirping or ‘Warbling’ sound being emitted:
1. Clean probe.
2. Possible water in probe (see troubleshooting under
‘When instrument turned on, instrument emits product or
water tone’).
3. Reel or probe circuitry could be damaged, please
contact Solinst.
Instrument detects “product” as “water”.
1. Thoroughly dry the stainless steel shroud covering the probe
tip.
2. Product may have degraded; if it has a detectable level of
conductivity it will read water. This can be checked by
placing the probe in pure phase product, a steady tone &
light should be observed.
For further information contact: Solinst Canada Ltd.
Fax: +1 (905) 873-1992;(800) 516-9081 Tel: +1 (905) 873-2255;(800) 661-2023
35 Todd Road, Georgetown, Ontario Canada L7G 4R8
E-mail: [email protected] Web: http://www.solinst.com