1
Drive-Point Profiler Operating Instructions
Model 660
Model 660 AW
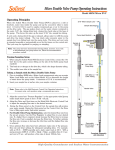
Drive-Point Profiler Tip (#101928)
5/32" (4 mm) SS Push-fit Fitting (#102214)
50 Mesh Screened Inlet
AW Rod Coupling
AW Drive Rod
4 mm x 2.5 mm LDPE Tubing
Drive & Sample Line (#102353)
Operating Principles
Advancing
The Drive-Point Profiler enables the collection of groundwater
samples from multiple discrete elevations in a single
drive/drilling location. A rig advances the Profiler and attached
AW rod to the desired sampling depth. Lengths of AW drive
rod are added as the assembly is advanced.
1. Turn the Peristaltic Pump on and start the delivery of D.I. water.
Begin advancing the Profiler to the desired sampling depth.
• Monitor the level of the D.I. water in the source container
in order to ensure continuous flow. Also note the rate and
volume of water injected into the ground.
The Profiler Tip has screened inlets set circumferentially. The
inlets lead to a single stainless steel fitting, where tubing that
runs through the extension rods to the surface is attached.
A Peristaltic Pump connected to the tubing is used to collect
samples from each discrete depth.
To prevent the inlets from clogging, the Profiler is flushed with
de-ionized (D.I.) water while it is driven between sampling
zones.
Note: The Solinst Model 410 Peristaltic Pump is effective to
depths up to the suction lift limit, which can be up to 33 ft
or 10 m at sea level.
AW Drive-Point Profiler Setup
1. Ensure a Peristaltic Pump is available and functioning properly.
2. Check that enough de-ionized water is on hand to complete the
job. During driving, flushing approximately 5 to 20 ml/min is
sufficient.
3. Cut an appropriate length of 5/32" (4 mm) LDPE or Teflonlined tubing. The minimum tubing length cut should be equal to
the expected drive depth, plus an additional 10 ft (3 m).
Note: Tubing must be square cut to properly connect to
the push-fit fitting.
• If the Profiler is clogged, the flow will stop.
• Increase the pumping rate to clear the obstruction.
2. Turn off the pump and stop driving when the appropriate
sampling depth has been reached.
Sampling
1. Remove the pump tubing from the D.I. water.
2. Hold the pump tubing over a waste water container and
reverse the flow of the pump.
• Monitor the clarity, volume, and conductivity of the
sampled water.
• Take samples when the water becomes “dirty”, the volume
removed equals the volume injected, and the conductivity
exhibits marked change, indicating that all D.I. water has
been purged and formation water is being extracted.
Note: A flow-cell and in-line sensors can also be used to monitor
other chemical parameters such as temperature, pH, and
dissolved oxygen as the water is being purged. Once these
parameters stabilize, a sample representative of the
formation water can be assured.
3. Place the pump tubing back into the D.I. source and pump D.I
water (amount equal or greater than the volume of the tubing)
back into the system to rinse the tubing before driving to the next
sampling point.
4. Repeat steps 1 through 3 for each subsequent sampling point.
Adding Drive Rod Lengths
1. Disconnect the 5/32" (4 mm) tubing from the Peristaltic Pump.
4. Pass the tubing through the first length of AW Drive Rod and
AW Coupling and push-fit the tubing into the fitting on the
inside of the Profiler Tip.
5. Thread the AW Coupling and Drive Rod into the Profiler Tip
and tighten with pipe wrenches.
6. Thread the AW Drive Head Adaptor (not supplied by Solinst)
over the tubing and tighten onto the AW Drive Rod.
7. Slip the AW Drive Head over the tubing and onto the Adaptor
ensuring that the tubing protrudes through the AW Drive Head slot.
8. Connect the 5/32" (4 mm) tubing to the Peristaltic Pump.
Page 1 of 2
2. Remove the AW Drive Head and Drive Head Adaptor.
3. Thread an AW Coupling and Drive Rod over the Tubing.
4. Thread the Drive Rods together using the Coupling and tighten.
5. Reinstall the AW Drive Adaptor and Drive Head.
6. Reconnect the 5/32" (4 mm) tubing to the Peristaltic Pump.
7. Continue advancing and sampling.
Note: Replacement or decontamination of the downhole materials
used is recommended before attempting subsequent
sampling sites. See over.
High Quality Groundwater and Surface Water Instrumentation
Model 660 AW Grout Tip
(#101225)
5/32" (4 mm) SS Push-fit Fitting (#102214)
Replacement Grout Tip (#100643)
AW Rod Grout Tip Body (#102547)
50 Mesh Screened Inlet
O-Ring V214 (#102565)
AW Rod Coupling
AW Drive Rod
4 mm x 2.5 mm LDPE Tubing
Drive & Sample Line (#102353)
Sealing Profiler Holes
Maintenance and Decontamination
Grout Tip AW Drive-Point Profiler
After the system has been removed, proper decontamination of the DrivePoint Profiler must be performed.
1. Disconnect the 5/32" (4 mm) tubing and discard or appropriately
decontaminate.
2. Using the Allen Key provided, remove the screened inlet hole inserts
and then remove the screens (50 mesh).
Holes in most homogeneous sands will collapse as soon as the
Profiler is withdrawn. In other geologic formations it is best to use a
Profiler fitted with a Grout Tip.
• Sampling using the Grout Tip Profiler is done in the same
manner as those without a Grout Tip. (See previous page).
• The Grout Tip is a single use tip that can be separated from
the Profiler with a high-pressure grout pump, after sampling
is complete.
• This allows the hole to be grout sealed as the Profiler is being
withdrawn, ensuring no void spaces.
• Replacement Grout Tips are available (#100643), and easily
fit onto existing Grout Tip Bodies by pushing into the end until
the O-ring properly seats.
Note: Be careful not to lose the screens. Replacement screens are
provided for convenience. Be careful not to damage the
screens when decontaminating.
3. Wash all components with a mild detergent and thoroughly rinse with
D.I. water, or follow local guidelines or standards as required by your
decontamination procedure.
® Solinst is a registered trademark of Solinst Canada Ltd.
Printed in Canada
June 25, 2009
(#109227)
Page 2 of 2
For further information contact: Solinst Canada Ltd.
Fax: +1 (905) 873-1992; (800) 516-9081 Tel: +1 (905) 873-2255; (800) 661-2023
35 Todd Road, Georgetown, Ontario Canada L7G 4R8
Web Site: www.solinst.com E-mail: [email protected]