1
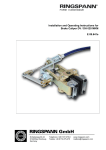
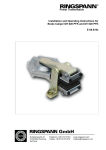
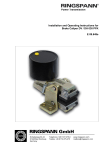
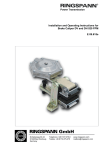
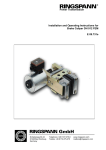
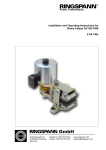
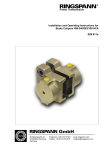
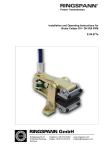
Power Transmission Installation and Operating Instructions for Brake Caliper DH 010 FPM E 09.634e Schaberweg 30-34 61348 Bad Homburg Germany Telephone +49 6172 275-0 Telefax +49 6172 275-275 www.ringspann.com [email protected] Installation and Operating Instructions for Brake Caliper DH 010 FPM spring activated, pneumatically released Issue: 27.02.2014 Version : 4 drawn: Su checked: Su E 09.634 e Pages: 11 Page: 2 Important Please read these instructions carefully before installing and operating the product. Your particular attention is drawn to the notes on safety. These installation and operating instructions are valid on condition that the product meets the selection criteria for its proper use. Selection and design of the product is not the subject of these installation and operating instructions. Disregarding or misinterpreting these installation and operating instructions invalidates any product liability or warranty by RINGSPANN; the same applies if the product is taken apart or changed. These installation and operating instructions should be kept in a safe place and should accompany the product if it is passed on to others – either on its own or as part of a machine – to make it accessible to the user. Safety Notice Installation and operation of this product should only be carried out by skilled personnel. Repairs may only be carried out by the manufacturer or accredited RINGSPANN agents. If a malfunction is indicated, the product or the machine into which it is installed, should be stopped immediately and either RINGSPANN or an accredited RINGSPANN agent should be informed. Switch off the power supply before commencing work on electrical components. Rotating machine elements must be protected by the purchaser to prevent accidental contact. Supplies abroad are subject to the safety laws prevailing in those countries. Installation and Operating Instructions for Brake Caliper DH 010 FPM spring activated, pneumatically released Issue: 27.02.2014 Version : 4 drawn: Su Contents 1. General information 2. Configuration and function 3. Drawing and parts list 4. Condition on delivery 5. Installing the RINGSPANN brake caliper 5.1 Installation 5.2 Compressed air connection 5.3 Adjustment the braking and/or holding force 5.4 Running-in procedure 6. Maintenance 6.1 General maintenance 6.2 Checking/adjusting brake pad wear and braking force 7. Replacement of worn parts 7.1 Replacing brake pads 7.2 Exchange of the piston seal checked: Su E 09.634 e Pages: 11 Page: 3 Installation and Operating Instructions for Brake Caliper DH 010 FPM spring activated, pneumatically released Issue: 27.02.2014 1. Version : 4 drawn: Su checked: Su E 09.634 e Pages: 11 Page: 4 General information These installation and operating instructions apply to: the version DH 010 FPM – 010M und DH 010 FPM – 012M, see Fig. 3.1 under Section 3 for mounting on a disc brake (disc thickness 12.5 mm). the special version for 5,0 mm thick brake disc the execution without brake pads the remarks with special brake pad materials. An identification plate with a 16-digit part number is affixed to the calliper. The precise design of the brake caliper is defined by this part number only. Please consult the drawings in each section when using this instructions. 2. Configuration and function The brake caliper is used as a stopping and parking brake. Braking force is generated by springs in the cylinder block (1). It is released (opened) pneumatically with compressed air. If brake pads (4) are worn, braking and holding force is diminished, as the tension in the springs (10) is reduced. If brake pads are worn, brake pad wear must be checked (see Section 6.2) and braking force adjusted (see Section 5.3). Rotating parts must be secured by the user against inadvertent contact (e.g. brake disc). Danger to life and limb! It is essential to secure the entire drive train against inadvertent starts during brake installation and maintenance. Rotating components can cause severe injuries. Therefore, rotating components (e.g. brake disc) must be secured by the operator to prevent accidental contact. Caution! If the brakes are used as holding brakes, the indicated braking torques are not achieved. Reductions of up to 50% of the braking torques are possible. Installation and Operating Instructions for Brake Caliper DH 010 FPM spring activated, pneumatically released Issue: 27.02.2014 3. Version : 4 drawn: Su checked: Su E 09.634 e Pages: 11 Page: 5 Drawing and parts list Fig. 3.1 Parts list: Part 1 2 3 4 5 Nomenclature Quantity Part number 1 3514-079001-000000 2 2 2771-030602-000000 2789-087002-000000 Standard brake pad with split pin for brake caliper: 4457-901102-000000 2 3457-901101-000000* Brake pad from BK 6905 with split pin for brake caliper: 4457-100608-000000 2 3457-901104-000000* 2 3457-901105-000000* 4 5213-010150-000000 Cylinder block assembly group completely to DH 010 FPM Piston to DH 010 FPM Lever to DH 010 FPM Brake pad with glued on BK 4773 plate and split pin for W = 5mm for brake caliper: 4457-901104-000000 Pin with head a hole for split pin 6h11x50 Installation and Operating Instructions for Brake Caliper DH 010 FPM spring activated, pneumatically released Issue: 27.02.2014 6 7 8 or 9 9 or 8 10 11 12 13 14 15 16 17 Version : 4 Split pin 1,6x12 Adjustment spindle to DH 010 FPM Pressure nut with right-hand thread Pressure nut with left-hand thread Pressure spring to DH 010 FPM-H O-ring 24x3 O-ring 12,3x2,4 Return spring to DH 010 P Bearing cover to DH 010 FPM Hexagonal socket cap screw M4x16 DIN 6912-8.8 L-shaped hose connector, swivelling Clamping sleeve 3x20 DIN 1481 drawn: Su checked: Su E 09.634 e Pages: 11 Page: 6 4 1 1 1 2 4 2 1 2 5202-016106-000000 2712-006606-000000 2742-010101-000000 2742-101102-000000 2701-010004-000000 5116-024003-000000 5116-012003-000000 2449-146001-000000 2771-045102-000000 4 5002-004004-000000 1 1 5161-106102-000000 5203-003010-000000 * Part number for 1 pad 4. Condition on delivery The brake caliper is delivered with a clamping gap of approx. 5,5 to 6 mm between brake pads. During the special equipment for 5 mm of brake disk thickness leagues the brake pads together. Under air pressure (5 – 6 bar), the brake caliper opens to the pre-defined clamping gap of approx. 13.2 mm or 6.5 mm. 5. Installing the RINGSPANN brake caliper Before installing the brake, the brake disc must be cleaned with alcohol, e.g. ethyl or isopropyl alcohol, or water-based surfactant solution (soapy water, etc.) and then rubbed dry with a clean cloth. When cleaning the brake disc with a thinner, acetone or a brake cleaning agent, it is important to ensure that neither these cleaners nor any cleaner residues come in contact with the brake pads. This is especially important in the case of brakes used only as parking brakes, as no dynamic Braking operations take place during which thinner residues would be rubbed off the brake disc. Caution! Oil and rust proofing agent residues reduce friction coefficients and thus diminish transmissible braking torque substantially! Prior to installation to a 12.5 mm and/or 5.0 mm-thick brake disc, the brake caliper must be released (opened). This is possible once the compressed air supply has been connected (see Section 5.2). Installation and Operating Instructions for Brake Caliper DH 010 FPM spring activated, pneumatically released Issue: 27.02.2014 Version : 4 drawn: Su checked: Su E 09.634 e Pages: 11 Page: 7 5.1 Installation The brake caliper should be mounted to stabile, vibration-free machine components in order to ensure noise-free, non-screech. During installation, it is essential to ensure that brake pads are centred and in full contact with the brake disc (the midlines of the brake arm must point to the midpoint of the brake disc.). Maximum permissible lateral brake disc wobble is 0.2 mm. Greater wobble may cause rattling and shaking of the brake unit. The brake caliper is mounted to the machine component with using 2 M8 bolts (strength class 8.8). 5.2 Compressed air connection The system requires pressure of at least 5 bar; maximum permissible pressure is 8 bar. The connection thread on the cylinder block is M5. The actual screw depth is 4.5 mm. The brake caliper is factory-delivered with an 360° swiveling L-shaped hose connector. Two versions are available: LCS-M5-PK4 (old version) made of blue plastic with a metal screw plug and a red clamping ring. This version is connected by means of a PU, PL or PP plastic hose with an outside diameter of 6 mm (e.g. plastic hose PU-4, part no. 6204, blue, or part no. 5733, black, manufactured by FESTO AG & Co, D-73726 Esslingen). QSML-M5-6 (new version) made of black plastic with a metal screw plug and a blue clamping element. This version is connected by means of a PUN or PAN plastic hose with an outside diameter of 6mm (e.g. plastic hose PUN-6x1-BL, part no. 159664, blue, or part no.159665 Compressed air must be filtered to remove all dirt, pipe chips, rust and condensation. Purified air must then be enriched with a fine oil mist injected by a standard, commercially available conditioning unit. The quantity of oil added depends on the nominal air flow rate in l/min and is specified by the manufacturer of the conditioning unit. The following types of oil are recommended for conditioning units: Suitable types of oil Viscosyty at 20° C (mm²/s) Avia Avilub RSL 3 BP Energol HLP 40 ESSO Spinesso 34 Shell Tellus Öl C 10 Mobil VAC HLP 9 34 27 23 22 25,2 Maximum air consumption per braking operations is approx. 10 cm³ . 5.3 Adjustment the braking and/or holding force The gap must be reset: - during initial installation - when brake pad wear has been detected - following brake pad replacement Pressurize the brake caliper with 5 to 6 bar air pressure. Note: Subsequent operating pressure must be equal to or greater than this initial setup pressure, as otherwise the brake caliper will not open completely during normal operation, which can result in brake pad rubbing. Installation and Operating Instructions for Brake Caliper DH 010 FPM spring activated, pneumatically released Issue: 27.02.2014 Version : 4 drawn: Su checked: Su E 09.634 e Pages: 11 Page: 8 Using an SW 3 hex socket spanner, turn the part clockwise or counter-clockwise through the bore into the caliper arms (3) and the piston (2) at the adjustment spindle (7) until both brake pads are separated by a minimal gap from the brake disc. Caution! The setting friction pad spacing must be repeated after initial installation or after replacement of brake pads or items. Note: The minimum adjustable gap depends on the actual degree of lateral brake disc wobble. Smaller gaps increase the wear reserve, i.e. the interval between brake caliper adjustments. Caution! It is important to ensure that the brake pads (4) do not rub against the brake disc when the brake is released. Achtung! Check to ensure that the brake disc rotates freely. Release pressure from the brake caliper. The brake closes and full braking force (holding torque) is available. 5.4 Running-in procedure Optimum braking effect is achieved only when both brake pads (4) are in full contact with the brake disc and the brake pads have attained a temperature of approx. 200°C. This requires multiple, brief braking while the brake disc is rotating (run-in). Caution! If breaking-in is not performed, the braking forces cited in our catalogue no. 46 cannot be achieved. Reductions of up to 50% are possible. Note: If is not possible to break in the unit while the brake caliper is fully engaged (exposed to full spring pressure), braking force can be reduced by decreasing air pressure (1...4 bar). 6. Maintenance Maintenance should be performed on the brake caliper at intervals of 4 to 12 weeks, depending upon the frequency and duration of operation. Installation and Operating Instructions for Brake Caliper DH 010 FPM spring activated, pneumatically released Issue: 27.02.2014 Version : 4 drawn: Su checked: Su E 09.634 e Pages: 11 Page: 9 6.1 General maintenance Check both brake levers for ease of movement. Clean all bearings and glide points if necessary Lubricate all bearing and glide points if necessary. Check to ensure that the brake pads do not rub against the brake disc when the brake caliper is open. Caution! Brake pads must not be come in contact with lubricants. Check the tight bolt / screw connections from brake caliper to the machine part 6.2 Checking/adjusting brake pad wear and braking force Maximum permissible brake pad wear depends on the maximum possible piston stroke (2). Brake pad abrasion also reduces braking force. Caution! When the brake pads are worn, spring tension (Pos.10, Fig. 3.1, Section 3) increases and the brake caliper levers (3) are spread to the maximum permissible limit as shown in Fig. 3.1 (dimension a). Braking force is also reduced. It may be necessary to readjust the braking force as described in Section 5.3. Checking brake pad wear: Ensure that the brake caliper is closed and measure the distance between the two brake caliper levers (3) as shown in Fig. 3.1 (Section 3). If the brake caliper levers are precisely equidistant from the brake disc, the distances of the two caliper levers, dimension b, should be the same. This is not always the case in actual practice, however. Therefore, you should measure the distance b at both caliper levers. If distance “b” exceeds 12.8 mm at either of the caliper levers, both brake pads must be replaced. Installation and Operating Instructions for Brake Caliper DH 010 FPM spring activated, pneumatically released Issue: 27.02.2014 7. Version : 4 drawn: Su checked: Su E 09.634 e Pages: 11 Page: 10 Replacement of worn parts Consumable parts include brake pads and possibly the piston seals in the cylinder block (after extended operation). Brake pads (4) must always be replaced in pairs. 7.1 Replacing brake pads Caution! Before replacing brake pads, ensure that the mass held by the brake is secured against movement, as the brake must be released while the brake pads are replaced. Danger to life and limb! Brake pads may only be replacing when the plant or the working machine is at complete standstill! Apply pressure to the brake caliper (min. 6 bar). The brake caliper opens. If the braking force has been adjusted as described in Section 5.3, you must first enlarge the gap between the brake disc and the worn brake pads in order to replace the brake pads without difficulty. This is then done by turning the adjustment spindle (7) with an SW 3 hex socket spanner clockwise or counter-clockwise into the bore in the caliper levers (3) and the piston (2) until the gap between the brake disc and the brake pads is sufficiently large. Remove the split pin (6), pull the pin with head hole for split pin (5) out of the brake pad and caliper and remove the worn brake pad (4). Press the rounded side of the new brake pad against the return spring (13) and secure the pin with head hole with the split pin. Repeat this procedure on the opposite lever. Readjust the gap between the brake pads and the brake disc as described in Section 5.3. 7.2 Exchange of the piston seal If leaks occur and the brake calliper blows off air, the brake caliper should be inspected and repaired by RINGSPANN. If this is not possible, please proceed as follows: Danger to life and limb! Seals/gaskets may be replaced only with the equipment system and/or working machine is at a complete standstill! Disassemble the two brake caliper levers (3) by removing the split pins (6) and the pins with head hole (5). Loosen the screws (15) on the bearing covers (14), which is under spring pressure, uniformly in a crosswise pattern. Installation and Operating Instructions for Brake Caliper DH 010 FPM spring activated, pneumatically released Issue: 27.02.2014 Version : 4 drawn: Su checked: Su E 09.634 e Pages: 11 Page: 11 Remove the bearing covers (14) and the pistons (2), the pressure springs (10) and the adjustment spindle (7). Then remove the O-rings (11 and 12). Clean individual parts thoroughly, especially the O-ring grooves and the cylinder bore for the piston (2). Install the new O-rings and coat them before reassembly thin with ALVANIA fat G2 (Shell) a, as well as the cylinder bore for the piston (2). Turn the pressure nuts (8 and 9) on the adjustment spindle (7) until both sides contact with the middle of the adjustment spindle. The distance from the spindle ends to the pressure nuts must be 25 mm on each side. Mount a pressure spring (10) on each end. Push the first piston (2) into the cylinder bore from one side of the cylinder block (1) until it comes in contact with the clamping sleeve (17). Then insert the pre-mounted adjustment spindle with the pressure springs and the pressure nuts into the bore for the first piston (2) and the second piston (2) into the cylinder block. Move both pistons to the middle position. When this is done, both pistons protrude approx. 16 mm from the cylinder block. Place the bearing covers (14) on the pistons (2) and tighten the fasting bolts uniformly in a crosswise pattern (in order to prevent canting) to a tightening torque of 4.5 Nm. Reinstall both brake caliper levers (3), after applying a thin coat of ALVANIA G2 grease to the two pins with head hole (5). Do not forget to secure the pins with the split pins (6)!