1
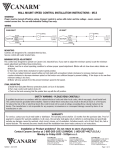
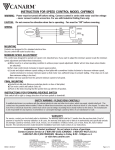
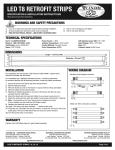
3-06218-OpInst-web10.ps
17/2/10
09:44
Page 3
Prod. No. 06218
ALDINGS (UK) LIMITED,
: 01522 500 600 Freefax: 0800 71 60 40
SPALDINGS (IRE) LIMITED,
Tel: +353 (0) 90 6486008 Fax: +353 (0) 90 6486133
www.spaldings.co.uk
Operating Instructions
BEFORE OPERATING THE BIRDSCARER
PLEASE READ THESE INSTRUCTIONS IN FULL
BIRDSCARER
Prod. No. 06218
BIRDSCARER CONVERSION KIT
Prod. No. 06219
Spaldings Limited,
Sadler Road, Lincoln LN6 3XJ
06218-info-0110
Tel:
Fax:
E-mail:
Web:
01522 500600
0800 716040
[email protected]
www.spaldings.co.uk
Spaldings (Ireland) Limited,
Moydrum Business Park,
Athlone, Co. Westmeath
Tel:
090 6486008
Fax:
090 6486133
E-mail: [email protected]
4-06218-OpInst-web10.ps
17/2/10
09:44
Page 4
1. OPERATING INSTRUCTIONS
Control panel display
1.0 Getting started
1.3 Selecting morning delay
– To operate the gas gun you will need a 12 volt
battery and a cylinder of Propane Gas
(see note right under power supply).
– Place the gas gun in a suitable position making
sure there is nothing obstructing the barrel. Take
particular care in standing crops as obstructions
could be ignited.
– Connect the regulator to the gas cylinder and
turn on the supply valve ensuring there is no gas
leakage. Always keep gas cylinders upright.
– Connect the battery to the two crocodile clips
ensuring correct connection, red to positive (+)
and black to negative (-).
To be adjusted for light summer mornings to delay
the start of firing and so avoid creating a nuisance.
1.1 Selecting the number of
bangs at each firing
– Set the knob indicated “NO. OF BANGS” to the
number of bangs required at each firing. There is
a delay of approximately 10 seconds between
the bangs.
– Make your selection from 1 to 4 or R.
The “R” setting will give a random number of
bangs at each firing of between 1 to 4.
– Use the “HRS / DAWN DELAY” control knob to set
the required dawn delay time, from 1 to 4 hours.
1.4 Volume control
– Use the “SECS / GAS” control knob to set the
amount of gas released into the gas chamber,
suggested setting approximately 3 secs.
Wear
ear protectors
ALWAYS USE EAR MUFFS
AS A SAFETY PRECAUTION
WHEN OPERATING THE
BIRDSCARER
1.5 Test mode
– To test fire the birdscarer, press and release the
black toggle switch on the side of the control box.
After 5 seconds the birdscarer will make one test
bang. This facility will work at any time, day or
night.
1.2 Selecting the interval
between firing
– Set the “RANDOM / TIMED” switch to “TIMED” to
pre-set the interval between firings.
– Use the “INTERVAL / MINS” control knob to set
the required interval between firings at between
15 to 60 minutes.
– Alternatively switch to “RANDOM” for a random
interval between firings of 15 to 60 minutes.
2
Spaldings Limited Tel: 01522 500600 Freefax: 0800 716040
5-06218-OpInst-web10.ps
17/2/10
09:45
Page 5
2. POWER SUPPLY
2.0 GAS
– The gas gun birdscarer is operated by Propane
Gas which is usually dispensed in orange/red
containers.
Do not use BUTANE GAS (usually in blue
containers).
Do not use BLACK TOPPED PROPANE as
used on forklifts.
2.1 Lead acid battery
– Do not use old batteries as these tend to
discharge very quickly.
– We recommend the use of a deep cycle 12 volt
lead acid battery as found in tractors etc. We don’t
recommend purchasing batteries that incorporate
nicad cells usually found in modern cars. These
usually go into deep discharge and are difficult to
recharge.
2.2 Compact rechargeable
battery
– The Truecraft Birdscarer can also be powered by
a compact rechargeable 12 volt (2.8 amp hours)
battery (Prod. No. 06255).
– To wire up the compact rechargeable 12 volt
battery, cut off the crocodile clips and crimp a
female spade connector onto the cable end.
– Fit the spade connector with the red wire to the
red connector on the battery and the spade
connector with the blue wire to the black
connector on the battery.
– Alternatively, use the crocodile clips provided and
clip onto the spade terminals in the usual way.
– When recharging the compact battery, allow
24 hours for a full charge.
Wear
ear protectors
ALWAYS USE EAR MUFFS
AS A SAFETY PRECAUTION
WHEN OPERATING THE
BIRDSCARER
Optional compact rechargable battery
Prod. No. 06255 12 volt (2.8 amp hours)
Compact rechargeable battery.
Prod. No. 06254 Battery charger for 06255.
NEVER CHANGE THE
PROPANE GAS CYLINDER
WHILST SMOKING OR
NEAR A NAKED FLAME.
3. CONVERSION KIT FITTING INSTRUCTIONS
Conversion kit fitted
to an Exid birdscarer
3.0 Conversion kit to fit:
The Conversion Kit is designed to convert and
modernise Zon*, Exid and many other makes of
mechanical / electrical scarers into electronically
controlled birdscarers.
3.1 Conversion method
1. Strip the mechanics away from the existing
birdscarer so that the body and frame remain.
Important Note: Please avoid drilling holes in the
plastic control box as this will let water/moisture
into the box causing premature failure. If a hole
has to be drilled, ensure a silicon sealer is used to
maintain a waterproof seal.
2. Take the spark plug plate from the kit and using it
as a template mark the two securing holes and the
centre plug hole. The template should be
positioned centrally at the rear of the gas chamber.
3. Drill two 1⁄8" holes for securing the plug plate.
Then drill a 1⁄2" hole and enlarge so that the spark
plug will fit through the hole.
4. Using two No. 8 x 1⁄2" self-tapping screws secure
the plate, attaching the earth wire to one of these.
If a welder is available tack weld the plate for
extra security.
5. Fit the spark plug (taking care not to over tighten)
and the ignition lead.
6. Fit the gas hose on to the existing jet assembly
underneath the birdscarer and secure using a
size 000 jubilee clip.
7. Always ensure the Air Breather valve on the side
of the control box points in a downward position.
8. Connect battery and test fire the birdscarer using
the test fire facility.
e-mail: [email protected] visit: www.spaldings.co.uk
*NOTE:
If converting a ZON
mechanical bird scarer, a
gas tube and block are
available FOC if problems
are encountered during
conversion.
Additional fitting
instructions are also
available on request.
TOOLS REQUIRED for
CONVERSION:
– Power drill
– Drill bits – 1⁄8" and 1⁄2"
– Pozi-drive screwdriver
– Adjustable spanner
3
2-06218-OpInst-web10.ps
17/2/10
09:44
Page 2
4. NOTES FOR EFFECTIVE AND SAFE USE
4.0 Positioning / Camouflaging
the birdscarer
– Change the position of the BIRDSCARER AS
FREQUENTLY as possible.
– The attention of the birds is drawn to gas guns by
the noise they produce. If such devices are to
continue to scare it is important that the birds
acquire as little information about them as
possible. Guns are usually painted bright colours
and are often sited conspicuously.
The best effect is produced if they are placed in a
hide of branches etc. However if they are hidden
the fire risks, and also the possibility of alarming
people unaware of their presence needs to be
considered.
An alternative way to camouflage an auditory
scarer is to hide it in a very conspicuous container
surrounded by many identical but otherwise
empty ones, for example it may be possible to
house a gas gun in a brightly coloured metal
drum laid on its side with several similar empty
drums in other positions in the field.
If the gun is moved from one drum to another the
birds will learn to associate the unpleasant sound
–
–
–
–
with the drums but will not be able to predict
which drum will emit the noise. In this situation
they will often avoid all the drums, therefore the
area protected by a single gun can be increased.
This effect can be further improved by
occasionally changing the colour and position of
the drums from time to time.
Reinforce the deterrent by occasionally
shooting in the vicinity.
Point the barrel of the BIRDSCARER downwind.
For best results the scatter-bird should not be set
more than once every 15 to 20 minutes.
Keep the photocell on the control panel clear, to
allow the circuit board to identify night and day.
NEVER CHANGE THE
PROPANE GAS CYLINDER
WHILST SMOKING OR
NEAR A NAKED FLAME.
For more information on the effectiveness of
auditory bird scarers refer to the DEFRA website:
www.defra.gov.uk/environment/quality/noise/research/
birdscaring/index.htm
Always adhere to the NFU bird scarers code
which can be viewed at:
www.nfuonline.com/x40819.xml
5. TROUBLE SHOOTING
5.0 Checking the control box
– Before going through this operation make sure
the gas is TURNED OFF and DISCONNECTED,
and all residual gas has been expelled from the
barrel.
– Press the test fire button, wait 5 seconds, then
you should hear one definite loud click (this is the
solenoid letting in the gas). 3 seconds later you
should hear another definite single click (this is
the solenoid closing, stopping the gas entering
the chamber) followed immediately by a buzzing
noise from inside the chamber. (This is the spark
plug sparking to ignite the gas). If this is not
happening then either the circuit board, solenoid
valve or spark coil could be faulty and advice
from Spaldings should be sought.
– Check the on board fuse (a 20mm 1 amp glass
fuse) and replace if necessary.
Replacement 20mm 1 amp glass fuses are
available from Spaldings (prod. 17655).
5.1 Gas delivered to the chamber
but no ignition
– The most likely cause will be the spark plug gap.
Remove the spark plug and set the gap to 2mm
wide. The gas gun may misfire if the gap is any
narrower or any wider.
– A faulty HT lead causing the spark to jump onto
the metal body before reaching the spark plug
can also cause this problem. Check the HT lead /
Spark Plug connector.
4
– If both the above remedies fail the problem is
most likely to be a blockage in the gas line leading
to the chamber which causes the air to gas ratio
to be disturbed. This can be caused by dirty gas
or soil being picked up by the regulator when
changing gas cylinders etc. Take out the gas
block and check the nipple is not blocked. Clear
with nozzle cleaners if necessary, DO NOT use a
drill bit to clean it out.
– Another cause of the problem could be the
REGULATOR which may have been replaced
since leaving the factory. So as not to upset the air
to gas ratio the replacement must be a 1 BAR
REGULATOR.
5.2 No gas being delivered
Wear
ear protectors
ALWAYS USE EAR MUFFS
AS A SAFETY PRECAUTION
WHEN OPERATING THE
BIRDSCARER
DO NOT USE OLD
BATTERIES AS THESE
TEND TO DISCHARGE
VERY QUICKLY
– Check to see the gas is turned on.
– Check to see that the solenoid is working,
(see section 5.0 – Checking the control box).
– Check the jet,
(see section 5.1 – Gas delivered etc).
– Check the REGULATOR IS 1 BAR
(see section 5.1 – Gas delivered etc).
– If you are still experiencing problems or need
advice contact Spaldings Customer Services
department.
5.3 Replacement parts
Prod. No. 17655 1 amp glass fuse. Pack of 10.
Prod. No. 17656 RN9LCC spark plug. Pack of 2.
Prod. No. 17719 Replacement gas regulator.
Spaldings Limited Tel: 01522 500600 Freefax: 0800 716040