1
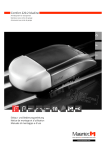
www.samsondoors.co.uk
01933 274276
Last updated 08/2008
Installation and Operating Instructions
Comfort Overhead Garage Door System made of Aluminium
www.samsondoors.co.uk
1.
01933 274276
Contents
1.
Contents . . . . . . . . . . . . . . . . . . . . . . . . . . . . . . . . . . . . . . . . . . . . . . . . . . . . . . . . . . . . . . . . . . . . .2
2.
Meaning of symbols . . . . . . . . . . . . . . . . . . . . . . . . . . . . . . . . . . . . . . . . . . . . . . . . . . . . . . . . . . .3
3.
General safety advice . . . . . . . . . . . . . . . . . . . . . . . . . . . . . . . . . . . . . . . . . . . . . . . . . . . . . . . . .3
4.
Scope of supply . . . . . . . . . . . . . . . . . . . . . . . . . . . . . . . . . . . . . . . . . . . . . . . . . . . . . . . . . . . . . . .6
5.
Assembly measurements . . . . . . . . . . . . . . . . . . . . . . . . . . . . . . . . . . . . . . . . . . . . . . . . . . . . . .7
6.
Installation . . . . . . . . . . . . . . . . . . . . . . . . . . . . . . . . . . . . . . . . . . . . . . . . . . . . . . . . . . . . . . . . . . .8
6.1
6.2
6.3
6.4
6.5
6.6
6.7
Checking the installation conditions . . . . . . . . . . . . . . . . . . . . . . . . . . . . . . . . . . . . . . . . . . . . . . . . . . . . . . . . . . . . .8
Mounting the upper track . . . . . . . . . . . . . . . . . . . . . . . . . . . . . . . . . . . . . . . . . . . . . . . . . . . . . . . . . . . . . . . . . . . . . .10
Assembling the floor rails . . . . . . . . . . . . . . . . . . . . . . . . . . . . . . . . . . . . . . . . . . . . . . . . . . . . . . . . . . . . . . . . . . . . . .11
Installing the curtain . . . . . . . . . . . . . . . . . . . . . . . . . . . . . . . . . . . . . . . . . . . . . . . . . . . . . . . . . . . . . . . . . . . . . . . . . . .13
Mounting the closing edge rail . . . . . . . . . . . . . . . . . . . . . . . . . . . . . . . . . . . . . . . . . . . . . . . . . . . . . . . . . . . . . . . . .16
Fitting the covers . . . . . . . . . . . . . . . . . . . . . . . . . . . . . . . . . . . . . . . . . . . . . . . . . . . . . . . . . . . . . . . . . . . . . . . . . . . . . .17
Assembling the emergency release device (optional) . . . . . . . . . . . . . . . . . . . . . . . . . . . . . . . . . . . . . . . . . . . .18
7.
Quick release and emergency release . . . . . . . . . . . . . . . . . . . . . . . . . . . . . . . . . . . . . . . . .20
8.
Connection of control elements . . . . . . . . . . . . . . . . . . . . . . . . . . . . . . . . . . . . . . . . . . . . . .21
9.
Hand transmitter . . . . . . . . . . . . . . . . . . . . . . . . . . . . . . . . . . . . . . . . . . . . . . . . . . . . . . . . . . . .23
9.1
9.2
Operation and accessories . . . . . . . . . . . . . . . . . . . . . . . . . . . . . . . . . . . . . . . . . . . . . . . . . . . . . . . . . . . . . . . . . . . . .23
Hand transmitter coding . . . . . . . . . . . . . . . . . . . . . . . . . . . . . . . . . . . . . . . . . . . . . . . . . . . . . . . . . . . . . . . . . . . . . . .24
10. Initial operation . . . . . . . . . . . . . . . . . . . . . . . . . . . . . . . . . . . . . . . . . . . . . . . . . . . . . . . . . . . . .26
10.1
10.2
10.3
10.4
10.5
10.6
10.7
Connecting the operator system . . . . . . . . . . . . . . . . . . . . . . . . . . . . . . . . . . . . . . . . . . . . . . . . . . . . . . . . . . . . . . .26
Overview of the control unit . . . . . . . . . . . . . . . . . . . . . . . . . . . . . . . . . . . . . . . . . . . . . . . . . . . . . . . . . . . . . . . . . . . .26
Overview of the display functions . . . . . . . . . . . . . . . . . . . . . . . . . . . . . . . . . . . . . . . . . . . . . . . . . . . . . . . . . . . . . .27
Reference point . . . . . . . . . . . . . . . . . . . . . . . . . . . . . . . . . . . . . . . . . . . . . . . . . . . . . . . . . . . . . . . . . . . . . . . . . . . . . . . .27
Express programming . . . . . . . . . . . . . . . . . . . . . . . . . . . . . . . . . . . . . . . . . . . . . . . . . . . . . . . . . . . . . . . . . . . . . . . . . .28
Advanced functions . . . . . . . . . . . . . . . . . . . . . . . . . . . . . . . . . . . . . . . . . . . . . . . . . . . . . . . . . . . . . . . . . . . . . . . . . . . .30
Function test . . . . . . . . . . . . . . . . . . . . . . . . . . . . . . . . . . . . . . . . . . . . . . . . . . . . . . . . . . . . . . . . . . . . . . . . . . . . . . . . . .31
11. Extended operator functions . . . . . . . . . . . . . . . . . . . . . . . . . . . . . . . . . . . . . . . . . . . . . . . . .33
11.1
11.2
11.3
11.4
General notes on extended operator functions . . . . . . . . . . . . . . . . . . . . . . . . . . . . . . . . . . . . . . . . . . . . . . . . . .33
Programming structure for extended operator functions (Example for Level 2, Menu 2) . . . . . . . . . .34
General overview of the programmable functions . . . . . . . . . . . . . . . . . . . . . . . . . . . . . . . . . . . . . . . . . . . . . .35
Functions overview for the levels . . . . . . . . . . . . . . . . . . . . . . . . . . . . . . . . . . . . . . . . . . . . . . . . . . . . . . . . . . . . . . .37
12. Messages . . . . . . . . . . . . . . . . . . . . . . . . . . . . . . . . . . . . . . . . . . . . . . . . . . . . . . . . . . . . . . . . . . . .47
12.1
12.2
12.3
Status messages . . . . . . . . . . . . . . . . . . . . . . . . . . . . . . . . . . . . . . . . . . . . . . . . . . . . . . . . . . . . . . . . . . . . . . . . . . . . . .47
Fault messages . . . . . . . . . . . . . . . . . . . . . . . . . . . . . . . . . . . . . . . . . . . . . . . . . . . . . . . . . . . . . . . . . . . . . . . . . . . . . . . .47
Rectifying faults . . . . . . . . . . . . . . . . . . . . . . . . . . . . . . . . . . . . . . . . . . . . . . . . . . . . . . . . . . . . . . . . . . . . . . . . . . . . . . . .48
13. Technical Data . . . . . . . . . . . . . . . . . . . . . . . . . . . . . . . . . . . . . . . . . . . . . . . . . . . . . . . . . . . . . . .50
The manufacturer reserves the right to make technical changes to improve the product.
2 Installation and operating instructions
www.samsondoors.co.uk
01933 274276
2.
Meaning of symbols
Caution! Risk of personal injury!
The following important safety advice must be observed to avoid personal injury!
Attention! Risk of damage to property!
Please observe the following important safety instructions without fail to avoid damage to property!
Operational check:
Installation and programming steps must be checked so that faults can be immediately detected. This makes any
subsequent work easier.
Advice/tip
Reference
3.
General safety advice
Caution!
To avoid personal injury or damage to property, the following points must be observed.
Target group
The installation instructions are intended for qualified and trained specialist persons. Mounting, initial operation, setting
works and service to the door and motor unit may only be carried out by qualified and trained specialist personnel.
Qualified and trained personnel in relation to these installation and operating instructions are persons who have been
adequately trained by or are supervised by electricians and technicians and are therefore capable of recognising
hazards, which can arise when dealing with electricity and mechanical forces.
They need to have the following qualifications corresponding to the respective work to be carried out, in particular:
- knowledge of the general and special safety and hazard prevention regulations,
- knowledge of the relevant electro-technical regulations,
- training in the use and maintenance of adequate safety equipment.
The following guidelines must be observed (this list is not exhaustive):
- VDE engineering guidelines (VDE - Association of German Electrical Engineers)
- VDE 0113 electric equipment with electronic components
- EN 60335 - 1 Household and similar electrical appliances - Safety
- Fire prevention regulations
- Accident prevention regulations
- VBG4 electric equipment and operating means
- ZH 1/494 Guidelines for electric windows, doors and gates
- 13241-1 Product standard for doors
Installation and operating instructions 3
www.samsondoors.co.uk
3.
01933 274276
General safety advice
Caution!
To avoid personal injury or damage to property, the following points must be observed.
Guarantee
A guarantee with regard to function and safety can only be granted if installation is carried out in a competent way
and these instructions are followed exactly.
If you do not observe the warnings, you run the risk of personal injury and damaging the door system.
The manufacturer is not responsible for any damage that occurs if the safety guidelines are not observed.
Wear and tear parts such as springs, bowden cables, door cables, rollers, pulleys, tooth belts, seals, batteries, fuses, bulbs,
locks and locking mechanisms are not included in the standard guarantee.
To avoid installation and operating errors, the installation and operation must be carried out exactly according to
these installation and operating instructions. The door and motor unit may only be operated after reading these
installation and operating instructions.
The door systems are manufactured in accordance with guidelines outlined in the conformity declaration and
standards and left the factory without fault and in compliance with safety standards.
The specialist trader carrying out the installation confirms the correct installation according to DIN EN 12635 by means
of his own individual conformity declaration.
The motor unit must only be operated in spaces. The guarantee for the door and motor unit is only valid if original
accessories are used.
These installation and operation instructions must be handed over to the end user who should store them carefully.
Maintenance must be performed on the door and motor unit before start-up and at least once a year thereafter.
All maintenance work must be documented.
Intended use
This door system is intended exclusively for domestic use (on average 2000 cycles a year) and is not licensed for
continuous operation.
Installation tips
The system must always be installed by at least two people.
• Ensure that the floor is at its finished level.
• Ensure that the walls and ceiling are already plastered.
• The travel path of the door must be free of all obstructions (e.g. nails, sockets, cables, etc.) to avoid damage to the door.
• Ensure that suitable fixing material is available for the foundation.
• Prefabricated garages must be drilled using a depth stop. Prefabricated garages with a ceiling thickness of 60 mm
may not be drilled any deeper than 35 mm.
• Before beginning cabling work, disconnect the motor unit from the power supply.
Ensure that the motor unit remains disconnected from the power supply during cabling work.
• Observe the local safety regulations.
• The power cable and the control cable must be laid separately. The control voltage is 24 V DC.
• Only mount the motor unit when the door is closed.
• Mount all pulse generators and control devices (e.g. radio code keypad) in the range of sight of the door and at a safe
distance from any moving parts of the door. The device must be mounted at least 1.5 m above the ground.
• After installation is complete, ensure that no door parts extend onto the public footpath or the street.
4 Installation and operating instructions
www.samsondoors.co.uk
01933 274276
3.
General safety advice
Caution!
To avoid personal injury or damage to property, the following points must be observed.
Advice on commissioning the door system
All door users must be instructed in the system’s operation once it has been installed.
• Make sure that children cannot play with the door controls.
• Make sure before operating the door that no objects or people are in the danger zone of the door.
• Check all existing emergency commands.
• Never place your hands in a moving door or moving parts.
• Be aware of possible pinching and shear zones in the door system.
The instructions of EN 13241-1 must be observed.
• Do not open the door by force.
• Check whether it is possible to operate the door during frost and freezing rain.
Advice on servicing the motor unit
To ensure correct functioning, the following points must be checked regularly and repaired when necessary.
• Before working on the door system, always disconnect the power supply to the motor unit. Ensure that the power
supply remains off during the cabling work.
• Perform a check on the OPEN and CLOSE automatic shutoff setting once a month.
• Check all movable parts of the door and motor unit.
• Check the door system for deterioration or damage.
• Manually check the movement of the door.
Measures to protect against corrosion
• Allow for sufficient water drainage on the outside so that the door parts are not in constant contact with water.
• Allow for sufficient drying and aeration.
• Protect the door against aggressive substances (nitre reactions from stone and mortar, road salt, leaching, acids,
coatings, or sealing compounds that have an aggressive effect).
• Cover the door before you begin any plaster or mortar work. Spots of mortar, cement and plaster or paint sprayers
can damage the door surface.
Notes on installation and operating instructions
- The diagrams in this manual are not to scale.
- Measurements are given in millimetres.
Installation and operating instructions 5
www.samsondoors.co.uk
4.
01933 274276
Scope of supply
4.1
2
1
3
4
6
7
5
8
9
!¯
!1
!2
!7
!#
!6
!5
!4
!8
“#
!9
“¯
“1
“2
Standard scope of supply
1 Curtain
2 Top track (opening side)
3 End cover for top track
4 Cover for top track (opening side)
5 Floor track (opening side)
6 Top corner deflection unit
7 End cover for floor track
8 Bottom corner deflection unit
9 Top track (wall side) with motor unit
10 Floor track (wall side)
11 Closing edge rail
12 Hand-held transmitter package
13 Covers for roller housing*
14 Bottom guide rollers*
15 Fixing brackets*
16 Sealing brush
17 Connector clamp
18 Connector
19 Screws for bottom guide rollers*
20 Screws with washers and nuts for fixing brackets*
21 Split pin for connector
22 Bag of screws for connector
23 Cover buttons
*Number depends on the door size
Fixation material for the foundation is not included in the
delivery scope.
4.2
“4
6 Installation and operating instructions
Optional scope of delivery
24 Emergency release device
www.samsondoors.co.uk
01933 274276
5.
Assembly measurements
These instructions are intended for a standard location with sufficient room at the lintel.
In the special case of “mounting on the ceiling”, please contact the manufacturer.
Assembly
5.1
b
a
c
Clearance width
3485 mm
- 2400 mm
4120 mm
2401 - 3000 mm
5410 mm
3001 - 4320 mm
6750 mm
4321 - 5620 mm
51
e
a
Room requirement
for the wall side at
the top
d
a
b
c
d
e
f
g
Lintel (standard situation)
Stop for corner deflection unit
(min. 130)
Element width
Clearance width
Room requirement at the top
on the wall side
Room requirement at the bottom
on the wall side
Element height
Clearance height
Ceiling
g
X
100
f
g
f
51
5.3
51
5.2
Installation and operating instructions 7
www.samsondoors.co.uk
6.
Installation
6.1
Checking the installation conditions
01933 274276
Attention!
To ensure a smooth door run, the installation location must be examined.
6.1
Checking the floor
• Underlay any slanted or uneven brickwork.
6.2
Specifications on the box sticker:
Element dimensions: e.g. 4500 x 2051 (a x b)
b
a
Measurement check
• Compare the installation location with the specifications on
the box sticker.
If the installation location does not comply with the
specifications
• Please contact your specialised retailer.
If the installation location complies with the specifications
• Check the scope of supply for completeness. If there are any
parts missing, please contact your specialised retailer before
you begin the installation
8 Installation and operating instructions
www.samsondoors.co.uk
01933 274276
6.
6.3
2000
Installation
2000
28
00
-
28
50
The angle between both mounting walls has to be 90°.
A tolerance of +/– 1° is allowed.
6.4
The slope in the garage must not exceed 1.5 %.
z
y x 100 = slope in %
< 1,5%
z
y
Installation and operating instructions 9
www.samsondoors.co.uk
6.
Installation
6.2
Mounting the upper track
01933 274276
Caution!
To avoid injuries, the tracks must be secured against falling.
To achieve sufficient stability, at least four fixing brackets must be installed per track (this number must be increased
accordingly for longer tracks).
To avoid damage to the upper tracks, the tracks must not tilt when brought together.
6.5
• For each fixing bracket (A) place two screws in the grooves (B)
of the upper track (C).
• Screw the fixing brackets (A) by hand to the upper tracks (C).
A
B
M8x16
C
B
6.6
0
• Position the fixing brackets (A) on the upper tracks (C).
• Align the fixing brackets (A) with the upper tracks (C).
• Tighten the screws.
15
=
=
0
15
A
=
150
C
=
=
=
150
A
6.7
C
E
• Place the upper corner deflection unit (D) in the upper track (C).
• Align the upper track (C) with the corner deflection unit (D)
flush to the wall.
• Align the upper track (C) on the lintel using the closing edge
rail (E).
• Secure the position of the upper track (C) with struts.
E
Check:
D
10 Installation and operating instructions
If the corner deflection unit is located closely
against the wall, the upper track must end at
least flush with the door opening.
www.samsondoors.co.uk
01933 274276
6.
A
6.8
Installation
• Drill through the fixing bracket (A) into the wall.
• Screw the fixing bracket (A) to the wall.
min Ø 6
6.9
A
• Push the upper track (C) with the motor unit into the upper
corner deflection unit (D).
• Position the upper track (C) aloft using the closing edge rail (E).
• Secure the position of the upper track (C) with struts.
• Screw all fixing brackets (A) to the wall.
D
C
E
6.3
Assembling the floor rails
Attention!
To ensure smooth door operation, the floor tracks must be positioned and screwed correctly.
For the floor tracks (A) to be able to withstand the loads, the floor tracks (A) must be screwed to the floor at all the
designated points in the door way.
6.10
A
A
• Push the floor tracks (A) into the corner deflection unit (B).
The water drain (C) must face outwards.
B
C
Installation and operating instructions 11
www.samsondoors.co.uk
6.
01933 274276
Installation
6.11
• Place the floor track (A) under the upper track (D).
D
A
6.12
• Align the floor track (A) so that it lies plumb beneath the
upper track (D) along its entire length.
D
A
Depending on the conditions on site, the position of the upper track may need to be adapted.
6.13
D
Assembly on an outwards-sloping wall
• Slide the floor track (A) further into the room until the floor
track (A) is positioned plumb beneath the upper track (D)
along its entire length.
A
6.14
D
A
12 Installation and operating instructions
Assembly on an inward-sloping wall
• Loosen the screws on the upper tracks (D).
• Position the upper track (D) further inwards, until the
plumb-line falls correctly to the floor track (A).
• Tighten the screws on the upper tracks (D).
www.samsondoors.co.uk
01933 274276
6.
6.15
• Fix the floor track (A).
• Mark the drill points.
• Drill through all openings in the guide grooves (E).
• Drill through all the indentations on the sides (F).
• Screw the floor track at all fixing points.
A
E
Installation
A
F
Tip:
For concrete foundations, the following fixing materials are suitable for a particularly secure fixing:
- Fixing points in the guide grooves (E):
Fischer Universal frame fixings Type FUR 10x80 T A4, counter sunk (Torx)
- Fixing points in the indentations (F):
Fischer Universal frame fixings Type FUR 10x80 SS A4, hexagonal head with stainless steel washers
6.4
Installing the curtain
Attention!
To avoid damage to the door, the following points must apply:
- The screws of the fixing brackets (A) may only be slightly loosened, otherwise the upper track (B) can fall down.
- The brush inlay (D) of the upper track (B) must abut the corner deflection unit (C).
- The door curtain (G) must be protected against scratches.
- All the rollers of the curtain (G) must run in the groove (I).
- The bottom of the curtain (G) must run between the floor track (J) and the wall.
The assembly aid (F) is an optional extra available from Alulux. The assembly aid (F) facilitates the insertion of the
curtain in the corner deflection unit (C).
6.16
• Mark the exact position of all fixing brackets (A) on the upper
track (B).
• Unscrew the screws on the fixing bracket (A).
A
B
Installation and operating instructions 13
www.samsondoors.co.uk
6.
01933 274276
Installation
6.17
• Move the upper track (B) approx. 600 mm from the corner
deflection unit (C).
• Pull the brush inlay (D) up to the corner deflection unit (C).
If the depth of the room does not allow you to pull the brush
inlay, the upper track (B) can also be detached.
0
60
C
D
B
E
6.18
• Place an edge protector (E) (e.g. a piece of carpet) in the
corner over the bottom corner deflection unit.
• Place the assembly aid (F) in the bottom corner of the door.
F
6.19
H
• Insert the curtain (G) as follows:
- Insert the side with the door closing profile (H) first.
- Insert all the way along the runway of the upper track (B).
• Remove the assembly aid (F) and the edge protection (E).
B
G
G
J
I
6.20
K
N
L
M
14 Installation and operating instructions
K
M6x20
• Screw the connector clamp (L) to the connector (K).
• Slide the connector (K) into the slot of the connection profile (M)
from below.
• Insert the split pin (N) through the drill hole of the connection
profile (M) and the connector (K).
• Force the split pin (N) apart on the other side.
www.samsondoors.co.uk
01933 274276
6.
6.21
Installation
• Slide the brush inlay (D) back into the upper track (B).
D
B
6.22
• Slide the upper track (B) past the connector and up to the
corner deflection unit (C).
• Position the upper track (B) on the markings.
• Tighten the screws on the fixing brackets (A).
A
C
B
A
6.23
Advice:
The sealing brush (P) is attached in such a way
that it cannot be seen when the door is closed.
The surface for the sticker on the door curtain
must be clean and free of grease.
• Place the closing edge rail (O) on the tracks.
• Close the door completely by inserting the door curtain as far
as it goes into the closing edge rail (O).
• Remove the closing edge rail (O) and slide the curtain further
in the direction of “door closed”.
• Attach the self-adhesive sealing brush (P) from the outside.
P
O
6.24
• Place the guide roller (R) with the brush in the slot near the
door closing profile (H).
R
J
H
Installation and operating instructions 15
www.samsondoors.co.uk
6.
01933 274276
Installation
6.25
S
Advice:
The slot on the last lamella must be fitted with
a guide roller (R).
If necessary, two guide rollers (R) must be
inserted next to each other here.
Torx 3x25
J
R
6.26
• Attach additional guide rollers (R) in every second slot.
• Screw the guide rollers (R) securely to the slots.
• Align the guide rollers (R) flush with the upper edge of the
floor track (J).
• Place the covers (S) on the guide rollers (R).
• Pull the connector clamp (L) to the carriage (Q).
• Attach the connector clamp (L) to the carriage (Q) with two
screws.
M6x20
Q
L
6.5
Mounting the closing edge rail
• Determine the drill points.
• Drill in die grooves of the closing edge rail (A).
Drill diameter:
Wall
ø 6.0 mm
Outside ø 9.5 mm:
550-800
550-800
A
100
6.27
ø6,0
100
550-800
ø9,5
16 Installation and operating instructions
www.samsondoors.co.uk
01933 274276
6.
6.28
B
C
A
Installation
• Align the closing edge rail (A) flush with the upper track (B).
• Secure the position with a screw clamp.
• Drill through the closing edge rail (A) into the wall.
• Screw the closing edge rail (A) to the wall.
• Cover the drill holes in the closing edge rail (A) with the cover
buttons (C).
• Remove the screw clamps.
≥ø6
6.29
Advice:
Quick release operation is described in section 7.
• Release the door.
• Move the door slowly into the OPEN and CLOSED positions.
Check:
The door must move easily into the OPEN and
CLOSED positions.
6.6
Fitting the covers
• Place the upper plug cover (A) in the upper roller rail (B) over
the door opening.
6.30
A
B
Installation and operating instructions 17
www.samsondoors.co.uk
6.
01933 274276
Installation
6.31
• Slide the bottom end cover (C) into the floor track (D) on the
wall side.
• Place the second end cover (C) in the floor track (D) on the
door opening side.
D
D
C
C
6.32
• Fit the cover (E) in the upper track (B) on the door opening side.
B
E
B
E
6.7
Assembling the emergency release device (optional)
Attention!
To avoid damage to the door and lock, the key may not be inserted in the emergency release lock while the door is
moving.
6.33
• Place the cover (A) on the door leaf from the outside.
• Guide the bowden cable (B) from the outside through the
cover (A) and the door leaf.
• Screw the lock counterpart (C) to the lock (D) from the inside.
The slotted side of the lock counterpart (C) must face the
motor unit.
A
D
B
D
18 Installation and operating instructions
C
www.samsondoors.co.uk
01933 274276
6.
C
6.34
35
0
50
F
G
• Loosen the preassembled bowden cable bracket (I).
• Screw the bowden cable cover (G) with the bowden cable
bracket (I) securely to the carriage (H).
H
I
• Screw the bowden cable cover (E) to the connector (F).
• Lay the bowden cable cover (G) at the door.
• Attach the bowden cable cover (G) at the connector (F) with
the screw of the bowden cable retainer (E).
• Pinch off the bowden cable cover (G) 50 mm before the lock
counterpart (C).
E
M6x10
6.35
Installation
G
6.36
B
G
• Guide the bowden cable (B) from the lock through the
bowden cable cover (G) into the carriage (H).
• Pull the lock 30 – 40 mm out of the lock cover (A).
A
40
D 30
B
6.37
Attention!
J
30
To avoid damaging the carriage (H), the
clamp (J) must be held using an open-ended
spanner (wrench size 8) when screwing.
H
• Guide the bowden cable (B) through the clamp (J) and
tighten the bowden cable (B).
• Pinch off the bowden cable 30 mm behind the clamp (J).
• Secure the lock (D).
Installation and operating instructions 19
www.samsondoors.co.uk
7.
01933 274276
Quick release and emergency release
Attention!
To avoid damage to the door, the door may only be moved at a moderate speed when released.
The key should not be inserted in the lock of the emergency release device when the door is moving.
Quick release
7.1
Disconnect the door from the motor unit
• Pull the cable (A) down as far as it can go.
The door is disconnected from the motor unit and can be
opened and closed manually.
A
7.2
To reconnect the door to the motor unit:
• Pull the cable (B) down as far as it can go.
• Start the door motor unit.
The door is connected to the motor unit.
B
Emergency release (optional)
7.3
To reconnect the door to the motor unit:
• Open the emergency release device with the key.
• Pull the emergency release cylinder (C) out until the carriage
is separated from the toothed drive belt.
• Slide the emergency release cylinder back and remove the
key.
C
20 Installation and operating instructions
The door is disconnected from the motor unit and can be
opened and closed manually.
www.samsondoors.co.uk
01933 274276
8.
Connection of control elements
Caution! Danger of electric shock!
Before any cabling works begin, it must be ensured that the cables are disconnected from the power supply.
During cabling works, it must be ensured that the cables remain disconnected from the power supply at all times
(e.g. prevent reconnection).
Attention!
In order to avoid damaging the controls:
- The local safety regulations must be complied with at all times.
- It is very important that mains cables are laid separately from control cables.
- The controls voltage must be 24 V DC.
- If external voltages are applied at terminals XP020, XB10 or XB01, the entire electronic system will be destroyed.
- Only potential-free normally open contacts may be connected to terminals 1 and 2 (XB01) .
- The shorting plug should never be plugged into the XP020 system socket!
Reference:
When installing external control elements, or safety and signal equipment, the relevant instructions
must be observed.
8.1
Label
Type / function
XB01
Connection of external control
elements without system cabling and
two-wire photocell
Fig.
8.2
XB10
Connection of external control
elements with system cabling
Fig.
8.3 / 8.4
XP020
Connection of system photocell or
adapter cable for modular antenna
11.4
Level 8
XB70
Connection of modular antenna
Fig.
10.1
XB01
3 1 2 7071
XB10
XP020
XB70
Advice:
Before connecting a control element to the
terminals with system sockets, the corresponding
shorting plug must first be removed.
Installation and operating instructions 21
www.samsondoors.co.uk
8.
01933 274276
Connection of control elements
Terminal XB01 (Fig. 8.2)
8.2
Label
Type / function
1
GND (0 V)
2
Impulse
3
24 V DC (max. 50 mA)
70
GND
70 + 71
Two-wire photocell
RX
Receiver for the two-wire photocell
Sb1
External impulse button
(if applicable)
TX
Transmitter for the two-wire photocell
Advice:
If a photocell is to be connected, it must be
installed before the express programming
procedure is carried out.
The photocell will only be recognised automatically
by the controls if this is the case.
Otherwise the photocell must be programmed
after installation.
22 Installation and operating instructions
www.samsondoors.co.uk
01933 274276
9.
9.1
Hand transmitter
Operation and accessories
Caution!
Children are not allowed to operate the hand transmitters!
Before operating the hand transmitter, make sure that there are neither persons nor objects in the operating range of
the door.
9.1
C
D
A
Hand transmitter
A Operating button - large
B Operating button - small
C Battery - transmission control light
D Transmission socket
D
B
Another operator system can be operated using the second
operating button.
9.2
Change batteries
E Back of hand transmitter
F Battery 3V CR 2032
E
• Open the back of the hand transmitter (E), e.g. with a coin.
+
F
• Change the battery (F) and observe correct poling.
9.3
Fixing accessories for hand transmitter (optional):
Wall support for hand transmitter.
9.4
Visor clip, for attaching the hand transmitter to a visor in a car.
Reference:
The procedure for programming hand
transmitters (remote controls) to operate the
operator system is described in Section 10.4.
Installation and operating instructions 23
www.samsondoors.co.uk
9.
Hand transmitter
9.2
Hand transmitter coding
01933 274276
Transfer the coding
Using this function it is possible to transfer the coding of a hand transmitter that has already been programmed for operating the
operator system (master transmitter) to another hand transmitter.
Caution!
Before operating the hand transmitter, ensure that there are neither persons
nor objects in the operating range of the door.
9.5
• Connect both transmitters with the enclosed transmission plug.
9.6
• Actuate the master transmitter and hold the button.
The transmitter LED lights up.
9.7
• Whilst keeping the button on the master transmitter
depressed, press the desired button on the other hand
transmitter.
The LED flashes.
After 1 - 2 seconds, the LED on the newly programmed
transmitter lights up permanently.
The programming procedure is complete.
The coding of the master transmitter has now been transferred
to the other hand transmitter.
• Remove the transmission plug.
Advice:
For multi-channel hand transmitters, the coding
procedure has to be carried out for each button
separately.
24 Installation and operating instructions
www.samsondoors.co.uk
01933 274276
9.
Hand transmitter
Change coding
If a hand transmitter has been lost, this function can be used to change the coding of the remaining remote control transmitters.
9.8
• Connect one end of the transmission plug to the hand
transmitter.
• At the free end of the transmission plug, short-circuit one of
the outer pins with the centre pin adjacent to it (e.g. using a
screw driver).
• Press the desired button on the hand transmitter.
A new code is then generated by the integrated random
coding facility.
The LED flashes quickly.
As soon as the LED lights up permanently, the hand transmitter
has been programmed with a new code. The button can then
be released and the transmission plug removed.
Advice:
After the hand transmitter has been
re-programmed, the operator system must also
be re-programmed to respond to the new code.
For multi-channel transmitters, the
programming process must be carried out for
each button separately.
Installation and operating instructions 25
www.samsondoors.co.uk
10.
Initial operation
10.1
Connecting the operator system
10.1
10.2
01933 274276
• Connect the motor unit to the electricity supply.
All control lights will be lit up for approx. 3 seconds.
Overview of the control unit
10.2
Operating elements
A
8 1 2
7
3
6 54
LED off
Type / function
A
Carousel display
10.3
B
OPEN button (+)
(e.g. to drive the door to
the OPEN position or to increase
parameters when programming)
-
C
CLOSE button (-)
(e.g. to drive the door to
the CLOSED position or to decrease
parameters when programming)
-
D
Button (p)
(e.g. to switch to
programming mode or
to save parameters)
-
B D
1
P
2
C
Legend:
Label
LED on
LED pulses
LED flashes quickly
LED flashes quickly
26 Installation and operating instructions
Factory default setting
–
Not possible
www.samsondoors.co.uk
01933 274276
10.
10.3
Initial operation
Overview of the display functions
LED displays in operating mode
10.4
Photocell beam interrupted
Door in CLOSED position
Door moving towards OPEN position
Reference point is switched
Door in OPEN position
Permanent actuation of an external control
element
Door is at intermediate position
Remote control is actuated
Door moving towards CLOSED position
Operating voltage
Reference point
In operating mode, LED 5 lights up briefly when an object/person passes the reference point.
Advice:
In the factory default setting and after a reset, the controls are set to start in the CLOSED door position.
To ensure trouble-free programming, therefore, the door and the operator system must be in the CLOSED end position
before resetting or carrying out the express programming procedure.
Installation and operating instructions 27
www.samsondoors.co.uk
10.
Initial operation
10.5
Express programming
01933 274276
Advice:
For proper initial operation of the operator system, the express programming procedure must be carried out.
This applies for the initial operation and after resetting.
When programming the OPEN and CLOSED door positions, the reference point must be passed.
Preconditions
The following conditions must be assured before express programming can commence:
- The door must be in the CLOSED end position.
- The carriage must be connected up.
The controls are programmed using the plus (+), minus (-) and (P) buttons. If no buttons are pressed within 120 seconds while in
programming mode, the controls revert to operating mode. A corresponding message is displayed.
Reference:
The messages are explained in Section 12.
Legend:
LED off
LED on
LED pulses
LED flashes quickly
LED flashes quickly
28 Installation and operating instructions
Factory default setting
–
Not possible
www.samsondoors.co.uk
01933 274276
10.
Initial operation
• Carry out the express programming according to the following procedure.
1x >2s <10s
1.
Operating
mode
P
Start express
programming /
Programme the door
OPEN end position
2.
Drive the door
to the OPEN position
3.
Correct the OPEN door
position using (+) and (–)
1x <1s
4.
P
Save the OPEN door
position /
Programme the
CLOSED door position
5.
Drive the door to
the CLOSED position
6.
Correct the CLOSED
door position
using (+) and (–)
1x <1s
7.
P
Save the CLOSED door
position /
Programme the remote
control
8.
Press the
hand transmitter
button
9.
Release the
hand transmitter
button
1x <1s
10.
P
Save the remote control
settings /
End the express
programming procedure
Installation and operating instructions 29
www.samsondoors.co.uk
10.
Initial operation
10.6
Advanced functions
01933 274276
Caution!
Important factory default settings can be changed using the extended functions.
All the parameters must be set correctly to avoid damage to persons or property.
Intermediate position
Operating mode/
Door CLOSED
1.
1x >10s
2.
Remote control intermediate position
P
Start advanced
programming/
Programme
intermediate position
1x >10s
2.
In Level 1/ Change to
Menu 3
P
3.
1x <1s
4.
Set the
intermediate position
with (+) and (-)
5.
4.
P
P
In Level 4 / change to
Menu 1
1x <1s
In Level 4 / change to
Menu 2
5.
1x <1s
6.
Select Level 4
1x <1s
Change to
programming mode
P
P
Start advanced
programming/
Programme remote
control intermediate
position
3x <1s
1x <1s
3.
Operation mode/
Door CLOSED
1.
1x <1s
Save intermediate
position
6.
End programming
7.
Activate hand-held
transmitter
Drive the door to
the CLOSED position
8.
Release hand-held
transmitter
P
Change to
programming mode
1x >5s
7.
P
8.
1x <1s
Advice:
9.
After changing the intermediate position,
a learning run must be carried out again.
The learning run is described in section 10.7.
1x >5s
10.
30 Installation and operating instructions
P
Save remote
control intermediate
position
P
End programming
www.samsondoors.co.uk
01933 274276
10.
10.7
Initial operation
Function test
Learning run for determining the driving power
Check:
After express programming and after making changes to the programming menu, the following learning runs and
checks must be carried out.
The operator system determines the maximum required driving power during the first two runs after setting the end positions of
the door.
• Operate the operator system (with the door coupled) to drive the door once from the CLOSED position to the OPEN position and
back to the CLOSED position without interruption.
During this learning run, the operator system determines the maximum push and pull forces and the reserve power required to
move the door.
Test:
1.
After pressing the (+) button: The door must open and travel to the saved OPEN end position.
2.
After pressing the (–) button: The door must close and travel to the saved CLOSED end position.
3.
After pressing the hand transmitter button:
The operator system must move the door in either the OPEN or CLOSE direction.
4.
After pressing the hand transmitter button while the operator system is running: The operator system must stop.
5.
When the button is pressed again, the operator system moves in the opposite direction.
Installation and operating instructions 31
www.samsondoors.co.uk
10.
01933 274276
Initial operation
Checking the automatic cut-out
Caution!
The automatic cut-out must be correctly programmed for the CLOSE and OPEN directions to prevent damage to
persons or property.
Automatic cut-out, OPENING
For drive systems where the door has openings in the door wing (diameter of opening > 50 mm):
• Apply a load of 20 kg to the middle of the lower edge of the door whilst the door is running.
The door must stop immediately.
Automatic cut-out, CLOSING
• Place a 50 mm high obstacle on the ground.
• Drive the door towards the obstacle.
The drive system must stop and reverse when it comes into contact with the obstacle.
Advice:
The parameter settings are still saved if the power supply is disconnected.
Only a reset causes the driving power settings for the OPEN and CLOSE directions to revert to the factory settings.
Legend:
LED off
LED on
LED pulses
LED flashes quickly
LED flashes quickly
32 Installation and operating instructions
Factory default setting
–
Not possible
www.samsondoors.co.uk
01933 274276
11.
11.1
Extended operator functions
General notes on extended operator functions
Additional functions can be programmed for the operator system using the extended functions.
Caution!
Important factory default settings can be changed using the extended functions.
All the parameters must be set correctly to avoid damage to persons or property.
The programming facility is divided into three areas:
Area 1: Levels
The adjustable functions have been grouped in 8 levels according to the type of function.
Each level can have up to 8 menus.
The (+) and (-) buttons are used to scroll through the selections within the levels.
Levels that are not used are displayed but cannot be opened.
Levels-Exit switches from programming to operating mode.
Area 2: Menu
Each menu sets one parameter.
The (+) and (-) buttons are used to scroll through the settings within the menus.
Menus that are not in use are skipped over and are not displayed.
You can return to the first level via Menu-Exit.
Area 3: Parameters
Each function has a maximum of 16 settings.
The (+) and (-) buttons are used to scroll through the settings for the adjustable parameters.
Parameters that cannot be adjusted are skipped over and not displayed.
It is not possible to overshoot by pressing the (+) and (-) buttons.
Pressing the (P) button saves the parameters you have set.
End Programming
The programming session can be ended in two ways:
1. Via Levels-Exit by pressing the (P) button. The controls then switch to operating mode.
2. By pressing the (P) button for longer than 5 seconds at any time and from any area. The controls then switch to operating mode.
If a parameter had been changed, it will be saved in the process.
When the programming session ends, all the LEDs light up and then go out one after the other, in sequence from 8 to 1.
If no buttons are pressed within 120 seconds while in programming mode, the controls revert to operating mode.
A corresponding message is displayed.
Reference:
- All the available levels and menus are described in the overview of the programmable functions (Section 11.3).
- The messages are explained in Section 12.
Installation and operating instructions 33
www.samsondoors.co.uk
01933 274276
11.
Extended operator functions
11.2
Programming structure for extended operator functions
(Example for Level 2, Menu 2)
Levels
Menu
Parameter
-
-
-
+
+
+
End
programming
Operating
mode
Level 4
Menu 3
Higher value
P
-
-
-
+
+
+
P
Menu 2
Level 3
P
Parameter
-
-
-
+
+
> 5 sec.
+
P
P
Lower value
Menu 1
Level 2
+
-
P
+
+
P
> 10 sec.
Menu-Exit
(Level 2)
Level 1
+
+
P
P
Levels-Exit
Menu 8
+
> 5 sec.
+
Level 8
P
+
> 5 sec.
Legend:
LED off
LED on
LED pulses
LED flashes quickly
LED flashes quickly
34 Installation and operating instructions
Factory default setting
–
Not possible
www.samsondoors.co.uk
01933 274276
11.
11.3
Extended operator functions
General overview of the programmable functions
Level
Menu
Factory default setting
Menu 3: Intermediate position OPEN
–
Menu 4: Intermediate position CLOSE
–
Menu 7: Relay output
Signal light
Menu 8: RESET
No reset
Menu 1: Required driving power OPEN
Setting 8
Menu 2: Required driving power CLOSE
Setting 8
Menu 3: Automatic cut-out OPEN
Setting 8
Menu 4: Automatic cut-out CLOSE
Setting 8
Menu 1: Automatic closing timer
Deactivated
Menu 3: Door open duration
2 seconds
Menu 4: Warning time
1 seconds
Menu 5: Start-up warning
0 seconds
Menu 7: Signal light
Door movement /
Warning:
flashing
Door stoppage: off
Menu 2: Intermediate position
–
Menu 1: Programmable impulse input
Impulse
Menu 4: Lighting duration
180 seconds
Level 1 – Basic functions
Level 2 – Operator settings
Level 3 – Automatic closing timer
Level 4 – Remote programming
Level 5 – Special function
Installation and operating instructions 35
www.samsondoors.co.uk
11.
01933 274276
Extended operator functions
Level
Menu
Factory default setting
Menu 1: Speed OPEN
Setting 16
Menu 2: Soft run speed OPEN
Setting 6
Menu 3: Soft run position OPEN
-
Menu 4: Speed CLOSE
Setting 16
Menu 5: Smart run speed, CLOSE
Setting 10
Menu 6: Soft run speed CLOSE
Setting 6
Menu 7: Smart run position, CLOSE
–
Menu 8: Soft run position CLOSED
–
Menu 1: Photocell
Operation without photocell
Menu 3: Function of the automatic cut-out
OPEN: door stops
CLOSE: door reverses a little
Menu 4: Operating modes
OPEN: Press-and-release
CLOSE: Press-and-release
Menu 5: Function of the direction command
transmitters
Not active
Menu 6: Function of the impulse command
transmitters
STOP only, then standard sequence
Level 6 - Variable speed
Level 8 – System settings
Legend:
LED off
LED on
LED pulses
LED flashes quickly
LED flashes quickly
36 Installation and operating instructions
Factory default setting
–
Not possible
www.samsondoors.co.uk
01933 274276
11.
11.4
Extended operator functions
Functions overview for the levels
Level 1 – Basic functions
1
Menu 3:
2
3
4
5
6
7
8
9
10
11
12
13
14
15
16
Intermediate position OPEN
Set using the (+ / OPEN) and (- / CLOSE) buttons
“Intermediate position OPEN” – closing function is possible with automatic closing timer
Menu 4:
Intermediate position CLOSE
Set using the (+ / OPEN) and (- / CLOSE) buttons
Menu 7:
Relay output (only programmable with optimum signal light relay)
A7
Menu 8:
B7
C7
D7
E7
F7
G7
H7
I7
J7
K7
–
–
–
–
–
–
–
–
–
–
–
–
–
–
–
–
–
–
–
RESET
No
Yes
Attention!
To ensure trouble-free programming, the door must be in the CLOSED position before resetting.
Advice:
After a reset, all the parameters revert to the factory settings.
In order to ensure that the controls operate properly:
- all the required functions must be re-programmed,
- the remote control unit must be re-programmed,
- the drive system must be driven once to the OPEN and CLOSED door positions.
Only the intermediate position that was programmed last can be used.
If an automatic closing timer is activated (Level 3 / Menu 1), the relay output (Level 1 / Menu 7)
cannot be programmed.
Reference:
If changes are made in Menus 3 and 4 in Level 1, a new learning run must be carried out for the
automatic cut-out. The learning run procedure is described in Section 10.7.
Installation and operating instructions 37
www.samsondoors.co.uk
11.
01933 274276
Extended operator functions
Menu 7: Relay output
Setting
Function (with optional signal light relay only)
Explanation / Advice
A7
Signal light
Function
Level 3
Menu 7
B7
Door position: OPEN
-
-
C7
Door position: CLOSED
-
-
D7
Intermediate position OPEN
-
-
E7
Intermediate position CLOSED
-
-
F7
Drive system starts running
Wiping impulse 1 second
-
G7
Problem
-
-
H7
Lighting
Lighting duration
Level 5 /
Menu 4
I7
Automatic locking release
Drive system is running
-
J7
Lock release
Drive system starts running /
Wiping impulse 3 seconds
-
K7
Push-open security device
-
-
Legend:
LED off
LED on
LED pulses
LED flashes quickly
LED flashes quickly
38 Installation and operating instructions
Factory default setting
–
Not possible
www.samsondoors.co.uk
01933 274276
11.
Extended operator functions
Menu 8: Reset
Operating mode/
CLOSED
door position
1.
1x >10s
2.
P
Start advanced
programming /
RESET
programming
1x <1s
3.
P
In Level 1/ Change
to Menu 3
3x <1s
In Level 1/ Change
to Menu 8
4.
1x <1s
5.
P
Change to
programming mode
1x <1s
6.
Select RESET
1x >5s
7.
P
Confirm reset /
End programming
Installation and operating instructions 39
www.samsondoors.co.uk
11.
01933 274276
Extended operator functions
Level 2 – Operator settings
1
Menu 1:
2
3
4
5
6
7
8
9
10
11
12
13
14
15
16
9
10
11
12
13
14
15
16
9
10
11
12
13
14
15
16
9
10
11
12
13
14
15
16
9
10
11
12
13
14
15
16
Required driving power OPEN (sensitivity in increments*)
1
Menu 2:
2
3
4
5
6
7
8
Required driving power CLOSE (sensitivity in increments*)
1
Menu 3:
2
3
4
5
6
7
8
Automatic cut-out OPEN (sensitivity in increments**)
OFF
Menu 4:
2
3
4
5
6
7
8
Automatic cut-out CLOSE (sensitivity in increments**)
OFF
2
3
4
5
6
7
8
* The higher the setting, the higher the driving power.
** The lower the setting, the more sensitive the automatic cut-out.
Caution!
To exclude any risk of injury, the automatic cut-out (Menus 3 and 4) may only be switched to OFF if a photocell barrier
or closing edge safety device is installed.
Level 3 – Automatic closing timer
1
Menu 1:
2
3
4
5
6
7
8
9
10
11
12
13
14
15
16
E1
F1
G1
H1
–
–
–
–
–
–
–
–
20
25
30
35
40
50
80
100
120
150
180
255
15
20
25
30
35
40
45
50
55
60
65
70
Automatic closing timer
A1
Menu 3:
B1
C1
D1
Door open duration (in seconds)
2
Menu 4:
5
10
15
Warning time (in seconds)
1
Menu 5:
2
5
10
Start-up warning (in seconds)
0
Menu 7:
1
2
3
4
5
6
7
–
–
–
–
–
–
–
–
C7
D7
E7
F7
–
–
–
–
–
–
–
–
–
–
Signal light
A7
Legend:
LED off
B7
LED on
LED pulses
LED flashes quickly
LED flashes quickly
40 Installation and operating instructions
Factory default setting
–
Not possible
www.samsondoors.co.uk
01933 274276
11.
Extended operator functions
Advice:
- The automatic closing timer can only be programmed if a photocell or a closing edge safety device is installed.
- The functions in Menu 1 can be altered as desired via the time settings in Menus 3 and 4.
Menu 1:
Automatic closing timer
Setting
Door open
duration
A1
-
-
deactivated
B1
15
5
activated
C1
30
5
activated
D1
60
8
activated
E1
15
5
activated
F1
30
5
activated
G1
60
8
activated
H1
unlimited
3
activated
Warning time Automatic closing timer
Other functions
-
Renewal (restart) of the door open duration after the
photocell barrier has been driven past
Interruption of the door open duration after the
photocell barrier has been driven past
Closes after the photocell barrier has been driven past /
closing prevention
Advice:
Without a connected photocell or closing prevention device, only parameter A1 can be adjusted.
Menu 7:
Signal light
Setting
Door movement / Warning
Door stoppage
A7
flashing
OFF (Electricity saving)
B7
lighting
OFF (Electricity saving)
C7
flashing
flashing
D7
lighting
lighting
E7
flashing
lighting
F7
lighting
flashing
Reference:
The signal light connection can be adjusted in level 1, menu 7.
Installation and operating instructions 41
www.samsondoors.co.uk
11.
01933 274276
Extended operator functions
Level 4 – Remote programming
Menu 2:
Intermediate position
LED 7 flashes slowly -> press the hand transmitter button -> LED 7 flashes quickly
Level 5 – Special function
1
Menu 1:
2
3
4
5
6
7
8
9
10
11
12
13
14
15
16
Programmable impulse input – Terminals 1/2
A1
Menu 4:
B1
C1
D1
E1
–
–
–
–
–
–
–
–
–
–
–
25
30
35
40
50
80
100
120
150
180
255
Lighting duration (in seconds)
OFF
5
10
15
20
Menu 1: Programmable impulse input
Setting
Function (with optional signal light relay only)
Explanation / Advice
A1
Impulse
normally open contact only
B1
Automatic on/off
normally open contact only
C1
closing prevention device
only in CLOSE direction – normally closed contact only
D1
Impulse OPEN
induction loop - normally open contact only
E1
Stop
normally closed contact only
Reference:
- The programming of the special function is dependent on terminal XB01.
Terminal XB01 is described in Section 8.
- The lighting duration programmed is only active when the relay output (Level 1 / Menu 7) is programmed for
lighting (H7).
Legend:
LED off
LED on
LED pulses
LED flashes quickly
LED flashes quickly
42 Installation and operating instructions
Factory default setting
–
Not possible
www.samsondoors.co.uk
01933 274276
11.
Extended operator functions
Level 6 - Variable speed
1
Menu 1:
2
3
4
5
6
7
8
9
10
11
12
13
14
15
16
–
–
7
8
9
10
11
12
13
14
15
16
7
8
9
10
11
12
13
14
15
16
Speed OPEN (in increments)
–
Menu 2:
–
–
–
Soft run speed OPEN (in increments)
1
Menu 3:
2
3
4
5
6
Soft run position OPEN
Set using the (+ / OPEN) and (- / CLOSE) buttons
Menu 4:
Speed CLOSE (in increments)
–
Menu 5:
–
–
–
–
7
8
9
10
11
12
13
14
15
16
7
8
9
10
11
12
13
14
15
16
7
8
9
10
11
12
13
14
15
16
Smart run speed, CLOSE (in increments)
1
Menu 6:
2
3
4
5
6
Soft run speed CLOSE (in increments)
1
Menu 7:
–
2
3
4
5
6
Smart run position, CLOSE
Set using the (+ / OPEN) and (- / CLOSE) buttons
Menu 8:
Soft run position CLOSED
Set using the (+ / OPEN) and (- / CLOSE) buttons
Reference:
If changes are made in Menus Menus 1, 2, 3, 4, 6 and 8 in Level 6, another learning run must be carried out for the
automatic cut-out. The learning run procedure is described in Section 10.7.
Installation and operating instructions 43
www.samsondoors.co.uk
11.
01933 274276
Extended operator functions
Level 8 – System settings
1
Menu 1:
2
3
4
5
6
7
8
9
10
11
12
13
14
15
16
C1
D1
–
–
–
–
–
–
–
–
–
–
–
–
D3
–
–
–
–
–
–
–
–
–
–
–
–
D4
–
–
–
–
–
–
–
–
–
–
–
–
–
–
–
–
–
–
–
–
–
–
–
–
–
–
–
–
–
–
Photocell
A1
Menu 3:
B1
Automatic cut-out
A3
Menu 4:
B3
C3
Operating modes
A4
Menu 5:
B4
C4
Function of the direction command transmitters
A5
Menu 6:
B5
–
–
–
–
–
Function of the impulse command transmitters
A6
B6
–
–
–
–
–
Attention!
If a photocell is connected, it is automatically recognised by the controls after MAINS ON.
The photocell can be reprogrammed later.
Menu 1: Photocell
Setting
Photocell 1
(Connection XP020)
Door movement, CLOSE
A1
Photocell 2
(Connection XB01 - Terminal 70/71)
Door movement, CLOSE
Operation without photocell
B1
Door reverses completely2
not active
C1
not active
Door reverses completely2
D1
Door reverses completely2
Door reverses completely2
Legend:
LED off
LED on
LED pulses
LED flashes quickly
LED flashes quickly
44 Installation and operating instructions
Factory default setting
–
Not possible
www.samsondoors.co.uk
01933 274276
11.
Extended operator functions
Menu 3: Function of automatic cut-out
Setting
Door movement, OPEN
Door movement, CLOSE
A3
Door stops
Door reverses a little1
B3
Door reverses a little1
Door reverses a little1
C3
Door stops
Door reverses completely2
D3
Door reverses completely2
Door reverses completely2
Setting
OPEN
CLOSE
A4
press and hold
press and hold
B4
automatic closing
press and hold
C4
press and hold
automatic closing
D4
automatic closing
automatic closing
Menu 4: Operating modes
1
Door reverses a little:
The drive system moves the door a short distance in the opposite direction in order to free an
obstacle.
2
Door reverses completely:
The drive system moves the door to the opposite end position.
Menu 5: Function of the direction command transmitter
Setting
Direction command transmitters
Explanations
A5
not active
The direction command transmitters only give a command
when the door is stationary.
B5
STOP only
A moving door is stopped by every direction command
transmitter.
Installation and operating instructions 45
www.samsondoors.co.uk
11.
01933 274276
Extended operator functions
Menu 6: Function of the impulse command transmitter
Setting
Impulse command transmitters
Explanations
A6
not active
The impulse command transmitters only give a command
when the door is stationary.
STOP only, then standard sequence
A moving door is stopped by every impulse command
transmitter. The next command starts the drive system
running in the opposite direction
(OPEN - STOP - CLOSE - STOP - OPEN).
B6
Legend:
LED off
LED on
LED pulses
LED flashes quickly
LED flashes quickly
46 Installation and operating instructions
Factory default setting
–
Not possible
www.samsondoors.co.uk
01933 274276
12.
12.1
Messages
Status messages
In addition to messages regarding the door position, status messages give information regarding the status of the operator
system during operation.
Safety elements:
During operation LED 1 serves as a status indicator for the safety elements connected (closing edge safety device,
photocell).
If the safety element in question is triggered, LED 1 lights up whilst it is activated.
Control elements / remote controls:
During operation and when carrying out component tests, LED 7 serves as a status indicator for the control elements
connected (OPEN, CLOSE, STOP, half OPEN, etc.)
If the control element in question is triggered, LED 7 lights up whilst it is activated.
If a remote signal is received, LED 7 flashes quickly.
12.2
Fault messages
1.
Message number is displayed for
approx. 3 seconds
(example: Message 15).
2.
Pause between messages for
approx. 1 second.
3.
Operating mode is displayed for
approx. 3 seconds
(example: operating voltage).
4.
Pause between messages for
approx. 1 second.
5.
Messages 1 to 4 are repeated.
Malfunctions in the system are indicated by a corresponding
message number.
The controls switch to message mode.
Advice:
- The controls show the message numbers via
one or more rhythmically flashing LEDs.
The message number is found by adding
together the numbers next to the flashing LEDs.
- During programming, all status messages and
other messages are suppressed. The messages
in programming mode are always
unambiguous.
The message numbers serve two purposes:
1. They indicate why the controls were unable to carry out the drive command given.
2. They indicate which components are faulty.
This facilitates better and faster service on site, and only the control components identified as being faulty need be replaced.
The controls remain in message mode until they switch to operating mode or diagnostic mode.
Installation and operating instructions 47
www.samsondoors.co.uk
12.
01933 274276
Messages
Switching to operating mode
The controls switch to operating mode as soon as they receive a movement impulse.
Switching to diagnostic mode
The controls can be switched to diagnostic mode from either message mode or operating mode.
• Give the (P) button a short press.
The controls switch to diagnostic mode and display the last fault.
12.3
Rectifying faults
12.3.1
Malfunctions without error messages
Error
Cause
Solution
LED 8 does not light up.
- No voltage.
- Check that the mains power supply is operational.
- Check the connection to the mains power supply.
- Thermal overload protection in power
transformer was activated.
- Allow the power transformer to cool down.
- Defective control unit.
- Have the operator system checked.
No reaction on impulse.
- The connection terminals for the
“impulse” button were by-passed,
e.g. due to a short-circuit or flattened
terminals.
- Try temporarily disconnecting any key switches or interior push
buttons that are connected to the control unit (Section 8):
remove the cable from socket XB10, insert the shorting plug
and look for cabling errors.
No reaction on impulse
from hand transmitter.
- Module antenna is not plugged in.
- Connect the module antenna to the control unit (Section 10.1).
- The hand transmitter coding does not
correspond to the receiver coding.
- Activate hand transmitter again (Section 10.4).
- Hand transmitter battery is empty.
- Insert new battery (Section 9.1).
- Defective hand transmitter, control unit
electronics or module antenna.
- Have all 3 components checked.
Legend:
LED off
LED on
LED pulses
LED flashes quickly
LED flashes quickly
48 Installation and operating instructions
Factory default setting
–
Not possible
www.samsondoors.co.uk
01933 274276
12.
12.3.2
Messages
Malfunctions with error messages
Error
Cause
Solution
Message 7
- If no buttons are pressed within 120 seconds, the programming mode terminates automatically.
- OPEN and CLOSED door positions programmed without passing the reference point.
Message 8
- Reference point button defective.
- Have the operator system checked.
Message 9
- No speed sensor impulses,
drive system is blocked.
- Have the operator system checked.
Message 10
- Door movement too stiff.
- Door blocked.
- Ensure that the door moves easily.
- Maximum driving power setting is too
low.
- Have the max. driving power (Section 11.4 / Level 2 /
Menu 1+2) checked by an expert.
Message 11
- Excess travel stop.
- Have the operator system checked.
Message 15
- External photocell interrupted or
defective.
- Remove obstacle or have the photocell checked.
- Programmed for photocell, but no
photocell is connected.
- Deactivate or connect the photocell.
Message 16
- Power sensor for the automatic
cut-out is defective.
- Have the motor unit checked.
Message 26
- Undervoltage, operator system
overloaded at maximum power
setting, 16.
- Have the external power supply checked.
- Ensure that the door moves easily.
Message 28
- Door movement too stiff or irregular.
- Door blocked.
- Check the path of the door and ensure that the door moves easily.
- Automatic cut-out is set to be too
sensitive.
- Have the automatic cut-out facility checked by an expert
(Section 11.4 / Level 2 / Menu 3+4).
Message 35
- Electronics are defective.
- Have the operator system checked.
Message 36
- Shorting plug removed, although a stop
button is not connected.
- Closed circuit is interrupted.
- Connect stop button or insert shorting plug (Section 8).
Installation and operating instructions 49
www.samsondoors.co.uk
13.
Technical Data
VERTICO garage door operator
Electrical data
- Nominal voltage
- Nominal frequency
- Power consumption
- Power input - operation
- Power input - stand-by
- Operating mode (operating time)
- Control voltage
- Protection category, motor unit
- Protection class
Mechanical data
- Max. push and pull force
- Travel speed
- Opening time (door specific)
General data
- Motor unit dimensions
- Weight
- Temperature range
230 V
50 Hz
1.1 A
0.25 KW
< 3.9 W
KB 2 Min.
24 V DC
IP 20
II
600 N
140 mm/sec.
approx. 15 sec.
220x125x395 mm
3,8 kg
-20 to +60 °C
Supply package
- Motor unit VERTICO
with integrated electronic controls
- Multibit remote control, 868 MHz,
Digital 302 mini hand transmitter, 2-channel
Features / Safety functions
- Reference point technology
- Soft-Start / Soft-Stop
- Delay safety device
- Automatic cut-out
- Blocking protection
- Undervoltage protection
- Excess travel stop
- Electronic travel cut-out
- Connection for pushbuttons, code buttons and key switches
- Connection of potential-free limit switch message system
- Error messages
50 Installation and operating instructions
01933 274276
www.samsondoors.co.uk
01933 274276
Installation and operating instructions 51
www.samsondoors.co.uk
01933 274276