1
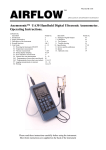
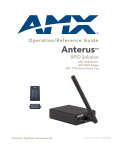
TA4 THERMAL
OPERATING
ANEMOMETER
INSTRUCTIONS
Please read these instructions
carefully before using the instrument
Shortform instructions
are on the back of the instrument.
.
INTRODUCTION.
The TA4 is a battery powered,hand held instrument with a digital LCD display
capable of measuring the velocity, volume flowrate and temperature of air by
means of a thermal probe.The unit allows the airstream area to be entered for
volume measurement.
Measurements may be displayed in either Metric or Imperial units as selected
from the keyboard.After selection,this will be 'remembered' by the instrument
until reselected from the keyboard.
The attached thermal anemometer probe has a tip diameter of Bmm and is,
therefore, suitable for measurements at grilles, slot diffusers and in small
ducts where large access holes are not acceptable.
The velocity sensor in the probe is compensated for variations in airstream
temperature by means of a second thermistor which also senses,and
displays,the actual airstream temperature in either metric or imperial units
consistent with the units selected for velocity.
2.
BATTERY INFORMATION.
The TA4 instrument is supplied without battery cells fitted.Four 1.5 volt AA
size cells are required which may be either disposable or rechargeable types.
Either 'Standard' or Alkaline disposable cells may be used but the 'Standard'
type will exhibit a relatively short life and are,therefore,not recommended.
Low battery condition is indicated by 'LOBAT' appearing on the instrument
display. The cells must be replaced as soon as possible to maintain optimum
accuracy.
The battery cells are accessible by means of the slide and 'snap in' cover at
the rear of the instrument case.
To remove the battery cover,press firmly on the cover and slide it in the
direction of the arrow.
A tape is now fitted in the battery compartment to ease the removal of the
battery cells and the use of a small screwdriver will also assist.
Ensure that the battery cells are replaced with the correct polarity as indicated
by the diagram in each cell compartment.
Rotate the cell slightly forwards and backwards to check that the cell is
properly seated in the cell compartment.
3
DESCRIPTION
OF THE INSTRUMENT. (Refer to FIG.1 )
3.1
Instrument
3.2
Keypad area
3.2
ON/OFF slide switch.
On powering up,initially all the display segments will be shown briefly on the
display,followed by a countdown from 9 down to 1. The display will then
indicate either velocity or volume flow and temperature of the probe in the
units previously selected.
case
This key sequentially selects on each key press either velocity,
volume or area display modes.
vel
vol
area
) This is a dual function key.
In either Velocity or Volume modes, this key allows the units to be
changed sequentially between Metric and Imperial on each key
" press.
In Area mode;the lower case option is selected which allows the
VM
area + airstream area to be incremented on each key press or by holding
the key down.
The rate of change of duct area will progressively
increase the
longer this key is held down.
]
r
zero
area
,
-
This is a dual function key.
After power up initialisation, or when either Velocity or Volume flow
modes have been selected, this key allows the unit to be zeroed
(see section 4.3).
In Area mode this key allows the airstream area to be decremented
on each key press or by holding the key down.
The rate of change of the duct area will progressively increase the
longer the key is held down.
3.3
Display.
All the character segments,as
shown,will be displayed briefly after
the unit is switched ON.
Battery cover. This slides and 'snaps in' at the rear of the case.
Telescopic probe and cable.
The telescopic probe gives an extended length of about gOOmm. With the
coiled cable fully extended, the maximum reach from the instrument case is
approximately 2 metres.
3.6
Direction of flow indicator.
Align with the arrow head on the probe cap
Velocity measuring thermistor.
3.8
Compensating
3.9
Zeroing cap for velocity sensor.
Direction
and temperature
of flow arrow
measuring
thermistor.
Range
O -800C.
head on end of probe.
4
USING THE INSTRUMENT.
4.1
Switch ON the instrument.
4.2
Check
battery
4.3
Zero the instrument.
With the zeroing cap covering the velocity thermistor to isolate it from any air
movement, press 'zero'. When zeroed the display 'press zero' will disappear.
For optimum accuracy it is necessary for the instrument to be rezeroed with
the probe at the operating temperature and zero velocity.
4.4
At switch on,either
which was selected
for LOBAT (low battery) on the display. If necessary,change
cells before taking measurements.
Refer to section 2.
other,press
the
Metric or Imperial units will be displayed depending
upon
when last used.To change the units from one to the
the 'I/M' switch.
4.5
To set a duct area,press the 'vel /vol /area' switch sequentially until 'area' is
displayed,followed by its current setting in either m2 or ft2 (depending upon
the units previously selected for velocity/volume).
Area units are automatically converted when using the 'I / M' switch.
Increment or decrement the area to its required value by means of the 'area
+' or 'area -, key.
Note that holding either of these keys down will increment or decrement the
duct area at an increasing rate dependent upon how long the key is held
down.
Reselect velocity or volume flowrate mode by means of the 'Vel/ Vol / Area'
key.
4.6
Extend the telescopic probe axially by pulling on the smallest section,
taking care not to damage or stress the probe tip and ensure that the cable
slides freely into the handle end of the probe. Remove the zeroing cap and
ensure that the 'direction of flow indicator' on the probe handle is aligned with
the 'flow arrow' on the probe cap.
Offer the probe head into the airstream pointing the arrow (or 'direction of flow
indicator' if the head is inside a duct) into the airstream in the direction of flow
and read the velocity and temperature of the airstream.
4.7
To use the probe inside ducting
a 9.5mm (3/8") diameter minimum hole is
required in the duct wall.
4.8
If a duct traverse is required, it may help to use the joints between the
telescopic tubes as markers to determine the probe head position.
4.9
When closing down the the telescopic
freely back through the probe.
4.10
Always
5
WHERE TO USE THE INSTRUMENT.
5
Checking the air velocity or volume flowrate over large areas.
When measuring velocity or volume flowrate over a large area, a number of
readings must be taken,spaced to give an even coverage of the whole
area. The average of these readings will give the mean velocity over the whole
area or the mean volume flowrate.lt should be noted that quite large variations
in readings may be observed and, in general,the larger the number of
readings taken,the more accurate the mean velocity or the mean volume
flowrate will be.
The mean velocity or mean volume flowrate = the sum of all the readings taken
the number of readings taken
switch
probe, ensure that the cable slides
OFF when not in use to extend battery life
5.2
Use on grilles.
Avoid intrusion of the arm and hand into the face area of the grille. The
blockage effect would cause artificially high velocity over the remainder of the
grille,leading to incorrect readings. The telescopic probe can be useful in
avoiding this problem.
Better measuring conditions can be obtained on grilles with adjustable
direction vanes if the vanes are temporarily straightened before taking
measurements. This should not significantly affect the flowrate so long as any
built-in dampers are not accidently disturbed. The instrument is suitable for
both supply and extract grilles, and the procedure is the same for both.
6.
POSSIBLE SOURCE OF ERRORS.
The above method ignores the effects of the reduced velocity at the duct
walls. A more precise method is shown in BS1042 Part 2 -the Log
Tchebycheff method. The positions for siting the probe for circular or
rectangular ducts or apertures is shown in the following figures:-
02350
c
1-°.437D
~ ~
05630
00
07650
09390
PosrtK>nof alternative measuring points and traverse
lines relative to side lengths for rectangular ducts
The previous procedure is satisfactory for use in ducts and unobstructed
apertures, however significant errors may occur if the aperture is covered by a
grille, particularly if this is of the type having adjustable direction vanes or
dampers. The airstream issuing from such a grille is invariably very disturbed,
consisting of many small areas of high velocity interspersed with areas of low
velocity. The transitions between these areas are highly turbulent and there
may even be some reversed flow.
If maximum accuracy is required,it is advisable to make up a short length of
test ducting which is just larger than the overall dimensions of the grille. This
duct can be of any convenient rigid material ( such as ~tiff cardboard) and it
should have a length of about twice the diagonal measurement of the grille.
The duct should be placed over the grille, and sealed to the wall with adhesive
tape. Measurements of flow can now be conducted, as already described, at
the unobstructed end of the test duct.
Ensure that the cross-sectional area of the ~
(not the grille) is entered in
the TA4.
7,
CHECKING THE INSTRUMENT.
The TA4 instrument is provided with a SELF TEST routine, called HELP and a
CALIBRATION
routine which may be accessed from the SETUP mode.
The calibration is a pushbutton procedure, with the calibration data being
stored in non-volatile memory. Calibration is in metric units only.
For optimum accuracy, perform a Temperature calibration prior to a Velocity
calibration.
7.1
SETUP Mode.
The SETUP mode is entered as follows:With the instrument switched OFF:
Hold down any key while switching the instrument ON.
The following messages will be sequentially displayed: SETUP
then: V *.* (This is the instrument's software version number,which may
change)
then: Code.
7.2
Function Code.
The code entered at this point will govern which SETUP function is chosen.
Assuming that the keys are numbered as follows:Top key = 1 , middle key = 2 and bottom key = 3, then the function key
codes are as given in the following table:-
rcooE"
lPURPOSE
FUNCTION
21132
Calibration
11332
HELP routine
mode
Push button calibration of temperature
or velocity.
To assist in fault diagnosis.
Each code keypress must be made within 15 seconds of each other or the
instrument will revert to its normal 'read' mode.
Each valid key press will result in a 'segment bar' appearing at the bottom of
the display.
If a non-valid code is entered, the instrument will revert to its normal 'read' mode.
7.3
HELP Routine. ( Code 11332).
The unit will display 'HELP' for a period of two seconds,and will then display
all the display segments as shown in section 3.3 ,with' Press Zero' shown
flashing: check that all the display segments are present.
Pressing the 'Zero' key will move the unit through a series of internal tests.
The unit will display 'PASS' if it is functioning satisfactorily or display an error
message if a test has failed. The significance of each error message is as
follows:-
'Lobat'
Low battery condition,or fault in low battery circuitry.
The HELP routine will not proceed while this prevails.
Change the batteries and retry.
'Error
1,
* The
eeprom
'Error 2'
* The
reference
oscillator
Service
7.4
if either
voltage
function
is not
is incorrect
satisfactory.
or the
internal
is faulty.
The probe is missing or incorrectly connected.
'Error 3'
* Note:
read/write
of these
Department
two
messages
appear,please
contact
Airfow
immediately.
Calibration routine (Function code 21132 entered)
The instrument will display: 'CAL':
TEMPERATURE Calibration Routine.
Specialised equipment is required for temperature calibration, for information
please contact Airflow Developments Limited, Airflow Lufttechnik GmbH or
Airflow Technical Products Inc..
VELOCITY Calibration Routine.
For velocity calibration, a stable air flow is required with a setting resolution of
+/- 0.2% of reading and a velocity accuracy better than +/-0.5% of reading.
Airflow can supply an Open Jet Wind Tunnel together with associated
instrumentation suitable for this purpose, please contact Airflow Sales
Department for details.
To select VELOCITY calibration press key1 .
1) On entry to the velocity calibration routine, '00.00 m/s' will be displayed
and a counter which decrements from '9' down to '0'.
The unit will ignore any keypress while the counter is displayed.
To set the zero for optimum performance, it is preferable that the probe tip is
totally enclosed in a container, rather than the Zeroing Cap, to shield the
probe tip from surrounding draughts. Allow 20 to 30 seconds for the probe tip
to fully stabilise to the temperature of the air inside the container.
Press Key 2 (zero key): the instrument will enter the input as the zero
calibration point and will then display '5.00 m/s'.
2) Place the probe tip in an air stream set to a velocity of precisely 5.00 m/s
and allow at least 10 seconds for the probe to stabilise to this condition.
Press key 2: the instrument will enter this as calibration data and then display
'10.00 m/s'.
3) Set the air stream velocity to 10.00 m/s precisely, allow 10 seconds to
stabilise, press key 2 and the instrument will then display '20.00 m/s'.
4) Set the air stream velocity to 20.00 m/s precisely, allow 10 seconds to
stabilise, press key 2 and the instrument will then display '30.00 m/s'.
5) Set the air stream velocity to 30.00 m/s precisely. allow 10 seconds to
stabilise, press key 2 and the instrument will then display 'Gal end'.
The velocity calibration is now complete, press key 2 to return to normal 'read
mode'. A calibration accuracy check may now be performed, if required.
WARNING: ALTERING THE CALIBRATION WILL INVALIDATE AIRFLOW'S
RESPONSIBILITY FOR CALIBRATION UNDER WARRANTY. The unit
monitors each time the calibration is effected.
If the calibration routine is inadvertently
entered then ABORT
immediately by switching the instrument OFF and then retry.
8.
SERVICE AND RECALIBRATION.
If a fault or the instrument's calibration is suspected, it should be returned to
Airflow Developments for repair or recalibration to original standards. In any
event, it is good practice to have the instrument checked at least once a year.
If an instrument is not working correctly or requires recalibration, contact your
nearest Airflow Agent or U.K. Service Department on High Wycombe (01494)
525252 (International: +441494525252).
Airflow Developments operate an Instrument Hire Service for the convenience
of customers having equipment repaired or recalibrated. If you intend to take
advantage of this facility please contact our service department to make
arrangements prior to returning your instrument.
9.
SPECIFICATION
PARAMETER
Velocity
METRIC
0 -30
Range
Accuracy*
mlsec
+1- 3% of reading
+1- 1 digit or
+1- 0.06 mls +1- 1 digit
whichever
Volume Flow
is the greater
3
m Isec
Range
0- 2,700
Accuracy*
+1- 3% of reading
+1- (0.06 x input Area)
+1- 1 digit whichever
I
Temperature
Range
I
~~~~:~ature
~~;~~cy
Qreater
o
0-80C
o
+1- 1 C +1- 1 digit
Airflow
Range
0.008
Operating
(Indicator
Storage
m31sec
is the
2
Area
Ambient
0- 999,999
+1- 1 digit or
m
o
Temperature
unit).
-90
+1- 1 digit or
+1- (12 x input Area) ft31min
+1- 1 digit whichever
is the
Qreater
o
176 F
0
+1- 2 F +1- 1 digit
32-
0.08 -900
ft2
0
-10to+50C
14 to 122 F
O
-20 to + 60 C
o
-4 to + 140 F
185 x 92 x 30mm
7.25 x 3.62 x 1 .25 in
360 gm.
12.7 OZ.
!
Temperature
ft31min
+1- 3% of reading
Four 1.5 volt AA type Alkaline,Standard
or Rechargeable cells.
Approximately 15 hours using Alkaline battery cells.
* Accuracy
CE Marking:
is at ambient
conditions
of 20 oC and 1013
mb (68 oF and 30 in. Hg.)
The unit complies with the EEC Directive on Electromagnetic Compatibility (EMC)
89/336/EEC.
Applied Harmonised Standards: EN50081-1 Radiated Emissions and EN50082-1
Radiated and ESD Immunities.
The statements and opinions contained in this document are made and expressed in good faith. Whilst every effort has been
made to provide reliable information, Airflow Developments Limited do not hold themselves responsible for possible errors of
an editorial or other nature, however caused. Should you require a more detailed specification for a product described herein,
please contact our Sales Department. In view of our continuous programme of improvement we reserve the right to change
AIRFLOW DEVELOPMENTS LIMITED, L.ancaster Road, Cressex Business Park, High Wycombe, Buckingham5hire HP12 30P, England
Telephone: (01494) 525252/443821. Facsimile: (01494) 461073. E-mail: [email protected] WWW: http://www.airflow.co.uk/airflow
AIRFLOW LumEcHNIK
GmbH., Postfach 1208, D53349, Rheinbach, Germany.
Telefon: 02226-9205.0. Telefax: 02226-9205-11.
AIRFLOW TECHNICAL PRODUCTS inc., 23 Railroad Avenue, Netcong, N.J. 07857 USA.
Telephone: 201-691-4825. Fax: 201-691-4703.
AIRFLOW LUFTTECHNIK GmbH, 0.5. Praha, HostynskA 520, 108 00 Praha 10- Malesice, Czech republic.
Telefon a fax 02-772230