1
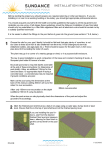
INSTA LLATI ON INSTR UC TIONS
Before starting the project you should acquire any required planning or other permissions. If you are
installing in or near to an existing building or boundary you should get appropriate professional advice.
You should acquaint yourself with the health and safety guidelines that apply to all the equipment and
materials you are using. At all stages these guidelines should be followed. Installation of gas-fired plant
should only be undertaken by a Gas Safe registered fitter and all electrical work should be carried out by
a suitably qualified technician.
It is far easier to attach the fittings to the pool before it goes into the ground (see sections 7 & 8, below).
1
Choose the site for your pool. Ideally it should be flat land that gets plenty of sunshine, is not
too close to trees but which is also sheltered from the wind. Avoid underground services
(telephone cables, sewage pipes etc.). There should be space for the plant room, which occupies about 2m3 excluding the boiler (if used).
The plant may go in a corner of a nearby garage or shed, or in a purpose-built enclosure.
The key to good installation is good compaction of the base and constant checking of levels. A
Roman I pool holds over 50 tonnes of water.
Excavate pool area to required depths (see table
at the end of these instructions for dimensions of
pool shells). Allow an additional 100mm for the
sand bed base. Or appropriate depth if laying a
concrete base - a concrete base may be required
if ground conditions are poor.
Mark out the pool using the dimensions at the
back of this manual, adding 300mm all round the
sides for over-excavation.
300mm over-excavation
Allow only 100mm over-excavation on the depth.
When the pool arrives on site physically check the dimensions of the pool and adjust the
groundwork accordingly.
2
Mark the finished pool shell level as a datum on pegs using a water pipe, dumpy level or laser
level. Ensure that this is the top of pool shell level not the finished paving level.
If you are installing the pool
indoors, start from the desired
finished floor level and measure down, allowing for floor
finish to get the correct level
for the pool shell.
PG 1/8
V 1.5 (1305)
INSTA LLATI ON INSTR UC TIONS
3
Excavate pool area to required depths (see table at the end of these instructions for dimensions
of pool shells). Allow an additional 100mm for the sand bed base or appropriate depth if laying a
concrete base.
Dimensions shown in mm
4
In clay soil or on a high water table it is vital to install external land drains with an accessible
sump and, if necessary, a pump. We would advise you consider doing this anyway.
Use flexible land drains (from a builders merchant) and lay them to terminate in a sump dug
at the edge of the cavity at its lowest point. Place a heavy-duty plastic bucket, with its base
perforated several times, in the sump. Make a hole in the side to fit the drain. Fill bucket with
gravel. Run 450mm drainpipe from the sump vertically to ground level (allowing for paving
etc.). Cap off with an inspection cover.
An electric submersible pump can be lowered through this pipe to remove any build-up of
water. In extreme cases the pump will need to be operating nearly all the time so a pump
with a float switch may be advisable.
Poor ground conditions may require you to put the pool on a concrete sub-base with sand
laid on top. If in doubt, contact Sundance Pools.
PG 2/8
V 1.5 (1305)
INSTA LLATI ON INSTR UC TIONS
5
Lay a bed of clean soft sand
and compact it using a plate
vibrator. For accurate results
place lengths of galvanised
pipe at either side of the
bottom of the hole and
ensure that they are at the
appropriate levels. A length
of timber laid edgewise
between the pipes can then
be used to level off the sand
(see diagram).
6
Some pool models have reinforcing ribs across the base for
transportation purposes. Before placing the pool into the
excavation remove these ribs from the underside of the pool
shell.
Cut the fibreglass saddles about 25mm from the pool shell
(see diagram) and carefully remove timbers.
You may need to prise the remaining fibreglass from the
timber with a blunt blade. Do not lever the timbers against
the pool shell as this may cause damage.
7
Install fittings to pool: underwater light, return jets, skimmer,
counter current (if applicable) etc. The light is normally fitted
into the deep end wall or side wall of the pool (but the Cottage
pool has two lights fitted in the steps.) Ensure the light is fitted
on a flat surface.
Consider carefully the position of the return jets and skimmer
box. If there is no counter current unit to be fitted, the skimmer
box should be fitted at the deep end and the return jets
opposite it at the shallow end. The jets should be positioned
and subsequently adjusted to create a good swirl in the water.
If a counter current unit
is to be fitted, the
skimmer box should be
fitted to the side of the
pool. Bear in mind the
position of the plant
room to shorten the
pipe run. Some pools with steps require the return jets to be
positioned on the side of the pool. Adjust the swirl so that it
keeps the steps clean.
PG 3/8
V 1.5 (1305)
INSTA LLATI ON INSTR UC TIONS
8
Pay special attention to health and safety guidelines at this stage: it is essential that you use
suitable respiratory protection when cutting and abrading fibreglass. Indoors you should ensure
that the area is well ventilated. Outdoors you should ensure that co-workers are not downwind of
the cutting operation.
Return jets should be positioned on a flat surface just below the reinforcing rib where possible.
They require a 60mm circular hole. To fit any equipment to the pool shell, mark out the position of
the unit on inside of pool. Cut out the 60mm holes with a hole cutter or jigsaw (with a jigsaw
ideally use a tile cutting carborundum blade). Check aperture is the correct size.
Clean off the bitumen paint (non-ceramic pools only) on outer side of pool using a solvent such
as petrol. Smooth fibreglass on outside of pool using a sander or in extreme cases an angle
grinder. Do not remove too much of the thickness of the pool wall. Clean fibreglass again with
solvent to remove dust etc. Fit item using seals and silicon etc. as per enclosed instructions.
The skimmer box should be fitted as high up the pool as possible, just under the lip (though the
lip should not be removed). First cut out a section of the reinforcing rib (on non-ceramic pools)
using an angle grinder. This should be wide enough to accommodate the full width of the box. On
larger pools we recommend cutting the reinforcing rib across the skimmer once the pool is
levelled up and in the hole.
To fit the skimmer hold the faceplate to the inside of the pool and mark the holes at two corners
on a diagonal. Drill these out and fix the faceplate using the long bolts and nuts supplied. Drill out
the other holes through the faceplate. Then mark for the rectangular cut-out by drawing round the
aperture in the faceplate. Remove the faceplate and cut out the rectangle by using a suitable
angle grinder and cutting approx. 4mm outside the mark to allow for the lip on the faceplate.
Smooth off the exterior of the pool and fit skimmer with seals and adequate sealant. In order to
bring the lid of the skimmer up to the finished floor level it may be necessary to use some
extension rings available from Sundance Pools.
The skimmer box has two holes in the bottom of the cylindrical section. Two threaded plugs are
provided, one with a cut-out to allow partial flow and one complete. The complete plug should be
screwed into the hole on the pool side of the cylinder and the plug with the cut-out should be
discarded, leaving the other hole open to take the pipework.
PG 4/8
V 1.5 (1305)
INSTA LLATI ON INSTR UC TIONS
9
Place the pool in position. Check that it is at the correct depth and is level. If more sand has to be
added beneath it, be sure to compact it well before returning the shell to its position.
Once the pool is level, fill it with water to a depth of 300mm in the deep end. Check that the pool
has remained level and adjust if necessary. Start caulking under the pool in order to prevent it
moving as it fills. Make a barrier under the curve of the deep end all the way round using a stiff
4:1 sand and cement mix (see diagram). Once caulking is complete, check levels once more and
re-commence filling the pool with water.
END VIEW
sand cement mix
water depth 300mm
10
Backfilling should be done with a dry sand and cement mix at a ratio of approximately 10:1. Be
careful not to allow backfill material to get into the pool.
As the pool fills, backfill to within 300mm of the water level. Gently consolidate the sand and cement mixture by foot or with water (if using water be careful not to wash all the cement out of the
mixture). Check that pool rim remains in shape: use wooden supports to the side of the cavity if
needed to stop it bowing out; if the sides of the pool bulge inwards remove backfill to relieve them.
Continue backfilling until you reach the level of the pipework. Be careful to fill the voids fully beneath steps with concrete. Roman ends may need supporting to ensure that they are level.
300mm minimum
sand cement mix
PG 5/8
Note:
for
in-
V 1.5 (1305)
INSTA LLATI ON INSTR UC TIONS
11
Connect the pipework to the fittings by first cleaning the
pipe and fitting surfaces with solvent cleaner and then
applying glue to both surfaces. PTFE tape should be
used on all threaded joints.
Check carefully for leaks (pressure test) as the pipes run
through the backfill and are inaccessible when the pool
is finished. Keep pipe runs horizontal wherever possible.
Continue to backfill to within 150mm of the top edge of
the pool.
Underwater Light (UWL) 12 VOLT
The underwater light should be fitted to the pool shell as
per the manufacturer’s instructions. The light must be
mounted on a flat surface so it may be necessary to mount
it higher than the instructions advise due to the curvature of
the pool. On the outside of the pool, the union and conduit should be fitted to the
light. Use glue and PTFE as necessary. The cable runs inside the conduit and up to
the deck box which should be attached to the top of the conduit. The deck box should
be mounted flush with the paving and is where the 12V supply from the plant room is
connected. The 12V transformer for the light must be mounted in the plant room.
12
Cast a concrete ring around the pool. For outdoor pools allow sufficient slope to the base
so that surface water drains away from the pool (at least 20mm fall away per metre of surround).
For an indoor pool use flat top coping stones and ensure the concrete has a fall towards
the pool so that surface water returns to the pool.
paving slabs
coping stones
(external)
patio
sub-structure
pool shell reinforcing rib
(non-ceramic pools only)
concrete ring
pipework
ground
PG 6/8
water line
sand/cement backfill
V 1.5 (1305)
INSTA LLATI ON INSTR UC TIONS
TYPICAL PLANT ROOM & PIPEWORK SCHEMATIC
The below schematic shows a typical plant installation with the addition of solar panels.
PG 7/8
V 1.5 (1305)
INSTA LLATI ON INSTR UC TIONS
Pool (m)
Length
Width
A
B
D
Weight
11.0m
4.3m
435mm
2000mm
185mm
1020mm
1500Kg
30.6m
60,000l
425Kg
Roman
9.5m
4.0m
1500mm
1700mm 2000mm
1100mm
700Kg
25.3m
52,500l
368Kg
Bolero
7.5m
3.3m
1500mm
1650mm 1000mm
1020mm
450Kg
20.6m
33,000l
230Kg
Terrace 6
6.0m
3.3m
500mm
1360mm
500mm
1360mm
400Kg
18.6m
27,000l
190Kg
Jetswim
4.0m
2.2m
500mm
1200mm
500mm
1200mm
250Kg
12.4m
9,000l
65Kg
Aphrodite
9.0m
3.8m
1000mm
1500mm 1500mm
1500mm
880Kg
25.6m
40,000l
275Kg
Aurora
7.5m
3.75m
1000mm
1500mm 1000mm
1500mm
730Kg
22.5m
33,000l
225Kg
Olympia
6.2m
3.3m
1000mm
1500mm 1000mm
1500mm
600Kg
19.0m
23,000l
160Kg
Solaris
5.5m
3.0m
1000mm
1500mm 1000mm
1500mm
530Kg
17.0m
18,000l
125Kg
Sunquest 36
C
Perimeter Capacity
Salt
Note. We advise that under no circumstances should the water
be emptied from a pool without referring to Sundance Pools
SUNDANC E POOLS C ONTAC T TELEPHONE 01296 71 5071
PG 8/8
V 1.5 (1305)