1
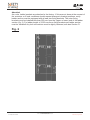
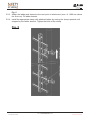
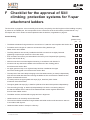
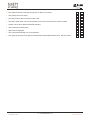
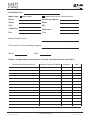
Manual
for Installation
and Maintenance
of
De-Mountable Yspar Ladders
Aluminium Part-No. YAL-.......
Date: 25.06.2008
SE 22
Tel: +44(0)161 446 5615
Safety At Height Limited
Unit 1 Pennine View, Marple, Stockport
Cheshire, SK67JW
1
www.safety-height.co.uk
Table of contents
A General
3
B Installation
5
C Inspection, Approval and Maintenance
16
D Bolt connections/securing of bolts
17
E Use of the ladder
18
F Checklist
20
These instructions are protected by copyright!
They may not be reproduced and distributed in any ways/
by any means without prior written consent of the author
according to Articles 16 and 17 of the German Copyright Act.
Sperian Fall Protection Deutschland GmbH & Co. KG
will prosecute any violations against this
under Article 106 of the German Copyright Act.
Tel: +44(0)161 446 5615
Safety At Height Limited
Unit 1 Pennine View, Marple, Stockport
Cheshire, SK67JW
2
www.safety-height.co.uk
A General
A 1.
Anyone working with or on SÖLL fall protection systems in accordance with EN 353/part 1
must be familiarized with these instructions prior to using the system. Use which is not in
accordance with these instructions constitutes a risk to human life!
A 2.
The operator of the fall protection system must ensure that these instructions are either
• retained in a dry and secure condition at the installation or
• retained by the operator, whereby he or she must ensure that the user is aware of the
storage location of these instructions and that the documents are accessible at all
times.
A 3.
If requested, the plant operator must present these instructions to the manufacturer of the
fall protection system (Sperian Fall Protection Deutschland GmbH & Co. KG or a dealer
authorized by the same).
A 4.
The SÖLL fall protection system must be used in accordance with the instructions for the
relevant SÖLL fall arrester.
A 5.
The fitment and use of SÖLL accessories to such fall protection systems must strictly
adhere to the relevant instructions for the fitment and use thereof.
A 6.
In case of the use of further personal protective equipment, relevant instructions must be
followed.
A 7.
National regulations on accident prevention and use of safety equipment for construction
work must be adhered to.
A 8.
Söll fall protection systems may only be fitted and used with original Söll components/
elements. The combination with non-original components/elements may influence the
safety of SÖLL fall protection systems. In such cases, Sperian Fall Protection Deutschland GmbH & Co. KG and a dealer authorized by the same refuse to accept product
liability. In addition, such systems are not properly approved and authorized since SÖLL
fall protection systems are tested, approved and authorized as complete systems. Full
liability will therefore rest with the operator. This product and it's components are
patented. The combination with components not originated by Söll may therfore not be
used. Sperian Fall Protection Deutschland GmbH & Co. KG will prosecute any violations
against this.
A 9.
The check list (see Section F) must be fully and correctly compiled by the chief engineer
of the installing company by means of an indelible pen.
A 10. Before and during the use of the installed fall protection system, the system must be
visibly inspected to ensure that it is operating properly. (refer to clause C)
A 11. While fastening clamps, the bars may deform a little. This may cause breaks to the layer
of zinc. This has no adverse effect to safety, durability or corrosion resistance.
Tel: +44(0)161 446 5615
Safety At Height Limited
Unit 1 Pennine View, Marple, Stockport
Cheshire, SK67JW
3
www.safety-height.co.uk
A 12. With a weight of 100 kg and fall factor 2 situation (worst-case scenario) the height
required under the feet of the user is at least 2 m.
A 13. The system has been tested and approved by "Stelle 0158: DEKRA EXAM GmbH,
Zertifizierungsstelle, Dinnendahlstraße 9, 44809 Bochum.
Tel: +44(0)161 446 5615
Safety At Height Limited
Unit 1 Pennine View, Marple, Stockport
Cheshire, SK67JW
4
www.safety-height.co.uk
B Installation
Caution:
Before, during and after fitting, persons must always be protected against falls from the
ladder, the platform or the roof, using appropriate protective equipment prescribed by the
local safety regulations. In addition, every component (such as ladder section, bracket,
tools) must be protected from falling from the building or the platform during fitting and
dismounting!
Two basic types of ladders are supplied:
Type 1: Single ladder (may not be put together)
Type 2: Ladder which may be put together
Type 1, single ladder: length of ladder in accordance with specification
The ladder set consists of:
1 ladder section
1 male bracket, complete
1 female-clamp, complete
1 male-lock-bracket, complete
1 safety clamp, complete
1 bottom end-stop
1 rigid end-stop
Part-No. YAL-.....
Part-No. 10779
Part-No. BES-OA
Part-No. 14981
Part-No. BES-MA
Part-No. 14666
Part-No. 11634
For the ladder length of more than 1960 mm, additional
1 male-bracket, complete
Part-No. 14982
1 female-clamp, complete
Part-No. BES-OA
Type 1 up to 1960
mm
Type 1 from 1960 mm
Tel: +44(0)161 446 5615
Safety At Height Limited
Unit 1 Pennine View, Marple, Stockport
Cheshire, SK67JW
5
www.safety-height.co.uk
Type 2 joinable ladder length of ladder sections to specification
The ladder set consists of:
1 footer (longest piece)
1 male-bracket, complete
1 female-clamp, complete
1 male-lock-bracket, complete
1 female-clamp, complete
1 bottom end-stop
Part-No. YAL-.....
Part-No. 10779
Part-No. BES-OA
Part-No. 14981
Part-No. BES-MA
Part-No. 14666
For the ladder length of more than 1960 mm,
additional
1 male-bracket, complete
Part-No. 14982
1 female-clamp, complete
Part-No. BES-OA
possibly 1 or more central sections
Per section (max. ladder length 1960 mm):
Part-No. YAL-.....
1 male-bracket, complete
Part-No. 10779
1 male-bracket, complete
Part-No. 14982
2 female-clamps, complete
Part-No. BES-OA
1 header (max. 1960 mm)
1 male-bracket, complete
1 male-bracket, complete
2 female-clamps, complete
1 rigid end-stop
Part-No. YAL-.....
Part-No. 10779
Part-No. 14982
Part-No. BES-OA
Part-No. 11634
Type 2
Before the fitting, all ladder components of type 2 ladders should be laid out in the order
of fitting.
Attention should be paid to differing overhangs of fixing brackets on tapered or
shouldered masts.
Tel: +44(0)161 446 5615
Safety At Height Limited
Unit 1 Pennine View, Marple, Stockport
Cheshire, SK67JW
6
www.safety-height.co.uk
B 1.
Equipment required for easy mounting:
2 open wrenches, SW 19
2 fall arresters,
2 full body harnesses according EN 361
Min. 1 additional safety lanyard according to EN 354/355 with energy absorber und
1 separates Halteseil nach EN 358 for each person to protect the mounting person
against falls from height during the installation.
B 2.
Personnel required for installation: two persons
B 3.
Components must be handled carefully. Ladder sections must not be thrown.
B 4.
Before installation, ladder sections must be cleaned from dirt - in particular on connecting
surfaces joints. They should not come into contact with cement, mortar or similar
substances. Remnants of mortar must be wiped off immediately. Especially the sliding
surfaces for the fall arrester on the inside and outside of the guide-rail must be free of dirt.
B 5.
Damaged parts may neither be used nor repaired but must be replaced by new ones.
B 6.
Minimum bolt dimensions for the installation of ladders:
The minimum bolt size is M 12. According to DIN 18799-3, the bolts used on chimneys
must be of stainless steel A 4 DIN ISO 3506-1, at least M 20 or, when used for anchoring,
1.25 m M 12 bolts. Ordering of the mounting brackets must be based on the minimum
dimensions.
B 7.
We specifically stress that only those dowels may be used which are permitted by site
inspection engineers.
B 8.
For concrete structures we recommend the use of injection anchor or undercut dowels
(such as Hilti, Fischer, UPAT or Liebig); follow technical instructions given by the
manufacturer.
In case of installation on brick wall constructions we recommend you to consult the
responsible design engineer for an approval in each specific case.
Use the following instructions to calculate the anchoring forces.
Always select the least favourable loading result.
• Extreme influences (fall accident):
In case a load F4 = 6 kN acting along the centre of the ladder
is to be assumed. This load may be distributed over four
mounting brackets (if available).
• Varying influences (loads appearing during use):
In this case it shall be assumed that loads F2 = 1,5 kN
appears at a distance of 30 cm in front of the ladder centre
and in distances of 2 m from each other influence the
installation. Also consider a horizontal load F5 = 0,3 kN
influencing the attachment at the most unfavourable location.
Tel: +44(0)161 446 5615
Safety At Height Limited
Unit 1 Pennine View, Marple, Stockport
Cheshire, SK67JW
7
www.safety-height.co.uk
B 9.
Warning!
The proper functioning of the fall arrester can only be guaranteed in that part of the
guiding rail that is located between gated end stops as well as during proper use.
Installation or dismounting of the fall arrester on the guiding rail as well as moving beyond
the gated end stop may only be done in a safe position (e.g., firm ground, safe platform,
safety rope in accordance with EN 354/355).
Fig. 1
B 10. Erection staff can during the installation secure themselves by using:
ØSafety lanyard (acc. to EN 354/355) connected to the center rail to the ladder under the
highest situated properly secured mounting bracket
ØThe carabiner of a safety lanyard (EN 354/355) is connected to a mounting bracket
ØSupport lanyard (EN 358) routed around the centre rail of the ladder
ØThe use of an external anchorage point
Fig. 1
EN 354/355
Tel: +44(0)161 446 5615
EN 358
Safety At Height Limited
Unit 1 Pennine View, Marple, Stockport
Cheshire, SK67JW
8
www.safety-height.co.uk
Attention!
As a rule, ladder brackets are attached in the factory. If this was not done at the request of
the customer or if local conditions should request changes in bracket positions, every
ladder section must be equipped with at least two fixing brackets. The outer fixing
brackets must be installed less than 525 mm from the (upper or lower) end of the ladder
section (fig. 2). For ladder length of 2,520 mm three fixing brackets per ladder section
must be installed! Any bolt connections must be tightly fastened, see also Section D.
Fig. 2
Tel: +44(0)161 446 5615
Safety At Height Limited
Unit 1 Pennine View, Marple, Stockport
Cheshire, SK67JW
9
www.safety-height.co.uk
B 11. Before fitting it has to be examined where mast brackets can be installed.
B 12. Fig. 3/4
After having fitted the lowest bracket to the first ladder section (also called footer) the mast
clamp is installed as shown in the drawing. Adjust the height where the clamps should be
installed, in such a way that the next clamp can be installed at a maximum distance of
1.680 mm without encountering any barriers (such as an atenna fixing device).
Fig. 3
Tel: +44(0)161 446 5615
Fig. 4
Safety At Height Limited
Unit 1 Pennine View, Marple, Stockport
Cheshire, SK67JW
10
www.safety-height.co.uk
Fig. 5
B 13. Attach the ladder and determine the next point of attachment (max. of 1,680 mm above
the first one). Fit ladder bracket.
B 14. Install the appropriate clamp with attached ladder by moving the clamp upwards until
stopped by the ladder bracket. Tighten the bolts of the clamp.
Fig. 5
Tel: +44(0)161 446 5615
Safety At Height Limited
Unit 1 Pennine View, Marple, Stockport
Cheshire, SK67JW
11
www.safety-height.co.uk
Fig. 6
Attention!
The stop pin (2.1) attached to the safety clamp (2.0) must automatically lock into place
when the lower ladder section is attached to the ladder bracket (3.0). When raising the
ladder section it must be impossible to remove the ladder section from the ladder
brackets. All clamps/brackets must be in alignment otherwise the ladder can not be
properly installed or dismounted!
Make sure that the ladder may be easily fitted and dismounted! If this is not the case,
readjust clamps. It must be ensured that locked ladder brackets remain on mast clamps in
a flat way. It must also be ensured that there are no barriers (such as antennae or cables)
which prevent proper fitting and dismounting of the ladder.
Fig. 6
Tel: +44(0)161 446 5615
Safety At Height Limited
Unit 1 Pennine View, Marple, Stockport
Cheshire, SK67JW
12
www.safety-height.co.uk
B 15. Torque ranges:
When tightening mounting screws in steel quality 8.8 used in combination with tooth lock
washers the following tightening torque range is recommended:
Screw size:
M 10
20 Nm
M 12
25 Nm
M 16
60 Nm
M 20
120 Nm
When tightening mounting screws in stainless steel quality 1.4571 in combination with
Söll supplied auto-locking nuts (DIN 985) the following torque range is recommended:
Screw size:
M 10
40 Nm
M 12
45 Nm
M 16
85 Nm
M 20
Fig. 7 a/b
B 16. If the „bottom end-stop“ (4.0) was not attached in the factory it is bolted through the
rectangular slot (1.4) of the central spar (1.1) directly below the second „pin stop“ (1.2)
onto the lowest ladder section (also called footer).
If there is a recess, screw the "Climbing lock below" (4.0) from behind through the square
perforation (1.4) of the centre spar (1.1) using the ladder such that the "Climbing lock
below" (4.0) is minimum 240 mm and maximum 590 mm over the recess (1.3).
Note:
The "Climbing lock below" must be mounted such that the foldable locking bar (4.1) is to
the right of the centre spar.
Fig. 7a
Tel: +44(0)161 446 5615
Fig 7b
Safety At Height Limited
Unit 1 Pennine View, Marple, Stockport
Cheshire, SK67JW
13
www.safety-height.co.uk
Attention:
In order to prevent the incorrect installation of the fall arrester, it should only be installed
after the fitment of the bottom end-stop.
Fig. 8
Attention!
For type 2 ladders (page 5) the fall arrester may not be moved past the upper gated end
stop (5.0) if the next ladder section has not been installed completely and attached to the
other ladder section by means of the connecting pin (6.0). During installation work the
fall arrester may never be moved past the last fixing bracket which has been firmly
anchored to the structure (see also section D!).
Fig. 8
Tel: +44(0)161 446 5615
Safety At Height Limited
Unit 1 Pennine View, Marple, Stockport
Cheshire, SK67JW
14
www.safety-height.co.uk
B 17. The next ladder section which is to be fitted should remain against the mast and inserted
vertically into the ladder section which has already been fixed. Follow the instructions on
page 13 and the figures on pages 4 and 5 always taking into account the relevant type of
ladder. Use additional equipment against falls (see Section B 5 and 6)!
Fig. 9
B 18. If not attached in the factory, the rigid end-stop (8.0) is fitted in the first rectangular slot
(1.4) below the last pin stop (1.2) of the guiding rail at the upper end of the climbing path
(or header). The rigid end-stop must be installed in such a way that both of its sides (8.1)
embrace the rail from the front.
The rigid end-stop (8.0) prevents the fall arrester from accidental sliding out of the rail.
Fig. 9
B 19. Keep ladders in vertical line at all times during fitting.
Tel: +44(0)161 446 5615
Safety At Height Limited
Unit 1 Pennine View, Marple, Stockport
Cheshire, SK67JW
15
www.safety-height.co.uk
C Inspection, Approval and Maintenance
(see also check list on pages 20-22)
C 1.
It must be ensured that ladders are in a vertical position. All clamps must be in alignment.
Ladder joints may not show any gaps.
C 2.
Ladder sections must be easily inserted and removed.
C 3.
For ladder sections of 2,250 mm at least three fixing brackets must be installed.
C 4.
When inserting the first ladder section, the corresponding lower bracket must lock into the
stop bolt (Fig. 6/detail 2.1).
C 5.
When joining ladder sections the connection pin(Fig. 8/detail 6.0) must lock into the
connecting element and thus secure the upper ladder section against unintentional lifting.
C 6.
All screw connections have to be properly tightened and secured against unintended
opening (refer to section D). Even bolts pre-assembled in the factory must be checked
and secured where appropriate.
C 7.
Gated and rigid end-stops must be inspected. They must be safely fastened and locked
against loosening. The locking lever of the "Climbing lock below" must go back to its initial
position automatically. The end stop pin (Fig. 8/detail 5.0) below the section connector
must automatically block the passing of the fall arrester.
C 8.
All locking pins (of clamps and connecting straps) must fall into their counterparts
independently and secure them against unintentional removal.
Attention:
For reasons of safety ladder sections should not be repaired without consulting qualified
personnel. Ladders which were mechanically damaged, for example, after a fall from
heights or by throwing, must be exchanged.
C 9.
Warning:
The connectiong pin (Fig. 8/Detail 6.0) as well as the stop bolt (Fig. 6/Detail 2.1) may
slightly commode in heavy corrosive environment (eg. sea water). This kind of corrosion
does not influence the stability of the product, but it may influence its function. Therefore
the functionality of these elements has always to be checked before use by pulling out
and releasing them. If they do not automatically resume their neutral position apply
penetrating oil and try again. If this does not help, remove the ladder section from use.
Tel: +44(0)161 446 5615
Safety At Height Limited
Unit 1 Pennine View, Marple, Stockport
Cheshire, SK67JW
16
www.safety-height.co.uk
C 10. Ask an expert to inspect the fall protection devices with fixed guides regularly as per
requirement, however at least once every 12 months, by taking the manufacturer’s
specifications as well as statutory regulations, usage and operating conditions into
account.
Note:
If the device has not been used for a period longer than one year, ask an expert to inspect
the device before reusing it.
C 11. Fall arresters must be examined by an expert at least once a year and after every fall from
a height. In such cases refer to the relevant instructions.
C 12. Check the proper condition and functioning of all elements of the climbing protection
system before and during use.
C 13. At every location of a fall arrest system where a fall arrester may be connected or
disconnected to the system a permanent sign board with the following information shall be
displayed:
-
Year of manufacture
System manufacturer´s or importer´s name
Type of fall system e.g. DIN EN 353-1
"Anyone using the system shall use a full body safety harness and an appropriate fall
arrester"
Note: Sign Boards may consist of stamped aluminium plates.
Note:
Installer shall agree with system owner about the necessary quantity of fall arresters (e.g.
Comfort) needed. Every system shall include at least two fall arresters.
D Bolt connections/securing of bolts
At use of hot dip galvanised screws the troth washer ensures satisfactory securing of the
screw/nut connection.
At use of stainless steel screws self-locking nuts (nyloe or similar) shall be used.
Tel: +44(0)161 446 5615
Safety At Height Limited
Unit 1 Pennine View, Marple, Stockport
Cheshire, SK67JW
17
www.safety-height.co.uk
E Use of the ladder
Note:
Particular attention is required when ascending and descending the first 2 m of ladder, as
it may not be possible to prevent the user from falling to the ground.
Both before and during use, consideration should be given to how rescue operations can
be performed safely and effectively.
A fall protection device according to EN 353 Part 1 should only be used by persons who
• have been trained and/or are otherwise proficient in its use, or
• are under the direct supervision of a person who has been trained and/or is otherwise
proficient in its use.
Warning:
The fall arrest system must not be used if defects have been noted or in case of doubts
as to its proper function. Before further use an inspection by a competent person is
needed or the defective parts have to be replaced.
Warning!
The person using this ladder must always protect himself against falls from heights with
proper equipment. Always secure ladder sections against falls by means of a rope!
E 1.
Before fitment all ladder sections should be laid out in the order of their fitment.
E 2.
Insert the first ladder section (or footer) (figures 3 and 4) and lock it into the locking bracket (fig. 6). Lift ladder and thus check locking. Insert fall arrester and attach to safety
harness. Ladder sections must be installed only when using the fall arrester.
Warning!
The fall arrester may not be moved past the gated end stop (fig. 8, detail 5.0) at the upper
part of the lower ladder section unless the next ladder section has been firmly installed.
Warning:
The end stop (Fig. 8/detail 5.0) located at the upper end of the lower section must not be
passed with the fall arrester, unless the next section is mounted and secured in place.
E 3.
Add the next ladder section and secure with connecting pin (fig. 8, detail 6.0) of section
connector. Check again by lifting whether the section locked properly. Only then open the
gated end stop (fig. 8, detail 5.0) by pulling the safety pin at the back of the ladder and
move the fall arrester to the next ladder section.
E 4.
The ladder with rigid end-stop (fig. 9) is the last piece to be installed on the climbing path.
Dismounting of the ladder: Same steps E 1 to E 5 in reversed order.
Tel: +44(0)161 446 5615
Safety At Height Limited
Unit 1 Pennine View, Marple, Stockport
Cheshire, SK67JW
18
www.safety-height.co.uk
Warning!
Before removing the relevant upper ladder section the fall arrester must be moved below
the gated end stop (fig. 8, detail 5.0) of the next lower ladder section! Otherwise the fall
arrester might be removed unintentionally and thus lead to the risk of a fall from a height.
Tel: +44(0)161 446 5615
Safety At Height Limited
Unit 1 Pennine View, Marple, Stockport
Cheshire, SK67JW
19
www.safety-height.co.uk
F Checklist for the approval of Söll
climbing protection systems for Y-spar
attachment ladders
The check list on pages 20 - 22 must be fully and correctly compiled by the chief engineer of the installing company
by means of an indelible pen. He is responsible for the correctness of all the information provided therein. Any
checkpoint with a "No" remark must be explained under the defects, irregularities on page 22.
Remarks
Control Activity
(please cross)
yes
•
The distance between fixings amounts to a maximum of 1,680 mm and complies with Section B 8.
•
For ladder section lengths of 2,250 mm at least three fixing brackets per
no
ladder section are installed.
•
The fixing elements are correctly installed and all bolt connections are tightly fastened.
(tightening torques as per section B 17/B 24 are used)
•
Even screwed connections pre-assembled in the factory were inspected (for tightening
torques see Section B 15)
•
All bolt connections are locked against loosening in accordance with Section D.
•
A bottom end-stop has been installed at the lowest end of the climbing path in
accordance with Section B16.
•
An upper gated end stop or an rigid end-stop has been installed at the upper
end of the climbing path in accordance with Section B18.
•
The stop bolt of the mast clamp belonging to the first ladder section (or footer) independently
locks into the ladder bracket when inserting the ladder section and blocks the ladder section
against unintentional removal.
•
In neutral position the upper gated end stops (fig. 8, detail 5.0) block further
movement of the fall arrester.
•
The upper gated end stops (fig. 8, detail 5.0) fall back into their initial position independently.
•
The connecting pins (fig. 8, detail 6.0) independently lock into the connecting straps of
the attached ladder section and block the attached ladder section against detachment
from the lower ladder section.
•
The ladder sections are fitted without gaps and are in alignment.
•
Ladder sections can be easily removed/inserted.
•
The maximum distance between fixing brackets and ladder section ends amounts to 525 mm
in accordance with figure 2.
•
Ladder brackets remain in clamps in a flat way.
Tel: +44(0)161 446 5615
Safety At Height Limited
Unit 1 Pennine View, Marple, Stockport
Cheshire, SK67JW
20
www.safety-height.co.uk
•
The distance between first step and ground is 300 mm maximum.
•
The guiding rail is free of dirt.
•
Only anticorrosive bolt connections were used.
•
The SÖLL fall arrester can only be inserted into the rail in the direction in which it travels.
•
System owner has at least two Söll fall arresters.
•
Test climbing has taken place.
•
Sign board is displayed.
•
This manual was handed over to the operator.
•
Only original components of Sperian Fall Protection Deutschland GmbH & Co. KG were used.
Tel: +44(0)161 446 5615
Safety At Height Limited
Unit 1 Pennine View, Marple, Stockport
Cheshire, SK67JW
21
www.safety-height.co.uk
Installation Site:
ladder type:
single ladder
Ladders that can be folded together
Owner:
Installing company:
Street:
Street:
City:
City:
Telephone:
Telephone:
Fax:
Fax:
Manual handet over to:
name (site operator or representative)
signature
name
signature
Chief engineer of the installing company:
Place:
Date:
Defects, irregularities and deviations from the checklist must be noted here:
Noted defects/shortcomings
Tel: +44(0)161 446 5615
competent person/installer
Safety At Height Limited
Unit 1 Pennine View, Marple, Stockport
Cheshire, SK67JW
signature
date
22
www.safety-height.co.uk