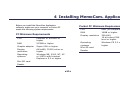
1
Hardware Installation Manual MEMOCAM ZORRO (MZ-SERIES) ® V7148001 Copyright © Video Domain Technologies Ltd. 2007 Video Domain Technologies Ltd. holds the copyright to this manual. All rights are reserved. No part of this publication may be reproduced or transmitted in any form or by any means without prior written consent from Video Domain Technologies Ltd. Disclaimer The information in this manual was accurate and reliable at the time of its release. However, Video Domain Technologies Ltd. reserves the right to change the specifications of the product described in this manual without notice at any time. As such, the descriptions and data included in this document may not be current. Video Domain Technologies Ltd. assumes no responsibility for any inconsistencies between the actual product and this manual's description of it. Any party electing to use this manual does so with the full knowledge of the possibility of such inconsistencies and takes full responsibility for any consequences that may arise while installing and/or using this product. The customer should note that in the field of multimedia there are a number of patents held by various parties. It is the responsibility of the user to assure that a particular implementation does not infringe on those patents. Video Domain Technologies Ltd. does not indemnify the user from any patent or intellectual property infringement. Registered Trademarks All other proprietary names mentioned in this manual are the trademarks of their respective owners. Document Version 01 June 2007 Manufacturer: Video Domain Technologies Ltd. Model: MemoCam Zorro Rated voltage(s): 12VDC Current(s) (or power): 0.5 A This device complies with Part 15 of the FCC Rules. Operation is subject to the following two conditions: (1) This device may not cause harmful interference, and (2) This device must accept any interference received, including interference that may cause undesired operation. This Class A/B digital apparatus complies with Canadian ICES-003. Cet appareil numẻrique de la classe A/B est conforme ả la norme NMB-003 du Canada. FCC Changes or modifications not expressly approved by Video Domain could void the user’s authority to operate the equipment. NOTE: This equipment has been tested and found to comply with the limits for a Class B digital device, pursuant to Part 15 of the FCC Rules. These limits are designed to provide reasonable protection against harmful interference in a residential installation. This equipment generates, uses and can radiate radio frequency energy and, if not installed and used in accordance with the instructions, may cause harmful interference to radio communications. However, there is no guarantee that interference will not occur in a particular installation. If this equipment does cause harmful interference to radio or television reception, which can be determined by turning the equipment off and on, the user is encouraged to try to correct the interference by one or more of the following measures: -- Reorient or relocate the receiving antenna. -- Increase the separation between the equipment and receiver. -- Connect the equipment into an outlet on a circuit different from that to which the receiver is connected. -- Consult the dealer or an experienced radio/TV technician for help. Contents 1 Introduction ............................................................................................................................. 1 1.1 See What MemoCam®Zorro Can Capture ............................................................................... 2 1.2 Features ........................................................................................................................... 4 The MemoCam Zorro Series features: ...................................................................................4 The MemoCam software enables you to:................................................................................4 1.3 Scope of this Guide............................................................................................................. 5 1.4 Package Contents............................................................................................................... 5 2 Installing the Zorro Unit........................................................................................................... 6 2.1 Description of Zorro Unit ..................................................................................................... 6 2.2 Basic Unit Installation ......................................................................................................... 7 2.3 Mounting the Unit............................................................................................................... 9 Selecting a Mounting Location ..............................................................................................9 Mounting the Bracket..........................................................................................................9 Attaching the Unit to the Bracket ........................................................................................ 10 2.4 Connecting the Power Supply ............................................................................................. 10 2.5 Optional Add-Ons ............................................................................................................. 11 External Monitor............................................................................................................... 11 Light or IR Illuminator....................................................................................................... 11 Siren .............................................................................................................................. 13 Arm/Disarm Control.......................................................................................................... 13 i Contents External Contact .............................................................................................................. 14 Communication with a Host ............................................................................................... 14 2.6 Connecting Any Add-On Device .......................................................................................... 15 Connecting an External Monitor .......................................................................................... 16 Connecting a Light, IR Illuminator, or Siren.......................................................................... 17 Connecting an Arm/Disarm Control ..................................................................................... 17 Connecting an External Contact .......................................................................................... 17 2.7 MemoCam® Zorro Series Circuit Board ................................................................................ 17 MemoCam Zorro Circuit Board Locations.............................................................................. 19 2.8 Connecting Multiple Zorro Units to a Host ............................................................................ 22 Setting Up an RS-485 Connection ....................................................................................... 22 3 Operating MemoCam Zorro® ................................................................................................... 29 3.1 Using the IR Remote Control .............................................................................................. 29 Keypad Description........................................................................................................... 29 Arming the Unit ............................................................................................................... 31 Disarming the Unit ........................................................................................................... 31 Recording a Snapshot ....................................................................................................... 32 Using the Panic Function ................................................................................................... 32 Using the Record Function ................................................................................................. 32 3.2 LED Indicators ................................................................................................................. 33 3.3 How to Use the Mini SD Card ............................................................................................. 34 Inserting the Mini SD card ................................................................................................. 34 Removing the Mini SD card ................................................................................................ 35 Formatting the Mini SD Card .............................................................................................. 35 3.4 Establishing Image Integrity .............................................................................................. 35 ii Contents 3.5 Changing the Unit Date/Time ............................................................................................. 35 3.6 Resetting Firmware to Factory Default ................................................................................. 35 4 Installing MemoCam® Application ......................................................................................... 37 4.1 Installing MemoCam® Application on Your PC ....................................................................... 38 4.2 Installing MemoCam® Application on Your Pocket PC ............................................................. 39 5 Configuring the MemoCam®Zorro Unit.................................................................................... 40 5.1 Using the Mini SD Card to Change the Unit Configuration ....................................................... 40 Updating the MemoCam® Zorro Unit Configuration ................................................................ 41 6 Viewing the Images ............................................................................................................... 42 6.1 Viewing the Image List...................................................................................................... 43 Images Thumbnails .......................................................................................................... 43 A Detailed List ................................................................................................................. 43 6.2 Playing the Images ........................................................................................................... 45 7 Testing the Installation .......................................................................................................... 47 8 Troubleshooting ..................................................................................................................... 48 9 Technical Specifications ......................................................................................................... 51 10 Glossary ................................................................................................................................. 54 iii Contents Figures Figure 1: The MemoCam Zorro System ............................................................................................. 3 Figure 2: MemoCam Zorro Front View............................................................................................... 6 Figure 3: MemoCam Zorro Back View ............................................................................................... 7 Figure 4: Remote Control Unit ......................................................................................................... 7 Figure 5: Fastening 15° Prop to Bracket............................................................................................ 9 Figure 6: Fastening Bracket to Wall ................................................................................................ 10 Figure 7: Stabilizing Angle of Unit .................................................................................................. 10 Figure 8: MemoCam Zorro Circuit Board ......................................................................................... 18 Figure 9: RS-485 as Full Duplex..................................................................................................... 23 Figure 10: RS-485 as Half Duplex .................................................................................................. 24 Figure 11: Thumbnails View – PC....................................................................................................... 43 Figure 12: Thumbnails View – Pocket PC.............................................................................................. 44 Figure 13: Detailed List View – PC...................................................................................................... 44 Figure 14: Detailed List View – Pocket PC ............................................................................................. 45 Figure 15: Image in MemoCam Image Viewer........................................................................................ 46 iv Contents Tables Table 1: Main Terminal Block Connections ............................................................................................. 19 Table 2: Secondary Terminal Blocks Connections ..................................................................................... 20 Table 3: PIR DIP Switch .................................................................................................................. 20 Table 4: SW1 DIP Switch (RS-485) ................................................................................................ 21 Table 5: RS-485 Address Table ...................................................................................................... 25 Table 6: LED Indications ................................................................................................................. 33 Table 7: Audible Signals for Remote Control .................................................................................... 33 Table 8: Audible Signals for Status Change...................................................................................... 34 v 1 Introduction the recorded events on any PC/pocket PC, the mini SD card is removed from the MemoCam Zorro unit, and the images are downloaded using a standard mini SD card reader and the MemoCam software. Congratulations on choosing MemoCam® Zorro, incorporating award-winning MemoCam® technology, as your security solution. MemoCam Zorro replaces the widely used by cumbersome combination of separate recorder, PIR detector and camera equipment. With MemoCam Zorro you get a fully integrated system of quality Camera, DVR (Digital Video Recorder), Video Motion Detection (VMD), and PIR sensor, packaged in a standard PIR detector case - making it perfect for covert operations. MemoCam Zorro is a reliable, secure system that will not let you down, with images dated, timed and watermarked for integrity. MemoCam is the system most trusted by important law enforcement agencies worldwide. One or more stand-alone MemoCam Zorro units can be placed at different locations, and configured using the mini SD memory card. MemoCam Zorro is a user-friendly system that is easy to set up and use without special training. Being a solid-state device, it does not require daily maintenance. MemoCam Zorro is fully controlled using the remote control device included in the package, which also has panic button functionality. MemoCam Zorro stores all images on a removable mini SD memory card. To analyze 1 MemoCam Zorro - Hardware Installation Manual Introduction 1.1 See What MemoCam®Zorro Can Capture Office and Warehouse See who opened the locked drawer in your office. View pictures of anyone who was around that valuable package that disappeared. See who came into the office after hours and what exactly they were doing there. Convenience and Retail Stores Replace the unreliable time-lapse VCR with the maintenance-free MemoCam Zorro. See who goes behind the counter and who reaches into the cashier drawer. Access Controlled Areas Verify that nobody but authorized personnel goes through that door. See which unauthorized people are entering. Home See if the babysitter is spending more time with her boyfriend than with your baby. Find out what the A/C technician was looking for in your bedroom chest of drawers. Determine what set off the alarm and why the police couldn’t find any entry marks. 2 MemoCam Zorro - Hardware Installation Manual Introduction Managers Make sure employees do not punch the clock for each other by matching picture time with time punched on the card. Schools/Hotels/Hospitals See who’s been pushing drugs in the school halls. Get the picture of who walked out of the employees’ room with all their purses. Who opened the restricted medicine supply cabinet and removed prescription-only drugs. Figure 1: The MemoCam Zorro System 3 MemoCam Zorro - Hardware Installation Manual Introduction 1.2 Features The MemoCam software enables you to: View images as thumbnails or in a detailed The MemoCam Zorro Series features: list view Automatic set-up using the removable mini Sort images by date and time View images from a specific time period Play, pause, fast-forward, and rewind SD card. User-defined image quality, frame rate, recording time per event, delay between events, and more. images. In addition, you can view images frame-by-frame or as a slide show playback Fixed or cyclic (oldest images replaced by the newest ones) recording modes. Pre-alarm recording. Image integrity protection. Internal weekly scheduler. Video Motion Detection (VMD) with selectable areas of interest. Verify frame integrity Export to the built-in image editor Export to AVI Control the MemoCam Zorro unit using the PC Serial Connection cable Configure the MemoCam unit using the Video Out. RS-485 connection Remote Control unit also functioning as removable mini SD card Print an image and more. panic button. 4 MemoCam Zorro - Hardware Installation Manual Introduction Video output cable MemoCam Zorro Hardware Installation Events recorded by the unit can be viewed on a PC with Windows 2000, ME, NT, XP or VISTA with Internet Explorer TM 5.0 (or higher), or a Pocket PC with Windows CE 3.0 (or higher). Manual (this manual) CD containing everything you need for Images are read from the mini SD card using a standard card reader and the MemoCam Application software. installing your unit/s: 1.3 Scope of this Guide This guide gives an overview of the MemoCam Zorro unit, and describes how to install the unit and how to connect external devices to it. 1.4 Package Contents MemoCam Application o MemoCam Application User Guide o MemoCam Zorro Series Hardware Installation Manual (copy of this manual) o MemoCam Zorro Datasheet o MemoCam Accessories applications and documents If any items are missing, please contact your local dealer. The MemoCam Zorro kit includes the following items: o MemoCam Zorro unit Mini SD memory card Swivel mounting bracket kit Power adaptor IR remote control unit and 2x AAA batteries 5 2 Installing the Zorro Unit This chapter explains how to install the Zorro unit, how to connect add-on devices that expand the functionalities of the unit, and how to connect multiple Zorro units to a host. 2.1 Description of Zorro Unit The figures below show the physical components of the MemoCam Zorro unit and remote control device. Figure 2: MemoCam Zorro Front View 6 MemoCam Zorro - Hardware Installation Manual Installing the Zorro Unit Figure 4: Remote Control Unit 2.2 Basic Unit Installation MemoCam Zorro is a plug & play device that is simple to install. Figure 3: MemoCam Zorro Back View 7 MemoCam Zorro - Hardware Installation Manual Installing the Zorro Unit Required Tools A screwdriver Two screws suitable for type of wall You may also need a drill and two screw 4. See Arming the Unit on page 31. anchors 5. Record a snapshot to test the unit’s field of view. See Recording a Snapshot on page 31. To install the unit: 1. 6. Mount the unit. 7. Connect the power supply. Adjust the angle of the unit if necessary. See Attaching the Unit to the Bracket on page 10. See Connecting the Power Supply on page 10. 3. View the images. See Viewing the Images on page 42. See Mounting the Unit on page 9 2. Arm the unit using the remote control. When armed, the Arm/Disarm LED (bottom) is lit (orange). Ensure that the mini SD card is installed. Note: The unit ships with the mini SD card already installed. See Inserting the Mini SD card on page 34. 8 MemoCam Zorro - Hardware Installation Manual Installing the Zorro Unit 2.3 Mounting the Unit Mounting the Bracket A swivel mounting bracket kit is included with the MemoCam Zorro unit. The swivel bracket base is already installed on the back cover. Selecting a Mounting Location Choose a location most likely to intercept an intruder. Make sure that the unit’s power cord can reach a nearby wall plug. If necessary, an extension cord can be used. 1. For corner mounting, fasten the 15° prop to the back of the mounting bracket (B). The PIR is most sensitive in detecting sideways motion. The unit performs best in steady light and stable temperature. Avoid the following locations: Facing direct sunlight or light sources Facing areas subject to quick temperature changes Areas with air ducts or substantial air flows Facing areas with high light contrast Figure 5: Fastening 15° Prop to Bracket 2. 9 Place the wall-mount section of the mounting bracket (B) on the desired location on the wall, and mark the drill points through the two fastener holes. MemoCam Zorro - Hardware Installation Manual 3. Installing the Zorro Unit Drill the holes (if necessary) and attach the bracket to the wall with two screws. Figure 7: Stabilizing Angle of Unit Figure 6: Fastening Bracket to Wall 2.4 Connecting the Power Supply Attaching the Unit to the Bracket 1. Attach the unit to the mounting bracket: clip the bracket base on the back of the unit onto the mounting bracket that you have already attached to the wall (B). 2. Adjust the angle of the unit and stabilize it with a single screw in one of the available holes. 1. Connect the power adaptor (supplied) to the power connector coming out of the MemoCam Zorro unit. See Figure 3 on page 7. 2. Plug the adaptor into a wall socket. The PIR activation LED (middle LED) blinks for 10 seconds. See Table 6 on page 33. 10 MemoCam Zorro - Hardware Installation Manual Installing the Zorro Unit External Monitor The MemoCam Zorro unit works only with the original power adaptor supplied with the unit. MemoCam Zorro models feature a video output interface that enables monitoring. The figure below shows a MemoCam Zorro unit connected to an external monitor. 2.5 Optional Add-Ons MemoCam Zorro is a versatile security solution that supports many different applications. You can connect your MemoCam Zorro unit to various external devices, depending on your security needs. This section gives you ideas for maximizing use of your Zorro unit, by connecting to the unit: Light or IR Illuminator External monitor Light / IR Illuminator If you need to record video events in the dark, you will need to illuminate the area. You can illuminate the area using a: Siren Arm/disarm control Light bulb InfraRed LED External contact Communication with a host MemoCam Zorro features a programmable output relay (relay 2) enabling you to connect 11 MemoCam Zorro - Hardware Installation Manual Installing the Zorro Unit You can also use IR LEDs as shown below. a step-up power relay that can turn on a light bulb via the mains, or an IR Led. You program the output relay to turn on the light for the duration of the recording event. 12 MemoCam Zorro - Hardware Installation Manual Installing the Zorro Unit Siren Arm/Disarm Control You can connect a MemoCam Zorro unit to a siren for sounding an alarm. This is done via the programmable output relay. The figure below shows a unit connected to a siren. In this example, the unit can be configured to sound the siren whenever the unit is triggered. You can control the arming and disarming of your MemoCam Zorro unit/s by using any of the following: The remote control: you can arm or disarm the MemoCam unit manually, using the remote control. The internal scheduler: that is part of the MemoCam Application Software An external control: you can connect an on/off switch or an alarm control panel to one of the programmable input interfaces as shown below. 13 MemoCam Zorro - Hardware Installation Manual Installing the Zorro Unit External Contact Communication with a Host You can control the triggering of snapshots or video recording also by using an external contact. The MemoCam Zorro unit features a serial communication port for connecting to a host. The figure below shows four Zorro units connected to a host PC. When video events are triggered, the unit records the entire event on the removable mini SD card. The figure below shows how to connect the MemoCam Zorro unit/s to a magnet operated door contact. Instead of the door contact you can use an ON/OFF switch, a panic button, an external PIR etc.) Tamper Detection The MemoCam Zorro unit features a tamper detection switch that can be monitored by an external device only if the unit is connected to serial connection. See Figure 8 on page 18 to find the tamper switch on the circuit board. 14 MemoCam Zorro - Hardware Installation Manual Installing the Zorro Unit 2.6 Connecting Any Add-On Device You can connect any external device by connecting each wire of the external device’s connection cable, to the appropriate interface on the MemoCam Zorro circuit board. The unit consists of 3 parts: Front cover. Inner back cover holding the electronic See Figure 8 on page 18 components and cable connectors. Outer back cover where the base of the To connect the cables: 1. swivel bracket is attached. 15 Open the unit by loosening the holding screw on the bottom end of the unit. MemoCam Zorro - Hardware Installation Manual 2. Installing the Zorro Unit Punch out access holes in inner back cover for routing the wiring into the unit, according to the figure below. 6. Replace the unit covers and tighten the holding screw. Connecting an External Monitor 3. Insert the external wires through the access holes. 4. Connect the wires to the appropriate terminal block connectors, ensuring that the wires are tightly held. See Figure 8 on page 18. For a description of the connectors and their general uses, see Table 1 and Table 2 on page 20. 16 To connect an external monitor to MemoCam Zorro: 1. Use the Video Output cable provided. 2. Connect the 2-pin connector at one end of the cable to J2 (the black wire points to the left). 3. Plug the external monitor into the BNC connector at the other end of the cable. MemoCam Zorro - Hardware Installation Manual Installing the Zorro Unit Connecting a Light, IR Illuminator, or Siren See Software Application User Guide (on CD provided) for configuring the inputs. To connect a light, IR illuminator or siren: Connecting an External Contact Connect the Zorro unit via a power relay to the programmable output relay interface - RELAY 2 N.O on circuit board. You can connect an external contact, such as a magnetic door contact, a panic button or an External PIR, as a trigger. See Software Application User Guide (on CD provided) for configuring Relay 2 when using an IR Illuminator. Connect the contact directly to one of the programmable input interfaces: IN1, IN2 or IN3 and one of the GND interfaces. Connecting an Arm/Disarm Control You can connect an arm/disarm control to Zorro unit either directly to the input connector, or via an alarm control panel. You can designate one of the programmable inputs as an arm/disarm control (IN1, IN2, and IN3 on the circuit board). 2.7 MemoCam® Zorro Series Circuit Board The MemoCam Zorro series circuit board locations are shown in Figure 8 below. 17 MemoCam Zorro - Hardware Installation Manual Installing the Zorro Unit Figure 8: MemoCam Zorro Circuit Board 18 MemoCam Zorro - Hardware Installation Manual Installing the Zorro Unit MemoCam Zorro Circuit Board Locations Interface Description Table 1: Main Terminal Block Connections RELAY 2 S/W N.O Programmable Output Relay. Interface Description POWER CONNECTIONS +12V This relay is softwareactivated. When tripped, the N.O. relay contact closes for a pre-defined period (0-999 s) that is user selectable. Connects to the positive output of the 12Vpower supply. Used to switch on an external device such as a video recorder, light or siren. GNDCommon power supply ground. IN1 Programmable Input. RELAY 1 PIR N.C Connects to an auxiliary device for external alarm triggers or arm/disarm control. PIR Detector Output Relay. This relay is activated by the PIR, and can be used to activate an external alarm device. When triggered by detected movement, the relay N.C. contact opens for 1.6 seconds (standard). External Alarm Input. Connects to an auxiliary device for external alarm triggers. Use with GND-MAIN (Pin 2) RS-485 PORT Serial Communication Port. Connects to a host using R+, R-, T+ and T- terminal blocks. 19 MemoCam Zorro - Hardware Installation Manual Installing the Zorro Unit PIR DIP Switch (SW1) Table 2: Secondary Terminal Blocks Connections Interface Description IN2 and GND Programmable Input Table 3 describes the PIR DIP switch settings Table 3: PIR DIP Switch Switch No. Connects to an auxiliary device for external alarm triggers or arm/disarm control. 1 Arm/Disarm Input. IN3 and GND Description Pulse count settings, provides PIR control for normal to high risk operating environments. Default setting is OFF. Connects to an auxiliary device, such as control panel for arm/disarm control. 2 Programmable Input. PIR Sensitivity (RV1) Connects to an auxiliary device for external alarm triggers or arm/disarm control. Use the potentiometer to adjust the detection sensitivity between 40% and 100%. To increase sensitivity, rotate the potentiometer counter-clockwise. To decrease sensitivity, rotate the potentiometer clockwise. The default setting is 70%. Arm/Disarm Input. Connects to an auxiliary device, such as control panel for arm/disarm control. 20 LED On/Off settings. See Table 6 on page 33. MemoCam Zorro - Hardware Installation Manual Installing the Zorro Unit Factory Default SW1 DIP Switch (RS-485) Settings J2 Video Out J2 connects to an external video monitor. The DIP switches are located on the top of the board with only the ON position marked on the DIP switch assembly. See External Monitor on page 11. SW1 DIP Switch (RS-485) The DIP switches are shown below in the ON position, therefore the address in switch positions 1 to 5 is 00 (zero). Table 4: SW1 DIP Switch (RS-485) Switch No. Description 1 RS-485 DIP switch address settings 2 You can connect up to 32 units (0 -31) 3 5 Factory default address is “00” (zero) and the switches 1 to 5 are in the ON position 6 Reserved 7 Both ON (half duplex) RS-485 2 wire 8 Both OFF (full duplex) RS-485 4 wire 4 The unit is shipped with the following configuration: ON ☼ 1 ☼ 2 ☼ 3 ☼ 4 ☼ 5 ☼ ☼ ☼ 6 7 8 J3 - RS-485 Termination Jumper J3 is used for terminating the interface and must be installed in the last unit on the interface. See Setting the Termination Jumper on page 23. 21 MemoCam Zorro - Hardware Installation Manual Installing the Zorro Unit Factory Default Interface Settings 2. Address switches all OFF (0). Full duplex (DIP SW2 positions 7 and 8 OFF). Line termination enabled (Jumper J3 See Setting the Termination Jumper on page 23. 3. installed) See Figure 8 on page 18. Connect the RS-485 interface. See Connecting the RS-485 Interface on page 23. 2.8 Connecting Multiple Zorro Units to a Host Allocating an RS-485 Address This section describes how to implement serial communication on one or more MemoCam units to a host. You can connect the units in FULL or in HALF duplex. The RS-485 address range is 0-31. You can install up to 32 MemoCam units on the same line. On the MemoCam Zorro circuit board, there are five DIP switches to define the RS485 address of the unit. Setting Up an RS-485 Connection 1. Set the termination jumper. Allocate an RS-485 address to the MemoCam Zorro unit. Refer to Figure 8 on page 18 for the location of the DIP switches. Use Table 5 on page 25 for the DIP address switch combinations. Each unit on a parallel RS-485 line must be given a unique address. See Allocating an RS-485 Address on page 22. Do not change the position of DIP switch 6. It should always be in the down (OFF) position. 22 MemoCam Zorro - Hardware Installation Manual Installing the Zorro Unit Setting the Termination Jumper Jumper J3 is used for terminating the interface and must be installed in the last unit on the interface. When a single unit is installed on the interface, this jumper must be installed. In all other units, this jumper must be removed. For the location of the J3 jumper see Figure 8 on page 18. Connecting the RS-485 Interface Full Duplex Connection 1. Figure 9: RS-485 as Full Duplex Set the interface address. Half Duplex Connection See Allocating an RS-485 Address. 2. 1. Using Figure 9 as a guide, connect the RS-485 interface wires between the units. Set the interface address. See Allocating an RS-485 Address. 2. Ensure that DIP SW1 positions 7 and 8 are set to OFF (default OFF). 23 Using Figure 10 below as a guide, connect the RS-485 interface wires as shown between the units. MemoCam Zorro - Hardware Installation Manual Installing the Zorro Unit Figure 10: RS-485 as Half Duplex 3. Ensure that DIP SW2 positions 7 and 8 are set to ON (default OFF). When these DIP switches are ON, the interface lines are automatically connected as shown in Figure 10. This connects R - to T - and R + to T +, forcing the interface to work in half-duplex mode. 4. Jumper the RS-485 output terminals at the Host as shown in Figure 10, if required. 24 MemoCam Zorro - Hardware Installation Manual Installing the Zorro Unit Table 5: RS-485 Address Table DIP Switch Settings (OFF is Active) Unit ID 0 Factory Default 2 ON ☼ ☼ ☼ ☼ ☼ OFF 3 4 1 ☼ ☼ ☼ 2 3 ON ☼ ☼ OFF 4 3 5 3 ON ☼ OFF 4 ☼ ☼ 1 2 3 4 5 OFF ☼ 3 5 4 5 ☼ ☼ ☼ 2 3 ON 4 5 ☼ ☼ OFF ☼ ☼ ☼ 1 25 2 ☼ 1 7 4 ☼ ☼ ☼ ON 5 ☼ ☼ 3 OFF ☼ ☼ 1 ☼ ☼ 2 ON 5 ☼ 2 ☼ ☼ ☼ ☼ OFF ☼ 5 ☼ 1 6 2 ON ☼ 1 4 ON 1 OFF 1 DIP Switch Settings (OFF is Active) Unit ID 2 3 4 5 MemoCam Zorro - Hardware Installation Manual DIP Switch Settings (OFF is Active) Unit ID 8 ON ☼ ☼ ☼ OFF ON ☼ OFF ☼ 4 ☼ 2 9 3 11 3 4 ON ☼ OFF 13 2 3 4 ON 15 5 2 5 ☼ ☼ 3 4 5 ☼ ☼ ☼ 2 3 4 ON 5 ☼ OFF ☼ ☼ ☼ ☼ 1 26 4 ☼ 1 ☼ 3 ☼ OFF ☼ 5 ☼ ☼ ☼ 1 ON 1 ☼ ☼ ☼ 2 OFF ☼ ☼ 5 ☼ ☼ 2 ☼ ☼ 1 ☼ 4 ON OFF ☼ 5 ☼ ON ☼ ☼ OFF 1 14 3 ☼ 1 12 2 DIP Switch Settings (OFF is Active) Unit ID ☼ 1 10 Installing the Zorro Unit 2 3 4 5 MemoCam Zorro - Hardware Installation Manual DIP Switch Settings (OFF is Active) Unit ID 16 ON ☼ OFF 4 2 ON ☼ ☼ 4 2 3 ON ☼ OFF 4 3 ☼ 4 ON 5 2 3 4 5 2 5 ☼ ☼ 3 ON ☼ 4 5 ☼ OFF ☼ ☼ ☼ 1 27 4 ☼ ☼ 1 23 3 ☼ ☼ OFF ☼ 5 ☼ 2 ON 1 21 ☼ 2 OFF ☼ ☼ 5 ☼ ☼ ☼ 1 19 ☼ ☼ ☼ ☼ ☼ 1 ☼ 3 ON OFF ☼ 5 ☼ ☼ OFF 1 22 3 ☼ 1 20 17 ☼ 2 DIP Switch Settings (OFF is Active) Unit ID ON ☼ ☼ ☼ ☼ OFF 1 18 Installing the Zorro Unit 2 3 ☼ 4 5 MemoCam Zorro - Hardware Installation Manual DIP Switch Settings (OFF is Active) Unit ID 24 OFF ON ☼ OFF 4 27 ☼ ☼ 3 4 OFF 3 4 29 1 2 3 4 5 ON 4 5 2 ☼ ☼ 3 4 5 ☼ OFF ☼ ☼ ☼ ☼ 2 3 4 5 ON OFF ☼ ☼ ☼ ☼ ☼ 1 28 3 ☼ 1 ☼ ☼ ☼ ☼ 2 OFF ☼ ☼ 5 31 ☼ ☼ ON 1 ON ☼ OFF OFF ☼ 5 ☼ ☼ ☼ 2 ☼ ☼ 1 ☼ 2 ON 5 ON ☼ ☼ 1 30 3 ☼ 1 28 25 ☼ ☼ 2 DIP Switch Settings (OFF is Active) Unit ID ON ☼ ☼ ☼ 1 26 Installing the Zorro Unit 2 3 4 5 3 Operating MemoCam Zorro® This chapter describes: In an emergency it can also be used as a panic button. Operating the unit using the IR Remote Control The remote control works best when pointed directly at the front of the unit. The LED indicators The Sound Signals emitted by the unit. Using the mini SD card Before using the remote control, ensure that new AAA batteries provided with the unit are installed. Establishing Image Integrity Changing Unit Date / Time Setting Firmware to Factory Default Keypad Description The keypad is divided into 2 sections. The top section contains the Numeric buttons for entering the codes. 3.1 Using the IR Remote Control You can use the remote control device provided with the MemoCam Zorro to: The bottom section contains the buttons for performing the various actions described below. Arm the unit Disarm the unit Record a snapshot 29 MemoCam Zorro - Hardware Installation Manual Operating MemoCam Zorro® Arming the unit enables the Notification on Alarm (NOA) function. Disarming the unit disables the NOA function. Record and Panic buttons These actions are denoted in blue below the buttons To perform the Record and Panic actions you must first press the Function button and then immediately afterwards press the Record or Panic button (also below the key in blue). The panic button action can be done in both armed and disarmed modes. Numeric Keypad These buttons, 1 – 4, are used to enter the arm and disarm codes. Default code - 1234. Arm, Disarm and Snapshot buttons These actions are denoted in white above the buttons. Press the button to perform the action. 30 MemoCam Zorro - Hardware Installation Manual Operating MemoCam Zorro® Disarming the Unit Arming the Unit To arm the unit using the remote control: 1. Make sure the MemoCam Zorro unit is powered, and the mini SD card is inserted. 2. Point the remote control at the MemoCam Zorro unit and press the Arm button. To disarm the unit using the remote control: 1. Point the remote control at the MemoCam Zorro unit and enter the disarm code using the four digit buttons. To define a disarm code, see the Software Application User Guide (CD provided). The unit beeps once and the Arm Mode (bottom) LED lights orange to inform you that the unit is now armed. 2. Press the Disarm button. The unit beeps three times and the Arm Mode (right) LED turns off to inform you that the unit is now disarmed. A user-defined exit delay enables you several seconds to exit the premises before the MemoCam Zorro detector arms the system. This is described in the Software Application User Guide (on the CD provided). See the section on Exit Delay. You can also arm the unit using the mini SD card, or use the scheduler for Zorro to arm itself at specific times. This is described in the Software Application User Guide (on the CD provided). See the section on Exit Delay. 31 MemoCam Zorro - Hardware Installation Manual Operating MemoCam Zorro® Recording a Snapshot You can use the remote control to record a snapshot at any given moment. Point the remote control at the unit and press the Function button and then immediately the Panic button. To record a snapshot using the remote control: 1. Make sure that the MemoCam Zorro unit is in Disarm mode, and the mini SD card is inserted. 2. Point the remote control at the unit and press the SNAPSHOT button. The mini SD card Status (top) LED blinks green informing you that an image is being recorded. To use the remote control as a panic button: Using the Record Function Only used when the RS-485 is enabled, when you want to arm the unit without activating the Notification on Alarm function. Using the Panic Function Can only be used when the RS-485 is enabled. Can be used with the unit in arm or disarm mode. To use the Record Function 1. Make sure that the MemoCam Zorro unit is in Disarm mode, and the mini SD card is inserted. 2. Point the remote control at the unit and press the Function button and then immediately the REC button. The mini SD card Status (top) LED blinks green informing you that images are being recorded. 32 MemoCam Zorro - Hardware Installation Manual Operating MemoCam Zorro® 3.2 LED Indicators PIR LED indicator can be enabled or disabled by on board switch. See the Software Installation Manual (on the CD provided). The MemoCam Zorro unit indicates actions and errors using the three LED status indicators on the front panel. See Figure 2 on page 6. 1.3 Sound Signals Table 6: LED Indications LED Color Description Mini SD Card Status (Top) Red Mini SD card is faulty or not inserted correctly Blinking Green Data is being written to the mini SD card Orange Mini SD card full PIR Activation (Middle) Flashing Red Movement detected Arm/Disarm Mode (Bottom) Orange ARM mode None DISARM mode MemoCam Zorro emits a sound signal when you use the remote control for certain actions, or when the unit status has changed. Table 7: Audible Signals for Remote Control Using the Remote Control 33 Action Signal Arm the unit Long beep Enter a disarm code Short beep after each number key is pressed Disarm the unit Two short beeps and one long beep MemoCam Zorro - Hardware Installation Manual Operating MemoCam Zorro® 3.3 How to Use the Mini SD Card Table 8: Audible Signals for Status Change Change in Unit Status Inserting the Mini SD card Status Signal 1. Ensure that the unit is powered on. Disarm mode Recurring short beep 1. Mini SD card is not inserted Recurring short beep Insert the mini SD card into the card slot on the left-hand side of the unit with the notched corner on the top left. The configuration has been upgraded by inserting a mini SD card with upgraded configuration One short beep 2. Gently push the mini SD card as far as will go so that it locks into position. Unit returned to default configuration because the registry is corrupted Three short beeps Sound signals can be enabled or disabled. See the MemoCam Application User Guide (on CD provided). 34 MemoCam Zorro - Hardware Installation Manual Operating MemoCam Zorro® 3.4 Establishing Image Integrity Removing the Mini SD card 1. Ensure that the unit is disarmed. 2. Gently push the mini SD card further into the card slot and then release your finger. Images can be digitally verified for integrity. This could ensure their admissibility in a court of law. This is explained in the MemoCam Application User Guide (on the CD provided). The mini SD card is unlocked and you can remove it. 3.5 Changing the Unit Date/Time Each unit leaves the factory with the unit clock set to GMT (Greenwich Mean Time) and the correct date. To change the unit date and time, see the MemoCam Application User Guide (on the CD provided). Formatting the Mini SD Card The mini SD card that comes with the MemoCam Zorro unit is already formatted. In case you are using a mini SD card that does not come from the MemoCam Zorro manufacturer, the MemoCam Zorro unit will automatically format the mini SD card: 1. 3.6 Resetting Firmware to Factory Default To restore unit firmware to factory default: Insert the mini SD card into the unit. See Inserting the Mini SD card on page 34. 2. When the mini SD card Status LED (top) turns off, the card is formatted. 35 1. Disconnect unit from power. 2. Move Factory Default Switch (dip switch 6) up to the ON position. 3. Reconnect unit to power. MemoCam Zorro - Hardware Installation Manual 4. Immediately after you have reconnected unit power, return DIP switch 6 back to the OFF position (down). You have a few seconds to do this. 5. When the unit is reset successfully to the factory default, it will give 3 rapid beeps. 6. Restart the unit by disconnecting it from power and then reconnecting it to power. Operating MemoCam Zorro® If you do not return the Factory Default switch to the OFF position in time, the unit will not reset to factory default. 36 4 Installing MemoCam® Application Pocket PC Minimum Requirements Before you install the MemoCam Application software, make sure your computer or Pocket PC meets the following system requirements. PC Minimum Requirements CPU Pentium III 800MHz or higher RAM 512MB or higher Graphic adapter Super VGA or higher Display resolution 640x480, 32000 colors or higher Operating systems Windows ME, 2000, NT, XP or VISTA with Internet ExplorerTM 5.0 or higher CPU ARM (or compatible) RAM 16MB or higher Display resolution 320x240, 16 bit colors/256 gray level or higher Operating systems Windows CE 3.0 or higher Mini SD card Reader Mini SD card Reader 37 MemoCam Zorro - Hardware Installation Manual Installing MemoCam® Application You accept the License Agreement terms. The Destination Location screen opens, indicating where the program will be installed. 4.1 Installing MemoCam® Application on Your PC Before beginning the installation, close all Windows programs you have running. 5. To install the MemoCam software: 1. OR Insert the CD provided into the CD-ROM drive. To continue, click the Next button. The CD Browser screen is displayed automatically. If the CD Browser screen does not open automatically, open Windows Explorer, browse to the CD-ROM drive, and double-click MCBrowse.exe. 2. Go to Installation Tools and click the MemoCam Software Application button. 3. Click the Next button. The MemoCam files are installed and the Setup Complete screen opens. 6. Restart your computer in order to use the newly installed program. Select the Restart option and click the Finish button. Your computer is automatically restarted. For more information, see the MemoCam Application User Guide (on CD provided). The License Agreement screen opens. 4. If you want to change the folder location, click the Browse button. Click the Yes button. 38 MemoCam Zorro - Hardware Installation Manual Installing MemoCam® Application 4.2 Installing MemoCam® Application on Your Pocket PC Before installing the MemoCam software for your Pocket PC, install and configure the MemoCam software on your PC. For information on installing the MemoCam software on your Pocket PC, refer to the MemoCam® Pocket PC Player User Guide (on CD provided) under MemoCam Accessories. To install the mini SD card Reader on your computer, refer to the documentation supplied with the mini SD card Reader. 39 5 Configuring the MemoCam®Zorro Unit The MemoCam Zorro unit has default configuration settings that allow for immediate use upon initial installation. 5.1 Using the Mini SD Card to Change the Unit Configuration You can also customize the MemoCam Zorro configuration using the removable mini SD card and MemoCam software provided with your Unit. To configure the MemoCam Zorro unit: 1. Connect your mini SD card reader to the USB port of your PC. Requirements for Using the Mini SD Card to Configure the Unit 2. Insert the mini SD card into the card reader. 1. A PC with the MemoCam Application software installed. 3. 2. A mini SD card reader (off-the-shelf). Use the MemoCam software to set the configuration parameters on the mini SD card. See the MemoCam Application User guide (on CD provided) for details of how to use the MemoCam Application. 40 MemoCam Zorro - Hardware Installation Manual Configuring the MemoCam®Zorro Unit Updating the MemoCam® Zorro Unit Configuration After using the MemoCam software to change the configuration settings on the mini SD card, you can update the configuration of the unit. This is done by inserting the mini SD card into the card slot on the left side of the MemoCam Zorro unit. See also Inserting the Mini SD card on page 34. If the configuration on the mini SD card is different from the previous configuration of the MemoCam Zorro unit, the unit beeps. The configuration is automatically updated. For detailed configuration information, refer to the MemoCam Application User Guide (on CD provided). The MemoCam unit has an internal clock. To configure the date and time, refer to the MemoCam Application User Guide (on CD provided). 41 6 Viewing the Images This section describes how to view MemoCam Zorro images. For detailed information about all of MemoCam Zorro’s many features, refer to the MemoCam Application User Guide (on CD provided). To view the recorded images: If your MemoCam Zorro is connected directly to your computer through the serial port, proceed directly to Step 4. 1. Insert the mini SD card into the card reader attached to your computer or Pocket PC. 4. On your desktop, click the open the MemoCam software. icon to The MemoCam window opens, displaying thumbnails of the images stored on the mini SD card. See Figure 11 on page 43. Disarm the MemoCam Zorro unit. If there is no mini SD card in the reader, the MemoCam Application opens a file containing sample images. See on page 31. 2. 3. Remove the mini SD card from the MemoCam Zorro unit. See Removing the Mini SD card on page 35 42 MemoCam Zorro - Hardware Installation Manual Viewing the Images 6.1 Viewing the Image List For more information, refer to the MemoCam Application User Guide (on the CD provided). You can view the Image List displayed in the MemoCam window as: If you are using a PC, the thumbnails view is shown below. Images Thumbnails To display the Images as thumbnails: Click the icon OR Open the View menu and click Thumbnails. See Figure 11 below. A Detailed List To display the Images as detailed list: Click the icon. OR Open the View menu and click Details. See Figure 13 below Figure 11: Thumbnails View – PC 43 MemoCam Zorro - Hardware Installation Manual Viewing the Images If you are using a PC, the detailed list view appears as shown in Figure 13. If you are using a Pocket PC, the thumbnails view is shown below. Figure 12: Thumbnails View – Pocket PC Figure 13: Detailed List View – PC 44 MemoCam Zorro - Hardware Installation Manual Viewing the Images If you are using a Pocket PC, the detailed list view is shown below. 6.2 Playing the Images You can view images consecutively in the MemoCam Image Viewer. The images are played in the order they appear in the Image List. A toolbar to control the viewing of images appears on the top of the window. To play images: Double-click an image in the list. OR Select an image in the list. Right-click on selected image with the mouse and select Play. Figure 14: Detailed List View – Pocket PC 45 MemoCam Zorro - Hardware Installation Manual Viewing the Images The MemoCam Image Viewer toolbar contains the following buttons: Button Description Plays the images backward. Plays the images forward. Pauses the playing of images. Displays the current image in your PC’s default viewer. Displays the previous image. Displays the next image. Checks the image integrity. Enter the integrity key or load the key from a file. For more information, refer to the MemoCam Software Manual. Figure 15: Image in MemoCam Image Viewer Adjusts the speed at which the images are displayed. 46 7 Testing the Installation The mini SD card status (top) LED blinks green. This section describes how to check that the unit was installed successfully and is operating correctly. You will require a mini SD card reader attached to your PC/Pocket PC. 4. See Removing the Mini SD card on page 35. To check: 1. Ensure that the mini SD card is inserted in the MemoCam Zorro unit. See Inserting the Mini SD card on page 34. 2. 5. Insert the mini SD card into the mini SD card reader attached to your PC/Pocket PC. 6. View the images. See Viewing the Images on page 42. Disarm MemoCam Zorro unit. 7. See Disarming the Unit on page 31. 3. Remove the mini SD card from the unit. Point the remote control at the unit and press the SNAPSHOT button. 47 If you encounter any problems while checking the unit, see Troubleshooting on page 48, or the MemoCam Application User Guide (on CD provided). 8 Troubleshooting Use the following table to troubleshoot your MemoCam Zorro unit. Should you require further assistance or support in using MemoCam Zorro, please contact your local dealer. Problem Symptom Solution Unit does not work. Impossible to operate unit, top LED does not glow, and PIR LED (middle) does not blink. Check power supply and power cable. The MemoCam Zorro unit does not record even though a mini SD card is inserted in the unit. Top red LED remains illuminated when the mini SD card is inserted into the unit. 1. 2. 3. 4. Remote control does not work. Unit does not arm and other remote control functions do not work. No beeping. The unit does not recognize the mini SD card. 48 Remove the mini SD card from the unit. Ensure the mini SD card is not Read Only Re-power the unit. Insert the card back into the unit. After a few seconds, the top red LED should go off. 5. Arm the unit and make sure the top LED flashes green when new images are recorded on the mini SD card. Check remote control batteries. Make sure the mini SD card is inserted in the unit. MemoCam Zorro - Hardware Installation Manual Problem Troubleshooting Symptom Solution Cannot arm unit using remote control. Unit may already be armed. Try to disarm the unit first. Make sure the mini SD card is inserted in the unit. Cannot disarm unit using remote control. Unit may already be disarmed, or you may not be disarming the unit properly. Enter the disarm code and then click the disarm button. Check that the code is correct. When an input is configured for arm/disarm control panel and is in the armed state, you cannot disarm the unit using the remote control. Cannot record an image using the remote control. MemoCam application does not correctly read the mini SD card. Ensure that the unit is disarmed. You cannot use snapshot recording when system is armed. You receive error messages. MemoCam application does not start correctly. Check that the mini SD card is inserted correctly into the card reader. Try restarting the MemoCam application. Check that you installed the application as described in the manual. If not, reinstall the application. 49 MemoCam Zorro - Hardware Installation Manual Problem Troubleshooting Symptom Solution You receive error messages while working with MemoCam application. Restart the application. Reader is not installed as additional drive. You see the mini SD card as A: or B: drive. MemoCam Application works in demo mode. Edit the memocam iP.ini file to force the reader drive as follows: [Source] MMC-Source=a:\ For this solution, refer to the MemoCam Application User Guide (on CD provided). Image is black The mini SD card player displays a black picture. Check the video cable connecting the unit to the camera. Check that the camera is powered and the lens is unobstructed. 50 9 Technical Specifications Following are the specifications for the various MemoCam Zorro models. Model Zorro Mega Zorro C Zorro B and Zorro BX Model Zorro Mega Zorro C Zorro B and Zorro BX Video Resolution Camera Type 1.2 Megapixel CMOS color pinhole lens 6mm CCD color pinhole lens 4.3 mm 0.5 Lux CCD B/W pinhole lens 4.3 mm B: 0.1 Lux BX: 0.003 Lux Mega: 1280 x 960 / 640 x 480 (VGA) / 320 x 240 (CIF) C, B and BX: 640 x 480 (VGA) / 320 x 240 (CIF) Recording Quality 5 levels Video Compression JPEG Video Format Digital 8 bits PAL or NTSC CCIR or EIA Yes Camera Internal camera Video Motion Detection (VMD) Video Output NTSC / PAL 51 MemoCam Zorro - Hardware Installation Manual Model Zorro Mega Recording Rate From 10 images/sec to 1 image/5 min Image Size From 10K to 500K byte Storage Type Removable mini SD card up to 2GB (as of date of publishing). Please refer to manufacturer website for latest information – www.vdomain.com Recording Modes Zorro C Technical Specifications Zorro B and Zorro BX Model Zorro Mega Image Protection (Integrity) Each image is differentially signed and can be authenticated Titles Time/Date/Unit-Name Scheduler Daily & Weekly Alarm/Arm/ Disarm Input 3 inputs Fixed – Records events until the memory card is full Alarm Output N/C 28Vdc 0.1A protected with a 20 Ohm resister Cyclic – Records events continuously overwriting old data when the memory card is full Programmab le Output N/O 28Vdc 0.1A protected with a 20 Ohm resister IR Remote Control Used for: Video Motion and/or PIR Detection Panic button using the IR remote control Pre-Alarm Recording Zorro C Zorro B and Zorro BX Arming and disarming the unit Emergencies as a panic button Security Yes 52 Password protected MemoCam Zorro - Hardware Installation Manual Model Zorro Mega Zorro C Internal PIR Dual element, hard spherical lens. Angle 90° Power Source Technical Specifications Zorro B and Zorro BX Model Zorro Mega Rs-485 Port Yes 12 VDC 250mA Software Upgradeable Yes Power Consumption <3W Dimensions (WxDxH) 137 x 65 x 49 mm / 5.4 x 2.6 x 1.9 inch Recovery Automatic recovery after source power failure Weight 340 gm / 12 oz 0° to 50° C / 32° to 122° F Audio Indicator Buzzer Operating Temperature Operation Status LED’s Two status color LEDs and one power ON PIR indicators 53 Zorro C Zorro B and Zorro BX 10 Glossary Arm Enables automatic detection and recording function. Cyclic Recording Continuous recording. The MemoCam Zorro records over older images from start of the cycle when Mini SD card is full. Disarm Disables the automatic detection and recording function. Entry Delay Time between first trigger and actual recording (unit is armed). Entry delay can be used when entering a room to avoid event recording until the unit is disarmed. Event The recording of one or more images as a result of a trigger. Exit Delay Once the operator arms the unit, a delay can be used to avoid event recording when exiting the room. LED Light Emitting Diode. An electric component that lights up. Mini SD card Secure Digital card. A stamp-sized plastic card containing read/write non-volatile memory. PIR Passive Infrared motion detector. Snapshot Recording of a single picture. Trigger A signal that activates the recording process. Usually generated by an alarm contact. VMD Video Motion Detection. A feature that detects changes in video frames. 54