Transcript
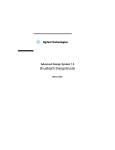
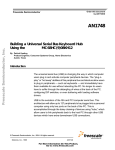
Installation Manual
1. Characteristics
1 Power supply: 220/230V ~ 50/60Hz.
2 Emission frequencies: 433MHz, arbitrary code can be studied by transmitter and receiver, And
rolling code technology makes coding reliable. With 100,000 codes as a team.
3 Receivers can receive 20 signal of the transmitter.
4 Normal working temperature: -20 to 60 .
5 Power of transmitter: GP12V battery Model: CR 23A.
2. Installation Of The Receiver
Cable tie-in downhill,prevent water filter.
Do not touch metal objects to prevent receiver spreading radio waves.
The shortest distance between receiver and ground: 1.5 meters.
The shortest distance between receiver and the roof: 1.5 meters.
The shortest distance between two receivers: 1.5 meters.
3. Wiring
Before wiring please turn off the main power supply.
Avoid static electricity.
grounding.
After installation,please confirm there is no longitudinal force vector on cable loader.
Please wire power cord and motor cord (CN3,CN2) and cord for manual selection (CN1)
(refer to the figure blow)
Note :At the same time press K2+K5, LED1 of the receiver starts flickering, In 3 seconds the LED1 will
stop flickering. that means changing the rotation direction of the motor has been completed.
(To change the rotation direction of the motor needn't change cable connections)
SW2,SW3,SW4 are manual control button which are parallel to CN1.
CN1: shown as above figure, from the top to bottom:
G:manual common,
U:manual up,
S:manual stop,
D:manual down.
CN2: shown as above figure, from the top to bottom:
N:motor common,
E:earth,
R:motor up/down,
CN3: shown as above figure, from the top to bottom:
L:live,
N:null,
E:earth,
L:motor down/up.
4. Program Setting
1 Learning Function:
The position of Button are shown as the above figure:
The learning function of single-channel transmitter:
Press the auto-learning button (SW5) on the receiver, LED1 will flicker,the receiver will wait for
the address information of the transmitter (For 30 seconds,after 30 seconds without operation,
the operation will be automatically canceled),Then press the auto-learning button(K5) on the
transmitter for about 3 seconds (the button K5 is under the battery cover of the single-channel
transmitter) until LED1 stop flickering,then the learning of the single-channel transmitter is
completed.
2 Memory Capability Of The Receiver :
20 channel receiver's maximum memory capability is 20, if the attempt to import the 21th
channels, your directive will be ignored, and LED1 of the receiver will stop flickering.
3 Deleting Channels:
Press the auto-learning button(SW5) on the receiver, LED1 will flicker, the receiver will wait for
the delete address information of the transmitter (For 30 seconds, after 30 seconds without
operation, the operation will be automatically canceled) Press the button (K3) on transmitter
until LED1 stop flickering. The address information of this transmitter is deleted, and deleting
mode ends automatically.
4 Clear Memory Of The Receiver:
Press the SW5 on receiver for about 2 seconds until LED1's flickering frequency becoming quick,
then press SW5 again (If SW5 is not pressed again in 2 seconds, the operation will be
automatically canceled),all the memory of the receiver will be clear.
PS: The Button Function of mirco-transmitter is like the single-channel transmitter.
But the K5 button inside the shell,you must use the neb press button.
North Valley Metal
INDUSTRIAL DOOR AND GATE OPERATORS
ACCESS CONTROL & SECURITY EQUIPMENT.
WALVERDENE WORKS, BROOK STREET, NELSON,
LANCASHIRE, BB9 9PU, ENGLAND
Tel:01282 615239
Fax:01282 698509