1
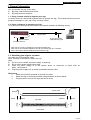
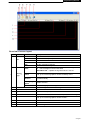
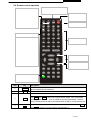
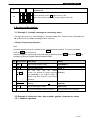
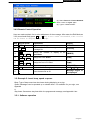
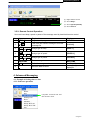
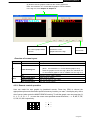
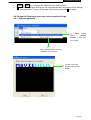
Messaging Software User Manual FOR PC & REMOTE OPER ATIONS (REV. 2.0) Note: Jan 29, 2007 This manual is applied to the model of M500N-7 series Note: Specifications are subject to change without notice P ramming Manual Programming Manual Contents 1: General information 1.1: Using a remote control to operate your sign 1.2: Using a computer to operate your sign 1.3: Attaching your sign to a surface 3 3 3 3 2: Basic sign operation 2.1: Turning a sign on and off 2.2: System requirement 2.3: Software operation 2.4: Remote control operation 4 4 4 4 6 3: Beginning messaging 3.1: Example 1- A simple message in seven easy steps 3.2: Example 2- Insert text, time, date, symbol, graphic, character and carton 3.2.1: Software operation 3.2.2: Remote control operation 3.3: Example 3- Create / Delete messages into different file names 3.3.1: Software operation 3.3.2: Remote control operation 3.4: Example 4- Adjustment of methods, fonts or colors 3.4.1: Software operation 3.4.2: Remote control operation 3.5: Example 5- Insert beep, speed or pause 3.5.1: Software operation 3.5.2: Remote control operation 8 8 8 8 9 11 11 12 12 12 13 13 13 13 4: Advanced messaging 4.1: Example 6- Setting time or date 4.1.1: Software operation 4.1.2: Remote control operation 4.2: Example 7- Programming filename messages in sequence 4.2.1: Software operation 4.2.2: Remote control operation 4.3: Example 8- Creating your own custom graphics & logo 4.3.1: Software operation 4.3.2: Remote control operation 4.4: Example 9- Displaying your own custom graphics & logo 4.4.1: Software operation 4.4.2: Remote control operation 14 14 14 14 15 15 16 16 16 18 20 20 20 5: Other timer options 5.1.1: Software operation 5.1.2: Remote control operation 21 21 22 Appendix A: Additional programming tips Appendix B: Listing of color Appendix C: Listing of international characters Appendix D: Listing of symbol characters Appendix E: Change password Troubleshooting 23 25 25 26 26 27 -Page2- P ramming Manual Programming Manual 1: General Information You can operate the sign in two ways: By using a hand-held remote control By using personal computer 1.1: Using a remote control to operate your sign A remote control is a hand-held keyboard used to operate the sign. This manual shows you how to program messages on your sign using a remote control. 1.2: Using a computer to operate your sign To do this, you’ ll need special connectors and computer software as following shown: LED Display Signal Cable To one of the PC’ s COM (RS232) ports Power Adaptor To Power Source Note: Do not connect a telephone to the sign’ s RS232 jack. Note: Do not use ordinary telephone wire to connect the sign to a computer Note: Use only the power supply that came with the sign. 1.3: Attaching your sign to a surface Your sign can be mounted to a wall. Note: This sign is intended for indoor use only. Note: Do not mount or attach the power supply to anything. Do not let the power supply hang loose. Place the power supply on a flat surface where no chemicals or liquid, such as water, will contact it. Plug the power supply into an easily accessible electrical outlet Wall mount 1. Attach the mounting brackets to the wall or surface. 2. Attach the sign to mounting brackets using hardware as shown below. 3. Plug the power cord into the sign and into an outlet. Brack et Power cord Bracket Screw Washer Top View Washer Sc rew Front View -Page3- P ramming Manual Programming Manual 2: Basic Sign Operation 2.1: Turning a sign on and off When you plug in the sign’ s power supply, the sign starts up automatically. On the other hands, in order to turn the sign off, you can unplug the power supply or use the remote control. 2.2: System requirement The computer must be Pentium 200 or above, 32M memories, 2M or above display memory, 100M empty hard disk. The computer must be installed window 95 or above version. The display mode is designed for 800x600, 16-bit or 24-bit colors. 2.3: Software operation Messaging Software allows you to send messages to your sign using a computer. Please follow the steps to activate your software: Turn on your computer and start Windows 98/2000/XP. Insert the software CD disk into CD-ROM, or you can copy the software into your PC for the easy operation. Double click the icon to activate the programming software, this is what should appear on your computer screen: 11 2 3 Letter Name Description 1 Color 2 Text Size /pix el The length of message sign, unit in pixel. The default setting is 80 3 Country option For new countries, select following choice for the operations If your sign is tricolor (Red, Green & Amber), select Double Color. Otherwise, please select single color. please Click OK to enter into the main screen as follows; -Page4- P ramming Manual Programming Manual Overview of screen layout Letter Name A B File Moving_ Sign Sub-menu Description Clear Clear all the contents in text edit area Open… Save Open the old files (*.sdv) Save the file of the current text edit area for later using Save as… Save the file of the current text edit area as a new file Exit Exit the messaging software Send - Send Edit Area’ s Content: Update the sign the new messages in the text edit area - Send Disk File… :Update the sign with stored *.sdv file Execution lattice Create custom 7x80 (height x width) pixels graphics Note: up to 8 custom graphics can be created by users Special function Allow you to schedule, to on/off, to alarm, to adjust time of your sign automatically Moving Sign option Models’selection Test Send a testing signal to the sign with C D Send New Update the sign with the new messages in the text edit area Clear all the contents in the text edit area E Open Open an old file (*.sdv) F Save Save the file of the current text edit area (*.sdv) for later using G Graphic edit Create custom 7x80 (height x width) pixels graphics Note: up to 8 custom graphics can be created H Font 7 different kind of fonts I J Color Text edit area 16 different kind of color combinations Type messages here -Page5- P ramming Manual Programming Manual 2.4: Remote control operation -Press PROG to enter into text Point the end of the remote control at the front of your sign editing mode - Type in your password (default=”000”) Hold down ALT and then press ENTER -Type in:”OPEN: 01”. turn the sign of and on then press ON/OFF to then press ENTER Press -… … start programming of these (Use PREV or to exit programming mode In text editing mode: Hold down ALT and then press GRA to put the sign into one RUN To type a special characters or symbol modes: NEXT to move from mode to mode and ENT to select a mode.) - GET GRAPH – for getting Press PREV or NEXT to move from mode to mode GRAPH A - P - MAKE GRAPH – for making NUMBER A –H - EDIT GRAPH – for editing NUMBER A-P Use SPA to insert a blank space between characters Hold down ALT and then press any key to select character or symbol above selected key Item Key 1 ON/OFF 2 PROG Description Power On / Off. If there is no file in 01 to 99, it will run file 00.If there is file in 01 to 99, it will display the last saved file. Enter the Edit Program Mode. Select 01 to 99 to enter message. Use for edit or reset password 3 CPW Use PREV and NEXT to select (a) to (d)(a) UNUSE PASS Turn off password security.(b) USE PASS Turn on password security(c) RES PASS Reset to factory default password “000”.(d) CHANGE PASS Change to new password (see 4 MET To select the display modes, totally up to 24 different modes. Note: Press PREV and NEXT to select (1) to (24) methods. See Appendix A. -Page6- g Manual Programming Manual 5 PREV Select option backward. 6 NEXT Select option forward. 7 CAP Toggle between Capital letter and lower case character. 8 TIME To select time option. See Appendix B. 9 SPE 10 FONT 11 COL 12 SYM Select 30 built-in symbols. (Use PREV and NEXT to select different symbols.) 13 CLR Erase option. Select the display speed of the message. (Use PREV and NEXT to select different speeds.) Select the font size of the display message. (Use PREV and NEXT to select different fo nt sizes.) Select the color of the display message. (Use PREV and NEXT to select different colors of the display message.) Select graphic option. (Use PREV and NEXT to select the following options:) (a)GET GRAPH Place the graphic in the message. Use PREV and NEXT to select GRAPH A to GRAPH P . 14 GRA (b)MAKE Create new graphics in location NUMBER A to NUMBER GRAPH H (c)EDIT GRAPH Edit GRAPH A to GRAPH P and store in one of the location of NUMBER A to NUMBER H. 15 <= Moving the message and command to the right. 16 >= Moving the message and command to the left. Note: IF YOU WANT TO DELETE MESSAGE OR COMMAND IN THE EDIT PROGRAM MODE.PLEASE USE ABOVE KEYS TO MOVE THAT MESSAGE OR COMMAND TO THE LEFT-MOST POSITION AND PRESS DEL . 17 ALT IF YOU WANT TO INSERT MESSAGE OR COMMAND IN THE EDIT PROGRAM MODE.PLEASE USE ABOVE KEYS TO MOVE THAT MESSAGE OR COMMAND TO THE LEFT-MOST POSITION AND (1)PRESS INS TO INSERT.(2)TYPE IN YOUR MESSAGE OR PRESS COMMAND KEY,IT WILL INSERT AUTOMATICALLY.(3)PRESS INS AGAIN TO OVERWRITE. Generate a pause within the programmed message. (Use PREV and NEXT to 18 PAU 19 PHR 20 BEEP 21 ENT Accept the selected option. 22 ESC Return to the upper manual in the edit program mode. 23 INS Refer to 15 and 16 24 DEL Refer to 15 and 16 25 SPA Insert space in message. select PAUSE 1 to PAUSE 8) Select a programmed animation in the message. (Use PREV and NEXT to select ANIM 1 to ANIM 8) Select beep sound in the message. (Use PREV and NEXT to select BEEP 1 to BEEP 3) (1) In edit program mode, press RUN to save and run the current message. 26 RUN (2) In display mode, press RUN and enter 01 to 99 to select other messages for display. -Page7- g Manual 27 Programming a sequence file. Please refer to Section 3.5: Programming a S 28 Programming Manual sequence file. F G H J K L N O P Cursor direction pointer . K toggles cursor on /off Note: The direction pointer only works in graphic edit mode 3: Beginning Messaging 3.1: Example 1- A simple message in seven easy steps The sign can store up to 100 messages in numbered data files. These files are numbered from 00 to 99. File 00 is a default message and for read only. A Simple Programming Example – Note: Underline denotes words or numbers to type, xxxx denotes key names. To correct a mistake, Press the DEL key to remove it. User can toggle the capital letter and small letter by pressing the key CAP, and use the ALT key to display symbol on keypad. Default Password:”000” Step Keys to press Explanation Display 1. PRO Begin the edit program mode PASSWORD:*** 2. 3. 00 0 ENT Default Password “000” Enter into editing mode The first two digit PASSWORD:*** OPEN: ?? 01 ENT (01-99) are allowed for naming message [CYCLIC] files [CYCLIC] is the default method of 4. file number display code which means to cycle through at random WELCOME Type the text you wish to display in you WELCOME VISITORS message VISITORS 6. RU End the edit program mode SAVE? (Y/N) 7. N Y Save the message as data file number 01 Message begins to be displayed 5. 3.2: Example 2- Insert text, time, date, symbol, graphic, character or carton 3.2.1: Software operation -Page8- g Manual Programming Manual (2) Click it to send the messages into the FILE01 (default) of your sign. (1) Insert text by typing and Right click the mouse to add time, date, symbol, graphic, character and carton respectively. Note: The default front and color are 7X 6 and Bright Red, respectively. (3) Select a suitable COM port, i.e. COM1 or COM2 (4) Input the value (default = 128) (5) Click OK to start the transmission. The sign will display the new message Note: The display mode is Cyclic in the example Note: If the display message is longer than one page of LED screen whatever the display method used, the display method will be [OPEN←] 3.2.2: Remote Control Operation -Page9- g Manual Programming Manual Keys to press Explanation Display 1 PROG Begin the edit program mode PASSWORD:*** 2 OOO Default Password “000” PASSWORD:*** 3 ENT Enter into editing mode OPEN:?? Step The first two digit file number (01-99)are allowed 4 for naming message files[CYCLIC] 01 ENT Is the default method of display code which [CYCLIC] means to cycle through at random To disable password function 5 CPW ENT **Note: Suppose the password function was [UNUSE PASS] disabled in the rest of this manual. 6 7 8 This Type the text you wish to display in your This message is your message message Time Enter into time function mode SET TIME Insert time to display your message ADD TIME Enter into time function mode SET TIME Insert date to display your message ADD DATE Enter into symbol mode [-><-] Specified graphic function mode [→] Enter into graphic function mode GET GRAPH PREV PREV PREV PREV first is your first ENT 9 10 11 12 13 14 15 16 17 18 Time PREV PREV PREV ENT SYM PREVor NEXT ENT GRA PREV or NEXT Specified graphic is selected ENT $ PREVor NEXT ENT PHR PREV or NEXT ENT [GRPAH A] Enter into character function mode [$] Specified character is selected [¥] Enter into cartoon function mode [ANIM 1] Specified cartoon is selected [ANIM 8] SAVE? (Y/N) 19 RUN End the edit program mode 20 Y Save the message as data file number 01 Message begins to be displayed Here are some important things that you learned from this first example: An audible beep is heard when the unit accepts programming input from the remote. This can assure you that the signal from remote has been received and understood. The default color for messages is Bright Red and the default font size is 7*6. You have the option to save your message at the end of your programming. g Manual Programming Manual The sign always begins with the default method of display as [CYCLIC], which stands for cycle through all color and method possibilities at random. -Page10In order to use international characters in your messages, you should first key in the corresponding equivalent English character and then use the NEXT and PREV buttons to scroll through the international characters, i.e.(Key in “$”and press the NEXT button you will see the “¢”character appears). For the international characters which do not have corresponding English character, please key in a SPACE and then use the NEXT and PREV buttons to scroll through the list of available characters. See Appendix D for the more information. 3.3: Example 3- Create / Delete messages into different file names You can create / delete messages into different FILE No. by using keyboard or hand-held remote control. P 3.3.1: Software operation ramming Manual To create different file names such as FILE 02, FILE 03 and so on , you can press CTRL + ENTER key. *Note:totally, users can create files from 01 to 99. If you make mistakes while typing, you can correct them by pressing DEL key until you have removed the mistake(s) and re-entered in the message properly. 3.3.2: Remote Control Operation To create and edit message used by remote control, you should follow the below steps. If there is a previously stored message under that file number, the display will show [OLDFIL] [CYCLIC], or may not be [CYCLIC] depending on actual content. -Page11- g Manual Programming Manual Step Keys to press Explanation Display 1. PROG Begin the edit program mode OPEN?? 2. 01 ENT This is the file number for the previously stored message file. OLDFIL [CYCLIC] You then can edit or create new message… … … . 3. RUN End the edit program mode SAVE? (Y/N) 4. Y There is a need to re-save the data file Message begins to be displayed In some circumstance, user may like to erase some of the message; the sign has such an option for user to do so. After enter the Edit Mode, user can press the key CLR and cycling through the difference functions by pressing the PREV or NEXT key. Listed below is the Erase functions and their usages: - DEL ALL DEL FILE ?? DEL MSG DEL ON/OFF DEL ALARM Clear all message files Delete the specified file Delete the message of the current opening file Disable the Auto Turn on /Turn off timer function Disable the alarm function 3.4: Example 4- Adjustment of methods, fonts and colors Method: Type of moving options which are displayed on a sign, see Appendix A. Fonts: Style of fonts which are displayed on a sign, see Appendix A too. Colors: Your sign can display up to 16 different colors, e.g: Red, Green, Yellow, etc. –plus 8 Special color combinations. To determine what colors are available on your sign, see Appendix B. 3.4.1:Software operation (1). Click the Box in the right of“Mode” (2). Select “Immediate “ (3). Select Font=5*6 Short &Color=Green (4). Type in “WELCOME” -Page12- P ramming Manual Programming Manual (5). Select Font=7*6 & Color=Rainbow Note: It turns on Cyclic again (6). Type in “HONG KONG” 3.4.2:Remote Control Operation User can make method, font or color adjustment of the message. After enter the Edit Mode as 3.2.2,user should firstly press → or ← key so as to enter into method, font or color can be chosen to display at the message. Step Keys to press 1. PROG 2. 3. 4. 01 ENT MET PREV or NEXT COL PREV or NEXT 6. 7. FONT PREV or NEXT WELCOME RUN 8. Y 5. Explanation Begin the edit program mode This is the file number to assign to this new message file Assign the method of display to an Immediate Display OPEN:?? Assign the color Green [GRE] Assign the font =5*6 Short [5×6] Enters in message text Exit out of edit message mode WELCOME SAVE?(Y/N) Message begins to be displayed Save the data file as 01 [CYCLIC] [IMMED] 3.5: Example 5- Insert beep, speed or pause Beep: Type of beep sound can be chosen during displaying on a sign. Speed: Messages can be speeded up or slowed down. It is available for your sign, see Appendix A. Stay timee: Generate a stay time within the programmed message, see Appendix A too. 3.5.1: Software operation -Page13- P ramming Manual Programming Manual (1) Right click the mouse (2) Insert Beep 1 (3) Insert Speed 3[default] (4) Insert Pause 5 3.5.2: Remote Control Operation User can insert beep, speed or pause of the message used by hand-held remote control. Step Keys to press 1 PROG 2 01 ENT 7 BEEP PREV or NEXT SPE PREV or NEXT PAU PREV or NEXT WELCOME RUN 8 Y 3 4 5 6 Explanation Begin the edit program mode This is the file number to assign to this new message file Display OPEN:?? Assign type of beep [BEEP 1] Assign type of speed [SPEED 3] Assign type of pause [PAUSE 5] Enter message text WELCOME SAVE? (Y/N) Message begins to be displayed Exit edit message mode Save the data file as 01 [CYCLIC] 4: Advanced Messaging 4.1: Example 6-Setting time or date 4.1.1: Software operation (1)Update corrected time and date from PC clock. -Page14- P ramming Manual Programming Manual (2) Click “Send”to update the change. 4.1.2: Remote control operation User can set time or date of the message used by hand-held remote control. Step Keys to press 1. PROG 2. 01 ENT 3. 4. 5. Time ENT ← or → Explanation Begin the edit program mode This is the file number to assign to this new message file Enter into time function mode Display current time Choose option of hour, minute or second 6. 7. 8. 9 10 11 12 13 PREV or NEXT ENT Time NEXT ENT ← or → PREV or NEXT ENT RUN Modify hour, minute or second Confirm new time setting Enter into date function mode Display current date Choose option of year, month or day Modify year, month or day Confirm new date setting End the edit program mode 14 Y Save the message as data file number 01 Display OPEN:?? [CYCLIC] SET TIME [00:00:00] [--:--:--] [--:--:--] [13:25:02] SET DATE [SA 17 –05-01] [XX XX –XX - XX] [XX XX –XX - XX] [TH 02 –09–04 ] SAVE?(Y/N) Message begins to be displayed 4.2: Example 7- Programming filename messages in sequence 4.2.1: Software operation In this example, it leverages the power of sequencing to achieve desired results. We’ ll display messages by their files’names (FILE01, FILE03) in certain order, and disappear at times you specified. * Note: Displaying messages in time order will work only as long as the sign has power. When your sign loses power, its internal clock becomes inaccurate and must be reset again. (See 4.1.1) -Page15- P ramming Manual Programming Manual (1) Select Schedule… (2) Select 0, totally there are 10 different kind of sequence files, from 0 to 9 , which you can specify. (5) Select File04 (6) Display on Wednesday ONLY. (7) Click Setting to update the changes (3) On time is 08:20 (4) Off time is 17:00 4.2.2: Remote control operation Sequence files have special names that begin with the letter ″S″ followed by a single digit number(S0-S9). As such, there are only ten sequence files, which can be stored and retrieved by the sign. Let’ s say that as the owner of a restaurant named Box Car Express. You have daily specials that appeal to the lunch crowd at noon. You have already created the following files: -Page16- P ramming Manual Programming Manual File Number Message 10 Welcome to the Box Car Express 11 Today’s special is 12 2-Pc. Chicken Meal with 13 Mashed Potatoes and Gravy. 14 Our drink Special is Diet Coke. You may want to display the above messages from 10:00 am to 1:00 pm, Monday to Friday. In order to display the entire message, your sequence file would contain the line: 10 11 12 13 14 Step 1. 2. 3. 4. 5. 6. 7. 8. 9. 10. 11. 12. 13. 14. 15. 16. Keys to press PROG S 1 ENT → Explanation Begin the edit message mode For sequential file Enter sequential file number Move right Display OPEN :?? [SO] DAY 0 1 2 3 4 5 6 1 high lighted 1 in green with red NEXT or PREV Toggle for ON/OFF background Repeat step 4 & 5 for 2、3、4、5 until all 1 2、3、4、5in green color S Set start time START 00:00 The digit in green will NEXT or PREV Change the start timer be changed ← or → Use the arrow key for proper digit Repeat steps 8 & 9 until display shown 10:00 S Set stop time END 23:59 Repeat 8 & 9 until display shown 13:00 ENT Confirm the time setting S1 This is the sequence of file numbers to 10 11 12 13 14 display, separated by a space. RUN Exit the edit program mode SAVE?(Y/N) Message begins to be Y Save the sequence file as S1 displayed The real advantage of sequencing files is the ability to change only one segment of a long message! If you decide to change the meal special but not the drink special, you need only edit file number 12. In essence, sequencing saves your time from having to edit long messages when only minor changes are needed. Please be remained that once there is any sequence file and the time setting is valid, the sign will display the preset message starts from sequence file S0 through S9. 4.3: Example 8- Creating your own custom graphics & logo 4.3.1: Software operation -Page17- P ramming Manual Programming Manual (1) Click Lattice icon to edit your graphic or logo. Note: The maximum no. of user-defined graphics can be installed in the sign is 8, from graphic A –graphic H. (3) Create your graphics in this area. Note: The graphic will be automatically saved. (2) Select the palette for different color. Note: Click left mouse to draw dot by dot Note: Click right mouse to delete a dot. (5) The total numbers of the graphics had defined by the user. (6) The no. of the graphic that is editing now. (4) The preview of graphic is the same as the content in the editing area. (7) Select Create Sending List to create your own graphic list -Page18- P ramming Manual Programming Manual (8) Double click the graphic to add into the current graphic list Note: The maximum no. of user-defined graphics can be installed in the sign is 8, from Graphic A- Graphic H. (9) Click Save to store (10) Click Send… to the current graphic list as upload the current “list”file. graphic list into the sign (11) Close the window Overview of screen layout Name File Sub-menu Save as… Description Save as another ISN number Save all the custom (Note: Create Sending List graphics as a “lst” file. the maximum no. of user-defined graphics is 8) Send the graphic list into the sign. (Note: the maximum no. of user-defined graphics can be installed into the sign is 8, Lattice Graphic A Graphic Close the graphic editing windowH Create another graphic Open an old lattice for the editing Clear the current graphic Exit Create a new lattice Editing old lattice Clear current lattice 4.3.2: Remote control operation User can make his own graphic by hand-held remote. Press key GRA to choose the appropriate option and after select specified memory location you want , the display only with a dot of cursor (when enter the MAKE GRAPH function).To edit the graph, user can press key G , H , L , P , O , N , J , F to move the cursor onto specified arrows directions, I . e . N, NE, E, SE, S, SW, W, NW respectively. F J N G K O H L P ↖ ↑ ↗ ← ● → ↙ ↓ ↘ -Page19- P ramming Manual Programming Manual PREV or NEXT key : Change the LED dot color continuously. K key : If user wants to draw a line, he can press the key and makes a line through the cursor position. To turn off the draw line function by press K key again. 4.4: Example 9- Displaying your own custom graphics & logo 4.4.1: Software operation (1) Select user’s Insert defined graphic to add your own graphic. Note: Change graphic set is not applicable in this manual. (2) Select your own graphic and then click Insert. -Page20- P ramming Manual Programming Manual (3) Your graphic is inserted in FILE01 4.4.2: Remote control operation In order to get a graphic for displaying between any messages, user should firstly enter the Edit mode at the desired location, press GRA and cycle through the functions and press ENT when the display shown ″GET GRAPH″. All preset graphics will cycle through with the key PREV or NEXT pressed. Press ENT for the right one. 5: Other Timer Options 5.1: Software operation The sign will alarm for 10 times The interval of each two alarms is 1 minute. set the hourly alarm on. set the hourly alarm off -Page21- P ramming Manual Programming Manual To power on the sign at 08:00 automatically To power off the sign at 18:30 automatically. Note that: You may only set the timer functions while running your message sign. 5.2: Remote control operation To select the timer function while in edit mode at the end of a message is fine, press the TIME key. Press the NEXT and PREV keys to cycle through the timer functions and press the ENT key to make your selection. Function Description SET TIME Adjust the Real Time Clock SET DATE Adjust the Date ALARM Set alarm times and interval HOUR ALARM Set the hourly alarm On/Off 12H MODE If selected, the time will be displayed in 12-hour format (Note: while programming, always enter the time in 24-hour format) 24H MODE If selected, the time will be displayed in 24-hour format ADD TIME Add a time display screen in the data file ADD DATE Add a date display screen in the data file OFF TIME Tums off at the programmed time of day ON TIME Tums on at the programmed time of day Additional Tips On Alarm SettingWhen you select the Alarm option, the sign will indicate C: XXXM: XXX. Where XXX is a number from 000 to 255. C is the total times of the alarm to be activated, and M is the time interval between two activations. -Page22- P ramming Manual Programming Manual ExampleC: 123M: 001 - this means that there will be 123 times of alarm signal, and the time interval between each alarm signals will be 1 minute. Note that: You may only set the timer functions while running your message sign. Appendix A: Additional Programming Tips Function Code METHOD COLOR Definition Display Option Alters the color of text Possibilities Control Cyclic Immediate [CYCLIC] [IMMED] Open from Right Open from Left [OPEN←] [OPEN→] Open from center Open to Center [OPEN<>] [OPEN><] Cover from Center Cover from Right Cover to Left [COVER<>] [COVER←] [COVER→] Cover to Center Scroll Up [COVER><] [SCROLL↑] Scroll Down Interlace to Center [SCROLL↓] [INTER><] Interlace to Cover Cover Up [INCOVER><] [COVER↑] Cover Down Scan Line [COVER↓] [SCANLN] Explode Pac Man Pall & Stack [EXPLOED] [PACMAN] [FALL] Shoot Flash [SHOOT] [FLASH] Random Slide in [RANDOM] [SLIDE IN] Auto(Note: It is appeared in window software only, but not available in remote control.) See Appendix B 5×6 Short 5×11 Short & Wide FONT 7×6 (Default) Changes the shape and 7×11 Wide size of characters 7×9 7×17 Extra Wide Small Fonts [AUTO] [5×6] [5×11] [7×6] [7×11] [7×9] [7×17] [Small] -Page23- P ramming Manual Programming Manual Speed 1(Fastest) Speed 2 SPEED Speed 3 Change the scrolling Speed 4 speed of the display Speed 5 Speed 6 Speed 7 Speed 8(Slowest) City Car Non- editable by user Vessel Tel Nature Ship Swim Cat MERRY X’MAS HAPPY NEW YEAR PHRASE 4 TH JULY Generate an animated HAPPY EASTER pre-programmed HAPPY HALLOWEEN display DON’T DRINK & DRIVE NO SMOKING WELCOME Pauses for 2second delay Pauses for 3second delay Pauses for 4second delay PAUSE [SPEED 4] [SPEED 5] [SPEED 6] [SPEED 7] [SPEED 8] [GRAPH A] [GRAPH B] [GRAPH C] [GRAPH D] [GRAPH E] [GRAPH F] Editable by user GRAPHICS [SPEED 1] [SPEED 2] [SPEED 3] Generate a pause Pauses for 6second delay within the programmed Pauses for 10second delay message Pauses for 20second delay Pauses for 30second delay Pauses for 60second delay [GRAPH G] [GRAPH H] [GRAPH I] [GRAPH J] [GRAPH K] [GRAPH L] [GRAPH M] [GRAPH N] [GRAPH O] [GRAPH P] [ANIM1] [ANIM2] [ANIM3] [ANIM4] [ANIM5] [ANIM6] [ANIM7] [ANIM8] [PAUSE1] [PAUSE2] [PAUSE3] [PAUSE4] [PAUSE5] [PAUSE6] [PAUSE7] [PAUSE8] -Page24- P ramming Manual Programming Manual Appendix B : Listing Of Color Color Name Display Code Red Bright Red Orange [RED] [RED]* [ORA] Bright Orange Yellow [ORA] * [YEL] Bright Yellow Green [YEL] * [GRE] Bright Green Layer Mix(Rainbow) [GRE] * [MIX] [MIX] * Bright Layer Mix(Rainbow) Vertical Mix Saw Tooth Mix Green on Red Red on Green Orange on Red Yellow on Green [MIX] [MIX] [MIX] [MIX] [MIX] [MIX] The color of the dots will not change, except the brightness Appendix C: Listing Of International Characters English Character A C E N O S U Z a c e i n o t u y Space ? $ International Characters ÄÅ Æ ÇĆ É Ñ ÖÓ Ś Ü Ż Ź âäàåæ á Ç éêëè ïîìí ñń ôöòó üûùú Ÿ α βΓπ Σ σ µτΦ θΩ ¿ ¢£¥Pt € ∞ δφ -Page25- P ramming Manual Programming Manual Appendix D: Listing Of Symbol Characters Note: The actual symbol appear in brackets (“[ Sunny Phone Alien Car Trees Crown Lower Left Arrow Shoe Cloudy Glasses Key Tank Duck Hearts Upper Left Arrow Martini Glass ]”) during the programming mode Rainy Faucet Sweater House Motorcycle Right Arrow Mug Clock Rocket Helicopter Teapot Bike Left Arrow Chair Appendix E: Change Password Step Keys to press Explanation Display 1. PROG Enter Edit mode OPEN: ?? 2. 00 ENT Enter file 00 OLDFIL [CYCLIC] 3. Press → while is being hold ALT Fast shift A few times until you reach to the end 4. Repeat step 3 of the file, this is to make sure you will not modify the content of the file while doing password change 5. CPW Enter password mode UNUSE PASS 6. NEXT USE PASS 7. NEXT RES PASS 8. NEXT Change password CHANGE: *** 9. AAA ENT Change the password to AAA AGAIN: *** 10. AAA ENT Confirm the password You have changed the password to AAA. *** Note: If for any reason the password is lost or forgotten, you must access the DIP switch in the back of the sign unit (not the remote control) and move Switch 8 to ON. -Page26- P ramming Manual Programming Manual Troubleshooting -Check if the power socket located at the back of the sign is connected. -Check if the AC power plug is plugged into the wall outlet. -Check if the main power of the AC outlet is normal. No display Not response to remote control No display but response the to remote -Check on/auto off remote time setting is correct. -Check ifif the the auto batteries of the control still have enough energy. If user is not sure, please replace all the batteries. -Check if the batteries of the remote control are placed at right polarity. Please follow the markings in the battery compartment. -Check if there is anything between the remote and the sign blocking the remote signal. -Check if the auto on/auto off time setting is correct. -Check if the data in the files are valid. -If you are not sure, you can enter the edit mode and press ‘ CLR’key of the remote control, select ‘ DEL ALL’to erase all data, this will reset the sign to display the default demo messages. control If the above procedures do not work, please contact your dealer. Remarks: When edit Turkey characters, after press C you just need to press NEXT and the other characters will take on. -Page27-