1
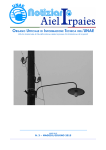
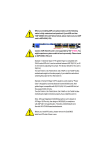
AIR™ & AIRLight™
Digital Audio Interview Recorder
User Manual
v1.4
For AIR & AIRLight v1.08
Table of Contents
Chapter 1 - Basic Usage......................................................................................3
1.1 Power On...................................................................................................3
1.2 Changing The Date & Time.......................................................................3
1.3 Starting A Recording.................................................................................4
1.3.1 Replacing Un-blank Discs...................................................................5
1.3.2 Checking Microphone Levels..............................................................6
1.4 During Recording......................................................................................7
1.4.1 Audio Level Monitor............................................................................7
1.5 Pausing the Recording...............................................................................8
1.6 Stopping the Recording............................................................................8
1.7 Recording Complete..................................................................................9
Chapter 2 - Failed Discs.....................................................................................10
2.1 Postponed Notices..................................................................................10
2.2 Recording Summary...............................................................................10
2.3 Remove Successful Discs........................................................................10
2.4 Remove & Dispose Of Failed Disc...........................................................11
2.5 Rewriting.................................................................................................11
2.5.1 Cancelling Rewriting........................................................................11
2.5.2 New Blank Discs...............................................................................11
2.5.3 Performing The Rewrite....................................................................11
2.5.4 Rewriting Failed................................................................................12
Chapter 3 - Power Loss Protection.....................................................................13
3.1 - After Power Loss....................................................................................13
3.2 - Resume..................................................................................................14
3.3 - Stop.......................................................................................................14
Chapter 4 - Networking.....................................................................................15
4.1 System Start-up.......................................................................................15
4.2 Starting A Recording................................................................................16
4.3 Stopping Recording..................................................................................17
Chapter 5 - Keyboard Input...............................................................................18
5.1 Data Entry................................................................................................18
5.2 Prompt.....................................................................................................18
5.3 Confirm....................................................................................................19
5.4 Finish Data Entry......................................................................................19
Chapter 6 - Remote Monitoring.........................................................................20
6.1 Using Remote Monitoring.........................................................................20
6.2 Additional Recording Indicators...............................................................20
Chapter 7 - User Setup......................................................................................21
7.1 User Setup - Main Menu...........................................................................21
7.2 User Setup - Network Settings.................................................................21
Chapter 8 - Rear Panel Connections..................................................................23
Chapter 9 -Troubleshooting................................................................................24
Chapter 10 - Conformance................................................................................25
Chapter 11 - Technical Specification..................................................................25
Chapter 12 - Support Information......................................................................26
2
Chapter 1 - Basic Usage
1.1 Power On
Connect the microphones and power to the rear of the AIR (see Chapter 5),
then switch the power on.
Once you power on the AIR, the display will show a starting screen for about 45
seconds, then you will hear a double beep and the Check Date & Time screen
will be displayed:
Check Date & Time
[Thu 2nd Aug 2007]
[12:27.32]
REC:OK PAUSE:Change
Screen 1: Check Date & Time
If the date and time are correct, press the REC button, then skip to section 1.3.
If they need to be changed, press the PAUSE button.
1.2 Changing The Date & Time
If you press PAUSE at the Check Date & Time screen, you will be shown each
component of the date and time one by one, allowing you to change them:
Set Date & Time
Year: 2007
REC: Up
STOP: Down
PAUSE: Next
Screen 2: Set Date & Time (year)
Press REC or STOP to increase or decrease the displayed item and PAUSE to
move to the next. You will be presented with the year, then month, day, hour
and finally minute.
When you finish setting the minute, you will be shown the modified date and
time and asked to confirm it:
3
Confirm Date & Time
[Thu 2nd Aug 2007]
[12:27.32]
REC: OK
STOP: Redo
Screen 3: Confirm Date & Time
If the date and time are correct, press REC, otherwise press STOP and perform
the changes again.
1.3 Starting A Recording
You will now be presented with the Idle screen:
Idle
REC: start
STOP: eject discs
Screen 4: Idle
When a recording is finished, the recorder will always return to this screen.
If you need to forcibly eject discs from the recorder, press STOP while on this
screen and all discs will be unconditionally ejected.
To begin the recording process, press REC.
The first thing the recorder does is check all its drives for blank discs.
Checking discs...
Screen 5: Checking Discs
If there are already blank discs in all the drives, no warning will be displayed
and you can skip to section 1.3.2.
NOTE: The AIR requires blank CD-R media. It will not accept CD-RW media.
4
1.3.1 Replacing Un-blank Discs
If any of the discs (referred to as media) are not blank, not present or not the
right type, the AIR will eject those discs and tell you which need to be replaced:
Missing Blank Media
Replace media in
drives A and D
Press REC to re-che>
Screen 6: Missing Blank Media
The last line scrolls across the screen and reads:
“Press REC to re-check, or STOP to cancel.”
You can press STOP to cancel the recording and return to the Idle screen.
Put new blank discs in the drives listed on your screen, then press REC.
Note:
If your unit is configured to allow recording without a full compliment of blank
discs, you will see the following screen instead of the screen above:
Missing Blank Media
1 blank
2 missing
Press REC to re-che>
Screen 7: Missing Blank Media
The last line scrolls across the screen and reads:
“Press REC to re-check, PAUSE to accept or STOP to cancel.”
If the detected blank discs are enough for your recording, press PAUSE to
accept this number and continue with the recording. If you want to add more
discs, insert them, then press REC and the unit will re-count the blank discs.
If you want to remove discs or cancel, press STOP.
NOTE: When inserting blank discs, wait for 3 seconds after inserting the last
disc before pressing REC to check again, else the unit may erroneously eject
the disc, reporting it as un-blank.
5
1.3.2 Checking Microphone Levels
The next step in preparing to record is checking that the microphones are
working correctly. You will see the following screen:
Please speak now.
Press STOP to cancel
<
<
Screen 8: Microphone Check
As you speak, the 2 bars at the bottom of the screen should increase from left
to right in response to your voice. Talking very loudly should result in them
almost touching the right hand side. The arrows show the peak audio level and
reset every few seconds.
In order to continue, you need to speak at a normal volume. The recorder
monitors this and when it detects enough volume, it allows you to continue:
Press REC to start
Press STOP to cancel
<
<
Screen 9: Microphone Check (done)
Now you can press REC for the final time, to start the recording proper.
If you do not press REC within 1 minute, the recording will be automatically
cancelled.
6
1.4 During Recording
When you press REC on the Microphone Check screen and the recording starts,
you will hear a 2-tone sound and the Recording screen will be displayed:
<
RECORDING
11:12:53
>
HOLD STOP: finish
Screen 10: Recording
The unit is now recording.
The bars on the left and right are the microphone levels for the left and right
channels, and move from bottom to top as you speak more loudly. The arrows
pointing at the level bars are the peak level markers.
In the centre, the current clock time is displayed. This stays on screen for 90
seconds, after which it switches to displaying the remaining recording time in
minutes, which will count down to zero. You can press the REC button at any
time during recording, to toggle this display between current clock time and
time remaining.
At 5 minutes left a warning beep will sound, and again at 1 minute left. When
the count down reaches zero, the recording will stop automatically.
1.4.1 Audio Level Monitor
During the recording the AIR monitors both microphones' audio level. If it
detects prolonged silence from either channel, it will alert you by beeping once
every 3 seconds until the audio returns.
While there is no audio, the screen will indicate which microphones need
attention by flashing “NO AUDIO” and pointing to the problem channel(s):
RECORDING
NO AUDIO---->
< 84 min. remain
HOLD STOP: finish
Screen 11: Audio Level Warning
(right channel).
7
1.5 Pausing the Recording
You can press the PAUSE button at any time during the recording to temporarily
pause. You will hear a double beep when the unit is paused and the following
screen will be displayed:
Recording paused
Press REC to resume
Hold STOP to finish
Screen 12: Paused
NOTE: it is possible that pausing has been disabled on your unit, in which case
the pause button will do nothing during the recording.
Pausing will not finalise the discs but will cease recording audio and will halt the
count down timer, until you resume or finish.
While paused, you can stop the recording and finalise the discs by holding
STOP for about 2 seconds.
Press REC to resume the recording.
A marker will be recorded at any points where the recording is paused, and the
audio will be split into a new file at that point. This allows for no mistake as to
when a recording was paused.
1.6 Stopping the Recording
You can stop the recording at any time by pressing and holding the STOP
button for about 2 seconds.
Once stopped, the AIR will finalise the discs, which can take anywhere from a
few seconds to a few minutes, depending on the amount recorded.
While the AIR is finalising a progress indicator will be displayed for each drive:
Finalising discs..
A: 10%
C: 10%
B: 10%
Screen 13: Write Progress
8
1.7 Recording Complete
In the normal case that all discs recorded successfully, the discs will all be
ejected, a 2-tone sound will be played and the following screen displayed:
Recording complete
Press STOP
Screen 14: Recording Complete
Remove your recorded discs and press STOP to return to the Idle screen.
If any of the discs were faulty and the recorder was unable to write to them,
then you will see a different screen in place of the Recording Complete screen.
See the next chapter.
If you leave the recorder on this screen for 5 minutes, it will return to the Idle
screen automatically.
9
Chapter 2 - Failed Discs
In the examples below, we are assuming the disc in drive C on a 3-drive
system, failed to write.
2.1 Postponed Notices
If a disc was faulty and could not be written to, the AIR will wait until after the
recording has been stopped before informing you. This is done so you are not
interrupted while making a recording.
A copy of the recording is kept internally on the AIR so any faulty discs can be
re-written at the end. This copy is deleted once you have a full complement of
correctly written discs.
2.2 Recording Summary
If a disc failed during your recording then at the end, instead of the Recording
Complete screen being displayed, a Recording Summary screen is shown
instead:
NOTICE
2 discs successful
1 disc failed
Press STOP
Screen 15: Recording Summary
You will now be asked to do the following, step by step:
1. Remove and file successful discs.
2. Remove and dispose of failed discs.
3. Insert new blank media in place of the failed discs.
Your replacement discs will then be written.
Press STOP.
Read the screens that follow carefully, because it is very easy to mix up failed
discs with successful discs.
2.3 Remove Successful Discs
You are now asked to press REC to eject successful discs. Do so, then remove
the discs indicated and store them safely. These discs are 100% correctly
written copies.
Then press STOP again.
10
2.4 Remove & Dispose Of Failed Disc
Now press REC to eject the failed disc. Remove this disc and dispose of it, then
press STOP.
2.5 Rewriting
At this stage you have removed all discs from the system, so you are given the
option to cancel or continue with rewriting the failed discs as normal:
Rewriting of
failed discs.
Press REC to begin
Press STOP to cancel
Screen 16: Rewriting Option
2.5.1 Cancelling Rewriting
If you cancel, you will be asked if you are sure, then the recording will be
permanently deleted from the internal store. You will be asked to press STOP a
final time, after which the system will return to the Idle screen.
2.5.2 New Blank Discs
Press REC to begin the rewriting process. You will be asked to insert blank discs
in specific drives:
Put a blank disc in
drive C
then press REC.
Press STOP to cancel
Screen 17: Insert Blanks
Do so, then press REC. The disc(s) will be checked and if any are not blank,
they will be ejected and you will need to repeat this.
Once blank discs are in all the required drives, rewriting will commence.
2.5.3 Performing The Rewrite
During rewriting a progress indicator will be shown for each disc being
rewritten.
When rewriting is complete, a 2-tone beep will sound and a Rewriting Complete
screen will be displayed.
Press STOP to return to the Idle screen.
11
2.5.4 Rewriting Failed
In the unlikely event that the replacement disc fails as well as the original, the
failed disc rewriting procedure will be repeated from the Recording Summary
screen (see chapter 2.2).
12
Chapter 3 - Power Loss Protection
Whether your AIR is battery or mains powered, it will never lose the recording
due to power loss.
If the battery runs out or there is a mains power cut during a recording, the AIR
will guide you through recovering the recording when it is next powered up.
3.1 - After Power Loss
Upon re-powering the AIR, the first screen you will see is:
WARNING
Power loss during
last recording.
Press REC
Screen 18: Power Loss Detected
Press REC and you will be prompted to check that the date and time are
correct, to ensure that your recording is written with accurate time information.
Press REC again to see the current date and time.
Please check the
time and date.
Press REC
Screen 19: Date & Time Prompt
Press REC if no change is needed, or PAUSE to change the date and time:
Check Date & Time
[Thu 2nd Aug 2007]
[12:27.32]
REC:OK PAUSE:Change
Screen 20: Check Date & Time
If you choose to change the date and time, see chapter 1.2 for further info.
13
3.2 - Resume
Once the date and time have been confirmed, the next screen will depend on
whether the recorder was recording, paused or writing the discs at the time of
power failure.
If the recorder had been in the middle of recording, then you will be offered to
resume recording:
Recording paused
Press REC to resume
Press STOP to finish
Screen 21: Recording paused
This is treated like any other pause and recording continues from here as
normal, however an entry will be logged in the recording manifest stating that
power was lost and that the recording was subsequently resumed.
If you press STOP, see below.
3.3 - Stop
If the recorder had been paused or was writing discs at the time of power loss,
then it will require you to stop the recording and write what has been recorded
so far, to disc.
Press REC to write
previous recording
to disc, or STOP
to discard it.
Screen 22: Write previous recording
Here you have the option to discard the recording. You will be asked to confirm
and then the recording will be cancelled entirely. WARNING: This exists only
to enable you to break out of the power loss protection in the unlikely event
that you cannot successfully write the discs, but need to do another recording.
Press REC to proceed with writing the discs. If power was lost while the
recording was being written to disc, then those discs will be unusable and must
be rewritten (see chapter 2.2 for details).
Once the recording has been either written to disc, resumed or cancelled, the
AIR will resume normal operation.
14
Chapter 4 - Networking
If your AIR has its networking capabilities enabled, it will operate slightly
differently to the basic AIR (chapter 1). The following chapter describes those
differences.
4.1 System Start-up
When the system starts up, the first thing it will do is connect to the network
storage server. This happens before you are asked to confirm the date and
time and will only take a few seconds, unless there is a network problem.
If the unit detects a missing network cable (or a cable only plugged in at one
end), it will display the following warning:
WARNING: No Link
The network port is
not connected.
Screen 23: No Link
When the network
automatically.
cable
is
reconnected,
the
recorder
will
continue
If the unit cannot communicate with the network storage server, the following
screen will be displayed:
WARNING
Network connection
failed.
Press REC to retry
Screen 24: Network connection
failed.
Press REC to retry. If you see the same warning again, contact your network
administrator to resolve the issue. Once the problem has been resolved, press
REC to retry.
Once a connection has been made, you will get to the Check Date & Time
screen. Continue from chapter 1.2.
15
4.2 Starting A Recording
When you start a recording, as per chapter 1.3, operation will continue as
normal up to the microphone level check (chapter 1.3.2).
Before the microphone level check, the AIR will wait for network information:
Waiting for
network start.
Screen 25: Waiting for network start.
The recording must be started remotely, via a compatible network booking
system. You can book a recording at any time, even before the AIR is switched
on.
Once the recording is booked, a tone will sound and the above screen will
change to confirm the booked recording:
Interviewer(s):
Mr. Reynolds
Correct?
REC=Yes
STOP=No
Screen 26: Check Interviewer
If the interviewer displayed is not the interviewer present, press STOP to reject
the recording and return to the Idle screen. The recording will need to be rebooked to continue.
If the interviewer is correct, press REC to continue and you will be asked to
confirm the interviewee:
Interviewee:
Alex Jones
Correct?
REC=Yes
STOP=No
Screen 27: Check Interviewee
Confirm the interviewee. The AIR will then continue with the microphone level
check (see chapter 1.3.2).
16
4.3 Stopping Recording
When you stop the recording on a networked system, the recording will be
uploaded to the network storage server before the discs are written.
If there is a problem with the upload, you will see the following screen:
WARNING
Network failed.
Press REC to retry.
Press STOP to cancel
Screen 28: Network Connection
Error
Press REC to retry the upload, and if it fails again, contact your network
administrator.
Do not press STOP unless the network problem cannot be corrected, otherwise
the recorder will not upload a recording.
Next, the discs will be written (as per chapter 1.5). The discs will always be
written, even if the network upload was cancelled.
17
Chapter 5 - Keyboard Input
If your AIR has keyboard meta-data input enabled, it will operate slightly
differently to the basic AIR (chapter 1), when a recording is started.
5.1 Data Entry
When you start a recording, as per chapter 1.3, operation will continue as
normal up to the microphone level check (chapter 1.3.2).
Before the microphone level check, the AIR will prompt you to enter
information via the keyboard:
Data Entry
Enter the following
information...
Press REC to begin.
Screen 29: Data Entry
Press REC to start data entry.
5.2 Prompt
The exact entries you will be prompted for, depend on how your AIR is
configured and may differ from the examples.
Next you will see the first prompt:
Interviewer's name:
ENTER to confirm
Screen 30: Prompt for Input
Type in the requested data with the keyboard, then press ENTER.
You can backspace and delete, as well as move the cursor back and forth with
the left and right arrow keys. You may enter more information than fits on the
screen – the entry field will scroll to the right when you reach the edge.
18
5.3 Confirm
When you press ENTER, the data you entered will be displayed and you will be
asked to confirm it is correct:
Interviewer's name:
Mr. Reynolds
Press REC to confirm
Press STOP to edit
Screen 31: Confirm Input
If the data you entered does not fit on the screen, it will scroll across the
display.
Press REC to confirm and move on to the next item, or STOP to return to the
previous screen and edit what you have typed.
5.4 Finish Data Entry
When you confirm the last item, you will see the following screen:
Finish data entry?
REC: Yes
STOP: Re-edit
Screen 32: Finish Data Entry
If you are satisfied all your entries were correct, press REC to continue with the
microphone level check (see chapter 1.3.2).
If you would like to review all entries, press STOP and you will start from the
beginning again (chapter 4.2), however your previous entries will be
preserved, so you only need edit them.
19
Chapter 6 - Remote Monitoring
If your AIR is configured for hard wired remote monitoring, it will need the
remote monitoring interface unit (part code: 1D-RMONI), connected to the
remote monitoring port on the rear of the AIR, via the remote monitoring
interface cable (part code: 1D-RMONIC).
The interface unit houses a recording LED, remote monitoring LED, remote
monitoring on/off switch, headphone socket and headphone volume control.
6.1 Using Remote Monitoring
When the AIR starts recording, the recording LED on the interface unit will also
light, but audio will not be output to the headphones.
To enable remote monitoring, switch the remote monitoring on/off switch to the
ON position. NOTE: if the switch was already in the ON position, then it must
first be switched OFF then ON. This avoids accidentally remote monitoring
when a recording starts, due to the switch being left ON.
When remote monitoring is switched on, the remote monitoring LED on the
interface unit will light, along with the remote monitoring LED on the AIR itself.
Audio will then be output to the interface unit and may be heard by connecting
headphones to it. Switch the switch on or off at any time during the recording
to disable/enable remote monitoring.
When the recording ends, remote monitoring will be automatically disabled by
the AIR and the switch will no longer enable or disable it until another recording
is started.
6.2 Additional Recording Indicators
If you require a “Recording in Progress” indicator outside your interview room
or elsewhere, you can attach up to 3 remote monitoring relays (part code: 1DRMONRE), either in-line with the remote monitoring interface unit or on their
own.
Each relay will switch 1 240Vmains feed (up to 3A), on when the AIR is
recording, and off when it stops. A light bulb or backlit sign are the intended
use for this equipment.
20
Chapter 7 - User Setup
From the Idle screen (see Basic Usage), pressing and holding the PAUSE button,
will put the unit into User Setup mode.
7.1 User Setup - Main Menu
The options presented to you may differ based on the features enabled in your
product. You will always see at least the following options:
> System Info.
Exit
Screen 33: User Setup - Main Menu
Press the STOP button to move the cursor ( > ), down, and the REC button to
move it up. Use the PAUSE button to select the option that the cursor points to.
Select System Info. to view the serial number, version, age and time zone of
your AIR. The current TCP/IP settings are also shown, if the AIR has networking
enabled.
7.2 User Setup - Network Settings
If your AIR has networking enabled, then the User Setup screen will have an
extra option: Network Settings.
This option will allow you to change the following network settings from the
AIR's front screen:
•
DHCP on/off
•
IP Address
•
Network mask
•
Default gateway
•
FTP server IP address
•
FTP server port
21
The first screen, Set DHCP, will show you the current DHCP setting and ask you
to change or confirm it. If you turn it off, you will next be asked to manually
enter the IP address, network mask and default gateway.
Left on, the AIR will get its TCP/IP settings from a DHCP server (if available), and
you will not be asked to enter them manually.
Set DHCP
DHCP: on
REC = on, STOP = off
PAUSE = cancel
Screen 34: User Setup – Network
Settings (Set DHCP)
Editing is done 1 digit at a time, using REC to increase and STOP to decrease
that digit. Press PAUSE to move to the next digit. A cursor will blink on the
digit being edited.
Set FTP Server IP
192.168.000.001
REC=up, STOP=down
PAUSE=next
Screen 35: User Setup – Network
Settings (Set FTP Server IP)
After the last digit, you will be shown what you entered and asked to confirm
(REC), edit it again (STOP), or cancel and return to the Idle Screen (PAUSE).
Once all fields have been edited and confirmed, all network settings will be
displayed for you to check over. Press REC to progress through these screens.
Finally, you will be asked whether you want to save your changes. Pressing
STOP (no), will repeat the editing process from the first screen (Set DHCP),
without losing any changes you have made so far.
Pressing REC (yes), will save the settings and then ask you to power the AIR off
and on.
22
Chapter 8 - Rear Panel Connections
At a minimum, you must connect both microphones (1) and the power (2) to
the rear of the unit.
(1) Microphones
AIR
(2) Mains Power
(3) Optional
(4) Maintenance
(1) Microphones
AIRLight
(2) DC Power
(4) Maintenance
(3) Optional
The USB, network and remote monitoring ports (3) are only enabled in specific
configurations. The console port (4) is used for maintenance only.
23
Chapter 9 -Troubleshooting
Most errors that occur on the AIR will be reported on-screen in plain English.
However, there are a few errors that cannot be expressed as such. Instead, the
Alert LED on the front of the unit will light and a beep will sound every second
until the problem is addressed.
The primary cause of the Alert LED being lit is over-heating. Ensure your unit is
not in a very hot location (hotter than 35 degrees Celsius), that the back panel
is not obstructed, and that the unit is not on a soft surface such that its bottom
vents are obscured.
If all of the above conditions are avoided and the alert does not abate after a
few minutes, your unit will need maintenance.
24
Chapter 10 - Conformance
The One Digital AIR has been designed as a direct replacement for legacy
analogue tape audio recorders.
The AIR meets all audio interview recording requirements under the UK Police
and Criminal Evidence Act 1984 (PACE) and Home Office guidelines.
Chapter 11 - Technical Specification
System
Audio Inputs
Power Requirements:
230 V AC, 50/60 Hz
AIR:
40W max.
AIRLight: 33W max.
Freq. Response: 50Hz – 12kHz (-3dB).
Input Impedance: 600ohm.
Input Sensitivity: 10mV @ 1kHz.
Crosstalk: >60dB typical.
Digitised: 2 channels @ 48kHz
Phantom Power: 30V
Operating Temperatures:
5°C to 35°C
Disc Drives
Operating Humidity:
35% to 70% RH, non-condensing.
Non-Operating Humidity:
20% to 80% RH, non-condensing.
Dimensions:
AIR:
W: 364mm + 41mm carry handle
D: 260mm
H: 130mm
AIRLight:
W: 220mm + 30mm carry handle
D: 210mm
H: 120mm
Add 30mm width for battery version.
Mass (approx.):
AIR: 3.8kg
AIRLight: 2.3kg
Physical Disc Format: CD-R
On-Disc Formats:
•
CD-DA (Red Book)
•
MPEG1 layer II @ 192kbps
•
MPEG2 layer III @ 192kbps
•
Speex @ 24-70kbps
NOTE: multiple formats can be used.
Number Of Drives (copies):
AIR:
2, 3 or 4
AIRLight: 2
Finalising Times:
2 minutes, for a full 2 hour recording.
(less for shorter recordings).
General
Max. Recording Times:
•
2 hours (normal mode).
•
8 hours (extended mode).
•
80 minutes (CD-DA mode).
Acoustic Noise:
AIR:
• max. 44 dB(A) @ 1m, idle.
• max. 46 dB(A) @ 1m, finalising. Supplied Accessories:
•
Quick start guide.
AIRLight:
•
User manual.
• max. 36 dB(A) @ 1m, idle.
•
Mains lead.
• max. 41 dB(A) @ 1m, finalising.
•
Sample printed CD-Rs.
25
Chapter 12 - Support Information
For further technical support or sales information, please contact One Digital
Ltd. in any of the following ways:
E-mail: [email protected]
Telephone: +44 (0)1604 652 152
Postal Address:
One Digital Ltd.
Ridgeway Farm
Hartwell Road
Ashton
NORTHAMPTON
NN7 2JR
Copyright Notice
It may be illegal to copy certain materials without permission or license,
including documents and images contained in this manual. If you are unsure
whether you have permission, please seek legal advice.
26