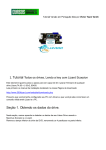
1
Setting up your own Internet Radio Station
Author:
Version:
Date:
Streamit B.V.
1.0.0
March 2007
Copyright Agreement
Notitions about trademarks
LUKAS IS A REGISTERED TRADEMARK OF STREAMIT, SEE WWW.STREAMIT.EU.
SIMPLECAST IS A COPYRIGHT OF SPACIAL AUDIO SOLUTIONS.
ICECAST2 IS A COPYRIGHT OF XIPH.ORG, SEE WWW.XIPH.ORG AND WWW.ICECAST.ORG
ALL OTHER TRADEMARKS AND REGISTERED TRADEMARKS THAT ARE MENTIONED IN THIS USERMANUAL, ARE
OWNED BY THEIR RESPECTIVE OWNERS.
© 2007 STREAMIT – All rights reserved
MATERIAL CONTAINED HEREIN IS COPYRIGHTED, PROPRIETARY AND CONFIDENTIAL MATERIAL
CONTAINING THE TRADE SECRETS OF STREAMIT AND/OR ONE OF ITS AFFILIATES. THE USE OF THIS MATERIAL
IS SUBJECT TO THE TERMS OF ANY APPLICABLE NON-DISCLOSURE AGREEMENT. IN ADDITION, THE MATERIAL
MAY NOT BE DISCLOSED TO A THIRD PARTY, IN WHOLE OR IN PART, WITHOUT THE EXPRESS PRIOR WRITTEN
CONSENT OF STREAMIT OR ONE OF ITS AFFILIATES. THIS MATERIAL IS FURTHER PROTECTED UNDER
NATIONAL AND INTERNATIONAL COPYRIGHT LAWS AS AN UNPUBLISHED WORK AND UNAUTHORIZED
REPRODUCTION OR MODIFICATION IS PROHIBITED.
THE
Foreword
The material contained herein is copyrighted, proprietary and confidential material containing the trade secrets of Streamit and/or one of its affiliates. The use of this material is subject to the terms of any applicable
non-disclosure agreement. In addition, the material may not be disclosed to a third party, in whole or in part, without the express prior written consent of Streamit or one of its affiliates. This material is further
protected under national and international copyright laws as an unpublished work and unauthorized reproduction or modification is prohibited.
Foreword
With the aid of this user manual and some knowledge about computers, software installation and
the Internet you will be able to setup your own Internet Radio Station using your sound-enabled
home PC. The setup in this example was performed on single Pentium 4 running windows XP.
This document is only meant for providing the user with the basic knowledge in Internet radio
and helps him in the first steps with setting up and running an Internet Radio Station.
This document introduces the user with Streamit’s products and provides an understanding on
where and how these products are used.
This reference is provided by Streamit free of charge, but no further support is given on this setup
or any of the non-Streamit products. We recommend that you visit the Streamit forum
(http://forum.streamit.eu/nl/ in Dutch) or Streamit’s partners for more information.
Setting up your own Internet Radio Station
Version 1.0.0
1
Requirements/System Overview
1 Requirements
The material contained herein is copyrighted, proprietary and confidential material containing the trade secrets of Streamit and/or one of its affiliates. The use of this material is subject to the terms of any applicable
non-disclosure agreement. In addition, the material may not be disclosed to a third party, in whole or in part, without the express prior written consent of Streamit or one of its affiliates. This material is further
protected under national and international copyright laws as an unpublished work and unauthorized reproduction or modification is prohibited.
To be able and set up and run your own Internet Radio Station the following are required:
1. A personal computer (minimum a Pentium II with Windows 98 Second Edition, but a
Pentium III or IV with Windows XP is preferred) with an Ethernet interface and a
reasonable soundcard (Windows 98: Soundblaster PCI128; Windows XP: Soundblaster
4.1 Digital) with a Line IN input. Most computers currently available in the market
feature a soundcard which is good enough.
2. Simplecast and Icecast2 software which can be downloaded from the download page of
Streamit’s website.
3. An Internet connection (High speed ADSL or cable is preferred)
When an ADSL line is used the ADSL line should have a fixed IP address. It is very important
that the ADSL line has an upstream bitrate which is high enough and an overbooking ratio which
is not too high. The number of listeners which can be served at the same time can be calculated
with the following formula:
upstream bitrate * % bandwidth available / bitrate per listener.
An example: Upstream bitrate of 1024 kbit/s, an average upstream bandwidth availability of 70%
and you wish to deliver sound quality of 56 kbps netto MP3 (about 70kbps including TCP/IP
headers). The number of listeners you can serve at the same time is (1024 * 70% / 70 ) about 10
listeners.
2 System Overview
The total setup for your Internet Radio Station would be as follows:
1. A system of your desire used to provide the audio that need broadcasting is connected to
your soundcard Line IN input. The Simplecast software encodes the audio data from the
audio card into digital information (mp3 in our example) that the computer then hacks
into packets and broadcasts them via the Internet.
2. When set up properly, the mp3 data are accepted by Icecast (the Stream Server) and
relayed for distribution to users.
3. The user plays the audio using his player software (e.g: Winamp) or hardware
(SIR/Lukas). The role of the player is to assemble the packets of digital information
together and converting it back into audio.
The software (Simplecast and Icecast) can be running in the same PC or different PCs. In our
example, both the software is run in the same PC. The setup is depicted below.
Setting up your own Internet Radio Station
Version 1.0.0
2
System Setup
3 System Setup
The material contained herein is copyrighted, proprietary and confidential material containing the trade secrets of Streamit and/or one of its affiliates. The use of this material is subject to the terms of any applicable
non-disclosure agreement. In addition, the material may not be disclosed to a third party, in whole or in part, without the express prior written consent of Streamit or one of its affiliates. This material is further
protected under national and international copyright laws as an unpublished work and unauthorized reproduction or modification is prohibited.
This section will describe how to setup your soundcard and ADSL router for proper operation.
3.1 Configuring the Soundcard
The soundcard should be configured so that the volume level during recording is at about two
third. Only the line-in is selected as input. To check the correct functioning only the Wave and
Volume control should be selected in the Volume control panel. This should be done as follows:
From the start menu select Volume Control under Accessories → Entertainment. Select
Options→Properties to you get the screen below (to the left, probably in your own language).
Select in this screen Volume adjustment for Recording and select all volume controls. Next you
get the screen to the right. Select in this screen only the Line input and adjust the volume level to
about two third.
Now click again on the Options→Properties menu. Choose this time Playback and select all
volume controls. Next you get the screen below. Mute all inputs except Volume and Wave. Set
the level of Wave on maximum and the level of Volume about half. The soundcard should now
be configured properly.
Setting up your own Internet Radio Station
Version 1.0.0
3
System Setup
The material contained herein is copyrighted, proprietary and confidential material containing the trade secrets of Streamit and/or one of its affiliates. The use of this material is subject to the terms of any applicable
non-disclosure agreement. In addition, the material may not be disclosed to a third party, in whole or in part, without the express prior written consent of Streamit or one of its affiliates. This material is further
protected under national and international copyright laws as an unpublished work and unauthorized reproduction or modification is prohibited.
3.2 Configuring your ADSL modem
The router functionality which is in your ADSL modem, protects your computer against
unwanted intruders from outside. The standard settings ensure your computer is not accessible
from outside through your ADSL interface. However, in some situations it is desired that people
(or computers) from outside get access to a small part of your computer In this case a small door
should be opened in the router. Fortunately most ADSL routers have provisions for this. In the
following pages this configuration will be described based on an Edimax router example.
With the virtual server settings remote users automatically can be redirected to the services on the
PC through public IP-addresses. The virtual server automatically redirects the public IP-address
to the internal IP-address. In other words, depending on the required service (TCP/UDPportnumber), the router redirects the external service request to the appropriate server (located on
one of your LAN’s private IP-address).
If you configure, for example, the option [Type/Public Port] on TCP/80 (HTTP or Web) and the
option [Private IP/Port] on 192.168.2.2/80, all http-requests from external users are send to
192.168.2.2 on port 80. This way users can, by simply typing in the ADSL fixed IP address
together with the correct port number, get access to the required service from your PC.
Assuming the internal IP-address of the PC running Simplecast and Icecast2 is 192.168.2.70, you
fill in 70 at Private IP. Because Icecast2 as default uses port 8000, you fill in 8000 at Private Port.
Of course you may fill in the port you want (any port above 1024, when you ensure Icecast2 uses
the same), but there is no reason why not to use port 8000 which is the standard port for audio
services. As Icecast2 uses the TCP protocol, this one should be selected also.
Now press the Apply button on the bottom of the page (please scroll through to view the button)
and the router has been configured! All requests from <public IP address>:8000 now are
redirected to 192.168.2.70:8000; in this case Icecast2.
Setting up your own Internet Radio Station
Version 1.0.0
4
Simplecast Configuration
The material contained herein is copyrighted, proprietary and confidential material containing the trade secrets of Streamit and/or one of its affiliates. The use of this material is subject to the terms of any applicable
non-disclosure agreement. In addition, the material may not be disclosed to a third party, in whole or in part, without the express prior written consent of Streamit or one of its affiliates. This material is further
protected under national and international copyright laws as an unpublished work and unauthorized reproduction or modification is prohibited.
4 Simplecast Configuration
Download and install Simplecast from the download page of Streamit’s website or from the
Streamit CDROM. Start the Simplecast application. Now you get the screen below:
In this main screen you can configure the following items:
1. The switching on/off of the soundcard. If the soundcard is configured well and there is
sound on the input, you see the VU meter moving. Please leave the soundcard always on!
If the soundcard is switched on, the text on the button is changed to Stop.
2. The encoders (converter from digital sound to MP3)
3. The statistics (number of listeners).
With the POWER button (top-left in the screen) you can switch off Simplecast while HIDE (topright) will hide the Simplecast in the system tray.
To start the configuration of Simplecast press Config and you get the following screen:
In 'General options', ensure that Automatically start on load is selected. This ensures the
encoders automatically log in at the audioserver after Simplecast is started. If you do not do this,
it seems like the program is running correctly, but it does not !! In Capture sound from device
you can select the used soundcard (when your PC has more than one). You can determine
yourself if you want to use logging or not.
You can skip the 'Member details' and 'Station details' menus. However, if you want to use these
features, please read the Simplecast documentation how to configure them.
Setting up your own Internet Radio Station
Version 1.0.0
5
The material contained herein is copyrighted, proprietary and confidential material containing the trade secrets of Streamit and/or one of its affiliates. The use of this material is subject to the terms of any applicable
non-disclosure agreement. In addition, the material may not be disclosed to a third party, in whole or in part, without the express prior written consent of Streamit or one of its affiliates. This material is further
protected under national and international copyright laws as an unpublished work and unauthorized reproduction or modification is prohibited.
Simplecast Configuration
'Statistic relays' will be configured after you have configured the encoders. If you do this now (as
described in the Simplecast help) it is our experience the statistics logging doesn’t always start
correctly.
From the 'Event Adaptors' menu, ensure the Select metadata adaptor is set to None. From the
'History log' menu the loggings settings can be configured at own desire. 'Registration key' menu
is used to register the program. Click OK to apply the configurations.
Next click on the Encoders button and you get the encoders screen. Below you see two encoders
already, while it is logical that when first run there will be no encoders in the list yet. After
configuring you can decide yourself if you want to keep the Encoders screen visible or not by
clicking on HIDE.
In this screen you can add encoders which convert the audiosignal which comes from the
soundcard to one or more audioservers. With Simplecast you can broadcast to several
audioservers at the same time. This manual describes the method which is supported by Streamit:
broadcasting with Simplecast using Icecast2.
The quality of the MP3 signal is fully determined by the encoder. As only the decoder algorithm
is standardized within MPEG, many different MP3 encoders are available in the market. To add
an encoder press the + button and you will get the Select plugin screen. Select MP3 and
mp3PRO and click on OK. Then you get the following screen (to the right)
Choose the desired output quality and format taking into account the calculations above
(upstream, quality and number of listeners).
Setting up your own Internet Radio Station
Version 1.0.0
6
Simplecast Configuration
The material contained herein is copyrighted, proprietary and confidential material containing the trade secrets of Streamit and/or one of its affiliates. The use of this material is subject to the terms of any applicable
non-disclosure agreement. In addition, the material may not be disclosed to a third party, in whole or in part, without the express prior written consent of Streamit or one of its affiliates. This material is further
protected under national and international copyright laws as an unpublished work and unauthorized reproduction or modification is prohibited.
With the option Auto start encoder after the encoder automatically tries to connect with the
configured audioserver after Simplecast is started. Set this to 5 seconds.
With the option Auto reconnect encoder after; if (for whatever reason) the audioserver
connection is broken, Simplecast tries to reconnect with the audioserver. Set this this to 1 second.
Next click the Server Details tab. The following screen is displayed:
Set the Server Type to IceCast. Next select Icecast2 and fill in the Server details. In our example
both Simplecast and Icecast2 run on the same PC and the default configuration of IceCast2 have
not been changed. When that is the case, the Server details are as follows.
Server IP:
localhost
Port:
8000
Password:
This password is the same password as the <source-password> in Icecast2. The
default password in Icecast2 is hackme. You may choose to change the
password to your desire, so long that the both passwords are the same.
Mount:
/live has been used in this example but you are free to choose your own name.
When Icecast and Simplecast are running in different machines, the Server IP will have to be the
external IP of the PC where Icecast2 is running. In any case you will need to remember the
settings above because these must be exactly the same as the configuration of Icecast2.
Station Details parameters you may fill in at your own preference.
In the Stream Archive tab, deselect the Save stream to file option. If you select this option, you
can store your files locally. Using this feature you can store services to be listened back at a later
stage or burn into CD etc. These functions, which may be in some cases very useful are beyond
the scope of this manual.
Click OK to apply the configurations.
Setting up your own Internet Radio Station
Version 1.0.0
7
Simplecast Configuration
The material contained herein is copyrighted, proprietary and confidential material containing the trade secrets of Streamit and/or one of its affiliates. The use of this material is subject to the terms of any applicable
non-disclosure agreement. In addition, the material may not be disclosed to a third party, in whole or in part, without the express prior written consent of Streamit or one of its affiliates. This material is further
protected under national and international copyright laws as an unpublished work and unauthorized reproduction or modification is prohibited.
If you want to use your own Icecast2 audioserver (as in this example), the time has come now to
install it. For the further setup and testing of Simplecast it is necessary to have a running the
Icecast2 server available. Please skip to the next chapter “Configuring Icecast2” first.
After Icecast2 has been properly configured, press the ► button in the Encoder screen to start the
encoder in Simplecast. If everything is ok, the status of the encoder changes from Idle to Logging
in to Encoding.
Optionally you can configure the statistics logging of Icecast2 to appear in the Simplecast main
screen. You also can do this at a late stage or simply skip it. To do this, press on the main screen
the Config button and select ‘Statistic Relays' from the menu. The following screen is now
shown:
In this menu you can create a connection to the audioserver to enable viewing of statistics in the
Simplecast main screen. After pressing the + button, you get the Select plugin screen. Select
Icecast2 statistic relay and press on the OK button. The following screen (to the right) is shown.
If everything goes as it should (but be aware, this feature does not always work stable) in Alias
now the encoders which broadcast through this Icecast server appear. That was the reason to first
configure and switch on the encoders before configuring the statistics relays.
As a next step you can give each stream a color. This is very useful especially when you
broadcast to more than one audioserver and/or broadcast in several bitrates at the same time.
Setting up your own Internet Radio Station
Version 1.0.0
8
Simplecast Configuration
The material contained herein is copyrighted, proprietary and confidential material containing the trade secrets of Streamit and/or one of its affiliates. The use of this material is subject to the terms of any applicable
non-disclosure agreement. In addition, the material may not be disclosed to a third party, in whole or in part, without the express prior written consent of Streamit or one of its affiliates. This material is further
protected under national and international copyright laws as an unpublished work and unauthorized reproduction or modification is prohibited.
By pressing the Statistics button in the main menu you can see the amount of listeners as a
function of the time:
After starting this screen for the first time, you most probably see under Status most probably
Inactive or something like this. To check if everything is configured well, press the button right
of the – button. Simplecast makes a connection to Icecast2 and grabs the statistic information.
Simplecast grabs the statistical information automatically one time per minute, but for the first
time it lets you wait for 1 minute.
Setting up your own Internet Radio Station
Version 1.0.0
9
Icecast2 Configuration
The material contained herein is copyrighted, proprietary and confidential material containing the trade secrets of Streamit and/or one of its affiliates. The use of this material is subject to the terms of any applicable
non-disclosure agreement. In addition, the material may not be disclosed to a third party, in whole or in part, without the express prior written consent of Streamit or one of its affiliates. This material is further
protected under national and international copyright laws as an unpublished work and unauthorized reproduction or modification is prohibited.
5 Icecast2 Configuration
Download and install the program from www.icecast.org or from the Streamit CDROM. Follow
hereby the installation instructions on the screen. After successful installation start the Icecast2
application. Now you see the screen below:
We recommend that Start Server on Application Startup is selected. Press on the Stop Server
button then Configuration → Edit Configuration. The Icecast2 configuration file is opened
(normally in Notepad)
All settings in this file are enclosed within tags in the form: <tag>parameter</tag>. Some groups
of parameters also are in between metatags in this form. It is very important to keep this XML
configuration intact !
Below you will find the values of all relative tags. The values you need to modify yourself are
indicated in red.
1. Group <limits>
<clients>
<sources>
<threadpool>
<queue-size>:
<client-timeout>:
<header-timeout>:
<source-timeout>:
<burst-on-connect>:
<burst-size>:
The number of listeners which are allowed to listen simultaneously. You
should determine this value based on the bandwidth of your connection
and quality.
1 ( you can change the default value if more than one source (or encoder)
is used)
5
102400
30
30
30
1
20480
Setting up your own Internet Radio Station
Version 1.0.0
10
Icecast2 Configuration
2. Group <authentication>
This password should be the same as the one used in Simplecast.
This password is not used, but we recommend you to change it to
withheld undesired visitors.
<admin-user>
Default admin
<admin-password>
Default hackme (this password is also used in the Simplecast statistics
logging)
3. Group <listen-socket>
The material contained herein is copyrighted, proprietary and confidential material containing the trade secrets of Streamit and/or one of its affiliates. The use of this material is subject to the terms of any applicable
non-disclosure agreement. In addition, the material may not be disclosed to a third party, in whole or in part, without the express prior written consent of Streamit or one of its affiliates. This material is further
protected under national and international copyright laws as an unpublished work and unauthorized reproduction or modification is prohibited.
<source-password>
<relay-password>
<port>
8000
4. Group <paths>
<basedir>
<logdir>
<webroot>
<adminroot>
./
./logs
./web
./admin
5. Group <logging>
<accesslog>
<errorlog>
<loglevel>
access.log
error.log
3
6. Group <security>
<chroot>
0
7. Tags which are not in a group
<hostname>
<fileserve>
localhost
1
After you have modified and verified once more all the tags, you should store this file again under
the same name. Close the editor and click on Start Server to restart the Icecast2 server again.
Setting up your own Internet Radio Station
Version 1.0.0
11
Testing
6 Testing
The material contained herein is copyrighted, proprietary and confidential material containing the trade secrets of Streamit and/or one of its affiliates. The use of this material is subject to the terms of any applicable
non-disclosure agreement. In addition, the material may not be disclosed to a third party, in whole or in part, without the express prior written consent of Streamit or one of its affiliates. This material is further
protected under national and international copyright laws as an unpublished work and unauthorized reproduction or modification is prohibited.
This section describes how to test each component of this setup as well as the whole system.
6.1 Testing Simplecast
To test Simplecast execute the following steps:
1. Ensure Icecast2 is running.
2. Connect an audiosource to the Line-in input of the soundcard. Start Simplecast switch the
soundcard on. If the setup is working properly you can see the VU meter move.
3. Check the encoder screen: if everything is working properly, it looks like the screen
below (The number of encoders listed depends on your settings.
6.2 Testing Icecast2
The testing of Icecast2 is as easy. Please follow the next steps:
1. Start Icecast2.
2. Start Simplecast as described in the previous paragraph.
3. If everything is working properly, you see the following screen:
Setting up your own Internet Radio Station
Version 1.0.0
12
The material contained herein is copyrighted, proprietary and confidential material containing the trade secrets of Streamit and/or one of its affiliates. The use of this material is subject to the terms of any applicable
non-disclosure agreement. In addition, the material may not be disclosed to a third party, in whole or in part, without the express prior written consent of Streamit or one of its affiliates. This material is further
protected under national and international copyright laws as an unpublished work and unauthorized reproduction or modification is prohibited.
Testing
After pressing on the Source Level Stats tab, you get the screens shown below. In this example
two sources were used (two encoders in fact) live and live2. If they are selected, the statistics for
each will be shown. From the statistics you can see that currently there is one listener for each of
the streams.
6.3 Testing Simplecast + Icecast2
To be sure everything works properly you want to hear sound from the speakers of the PC (or a
Lukas/SIR Internet radio). To configure your Lukas/SIR to play the stream, you could program
your device in “Mode 3” with one of the channels having the address of the stream as URL
(http://localhost:8000/live in our example). For more information on how to do that, download the
Streamit Terminal Program and the related documentation [1] from Streamit website.
To test with a PC is very easy and works as follows:
Install the Winamp audioplayer from the Streamit CD-ROM or from www.winamp.com and
follow the installation instructions.
1.
2.
3.
4.
Start Winamp.
Press on CTRL L or File->Play URL
Enter the local address of the stream: http://localhost:8000/live
If everything is working properly, you will see that winamp will play your radio station
(MY STATION NAME in our example). If so, you now can be sure that Icecast2 and
Simplecast have been configured properly. If Winamp is run in the same PC, you will not
hear any sound from the speakers because we did “mute” the speakers when we
configured the soundcard. So first you should enable the sound of the speakers (see
Soundcard Configuration).
Setting up your own Internet Radio Station
Version 1.0.0
13
The material contained herein is copyrighted, proprietary and confidential material containing the trade secrets of Streamit and/or one of its affiliates. The use of this material is subject to the terms of any applicable
non-disclosure agreement. In addition, the material may not be disclosed to a third party, in whole or in part, without the express prior written consent of Streamit or one of its affiliates. This material is further
protected under national and international copyright laws as an unpublished work and unauthorized reproduction or modification is prohibited.
Testing
6.4 Testing Simplecast + Icecast2 + ADSL modem
If you have succeeded the previous step, this is the last test you should execute to be sure
everything has been configured well. Instead of entering the local address of the stream you now
enter the public IP-addres: http://ip-adres:8000/live
You should have received the public ip-address from your ADSL provider. If you cannot find this
address anymore, just start your Internet Explorer (from the PC on which Winamp is installed)
and type in the following URL to get the IP http://www.streamit.eu/support/ip.php.
If your IP is XYZ.YZX.11.25,
http://XYZ.YZX.11.25:8000/live
the
public
address
of
your
broadcast
now
is:
Type this address in Winamp, and if everything is configured properly Winamp will start playing
and if you have sound enabled on that PC, you will be able to listen to the stream. The same you
can do for Lukas/SIR.
Setting up your own Internet Radio Station
Version 1.0.0
14
The material contained herein is copyrighted, proprietary and confidential material containing the trade secrets of Streamit and/or one of its affiliates. The use of this material is subject to the terms of any applicable
non-disclosure agreement. In addition, the material may not be disclosed to a third party, in whole or in part, without the express prior written consent of Streamit or one of its affiliates. This material is further
protected under national and international copyright laws as an unpublished work and unauthorized reproduction or modification is prohibited.
References
7 References
1. Information on how to setup your Lukas/SIR devices can be found on the STP user manual;
installed together with STP which can be downloaded from the download page of Streamit’s
website.
2. Information on how to use http authentication for your Internet Radio Station can be found on
the Streamit Channel Specs document which can be download from the secure download
page of Streamit’s website. Only available for particular customers.
Setting up your own Internet Radio Station
Version 1.0.0
15