1
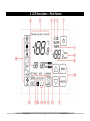
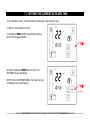
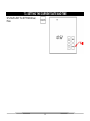
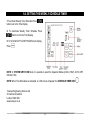
ThermoPad User Manual Please read these instructions carefully and take care to use this equipment correctly. Store these instructions safely for future reference. Be sure to pass these instructions and the corresponding installation instructions to anyone subsequently appointed to maintain this equipment. Installation and relocation of this equipment should be carried out by qualified persons only. Attempts by end users to install or move this equipment may lead to unsafe conditions or improper operation. CONTENTS 1. Safety Precautions ……………………………………………………………………………………….. 3 2. LCD Description – Parts Names ……………………………………………………………………………………….. 4 3. ON/OFF Settings ……………………………………………………………………………………….. 7 4. Setting the Temperature ……………………………………………………………………………………….. 8 5. Setting the Fan Speed ……………………………………………………………………………………….. 9 6. Setting the Operation Mode ……………………………………………………………………………………….. 10 7. Setting the Current Date and Time ……………………………………………………………………………………….. 11 8. Setting the Sleep Timer ……………………………………………………………………………………….. 14 9. Setting the Weekly Schedule Timer ……………………………………………………………………………………….. 16 2 1. SAFETY PRECAUTIONS Thank You for purchasing the ThermoPad Read this manual carefully and be sure you understand the information provided before attempting to use the product Keep this manual where it is readily accessible after reading it through. If another user operates the product in the future, be sure to hand over this manual to the new user Do not install the ThermoPad by yourself, consult a qualified engineer Do not relocate or reinstall the ThermoPad by yourself, consult a qualified engineer Do not touch the ThermoPad with wet hands Do not use the ThermoPad in extreme environment (places exposed to oils, steam, excess sun) Do not press any button using a sharp object ( a ball pen is acceptable) Do not wash the ThermoPad. Never Let the ThermoPad get wet. Do not clean the ThermoPad with benzene, thinner or other chemicals Do not modify or repair the ThermoPad Do not use flammable materials (e.g., hairspray or insecticide) near the product. Do not disassemble the ThermoPad 3 2. LCD Description – Parts Names 4 1 2 3 4 5 6 7 8 9 10 11 ON/OFF Button Press the ON/OFF button to start or stop the system Modbus Communication Indicator Schedule Timer Icon Indicates that a Timer is enabled Set Temperature Display Shows the Set Temperature Day of the Week Indicator Shows the current day of the week (or the set day when programming the schedule timer) Clock Display Indicates the current time (or the set time when programming the schedule timer) Timer Indicator “SLEEP TIMER” – Single Instance Timer Setup “TIMER” – Weekly Schedule Setup Minimum / Maximum Temperature Used to program Temperature restrictions (currently not in use) Room Temperature Indicates the Room Temperature MENU Button Used to Enter Setting Mode for Date, Time, Sleep Timer, Schedule Timer etc. Is displayed when touch next to Navigation Button CANCEL Button Touch to SAVE and EXIT Navigation Buttons UP/DOWN Used to adjust Operation Mode, Temperature Set point, Date and Time 5 SUN MON TUE WED THU FRY SAT SLEEP TIMER MIN MAX 12 ON / OFF Settings Used while setting the timers to activate/deactivate the Timers 13 Swing Option Button 15 16 Setup Indicators Displayed is some Setup Modes Sound on/off indication (currently not in use) Currently not in use 17 Malfunction indication 18 Fan speed button Indicates the Fan Speed Settings, touch to change (Low, Medium, High & Auto) 19 Operation Mode Icon Indicates the current operation Mode (Cool, Heat, Dry, Automatic, Auxiliary Heating & Fan) 14 Timer Active Timer NOT Active SETTINGS WAIT CLEANING 8888 6 3. ON / OFF SETTINGS When the ThermoPad is switched OFF, the screen will display the ON/OFF Button, Schedule Timer, Room Temperature, Day of the week and Time. NOTE: In OFF Mode, if the Clock display, Room Temperature and Schedule Timer are Disabled, the Screen will show only the ON/OFF Button Press the ON/OFF Button to switch the unit ON or OFF 7 4. SETTING THE TEMPERATURE To change the Set Temperature use the Navigation Buttons To raise the Room Temperature press To lower the Room Temperature press The set temperature changes 1oC each time the button is pressed When the Button is held down, the Set Temperature advances or reswitchs continuosly. A characteristic BEEP sound will support every touch. 8 5. SETTING THE FAN SPEED Depending on the Type of Air Conditioning, ThermoPad allows selection of up to 4 Fan Speed settings: Low, Medium, High & Auto. To change the Fan Speed use the Fan Speed Button Fan Speed LOW Fan Speed MEDIUM Fan Speed HIGH Fan Speed AUTO 9 6. SETTING THE OPERATION MODE Depending on the Type of system, ThermoPad allows to select up to five Operation Mode functions: COOL, HEAT, AUTO, DRY, HAUX & FAN To select / change the Operation Mode press the OPERATION MODE Icon. The OPERATION MODE Screen will display . The Operation Mode Screen display will be active for 3 secons after which will return to Default Mode. Using the NAVIGATION BUTTONS Choose the Operation Mode Desired COOL Cooling Operation Mode HEAT Heating Operation Mode DRY Dry Operation Mode AUTO Automatic Operation Mode HAUX Auxiliary Heating Operation Mode FAN Fan Operation Mode NOTE: If the NAVIGATION BUTTONS are not used within 3 seconds, the screen will return to the Default Mode 10 7.1. SETTING THE CURRENT DATE AND TIME To the Schedule Timers, ThermoPad relies on Date and Time Set by the user To Set The Current Date and Time: 1. Activate the MENU Button by touching the Screen Next to UP Navigation Button 2. Press the activated MENU Button 3 times. The SETTINGS Screen will display NOTE: When in SETTINGS MENU, the Week Day Icon and Minutes icon will be flashing 11 7.2. SETTING THE CURRENT DATE AND TIME 3. To set the Week Day, press the TOP SIDE OF THE DISPLAY. The Day will Change each time the Screen is Touched ( a characteristic BEEP sound will support every touch). The Options for changind the Week Day are: SUN MON TUE WED THU FRI SAT. 4.To set the Minutes, press the MINUTES Icon. When activated, the MINUTES Icon will start flashing ( a characteristic BEEP sound will support every touch). Using the Navigation Buttons , change the Minutes Each Time the Navigation Button is pressed, the time advances 1 minute. When the Button is held down, the time advances or reverses continuosly. Setting the HOUR is similar to setting the Minutes 12 7.3. SETTING THE CURRENT DATE AND TIME 5.To SAVE & EXIT The SETTINGS Screen, Press 13 8.1. SETTING THE SLEEP TIMER SLEEP TIMER Option enables the user to switch the System ON/OFF on occasions when the user desires to switch ON/OFF the system only once. ThermoPad supports 4 SLEEP TIMER operations. Each SLEEP TIMER operation enables switching the unit ON/OFF by a preset "time period" from the current time. Setting the SLEEP TIMER: 1. Activate the MENU Button by touching the Screen Next to UP Navigation Button 2. Press the activated MENU Button Once. The SLEEP TIMER Screen will display. 3. – 4. To change the SLEEP TIMER Operation Number press the Timer or and then the Navigation Buttons . This will allow the user to navigate between SLEEP TIMERS. 14 8.1. SETTING THE SLEEP TIMER 5. To SET The Time after which the System should turn ON/OFF, press the Clock Display 6.1 – System switch OFF and using the Navigation Buttons change to the time desired (the Time setup is similar to Date and Time Setup). 6. Press ON/OFF Button to set whether the system Should switch ON or OFF. NOTE: The SLEEP TIMER Operation Number will flash at all times 6.2 – System switch ON NOTE: When System Switch ON is enabled, the OPERATION MODE Icon will display (for details see Fig 6.1 - 6.2) 15 8.2. SETTING THE SLEEP TIMER 7. To activate SLEEP TIMER Operation Press button next to the Time Display 8. To deactivate SLEEP TIMER Operation Press button next to the Time Display 9. To SAVE & EXIT The SETTINGS Screen Display, Press 16 9.1. SETTING THE WEEKLY SCHEDULE TIMER ThermoPad allows up to 50 Weekly Schedules. Each schedule can occur up to 7 times a week. For each Schedule, the user can select the Operation Status (ON/OFF), Operation Mode (Cool, Heat, Dry, Auto, HAUX, Fan), Fan speed (Low, Medium, High, Auto), Temperature set point, and the occurrence (day of the week and time). After programming, each Schedule can be activated or deactivated. Setting the Weekly Schedule: 1. Activate the MENU Button by touching the Screen Next to UP Navigation Button 2. Press the activated MENU Button Twice. The TIMER Screen will display. 17 9.2. SETTING THE WEEKLY SCHEDULE TIMER 3. Press The Schedule Timer Number (The Timer will flash at all times). To change the Timer Number press the Timer then the Navigation Buttons or and . This will allow the user to navigate between Timer schedules NOTE: Up to 50 Weekly Schedule Timers can be set. 4. To Schedule the day (or several days) press on the days required. The icons for the selected days will start flashing. It is possible to select as many days of the week as the user desires (1 to 7). 18 9.3. SETTING THE WEEKLY SCHEDULE TIMER 6.1 – System switch ON 5. To SET The Time press the Clock Display and using the Navigation Buttons change to the time desired (the Time setup is similar to Date and Time Setup). 6. Press ON/OFF Button to set whether the system should switch ON or OFF. NOTE: When System Switch ON is enabled, the OPERATION MODE Icon will display (for details see Fig 6.1 - 6.2) 6.1 – System switch OFF 19 9.4. SETTING THE WEEKLY SCHEDULE TIMER 7.To activate Weekly Timer Schedule Press button next to the Time Display 8. To deactivate Weekly Timer Schedule Press button next to the Time Display 9. To SAVE & EXIT The SETTINGS Screen Display, Press NOTE: In SYSTEM SWITCH ON Mode, it is possible to select the Operation Modes (COOL, HEAT, AUTO, DRY, HAUX & FAN) NOTE: When Time Schedules are activated, on LCD screen will appear the SCHEDULE TIMER ICON Tenways Engineering Services Ltd. 21 Denehurst Gardens London, NW4 3QS www.tenways.co.uk 20