1
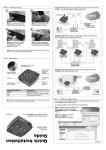
USER MANUAL
For model: RAR101
1: Introduction
Chapter 1: Introduction
1.1.
Introduction
Router Auto Reboot is designed to automatically power-cycle either one or both of its
outlets when either;
a) internet connectivity is lost (resets Router/Modem to restart it), or
b) The network device being monitored is no longer responding in LAN.
It can also be used to;
a) Remotely control outlets via instant messaging tool like MSN, or a Web User
Interface.
b) perform scheduled power on / off / reset
Therefore, Router Auto Reboot is particularly useful where the internet connection
and accessibility to a remote site is critical. Router Auto Reboot can be setup so that
if the remote broadband / cable / DSL connection drops or if the remote router freezeup, it will auto reset the router to re-gain connectivity. Router Auto Reboot is also
useful for;
1. Saving home users the trouble of constantly having to power-cycle their
router to re-gain internet connectivity.
2. Resetting unresponsive device (for instance IP camera or NAS servers)
which otherwise will be inaccessible from remote.
3. IT Professionals who need to automatically or remotely reset devices
4. Preventing your connection from timing out or going dormant
5. Having devices on an automatic power schedule [Ex: Turn on at 9am & turn
off at 5pm]
Generalized description of network connection:
Hardware Specifications:
1. Built-in Web Server with 32-Bit RISC CPU.
2. 10/100Mbps Fast Ethernet Network Access.
3. Support IE or Java-Enabled Web Browser.
4. Network Protocol: HTTP, TCP/IP, UDP, SMTP, Dynamic DNS, DNS Client,
SNTP, DHCP.
5. Operating Temperature: 0°C ~ 60°C; Operating Humidity: 10% ~ 90%
6. For indoor use only.
Basic: Hardware Setup
The following details the hardware installation procedure for RAR101.
Step 1:
Connect the power cord to device and wall
outlet. The two orange LED will light up,
indicating that the
Outlet is ON.
Press the Orange LED
for 2 seconds to turn
the Outlet On / off.
Step 2:
Connect the power plug to Router Auto
Reboot outlet.
Note:
In order for Router Auto Reboot to
maintain continuous internet connection
or reset your xDSL modem / Router, the
router power input must be connected
here.
Step 3:
Connect LAN cable from your router.
Step 4:
Make sure the Internet LED light will blink
to show that the internet connection is
ready.
Press and hold (2 seconds) On/Off button
to activate internet protection.
Software & Web Setup
Chapter 3: Software & Web Setup (For Advanced User)
3.1.
Introduction
Router Auto Reboot is designed to work without having to install any software (see
hardware setup above). However, for advanced user the unit can be customized and
configured for remote access. This gives the user further control over the power
ports.
There are two ways to remotely control the outlets (access from WAN);
a. Using DDNS and Port forwarding, see Section 3.3 or;
b. Using MSN instant messaging tool (future version will include Yahoo or ICQ),
see Section 3.4.
3.2.
How to Locate & Access Router Auto Reboot in LAN
Router Auto Reboot comes with a built-in Web User Interface (Web UI) that allows for
more advanced control over the unit. There are two ways of accessing the Web UI in
LAN
(I.e. when both Router Auto Reboot and PC is connected to the same router).
a. by hostname (entering http:// in the browser on the local PC) or,
b. By using the Netility program.
3.2.1
Step 1:
Open
http://
Locate Router Auto Reboot in LAN using the default hostname.
a
browser
and
Step 2:
A password dialog box appears.
By default; User name is: admin
(Password field is left blank).
Press “OK”.
type
3: Software & Web Setup
Step 3:
Enter Router Auto Reboot main menu.
3.2.2
Locate Router Auto Reboot in LAN using Netility program.
Step 1:
Download
the
Netility
http://www.routerautoreboot.com
and install.
program
from
Once installed Netility will locate and list the
Router Auto Reboot units.
Note:
1. Netility can only discover Router Auto Reboot
units that are located within the same LAN or
network.
2. Netility will show LAN IP if units are connected to
a Router. Else, user will have to manually assign
an IP address.
Step 2:
Click “Launch Device” to run Internet Explorer (or
your default browser) and access the IP address of
the unit.
A password dialog box will appear.
By default; User name: admin (Password field is left
blank). Press “OK”.
Step 3:
Enter Router Auto Reboot main menu.