1
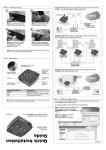
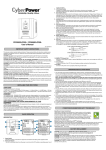
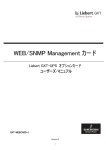
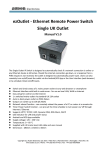
QUICK INSTALLATION GUIDE
Network Management Card
RMCARD301
The RMCARD301 Network Management Card provides for advanced ups management and configuration.
INSTALLATION GUIDE
Description:
LED Status indicator TABLE
Yellow
Red
Green
Off
Off
ON
Power ON
Flashing
ON
ON
System initial
ON
Off
ON
Normal operation
ON
Flashing
ON
No connection to
UPS
Flashing
Flashing
ON
Green light : Power state
Red light : Connection state with UPS
Step 1. Hardware Installation
Status
Writing data to flash
memory
(1) Insert the RMCARD301 into the UPS management card slot
(2) Connect the network cable
Step 2. Configure the IP address and update the firmware.
Section 1. Install Netility
(1) Insert the NetAgent Utility CD to the CD-ROM driver and execute Netility.exe.
(2) After the installation completes, there will be a ‘Netility’ group in Windows ’Start’ -> ‘Program Group’.
(3) Click "Netility" to launch Netility and enter the main configuration screen.
Section 2. Using Netility
The main Netility screen shows a list of all the RMCARD301s found on the network and shortcuts to configure, update, or launch the device.
(1) Launch Device
Click Launch Device or double click the RMCARD301 listed in the table to launch it.
Enter the Account (Login Name) and Password (Login Password) to login. If an Account and Password have not been configured click "Apply"
to login.
(2) Configure
Choose the RMCARD301 from the table, then click “Configure”.
IP Address: Set the IP address for the RMCARD301
Select DHCP, BOOTP, or Static IP. For a static IP configure the IP address, subnet mask and gateway.
After configuring the settings the
RMCARD301 interface is accessible using a browser or telnet.
Advanced: RMCARD301 Settings
In order to ensure the secure management the RMCARD301 provides two security options to control access to the management interface.
RMCARD301 Password
After setting the password all commands given to the RMCARD 301 by the Netility software will require the password. (Make sure to remember
the password. )
Management Protocol
The RMCARD301 provides HTTP (web) and Telnet access for management. For security purposes the port for each protocol can be configured.
1. On the advanced tab select HTTP and Telnet management and the port to use for each. The default ports for each protocol can be used.
2. If using a port other than the default for HTTP (80) or Telnet (23) the full IP address and port must be used to access the RMCARD301.
For example,
(a) Set 81 as HTTP port number, then http://192.168.0.177:81 must be typed at the web address to proceed to RMCARD301 web interface.
(b) Set 24 as Telnet port number, then "192.168.0.177:24" must be typed at Telnet to proceed to the RMCARD301 Telnet interface.
(3) Download Firmware
The RMCARD301 offers a simply method to upgrade the firmware. To upgrade firmware, click Download Firmware from RMCARD301 Setup
menu, click “Browser” select new firmware file (*.bin) and press “Start”. The RMCARD301's Red LED and Yellow LED will flash to indicate the
firmware is upgrading. After the upgrade is complete the RMCARD301 will reboot. To upgrade multiple RMCARD301s with the same firmware,
press and hold the Ctrl key and select the RMCARD301s to upgrade.
(To obtain the latest firmware please visit http://www.megatec.com.tw ) If upgrading multiple units, select the option for multiple NetAgent
upgrades.
Note: The RMCARD301 provides a fail safe method to upgrade the firmware.
previous firmware. If the upgrade fails simply repeat the upgrade process.
If the upgrade is interrupted the RMCARD301 will revert to the
(4) About - Displays details about the current version of Netility.
(5) Refresh - Forces netility to scan the network for RMCARD301s.
Netility will automatically scan the network or the refresh button can be used to force another scan..
RMCARD301
Web Management
Section 1. Introduction
After completing the RMCARD301 installation, you will now be able to go to RMCARD301 web interface to monitor and control UPS by inputting
RMCARD301 IP address in a web browser.
(1) Launch a web browser (Firefox or Internet Explorer)
(2) Enter the RMCARD301 IP Address previously configured e.g. 192.168.0.177.
Enter the RMCARD301 IP address
(3) On the first screen, enter the previously configured password. If no password has been configured press [ENTER].
RMCARD301 Login dialog
Section 2. RMCARD301 NetAgent Web Interface
There are 4 main function categories on the initial screen.
2.1 Information
2.2 Configuration
2.3 Log Information
2.4 Help
Select the main category on the left and the subcategory. When using NetAgent for the first time, please enter the [Configuration] category
to set the necessary configurations.
2.1 Information
Sub-Menu :
2.1.1 System Status
2.1.2 Basic Information
2.1.3 Current Status
2.1.4 Remote Control
2.1.5 Meter/Chart
2.1.1 System Status
This screen displays the NetAgent system information and Network settings. Values shown here are either provided by NetAgent itself or they are
user settings from the Configuration pages.
System Information
This section displays the NetAgent system information. Values in Hardware Version/Firmware Version/Serial Number/System Time are provided
by NetAgent itself. Other values are user settings from the Configuration pages.
Network Status
This section displays NetAgent Network settings. The MAC address is provided by NetAgent. All other values in this section are user settings from
the Configuration pages.
System Status
2.1.2 Basic Information
This page displays basic information about the UPS. Values here are either provided by the UPS or they are user settings from the Configuration
pages.
UPS Information
Information about UPS Manufacturer/UPS Firmware Version/UPS Model are provided by the UPS.
Battery Information
Values here are user settings from the Configuration pages.
Rating Information
Values here are provided by the UPS.
Basic Information
2.1.3 Current Status
This page displays the current UPS status. Users can choose an interval from the drop-down box to refresh the status readings.
UPS Status
This section displays the UPS power status. An abnormal status will be displayed in red when there is a power event.
Input Status
This section displays the UPS input status, including AC Status/Input Voltage/Input Frequency. Values here will be shown in red when an abnormal
condition occurs.
Output Status
This section displays the UPS output status, including Output Voltage/Output Status/UPS Loading. Values here will be shown in red when an
abnormal condition occurs.
Battery Status
This section displays the UPS Battery Status, including Temperature/Battery Status/Battery Capacity/Battery Voltage/Time on Battery. Values here
will be shown in red when an abnormal condition occurs.
Current Status
2.1.4 Remote Control
This page provides test routines for the UPS. Select the specific test, then click on 'Apply' to execute it. (Please refer to the UPS manual for
additional information on the individual UPS Test functions.)
If you are using a Contact Closure UPS, you will only be able to use the function ' Turn off UPS when AC Failed'.
Cancel Test
This function cancels the current test.
Turn off UPS when AC failed/Reboot UPS
Selecting ' Turn off UPS when AC failed' will turn off the UPS. You can reboot the UPS by selecting ' Reboot UPS'.
Put UPS in Sleep mode for __ minutes/Wake up UPS
When the UPS is put into Sleep mode, it will not provide power. The UPS will provide power again after Sleep mode time is complete.
Reboot UPS
This will power off the UPS and restart it. Caution: The load will lose power..
Remote Control
2.1.5 Meter/Chart
This page displays temperature, capacity, load, voltage..etc of the UPS with using graphic meters or charts.
Meter/Chart