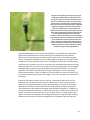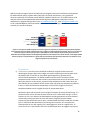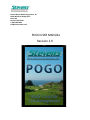
1
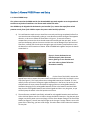
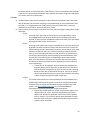
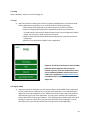
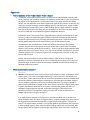
Stevens Water Monitoring Systems, Inc. 12067 NE Glenn Widing Drive Suite 106 Portland, OR 97220 1 (503) 445-8000 [email protected] POGO USER MANUAL Revision 1.9 Table of Contents Section 1: General POGO Power and Setup Page 3 Section 2: Establishing a Connection with Your Mobile Device Page 4 Section 3: Download POGO Turfpro from Apple Store or Google Play Page 6 Section 4: Using the POGO Turfpro App (App Quick Start) Page 7 Section 5: Setting Up Zones and Locations Page 10 Section 6: Further SETUP Options Page 14 Section 7: SETUP MENU Page 22 Section 8: General POGO Use Page 25 Section 9: Sampling Process Detail Page 27 Appendix Page 31 The Uniqueness of the POGO’s Hydra Probe II Sensor Page 31 What do the numbers mean? (Moisture) Page 31 What do the numbers mean? (EC) Page 33 What do the numbers mean? (Temp) Page 35 Advanced Use, Utilizing the POGO Turfpro Cloud Analytical System Page 36 Frequently Asked Questions Page 36 Troubleshooting Page 37 Integrated Sensor Specifications Page 40 Notes Page 41 2 Section 1: General POGO Power and Setup 1-1: General POGO Setup First, please note that the POGO and the free downloadable app work together as an integrated tool to measure turf and soil conditions. One cannot work without the other. Your POGO may be shipped with the batteries pre-installed. If so, remove the taped foam switch protector on the front of the POGO to expose the power switch and skip a) below. a) To install batteries make sure you install them correctly and charge completely before first use. Note that two of the battery packs go in one direction and the third goes the opposite direction, so be sure to follow the illustrations in Figure 1. To access the battery compartment, unscrew the three thumb screws and carefully pull the unit apart. A wire connects the battery pack to the sensor and this wire can be damaged if you pull too hard. Therefore, carefully pull the unit apart enough to get to the battery compartments. Insert the batteries in the orientation as shown. Slide the POGO back together and put the thumb screws back in. Figure 1. Ensure the batteries are installed properly. Note that two battery packs go in one direction and one in the other so please follow the illustrations carefully. b) On the front of the POGO, remove the tapped foam cover to expose the power switch and make sure the CHG / AA switch is set to CHG (See Figure 2). This simply means that rechargeable batteries are installed. If, in the unlikely chance you have to change to regular AA batteries in the future, be sure to put the CHG/AA switch to AA to prevent accidental charging of the non-rechargeable batteries. Accidental charging of non-rechargeable batteries will harm the batteries and the POGO. Note that the rechargeable batteries are industrial grade and last a very long time, so you will likely keep the switch in the CHG position at all times. c) The transformer provided is specifically selected for rechargeable batteries and transforms 110 to 220 VAC power source to 12 VDC to charge the POGO’s batteries. Plug the two piece charger into the AC power source and plug it into the silver adapter fitting on the face of the POGO (see Figure 2). You will see that the light on the charger is orange. When it turns solid green with no flickering, you have a full charge. This takes about 2 hours when the batteries are very low. 3 d) The LCD on the front of the POGO shows the charge (See Figure 2). Never operate the POGO when the LCD shows under 10.00 volts. We suggest plugging the charger in at the end of the day so it is fresh in the morning for another day. It is OK to leave the charger in as it will stop charging when full. Figure 2. With rechargeable batteries installed, leave the switch to CHG and always charge the POGO when the voltage falls below 10 V. Ensure the batteries are installed properly. Section 2: Establishing a Connection with Your Mobile Device 2-1: Establish a connection with mobile device (Wi-Fi Ad Hoc) 4 Note that section 2 and 3 can be done in any order. That is, you can down load the app at any time as directed in section 3. To establish a connection between the POGO and your mobile device, first turn the POGO on. For Apple and Android devices, open your ‘settings’ on the mobile device (See Figure 3). Find the Wi-Fi settings and make sure Wi-Fi is on. Tap “Wi-Fi” to see the available Wi-Fi network / devices. Look for your POGO. Your POGO should be listed as ‘POGO xxxxxx’ where x represents your six digit serial number (located on the front of your POGO). Tap the POGO xxxxxx you wish to connect. Agree to connect to that if your device asks you. a) After you see a check mark next to the POGO you’ve connected, tap the blue icon to the right of that (Apple) or open the advanced settings for the POGO Wi-Fi connection in your Android device. Input the following information: Change the IP Address Type to Static (it is likely DHCP by default). Change the IP Address to 192.168.1.10 Change the Subnet Mask to 255.255.255.0 Leave all other choices blank and exit out of that settings screen You are now connected and can utilize the POGO Turfpro App. Figure 3. Your POGO from your Wi-Fi list in your mobile device’s settings. If you do not see your POGO in this list, turn the POGO off and on and make sure you refresh the Wi-Fi list in your mobile device. This may take several seconds to show up for the first time. Your POGO(s) will be listed with the word POGO followed by your POGO’s six digit serial number. Choose only the one you wish to work with for that period of time as you can only use one POGO at a time per mobile device. When the check mark appears next to your POGO indicating you are connected to its Wi-Fi, tap the blue icon to the far right in the settings to open up the IP settings for that POGO connection. Choose ‘Static’ and fill in the IP Address and Subnet Address as indicated above. 5 Section 3: Download POGO Turfpro from Apple Store or Google Play 3-1: Download and Install POGO Turfpro App Download the free POGO Turfpro app from the Apple Store or Google Play depending on whether you are using Apple or Android. a) Note that for Apple, you may have to choose the option to search ‘iPhone Only’ to find the app. Despite this, the app works with any Apple device including iPod Touch and iPads in addition to the iPhone. The app works with iPhone 4 or newer as well as 4th generation Android or newer. b) Once downloaded, you can open the app. Say yes when it asks if it is OK to use location services for the app. Figure 4. Search for POGO Turf Pro on the Apple store for iOS devices (iPhone, iPod Touch, iPad) or the Google Play store for all Android devices. Note you may have to choose ‘Search iPhone Only’ in the Apple store settings as sometimes the search does not find the app otherwise. Despite this, the app works on all iOS devices. Download and install the app onto your device as you would any other app. Updates from Stevens will be automatic and you will be notified through the app system on your mobile device that an update is available. You just have to agree to install it. 6 Section 4: Using the POGO Turfpro App (App Quick Start) 4-1: Using the POGO Turfpro App for the First Time Make sure the POGO is on and you have established a Wi-Fi connection between the POGO and your mobile device. a) Open the POGO Turfpro app. When you first open the POGO Turfpro app, it will ask you to set up a user name. You can set up any number of users but need at least one to utilize the app and POGO. Tap the ‘Add New User’ tab to set up a user and fill in the information. After you set up a user, choose that user by tapping it. Figure 5. You must have at least one user and one course to utilize the POGO Turfpro app. Note that you may delete a user or course by sliding your finger from right to left and tapping the delete button (illustrated in Fig. 10 in this manual) b) Once you choose a user, the app asks you for a course. You need at least one course to utilize the POGO but can have as many courses as you like for multiple course venues or management companies. Set up a new course by choosing ‘Add New Course’. Fill in the info. You can tap ‘GPS’ to fill in Longitude and Latitude coordinates for that course location. This comes in handy should you decide to utilize the optional POGO Turfpro cloud analytical system that maps GPS positions of courses, zones, locations and sample spots. Once you have a course set up, choose that course. This will take you to the Connect page. c) When on the ‘Connect’ page, you will see a large ‘Connect’ button at the bottom of the page. Just above that will show the Wi-Fi connection you have with that mobile device. If this is anything other than the POGO xxxxxx, then you are not connected to the POGO via the Wi-Fi settings (see Section 2-1). Make sure that the POGO Wi-Fi is the chosen connection in your mobile device’s Wi-Fi settings. 7 Once the POGO xxxxxx is shown above the Connect button, hit ‘Connect’ and you will be connected to the App and taken to the sample page. (xxxxxx denotes serial number) Figure 6. Once you choose a user and course, the ‘Connect’ screen will open. The Wi-Fi network your device is connected to is listed just above the ‘Connect’ button. Make sure this matches the POGO you are using. If you are not connected to the POGO here, the app will give you a message to connect the POGO. You have to do that in your mobile device’s Wi-Fi settings. Hit connect to go to the Sample page. d) To use the POGO as a standalone device, you are free to start sampling from this page. Simply insert the POGO’s sensor tines fully in the turf ensuring the metal plate at the top of the sensor is firmly on the turf surface. Hit sample and you will see your readings of Moisture % (water fraction volume) top left, EC - Salinity (dS/m) top right, Temperature C bottom left, and Temperature F bottom right. To record GPS positions for your samples, turn the GPS function on by pressing the ‘GPS’ button at the bottom of the sample page. Once activated, GPS will remain on by default for all readings until you turn it off by tapping the ‘GPS’ button again. For each sample, you can record a scouting note or memo by pressing the ‘Memo’ button (See Figure 7). A memo box will show up and you can type whatever you wish in there. Once you have sampled and chosen GPS and/or Memo if desired, tap ‘Save’ to save the data. If you do not save the data, your reading and related memo entry will be lost. After you take a reading, you will notice a camera icon show up under the ‘+’ symbol between Sample and Save (See Figure 7). This icon allows the user to take a photo memo for a particular reading. This is useful when dealing with a turf stress or unique condition that you wish to log along with the sampled readings from the POGO. To take a picture memo: i. After pressing ‘Sample’, tap the camera icon located between the Sample and Save buttons (See Figure 7). The mobile device’s camera will open. Take your picture by tapping the camera icon at the center lower bottom of the screen. You can turn the flash on and off by tapping the lightning bolt icon 8 on the lower right. If you like the photo you took, tap the check mark (lower right) or tap the X (lower left) to take a different photo. You can use the cropping feature of the camera by tapping the cropping icon (bottom center). Once you have your Sample taken, the photo taken, GPS options and any memos you wish to record, tap Save. This will save everything to the data file in the app. Figure 7. Tap the camera icon between Sample and Save to take a photo at any time for any sample. Tap GPS to log the GPS position. Note that GPS remains on by default once activated. Choose the Memo button to take a memo note for any sample. This ends the quick start to using the POGO and taking general samples. However, to unleash the full power of the POGO, there are some additional settings you may want to set up before using the POGO on your course or courses. Note that once the POGO is set up, you do not have to go through this process again. Taking 10-15 minutes to set up the POGO as follows will greatly enhance your values from using the POGO. Also note that if using the POGO without setting up zones and locations, the app will default to the ‘Others’ zone for all readings. This ‘Other’ zone cannot be deleted from the app. 9 Section 5: Setting Up Zones and Locations 5-1: Zones Zones are distinct areas of a course such as 01Green, 15Green, 6FW, 9Tee, etc. You may also wish to have stress zones like ‘Hot Collars’ or ‘Salt Stress’. You are permitted to name a zone whatever you wish. The more zones you set up, the more detailed your database and historical charting/mapping will be. a) To set up a zone: When on the Sample page within the app (See Figure 7), tap the top left corner where it says ‘SETUP’. Or you may get to the SETUP screen by simply dragging your finger from left to right across the sample page. The page will slide to the right and open up the Menu page (see Figure 8). Slide your finger back to the right to get back to the Sample page. Slide your finger from left to right on the sample page to get to the Setup Menu. Slide your finger from right to left to get back to the full Sample page Figure 8. The initial set configuration / setup Menu. Section 5 provides instructions for the Setup feature of this menu. See Section 7 at page 22 for instructions on other sections of this Menu On the SETUP page, choose SETUP then ZONE. Choose ‘Add New Zone’. Name your zone. i. We suggest naming your zones with a two-number system as the order is automatically put in alphabetical and numerical order. This will make it easy to migrate through your choices when using the POGO on the course. Examples of a two-number zone naming system would be 01Green instead of 1 Green. 10 Choose GPS if you want to fill in the coordinates for that zone. i. If the app does not fill in the GPS coordinates, that means that you don’t have a good GPS fix on your location. It also makes sense to tap GPS when you are standing at the center of your zone you are setting up so that it fills in a centralized set of coordinates. You do not have to have a GPS position for the zone. You do have to have a name. If you wish to utilize GPS for any zone or location, you must define the GPS position at setup of that position. Figure 9. Access the Setup screen by tapping the Setup text at the top left of the Sample page, or slide your finger from left to right on the sample page. To set up a Zone, tap Zone, and Add New Zone. A list of your zones is listed in order, and you can delete a zone by sliding your finger from right to left on any zone you wish to remove. This delete method is used throughout the app. Set up as many zones as you wish. i. Generally, most courses will set up 01Green through 18Green, Putting Greens, Chipping Greens, and other key areas of interest. If you wish to do irrigation assessments throughout your property, then you may choose to set up every hole and significant areas of that hole such as 01Green and all the greens, 01TeeFront and all of the tees for a particular hole, 01FW and all of the fairways and many key bunker banks that you are interested in tracking or any other area of the course like the Clubhouse Lawn. 5-2: Locations Locations are areas within Zones. For most zone monitoring situations, it is good practice to measure similar areas over time so you can see improving or deteriorating conditions from day to day. Stevens suggests dividing up zones in appropriate segments. For instance, for tournament monitoring, and typical day to day monitoring of putting greens, it is good practice to segment the green into at least 9 sections. Imagine three distinct sections from front to back with three areas left to right within those 11 sections. Minimally, this is the suggested segmentation of a typical putting green although larger greens may require more areas for a better representation. Tees can manage with fewer areas, fairways with more. Like taking soil core tests, a well representative sampling method will give you the most value. a) To set up Locations: Migrate to the SETUP page in the app, choose SETUP then ZONE. In your Zone list, choose the Zone which you want to add Locations. i. Note that this method is better than choosing ‘LOCATION’ within the SETUP screen as it will default to this zone for all of the locations you set up…making it very easy to add multiple locations for a particular zone. The later method will require you to choose Zone every time you go to set up a new location. It can be done that way but takes a little longer. Once you choose the zone you wish to add some locations, choose ‘Add New Location’. Name your location. i. Again, it is suggested that you use a two-number system so that the locations are ordered in an easy to follow method when sampling. (01 or 01BL to represent the location 1 of that zone or further described as 01 back left). You are free to name your locations anything you like. However, for greens, if you use a similar method like positions 01 through 09 for 9 locations within a green, you will know that for every green 01 represents a certain position like Front Right or Back Left, 02 could be Middle Front or Middle Back, etc. Then you can follow similar monitoring methods throughout the property. If you desire, you can choose GPS to log the Latitude and Longitude GPS position of that location while standing on the zone. This is not necessary however. You simply need a name to add and use a new location when sampling. However, if you wish to utilize GPS positions for a particular location, like zones, you must name the GPS position when setting up that location. 12 Figure 10. Note that at any time, if you wish to delete something within the app, you can slide your finger from right to left across a zone or location for instance. When the Delete tab opens, tap it to delete that item. This also applies to users and courses. Add as many locations as you wish. When done with each zone, choose another zone and repeat the process to have all the locations you wish for that zone. 13 Section 6: Further SETUP Options There are several other options in SETUP. These include the following: 6-1: Warnings a) Choosing Warnings will open up a list of all of your zones. You can set different desired ranges of values for each zone separately from each other and for each variable (Moisture, EC, Temp). Note: warning ranges are set for each zone, not for locations within the respective zone. Choose Warnings from the SETUP screen Choose the zone you wish to set up warnings. b) Set up a Moisture warning: Tap the Soil Moisture text. A screen will come up allowing you to put in your very low, low, high and very high values that you want to target. Fill your values in for each segment of the moisture scale. Use whole numbers such as 15 for 15%, 28 for 28%, etc. Be sure to ‘SAVE’ your values when done. Figure 11. Set up Warnings by choosing SETUP, then Warnings. Choose the Zone which you want to set up your desired ranges (warnings) and tap each variable separately to set up the individual settings. c) Set up a Temp Warning: Tap the Temp text. A screen will come up allowing you to put in your very low, low, high and very high values that you want to target. 14 i. ii. Temperature is different from Moisture and EC in that we usually target a temperature point where things happen…weeds, stress, etc. Whatever this number is should be the ‘Very High’ value with the others about 2 degrees lower in succession. For instance, if your target is 88 degrees F (31 degrees C), set your Very High value to this number in whole numbers (88 for 88 degrees F). a. Note that if you wish to toggle between setting up your temperature by F or C, tap the °F at the top right to choose Fahrenheit or °C at the top right to choose Celsius. Once you choose the scale you wish to use, again, insert your numbers in whole number values. If you choose, you may add a decimal place which is sometimes used in degrees C but not often used in degrees F. b. If your target is 88 degrees F (31 degrees C), then set that as your Very High, set the High value at 86 or 30, set Low at 84 or 29 and the Very Low at 82 or 28 respectively for F and C. The temperature color indicator will be read when you hit your very high number.This is one proven method that works to help users target when they are approaching a particular temperature point. However, you are free to set this up as you please with a larger or smaller range of tolerance. Be sure to ‘SAVE’ your values when done. Figure 12. You can switch between temperature F and C by tapping the ° F or ° C in the top right corner. 15 d) Set up an EC (electro conductivity) warning: Tap the Bulk EC text. A screen will come up allowing you to put in your very low, low, high and very high values that you want to target. i. Fill in your values for each segment by putting in numbers to 2 decimal places. For instance, 0.15 for 0.15 dS/m, 1.25 for 1.25 dS/m, etc. ii. Be sure to ‘SAVE’ your values when done. Figure 13. Set up the EC similarly to moisture and temp by tapping the Bulk EC text on the Set Warning page and choosing your settings to one or two decimal places. (Note that moisture and temperature can be whole numbers). e) Once set up and saved, while sampling that particular zone, the numbers on the sample page will have color indicators to show you where you are in respect to your desired ranges. Moisture: i. If you are below the lowest value, the number turns RED ii. If you are between your very low and low values, the number turns Tan iii. If you are between your Low and High values, the number remains BLACK indicating you are in your desired range iv. If you are between your High and Very High values, the number turns LIGHT BLUE v. If you are above your Very High value, the number turns DARK BLUE indicating you are very wet in respect to your desired range 16 Temperature: i. If you are below the Very Low value, the number will be DARK BLUE ii. If you are between the Very Low value and the Low value, the color will be TAN iii. If you are between the Low and the High value, the number will remain BLACK iv. If you are between the High value and the Very High value, the color will turn LIGHT BLUE v. If you are above the Very High value the number will turn RED Bulk EC: i. If you are below the Very Low value, the number will be DARK BLUE ii. If you are between the Very Low value and the Low value, the number will be TAN iii. If you are between the Low value and the High value, the number will remain BLACK indicating you are within your desired range iv. If you are between your High and Very High value, the number will be LIGHT BLUE v. If you are above your Very High value, the number will be RED Figure 14. Once warnings are setup, your sample page will indicate where your recorded values are in relation to you specific warning levels. Note in the image to the top right the light blue for moisture (indicating slightly wet conditions), the red EC level (indicating very high salinity) and the dark blue temperature indicating we have not reached our warning range for temperature yet. Also note the bottom left of the screen indicating the zone and location we are in, the camera icon for taking photo memos in the middle of Sample/Save buttons, the GPS button and the Memo button as described. Finally, note the <SETUP and Set 1> labels at the top indicating the tab to enter the Setup menu and the Data set respectively when desired. 17 f) Note that these colors will carry over to the optional POGO Turfpro cloud analytical system so that when you view historical data, you will easily see when you were within your desired ranges over time and how you got there or how you got out of those ranges. This opens up many opportunities to dial in a management program to maintain your desired ranges over time. Be sure to check out http://POGOTurfpro.com for all the latest improvements and updates for the cloud service offerings. These include Stevens Turf Performance Indicators and other stress degree and predictive models that are years in the making and allow for very in depth management practices allowing the user to truly manage their property with Best Management Practices (BMP’s). g) Summary of ‘Warnings’ After you set up warnings for every zone you desire, the app will remember these throughout your POGO usage from day to day, year to year. You may choose to dial these values in over a period of time as there is no set of values that applies to everyone although Stevens Agronomy Management Solutions consultation services can help you dial these in based off of a massive database and experience in utilizing monitored data to make the best decisions in turfgrass management. For more information on consultation services, email [email protected] or call 1-503445-8000. See more details on sampling procedures below on how the Warning feature comes into play. 6-2: Cup a) The POGO Turfpro app allows you to log your cup locations on a golf course. This feature is activated when you purchase the optional POGO Turfpro cloud analytical services package. You will be able to monitor your cup positions over time, use this for course setup sheets, correlate stresses with values for particular locations, etc. b) To set up a cup location: Choose SETUP from the SETUP screen. Choose Cup. Choose ‘Add New Cup’. Setting up Cups and Logging the GPS position of a cup location is a 2 step process. You have to define a cup name AND a cup location separately from each other. This allows for easy organization of your cup placements. By default, the app allows you to choose the zone for the cup placement and it automatically names the cup category as that Zone name plus the word Cup. For example, if you choose 01 Green as your zone, it will default the cup category to 01 Green Cup. Then when you log your cup placements from day to day, all you have to do is choose the cup category (i.e. 01 Green Cup, Member Guest, Spring Derby, etc.) and tap GPS to log the coordinates. The date and name are saved automatically and organized that way in the database. Utilizing the POGO Turfpro mapping system will plot the positions of the cups over time for each zone. You must have a POGO Turfpro cloud account to utilize the full features of monitoring your cup placements. 18 Figure 15. To set up a Cup location, it is a two-step process. First, choose a cup category. By default, when you choose ‘Add New Cup’ after choosing Setup then Cup, you have to choose the Zone for the cup and the cup category is named the zone you chose plus the word ‘cup’ (such as 01Green Cup). Then, you choose the category and tap ‘Add New CupLocation’, tap GPS and the coordinates are saved for that cup location. To utilize the mapped cups, you must have an active POGO Turfpro cloud account. Contact Stevens at [email protected] or 1-503-445-8000. 6-3: Sprinkler a) The Sprinkler setting in SETUP allows you to log the GPS position of sprinklers and define the irrigation pattern and coverage of that sprinkler. This illustration becomes a layer in the optional POGO Turfpro cloud analytical service. b) To set up a sprinkler: Choose SETUP from the SETUP screen. Choose ‘Add New Sprinkler’. Now choose the zone that the sprinkler is located such as 08Green. Choose a name for your sprinkler like 01GreeenBL for 1 Green back left position. When standing over the sprinkler, log the Longitude and Latitude by tapping GPS. Tap ‘Coverage’ and define the sprinkler coverage as full circle or part circle Finally, fill in the radius of the distribution pattern. Enter this in whole numbers in feet. (Example: 38 for 38 foot radius) c) These settings allow a layer to be formed that will be used on the POGO Turfpro Cloud analytical mapping features to indicate the irrigation pattern on a particular zone. The user can then see the effects of that sprinkler, associated turf mat conditions (Moisture, EC, Temp) and make specific changes to help distribute water more appropriately. 19 Figure 16. The POGO Turfpro cloud system is capable of logging many things including sprinkler locations and information about that sprinkler. Simply choose Setup then Sprinkler, you can choose the zone where the sprinkler is located, name the sprinkler, log the GPS position of the sprinkler, define whether the coverage is full circle or part circle and define the radius in feet. In an advanced use of the POGO Turfpro cloud system, you can view the coverage of that sprinkler in a particular zone to correlate that coverage with logged readings of moisture, temperature and salinity from the POGO. 6-4: File Name a) When emailing the data file of all readings taken in the POGO Turfpro app, the user can organize these files by custom naming the file. Otherwise, the file will default to the username logged into the app followed by the date and time. If you wish to custom name the file, do the following: Choose SETUP from the SETUP screen, then choose File Name. Name the file what you like. This can be any name and can be changed anytime. For example, maybe you want to name a file ‘Club Championship POGO Insight 2014’ or ‘Spring Pre Aerification POGO Readings’. Feel free to name the file what you wish or leave it as the default user name, date and time. 20 Figure 17. To set up a custom file name, choose Setup from the SETUP Menu page (Figure 18) to get to the Setup page illustrated on the left above. Then choose File Name from this page. The name you choose here will be the name of the CSV file that is emailed from the app when you choose DATA from the SETUP Menu page and select Email (described in Section 7-3 below. It is not necessary to custom name your file as the app will default the file name to the user logged into the app along with the date and time of the data file transmission. 21 Section 7: SETUP MENU The SETUP Menu offers several opportunities to customize the POGO connection, usage and data management. We previously discussed the SETUP option in this menu. The other choices are listed below: Figure 18. To enter the Setup screen, either choose SETUP from the top left of the Sample page or swipe your finger from left to right on the Sample page. Choose back to get out of the Sample page or swipe your finger from right to left. 7-1: Soil Type a) There are two choices for Soil Type. These include Turf and Sand. Note that for all Turf applications, choose Turf as the POGO is designed to precisely measure a turf mat medium that consists of the surface canopy, thatch, mat zone and uppermost layer of rootzone soil. The science behind the POGO’s integrated sensor, the Stevens’ Hydra Probe II, is developed with state of the art technology, recording measurements of Moisture, EC and Temperature like no other instrument commercially available. No matter what medium turfgrass is grown, when using the POGO in turf, make sure this setting is set to Turf. By default, it is. Choose Sand only when using the POGO in a sand medium, like a bunker, that does not have any turf material in it. 7-2: Disconnect a) The Disconnect button operates opposite to the large circular ‘Connect’ button when you first log into the POGO Turfpro app, after you choose the user and course. This button simply disconnects the POGO Turfpro app from the POGO. It does not, however, disconnect 22 7-3: Data the mobile device from the POGO Wi-Fi. Alternatively, if you are connected to the POGO WiFi but have not connected to the POGO Turfpro App yet, this button will give you the option to ‘Connect’ rather than ‘Disconnect.’ a) The data button allows you to manage your data collected in the POGO Turfpro app. Note that all data that you save when sampling is stored indefinitely on your mobile device until you clear it. It is suggested that you send yourself a copy of the data often in case your mobile device ever crashes, breaks or gets lost or stolen. b) There are three choices when you choose ‘Data’ from the SETUP page including Clear, Email and Cloud: Clear: i. Choosing ‘Clear’ will erase all of your data on your mobile device. This is only suggested when you have emailed a copy of the data to yourself or another, or after you have uploaded the data to the cloud (if you purchased the optional POGO Turfpro cloud service). Email i. Choosing ‘Email’ allows you to send a .CSV data file to any email you choose. By default, the email recipient is filled in with the current user’s email info (defined during the user setup earlier). However, you can add as many email addresses as you like. When you hit the Email button, POGO Turfpro will open up your mail application and insert the data file as an attachment. If you took any photo memos, photos typically get emailed separately from the data file so you will see your mail application send at least 2 emails when there are photos in your data. The number and size of your photos will determine how many emails are sent depending on the limitations of your mobile device. a. The CSV file can be opened in Excel and other data management programs where you can log and chart the data just as you would with any data file. Doing this over time, the user can see a charting display of their data, customized as they wish. There is no need to connect the POGO with wires or use any other software. Everything is done wirelessly through the POGO Turfpro app. Cloud i. The ‘Cloud’ button allows for instant uploading of all collected data to the POGO Turfpro Cloud analytics system. You must be a registered and paid customer with a username and password to access and utilize the cloud system. Visit http://POGOTurfpro.com or call 1-503-445-8000 for information on purchasing the POGO Turfpro cloud access. a. Choose SETUP then DATA then CLOUD to upload your data to your cloud account. Fill in your username and password and choose LOGIN. Your data will be uploaded. Data on the cloud is updated every 5 minutes. If you have any photos being uploaded, the data may take a few moments to upload and will take longer than when you don’t have any photos. 23 7-4: Setup Setup is defined in Sections 5 and 6. See page 10. 7-5: Help a) Help has information about general terms, frequently asked questions, information about Stevens Water Monitoring Systems, Inc. and info about the POGO Turfpro App. Terminology contains general terms used in agronomy and with the POGO FAQ has a categorically organized list of questions asked by users related to Communications, Data Analysis, Measurement Process, Physical Operations, POGO Design, Set Up Process, Usage, and the Cloud System About Us describes the Stevens Water Monitoring Systems company and contact information POGO Turf Pro describes the POGO Turf Pro application Figure 19. The HELP tab in Setup has many variables defined as well as questions and answers for common concerns. These are updated often as we receive additional feedback so please feel free to send us your feedback at [email protected] and indicate POGO Turfpro Feedback in your email subject line. 7-6: Logout (USER) a) Logout with the user name gives you the option to log out of the POGO Turfpro application on your mobile device. Simply tap this to log out of the application. Know that leaving the application to do something else on your mobile device such as take a phone call, does not automatically log you out of the application. You may return to where you left off before taking a break from using the app. However, if the POGO becomes disconnected in the Wi-Fi settings, the app may restart when you go to open the POGO Turfpro app again. You will then choose your user and course then connect to get back into the application. 24 7-7: Wi-Fi Connection ID At the very bottom center of the Setup screen, whatever Wi-Fi network your mobile device is connected to is displayed. If you are not connected to the POGO Wi-Fi, then something other than ‘POGO xxxxxx’ where x represents the serial number, will be shown here. If you are not connected to the POGO Wi-Fi in your device’s Wi-Fi settings, you cannot use the POGO Turfpro app except to log in with a user and course and access the Setup screen to perform the functions of setting up zones, locations, etc. See page 4, Section 2: Establishing a Connection with Your Mobile Device. Section 8: General POGO Use Below are some tips for successful use of the POGO Turf and Soil Insight Tool 1. Always make sure your POGO(s) has a fresh charge for best performance. While the POGO will operate at voltages down to 9 or so, it is suggested that you charge the POGO at the end of the day or end of use so that you have a full charge the next day. We highly suggest you never use the POGO when the charge falls below 10 volts to ensure you have no issues. Low voltage will affect POGO connectivity, reading capabilities and general performance. 2. When transporting the POGO it is highly advised to use the hard carrying case to protect the POGO from any damage and limit the chance of the tines heating up from the sun requiring a longer period to acclimate to the turf’s surface temperature. 3. Make sure your mobile device’s operation system is up to date as the updates to the POGO consider these updates in our programming. This will help ensure your mobile device and POGO Turfpro are operating at peak performance. 4. The POGO is designed to be consistently accurate and precise. Built upon the Stevens’ Hydra Probe II, the only commercially available research grade sensor and one that requires no calibration, the POGO is the most advanced technology available for monitoring turf systems effectively. It is important that consistent measurement processes are followed to maximize the POGO’s value. The size of the POGO is made so that consistent sampling practices are followed. The POGO Turfpro App is built to maximize the value from the data collected and to easily assess it. The POGO Turfpro cloud analytical system is designed to allow the user to track and assess their property over time with many practical applications covered. 5. When creating your Zones and Locations, choose representative spots and enough of them to truly represent a particular area. Typically, 9 readings or more are sufficient for monitoring an average size putting green surface (5,000 ft2 / 465 m2). Significantly larger areas like fairways or large lawns require more readings to be representative. Significantly smaller areas like tees can suffice with 3 to 6 readings. 6. Turf is highly variable from spot to spot and day to day do due to the many moving components in the turf system including organic matter, ionic repositioning in and out of the plant, transpiration, irrigation, free water movement, compaction, sun and shade patterns, weather variations, microbial activity, etc. Therefore there really is no ‘odd’ reading meaning that if you see something ‘odd’, you are likely looking at something important like a high salinity spot, hydrophobic condition, high OM concentration, etc. So ensuring you have enough readings across a zone to truly understand the general conditions of that zone is vitally important to getting the most out of your POGO(s). 7. Note that the POGO is very sensitive to all moisture from the surface through the root system. The POGO will also sense dew layers or moisture on the surface. So to be consistent over time and from 25 day to day, it is advised that measurements are taken when the dew layer is removed, preferably after mowing has taken place and after an irrigation cycle has infiltrated the surface and percolated into the rootzone. Following this routine on regular basis will give you the best methods for measuring changes over time and making the most informed decisions. The POGO Turfpro cloud system offers many avenues for using the POGO effectively over time. It is constantly updated with Stevens’ agronomy management solutions and customer feedback. 8. When inserting the POGO in the turf, be sure to insert the POGO fully so that the sensor plate is firmly in touch with the turf surface. Figure 20. Take measurements after any dew layer or excessive moisture has been removed from the surface to allow for consistent measurements from day to day. Ideally, monitor the turf after morning mowing procedures and in the afternoon to see the changes that take place throughout the day and over time. Be sure to insert the POGO completely in the ground with the plate at the top of the tines firmly in place on the turf surface. The photo on the right illustrates a cross section in the turf system where the POGO measures the region of highest influence on the surface including the surface, mat, organic matter rich and uppermost soil medium. Unlike other sensors, the POGO measures Moisture, EC and Temp with no calibration and leaves minimal voids from the very strong marine grade steel tines. 9. Note that temperature can take a few moments to acclimate to the turf’s surface temperature. This is especially true if you have the POGO sitting in your cart in the sun and the tines heat up hotter than the turf’s surface. While very sensitive to small temperature changes from reading to reading, the first reading in the turf could require 30-60 seconds to acclimate to the turf’s temperature depending on how different (or hotter) the POGO tines are compared to the turf. We suggest putting the POGO in the turf, performing your course setup tasks such as cutting a cup, setting tees, etc., and then taking your readings. In addition, leaving the protective foam on the tines between greens and keeping the POGO out of the sun between areas will greatly reduce this variance. Also know that it is very common that the surface temperature of the turf is hotter than the air temperature and the soil temperature. In saturated conditions under high sun and/or heat, it is possible that the soil will heat up hotter than the surface and hold on to that heat through the evening hours leading to hotter surface temperatures than one may expect. 26 10. After inserting the POGO in the turf, allow it to stand on its own to ensure consistent measurements. This will also allow for strong communication with no interference from covering the communication processes out of the head of the POGO. 11. Once inserted into the turf, do not move, rock or lean on the POGO as this can cause air gaps around the tines and affect the data. Section 9: Sampling Process Detail The Sample page indicates many things that are helpful to the user understanding the values being measured and what they mean for turf insight. The following describes sampling procedures and various controls and buttons on the Sample page: 1. At any time, to enter Setup from the Sample page, either tap the <SETUP tab at the top left of the screen OR slide your finger from left to right to slide the Setup page open. 2. Moisture (WFV) is shown in the top left box, EC (dS/m) is shown in the top right box, Temperature C is shown in the bottom left box and Temperature F is shown in the bottom right box for each sample taken. 3. To Sample, you may simply tap ‘Sample’ when the POGO is inserted in the ground. To save that reading tap Save after the value boxes are populated with the readings. If you wish to log GPS positions with the reading, tap GPS (which stays on by default once turned on and until you turn it off). If you wish to take a memo with any particular reading, tap Memo (which must be turned on for any reading you wish to record a memo). Be sure to make these selections prior to tapping Save. Figure 21.In these images, this shows the Sample page (left) ready to take samples in Zone 01Green, Location 01 and data Set 1 such as the first set of readings in the AM for this zone. On the right, this indicates the readings just sampled along with their relationship to the warning setup (color indicators). In addition, the time stamp is located in the middle of the screen indicating the last recorded time and date. Notice that the Save button is still present and there is no star to the right of the time stamp bar indicating that this sample has not been saved yet. Only when you Save your sample is it committed to the data memory and available for email or upload to the cloud. 27 Figure 22. From the Sample screen, tap the lower left corner to open up the Zone and Location choices. Choose zones from the horizontally scrolling list. Once you choose a zone, the available Locations will show up in a vertically scrolling list. When done, simply tap the faint arrow at the top center of that information box. The window will close. Note that when you choose a zone and location and the app reverts to the Sample page, an info statement will appear briefly at the top of the screen indicating what data set you are on for that zone. The app remembers how many times you have entered that zone in a particular day. If you wish to add to a data set from earlier, you can tap the ‘Set’ at the top right of the Sample screen and choose the data set you desire. 4. The Sample info bar located in the middle of the screen between the value boxes on the top and the Sample and Save section indicates the last recorded date and time values. Note that the star to the right of this info bar is populated after you Save a particular reading indicating that the app stored that data for you. 5. Choosing Zones and Locations is done by tapping the bottom left part of the screen when it shows the Zone: and Loc:. By default, the zone will indicate ‘Others’ as you must have at least one zone to record readings, and ‘Others’ is set up by default as that general zone. However, it is highly suggested that you utilize sensible zones and locations specific to your property (see section 5). 6. To choose a zone and location for a particular reading, tap the bottom left of the screen (Zone: and Loc: section). All of the zones you have set up (in the SETUP section) will show up in a horizontally scrolling list. To scroll through that list, simply drag your finger or swipe from left to right or right to left. Choose the Zone you are recording (Example: 01Green). If you have not set up any zones yet, your only choice will be ‘Others’. a) Notice that once you choose a zone, all of the locations that you have set up within that zone will appear in a vertical list. You can scroll through that list by dragging your finger or swiping up and down. As mentioned in SETUP (section 5), using a two-number system will help maintain these lists in an easy to use order so that you can easily scroll through the list 28 while sampling going from 01xxx to the largest number you have. If you don’t follow an alphabetical pattern, you will be taking time to scroll through the list while trying to take samples quickly and this will slow that process down. Having the list organized well allows you to quickly go through the locations within a zone, greatly speeding up the sampling process. 7. Data set averaging is computed for every zone you are measuring. When you choose a particular zone and start sampling locations within that zone, you will notice that after each Save process of a recorded sample, a number will increase by one between the Sample and Save button. This indicates the number of samples you have taken within that zone. You will also notice that in the value boxes, there is a larger number and a smaller AVG: number beneath it. The larger number indicates the last recorded value while the AVG: number indicates the average for that zone for this set of data. This is useful when trying to identify key areas of interest due to significantly different values compared to the whole of the group of data. a) To know that you saved a particular reading, notice that the ‘Save’ button disappears after you have saved a sampled value. In addition, after you save a sample, there is a star symbol to the rightmost side of the time stamp strip between the Sample/Save section and the recorded values section above. Figure 23. Be sure to save your sample to commit it to the data memory in the app and on your mobile device. Once you save a particular sample, the Save button removes the word Save. Also, a star appears on the time stamp strip in the middle of the Sample screen (not pictured here as the Sample was not saved yet. If you took a photo memo, the camera icon between the Sample and Save buttons turns green. If you took a memo, the memo button remains white. 29 8. Warning indicators are shown in color and based on your Warning values defined in the SETUP, Warning section (See Warnings in section 6-1). If you have warnings set up, your values will be colorized to indicate where you are in relation to your warning settings. If you do not have any warnings set up for this particular zone, all values will be indicated in black. 9. You may find that you want to measure a particular zone more than once per day. The POGO Turfpro app is smart to remember when you have sampled a particular zone and if you come back to that zone or not within a 24 hour period. This is useful when considering averaging that the app calculates during a set of data. It also allows the data sets to be separated and viewed historically on the optional cloud system. b) To view which dataset a particular set of readings is being added to during a sampling process, look to the top right of the Sample page. You will see the word SET and a number next to it indicating the data set number you are sampling for that particular zone. If you leave that zone and return to it, the data set value will increase by one. You can force a particular data set to be used at any time by tapping the Set value at the top right of the screen and choosing the desired data set from the list. Figure 24. The POGO Turfpro app allows for different data sets to be recorded for any particular zone. There is no limit to the number of data sets. When you choose a zone and enter the Sample page, a flash message appears at the top of the screen indicating the data set you are working in at that moment. If you leave that zone and come back to it, the next data set in succession will be assigned. If you wish to add the collected samples to a particular data set, you can tap ‘Set’ at the top right of the Sample page and tap the data set you wish. 30 Appendix 1. The Uniqueness of the POGO’s Hydra Probe II Sensor a) The POGO’s unique Hydra Probe II sensor, the only commercially available research grade sensor, precisely and accurately measures the moisture content and EC in the turf system at the region most influential on the surface performance. This region includes the surface canopy, the mat and thatch zone and the uppermost region of the rootzone. In this area, the majority of nutrient exchange, moisture holding capacity, root tissue mass, organic matter and influential microbial activity exists. Understanding how this region matures or changes from day to day and over time along with the variability from one zone to another allows the user to make the most influential turfgrass management decisions. The POGO’s sensor, built to last of very high grade marine stainless steel and with a 5 year warranty, requires no calibration given its unique method of measurement that looks for the specific response to an array of energy generated by the sensor. Unlike other sensors utilizing specific electrical current measurements, such as TDR devices or wave measurements such as FDR devices, EC does not influence the accuracy of measuring moisture, and vice versa. This assures the user if he/she sees a specific set of conditions today (i.e. 22% moisture, 0.28 dS/m EC and 87°F / 30.6°C), that when those conditions exist again at any point in the past or future, , he or she can be confident that there are the same conditions present. This is extremely important for making decisions from day to day, zone to zone and over time. Further, due to the uniqueness of the POGO’s design in both its sensor and physical dimensions, the user is assured that he or she is maximizing the sampling area in the most influential region of the turf system and consistent repeated measurement processes are followed sample after sample. 2. What do the numbers mean? Moisture a) Moisture is measured as water fraction volume (wfv) otherwise known as volumetric water content (vwc). This is the percentage of moisture (i.e. water) present in the sample area. Far too often, smaller sample sizes limit an area to be representative of what is happening in the overall conditions. Maximizing this sampling area, the POGO gives incredible insight to what is happening. Moisture is one of the most influential factors on turfgrass growth. It determines the availability of oxygen to the roots, delivers nutrients in solution, determines if good or bad bacteria dominate the turf system, facilitates the growth and vitality of pathogenic fungi (along with high OM, thatch and low oxygen), influences surface performance and turf’s recuperative capacity to stress and, of course, influences our budgets significantly in turfgrass operations. In an ideal situation, there are as many pores in the rootzone filled with air as there are those filled with water. This does not happen often in turfgrass management, particularly in the high profile and performance operations on golf course putting greens. Typically, for every 1% of organic matter increase in a turf system leads to approximately a 10% increase in water holding capacity. Often, when this water holding capacity hits a certain level, bad things happen, and the negative responses get exponentially worse if we don’t correct the 31 situation. On the flip side, as we improve the conditions, beneficial responses occur again in exponential fashion over time. With this said, there is no ideal moisture percentage that applies to everyone. It is all relative over time. There are some general guidelines, listed below in Figure 25 that will get most users in the ball park. Note that these are for a typical putting green system. Moisture (%WFV) Very Low Low High Very High 12 18 26 32 Figure 25. General moisture range for turfgrass putting green systems. Note that this shows a larger allowance than many would like to see, especially under tournament conditions. However, these are very representative of general conditions found in all regions of the world. If you are consistently in the high to very high region, it is a direct indication that you have confined organic matter holding much water in the uppermost region of the turfgrass system, or you are maintaining wet conditions too often. This leads to reduced surface performance, high disease pressure, low nutrient exchange and less than optimal turfgrass performance. Gage the effectiveness of your cultural practices by monitoring changes over time and the reduction in water-holding capacities based on trended POGO readings. Note that these numbers are widely ranged and most putting green systems will have tighter allowances per the turf manager’s demand, especially under tournament conditions. Also note that no matter what medium the turfgrass system is based upon initially at grow in or establishment, the uppermost region of the turf system as we have described acts very similarly to moisture and salt holding responses. In other words, a system grown on straight sand develops a region of organic matter rich material in a short period of time with much water holding capacity compared to the underlying sandy medium. Another putting green grown on a heavier soil but modified over time with topdressing and cultural practice applications, also acts like the above in the uppermost influential region of the turf system. Only in very newly seeded greens on a high sand medium do we see a more fluid system that drains much faster than the above and generally has a lower level of water holding capacity (and nutrient salt exchange). Using the POGO in that situation will indicate how quickly the organic matter is building up along with the water holding and salinity holding capacities of the maturing turf system. So following soil science guidelines written for the various textural classes of soil (Sand, Silt, Loam, Clay, etc.) is not fully applicable to turfgrass systems given this biologically modified and human influenced system. In addition, when we have compacted and high levels of organic matter concentrated in a particular area as we often see in turfgrass systems (very unique to turfgrass), we can have a system grown on straight sand act like a clay in a very small region (<3 mm) in many cases. A layer this fine can influence the entire turfgrass system, and the POGO very accurately and precisely will measure that influence so the user can make decisions on irrigation, cultural practices and overall turfgrass management practices to improve his or her conditions. For the first 30 days of using the POGO, find your course’s ‘pulse’ by seeing what your typical levels are under your normal operating conditions, irrigation practices, weather influences and fertilization influences. That will show you where you are here and now. From there, adjust your practices to see how that influences the variables collected by the 32 POGO. You will quickly make correlations between measured variables and characteristics of your surface performance - aesthetically and performance wise for the game of golf (speed, rigidity, recuperative capacity, etc.). For instance, you will find that a discoloration resulted from concentrated salts and not from a lack of water (LDS) as often is misdiagnosed. Utilize the memo and photo memo features to associate what you see with collected data. Over time, this information becomes priceless. The final consideration for moisture readings is that many think moisture percentage and ball speed are directly correlated and similar across various properties. Research has shown there is no such correlation. However, there is a level of moisture that results in the best putting speed and quality for a particular property or putting green. Using the POGO to find that level and maintain it is a fine way to use POGO technology to your advantage. Just because we dry out a turf system, for instance, does not mean that putting speed will rise. That is a big misconception in the industry. The major influential factor that negates that thought is the presence of thatch which as most turf managers realize has a significant impact on putting surface quality. As thatch dries, it becomes brittle with very little recuperative capacity or resiliency to pressure, including ball friction, at the surface. So in this case, maintaining a particular level of moisture will result in better putting quality and speed rather than just drying out the system as dry as possible. Using the POGO to find that optimum moisture level if facilitated by using the ‘warning’ system in the app as described earlier (see page 14 of this user manual) will help you develop optimum conditions. Using the POGO Turfpro cloud system allows for great insight to understanding the relationships between measured values, appearances and overall conditioning of the turf system over time. EC (Electro-conductivity) b) EC (Electro-conductivity in dS/m, otherwise known as salinity) is a measurement of salts in solution. Note that ‘salts’ does not imply only salt, or Sodium chloride (NaCl). Any ion in solution adds to the salinity makeup of the turf/soil solution. When ions are not bound up in a solid structure, like NaCl, KNO3 or NH4SO4 for instance, they are not in solution and, therefore, have little to no influence on the overall in-situ salinity that the turf experiences. As these salts go into solution and various ions separate (for example, NH4+ and SO4- ions), these ions give off energy until they are bound up again. That energy is measured as EC. The POGO measures this EC and effectively sees what the turf sees in solution. Salts build up in a turf system happens from fertilization practices and irrigation quality influences, and this is greatly influenced by the water holding or salt holding capacity of the turf system (i.e. high organic matter, dense layers, etc.). Generally speaking when salts build up in turf, the salinity level or EC activity will rise and moisture levels rise. Again, that is assuming that salts are present to go into solution or the irrigation water is introducing salts. However, it is not always the case that a higher level of moisture will lead to a higher level of salinity. For instance, localized dry spot (LDS), a common ailment in golf course putting greens caused by the hydrophobic nature of sands that are coated with key organic compounds from natural growth processes, causes turf to discolor and turn yellowish due to low moisture availability. Having high salt concentrations causes a very similar appearance in turf. In addition, so does high thatch conditions. See Figure 26. All of these are easily distinguished using the POGO. 33 Figure 26. At this property in the image to the left, the POGO quickly indicated that the discoloration on the putting green turf was not moisture related and was in fact due to a salinity (EC) response. This turf had a very high EC level in concentrated areas around the putting green. The EC was due to high organic matter compacted which was trapping many nutrients from fertilization practices and raising the EC in these confined areas leading to discoloration and poor performance of the turf. Rather than the application of retention agents like this user was applying thinking he had a low moisture condition or LDS issue, the opposite practice of applying a penetrating agent with some beneficial nutrients allowed for the movement of salts away from the surface and quickly remedying the problem. The POGO’s ability to measure moisture, EC and temperature together without calibration makes it the perfect insight tool to identify true ailments against strong turf performance. Using the POGO regularly, one can easily see if high EC or LDS conditions are developing while assessing effectiveness of cultural practices. The treatments for both are quite different so it is important to know which condition exists. Further, the POGO can gauge salinity or fertilization conditions over time. Many negative ailments in turf systems can be related to EC activity, especially when that EC is being driven by bad salts like sodium (Na+) and chloride (Cl-). However, there is no cut and dry scale that determines what level of salts will be a problem for turf systems. For instance, a Poa annua putting green that is managed with good quality irrigation water will typically be tolerable of EC activity in a much lower range (0.1 to 0.2 dS/m) compared to the same grass managed over time on a property where reclaimed water is used. Turf adapts to its environment over time to an extent. Turf in this later situation may have typical EC ranges in the 0.2 to 0.4 range, nearly twice that of the former. In either of the above situations, there is a limit or a threshold of tolerance for EC. The POGO will help you determine that tolerance, indicate when you are moving toward or away from the acceptable tolerance range and indicate when it is time to do something about the EC conditions as well as allow for easy documentation to log the information, notes and photos of the symptoms caused by the quantitative information. In addition to the typical management influences on the EC tolerances of turf, different turf varieties and species have various levels of tolerance as well. So again, there is no range of values that applies to everyone for making key salt management decisions. Using the POGO, however, to determine the impact of nutrient management on EC fluctuations will serve you well. 34 With that said, the range of values normally found in turfgrass systems are listed below and separated by Good and Poor quality irrigation water (See Figure 27 below). Know that it is very possible to associate a particular EC level with several different conditions found in turf. The POGO Turfpro cloud analytics system will be updated often with Stevens Agronomy Management Solutions for many applications in turfgrass and agriculture. Visit http://POGOTurfpro.com, email [email protected] or call 1-503-445-8000 for more information on the POGO Turfpro offerings and solutions that can help you with your specific challenges. EC (dS/m) Good Quality H2O EC (dS/m) Poor Quality H2) Very Low Low High Very High 0.10 0.15 0.21 0.25 0.20 0.30 0.40 0.50 Figure 27. The typical acceptable ranges for EC levels in turfgrass are listed here for properties using good quality irrigation water and those using poor quality irrigation water such as effluent or reclaimed (of varying qualities). There is no set value that means the same for everyone. It is important to understand the normal conditions on your property and know how to manipulate them through beneficial salt management (fertilization) and cultural practices. Peaks and lows can be highly variable around a property so using the POGO on a regular daily basis will indicate those fluctuations and what is acceptable or not for turfgrass performance at each property. Temperature c) Temperature is one of the most influential variables for turfgrass performance and physiological changes. Many turf managers are used to measuring soil temperature which the Hydra Probe II is used for in many below ground agronomy, agricultural and environmental applications. The POGO, however uses the sensor to measure surface temperature with a thermistor that resides in the metal plate at the top of the sensor tines. When this plate sits on the surface, it measures the temperature of the surface which we have found to be very indicative of turf stresses often missed by soil temperature indicators. In fact, it is often found that the temperature on the surface is higher than the soil temperature below as well as higher than the air temperature above. Because this plate and the sensor tines are highly conductive of heat (and cold) energy, it is possible that the sensor will heat up hotter than the turf’s surface when sitting in a cart in transport or in the sun. Stevens has developed an insulating protective cap to be released commercially shortly to protect the tines and prevent a significant variance when transporting the POGO from zone to zone. It is advised that the POGO is used after the dew layer is removed (as described earlier) and during course setup or at a time when the superintendent or user will regularly visit a putting green or zone on a regular basis. To assure the sensor is acclimated to the turf’s surface temperature, we suggest inserting the 35 POGO in the ground prior to doing the course setup or inspection processes on a particular green or zone. After the hole is cut or other inspection operations are completed, you can be assured that the sensor is acclimated to the temperature of the turf surface. Note that this is only necessary when a significant variance exists from the sensor heating up in transport or from sitting in the sun. Once acclimated, the POGO is very sensitive to small changes in variance across a green or zone. Temperature can be a direct indicator of stress in the turf indicating that the surface is hotter than the air (likely due from too much moisture absorbing heat energy into the canopy and not allowing a proper cool down in the evening hours…further adding to the heat the next day and so on). Also, as turf gets brittle from too much thatch, that too has a direct impact on surface temperature. Further, many stresses, as utilized in the Stevens agronomy management solutions are the result of combined temperature and moisture as well as salinity effects. Finally, temperature is a direct indicator of when a particular pest or weed may emerge. There is no tolerable temperature range that applies to everyone, and often, temperature alone cannot tell us everything about a particular stress. Using the POGO to log when a particular stress occurs on your property and then correlating that with your trends before and leading up to the condition will open your eyes to great values not easily recognized at first…and possibly not recognized at all without the POGO. To maximize this insight, measure your turf on a regular basis, log memos and photos and utilize the POGO Turfpro cloud analytics system to help you map out, both visually and numerically, the trends on your property over time to greatly improve your integrated pest management (IPM) program. That is truly a best management practice that will serve you well. 3. Advanced Use, Utilizing the POGO Turfpro Cloud Analytical System While the POGO Turfpro application is designed to unlock many of the values of the POGO, only when utilizing the POGO Turfpro cloud analytical system can a user truly unleash the full power of the POGO. This service allows for historical trending of data, correlations with key physical symptoms, degree model development and many other valuable agronomy applications used to enhance turfgrass management. Added features are being implemented often to suit the needs of turfgrass managers around the world. For information on purchasing the POGO Turfpro cloud service, visit http://POGOTurfpro.com. Or contact us by emailing [email protected] or calling 1-503-445-8000. 4. Frequently Asked Questions As questions arise, we implement them into the POGO Turfpro app. You can find nearly all questions that arise asked and answered in the POGO Turfpro app. Go to the SETUP screen on the app, choose HELP and in there you will find many useful resources for terminology and frequently asked questions. If you find you have a questions that is not answered, feel free to email Stevens at [email protected] with your subject line titled POGO Question. We will answer it immediately and incorporate it into an app update to share with the entire POGO network. Note that app updates are automatic and you will receive a notice on your mobile device that an update is available. Just give permission for the app to be updated and you will receive the latest features. 36 5. Troubleshooting The following explains how to address certain errors you may encounter in setting up your POGO and to help ensure your POGO performs perfectly. a) I cannot see the POGO xxxxxx in my list of available Wi-Fi networks on my mobile device. Make sure the Wi-Fi function is turned on in your mobile device’s settings Make sure the POGO is turned on AND charged above 10 volts Make sure you Mobile device has the latest software updates If it still does not show up, it is possible that the Wi-Fi board on the POGO got hung up which is rare and can be caused by mobile issues that are often corrected by updating the mobile device’s software. However, it all of the above does not fix the issue: i. Turn the POGO off then on again and recheck the Wi-Fi List ii. Refresh the Wi-Fi list in your mobile device (different devices have different processes for this so refer to your mobile device to choose the correct process. You can often just turn the Wi-Fi button off then on again and the mobile device will automatically do a new search. This may take several seconds. iii. Turn the POGO off. Remove the three silver thumb screws and carefully slide the top of the POGO off of the POGO shaft to expose the batteries. Remove two of the battery packs for 15 seconds. Replace the battery packs in the correct orientation as indicated on the illustrations in the battery compartment. Slide the POGO back together and put the silver thumb screws back in place. Turn the POGO on. Follow the instructions earlier to establish a connection. If none of the above correct the issue, feel free to contact your POGO distributor or Stevens directly at 1-503-445-8000 or [email protected]. Reference POGO Technical Support. b) When I tap ‘Sample’ on the sample page, the working wheel in the middle of the screen keeps spinning and no sample is taken If for some reason the app becomes disconnected with the POGO, freezes up or if there is a communication issue between the sensor and the Wi-Fi transmission from the POGO, this can hang up the App and cause the sampling ‘working wheel’ to keep spinning. There are few things you can try to ensure this does not happen. First, make sure your mobile device is up to date with its operating system and you have accepted any updates for the POGO app as they become available. Also make sure you have a connection between your mobile device and the POGO Wi-Fi network as described earlier. Further, make sure you are connected in the app by going to the SETUP screen and choosing ‘Connect’ if it is not already done. At the bottom of the SETUP screen AND above the CONNECT button on the Connect Screen, you should see your POGO with its serial number listed. This ensures you have a connection. If the wheel keeps spinning when trying to take a sample, do the following: i. Disconnect from the POGO by choosing SETUP then Disconnect. Turn your WiFi button off and then on again on your mobile device and make sure you are connected to the POGO with the appropriate serial number. Re-open the POGO Turfpro app and connect as usual. Attempt to take samples and see if the problem is still present. If the problem is resolved then the app was hung up for 37 some reason and needed to be restarted. If the problem is not resolved, try the next step: ii. It is possible that the Wi-Fi board in the POGO is getting hung up. To refresh it completely: 1. Turn the POGO off. Remove the three silver thumb screws and carefully slide the top of the POGO off of the POGO shaft to expose the batteries. Remove two of the battery packs for 15 seconds. Replace the battery packs in the correct orientation as indicated on the illustrations in the battery compartment. Slide the POGO back together and put the silver thumb screws back in place. Turn the POGO on. Follow the instructions earlier to establish a connection and see if the problem persists. If it is resolved then you have removed the hang up and can proceed using the POGO normally. If the problem persists, try the next step: iii. If you removed the POGO to insert the batteries yourself, or possibly during shipping, it is possible that the wire inside the POGO that connects the sensor to the Wi-Fi module came loose on one or both ends. To ensure this cable is tight and this could cause a problem with communication from the sensor to the WiFi board. To easily tighten this cable: 1. Remove the three thumb screws on the outside of the POGO and carefully slide the POGO head off of the shaft to expose the battery compartment 2. Where the wire connects to the Wi-Fi module, there is a silver tightening screw. While holding the top of the wire just beneath this silver tightening screw, turn the screw with your other hand to ensure it is snug. 3. Replace the POGO top to the shaft and re-insert the silver thumb screws 4. Follow the instructions earlier to establish a connection and using the POGO Turfpro App to see if the issue is corrected. If it isn’t, it is possible that the wire came loose on the sensor side of the POGO. To expose that wire tightening screw (similar to the one at the top), remove the three allen screws at the end of the POGO holding the integrated sensor in place. The sensor will slide out. When out enough to expose the silver tightening screw, tighten this screw similarly to as described above. Replace the sensor by lining up the screw holes with the slot in the sensor housing and replacing the allen set screws to securely hold the sensor in place. 5. If the problem persists, contact your distributor or Stevens directly at 1503-445-8000 or [email protected] and reference POGO Technical Support 38 Figure 28. If the connection between the integrated sensor and the POGO’s Wi-Fi board comes loose, possibly during the process of inserting new batteries, you may encounter a ‘Receive Failed’ error or the POGO will not function properly. Follow the instructions to troubleshoot the issue. Carefully slide the POGO head off of the POGO shaft after removing the three silver thumb screws. This will expose the connector referred to in the instructions. If necessary, contact your POGO distributor or Stevens directly at 1-503-445-8000 or c) I am getting a ‘Receive Failed’ error on the POGO Turfpro app. The ‘receive failed’ error occurs when the POGO WiFi board loses communication with the integrated sensor. The solution to this error is similar to b) above. Follow the procedures to ensure the connections are tight. If the problem persists, contact your POGO distributor or Stevens directly at 1-503-445-8000 or [email protected] and reference POGO Technical Support. d) I just downloaded and installed POGO Turfpro but the readings don’t look right First of all, it is quite possible that you may record readings that you do not expect. This happens often, particularly for those new to monitoring their turf. However, if you see numbers that truly don’t make sense such as a very dry moisture reading (<5%) when the turf system is clearly moist, then it is possible that the app was not installed correctly or is in conflict with another version of the app previously installed and not removed completely or updated properly. If you encounter this situation: i. Uninstall all versions of the POGO Turfpro app from your mobile device(s) by tapping and holding the app, then tapping the ‘x’ to remove the app (Apple iOS) or sliding the app to the ‘uninstall’ tab usually located at the top of the screen. ii. If you are using iTunes to sync your iOS mobile device, also delete the app(s) from your iTunes App folder. iii. Once these are completed, you can download and reinstall the POGO Turfpro app from Apple App Store or Google Play for Android. 39 iv. If this does not resolve the problem, contact your distributor or Stevens directly at 1-503-445-8000 or [email protected] and reference POGO Technical Support. 6. POGO Integrated Sensor Specifications (Hydra Probe II) Technical Specifications (Hydra Probe II Integrated Sensor) Measurements Range Accuracy Dielectric Constant 1 to 80 where 1 is air and 80 is distilled water +/- 1.5% or 0.2 whichever is typically greater Moisture From completely dry to fully saturated +/- 0.01 WFV for most soils +/- 0.03 max for fine textured soils Conductivity 0.1 to 15.0 dS/m +/- 2.0 % or 0.05 dS/m whichever is typically greater Temperature -10.0 °C to +55.0 °C +/- 0.1 °C 40 Notes: 41 THANK YOU! Thank you for your purchase of the POGO. Stevens is here to help any way we can so please feel free to contact us with any questions you have. Enjoy using this state of the art technology to your advantage! Stevens Water Monitoring Systems, Inc. 12067 NE Glenn Widing Drive Suite 106 Portland, OR 97220 503-445-8000 [email protected] http://POGOTurfpro.com 42