1
BEFORE USING FOR THE FIRST TIME
Carefully unpack the health grill and remove any packaging. Wipe the outside of the grill with a damp cloth, then
dry. It must not be immersed in water or any liquid.
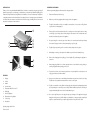
The grill plates are easily removed for washing. If the lid is locked, slide the lock along to the open padlock
symbol. Hold the top grill plate and press the top release button to remove it. Press the lower release button
and lift out the lower grill plate. Slide out the drip tray at the back of the health grill. Wash the drip tray and grill
plates in hot, soapy water, or in the dishwasher. Rinse, then dry thoroughly and slot back into place.
USING YOUR HEALTH GRILL
This family-sized health grill cooks food from both sides, for quick and efficient results. Choose from a variety of
temperatures to suit everything from your favourite panini to a juicy steak; set the timer or select ALWAYS ON
for continuous grilling. The heating elements are precisely placed to spread heat evenly across the plates, and
the concealed drip tray catches excess fat as it runs off meat and poultry, helping to cut calories.
1.
Plug in the health grill. Select your temperature by turning the dial clockwise; the display will light up. You
may find this guide helpful.
100°C – useful for keeping grilled foods warm until serving.
150°C – for toasted sandwiches, panini etc.
200°C – for burgers, chops and chicken breasts.
230°C – try the hottest setting to sear steaks etc, whilst keeping the inside juicy and pink.
2.
Preheat the grill plates by setting the timer for 5 minutes; turn the dial clockwise. When the timer has ticked
down, a bell will ‘ping’. The green ready light should now be on, which means the grill is ready to cook.
3.
Carefully open the grill by its handle, always wearing oven gloves. Take care not to touch the hot grill plates.
Lightly brush the plates with oil and place your food on the lower grill plate. Metal utensils are best avoided
as they will scratch the non-stick. Close the lid to sandwich the food between the plates.
4.
Set the timer by turning the dial clockwise to the required number of minutes. See GRILLING GUIDE.
When the timer has ticked down to ‘0’, a bell will ‘ping’ and the grill will stop heating. If you prefer a longer
grilling time, set the timer to ALWAYS ON by turning it anticlockwise. To stop cooking, turn the dial to ‘0’.
5.
When your food is cooked, carefully open the grill by its handle and keep hold as you remove the food with
non-metal tongs or a spatula. We recommend a kitchen thermometer to check that meats and poultry are
properly cooked.
6.
Close the grill and unplug. Leave it to cool completely before removing the grill plates and drip tray for
cleaning.
GRILLING GUIDE
Please use these settings purely as a guide. All cooking times will vary, depending on the size and thickness of
your ingredients. Adjust the cooking times accordingly, and always check that food is thoroughly cooked before
serving.
FOOD
Thin beef steaks
Thick beef steaks
Burgers
Pork chops
Lamb chops
Chicken breasts
Fish fillets
Prawns
Toasted sandwich,
panini, focaccia
COOKING TIME
2-3 mins
5-7 mins
5-6 mins
5-7 mins
3-4 mins
5-6 mins
3-4 mins
2-3 mins
TEMPERATURE
230°C
230°C
200°C
200°C
200°C
200°C
200°C
200°C
2-5 mins
150°C
CARE AND CLEANING
The health grill must be switched off, unplugged and completely cool before cleaning. Wipe the outside with a
soft, damp cloth, then dry. Never immerse in water.
Slide out the drip tray. Lift out the grill plates, following the steps in BEFORE USING FOR THE FIRST TIME.
The drip tray and grill plates can be washed in hot, soapy water, or in the dishwasher. Rinse, then dry, and put
back into place. Please do not use abrasive cleaners, wire wool or scourers as they will damage the health grill.
SPACE-SAVING STORAGE
To save space in your kitchen, the health grill can be locked for storing upright. Once the grill is cool and clean,
slide the lock along to the padlock symbol. To unlock, slide the lock to the unlocked padlock symbol.
HELPFUL HINTS
•
If the grill plates do not heat up, check that you have set both the temperature and the cooking time. The
grill will not begin heating until the timer is set.
•
For the best results, choose steaks, chops, chicken breasts etc of the same thickness. Always thaw meats
and poultry before grilling, to ensure they cook right through. The health grill is not suitable for defrosting
food.
•
The grill plates are non-stick coated, but for best results we still recommend a light slick of oil.
•
After washing the grill plates, make sure that the plate with the drainage hole goes back onto the bottom
of the health grill. The drainage hole should be at the back.